1
——
UseandCareofSpacemaker@
..
model
‘
Features
of
youroven
p5
Cooking
bytime
p8
cooking
bytemperature
plo
Howtouse
Defrost
p9
Savethe andmoney.
Before
youcallforservice,
usetheProblem
Solver p13
-..
YourDirectLine toGeneralElectric
TheGEAnswer
.
,,
.,
.
Fhxi3dthis
E%?
sure your
It will help you operate and maintain your new Microwave Oven
properly.
oven k
Keep it handy for answers to your
questions.
If you don’t understand something
or need more help. . .
Call, toll free:
TW?GE Answer CXM3+’M
It is important that we, the manufacturer, know the location of your
Microwave Oven should a need
occur for adjustments.
Your supplier is responsible for
registering you as the owner.
TO
.
~~
‘-
Please check with your supplier to
be sure he has done so: also send
in your Consumer Product C)wnership Registration Card. If you move,
consumer information service
or writ(?:(include your phone
nu rnkm.);
Consumer Affairs
General Electric C33mpany
Appliance Park
Louisville, KY 40225
..
.
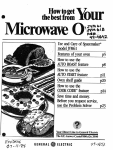
Before Microwaving ... , . . . . . . . . 2
SafetyInstructions . . . . . . . . . . . 3, 4
Features of YourOven . . . . . . . . . . 5
TouchControl Panel . . . . . . . . . 6,7
Howto Time Cook . . . . . . . . . . . . . 8
Howto Defrost . . . . . . . . . . . . . . . . 9
HowtoTempCook .0....,. . . . 10
Grounding Instructions . . . . . . . . 11
CareofYourOven . . . . . . . . . 12,13
The ProblemSolver . . . . . . . . . . . 13
The ExhaustFeature . . . . . . . . . . 14
IfYouNeedService . . . . . . . . . . . 15
Warranty. . . . . . . . .. .., f3ackCover
Whenusing electricalappliances
basicsafetyprecautionsshould
be followed, including the
following:
WAFINIIW3-TOreducethe risk
of burns,electric shock,fire,
injury to personsor exposureto
excessivemicrowaveenergy:
@ Usethis appiiarweonly for its
intended useas describedin this
manual.
@ Readand follow the specific
“PRECAU?7CXW TO AVOID
FQSSIBLE EXFKMJFE TO
ENERGY” found cmpage2$
e Makesure all utensilsusedin
your microwaveovenare labeled
“suitablefor microwaving”.Check
yourCookbook for specific test
to determine“microwave-safe”
utensils.
* Papertowels,wax paper,and
plastic wrap can be usedto cover
dishesin order to retain moisture
and preventspattering.
@Somemicrowavedfoods require
stirring,rotating,or rearranging.
Checkyour Cookbook for specific
instructions.
@Somefoods such as unshelled
eggsand hot dogs must be pierced
to allow steamto escapeduring
cooking,
a This appliancemust be
grounded, Connect only to
properly grounded outlet.See
found Qnpage ~1.
s For best operation, plug this
appkmx
ktta its own ekdrical
QUth3?t,
to p@&3nt flickering of
lights,
of fuse or trip=
ping of circuit breaker.
or kxxte thisappliance
4 !nstall
only in mxmrdancewith ths pr43vicieclinstallation
@Do not cover or Mock any
amth43
a CM)not L&%3
4s CMnot
power cord
CXplug in water.
a Keep power cord awayfrom
heatedsur%M%3EL
‘
43 Do not let power cord hang
over edge of table or counter,
a Do not operatethis appliance
if it has a
power cord
or pltig, Hit is ncdworking prop=
erly, or if it has beendamaged
or dropped.
@ This applianceshould be $xwviced cmlyby
service
personnel,
nearest
Wm4ce fa~ility for
exarnin~tio?l,repair or
@ As withmy appliance,close
supervisionis rwcessar’ywhen
used by ahildren.
3
@ Seedoor cleaninginstructions cmpage 12.
s To reducethe risk of fire in
the oven cavity:
—Do not overcook food.Carefully attendappiianceif paper,
plastic,or other combustible
materialsare piacedinsidethe
ovento facilitatecooking.
—Removewire twist-tiesfrom
paperor plastic bagsbefore
placing bag in oven.
---Do not useyour microwave
ovento dry newspapers.
-Paper towels and napkins,
waxpaper.l%~ycledpaper
products can contain metal
flecks which maycausearcing
or ignite. Paperproductscontaining nylon or nykm filaments
SIMX.Mbe avoided,as they may
also ignite.
-!343 no! pop
In your
aven unlessin a special microwave~pcorn acx.x3ssory or unles you use popcmrn
labeledfor use;,nmicrowave
ovens.
—00 not qwwa!ethe awn whlk
empty!03VM damageto the
avenandthe
of fkw.H by
acxkkmtthe ovenshould run
empty 43minute or two, no harm
is clone,F+3wever,
try to avoid
opsrating the oven empty at all
times—itsavesenergy and proIcmgslife of the oven.
-if materialsinsidethe oven
should ignite, keepcwendoor
closed,turn oven off, and disconnect the power cord, or shut
off power at the fuse Orcircuit
breakerpanel,
@ Some products such as
whole eggs and sealed cmntainem+=+xexample,closed
glassjars–may explode and
should nut Beheatedin this
oven.
..
...—
heating baby k)ocfin
glassjars, evenwithout their
lids; especiallymeatand egg
a Add
mixtures.
@ E’bn’t defrostfrozenbever-
agesin narrow neck bottles;
especiaHycarbonatedones.
Evenif the containeris opened,
pressurecan build up. This can
causethe containerto burst,
resultingin injury.
~ Usemetalonly as directedin
CCNMXM. Metalstrips as used
on meat,roastsare helpful when
usedas shown in Cookbook.
TV dinners may be cooked in
metaltrays. I-k3wever,
when
using metalin microwaveoven,
keepmefa!al least‘t+lch away
from sidesd mm.
* Cooking ukmsilsmay
hot becauseof heat
transferredfrom the heated
food. This is especiallytrue if
plasticwrap has beencovering
the top and handlesof the
utensil.Potholdersmay be
neededto handlethe utensiL
@
the C$Vml
fhxw
can
too hot !0 tauch.
Be carefultouching the floor
during and aftercooking,
S ml not $,&wany
in food you are microwaving
unlessthat
is
or
for
use ifl the
oven.
63
the
the mlmm
$MM
Hto cook with. If you leave
the probe insidettw CMWI
without
irfsertirlgit in focalor liquid, and
turn on microwaveenergy,it can
createelectricalarcing in the
cwen,and damageoven walls.
e Plastic
IJterwMv-+%3stic
utensilsdesignedfor microwave
cooking are very useful,but
should be usedcarefully.EverI
microwaveplastic may not be as
tolerant of overcookingconditions as are glassor ceramic
materialsand maysoftenor
char if subjectedto short periods
of overcooking.In longer exposuresto overcooking,the food
and utensilscould ignite. For
these reasons:1) Usemicrowaveplasticsonly “and use
them” in strict compliancewith
the utensil manufacturer’s
2) Do not
subjectempty utensilsto rnicrowavirfg,3) Do not permitchildren
to use plasti~utensilswithout
completesupervision.
e
cC@drigpark follow
our diredions exactlyand
alwayscook the meatto at least
170°.This assuresthat, in the
remote possibility that trichina
may be presentin the meat,it
will be killed and meatwill be
safeto eat.
@
eggs (in and CM$M
shell) !$3not
f(lf’
microwavecooking. Pressure
can build up insideegg yolk and
may causeit to burst, resulting
in injury,
@
with
CMJter
‘W@%”
Swci-1
as pQ&3iCE$%
hat
dogs or 5EM3agQs,
apples}chicken liversand other
giblets,and eggs (Sx33
abcwe)
shm.dcibe piercedto allow
steamto escapeduring cx30kif4g.
Is
and
Chw%?d
138Q51
should be alit, pierced or vw%ed
as ciirecteciiri Cookbook If they
are not, pk3sticcmulciburst during or
after cooking,
possibly resulting in Injury. Also,
plastic storagecontainersshouid
beat ieast
becausethey form a tight seai,
Whencooking witin
lightiy coveredwith piastic wrap,
remove03verif3gcaf’efuiiyarlci
diwmtsteamaway from hands
and &Kx3.
4
grounded by a
.
See the speciaiinstallationbook-
iet pack$dwith the microwave
oven.
-Newer kxwe WC&X3unik3
at highhw3tsettings.
130ilcwer
causessmokingand
greasyspilkwersthat may ignite
and spreadif ventfan is operating. To minimizeautomaticfan
operation,useadequatesized
utensiisand usehigh heatsettings only when necessary.
-In thement of43fpwasefirs,
smotherfiarning pan on surface
unit by covering pwl completely
with
!M,cookie sheet
or fiat tray.
—Never
kmchunderthe
ovenwithme ventfan
becauseit may spreadthe
frames,
--4@q3 h@Qd
m?t!$&wwn
dmn9 wxxxding W instructions
WI p$3g3!3
13 WKi 14,to maintain
and avoid grease
good
fires,
~—
-.. ,
Ir,=ilr’i%e@ 7ill
u
illl
I
I
&4?z?z
1. Door Handle, (Mm doesn’t operate unless door
is securely latched.
2. Door Latch. Push In to open door,
3. WindowwithMetalShield,Screen allows cook=
irtg to be viewed while keeping microwaves
confined in overt,
4. MasticMode SthwwCover. Protectsthe rrmcle
stirrer which distributes microwave energy into
the oven.
5. Oven Vent.
& (Mm Light.Goes on when ckxx is opened or
when oven is operating in arty function.
7. OvenFioor,
& Temperature Probe. Use with Temperature
Cook only,
9 Receptaclefor TernperstureProbe,
10 Time W CXmtroLUse tosotamount of cooking
timo when rnlcrowaving by time,
11,Ternp4wature
Set G2ntrol. Use to set finished’
temperature of food when microwaving by
temperature,
12. T’hne/Temp $wltch [Cook Mode Selection).
SelectTimeor Temperature Cooking by setting
switch to desired function.
13. Power Levd Set Control.Set variable powers by
turning this control.
14. Start, Aiways push Start last after setting all
controis.
150Greasei%tem.
16. CooktopLight,
17. HoodControls:
Fan SwMh. Press once for high and twice for
low speed.Pressagain for off.
LampSwitch.Push and releasefor light,
18. Model and SerialNumbers.Locat@dinside oven
at top left side,
5
~......................... ,...-.............. -.—. .
.—
-..-=—-.-..--..-—-:----——
.——
.— -- -----
----
— -.
—-
TIME CONW?(’)L
~:—-.
Your microwave oven hasa circular timer that can be
rotated manually. The timer indicatcwmoves toward
“O” only when the oven is cooking or defrosting with
microwave energy.
m~m
- . . .. . .... --- —
.—
:J=~,~=,--—
--
When the timer reaches “O” a bell will sound to tell
you that cooking is completed and the power, interior light and fan are shut off automatically.
Remember, if you open the door before the timer
reaches “O”, cooking or defrosting will stop. When
you close the door and press START,cooking starts
again where you left off,
TIME/TEMP SWITCH
I ———
❑
To cook by Time, turn to the left, set timer. To cook
by Temperature, turn to the right and set tempera=
ture dial.
+
TEYvIPERATUFE
CONTROL
SET
Insert temperature probe into food and place Inte
oven. Insert cable end hMoreceptacleon oven wall, M
oven will not start when STARTis pushed, recheck to
makesure the probe is secwely attached,
~
1 ——
Dial the finished temperature following the recipe directions. NOTE:If the actual temperature of the food
hI the oven is higher than the temperature you dial,
the oven will not start. Check temperature again to
makesure you’ve set the dial correctly. If not, resst. If
so, the food in the oven has already r~ached the de=
sired finished temperature and no more heating is
—
-- -“
---
.-=
=—-—
—
--——
\=,=.
.
—---—
———/!=
b ;
fieeded,
I
NOTE: The actual temperature of the food during
cooking may be determined by turning the TEWW
CX?NTFK)L
dial to a lower setting until the oven turns
off. (Before restarting, open and close oven door to
reset control)
6
—
—
_—
__ —
T—
—
When preset internal temperature is reached, oven
automatically turns off to signal that cooking has
stopped. Removethe cable end of the probe from receptacle, take food and probe out together,
———
—.
—.
-——
—.——
———
—
—
.——---.
.- -- —. —. .....
-.
—.
-.
-.
-.—
—.
~+-~.~
—-—-
—4
.-
—..
?latisiizalzz%%
VARIAEME POWERCONTROL
-.-—-.
..-.A=.* l
-—.—-—.-..-..
Z
Your new microwave oven allows you a complete
selection of microwave power levels from which to
choose. Always check with The Microwave Guide
and Cookbook to find out which power level is
recommendedfor the food you’re cooking,
The Variable Power Control is marked with 10 settings. However, you can adjust the power level to
selectsettings between the numbers marked orI control, to fit the type, amount and kind of food you are
cooking. In this way, you havecomplete control over
the amount of microwave power used for cooking
your food and, you have flexibility to cook all food
types,becausepower can he edjusted,
—-—
.-a.
.—
—
—
.
.
.
.-
-
—.
..,:-*-===::
—
.--—
-
—
.-.
START
HOODCONT’RCMJ3
Fan Switch,Press once for high speed. Press twice
for low speed, Pressagain for off.
@
LampSwitch.Push and releasefor light,
/
/
AU’KNVIA?VC
FM FEATURE
Cooking appliances installed under the oven might,
under some heavy usage cond~?ions,cwse temperatures high enough to overheat some internal parts
of the microwaveoven.
To prevent overheating from taking place, the vent
fan is designed to automatically turn on at low speed
if excessivetemperaturesoccur. Should this happen,
the fan cannot be manuallyturned off, but it wil{ auto=
matically turn off when the temperature is reduced,
The fan may stay on up to approximately3(I minutes
after the range and microwave oven controls have
beenturned off.
-
7
The time cooking featureallows
you to presetthe cookingtime.
The ovenshutsoff automatically.
PowerLevel10is recommendedfor
mosttime cooking, but you may
changethis for more flexibility.
Seeyour Cookbook.
To becomebetteracquaintedwith
time cooking,makea cup of coffee
by following the stepsbelow.
Step4: Turn Time Set to 1%or halfway between1 and 2 for a cooking
time of 1 minuteand 30 seconds.
id!!!
Step1:Fill a cup 2/3full of waterand
add 1 teaspoon of freeze dried
coffee. Usea cup that has no metal
decoration. Placecup in oVenand
closedoor.
Step 2: Turn PowerLevel Control
to HIGH*
Srmr
Step% Push START.When oven is
cooking,interiorlight comeson, and
a fan starts to operate to tell you
ovenis oper%ing.
Step6: When time is up, oven signalsand shutsoff automatically.
NOTE:When setting a time of less
than 1 minute, rotate timer % turn
and then back to desired time
setting.
Step % Turn Tirne/Temp Switch to
the left to TIME.
(% i want to cook my dish cm a
Power Levelother than HIGH, what
do I need to do?
A. To changethe Power Level,turn
the Variable Power Level Control
to Power Level desired.
t% I set myoven forthetimecalled
for in the recipe but at the end of
the time allowed, my dish wasn’t
done. What happened?
A. Since house power varies due
to time or location, many Time
Cook recipes give you a time range
to prevent overcooking Set the
owm for minimum time, t~st the
food for doneness, and cook your
dish a little longer, if necessary,
8
Q. Can I interrupt my Time Cooking to check the food?
A. Yes. If there is time remaining
on the Timer, simply close the door
and push START,
NOTE: Microwave power will not
come on until ym.Jare ready. You
must push START for cooking to
begin.
Tips
The Defrost setting is designed
for eventhawing necessaryfor
large amounts of food and is one
of the most important advantages
of a microwaveoven.
e Power Level3 is recu,mmencied
for most defrosting, but you may
changethis for more flexibility.
o Seeyour Cookbook for the
complete defrosting chart.
o Foodsfrozen in paper or plastic
can be defrosted in the package.
@ Forevendefrosting,many foods
need to be broken up or separated
part of the way through the defrosting time.
/53=---./’
,-f
Step3.Turn Time Setto 8 minutes,
To bacome better acquainted with
the defrost function, defrost frozen
pork chops by following the steps
below.
Step 1: Place package of chops in
the oven and turn Variable Power
LevelControlto 3 (LOW/C)
EFROST).
TIME’@~
i
START
I
Step 4: Push START. Interior light
comes on and a fan starts telling
you oven is operating.
Step % When oven signals and
shuts off, turn package over and
close door.
I
4) Check your Cookbook for other
defrosting tips.
~\ft/&::::~fl
Coowtw
and
C).Can I Defrost small Items in a
hurry?
A, Yes, small porous foods like
breadsand rolls, and small portions
of frozenfoods may be microwaved
~t high~r pow~r.Chock the “HOWto
ConvertDefrostTimes” Chart in the
Cookbook for the amount of time
savedwhen using higher powers.
—
-—
@ Hamemacfedinners
canbefrozen
in shallow foil trays and heated for
lateruse.Selectfoods which microwave welL
o Pre-packaged frozen dinners
can be defrosted and microwave
cooked.
e TEMP
f
I.——.—
Step2, Turn Tirne/Temp Switch to
the left to TtME.
~
~
I
Step&Turn Time Set to 8 minutes,
and push START,Whenovenshuts
off, separatepiecesand let standto
Qompletedefrosting.
Q. When I cWMedthe door, I hear a
dull thumping noise.Whatis it?
A. This sound is normal, It is letting
you know the ovenis usinga Power
Levellower than I-KM-t,
Q. Can I open the door during
defrostingto check on the progress
of my food?
A. Yes.You may open the door at
any time during microwaving. To
resume defrosting, close the door,
oven begins operatin$jif time is left
on timer. If not, resettimer.
9
C?.Why don’t the defrostingtimes in
the Cookbook seem right for my
food?
A. Cookbook times are average.
Defrostingtime can vary according
to the temperature in your freezer.
Setyour ovenfor the time indicated
in your Cookbook,if yourfood is still
not completelythawedat the end of
that time, re-set your oven and
adjustthe time accordingly.
.
~..-.
For many foods, internal temperature is the best
test of doneness.
Roasts or poultry are cooked to your preference
when temperature cooking. Heating or reheating
foods accurately to a serving temperature you
desire is simple and easy.
TEMP COOK takes the guesswork out of cooking
becausethe oven shuts off automatically when the
food is done,
The
Temperature
Probe
The temperature probe is a food thermometer that
gauges the internal temperature of your food; it
must be usedwhen using TEMP COOK.
HANDI E
SENSOR
CLIP
Howto TemperatureCookBasic
Step 6. When temperature
is
reached, the oven will automatically shut off. Remove probe and
food from the oven.
Step 1. Insert temperature probe
as directed in Cookbook and attach probe securely in oven wall,
Close the door.
SELECT
TIME
ORTEMP
Coolaffi
CookingTips
Step4,TurnTemperatureSetto 170.
START
Step2. Turn Time/Tem~ Switch to
-fHiLtw”
I
I
I ($ .f~m
Step5. Push STAR7’butkn Inte=
Step 3. Turn Variable Power Level
Control to 10 (HIGH),
(2. Are there any foods I can’t
TEMP COOK?
A. Yes, 13cdicatebutter icings, ice
cream, frozen whipped toppings,
etc., soften rapidly at warm temperatures+Gatters and doughs as
well as frozen foods are also difficult to cook precisely with the
probe, It is best to TIME CC)(3K
these foods.
rior light and fan come cm to tell
you oven is operating.
Q. CanI leavemy probe in the oven
if it’s not inserted in the food?
A. No, If the probe is left inside the
oven, touching the oven wall, and
not inserted in food, you may damage the oven.
Q. i-low do I know what temperature to set?
A, Your Cookbookcontains sections on all types of foods showing
the temperatures needed to cook
the foods to different degrees
of doneness, For reheating, refer
to Reheating Charts in the front
of the Cookbook for specific
temperatures.
@ Usea lower power level setting;
it will heatmoreevenlyeventhough
requiring more time.
@ Be sure frozen food has been
completely defrosted before inserting probe. Probe may break off if
used in frozen foods.
@ Always insert probe into the
center of meaty areas; take care
not to touch the fat or the bone.
. Insert probe as horizontally as
possible into foods as directed in
the recipes, Make sure the handle
does not touch the food.
@ Use the clip to keep the probe
in place while heating,
. Cover *foods as directed in
Cookbook for moisture control and
quick, even heating.
Q. Oven would not start although
I dialedthe temperaturecorrectly.
WhatiJSwrcmg?
A. If you have not securely seated
the end of the probe into the
receptacle in the oven wall, or if
you haveforgotten to usethe probe
or if the actual food temperature is
higher than set temperature, oven
will not start.
10
—
—
———
——
.
——.—
..— —-— ——.
———.
Thisappliancemust be grounded.
In the eventof an electricalshort
circuit,grounding reducesthe risk
of electricshock by providingan
escapewire for the electriccurrent.
This applianceis equippedwith a
powercord havinga grounding
wire with a grounding plug.The
plug must be pluggedinto an outlet
that is properly installedand
grounded.(Fig, 1)
Wherea standardtwo-prongwall
receptacleis encountered,it is your
personalresponsibilityandobligation to haveit replacedwith a properly groundedthree-prongwall
receptacle,
WARNING—improperuseof the
groundingplug can resultin a risk
of eiectricshock,
Do Notthe anAdapterPlug
WithThisAppliance.
00 iUOt UnderAnyCkcumWmes Cutor Removethe
Third(Ground)ProngFrom
ThePowerCord.
.
Q
fiJJJ-1
00 NotUsean Extension
CardWithThisAppliance.
‘t
6
Fig,1
\
INSUREPROPER
GROUND
EXIST’S BEFORE
USE
Consulta qualifiedelectricianor
servicetechnicianif the grounding
instructionsare not completely
understood,or if doubt existsas to
whetherthe applianceis properly
grounded.
11
———
YourNewMicrowaveOvenisa
ValuableAppliance,ProtectUFrom
MisuseByFollowingTheseRules:
e Keepyourovencleanand
sweet-smelling.
Openingthe oven
door a few minutesaftercooking
helps“air-out” the interior.An
occasionalthorough wiping with a
solutionof bakingsodaand water
keepsthe interior fresh.
e Don’tusesharp-edgedutensils
withyouroven.The interiw and exterior ovenwalls can be scratched.
The control panelcan be damaged.
6? Don’tremovecoveroverthe
‘Ww#’ atthetop of theoven(microwavefeature4 cmpage5). Youwill
damagethe oven.
BECERTAINPOWERB OFF
BEFORECLEANINGANY
PARTOF“1’’I”M$
OVEN*
How to
Clean
Door-inside.Glass:Wipeup spatters
daily,washwhen soiled,with a minimum of sudsywarm water.Rinse
thoroughlyand dry.
Metaland plasticpartson door:
Wipefrequentlywith a dampcloth
to removeall soil. DO NOT USE
ABRASIVES,SUCHAS CLEANING
POWDERSOR STEELAND PLASTIC PADS.THEYMAYMARTHE
SURFACE.
Howto (Mm theOutside
Case.Cleanthe outsideof your
ovenwith soapand damp cloth,
then rinseand dry,The outer pane
of the window is glass.Just wipe
cleanwith a dampcloth. Chrome
trim is bestwiped with a damp cloth
and then with a dry towel.
ControlPanel.Wipewith a damp
cloth. Dry thoroughly. Do not use
abrasivesor sharpobjectson the
panel.They can damageit.
i%mrSurface.
Whenc!~aningsurfacesof door and oventhat come
togetheron closingthe door, use
only mild, non-abrasivesoapsor
detergentsappliedwith a sponge
c?rSOftcloth.
SpeeialnotewhenusingBrown‘N
Sear131sh:
High heatgeneratedon
bottomof Brown‘N SearDishcan
causescorchedappearingstainsto
bakeonto the ovenfloor if greaseis
present.Thesemay be removed
with Bar KeepersFriend@Cleanser
by SerVaasLaboratories,Inc.
After using~ar KeepersFriend@
Cleanser,rinseand dry thoroughly,
following instructionson can.Do
not useBar KeepersFriend@
Cleanseron the paintedsurfaces
suchas the walls.It mayscratchthe
paint.
Bar KeepersFriend@Cleanseris
sold in manygrocery,hardware,
and departmentstores.
AutomaticTemperature
Probe.
Probeis sturdy,but careshouldbe
taken in handling.Do not twist or
bend;avoiddroppingtemperature
probe.
Cleanassoonafterusingas possible.‘b clean,wipe with sudsy
cloth, then rub !lghtly with plastic scouringbaii if necessary.Rinse
and dry. (Or washin dishwasher,)
the Inside
Walls,floorand pkwtlccover.!%=
causethereis little heatexceptin
the food, or sonwtimesin the utensils,spills and spattersare easyto
remove.Somespatterscan be removedwith a papertowel,others
may requirea damp cloth. Fierrtove
greasyspatterswith a sudsycloth,
then rinseand dry. Do not use
abrasivecleanerscmovenwalls.
NEVERUSEA COMMERCIAL
OVENCLEANERON ANY PART
OF YOURMICROWAVEOVEN.
12
—
..
SWe time and money=. .bekxe you
cd forSWWb, check the
Probiem:The oven doesn’t seemto work at all.
Solution:Check first to seethat the 3-prong plug is
inserted firmly into the proper receptacle. Next,
check to seeif a fuse needsreplacingat control box.
Problem:Oven won’t start when using temperature
probe,
Solution:Check to make sure Time/Temp switch is
set at TEMP. Make sure the cable end is securely
“seated” into oven receptacleand that temperature
seton dial is higher than actualtemperatureof food.
I%obk?rn:
Hood fan isn’t working right.
Solution:If it doesn’t work at aii, check the main
fuse or circuit breaker. If it works but is faster than
usuai, the fiiter may need cleaning. If fan goes cm
and off, it’s probabiy overheating. Check to make
sure the filter is ciean. if it is,caii for service.If fanis
on and can’t be turned off, see page 7 about the
automaticfan feature.
Problem:Microwave power won’t come on.
Solution: Check to be sure the door is securely
ciosed and the timer set. if a dish is touching the
door when it seemsto be ciosed, it actuaiiy may not
be firmiy ciosed.
Problem:Ovengoes off beforeset time has elapsed.
Solution:Check to be certain the ‘fuseprotecting
the receptacle into which c~id is plugged is operating, if fuse Hasnot biown and power stiii does not
function, caii for service.
To replace hood iamp, first disconnectpower at
main fuse or circuit breaker panel or pull plug.
Remove2 screws from each side of lower panel and
3 screws from front edge. Lower panel until it rests
on range below. Be sure buih to be replaced is cool
before removing. Remove bulb or bulbs and replace
with 40 watt appliance bulbs. Raise lower panel and
replace screws. Connect electrical power to microwaveoven.
0
To replaceyour oven lamp,first disconnectpewerat
mainfuse or circuitbreakeror put{ptug.Removethe
top grill by taking off 2 screws which hoid it in piace.
Nexti remove the single screw on top left that
secures lamp housing. (On models so equipped,)
Open oven door for easier removalof the lamp housing assembly.Then grasp tab and pull out and up to
clear door hinge and front lip of oven, To remove
bulb, push it inward gently and turn to left, then puii
outward from socket. Replace with GE Lamp
= 25T8DC,
Do notattemptto operatethe ovenualessthe gdli [s
in place,
AllTheseThingsAre
on Your
Oven:
1. Steam or vapor escaping from around the door.
2. Light refiectkm around door or outer case.
3. Ouil thumping sound while operating at power
ieveisother than high.
4. Dimming oven iight and change in biower sound
may occur whiie operating at power levels other
than high.
5. Some TV-Radio interference might be noticed
while usitig your microwave oven. it’s similar to the
interference caused by other smail appliances and
does not indicate a probiem with your oven.
L.—-==LL-.---JL-3__----J
—
—
Clean off the grease and dust on hood surfaces
often. Use a warm detergent solution. About f tablespoon of ammonia may be added to the water. Take
care not to touch the filters and enameled surfaces
with this. Ammoniawill tend to darken metal.
13
*
m
J
/
--
*
I
The exhaust hood feature on your GE microwave
oven is equipped with a metal‘filter which collects
grease, When the fan is operated, ah’ is drawn up
through the filter and is then discharged through
provided venting to the outside. The hood also has a
light for illumina~ingthe counter surface.
To removegrease fiiter, grasp the “finger hold” on
the filter and push to MOrear. The filter will drop out,
To repiace grease filter, irwart the filter in the top
frame slot cm the back of the opening. Push to the
rear and upward to smapinto place.
Soak, then agitate fiiter in hot detergent soiution.
Don’t use ammcmla or other alkali because it will
darken metal. Light brushing cm be used to wwnuve
embedded dirt, Rinse, shake and remove moisture
before replacing. Filters
shouldbe cleaned atkmt
once a month.Neveroperateyour hood withoutthe
filter In phwe. in situations where flaming might
occur cmsurfaces below hood, filter wili retard entry
of fiamos into the unit.
14
Iif
Toobtainservice,seeyourwarranty
onthe backpageof this book.
We’reproudof our serviceand
wantyouto be pleased.If for some
reasonyouare nothappywiththe
serviceyoureceive,herearethree
stepsto followfor further help,
FIRSTcontactthe peoplewho
servicedyourappliance.Explain
whyyouarenotpleased.In most
cases,this will solvethe problem.
NEXT,if youarestill not pleased,
writeall the details—-including
your
phonenumber—to:
Manager,ConsumerRelations
GeneralElectric
AppliancePark
Louisville,Kentucky40225 ,
FINALLY,if yourproblemis still not
resolved,write:
MajorAppliance
ConsumerActionPanel
20 NorthWackerDrive
Chicago,Illinois60606
—
*
15
———
- WHATIS COVERED
I
I
1
,
I
part of the microwave ovenkange
that fails becauseof a manufac”
turing defect.
# :1
i
,
. !1
,
%
,
LIMITEDADf31T10hiAL
FOtNIOYEAf?
WARRANTY
For the secondthroughfifth year
from dateof originalpurchase,
we will provide,freeof charge,a
replacementmagnetron tube if the
magnetrontube fails becauseof a
manufacturingdefect.Youpayfor
the servicetrip to your homeand
servicelaborcharges.
4
>
, ,
, ,
,
.~
i
: -:! WHATIS NOT
——.
5s7i—
;
9$ ~
...—-—
*=.==
—.~Ii
——
x=~j~
xl!
a.;-—,
->- ~1
If
IUG1!
..L--.,
I
~ Improper
If you havean installationproblem,
contactyour dealeror installer.
Youare responsiblefor providing
adequateelectrical,exhausting
and otherconnectingfacilities.
--==”1:
afi-aal
—--—.
-,-,
-~”%11
-=.1
::&%l
.—.
SLal,
B>.:I
-,-’
.:q
::=!~
-.-l Z
==:1:
in.
-,:
-=s-,ll
——
------ —.
= —. —.
.. ,...,—---
——.-..-..—”..—...—
—.—.
This warrantyis extendedto the
originalpurchaserandany succeeding ownerfor productspurchased
for ordinaryhome usein the 48
mainlandstates,Hawaiiand
Washington,D.C.in Alaskathe
warrantyis the sameexceptthat it
is LIMITEDbecauseyou must pay
to ship the productto the service
shopor for the servicetechnician’s
travelcosts to your home.
All warrantyservicewill be provided
by our FactoryServiceCentersor
by our authorizwlCustomerCare@
servicersduring normalworking
hours.
1“
$
;
i
1:
1‘-~:
*:-‘
Look in the White or YellowPages
of yourtelephonedirectoryfor
GENERALELECTRICCOMPANY,
GENERALELECTRICFACTORY
SERVICE,GENERALELECTRICHOTPOINTFACTORYSERVICEor
GENERALELECTRICCUSTOMER
CARE@
SERVICE.
, .-,
.—
—.--—~::——==”.. . . .. ...
- —.-.
..=”.=.. .,. .,...-——
.-
@Servicetrips toyour hometo
teachyou how to usethe ptoduct.
Readyew Useand Care material,
If you then haveanyquestions
aboutoperatingthe product,
pleasecontactyourdealeror our
ConsumerAffairs office at the
addressbelow,or call, toll free:
TheGEAnswerCenter~M
MXI*626JKEXI
consumerinformationservice
t
1
i
~
$
{I
1
D>::}:
=~1}
----q!!
K z=I*::~1
A-&&
=y:!
FULLONE=YEAR
WARRANTY
For oneyearfrom dateof original
purchase,we will provide,freeof
charge,parts and servicelaborin
your hometo repairor replaceany
--
@Replacementof housefuses
or reswttingof circuit breakers.
~ F\?ilureof the productif it is
usedfor (ither than its intended
purposeor usedcomrnercialiy.
,
s Damageto productcaused
by accident,fire, fioods or acts
Of God.
—
WARRANTORISIV(27RESPON=
S@LEFORCONSEQUENTIAL
DAMAGES,
,
~ ‘
%xnestatesdoml allowIIwexclwiion
orlimitation
of incidental or comwquential
damages,
sothe above iimikdion or exclusion
may not apply to you. This warranty gives you specific legalright!3,and you may also have other Aght$ which vary from state to state.
To know what your legal rights are in your state, consult your Iocai or state consumer affairs office or your state’s Attorney General.
-
, ., ~
Warrantor:General Electric Company
If further help k rwweiecicomxwning this warranty, contact:
tVianagsr-Cmwwner Affairs, General Electric Company, Appliance Park, Louisville, KY 40225
.=—.W—@-q*–a—m
----#’&w
<-% P.w@v#>m#i’,WJW%m
mNuqwuw
-..WH
qp~’xJ=#’#vk’xm.3#h*w&m>>
wF\’K.A-3T@ww@&:7V>>
ww~x-mx’~lbr<x-x-m~
qr~xVW.&’#
PartNO. 862A725P98%V, 1
Pub.NO. 49-4580-1
1
6-85
.
-u -- *-. -–