1
B.
WIRING
Make all electrical connections in accordance with
the National Electrical Code and any applicable
local code requirements.
Verify that supply voltage is correct by comparing it
to nameplate.
IF SINGLE VOLTAGE:
All single voltage ballasts are pre-wired such that user
need only connect the supply conductors.
IF MULTIVOLT: (120/208/240/277 volts)
Connect the ballast lead with the insulated terminal to
the desired voltage terminal as indicated on the ballast
terminal nameplate.
IF MULTIWATT:
Multiwatt ballasts are available in various combinations
of wattage. See wiring instructions on wiring tag inside
the luminaire.
• Optional Features such as fusing and photocontrols
are voltage specific.
• Replace power fuses only with fuses of the same
type and rating.
• When changing voltage on reconnectable units,
move only the lead with the insulated connector.
C.
Use only lamps specified on nameplate. Observe
lamp manufacturer’s recommendations and restrictions on lamp operation, particularly ballast type,
burning position, etc.
LAMP TIGHTNESS: The lamp should be securely inserted
to NEMA-EEI specified torque of 35 inch-pounds, which is
best achieved by very firmly tightening to insure application
of sufficient torque. Tightening must be sufficient to fully
depress and load center contact of socket.
g
The light output of a luminaire is dependent on the age
of the lamp. In applications where the light level is critical,
it may be desirable to replace lamps before they burn out.
The lamp manufacturer can provide data showing how the
lamp light output decreases with use.
LAMPS
Risque d'électrocution
• Mettre hors tension avant d'intervenir
– Suivez les instructions
GÉNÉRALITÉS
Ce luminaire a été conçu pour une utilisation à l'extérieur sans
que la température ambiante ne dépasse 25°C. Installez-le et
entretenez-le conformément aux recommandations ci-dessous.
A.
MONTAGE
AT TENTION
Risque de chute en cas de mauvais
montage
• Suivez les instructions
CAUTION
Risk of burn
• Allow lamp/fixture to cool before
handling
1. Placez le luminaire sur un tenon de grosseur appropriée.
2. Serrez les vis d'arrêt du luminaire avec un couple de 18 à 22 lb-pi.
3. Installez la lampe (voir la section C de cette notice
d'installation).
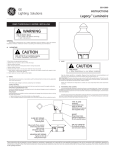
SOCKET
Lamps should be tightened to
35 inch-pounds torque.
INTERNAL GLASS REFRACTOR
(optional)
Install before lamp. Find street
side labeling and align
accordingly. Secure with
supplied clamp.
Luminaire Patriarch™
AV E RT I S S E M E N T
MAINTENANCE AND CLEANING
It will occasionally be necessary to clean the refractor to
maintain light levels. Frequency of cleaning will depend on
ambient dirt level and minimum light level which is
acceptable to the user. The refractor should be washed in a
solution of warm water and mild, nonabrasive household
detergent, rinsed with clean water and wiped dry.
INSTRUCTIONS
LIRE ATTENTIVEMENT AVANT D'INSTALLER
NOTE: Use of lubricants on lamp base or sockets
can cause rapid lamp failure and voids fixture
warranty.
D.
GEH-5913
GE
Lighting Solutions
4. Installez le réfracteur en vous assurant que les réfracteurs
asymétriques sont correctement orientés par rapport aux
étiquettes « House Side » (côté maison) et « Street Side »
(côté rue).
5. Serrez les vis d'arrêt du globe de façon à ce qu'elles touchent
légèrement ce dernier.
6. Câblez le luminaire (voir les instructions de câblage dans la
section B de cette notice d'installation).
7. Poussez l'étrier coulissant jusqu'à la position fermée, s'il est en
position ouverte et qu'aucun cordon n'est utilisé (voir
l'illustration).
8. Fermez solidement la porte.
COMMANDE PHOTOÉLECTRIQUE
OPTIONNELLE
(se commande séparément)
Faites tourner la base de façon
à ce que la fenêtre du module
photoélectrique soit orientée
vers d'autres sources
lumineuses.
BALLAST CANNISTER
For multivolt ballasts,
see above instructions.
ÉCRAN PROTECTEUR
FUSE BLOCK
(optional)
SIMPLEX RECEPTACLE
(optional)
TERMINAL BOARD
LINE
GROUND
LINE or NEUTRAL
ÉTRIER COULISSANT
Placer l'étrier en position ouverte
(tel qu'illustré) pour laisser passer
un cordon électrique. Si aucun
cordon n'est utilisé, ne pas oublier
de placer en position fermée.
Ces instructions n'ont pas pour destination de couvrir tous les détails ou variantes de l'équipement, ni de répondre à toutes les éventualités que vous pourriez rencontrer pendant l'installation,
le fonctionnement ou l'entretien. Si vous souhaitez des informations complémentaires, ou si vous rencontrez un problème particulier qui ne soit pas adressé de votre point de vue d'acheteur,
le sujet doit être remonté jusqu'à la société GE Lighting Solutions