1
ge.com
Safety Instructions
Operating
......
2,s
Instructions
EDWSO00 Series
Care and Cleaning ............
12
Control Panel and Settings ... 4-7
Loading Place Settings ........
11
Loading the Racks ............
10
Optional Accessories ..........
11
Using the Dishwasher
........
8, 9
Troubleshooting
Tips .. 13, 14
Consumer Support
Consumer Support ..... Back Cover
Warrants
....................
1S
EDW6000
Series
GHDA400
Series
GHDA650
Series
GLD4100
Series
GLD4200
Series
GLD4300
Series
GLD5500
Series
GLD5800
Series
GLD6200
Series
GLD6300
Series
GLD6500
Series
HLD4000
Series
Write the model and serial
numbers here:
Model #
Serial #
You can find them on the tub wall
just inside the door
165D4 700P339
49-55019
03-06JR
IMPORTANT SAFETY INFORMATION.
READ ALL INSTRUCTIONS BEFORE USING -SAVE THESE INSTRUCTIONS
WARNING!
For your safety, the information in this manual must be followed to minimize the risk of fire
or explosion, electric shock, and to prevent property damage, personal in]ur 9, or death,
_tls
A WARNING! WATER
HEATER
SAFETY
f
_,,J',_ "_
Under certain conditions hydrogen gas may be produced in o water heater that has not been used
for two weeks or more. HYDROGEN GAS IS EXPLOSIVE.
If the hot water has not been used for two weeks or more, prevent the possibility of damage or injury
bg turning on all hot water faucets and allow them to run for several minutes. Do this before using ang
electrical appliance which is connected to the hot water sgstem. This simple procedure will allow ang builtup hgdrogen gas to escape. Sincethe gas is flammable, do not smoke or use an open flame or appliance
during this process.
%
PROPER INSTALLATIONAND MAINTENANCE
This dishwasher must be properly installed and located in accordance with the Installation
Instructions before it is used. If you did not receive on Installation Instructions sheet with
your dishwasher, you con receive one bg visiting our website at ge.com.
• Connect to a grounded metal, permanent wiring
sgstem; or run an equipment-grounding
conductor with the circuit conductors and
connect to the equipment-grounding terminal
or lead of the appliance.
• Improper connection of the equipment-grounding
conductor can result in a risk of electric shock.
Check with a qualified electrician or service
representative if you are in doubt whether the
appliance is properly grounded.
• Disposeof discarded appliances and shipping
or packing material properly.
A CAUTION:
To prevent
• Do not attempt to repair or replace any part
of your dishwasher unless it is specifically
recommended in this manual. All other servicing
should be referred to a qualified technician.
• To minimize the possibility of electric shock,
disconnect this appliance from the power supply
before attempting any maintenance.
NOTE:Turning the dishwasher off does not
disconnect the appliance from the power supply.
We recommend having o qualified technician
serviceyour appliance.
minor injurg or propertg
• Contents washed in Anti-bacterial mode, if
available, may be hot to the touch. Use care
before handling.
• Using a detergent that is
not specifically designed
for dishwashers will cause
the dishwasher to fill with
suds.
• If your dishwasher is connected to a
wall switch, ensure that the switch is
on prior to use.
• On dishwashers with electronic controls,
if you choose to turn the switch off
between wash cycles, allow 5-10
seconds after tuming the switch on before
touching START/RESET
to allow the control to
reboot.
damage
• Non-Dishware Items: Do not wash items such
as electronic air cleaner filters, furnace filters and
paint brushes in your dishwasher. Damage to
dishwasher and discoloration or staining of
dishwasher may result.
• Closesupervision is necessary if this appliance
is used by or near children.
• Load light, plastic items so they will not
become dislodged and drop to the bottom
of the dishwasher-they might come into
contact with the heating element and be
damaged.
ge.com
.t_ WARNING! RISK OF CHILD ENTRAPMENT
PROPER DISPOSAL OF THE DISHWASHER
Junked or abandoned dishwashers are
dangerous...even if they will sit for '_justa
few days." If you are getting rid of your old
dishwasher, please follow the instructions
below to help prevent accidents.
Before You Throw Away Your Old
Dishwasher:
mTake off the door of the washing compartment
or remove the door latch keeper (as shown).
Door latch keeper
WARNING!
When using your dishwasher, follow basic precautions,
including the following:
• Use this appliance only for its intended purpose
as described in this Owner's Manual.
• Do not operate your dishwasher unless all
enclosure panels are properly in place.
• Use only powder, tabs, liquid detergents or rinse
• Do not tamper with controls.
agents recommended for use in a dishwasher and • Do not abuse, sit on or stand on the door or dish
keep them out of the reach of children. Cascade@,
rack of the dishwasher`
Cascade @ Complete and Electrasol @ Automatic
• Do not allow children to play around dishwasher
Dishwashing Deter_nts, and Jet-Dr&l@and
when opening or closing door due to the possibility
Cascade Rinse Aid w rinse agents have been
of small fingers being pinched in door.
approved for use in all GEdishwashers.
• Do not discard a dishwasher without first removing
• Locate sharp items so that they are not likely
the door of the washing compartment.
to damage the door seal.
• Do not store or use combustible materials, gasoline
• Load sharp knives with the handles up to reduce
or other flammable vapors and liquids in the
the risk of cut-type injuries.
vicinity of this or any other appliance.
• Do not wash plastic items unless marked
• Do not allow children to play with, on or inside this
dishwasher safe or the equivalent. For plastic
appliance or any discarded appliance.
items not so marked, check the manufacturer's
recommendations.
• Do not touch the heating element during or
immediately after use.
READAND FOLLOW THIS SAFETYINFORMATION
CAREFULLY.
SAVE THESE INSTRUCTIONS
About
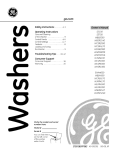
the dishwasher control paneu.IFor modelswith sensor:EDWGO00Series,
GHDA650 Series, GLD6200 Series, GLD6300 Series, and GLD6500 Series)
You can locate your model number on the tub wall just inside the doon Throughout this manual, features and
appearance may vary from your model.
I11
B
Status Indicator Lights
TheStatusdisplaytellsyou what'shappeningwhilethe dishwasherisin operationand may flash,indicatinga
malfunction(seepage8).Thelightswillcome ONindicatingthesequenceof operationthe dishwasherisin.
SENSING
Displayedwhilethe sensoris measuringthe amountof soiland temperatureof wate_
(onsomemodels) Thedishwasherwill adJusttheselectedcycleto achieveoptimal performance.
WASHING
Displayedduringprewashand mainwash periods.
(onsomemodels)
RINSING
Displayedduringrinseperiods.
(onsomemodels)
DRYING
DisplayedduringHEATED
DR'/.
(onsomemodels)
SANITIZED
CLEAN
Displayedwhencyclehasmet sonitizationconditions.LightremainsONuntildoor isopened.
Displayedwhen a wash cycleiscomplete.ThelightstaysONasa reminderthat the dishesare
cleanuntilthedoor is relatchedor untilanothercycleisselected.
_'_
Time Remaining Display Ionsomemodels)
D
Cycles
Thelightabovethe selectedpad will be ONto indicatewhichcyclehasbeenselected.
Duringoperation,the displayshowsthe minutesremaininguntilthecycleis complete.Thedisplaymay adjustthe
remainingtime whilethe sensinglight ison.Thetime displayedat the start of eachcyclemay changefrom the
factory settingasthe unit customizesitselfto homeuse.Duringa delaystart,the displaywillshow hoursof time
remaininguntilthe cyclestarts.
Thisdishwasheris equippedwith a dirt and temperaturesensor.Cyclelengthand timewill vary dependingon the
soilleveland temperature.
ANTI-BACTERIA
or SANI WASH
Heavy8.5gal.,84 min.
Medium7.3gal.,78 min.
Light6.1gal.,75 min.
Thiscycle raisesthe watertemperaturein the finalrinseto sanitizeyourdishware.Thecycle
lengthwillvary dependingon the temperatureof your inletwaten
NOTE:TheAnti-Bacteriacycleismonitoredfor sanitizationrequirements.If the cycleis
interruptedduringor after the mainwashportionor ifthe incomingwatertemperatureissolow
that adequatewater heatingcannotbe achieved,the sanitizingconditionsmay not be met. In
thesecases,the sanitizedlightwillnot illuminateat the end ofthe cycle.
NOTE:NSFcertifiedresidentialdishwashersare notintendedfor licensedfoodestablishments.
POTS
& PANS
Heavg10.9gal.,102 min.
Medium8.5gal.,78 min.
Light 7.3gal.,73 min.
Thiscycle ismeantfor heavilysoileddishesor cookwarewith dried-onor baked-onsoils.
Everydaydishesare safeto be usedin this cycle.
NORMALWASH
Heavy8.5gal.,65 min.
Medium7.3gal.,60 min.
Light4.9gal.,49 min.
Thiscycle isfor medium/heavilysoileddishesand glassware.
ge.com
SPEED
CYCLE
7.3gal.,35 min.
or
Thiscycle isfor everydaydishesand glassware.
SPEEDWASH
(onsomemodels)
CHINACRYSTAL 7.3gal.,48 min.
(onsomemodels) Thiscycle isfor lightlysoiledchinaand crystal.
RINSEONLY
2.5gal.,12 min.
Forrinsingpartialloadsthat willbe washedlater.Donot usedetergentwith this cycle.
NOTE:Onlythe Anti-Bacteriacyclehasbeendesignedto meetthe requirementsof Section6,NSF184for
soilremovaland sanitizationefficacy.
_
Options
Thelight abovethe selectedpad will be ONto indicatewhichoptionhasbeenselected.
PRESCRUB
Forusewith heavilysoiledand/or dried-on,baked-onsoils.ThisoptionMUSTbe selectedPRIORto
(onsomemodels) startingthe cycle.Thisoptionadds16 minutesto thecycletime.NOTE:Cannotbe selectedwith
RINSEONLYcycle.
HEATED
DRY
LightOFF
Shutsoff the dryingheatoption.Dishesair dry naturallyand energyissaved.Forfasterair dry,
youcan propthe door openafter the CLEANlight illuminates.
HEATED
DRY
LightON
Turnsthe heateron for fast drying.Thiswillextendthetotal run time by 8 minutesfor the SPEED
CYCLE,
38 minutesfor NORMAL
and POTS/PANS,
and 30 minutesfor all othercycles.
NOTE:Cannotbe selectedwith RINSEONLYcycle.
LOCK
Youcanlockthe controlsto preventangselectionsfrom beingmade.Oryou canlockthecontrols
after you havestarteda cycle.
Childrencannotaccidentallystartdishwasherby touchingpadswith this optionselected.
To LOCKthe dishwashercontrol,touch and holdthe HEATED
DRYpadfor 3 seconds.Thelight
belowtheHEATEDDRYpad willturn on.ToUNLOCK
the dishwashercontrol,touch and holdthe
HEATED
DRYpadfor 3 seconds.TheLOCKlightwillturn off.
_t
ADDED
HEAT
Whenselected,the cyclewillrun longerwith the heatingelementon to improvebothwashand
dry performance.NOTE:Cannotbe selectedwith RINSEONLYcycle.
DELAYHOURS
Youcandelaythe start ofa wash cyclefor upto 9 hours.Touchthe DELAY
HOURSpadto choose
the numberof hoursyou want to delaythe start of the cycle;thentouch START/RESET
one time.
Thedishwasherwill count downand startautomaticallyat the correcttime.Touching
START/RESET a secondtime will cancelthe DELAY
START
selection.
RESET
Tochangea cycleafterwashingstarts,touch the START/RESET
padto cancelthe cycle.The
START/RESET
lightwillflashwhilethe water is pumpedout if needed.Thistakesapproximately
90 seconds.Whenthe lightstopsflashing,the dishwashercan be reprogrammedand restarted.
Start
Closeand latchthe dishwasherdoorand selectthe cycleand desiredenhancements.
Touchthe START/RESET
pad
onceto beginthe cycle.Water beginsto fillthe dishwasher,and approximately60secondslaterthe washaction
begins.TouchingtheSTART/RESET
pad a secondtime willcancelthe cycleand causethewater to drainout. Thiswill
takeapproximately2 minutes.
NOTE:Thedishwasherremembersyour lastcycleso you don'thaveto reprogrameachtime.Whenthe dishwasher
door isfully closed,the controlpanel lightswill displaythe last settingsyou selected.
If you don'twant to changeany of the settings,simplytouchthe START/RESET
pad onceto beginthecycle.
If the door isclosed,the indicatorlightswillturn off ifthe START/RESET
pad isnot pressedwithin two minutes.
Toactivatethe display,openand closethe door or touch any pad.
Also,if a power failure occurs, NORMALand HEATEDDRYwill automatically be programmed.
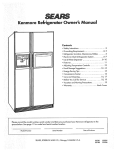
About the dishwasher control panel. C or
models
without
o sensor:EDWSO00
Series,
GHDA400 Series, GLD4100 Series, GLD4200 Series, GLD4300 Series, GLD5500 Series, GLD5800 Series and HLD4000 Series)
You can locate your model number on the tub wall just inside the doon Throughout this manual, features and
appearance may vary from your model.
I
!!
e
"
SANITIZ_O
r- _,_?_/
,_,A
It.
-J(-S _
"
....
WASH
Cycles
k._
NORMAL
------.... £
C_'A's.J
Lw,,Hj
n
Control Settings
H
Status Indicator Lights
The Status displag tells gou what's happening while the dishwasher is in operation and mag flash,
indicating a malfunction (see page 8). The lights will come ON indicating the sequence
of operation the dishwasher is in.
SANITIZED
(on some
models)
Disploged when cycle has met sanitization conditions. Light remains ON until
door is opened.
CLEAN
Displayed when a wash cgcle is complete. The light stags ON as a reminder that
the dishes are clean until the door is opened or until another cgcle is selected.
(onsome
models)
m Q/des
The light above the selected pad will be ON to indicate which c£1clehas been selected.
SANI WASH
7.3 gal., 97 min.
(on some
models)
This cgcle raises the water temperature
in the final rinse to sanitize gour dishware.
The cgcle length will va% depending on the temperature
of your inlet water.
NOTE: The SANI-WASH cgcle is monitored for sanitization requirements,
If the
cgcle is interrupted during or after the main wash portion or if the incoming water
temperature
is so low that adequate water heating cannot be achieved, the
sanitizing conditions mag not be met. In these cases, the sanitized light will not
illuminate at the end of the cgcle,
NOTE: NSF certified
establishments.
residential
dishwashers
are not intended
for licensed food
POTS & PANS
or HEAVY
WASH
8.5 gal., 89 min.
This cgcle is meant for heavily soiled dishes or cookware with dried-on
on soils. Evergdag dishes are safe to be used in this cgcle.
NORMALWASH
5.9 gal., 56 rain.
This cgcle is for medium/heavily
LIGHT WASH
(on some
models)
6.1 gal., 36 min.
This cgcle is for everudag
or baked-
soiled dishes and glassware.
dishes and glassware.
CHINA CRYSTAL 6.1 gal., 39 min.
(on some
This cgcle is for lightly soiled china and crustal.
models)
RINSE ONLY
1.2 gal., 6 min.
For rinsing partial
this cgcle.
loads that will be washed
NOTE: Onl U the SANI-WASH cgcle has been designed
NSF 184 for soil removal and sanitization efficacg.
lateE Do not use detergent
to meet the requirements
with
of Section 6,
ge.com
_l
Options
The light above the selected pad will be ON to indicate which OPTION has been selected.
HOT START
(on some
models)
For use with heavily soiled and/or dried-on, baked-on soils. This option MUST be
selected PRIORto starting the cycle. This option will improve both wash and dry
performance. This option adds 20 minutes to the cycle time.
NOTE:Cannot be selected with RINSEONLY cycle.
HEATEDDRY
Light OFF
Shuts off the drying heat option. Dishes air dry naturally and energy is saved.
For faster air dry you can prop the door open after the CLEAN light illuminates.
HEATEDDRY
Light ON
Turns the heater on for fast drying. This will extend the total run time by B8 minutes.
NOTE: Cannot be selected with RINSE ONLY cycle.
LOCK
You can lock the controls to prevent any selections from being mode. Or you con lock
the controls after you have started a cycle.
(on some
Children cannot accidentally start dishwasher by touching pads with this option
selected.
models)
ToLOCKthe dishwashercontrol, touch and holdthe HEATED
DRYpad for 3 seconds.Thelightbelow
the HEATED
DRYpad willturn on.ToUNLOCK
the dishwashercontrol,touch and holdthe HEATED
DRYpadfor 3 seconds.TheLOCKlightwill turn off.
HOT WASH
When selected, the cycle will run longer with the heating element on to improve
wash and dry performance. NOTE: Cannot be selected with RINSE ONLY cycle.
both
DELAY HOURS
You can delay the start of a wash cycle for 2, 4 or 8 hours {delay time options may
vary by model). Touch the DELAY HOURS pad to choose the number of hours you want
to delay the start of the cycle; then touch START/RESET one time. The dishwasher will
count down and start automatically
at the correct time. Touching START/RESETa
second time will cancel the DELAY START selection.
RESET
To change a cycle after washing starts, touch the START/RESETpad to cancel the
cycle. The START/RESETlight will flash while the water is pumped out if needed. This
takes approximately 90 seconds. When the light stops flashing, the dishwasher can be
reprogrammed and restarted.
Start
Close and latch the dishwasher door and select the cycle and desired enhancements. Touch the
START/RESETpad once to begin the cycle. Water begins to fill the dishwasher, and approximately 60
seconds later the wash action begins. Touching the START/RESETpad a second time will cancel the
cycle and cause the water to drain out. This will take approximately 2 minutes.
NOTE:The dishwasher remembers your last cycle so you don't have to reprogram each time. When
the dishwasher door is fully closed, the control panel lights will display the last settings you selected.
If you don't want to change any of the settings, simply touch the START/RESETpad once to begin
the cycle.
If the door is closed, the indicator lights will turn off if the START/RESETpad is not pressed within two
minutes. To activate the display, open and close the door or touch any pad.
Also, if a power failure occurs, NORMAL and HEATEDDRY will automatically be programmed.
Using the dishwasher.
Check the Water Temperature
The entering water should be at least 120°F and
not more than 150°F_for effective cleaning and to
prevent dish damage. Check the water temperature
with a candg or meat thermometer Tum on the hot
water faucet nearest the dishwasher, place the
thermometer in a glass and let the water run
continuously into the glass until the temperature
stops rising.
Clear®Rinse
®or Cascade
Jet-Dry ® or Cascade Crystal Clear _°_
rinse agents remove spots and prevent
your dishes, glasses, flatware, cookware and plastic.
new film buildup
on
Filling the Dispenser
The rinse agent dispenser holds 3.5 oz. of rinse agent. Under normal
conditions, this will last approximately
one month. Refill when rinse agent
is not visible in the indicator. Do not overfill.
Indicator
i-1"1Hake sure the dishwasher door is fully open.
r-Ti Turn the dispenser cap to the left and lift it out.
E_] Add rinse agent until the indicator window looks full. Do not overfill.
_
D__pt!!g
rz_-iClean up ang spilled rinse agent with a damp cloth to prevent foam.
Dispenser cap
[_] Replace the dispenser cap.
Rinse Aid Setting
The amount of rinse agent released into the final wash can be
adjusted. The factorg setting is at the midpoint. If there are rings of
calcium (hard water) spots on dishes, try a higher setting. If you
observe foam in the final rinse, try a lower setting.
To adjust
the setting
Remove the dispenser cap, then turn the adjustable setting dial
counterclockwise
to increase the amount of rinse agent or clockwise
to reduce the amount of rinse agent dispensed.
Dish Preparation Prior to Loading
• No pre-rinsing of normal food soil is required,
• Scrape off hard soils, including bones,
toothpicks, skins and seeds.
• Remove large quantities of any remaining
food.
• Remove leafy vegetables, meat trimmings
and excessive amounts of grease or oil,
• Remove acidic food soils that can discolor
stainless steel.
dial
Using the dishwasher,
gecom
Proper Use of Detergent
Use onl Udetergent specificall U made for use
in dishwashers. Cascade_ and ElectrasoP
Automatic Dishwashing Detergents have been
approved for use in all GE dishwashers. Keep
gour detergent fresh and drg. Don't put powder
detergent into the dispenser until gou're readg
to wash dishes.
The amount of detergent to use depends on
whether gour water is hard or soft. With hard
water, you need extra detergent. With soft water,
you need less detergent.
Protect your dishes and dishwasher by
contacting your water department and asking
how hard your water is. Twelve or more grains
is extremely hard water. A water softener is
recommended. Without it, lime can build up
in the water valve, which could stick while open
and cause flooding. Too much detergent with
soft water can cause a permanent cloudiness
of glassware, called etching.
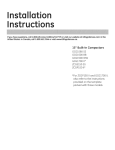
Use the information in the table below as a
guideline to determine the amount of automatic
dishwasher detergent to place in the dispenser.
Number
of Groins
Detergent Cups to Fill
Lessthan 4
15 cup or fill cup to first line
4 to 8
25 cup orfill cup to second line
8 to 12
15 and 25 cups or fill main wash cup
Greater
than 12
15, 25 cups and the open cup or fill
both Main Wash and PreWash cup
Open
cup_
f/
/(on some models)
For heovilg-soiled loads, use the Pots and Pans or
Hearst Wash cgcle and odd o little extra detergent.
DO NOT USE HAND DISH DETERGENT
m
m
NOTE:Using a detergent that is not specificall_l
designed for dishwashers will cause the dishwasher
to fill with suds. During operation, these suds will spill
out of the dishwasher vents, covering the kitchen
floor and making the floor wet.
Because so mang detergent containers look alike,
store the dishwasher detergent in a separate space
from all other cleaners.Show angone who may use
the dishwasher the correct detergent and where
it is stored.
While there will be no lasting damage to the
dishwasher, your dishes will not get clean using a
dishwashing detergent that is not formulated to
work with dishwashers.
(on some models)
Soft
Medium
Soft
Medium
Hard
Extremelg
Hard
(on some models)
Forget to Add o Dish?
A forgotten dish can be added ang time before
the main wash.
FT1 Squeeze the door latch to release the door.
r'_Do not open the door until the water sprag
action stops. Steam may rise out of the
dishwasher.
r_
Add forgotten
[]
Close the door.
dishes.
Loading the dishwasher racks.
For best dishwashing results, follow these loading guidelines. Features and appearance
baskets mag varg from gout model.
of racks and silverware
Upper Rack
Although the upper rack is for glasses, cups
and saucers, pots and pans can be placed
in this rack for effective cleaning. Cups and
glassesfit best along the sides.This is also
a secure place for dishwasher-safe plastics.
The utility shelf(on some models) may be
placed in the up or down position to add
flexibility. A wine gloss holder (on some
models) secures wine glosses for best
washabilitu. Becausewine glasses come
in various sizes,after loading, slowlu push
in the rack to make sure they will clear
the top of the dishwashen
Securelarger dishwasher-safeplastics over
2 tines when possible.
Hake sure small plastic items ore secureso
theg can't fall onto the heoten
Be sure that items do not protrude through the
bottom of the rack and block rotation of the
middle sprog arm. Thiscould result in poor
wash performance for items in the upper rock.
Check to make
sure that no
items will block
rotation of the
wash arms.
The upper rack is good for all kinds of
odd-shaped utensils. Saucepans,mixing
bowls and other items should be placed
face down. Fold-down tines (on some models)
provide flexibility for extra-large and hardto-fit items.
Lower Rack
The lower rack is best used for plates, saucers
and cookware. Large items such as broiler
puns and baking racks should go along the
left-hand side. Loud platters, pots and bowls
along the sides,in corners or in the back. The
soiled side of items should face the center of
the rack. If necessary, oversized glassesand
mugs can be placed in the lower rack to
maximize loading flexibilitg.
Single basket Ion some models)
One-piece basket Ion some models)
Three-piece basket ton some models)
Don't let ang
item extend
through
bottom.
Silverware
10
Basket
To load flatware, simply push the adjustable
handle to either side (on some models).Put
flatware in the removable basket with fork
and knife handles up to protect your hands.
Place spoons in the basket with handles
down. Mix knives,forks and spoons so they
don't nest togethe_ Distribute evenly. Small
plastic items, such as measuring spoons and
lids from small containers should go in the
bottom of the silverware basket with the
silverware on top.
The one-piece silverware basket (on some
models) can be placed in the front, right side
or back of the lower rack.
A variety of options is available regarding
the three-piece silverware basket (on some
models) in your dishwashenThe complete
basket is designed to fit on the right side
of the lower rack. Additionally, each end of
the basket is removable to add loading
flexibility to accommodate flatware and
lower rack capacity needs.
To remove end baskets, grasp the basket
at opposite corners and slide apart.
Also,be careful not to let a portion of an item
such as a pot or dish handle extend through
the bottom rack. This could block the wash
arm and cause poor washing results.
Fold-down tines (on some models)provide
flexibilitg for extra-large and hard-to-fit items.
The tines mag be left in the up position or
folded down to customize the lower rack.
The lids of both end and middle baskets (on
some models) can be closed to contain small
items. Long items can be placed on the utility
shelf in the upper rack.
basket (on some
models) can hold
small items such
as: baby bottle
nipples, plastic lids,
The
cornaccessory!
cob holders, etc.
Loading place settings..,
ge.com
Follow these guidelines for loading 10 place settings. Features and appearance
of racks and silverware
baskets
mag varg from gour model.
Upper Rack--lO
place settings
Lower Rack--lO
place settings
Lower Rack--lO
Follow these guidelines for loading 12 place settings. Features and appearance
mag vorg from gour model.
Upper Rack--12 place settings
place settings
of racks and silverware
baskets
Lower Rack--12 place settings
Optional accessories.
You can change the appearance of gour
dishwasher bg adding a custom panel trim kit.
Wood panel trim kit--This accessorg contains
trim and instructions for gou to supplg and install
a 1/4" thick decorative wood door:
•
•
•
GPF525B (Black)
GPF525W (White)
GPF525C (Bisque)
Trimless wood panel kit--This accessorg
contains parts and instructions for gou to supplg
and install a 3/4" thick decorative wood door:
•
Non-wood countertop bracket kit--This is for
installations which have non-wood countertops
and includes side-mounting brackets and
instructions for securing the dishwasher.
•
GPF65
These accessories are available at extra cost from
GE. Coil 800.626.2002 to order. Visa, Hastercord
or Discover cords ore accepted.
Specif_] accessoq] number when ordering.
GPF575
ll
Caring for the dishwasher.
Cleaning the Door Panel
Before cleaning the front panel, make sure
gou know what tgpe of panel gou have.
Refer to the last two letters of gour model
number. You can locate gour model
number on the left-hand tub wall just
inside the door. If gour model number ends
with BB,WW, CC, SA or BG,then gou have
a Painted Door panel. If gour model
number ends with SS,then gou have a
Stainless Steel Door panel. If gour model
number ends with CS,then gou have a
CleanSteel Door panel.
Stainless Steel Door Panel (model
numbers ending in SS)
Follow the instructions below for cleaning
the door panel for gour specific model.
CleanSteel Door Panel (model numbers
ending in CS)
Painted Door Panel (model numbers
ending in BB-black, WW-white, CC-bisque,
SA-silver metallic or BG-graphite metallic)
Use a clean, soft, lightlg dampened cloth,
then drg thoroughlg. Do not use appliance
wax, polish or ang chemical agent on
CleanSteel doors.
Use a clean, soft, lightlg dampened cloth,
then drg thoroughlg. You mag also use a
good appliance wax or polish.
The stainless steel panels can be cleaned
with Stainless Steel Hogic or a similar
product using a clean, soft cloth. Do not
use appliance wax, polish, bleach or
products containing chlorine on Stainless
Steel doors.
You can order Stainless Steel Hagic
#WXIOX1S through GE Parts bg calling
800.626.2002.
Do not wipe the dishwasher with a soiled
dish cloth or wet towel. These may leave
a residue. Do not use scouring pads or
powdered cleaners because these
products can scratch the finish.
Cleaning the Control Panel
To clean the control panel, use a lightly
dampened cloth. Then drg thoroughlg.
Protect Against Freezing
If gour dishwasher is left in an unheated
place during the winter, ask a service
technician to:
['_1 Drain water from the water inlet line
and water valve. (Use a pan to catch
the water.)
[3_] Cut off electrical power to the
dishwasher. Remove fuses or trip
circuit breaker.
E] Reconnect the water inlet line to the
water valve.
m
Air gap
Turn off the water supplg and
disconnect the water inlet line from
the water valve.
Does Your Dishwasher
Have an Air Gap?
An air gap protects gour dishwasher
against water backing up into it if a drain
clogs. The air gap is not a part of the
dishwasher. It is not covered bg gour
warrantg. Not all plumbing codes require
air gaps, so gou mag not have one.
Checkthe air gap ang time
_!ourdishwasher isn't draining
well.
12
The air gap is easy to clean.
[]
Turn off the dishwasher
cover
and lift off the
r-_l Remove the plastic cap and dean with
a toothpick.
Before you call for service..,
_,_
gecom
Save time and money! Review the charts on the following
pages,
or visit ge.com.
roubleshooting
Tips You may not need to call for service.
Error Messages
Possible Causes
What To Do
START/RESET
status
You hove pressed the
• PresstheSTART/RESET
pad onlg whengou want to restartthe
indicator light flashing START/RESET
pod while the
dishwasher.
dishwasher is running. This will
cancel the cgcle. The light will stop
flashing after the dishwasher drains
(about 90 seconds).
Dishwasher BEEPS This is o reminder that gour
• Closeand latchthe door after openingit mid-cgcle.
once every 30 seconds dishwasher door has been left
open during operation. It will
continue beeping until gou close
the door.
Problem
Possible Causes
What To Do
Dishesand flatware
not clean
Lowinlet water temperature
* Hakesureinletwater temperatureis correct(seepage8).Turnon
the hot waterfaucet nearestthe dishwasher,let run untilthe water
temperaturestopsrising.Thenstart thedishwasherandturn off
thefaucet. Thisinsuresthe enteringwater ishot.
Water pressureis temporarilg low * Turnon a faucet. Iswater comingout moreslowlUthan usual?
If so,wait untilpressureisnormalbeforeusinggourdishwasher
Spotsand filming
on glassesand
flatware
Air gap or disposerisclogged
• Cleanthe air gap or flushthe disposer.
Improper rack loading
• Hakesurelargedishwaredoesnot blockthe detergentdispenser
or the wash arms.Seethe Loadingthedishwasherrackssection.
No air gap or high drain loop
• Verifgthat gou havean air gap or a highdrain loop.Referto
the InstallationInstructions.
Extremelghard water
• UseJet-Dry®orCascadeCrystalCleaPrinseagentstoremovespotsand
preventnewfilm buildup.
Low inlet water temperature
Overloadingthe dishwasher
• Toremovestubbornspotsand pre-existingfilm from glassware:
Improper loading
1 Removeall metalutensilsfrom the dishwasher
Old or damp powderdetergent
2 Donot add detergent.
Rinseagent dispenseremptg
3 Selectthe POTS& PANSor HEAVYWASHcgcle.
Toolittle detergent
4 Startthe dishwasherand allowto run for 18to 22 minutes.Dishwasher
will nowbein themainwash.
5 Openthe door and pour 2 cups(500ml)of whitevinegarintothe
bottomof the dishwasher.
6 Closethe door andallowto completethe cgcle.If vinegarrinsedoesn't
work:Repeatasabove,exceptuse1/4cup(60ml)of citricacidcrgstals
insteadof vinegar.
Cloudinesson
glassware
Sudsin the tub
Combinationof soft water and
too much detergent
• Thisiscalledetchingand is permanent.Topreventthis from happening,
uselessdetergentif gouhavesoftwater.Washglasswarein the shortest
cgclethat will getthem clean.
Water temperatureentering
the dishwasherexceeds150°F
• Thiscouldbe etching.Lowerthe water heatertemperature.
Correctdetergent
wasn't used
• Useonlgautomaticdishwasherdetergentsto avoidsudsing.
Cascade
®and ElectrasoPAutomaticDishwashingDetergents
___
Rinseagent was spilled
• Toremovesudsfrom the tub, openthe dishwasherand let
sudsdissipate.
Closeandusein
latch thedishwashen
Pumpoutwater
havebeenapprovedfor
all GEdishwashers.
bg touchingtheSTART/RESET
pad once;then 30 secondslater,
touchthe START/RESET
pad again.Repeatif necessarg.
• Alwagswipeup rinseagentspillsimmediatelg.
15
Beforegou call for service...
Problem
Possible Causes
What To Do
Detergent left in
dispenser cups
• Repositionthe dishes,so the water from the lowersprag arm can
flush the detergent cup. Seethe Loading the dishwashersection.
Blackor gray
marks on dishes
Dishesare blocking the
detergent cup
Aluminum utensilshave
rubbedagainst dishes
Dishesdon'tdry
Lowinlet water temperature
•
•
•
•
Rinseagent dispenserisemptg
• Checkthe rinseagentdispenserand fill as required.
ControlpanelrespondedDoorlatch mag not be properlg
toinputsbutdishwasher seated
neverfilledwith water Water valve mag be turned off
Stained tub interior
Sometomato-basedfoods can
cause reddishstains
Dishwasherwon't run
• Removemarkswith a mild,abrasivecleaner.
Hakesureinletwatertemperatureisat least120oR
SelectHEATED
DRY.
UseHOTSTART,
HOTWASHorADDEDHEAToptions.
Selecta highercgcle,such asANTI-BACTERIA,
SANIWASH,POTS& PANS
or HEAWWASH.
• Makesurethedoor isfirmlg closed.
• Hakesurewater valve(usuallglocatedunderthe sink)isturnedon.
• Useofthe RINSEONLYcgcleafter addingthe dishto the load
candecreasethe levelof staining.GErecommendsCascade
®
PlasticBoasterto helpremovethesetapesof stains.
Tea or coffee stains
• Removethe stain bg hand,usinga solutionof 1/2cup bleach
and 3 cupswarm waten
WARNING
Beforecleaninginterior,wait at least20 minutesafter a cgclefor the
heatinqelementsto cooldown. Failureto do socan resultin burns.
An overallgellowor brownfilm can • A specialflter in the water supplgline isthe onlgwagto correct
becausedbgiron depositsin water this problem.Contacta water softenercompang.
White film on insidesurface• GErecommends Jet-Dry ®or Cascade Crystal Clear_to help
hard water minerals
prevent hard water mineral deposits from forming.
• Rundishwasherwith citricacidto removemineraldeposits.Citricacid
(Partnumber:WD3SX151)canbe orderedthroughGEParts.Seeback
coverfor orderinginformation.
Fuseis blownor circuitbreaker
• Replacefuse or resetcircuitbreaker.Removeang otherappliancesfrom
the circuit.
is tripped
Poweristurned off
• Insome installations,
the powerto the dishwasheris providedthrougha
wallswitch,often locatednextto the disposerswitch.Hakesureit is on.
Control panel is locked
• Unlockcontrolpanel.Seepage 5 or 7.
Reboot gour control
• Turnoff powerto the dishwasher(circuitbreakeror wall switch)for
30 seconds;thenturn backon.
Control panel lights
go off when you're
setting controls
Water standing in
the bottom of the tub
Time too long between
touching of selected pads
• Eachpad must be touched within 30 secondsof the others.
To relight, touch ang pad again,or unlock and relatch door.
This is normal
• A small amount of cleanwater around the outlet on the tub
bottom at the back of the tub keepsthe water seal lubricated.
Water won't pump
out of the tub
Drainis clogged
• If gou havean air gap,cleanit. Seepage 12.
• Ifthedishwasherdrainsintoadisposer,rundisposerclear.
• Checkto seeif gour kitchensinkisdrainingwell.If not, gou
mag needa plumben
Steam
This is normal
Sanitized light does
not illuminate at the
end of the cgde
(Anti-Bacteria
cycleonly)
Noise
Thedoor was openedand the
cgcle was interrupted during
or after the main wash portion
Theincomingwater
temperature was too low
Normal operating sounds
• Warm,moistair comesthroughthevent bg the door latch duringdrging
and whenwater is beingpumpedout. Thisisnecessargfor drging.
• Donot interruptthe cgcleangtimeduring or after mainwash.
14
Rattling dishes when the sprag
arm rotates
• Raisethe water heater temperature to between 120% and 140°R
• Detergentcup opening.
• Water entering dishwasher.
• The motor stops and starts at various times during the cgcle.
• Drain pump sounds durinq the pump out.
• Hake suredishes are properlg loaded.Seethe Loading the
dishwasherrackssection.
GE Dishwasher Warrants.
All warranty service provided by our Factory ServiceCenters,
or an authorized CustomerCare_ technician.To schedule
service,on-line, 24 hours a day, visit us at go.cam,or call
800.GE.CARES
(800.432.2737).Pleasehave serial number
and model number available when coiling for service.
Staple your receipt here.
Proof of the original purchase
date is needed to obtain service
under the warranty.
For The Period Of:
GE Will Replace:
One Year
From the dote of the
original purchase
Any part of the dishwasher which fails due to a defect in materials or workmanship. During this
limited one-year warranty, GE will also provide, free of charge, all labor and related service to
replace the defective part.
What GE Will Not Cover:
• Service trips to gour home to teach gou how to use
the product.
• Damage to the product
or acts of God.
• Improper installation,
• Incidental or consequential
defects with this appliance.
deliverg or maintenance.
• Failure of the product if it is abused, misused, or used for
other than the intended purpose or used commerciallg.
• Replacement
breakers.
of house fuses or resetting
of circuit
• Cleaning or servicing
drain line.
caused bg accident,
damage
fire, floods
caused bg possible
of the air gap device in the
• Damage caused after deliverg.
•
Product not accessible to provide required service.
EXCLUSION OF IMPLIED WARRANTIES--Your sole and exclusive remedy is product repair as provided in this Limited
Warranty. Any implied warranties, including the implied warranties of merchantability
or fitness for a particular
purpose, are limited to one year or the shortest period allowed by law.
I
This warrantF is extended
to the original purchaser and any succeeding
owner for products purchased
for
home use within the USA. If the product is located in an area where service by a GE Authorized Servicer is not
available, you may be responsible for a trip charge or you may be required to bring the product to an Authorized GE
Service location for service. Proof of original purchase date is needed to obtain service under the warranty. In
Alaska, the warranty excludes the cost of shipping or service calls to your home.
Some states do not allow the exclusion or limitation of incidenta! or consequential
damages.
This warranty
gives you specific legal rights, and you may also have other rights which vary from state to state. To know
what your legal rights are, consult your local or state consumer affairs office or your state's Attorney General.
Warrantor:
General
Electric Compang.
Louisville,
KY 40225
15
Consumer Support.
GEAppliances Website
ge.com
Have a question or need assistance with uour appliance? Tru the GEAppliances Website 24 hours a dau,
anu dau of the uead For greater convenience and faster service, UOUcan now download Owner's Manuals,
order parts, catalogs, or even schedule service on-line. You can also "AskOur Team of Experts"" uour questions,
and so much more...
ScheduleService
go.corn
Expert GErepair serviceisonlu one step awau from uour door Geton-line and scheduleuour serviceat
uour convenience24 hours anu dag of the uear!Or call 800.GECARES
(800.43Z2737)duringnormal businesshours.
RealLife DesignStudio
go.cam
GEsupports the Universal Design concept-products, services and environments that can be used bu
people of all ages, sizesand capabilities. We recognize the need to design for a wide range of phusical and
mental abilities and impairments. For details of GE'sUniversal Design applications, including kitchen design ideas
for people with disabilities,check out our Website todau. Forthe hearing impaired, please call 800.TDD.GEAC
(800.833.4322).
Extended Warranties
ge.com
Purchase a GEextended warrantu and learn about special discounts that are available while uour warrantu
is still in effect. You can purchase it on-line anutime, or call 800.626.2224 during normal business hours.
GEConsumer Home Serviceswill still be there after uour warrantu expires.
Parts and Accessories
go.corn
Individuals qualified to service their own appliances can have parts or accessoriessent directlg to their homes
(VISA,MasterCard and Discover cards are accepted). Order on-line todag, 24 hours everg dag or bg phone at
800.626.2002 during normal business hours.
Instructions contoined in this menuo! cover procedures to be performed by any user. Other servicing
generally should be referred to quelified service personnel. Caution must be exercised, since improper
servicing mey cause unsefe operation.
Contact Us
ge.com
If gou are not satisfied with the service you receive from GE, contact us on our Website with all the details
including gour phone number, or write to:
General Manager, Customer Relations
GE Appliances, Appliance Park
Louisville, KY 40225
Register Your Appliance
ge.com
Register sour new appliance on-line--at sour convenience! Timelg product registration will allow for
enhanced communication and prompt service under the terms of gour warrantg, should the need arise.
You mug also mail in the pre-pfinted registration card included in the packing material, or detach and
use the form in this Owner's Manual.
_
_
Printed
Printed
in the United States
on Recycled Paper