1
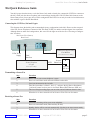
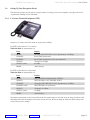
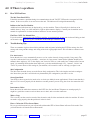
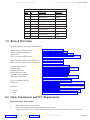
Model 90si
Secure Fax Gateway
User's Guide
GateWay
Fax
Systems, Inc.
Secure Fax Products
Virginia, USA
Tel: 804-796-1900
Toll-Free: 877-951-9800
Fax: 804-796-1116
E-Mail: [email protected]
Web: www.gwfs.com
Help Line: 877-951-9814
Revision 4.3
1/16/2010
GateWay Fax Systems, inc.
Model 90si Secure Fax Gateway User's Guide
90si Quick Reference Guide
Your 90si comes from the factory set for the Secure Only mode, whereby the commercial (COTS) fax connects to
the 90si’s FAX jack (the other two phone jacks remain empty) and the 90si’s RS-232 Data cable connects to the
Secure Data port of your crypto device. In this configuration the COTS fax can only be used for classified transactions with the crypto in Secure Data Mode.
Connecting the COTS fax, 90si and Crypto
This diagram shows the default (and recommended) factory configuration for the 90si. Shown are the rear panel
of the 90si, Secure Telephone, Commercial-Off-The-Shelf (COTS) fax and the outside telepone line connection.
Although there are other 90si configurations, this one will work right out of the box. See "Choosing a Configuration" for others.
90si Secure Fax Gateway
Rear Panel
5VDC Power
Supply
FAX
LINE
"Red"
Data Port
Secure Telephone
/ Crypto
PSTN
Commercial-Off-The-Shelf
Fax Machine
(Set to Auto-Answer on 1 Ring)
"Secure"
Phone Line
Telephone
Wall Jack
(Set to Async 9.6kbps)
Transmitting a Secure Fax
Step
1.
2.
3.
4.
5.
6.
Procedure
Place a call on your secure telephone / crypto.
Place it in secure data mode and set the handset on the table
Load your document in the facsimile
Take the fax machine "off-hook", dial a "1" and press the big Start or Sent button.
("off-hook" button: look on your fax for Hook, Manual Dial, Monitor, OHD, etc.)
The fax will begin sending pages, one at a time, and will indicate when it's done.
When the fax is done, return the call to Secure or Clear Voice or disconnect.
Receiving a Secure Fax
Step
1.
2.
3.
4.
Procedure
Answer the incoming call on your secure telephone
Place it in secure data mode (either end may do this)
Standby, the fax will be received automatically. (Set the fax to Auto-Answer mode)
When the fax is done, return the call to Secure or Clear Voice or disconnect.
www.gwfs.com, 877-951-9800, [email protected]
help line: 877-951-9814
page 2
GateWay Fax Systems, inc.
Model 90si Secure Fax Gateway User's Guide
Table of Contents
90si Quick Reference Guide . . . . . . . . . . . . . . . . . . . . . .
Connecting the COTS fax, 90si and Crypto . . . . . . . . . . .
Transmitting a Secure Fax . . . . . . . . . . . . . . . . . . . .
Receiving a Secure Fax . . . . . . . . . . . . . . . . . . . . .
1.0
Getting Started . . . . . . . . . . . . . . . . . . . . . . . . .
1.1
Introduction . . . . . . . . . . . . . . . . . . . . . . . . .
1.2
What in the Box . . . . . . . . . . . . . . . . . . . . . . .
1.3
Looking at your 90si . . . . . . . . . . . . . . . . . . . .
2.0
Installation . . . . . . . . . . . . . . . . . . . . . . . . . . .
2.1
Choosing a COTS Fax. . . . . . . . . . . . . . . . . . . .
2.2
Choose a Location. . . . . . . . . . . . . . . . . . . . . .
2.3
Choose a Configuration . . . . . . . . . . . . . . . . . . .
2.3.1
Secure Only Configuration (Recommended) . . . . . .
2.3.2
Dual Mode Considerations . . . . . . . . . . . . . . .
2.3.3
Configuration Selection Chart . . . . . . . . . . . . .
2.3.4
1-Line, Dual-Mode . . . . . . . . . . . . . . . . . . .
2.3.5
2-Line Dual-Mode . . . . . . . . . . . . . . . . . . .
2.3.6
1-Line Dual-Mode with 910 Option . . . . . . . . . .
2.4
Setting Your Chosen Configuration . . . . . . . . . . . . .
2.5
Print the Default Settings List . . . . . . . . . . . . . . . .
2.6
Setting Up Your Encryption Device. . . . . . . . . . . . .
2.6.1
L-3 Secure Terminal Equipment (STE) . . . . . . . . .
2.6.2
L-3 OMNI / OMNIxi . . . . . . . . . . . . . . . . . .
2.6.3
General Dynamics Sectera . . . . . . . . . . . . . . .
2.6.4
General Dynamics VIPER . . . . . . . . . . . . . . .
2.6.5
Motorola STU-IIB & STU-IIIA. . . . . . . . . . . . .
3.0
Using your 90si . . . . . . . . . . . . . . . . . . . . . . . . .
3.1
Applying Power . . . . . . . . . . . . . . . . . . . . . . .
3.2
Sending a Secure Fax . . . . . . . . . . . . . . . . . . . .
3.3
Receiving a Secure Fax . . . . . . . . . . . . . . . . . . .
3.4
Sending a Public Fax (Dual-Mode Configurations Only). .
3.5
Receiving a Public Fax (Dual-Mode Configurations Only).
3.6
90si Status Lights . . . . . . . . . . . . . . . . . . . . . .
3.7
Selecting a Transmit Protocol . . . . . . . . . . . . . . . .
3.7.1
SCIP Async Protocol . . . . . . . . . . . . . . . . . .
3.7.2
MIL-STD-161 Protocols (Synchronous) . . . . . . . .
3.7.3
Ricoh/Compat Protocols (Synchronous) . . . . . . . .
3.8
Setting and Using the Default Transmit Protocol . . . . . .
3.9
Using a One-Time Transmit Protocol Code . . . . . . . . .
4.0
If There's a problem . . . . . . . . . . . . . . . . . . . . . .
4.1
How Will You Know . . . . . . . . . . . . . . . . . . . .
4.2
Troubleshooting Tips . . . . . . . . . . . . . . . . . . . .
4.3
When All Else Fails...Call Our Help Line. . . . . . . . . .
5.0
Warranty Information . . . . . . . . . . . . . . . . . . . . .
6.0
Specifications . . . . . . . . . . . . . . . . . . . . . . . . . .
6.1
General Specifications. . . . . . . . . . . . . . . . . . . .
6.2
Digital Interface Specifications . . . . . . . . . . . . . . .
7.0
Related Web Links . . . . . . . . . . . . . . . . . . . . . . .
8.0
Safety Information and FCC Requirements . . . . . . . . .
9.0
Glossary . . . . . . . . . . . . . . . . . . . . . . . . . . . . .
www.gwfs.com, 877-951-9800, [email protected]
.
.
.
.
.
.
.
.
.
.
.
.
.
.
.
.
.
.
.
.
.
.
.
.
.
.
.
.
.
.
.
.
.
.
.
.
.
.
.
.
.
.
.
.
.
.
.
.
.
.
.
.
.
.
.
.
.
.
.
.
.
.
.
.
.
.
.
.
.
.
.
.
.
.
.
.
.
.
.
.
.
.
.
.
.
.
.
.
.
.
.
.
.
.
.
.
.
.
.
.
.
.
.
.
.
.
.
.
.
.
.
.
.
.
.
.
.
.
.
.
.
.
.
.
.
.
.
.
.
.
.
.
.
.
.
.
.
.
.
.
.
.
.
.
.
.
.
.
.
.
.
.
.
.
.
.
.
.
.
.
.
.
.
.
.
.
.
.
.
.
.
.
.
.
.
.
.
.
.
.
.
.
.
.
.
.
.
.
.
.
.
.
.
.
.
.
.
.
.
.
.
.
.
.
.
.
.
.
.
.
.
.
.
.
.
.
.
.
.
.
.
.
.
.
.
.
.
.
.
.
.
.
.
.
.
.
.
.
.
.
.
.
.
.
.
.
.
.
.
.
.
.
.
.
.
.
.
.
.
.
.
.
.
.
.
.
.
.
.
.
.
.
.
.
.
.
.
.
.
.
.
.
.
.
.
.
.
.
.
.
.
.
.
.
.
.
.
.
.
.
.
.
.
.
.
.
.
.
.
.
.
.
.
.
.
.
.
.
.
.
.
.
.
.
.
.
.
.
.
.
.
.
.
.
.
.
.
.
.
.
.
.
.
.
.
.
.
.
.
.
.
.
.
.
.
.
.
.
.
.
.
.
.
.
.
.
.
.
.
.
.
.
.
.
.
.
.
.
.
.
.
.
.
.
.
.
.
.
.
.
.
.
.
.
.
.
.
.
.
.
help line: 877-951-9814
.
.
.
.
.
.
.
.
.
.
.
.
.
.
.
.
.
.
.
.
.
.
.
.
.
.
.
.
.
.
.
.
.
.
.
.
.
.
.
.
.
.
.
.
.
.
.
.
.
.
.
.
.
.
.
.
.
.
.
.
.
.
.
.
.
.
.
.
.
.
.
.
.
.
.
.
.
.
.
.
.
.
.
.
.
.
.
.
.
.
.
.
.
.
.
.
.
.
.
.
.
.
.
.
.
.
.
.
.
.
.
.
.
.
.
.
.
.
.
.
.
.
.
.
.
.
.
.
.
.
.
.
.
.
.
.
.
.
.
.
.
.
.
.
.
.
.
.
.
.
.
.
.
.
.
.
.
.
.
.
.
.
.
.
.
.
.
.
.
.
.
.
.
.
.
.
.
.
.
.
.
.
.
.
.
.
.
.
.
.
.
.
.
.
.
.
.
.
.
.
.
.
.
.
.
.
.
.
.
.
.
.
.
.
.
.
.
.
.
.
.
.
.
.
.
.
.
.
.
.
.
.
.
.
.
.
.
.
.
.
.
.
.
.
.
.
.
.
.
.
.
.
.
.
.
.
.
.
.
.
.
.
.
.
.
.
.
.
.
.
.
.
.
.
.
.
.
.
.
.
.
.
.
.
.
.
.
.
.
.
.
.
.
.
.
.
.
.
.
.
.
.
.
.
.
.
.
.
.
.
.
.
.
.
.
.
.
.
.
.
.
.
.
.
.
.
.
.
.
.
.
.
.
.
.
.
.
.
.
.
.
.
.
.
.
.
.
.
.
.
.
.
.
.
.
.
.
.
.
.
.
.
.
.
.
.
.
.
.
.
.
.
.
.
.
.
.
.
.
.
.
.
.
.
.
.
.
.
.
.
.
.
.
.
.
.
.
.
.
.
.
.
.
.
.
.
.
.
.
.
.
.
.
.
.
.
.
.
.
.
.
.
.
.
.
.
.
.
.
.
.
.
.
.
.
.
.
.
.
.
.
.
.
.
.
.
.
.
.
.
.
.
.
.
.
.
.
.
.
.
.
.
.
.
.
.
.
.
.
.
.
.
.
.
.
.
.
.
.
.
.
.
.
.
.
.
.
.
.
.
.
.
.
.
.
.
.
.
.
.
.
.
.
.
.
.
.
.
.
.
.
.
.
.
.
.
.
.
.
.
.
.
.
.
.
.
.
.
.
.
.
.
.
.
.
.
.
.
.
.
.
.
.
.
.
.
.
.
.
.
.
.
.
.
.
.
.
.
.
.
.
.
.
.
.
.
.
.
.
.
.
.
.
.
.
.
.
.
.
.
.
.
.
.
.
.
.
.
.
.
.
.
.
.
.
.
.
.
.
.
.
.
.
.
.
.
.
.
.
.
.
.
.
.
.
.
.
.
.
.
.
.
.
.
.
.
.
.
.
.
.
.
.
.
.
.
.
.
.
.
.
.
.
.
.
.
.
.
.
.
.
.
.
.
.
.
.
.
.
.
.
.
.
.
.
.
.
.
.
.
.
.
.
.
.
.
.
.
.
.
.
.
.
.
.
.
.
.
.
.
.
.
.
.
.
.
.
.
.
.
.
.
.
.
.
.
.
.
.
.
.
.
.
.
.
.
.
.
.
.
.
.
.
.
.
.
.
.
.
.
.
.
.
.
.
.
.
.
.
.
.
.
.
.
.
.
.
.
.
.
.
.
.
.
.
.
.
.
.
.
.
.
.
.
.
.
.
.
.
.
.
.
.
.
.
.
.
.
.
.
.
.
.
.
.
.
.
.
.
.
.
.
.
.
.
.
.
.
.
.
.
.
.
.
.
.
.
.
.
.
.
.
.
.
.
.
.
.
.
.
.
.
.
.
.
.
.
.
.
.
.
.
.
.
.
.
.
.
.
.
.
.
.
.
.
.
.
.
.
.
.2
.2
.2
.2
.4
.4
.4
.5
.6
.6
.6
.6
.7
.7
.7
.8
.9
.10
.10
.11
.12
.12
.13
.14
.14
.15
.16
.16
.16
.16
.16
.17
.17
.18
.18
.18
.19
.19
.20
.21
.21
.21
.22
.22
.22
.22
.23
.24
.24
.27
page 3
GateWay Fax Systems, inc.
Model 90si Secure Fax Gateway User's Guide
1.0 Getting Started
1.1
Introduction
What's New
In 2010 we began shipping 90si's with a number of new features including the SCIP Interoperable Async Secure
Fax Protocol or Async for short. This protocols allows the 90si to communicate with all other Async capable secure fax using STE, OMNI, Sectera and other SCIP capable cryptos in Async Secure Data Mode. We also eliminated the DIP switches (on the bottom of the old units) used for setting the transmit protocol and configuration.
Now, the user sets the default configuration and protocol using the attached fax's dial pad. The last major change
is the addition of a remote software/firmware upgrade mechanism.
General Description and Benefits of the 90si
The 90si Secure Fax Gateway allows any current or future commercial fax device to connect to a STE, OMNI,
Sectera or other cryptographic device. That leaves the choice of facsimile features in your hands. You choose the
fax that best suits your needs, such as: toner or ink-jet, multi-functin or fax only, portable, high-volume/low-volume, computer-based fax, whatever you like !! The 90si also preserves your choices for the future by allowing
you to easily and economically upgrade your fax machine as technology and requirements change or if your old
fax simply wears out, as they all will. With all-in-one secure faxes, you must throw away your investment in the
secure fax protocols (the 90si like electronics that they build into their faxes) along with the fax machine. Being an external device, you retain your investment in the 90si and replace only the COTS fax machine (at COTS
prices) when necessary.
Thank you for your purchase of the 90si Secure Fax Gateway.
1.2
What in the Box
Before you install the Easy-Fax 90si STU-III Gateway, make sure that you have received the following items:
90si Main Unit
AC Power Supply
AC Power Cord
Phone Cord
Additional items required for your 90si secure fax system are:
1.
a COTS fax machine or a computer with fax capability
2.
an operational STE, OMNI, SECTERA, STU-IIB or other cryptographic device.
3.
on outside phone line.
www.gwfs.com, 877-951-9800, [email protected]
help line: 877-951-9814
page 4
GateWay Fax Systems, inc.
1.3
Model 90si Secure Fax Gateway User's Guide
Looking at your 90si
The figures below indicate the location and functions of the 90si buttons, indicators and connectors.
Reset
Button
Old -vs- New 90si:
• Old 90si has DIP switches on bottom.
• New Async-Capable 90si does not.
"Red" Data Connector
RD-232, DB-25 pin
(required)
Power
Indicator
(Green)
5VDC Power
Connector
(required)
TEL LINE
(optional)
STE
(optional)
FAX
(required)
Fault
Indicator
(Red)
90si Phone
Connections
Figure x - Looking at your 90si
RESET Button
FAULT Indicator (Red)
POWER Indicator (Green)
STE "Red" Data Cable
(required)
FAX Connector
(required)
STE Connector
(optional)
TEL LINE Connector
(optional)
EXT. 5VDC SUPPLY
(required)
When pressed it causes a hardware and software reset. While the light is blinking, self-tests are executed. When the light is on steay, the unit is ready to
operate.
It illuminates for 90 seconds following an error condition and is off during
normal operation.
When illuminated, power is applied and self-tests were successful.
This serial data cable is terminated with an RS-232 (25 Pin) connector that
goes to the "Red" Data Port on the back of your secure telephone or crypto.
This connector is used for all configurations. It connects to the "Line" or "L"
jack on your COTS or computer-based fax.
Used only for the 1-Line, Dual-Mode configuration where it connects to the
PSTN jack on the Secure Phone. It is not used for the Secure Only or 2-Line
Dual-Mode configurations.
Used only for Dual-Mode configurations (1-Line Dual-Mode or 2-Line DualMode) where it connects to a commercial 2-wire loop telephone line.
This connects to the supplied 110-220VAC auto-sensing power supply.
www.gwfs.com, 877-951-9800, [email protected]
help line: 877-951-9814
page 5
GateWay Fax Systems, inc.
Model 90si Secure Fax Gateway User's Guide
2.0 Installation
2.1
Choosing a COTS Fax
By the nature of their design, Secure Telephones require operator intervention to place and receive calls and
transition those call into and out of Secure Voice, Secure Data and Clear Voice modes. It is for this reason that we
recommend that you choose one of the more basic COTS faxes to connect to your 90si. All of the COTS faxes
automated features will not function in the Secure environment.
If possible, choose a COTS fax with a Hook, Monitor or Manual-Dial button. This Hook button takes the fax machine off-hook just as if you had lifted the handset of a phone. Whatever it may be called, using this button to send
a secure fax will cause the fax machine to enter what is usually called the "manual transmission" mode whereby
pages are scanned and sent one at a time. In this way you will know, at a glance from across the room, the staus of
the transmission and when the transmission is complete.
Memory Issues:
Additionally, static or permanent memory can be an issue when handling classified document. Gateway Fax
Systems offers COTS faxes that have only dynamic memory, the contents of which is erased when the power is
removed. Contact us if you wish to acquire one of these specially modified COTS faxes. And, as always, the 90si
never retains any facsimile image data as it constantly overwrites image memory. Additionally, the memory chips
used in the 90si are volatile. You may be doubly certain that no classified data remains in the 90si by depressing
the Reset button, as image memory is also overwritten during the reset process.
2.2
Choose a Location
Pick a spot that is within five (5) feet of your COTS fax, secure telephone or crypto, telephone line connection(s)
and an AC power outlet. We recommend that you place the COTS fax on the left and your Secure Telephone on
the right with the 90si in between the two.
2.3
Choose a Configuration
The 90si's primary function is to allow your COTS fax to become a secure fax. The simplest (and recommended)
configuration is called the Secure Only. If you choose, however, your 90si based secure fax system can also be
used to send and receive unclassified fax messages; See section 2.3.2 Dual Mode Considerations.
www.gwfs.com, 877-951-9800, [email protected]
help line: 877-951-9814
page 6
GateWay Fax Systems, inc.
2.3.1
Model 90si Secure Fax Gateway User's Guide
Secure Only Configuration (Recommended)
This factory default configuration allows the attached COTS fax to function only as a secure fax. If you wish to
process Public or Uncalssified documents as well; see Section 2.3.2 "Dual-Mode Considerations."
If your 90si is factory fresh, it is already pre-set to operate in this mode. If it has been in another location or you
are unsure of the current setting, set the Configuration to (01) Secure Only. See Section 2.4, Setting Your Chosen Configuration for instructions on how to do this.
90si Secure Fax Gateway
Rear Panel
5VDC Power
Supply
FAX
LINE
"Red"
Data Port
Secure Telephone
/ Crypto
PSTN
Commercial-Off-The-Shelf
Fax Machine
(Set to Auto-Answer on 1 Ring)
"Secure"
Phone Line
(Set to Async 9.6kbps)
Telephone
Wall Jack
Figure 1: Default Factory Configuration, Secure Only
2.3.2
Dual Mode Considerations
We define Daul-Mode as any 90si configuration that allows the COTS fax to directly access an outside line,
around the Secure Telephone, thus enabling the transmission and reception of unclassified faxes. The differientation between sending a document using the Secure Phone's Secure Data Mode (a secure fax) and sending that
same document to a non-secure fax is procedural. Therefore, if your 90si is configured for Dual-Mode, an untrained operator could compromise a document. It is for this reason that the 90si is factory set to the Secure Only
mode.
If untrained (regarding the 90si) people have access to your secure fax location, use the Secure Only Configuration and have the users go elsewhere for unclassified faxes. If, on the other hand, a limited number of people have
access to the 90si, and they can all be trained on safe 90si operation, then one of the Dual-Mode configurations
may be approprite for the location.
If you wish to use your 90si system for both secure and non-secure (unclassified) fax documents choose one of the
the following dual-mode configurations.
2.3.3
Configuration Selection Chart
The following chart will assist you in choosing the 90si configuration that best suits your requirements.
www.gwfs.com, 877-951-9800, [email protected]
help line: 877-951-9814
page 7
GateWay Fax Systems, inc.
Configuration
Secure Only
2-Line DualMode
1-Line DualMode
1-Line DualMode with an
A/B Switch
1-Line DualMode with 910
Option
Model 90si Secure Fax Gateway User's Guide
Secure
Non-Secure
Operation Operation
Primary
n/a
Primary
Primary
Primary
Secondary
Manual
Secure of
Non-Sec
Primary
Manual
Secure of
Non-Sec
Primary
Description
For Secure Fax operation only (factory default setting); See
Section 2.3.1.
For primary Non-Secure fax and primary Secure fax operation
using 2 separate telephone lines; See Section 2.3.5.
For secondary Non-Secure fax and primary Secure fax operation using 1 telephone line for all functions; See Section 2.3.4.
For manual, selective Secure and Non-Secure fax operation
using 1 telephone line for either Non-Secure fax OR Secure
operation. Call our Help Line (1-877-951-9814).
For primary Non-Secure and primary Secure fax operation,
automatically, using only 1 telephone line. See Section 2.3.6.
NOTE: Primary is defined as a secure fax that operates as you would expect, without any unique or unusual
steps. For non-secure fax operation, it means that the COTS fax will automatically answer an incoming non-secure fax call, just like all of the dedicated non-secure faxes you have used. Secondary means that an operator will
have to be present to receive a non-secure fax call.
2.3.4
1-Line, Dual-Mode
With this configuration your fax will function as a Secondary non-secure fax as well as your primary secure fax.
Only one phone line is required, however an operator must be present to receive a non-secure fax.
Set the Configuration to (02) 1-Line Dual-Mode. See Section 2.4, Setting Your Chosen Configuration for instructions on how to do this.
Phone Line
90si Secure Fax Gateway
Rear Panel
5VDC Power
Supply
Telephone
Wall Jack
TEL LINE
STE
FAX
LINE
"Red"
Data Port
Commercial-Off-The-Shelf
Fax Machine
(Set to Auto-Answer on 1 Ring)
PSTN
Secure Telephone
/ Crypto
(Set to Async 9.6kbps)
Figure 2: 1-Line, Dual-Mode Configuration
www.gwfs.com, 877-951-9800, [email protected]
help line: 877-951-9814
page 8
GateWay Fax Systems, inc.
2.3.5
Model 90si Secure Fax Gateway User's Guide
2-Line Dual-Mode
With this configuration your fax will function as your Primary non-secure fax as well as your Primary secure fax.
It requires two separate phone lines, one is your unclassified fax number and the other is your classified phone
number. Incoming Non-Secure fax calls will be answered automatically, as long as the fax is not otherwise processing a secure fax. All of the automatic functions of the COTS fax will work in Non-Secure mode.
Set the Configuration to (03) 2-Line Dual-Mode. See Section 2.4, Setting Your Chosen Configuration for instructions on how to do this.
90si Secure Fax Gateway
Rear Panel
5VDC Power
Supply
Unclass Fax
Phone Line
Telephone
Wall Jack
TEL LINE
FAX
LINE
"Red"
Data Port
Secure Telephone
/ Crypto
PSTN
Commercial-Off-The-Shelf
Fax Machine
(Set to Auto-Answer on 1 Ring)
"Secure"
Phone Line
(Set to Async 9.6kbps)
Telephone
Wall Jack
Figure 3: 2-Line, Dual-Mode Configuration
www.gwfs.com, 877-951-9800, [email protected]
help line: 877-951-9814
page 9
GateWay Fax Systems, inc.
2.3.6
Model 90si Secure Fax Gateway User's Guide
1-Line Dual-Mode with 910 Option
This configuration requires the optional Model 910 Auto Fax/STE Switch which allows your fax to function as
both your Primary non-secure as well as your Primary secure fax while using only one telephone line. No operator
need be present to receive a non-secure fax.
Set the Configuration to (03) 2-Line Dual-Mode. See Section 2.4, Setting Your Chosen Configuration for instructions on how to do this.
LINE
90si Secure Fax Gateway
Rear Panel
5VDC Power
Supply
Commercial-Off-The-Shelf
Fax Machine
(Set to Auto-Answer on 1 Ring)
FAX
TEL LINE
"Red"
Data Port
PSTN
Model 910
Automatic
Fax/STE
Switch
Secure Telephone
/ Crypto
Phone
Line
Telephone
Wall Jack
(Set to Async 9.6kbps)
Figure 4: 1-Line, Dual-Mode with 910 Option Configuration
2.4
Setting Your Chosen Configuration
If you are using the Secure Only Configuration and your 90si is new from the factory, you need not set the configuration. If on the other hand your 90si is not factory new or you have chosen one of the Dual-Mode configurations
you will need to tell the 90si what configuration you will be using. This is done using DTMF tones from the FAX
dial pad while in the Default Settings mode. The confiuration options and code numbers are shown below:
90si Default Settings List:
Configuration (select one)
->(01)<- Secure Only (factory default)
(02)
1-Line Dual-Mode
(03)
2-Line Dual-Mode
Entering the Default Settings mode is done by pressing and holding the Reset button on the side of the 90si for
five (5) to six (6) seconds until both Green and Red lights extingush. Releasing the Reset button at this point will
place the 90si into the Default Settings mode as evidenced by the Green light extinguished and the Red light illuminated. Changing the default protocol is then done using the attached fax machine's handset (or Hook button)
and dialpad by dialing the two-digit code(s) of the setting(s) you wish to turn on or activate. The Secure Telepnone / Crypto should be idle (not in Secure Data Mode). After dialing the two-digit code(s), hang up the fax to
exit the Default Settings mode. The Green light will blink a number of times and then illuminate steadily. The 90si
is now ready to operate with your new Default Settings.
www.gwfs.com, 877-951-9800, [email protected]
help line: 877-951-9814
page 10
GateWay Fax Systems, inc.
Model 90si Secure Fax Gateway User's Guide
The following example shows how to change the default configuration to 2-Line Dual-Mode (defined as configuration # 03)...
With the Secure Phone idle and only the Green "Power" light illuminated:
Procedure
Press and hold
the Reset button
on the 90si
release Reset
Take the fax offhook *1
Press 0 and then
3 on the fax dial
pad
hang up the fax
Response
... until both the Green and Red lights extinguish, then...
the Green light will be extinguished and the Red light illuminated
(you will hear dial-tone)
you will hear a beep. (Note: 03 is the configuration code for 2-Line DualMode. See the above Default Settings list for Secure Only, and 1-Line
Dual-Mode.
The Green light will blink a number of times. When it illuminated steady
the 90si will now be ready and in the 2-Line Dual-Mode configuration.
Notes:
*1 Most fax machines have a button that when depressed, returns dial-tone from the telephone system. This button is often labled Hook, Manual Dial, Monitor, On Hook Dial or something to that effect. Find and use this Hook
button on your fax or use the handset. If your fax does not have a handset or a hook button you will need to temporarily connect a plain old telephone to the TEL jack on the back of the fax machine to change Default Settings.
2.5
Print the Default Settings List
Currently this feature is unavailable but will be provided to you, at no charge, in a future remote software upgrade.
The factory Default Settings List is printed from the 90si to the attached COTS fax and looks like this.
90si Default Settings List:
Configuration (select one)
->(01)<- Secure Only (factory default)
(02)
1-Line Dual-Mode
(03)
2-Line Dual-Mode
Mode (select one)
(04)
Half Duplex
->(05)<- Full Duplex
Protocol (select one)
(06)
Async 2400 Bd
(07)
Async 4800 Bd
->(08)<- Async 9600 Bd
(09)
Async 19200 Bd
(10)
Mil STD Handshake w/o FEC
(11)
Mil STD Handshake w/FEC
(12)
Mil STD Broadcast w/o FEC
(13)
Mil STD Broadcast w/FEC
(14)
Ricoh
(15)
Compatable
Misc: (select any)
->(16)<- STE Connected
(17)
OMNI, Sectera, vIPer, other Connected
www.gwfs.com, 877-951-9800, [email protected]
help line: 877-951-9814
page 11
GateWay Fax Systems, inc.
2.6
Model 90si Secure Fax Gateway User's Guide
Setting Up Your Encryption Device
The following sections provide step-by-step procedures for setting your secure telephone / encryption device for
Asynchronous 9600bps secure data mode.
2.6.1
L-3 Secure Terminal Equipment (STE)
Objective: To set the secure data mode to Asyncronous 9.6Kbps.
For STE's with software V2.3 or earlier:
While On-Hook (to permanently set)
Press
MODE
CHANGE
CHANGE
SCROLL
SCROLL (until)
MODE
Display
(Example) SECURE DATA: S19.2 (Synchronous, 19.2Kbps)
Secure Data Synchronous
Secure Data Asynchronous (Sets Asynchronous)
(Example) 19.2 Kbps
9.6 Kbps
(blank display)
For STE's with software V2.4 and later:
While On-Hook (to permanently set)
Press
MODE
SCROLL
CHANGE
CHANGE (until)
SCROLL
SCROLL (until)
MODE
Display
SECURE SIGNALLING MODE: STE/STU
SECURE DATA: /STU SECURE VOICE
(Example) SECURE DATA: S19.2 (Synchronous, 19.2Kbps)
SECURE DATA: Asynchronous
(Example) 19.2 Kbps
9.6 Kbps
(blank display)
Note that to permanently set the Secure Data mode, the handset must be on-hook. If you do these procedures with
the handset off-hook, the changes hold for the current call only. When you hang up, the Secure Data settings will
revert to the previous settings.
www.gwfs.com, 877-951-9800, [email protected]
help line: 877-951-9814
page 12
GateWay Fax Systems, inc.
2.6.2
Model 90si Secure Fax Gateway User's Guide
L-3 OMNI / OMNIxi
Objective: To set the Secure Data mode to PSTN, Async, 9600 bps.
Apply power to the omni and login as an Authorized User <AU> or Terminal Administrator <TA>...
Press
(logon)
ENTER
MENU
2, ENTER
2, ENTER
1
ENTER
BACK
6, ENTER
3, ENTER
MENU
Display
LOGON SUCCESSFUL
<TA MENU> / 0-EXIT TA MODE / 1-ZEROIZE
<OMNI CONFIG> / 1-TERM CONTROL / 2-SET NETWORK
(Example) NET: PSTN-SYNC / 1-PSTN ASYNC / 2-PSTN-SYNC
NET: PSTN-ASYNC
<OMNI CONFIG> / 1-TERM CONTROL / 2-SET NETWORK
(Example) Async 19200 bps
Async 9600 bps
(to exit)
If your OMNI / 90si does not work after you make the above changes, confirm the following setting. To view
these settings press the Menu button followed by each individual code digit followed by Enter. For example, 2,1
would be Menu, 2, Enter, 1, Enter to view the Term Control setting.
Code Setting
2,1 Term Control = Local
2,2 Set Network = PSTN ASYNC
2,4 Set LCL Port = EIA232
2,6 Set Rate = ASYNC 9.6 kbps
Code
Setting
3,1
SEC Settings/Secure Mode = Traditional
2,14
3,2,1
3,2,4
2,7,1-4 CLK Polarity = (set all to Normal) 3,3,1
2,12 DTE TX CLK = OMNI
2,13 RESYNC INTRVL = DSBL
3,3,4
Signaling = STANDARD
SEC/SACS Voice/Secure Voice = ENBL
SEC/SACS Voice/ACL SEC Voice = DSBL
SEC/SACS Data/Secure Data = ENBL
SEC/SACS Data/ACL SEC Data = DSBL
Required L-3 provided LDI Red Data Cable: Each OMNI ships with a Local Data Cable, L-3 part number
K10048260-4. One end of this cable terminates in a DB25 connector (into which the 90si plugs), the other connects to the "Local Data" connector on the back of the OMNI/OMNIxi.
www.gwfs.com, 877-951-9800, [email protected]
help line: 877-951-9814
page 13
GateWay Fax Systems, inc.
2.6.3
Model 90si Secure Fax Gateway User's Guide
General Dynamics Sectera
Objective: To set the Secure Data mode to Async, 9600 bps.
2.6.4
General Dynamics VIPER
www.gwfs.com, 877-951-9800, [email protected]
help line: 877-951-9814
page 14
GateWay Fax Systems, inc.
Model 90si Secure Fax Gateway User's Guide
2.6.5 Motorola STU-IIB & STU-IIIA
Objective: Objective: To set Secure Data Mode for 2.4/9.6 Kbps, Full Duplex, Synchronous for use with Mil-Std1881-161/STANAG 5000 and Modified G3 Protocols only.
While Off-Hook and in CLEAR mode:
Press
PRGM
SCROLL (unitl...)
PRGM
Display
(Example) DATA = 2400 ASYNC
DATA = SYNCHRONOUS
PRGM (current call status displayed)
While On-Hook:
Press
PRGM
SCROLL
*
SCROLL (until...)
#
PRGM
Display
PRGM (enunciator in display)
PLEASE WAIT (and then)
# for COMSEC * TO SET OPTIONS
PRESS SCROLL TO CONTINUE
(Example) DATA=2400 ASYNC # TO CHANGE
DATA=SYNCHRONOUS # TO CHANGE
PRGM (current call status displayed)
Note:
Make sure that “HD” DOES NOT appear in the display. If it does, press the “HALF-DUPLEX” button to make it
disappear.
www.gwfs.com, 877-951-9800, [email protected]
help line: 877-951-9814
page 15
GateWay Fax Systems, inc.
Model 90si Secure Fax Gateway User's Guide
3.0 Using your 90si
3.1
Applying Power
The Easy-Fax 90si STU-III Gateway uses an external power supply. Since the 90si has no ON/OFF switch, the
device is “on” as soon as power is applied. To confirm that the 90si is properly powered and ready to operate,
ensure that the Green "POWER" light is illuminated and that the Red "FAULT" indicator is extinguished.
3.2
Sending a Secure Fax
Use the following, generic, procedure to send a secure fax. You may want to make a version for your secure phone
and COTS fax that references the appropriate details.
Step
1.
2.
3.
4.
5.
6.
Procedure
Place a call on your secure telephone / crypto.
Place it in secure data mode and set the handset on the table
Load your document in the facsimile
Take the fax machine "off-hook", dial a "1" and press the big Start or Sent button
(this will use the default transmit protocol)
The fax will begin sending pages, one at a time, and will indicate when it's done,
usually with a beep.
When the fax is done, you may return the call to Secure or Clear Voice or disconnect.
Off-Hook
Most fax machines have a button that when depressed, returns dial-tone from the telephone system. This button is
often labled Hook, Manual Dial, Monitor, On Hook Dial or something to that effect. If your fax only has a handset
lift it off-hook, dial a "1" and press the Start button and then hang it back in its' cradle. If your fax does not have a
handset or a hook button (many HP faxes don't) simply eliminate this step (i.e. use 1, Start).
Secure/Non-Secure Differentiation
Secure faxes are always initiated from the secure phone / crypto and then the secure phone is placed in secure data
mode for the duration of the secure fax tansmission. The 90si will not allow public faxes to be initiated from the
secure phone / crypto.
3.3
Receiving a Secure Fax
Important: Your commercial fax device MUST be set to auto-receive as a fax for your 90si system to work
properly. Additionally, make sure that your fax is set to auto-answer on the fewest number of rings it will allow.
Ideally one or two rings. (See your faxes manual).
Step
1.
2.
3.
4.
3.4
Procedure
Answer the incoming call on your secure telephone
Place it in secure data mode (either end may do this)
Standby, the fax will be received automatically
When the fax is done, you may return the call to Secure or Clear Voice or disconnect
Sending a Public Fax (Dual-Mode Configurations Only)
www.gwfs.com, 877-951-9800, [email protected]
help line: 877-951-9814
page 16
GateWay Fax Systems, inc.
Model 90si Secure Fax Gateway User's Guide
To send a public (unclassified) fax, simply place the call as you normally would using the fax machine handset,
hook button (speakerphone) or one of its' programmed auto-dial buttons.
Note: The 90si will not allow you to send a public facsimile while the secure telephone is in the secure data mode.
3.5
Receiving a Public Fax (Dual-Mode Configurations Only)
Receiving a public (unclassified) fax differs depending on whether you are using one or two telephone lines.
Please insure that your COTS fax set to auto-answer as a fax on 1 or 2 rings.
With a Two-Line Dual-Mode configuration, public (unclassified) faxes will be received unattended.
With a One-Line Dual-Mode configuration the follwing procedure applies:
Step
1.
2.
3.
3.6
Procedure
Answer the incoming call on your secure telephone
Once the caller indicates a public fax document, is forthcoming, depress the "asteisk" (*) key on the secure telephone twice
Standby as the fax is received and printed
90si Status Lights
The 90si has two rectangular LED's protruding from the front of the unit as
shown in this picture. One is green and is labled (on the bottom of the unit)
POWER, the other is red and is labled FAULT. They are used together to indicate different status and error conditions as described below.
Power-up:
Note: Before applying power to the 90si, make sure that all cables are securely
connected and that your commercial fax device is in Auto-Receive (Fax) mode
and answers on 1 or 2 rings.
Power
Indicator
(Green)
Fault
Indicator
(Red)
There are a series of LED indications during the 90si power-up sequence.
Before power is supplied to the unit, both LED’s will be extinguished. When
power is initially applied, the green “POWER” LED will flash intermittently
indicating that a self-test is in progress. Once self-test is successfully completed, the green “POWER” LED will
illuminate. The 90si is now in the “ready” state.
Communication Errors:
If an error occurs during a reception or transmission of a fax, the red “FAULT” LED will illuminate. This indicates that a communications error has occurred. The unit will still operate. The red “FAULT” LED will go out
after 90 seconds or once a new transmission begins.
System Errors:
Flashing green and red LED’s indicate that the 90si has detected an internal failure during self-test at power up, or
during normal operation of the unit. If this occurs, press the white “RESET” button located on the right side of the
unit. This will restart the 90si and should return it to the “ready” state (green “POWER” LED on, red “FAULT”
LED off). If it does not, depress the “RESET” button a second time. If this is ineffective, unplug the unit from the
www.gwfs.com, 877-951-9800, [email protected]
help line: 877-951-9814
page 17
GateWay Fax Systems, inc.
Model 90si Secure Fax Gateway User's Guide
wall, wait a moment, and plug it back in.
3.7
Selecting a Transmit Protocol
As always, the 90si automatically determines and switches to the correct protocol as a receiver. So, as usual, you
must select the transmit protocol that you wish to use. There are two ways to do this; using the Default Protocol
Setting (Send via HOOK, 1, START) or by manually dialing the appropriate transmit protocol's One-Time Code
as you are sending the fax (Send via HOOK, "One-Time Code", START). When using the One-Time Codes, insure that your Secure Phone / Crypto's Secure Data mode is set correctly for the mode you choose (Sync or Async
& Baud Rate).
The 90si supports four different secure fax protocols plus a few subset of these first two; Async, Mil-Std-188-161,
Ricoh (AKA: Modified Group 3 or 3312) and Compat (AKA: Compatible or Valutec) mode. With the Async protocol the user must select a baud rate or speed of which the 90si supports four; 2400, 4800, 9600 and 19200 bps.
The Mil-Std protocol has four subsets; Handshake with FEC, Handshake w/o FEC (recommended), Broadcast
with FEC and Broadcast w/o FEC. As the Mil-Std, Ricoh and Compat modes are synchronous, baud rate selection
is automatic.
The 90si's factory default protocols is Asynchronous 9600bps.
3.7.1
SCIP Async Protocol
The Async protocol has been around since the late 1980's, however it has never been widely used until the production release of the KSV-21 Crypto Card for the STE. The KSV-21 does not support synchronous secure data
modes when the STE is connected to a PSTN line. While it does support synchronous when connected to an
ISDN line, the overwealmingly large number of STE's connected to PSTN lines will drive most secure fax users
to this mode. As a result, the 90si comes with the Async Protocol (with a baud rate of 9600 bps) set as the factory
default. The 90si supports Async baud rates of 2400, 4800, 9600 and 19,200 bps (bits per second).
3.7.2
MIL-STD-161 Protocols (Synchronous)
As mentioned earlier, the 90si impliments four flavors of the synchronous Mil-Std protocol:
HANDSHAKE with FEC Off
This is the only Mil-Std protocol we recemmend for use with desktop (non Tactical) cryptographic devices such
as the STE, OMNI and SECTERA. The handshaking that it gets its' name from come in the form of "acknowledgements" from the receiving fax machine which occur at the beginning of the transmission and between each
page. Forward Error Correction (FEC) is not necessary with these cryto devices because they provide their own,
quite effective, error correction.
HANDSHAKE with FEC On
As described above but with FEC turned on. This error correction technique adds about 20% more data to the image data but allows operation on noisy communications links with a Bit Error Rate of up to 10-2.
BROADCAST with FEC Off
The broadcast mode was designed for point-to-multipoint battlefield radio networks and is a poor choice for modern secure telephone networks. Requiring no response from the receiving secure fax, the sending secure fax has
no way of knowing if the transmission was received.
BROADCAST with FEC On
As described above but with FEC turned on.
www.gwfs.com, 877-951-9800, [email protected]
help line: 877-951-9814
page 18
GateWay Fax Systems, inc.
3.7.3
Model 90si Secure Fax Gateway User's Guide
Ricoh/Compat Protocols (Synchronous)
The Ricoh and Compat protocols have also been around since the late 1980's but unlike the Async protocol, they
have been used extensively every since. Being synchronous protocols, baud rate selection is automatic. We recommend using these protocols only as a last resort.
3.8
Setting and Using the Default Transmit Protocol
There are two ways to tell the 90si what protocol you wish it to use when transmitting a secure fax. One way is
using the Default Protocol Settings described in this section and the other is using the One-Time Codes described
in the next section.
The Default Transmit Protocol is factory set to Async 9600 bps and is employed during a normal 90si transmission by taking the fax off-hook, dialing a "1" on the dialpad and pressing the Start or Send button. The off-hook
step may be omitted if you fax does not have a Hook, Manual Dial, Monitor or On Hook Dial button (or its' equivalent). The default setting are indicated on the 90si Default Settings List, an example of which is shown below.
90si Default Settings List:
Configuration (select one)
->(01)<- Secure Only (factory default)
(02)
1-Line Dual-Mode
(03)
2-Line Dual-Mode
Mode (select one)
(04)
Half Duplex
->(05)<- Full Duplex
Protocol (select one)
(06)
Async 2400 Bd
(07)
Async 4800 Bd
->(08)<- Async 9600 Bd
(09)
Async 19200 Bd
(10)
Mil STD Handshake w/o FEC
(11)
Mil STD Handshake w/FEC
(12)
Mil STD Broadcast w/o FEC
(13)
Mil STD Broadcast w/FEC
(14)
Ricoh
(15)
Compatable
Misc: (select any)
->(16)<- STE Connected
(17)
OMNI, Sectera, vIPer, other Connected
The list is broken into four sections: Configuration, Mode and Protocol and Misc. The arrows (-> <-) point to the
item that is currently selected. In the above list, the Configuration is set to Secure Only, the Mode is Full Duplex
and the default Protocol is Async 9600 Bd (baud or bits per second). In each section, only one item can be selected at a time.
Entering the Default Settings mode is done by pressing and holding the Reset button on the side of the 90si for
five (5) to six (6) seconds until both Green and Red lights extingush. Releasing the Reset button at this point will
place the 90si into the Default Settings mode as evidenced by the Green light extinguished and the Red light illuminated. Changing the default protocol is then done using the attached fax machine's handset (or Hook button)
and dialpad by dialing the two-digit code(s) of the setting(s) you wish to change. The Secure Telepnone / Crypto
should be idle (not in Secure Data Mode). After dialing the two-digit code(s), hang up the fax to exit the Default
Settings mode. The Green light will blink a number of times and then illuminate steadily. The 90si is now ready to
operate with your new Default Settings.
www.gwfs.com, 877-951-9800, [email protected]
help line: 877-951-9814
page 19
GateWay Fax Systems, inc.
Model 90si Secure Fax Gateway User's Guide
The following example shows how to change the default protocol to "Mil STD Handshake w/o FEC" (defined as
protocol 10)...
With the Secure Phone idle and only the Green "Power" light illuminated:
Procedure
Press and hold
the Reset button
on the 90si
release Reset
Take the fax offhook *1
10 on the fax
hang up the fax
Response
... until both the Green and Red lights extinguish, then...
the Green light will be extinguished and the Red light illuminated
(you will hear dial-tone)
you will a beep. (Note: 10 is the protocol code for Mil STD Handshake w/o
FEC. See the above list for the other codes.)
The Green light will blink a number of times. When it illuminated steady
the 90si is ready send using the Mil STD Handshake w/o FEC protocol.
Notes:
*1 Most fax machines have a button that when depressed, returns dial-tone from the telephone system. This button is often labled Hook, Manual Dial, Monitor, On Hook Dial or something to that effect. Find and use this Hook
button on your fax or use the handset. If your fax does not have a handset or a hook button you will need to temporarily connect a plain old telephone to the TEL jack on the back of the fax machine to change Default Settings.
3.9
Using a One-Time Transmit Protocol Code
A one-time protocol code allows you use a different protocol (than the default setting) for the current transmission
only. The default protocol setting is not effected or changed. You will set-up to transmit a secure fax as normal
with one exception; instead of dialing a "1" (to use the default setting), you will substitute one of the follwing
one-time codes:
Code
*10
*11
*12
*13
*14
*15
*16
*17
*18
*19
*20
*21
*22
*23
One-Time Transmit Protocol
Async 2400
Async 4800
Async 9600
Async 19,200
Mil-Std-188-161 Handshake w/o FEC (Sync)
Mil-Std-188-161 Handshake with FEC (Sync)
Mil-Std-188-161 Broadcast w/o FEC (Sync)
Mil-Std-188-161 Broadcast with FEC (Sync)
MG3 Ricoh/Compat (Sync)
TBD
TBD
TBD
TBD
TBD
www.gwfs.com, 877-951-9800, [email protected]
help line: 877-951-9814
page 20
GateWay Fax Systems, inc.
Model 90si Secure Fax Gateway User's Guide
4.0 If There's a problem
4.1
How Will You Know
The 90si Front Panel LED's
If the 90si encounters a problem during fax communication, the red "FAULT" LED on the front panel will illuminate. If this occurs, there is no need to reset the unit. The indicator will extinguish automatically.
Indicators On Your Fax Machine
Additional error indications may be displayed by your fax machine. These will usually be in the form of an
audible alarm (a "beep") or visual indicator (a light or alpha-numeric display). Consult your fax machine user's
manual for explanations of alarm conditions and how to restore normal operation.
Find Your COTS Fax Manual Here
If you do not have a manual for your COTS fax machine, we maintain links on our web site that will help you find
an electronic copy: http://www.gwfs.com/Header/TechnicalHelp/FaxManuals.html
4.2
Troubleshooting Tips
There are a number of places from which a problem could orriginate, including the COTS fax settings, the 90si
settings and wiring and the settings and wiring of the local cryptographic device. We will address common issues
below:
Fax Auto-Answer
Insure that the fax is set to automatically answer, as a fax, on the fewest # of rings possible (3 rings max). The
way this is indicated will vary by machine -- some have an "auto answer" button and/or light that should be illuminated; others might say "fax" in the display (not "fax/tel or TAD, etc.) and usually have a button called "answer
mode" (or something like that) that when depressed, cycles the machine through "fax", "manual", "tel/fax" and
"TAD". If you are unsure of this setting for your machine, call or email us and we will help you figure it out.
90si Configuration
The 90si comes from the factory set to the Secure Only configuration. This is the simplest and safest configuration. Insure that your 90si is wired in the way demanded by the configuration your 90si is set for.
Secure Data Mode
Your STE (or other crypto device) needs to be set for Async 9600 (for most applications). Please insure that this is
the case. If it is not set properly for the default or one-time protocol you are using, the secure fax transaction will
fail.
Interconnect Cables
Insure that all of the cables that connecte to the COTS fax, 90si and Secure Telepnone are seated properly. It
might be a good idea to remove each of them, one at a time, and re-seat the connectors.
Make a Copy
This is an easy test that exercises much of the electronics and all of the mechanicals of the fax machine. If it does
not make a copy properly, then the problem is in the fax itself.
Place a Call on the STE or Secure Phone
Do you get a dial-tone and can you call and talk with another STE or Secure Phone in Secure Voice mode? Can
you transition the call into the Secure Data mode?
www.gwfs.com, 877-951-9800, [email protected]
help line: 877-951-9814
page 21
GateWay Fax Systems, inc.
Model 90si Secure Fax Gateway User's Guide
Send and Receive a Public Fax
Insure that you can send and receive a public fax. If you are using the Secure Only configuration, temporarily
disconnect the fax from the 90si and connect it directly to the outside phone line. When you test receiving a fax,
be sure to listen to how may rings occur before the fax answers. You should hear between 0 and 2 rings.
4.3
When All Else Fails...Call Our Help Line
If your problems persist, gather the following information and call us.
90si Serial Number
Brand and Model Number of your COTS fax.
Brand and Model Number of the Secure Telephone / Crypto
Your Secure and Public Fax Phone Numbers
Your Configuration Settings.
Call our Secure Fax Help Line at 1-877-951-9814 (toll free) or 336-697-9100 from your Secure telephone. We are
fully equipped and staffed to test and diagnose your problem over the phone -- answer any of your questions and
get your system operational quickly. And best of all, technical support is free and unlimited.
5.0 Warranty Information
Gateway Fax Systems, Inc. warrants the 90si to be free from defects in materials and workmanship under normal
use for a period of one (1) year from the date of delivery as evidenced by a copy of the sales receipt. GWFS will,
at its option, repair or replace the unit at no charge provided:
a)
The unit was not damaged due to misuse or abuse.
b)
You contact GWFS by phone, toll-free, at 1-877-951-9800 or e-mail at [email protected] and receive
a return authorization number.
c)
You ship your 90si prepaid to GWFS. GWFS will pay return freight via UPS 2nd Day Air.
d)
We will return the unit to working order and ship it back out within one business day of receiving it.
NO OTHER WARRANTIES ARE EXPRESSED OR IMPLIED INCLUDING IMPLIED WARRANTIES
OF MERCHANTABILITY OR FITNESS FOR A PARTICULAR PURPOSE.
6.0 Specifications
6.1
General Specifications
Compatible Secure Phones / Cryptos
STE, OMNI, OMNIxi, Sectera SWT, STU-II, STU-IIB, STU-IIIA, STU-III, KG-84, and other secure telephones/
cryptos.
Physical Interfaces (five)
1) Secure Telephone (DB-25F/RS-232 Digital), 6’ integral cable; 2) Secure Telephone (RJ-11C Analog); 3) Phone
Line (RJ-11C); 4) COTS Fax (RJ-11C); 5) Power from supplied AC power supply (see below)
Transmission Rate
Secure: 2400, 4800, 9600 bps sync & 2400, 4800, 9600, 19200 bps async, Non-Secure: Imposes no restrictions.
Supported Protocols
www.gwfs.com, 877-951-9800, [email protected]
help line: 877-951-9814
page 22
GateWay Fax Systems, inc.
Model 90si Secure Fax Gateway User's Guide
SCIP Async (2.4, 4.8, 9.6 and 19.2 Kbps), MIL-STD-188-161 Sync Type 1, STANAG 5000 Type 1 (less 16kbps
and uncompressed), Modified Group 3 (Sync) - Compatibility & 3312 Modes (Sync), CCITT Group 3 (T30, T4).
Secure Fax Compatibility
Secure faxes made by: Cryptek, Ilex, Ricoh, TSP/GTE (now Gateway Fax Systems), AN/UXC-7, all MIL-STD188-161 and NATO STANAG 5000 faxes.
Regulatory Approvals
FCC Part 15/68, DISA JITC (Ft. Huachuca, AZ) re-certified 18 JAN 99
Environmental
Temp: 10 to 40 C, Humidity: 20-80% RH
Electrical
Input 5 VDC, 6.2 W max., 2.7 W idle.
External Power Supply
Input: 100-240 VAC Auto Sensing, 50-60 Hz, Output: 5 VDC, 4A Regulated, Phys: 4x2.5x1.7 in, .75 Lb, Regulatory: UL, cUL, CE
Physical
90si: 5.52” x 5.52” x 1.5” (WxHxD), 1 lb, 2.5 oz; shipping box: weight 3.5 Lb, 12.5” x 8.5” x 4.5”
Standard Warranty
1 year parts-and-labor
Included in the Box
90si with integral 6’ long shielded data cable w/DB-25F connector, 6’ long modular telephone cord, User’s and
Reference guides, power supply, AC power cord, adhesive velcro strip
Technical Support
Unlimited, free, technical support for 90si, whatever fax you use and your secure phone.
6.2
Digital Interface Specifications
The 90si’s digital interface cable is a 6’ long, shielded, RS-232 cable, captive to the 90si and terminated in a DB
-25 male connector. The ten pins that the 90si uses are described below. The remaining pins are un-terminated,
even if the pin positions are not. Output drivers provide +/- 6 VDC with 3K ohm loads on all outputs.
www.gwfs.com, 877-951-9800, [email protected]
help line: 877-951-9814
page 23
GateWay Fax Systems, inc.
Pin #
1
2
3
4
5
6
7
15
17
20
Model 90si Secure Fax Gateway User's Guide
90si Digital Interface Pin-Assignments
ID
Description
Direction
FG
Frame Ground (sheild)
TD
Transmit Data
Output
RD
Receive Data
Input
RTS
Request To Send
Output
CTS
Clear To Send
Input
DSR
Data Set Ready
Input
SG
Signal Ground
TC
Transmit Clock
Input
RC
Receive Clock
Input
DTR
Data Terminal Ready
Output
7.0 Related Web Links
We have provided a few useful weblinks below:
Model 90si Secure Fax Gateway:
90si Presentations and Images:
90si Choices:
90si User’s Guide in PDF format:
http://www.gwfs.com/90si.html
http://www.gwfs.com/90si/more.html
http://www.gwfs.com/Choices/90sichoices.html
http://www.gwfs.com/Header/TechnicalHelp/90siusers.pdf
Model 690 Mid-Volume Secure-Fax System:
Model 390 Low-Volume Secure-Fax System:
http://www.gwfs.com/690.html
http://www.gwfs.com/390.html
Company Information:
Technical Help:
Complete Price List:
Product Selection Chart:
Frequently Asked Questions:
DISA/JITC Certification:
http://www.gwfs.com/Footer/Moved.html
http://www.gwfs.com/Header/TechnicalHelp/help.html
http://www.gwfs.com/Header/order.html
http://www.gwfs.com/Header/chart.html
http://www.gwfs.com/Header/faq.html
http://www.gwfs.com/JITCCertification/JITCcert.html
Gov’t SecurePhone Website:
GD Sectera:
https://www.iad.gov/securephone/index.cfm
http://www.gdc4s.com/content/detail.cfm?item=87249ff2-22ae478f-a483-a475b5dd0a8d
http://www.gdc4s.com/content/detail.cfm?item=0f71db22-0eb9413d-b144-8eea7c767e64
http://www.l-3com.com/cs-east/ia/omni/ie_ia_omni.shtml
http://www.l-3com.com/cs-east/ia/ste/ie_ia_ste.shtml
GD vIPer:
L-3 Omni:
L-3 STE:
8.0 Safety Information and FCC Requirements
Important Safety Instructions:
1.
2.
3.
Read and understand all instructions.
Follow all warnings and instructions marked on the product.
Unplug this product from the wall outlet before cleaning. Do not use liquid cleaners or aerosol cleaners.
www.gwfs.com, 877-951-9800, [email protected]
help line: 877-951-9814
page 24
GateWay Fax Systems, inc.
4.
5.
6.
7.
8.
9.
10.
11.
12.
13.
14.
15.
Model 90si Secure Fax Gateway User's Guide
Use a damp cloth for cleaning.
Do not use this product near water, for example, near a bathtub, wash bowl, kitchen sink, or laundry tub,
in a wet basement, or near a swimming pool.
Do not place this product on an unstable cart, stand or table. The product may fall causing serious damage
to the product.
This product should never be placed near or over a radiator or heat register. This product should not be
placed in a built-in installation unless proper ventilation is provided.
This product should only be powered from the type of power source indicated on the marking label. If
you are not sure of the type of power supply to your facility, consult your dealer or local power company.
This product is equipped with a three wire grounding type plug, a plug having a third (grounding) pin.
This plug will only fit into a grounding type power outlet. This is a safety feature. If you are unable to
insert the plug into the outlet, contact your electrician to replace your obsolete outlet. Do not defeat the
safety purpose of the grounding type outlet.
Do not allow anything to rest on the power cord. Do not locate this product where the cord will be abused
by persons walking on it.
Do not overload wall outlets and extension cords as this can result in the risk of fire or electric shock.
Never spill liquid of any type on the product.
To reduce the risk of electric shock, do not disassemble this product, but send it to a qualified service
facility when some service or repair work is required. Opening or removing covers may expose you to
dangerous voltages or other risks. Incorrect reassembly can cause electric shock when the unit is subsequently used.
Unplug this product from the wall outlet and refer servicing to qualified service personnel under the following conditions:
A.
When the power supply cord or plug is damaged or frayed.
B.
If liquid has been spilled into the product.
C.
If the product has been exposed to rain or water.
D.
If the product does not operate normally by following the operating instructions. Adjust only
those controls that are covered by the operating instructions because improper adjustment of other
controls may result in damage and will often require extensive work by a qualified technician to
restore the product to normal operation.
E.
If the product has been dropped or the cabinet has been damaged.
F.
If the product develops a distinct change in performance.
Avoid using a telephone (other than a cordless type) during an electrical storm. There may be a remote
risk of electric shock from lightning.
Do not use the telephone to report a gas leak in the vicinity of the leak.
Consumer Information and FCC Requirements:
•
This equipment complies with Part 68 of the FCC rules. On the bottom of the base of this equipment is
a label that contains, among other information, the FCC Registration Number and Ringer Equivalence
Number (REN) for this equipment. You must upon request, provide this information to your telephone
company.
•
The REN is useful to determine the quantity of devices you may connect to your telephone line and still
have all of those devices ring when your telephone number is called. In most, but not all areas, the sum of
the REN’s of all devices connected to one line should not exceed five (5.0). To be certain of the number of
devices you may connect to your line, as determined by the REN, you should contact your local telephone
company to determine the maximum REN for your calling area.
•
If your 90si causes harm to the telephone network, the telephone company may discontinue your service
temporarily. If possible, they will notify you in advance. But if advance notice isn’t practical, you will be
notified as soon as possible. You will be informed of your right to file a complaint with the FCC.
www.gwfs.com, 877-951-9800, [email protected]
help line: 877-951-9814
page 25
GateWay Fax Systems, inc.
Model 90si Secure Fax Gateway User's Guide
•
Your telephone company may make changes in its facilities, equipment, operations or procedures that
could affect the proper functioning of your equipment. If they do, you will be notified in advance to give
you an opportunity to maintain uninterrupted telephone service.
•
If you experience trouble with the 90si. there are no repairs that can be made by the customer. For repair/
warranty information please contact:
GWFS Customer Service
http://www,gwfs.com
[email protected], 1-877-951-9800
The telephone company may ask that you disconnect this equipment from the network until the problem
has been corrected or until you are sure that the equipment is not malfunctioning.
•
This equipment may not be used on coin service provided by the telephone company. Connection to party
lines is subject to state tariffs.
•
Current FCC regulations specify that any direct connections to a telephone company line be done using
only standard phone jacks and plugs that meet FCC regulations.
www.gwfs.com, 877-951-9800, [email protected]
help line: 877-951-9814
page 26
GateWay Fax Systems, inc.
Model 90si Secure Fax Gateway User's Guide
9.0 Glossary
An option available in the Mil-Std-161 mode
that can decrease errors in fax transmission
over noisy communication lines. Note that
STU’s provide “clean” communication lines
therefore eliminating the need for FEC.
Listed below are definitions of words and terms
used in the 90si User’s and Reference Guides.
Asynchronous
Async for short, Asynchronous refers to the
way in which data is passed between the 90si
and the attached Secure Phone. Specifically,
no physical "clock" signal is generated by the
Secure Phone. Instead, the timing data is embedded in the data and must be decoded by the
90si and the far end secure fax.
Handshake
A signaling option in the Mil-Std-161 mode
in which the transmitting fax device looks for
acknowledgements during a fax transmission.
Broadcast
A signaling option in the Mil-Std-161 mode in
which the transmitting device does not look for
any acknowledgements during a fax transmission.
Commercial Fax Device
A Commercial-Off-The-Shelf (COTS) “standard” Group III fax machine or computerbased fax device.
Configuration
For the purposes of this document, Configuration refers to the various ways in which the
90si can be connected together with the fax,
secure telephone and outside phone line to
provide differing sets of secure and nonsecure
fax and voice functions. See also, Secure Only,
1-Line Dual-Mode and 2-Line Dual-Mode.
Data Port (see also Red Data Port)
The term Data Port refers to the RS-232 serial
interface on the crypto device to which the
90si's "STE" cable connects. It is also referred
to as a Red Data Port.
FEC (Forward Error Correction)
www.gwfs.com, 877-951-9800, [email protected]
KOV-14
The KOV-14 Fortezza Plus Crypto Card is out
of production, replaced by the KSV-21 and will
no longer function after 31 DEC 2009. When
installed in a STE, the KOV-14 allowed the
STE to communicate with the installed base of
STU-III's.
LED
An acronym for Light Emitting Diode, this is
the type of indicator lights used on the 90si.
Mil-Std-188-161
The SECDEF-mandated military standard
protocol for digital data transmission between
fax devices. Mil-Std-161 is compatible with
NATO’s STANAG 5000 protocols.
Off-Hook
The state created on a telephone line when a
telephone handset is picked up.
Dual Mode
A 90si configuration which allows the local fax
machine to communicate with both secure and
commercial fax machines.
ECC
The KSV-21 ECC (Enhanced Crypto Card)
used in the STE, contains the SCIP cryptographic engine.
KSV-21
The KSV-21 Enhanced Crypto Card contains
the cryptographic engine for the STE. The
KSV-21 does not support synchronous modes
with the STE connected to the PSTN.
One-Line Dual-Mode Configuration
This configuration allows the attached fax to
function as BOTH a secure fax AND a nonsecure fax. An operator must be present to
receive an unclassified fax.
One-Touch Key
A feature on a fax machine that allows designated buttons to be programmed to go “OffHook” and automatically dial a telephone
number. In the case of the 90si, we recommend
that you program one of your fax’s one-touch
keys to dial a “1” and designate it the “Secure
help line: 877-951-9814
page 27
GateWay Fax Systems, inc.
Model 90si Secure Fax Gateway User's Guide
Start” key.
90si).
Primary Secure Fax
For the purposes of this document, a Primary
Secure Fax is any secure fax system employing
the 90si Secure Fax Gateway
Primary Non-Secure Fax
For the purposes of this document, a Primary
Non-Secure Fax is a COTS fax connested to
a 90si based system that can automoatically
answer incoming non-secure fax call, just like
all the other unclassified faxes you are familiar
with.
Protocol
Generally, a protocol is a set of standard rules
used to send data over a communications
channel. Specifically, secure faxes employ a
number of protocols including Mil-Std-188161 / STANAG 5000, SCIP Async and some
older secure fax protocols referred to Modified
Group 3.
PSTN
An acronym for Public Switched Telephone
Network, it refers to the commercial telephone
systems that carry the vast majority of non-mobile telephone calls worldwide.
Public Fax
A document that does not contain sensitive or
secret information and, therefore, need not be
transmitted in a secure manner.
Red Data Port
The term Red Data Port refers to the RS-232
serial interface on the crypto device to which
the 90si's "STE" cable connects. It is also referred to simply as Data Port.
Ricoh / Compatibility Protocols
A set of digital protocols for communication
between secure fax devices. These protocols
allow the 90si to be backwards compatible with
older secure fax machines. Also referred to as
Modified Group 3.
RS-232
Recommended Standard 232 is an industry
standard for the electrical interface between
communications equipment (such as the STE)
and communications terminals (such as the
www.gwfs.com, 877-951-9800, [email protected]
SCCP
An acronym for Skinny Call Control Protocol
which specifies how an IP telephone instrument
connects to and operates with a Cisco Systems
VoIP call router.
SCIP
Secure Communications Interoperability Protocol (SCIP) is a new US, Allied and NATO
cryptographic architecture that is employed i
new Secure Telephones such as the STE/ECC.
SCIP Asynchronous Protocol
Commonly called the Async protocol, this relatively unused secure fax protocol has become
the defacto standard due to the switch from
KOV-14 crypto cards to the new KSV-21.
SDD (Secure Data Device)
An SDD is a data only version of secure telephone.
Secondary Fax
Secure Data Mode
A STU-III or STE’s secure data mode encrypts
confidential or classified information to be
transmitted and received over standard telephone lines. It is this mode that secure faxes
are transmitted using.
Secure Fax
A secure fax is a document that contains confidential or classified information that must be
transmitted in a secure manner. This term is
alternately used to describe the equipment used
to transmit and receive classified documents.
See Secure Fax Device below.
Secure Fax Device
A specially manufactured fax device that
includes the interface and protocols necessary
to communicate over secure telephones such as
the STU-III.
Secure Only Configuration
This simplest of the 90si configurations allows
the attached fax to function as a secure fax and
only as a secure fax.
help line: 877-951-9814
page 28
GateWay Fax Systems, inc.
SIP
Model 90si Secure Fax Gateway User's Guide
SIP is an acronym for Session Initiated Protocol and refers to a widely used commercial protocol for multimedia sessions over IP networks.
STE (Secure Terminal Equipment)
New secure telephone for use by the US Government.
STU-IIB
Secure Telephone Unit Generation Two Version
B. NATO version of STU-III.
STU-III
Secure Telephone Unit Generation Three. no
longer in production and set to become obsolete at the end of 2009, the STU-III was the US
Government's primary secure communications
device for over twenty years.
STU-IIIA
Secure Telephone Unit Generation Three Version A. US Secure telephone that can connect
with a STU-IIB.
Synchronous
Synchronous refers to the way in which data
is passed between the 90si and the attached
Secure Telephone. Specifically, in synchronous
communications each data bit is "clocked"
between the 90si and the Secure Phone using
clock signals generated by the Secure Phone.
The clock signal tells the 90si what "data rate"
the Secure Phone is using.
Two-Line Dual-Mode Configuration
This 90si configuration allows the attached fax
to function as BOTH a secure fax AND a nonsecure fax. Unclassified faxes can be received
aoutomatically (unattended).
VoIP
An acronym for Voice Over Internet Protocol
which refers to systems for delivering voice
communications over IP networks.
Volatile Memory
Employed in the 90si, this type of memory
loses its data when power is removed.
www.gwfs.com, 877-951-9800, [email protected]
help line: 877-951-9814
page 29