1
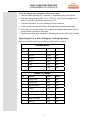
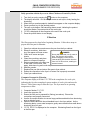
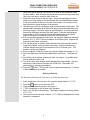
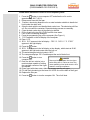
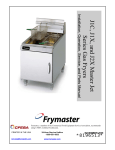
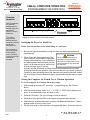
Prepared for
CM4-S(t) COMPUTER OPERATION
(PROGRAMMED FOR POPEYE’S)
8700 Line Ave.
Shreveport, LA 71106
Service Hotline 800-551-8633
Computer
Operation
1
1
CM4-S computers
are specially
programmed for
use with either the
restaurant's
chicken or french
fried items.
The cooking
programs are
different and the
computers must be
set for their
intended menu.
The computer is
set by the factory
to the chicken
menu. Follow the
instructions at right
to reset the
computer.
.
2
2
3
3
4
4
5
6
5
6
7
7
DProgramming key
8
8
9
9
10
10
CM4-S
Figure 1: CM4-S Computer with tactile switches.
Setting up the Fryer for Initial Use
Follow these instructions for the initial filling of a new fryer:
1. Boil out the frypot as described on page 5 to clear any debris associated with
manufacturing.
WARNING
2. Fill the frypot with liquid shortening to the
Never set a complete block of
lower of the two etched marks in the frypot.
shortening on top of heating
If using solid shortening, cut the shortening
elements or heating tubes. To do
into small squares and pack tightly into the
so will damage the fryer and void
frypot. Lift the elements on an electric fryer
the warranty.
to pack the lower frypot. Press the
elements into the shortening until they assume their normal position (a safety
switch prevents element operation if the elements are not in the "down" position).
Continue to pack shortening around the elements until reaching the lower etched
line in the frypot. Pack the shortening tightly around and under the tubes of a gas
fryer.
Setting the Computer for French Fry or Chicken Operation
To set the computer for Chicken, follow these steps:
1. With the display showing OFF, press the D programming key. See Figure 1
above.
2. With the numbered keys, enter 1113. Chicken Fryer will be displayed for
about 10 seconds and the fryer will return to OFF.
3. Press the ON button. The fryer will begin to heat to setpoint.
4. Press the #1 key and the LEDs in all programmed product keys will light.
5. When the fryer reaches setpoint the computer will display dashed lines. Press a
product button to launch a cook cycle.
6. Flip the menu strip on the computer to the appropriate menu. (See fryer manual.)
4/09
1
*8196465*
Prepared for
CM4-S COMPUTER OPERATION
(PROGRAMMED FOR POPEYE’S)
To set the computer for french fries follow these steps:
1. With the display showing OFF. Press the D programming key. See Figure1.
2. With the numbered keys, enter 1114. French Fryer will be displayed for
about 10 seconds and the fryer will return to OFF
3. Press the ON button. The fryer will begin to heat to setpoint.
4. Press a product key and the LEDs in all programmed product keys will light.
5. When the fryer reaches setpoint, the computer will display dashed lines. Press a
product button to launch a cook cycle.
6. Flip the menu strip on the computer to the appropriate menu. (See fryer manual.)
Operating the Fryer after Setting for Cooking Operation
Here are the default menus for the chicken and French fry settings:
Chicken Menu
Key
Product
Time
Temp
1
Chicken
12:00
340°
2
Chicken
12:00
340°
3
Chicken
12:00
340°
4
Strips
3:00
340°
5
Filets
5:00
340°
6
Pies
7:00
340°
French Fry Menu
Key
Product
Time
Temp
1
French Fries
3:00
340°
2
French Fries
3:15
340°
3
Popcorn Shrimp
3:00
340°
4
Catfish
4:30
340°
5
Nuggets
4:00
340°
6
Onion Rings
3:00
340°
7
Butter Fly Shrimp
3:00
340°
8
Crawfish
2:00
340°
2
Prepared for
CM4-S COMPUTER OPERATION
(PROGRAMMED FOR POPEYE’S)
Daily operation with the fryer set to either Chicken or French Fry Mode
1. Turn the fryer on by pressing the
button on the comptuer.
2. The display will show LOW as the fryer enters a melt cycle, slowly heating the
shortening.
3. When the fryer reaches setpoint, dashed lines appear on the computer display.
4. Press a product key for the desired product.
5. The cook cycle begins. Self-canceling alarms sound, indicating the product
should be shaken, at preset points in the cook cycle.
6. DONE is displayed on the computer at the end of the cook cycle.
7. Press the product button to end display.
Filtration
The filter pan must be clean before beginning filtration. Follow these steps to
prepare the filter pan for filtration:
1. Open fryer cabinet doors and remove the pan from the fryer cabinet.
2. Remove crumb tray, hold-down
ring, filter paper and inner screen.
DANGER
3. Clean inner screen and pan
Never drain more than one fry vat at a
time. The filter pan will overflow.
interior.
When unclogging a valve, do not
4. Clean the crumb tray and place
insert anything into the drain from the
debris in a fireproof container.
front. Hot oil will rush out, creating an
5. Return components to the filter pan
extreme hazard.
in this order: inner screen, filter
paper, hold-down ring and crumb tray.
6. Add filter powder.
7. Replace filter pan lids and return filter pan to fryer cabinet.
8. Ensure the connection to the fryer’s oil-return line is properly connected.
9. Close fryer cabinet doors.
Computer Prompts for Filtration
The computer display will flash FILTER at the completion of a cook cycle,
indicating the fryer has completed a preset number of cook cycles and must be
filtered. Follow these steps to filter the fryer. The fryer must be at operating
temperature to filter.
1. Computer flashes FILTER.
2. Leave the computer ON.
3. Ensure the filter pan is prepared for filtering (see above). Ensure the
connections are properly connected.
4. Use the fine-mesh skimmer to remove large particles and debris from shortening
prior to draining frypot.
5. Open the drain valve with the red-handled lever in the fryer cabinet. As the
shortening drains, use a metal scraper to gently remove debris from walls above
shortening level in frypot.
6. OPEN DRAIN is displayed on the computer. Shortening flows from the frypot
to the filter pan.
3
Prepared for
CM4-S COMPUTER OPERATION
(PROGRAMMED FOR POPEYE’S)
7. While the frypot is draining, connect the rinse hose to the connection inside
the filter cabinet. After all shortening has drained, remove the frypot wire rack.
Use a dry scrub pad to clean the walls of the vat.
8. Position the hose nozzle inside the frypot. Press the wand/disposal rocker
switch on the fryer topcap to ON and activate the blue Wand/Dispose handle
to the open position to start the 3-minute rinse process. Do not remove the
hose nozzle from frypot during the rinse process.
9. Hold the hose nozzle at a 45-degree angle toward the back of the frypot. This
washes debris toward the drain valve and helps prevent the drain valve from
becoming clogged. Rinse the frypot for approximately 2-½ minutes (allow 30
seconds to disconnect and drain the hose wand). Press the wand/disposal
rocker switch to OFF and switch the Wand/Dispose handle to the closed
position; disconnect and drain the rinse hose into the filter pan.
10. At 3 minutes after opening the drain valve, the computer display will alternate
between OPEN DRAIN and a countdown of the filtering time. Replace the
frypot wire rack before continuing.
11. Turn the filter pump on with the yellow-handled lever that coincides with the
frypot being filtered. Leave the drain valve open. Allow the shortening to
circulate through the frypot for the remainder of the 10-minute cycle. This
process is known as "polishing".
12. At the completion of the filter cycle, the computer display will change to FILL.
13. Close the drain valve with the red-handled drain valve lever. The frypot will
fill.
14. As the filter pan is emptied, bubbles will form in the frypot. An audible alarm
sounds when the frypot is full.
15. Turn off the filter pump with the yellow-handled filter pump handle. Add new
shortening to bring level to the upper OIL LEVEL line. Remember, the
shortening is at operating temperature.
16. Press the
button. The fryer will return to operating temperature. Continue
to filter other frypots as needed.
Delaying Filtration
The filtration can be delayed, if necessary, by following these steps.
1. At the completion of a cook cycle, the computer display flashes FILTER.
2.
3.
4.
5.
Press the
button to turn computer OFF.
Press the Dprogramming button. See Figure 1.
CODE is displayed on the left side of the computer.
Enter 1111 with the numbered keys. The display changes to a steady display
of FILTER.
6. Cook cycles can be launched, however, FILTER will be displayed until a filter
operation is completed.
4
Prepared for
CM4-S COMPUTER OPERATION
(PROGRAMMED FOR POPEYE’S)
Boil Out
Boil out is necessary before using a fryer for the first time and at prescribed times as
part of preventive maintenance. Follow these steps to boil out a frypot:
1. Ensure the shortening is at
operating temperature.
DANGER
2. Press the
button to turn
Never leave the fryer unattended during boil
computer OFF.
out. If the boil-out solution boils over, turn
3. Open the drain with the redthe computer off immediately and let the
handled drain-valve lever. The
solution cool before resuming the process.
shortening will flow into the filter
pan.
4. Close the drain valve when all
WARNING
shortening is drained.
Do not drain boil-out solution into the built-in
5. If a shortening disposal system
filtration system. It can damage the filter
is present, ensure it is
pump.
connected to the fryer and
working properly. Use the
cabinet-mounted rocker switch and the blue handle in the filter cabinet to
DISPOSE of spent shortening in the filter pan. Ensure all shortening is pumped
from filter pan and lines before turning off the pump. Remove and thoroughly
clean filter pan and components. Do not replace filter pan until boil-out procedure
is completed.
6. Fill the frypot to the top OIL LEVEL line with clean water.
7. Pour in boil-out cleaning detergent.
8. Press the programming key on the computer (See Figure 1).
9. CODE appears on the left display of the computer.
10. Enter 1115.
11. Boil Out appears in the left display. Press Check to Start appears
in the right display.
button.
12. Press the
13. Boil Out appears in the left display; a time display, which starts at 30:00,
appears in the right and counts down the boil out.
14. The water/detergent solution heats to 195°F.
15. The computer displays DONE and beeps at the end of the boil out.
button to turn
16. Press the
DANGER
computer OFF.
Remove
all
drops
of
water from the frypot
17. Drain the boil-out solution into a
before
filling
with
oil.
Failure to do so may
metal stockpot capable of holding
cause spattering of hot liquid when the oil is
the complete contents of the frypot
heated to cooking temperature.
and discard.
18. Rinse frypot with clean water, drain into stockpot and dry the frypot.
19. Fill with fresh shortening to the lower OIL LEVEL line on the back of the frypot.
20. Replace the filter pan.
21. Press the
button to turn the computer ON. The oil will heat.
5
Prepared for
CM4-S COMPUTER OPERATION
(PROGRAMMED FOR POPEYE’S)
Follow these instructions if there is no oil disposal system:
1. Press the
button to turn computer OFF and allow the oil to cool to
approximately 100°F (38°C).
2. Remove and clean the filter pan.
3. Position a shortening disposal unit or a metal container suitable to handle hot
liquid under the drain valve.
4. Open the drain with the red-handled drain-valve lever. The shortening will flow
out. Do not overfill the container. Repeat draining process as necessary.
5. Close the drain valve when all shortening is drained.
6. Fill the frypot to the top OIL LEVEL line with clean water.
7. Pour in boil-out cleaning detergent.
8. Press the programming key on the computer (See Figure 1).
9. CODE appears on the left display of the computer.
10. Enter 1115.
11. Boil Out appears in the left display. Press Check to Start
appears in the right display.
12. Press the
button.
13. Boil Out appears in the left display; a time display, which starts at 30:00,
appears in the right and counts down the boil out.
14. The water/detergent solution heats to 195°F.
15. The computer displays DONE and beeps at the end of the boil out.
button to turn
16. Press the
DANGER
computer OFF.
Remove
all
drops
of
water from the frypot
17. Drain the boil-out solution into a
before
filling
with
oil.
Failure to do so may
metal stockpot capable of holding
cause spattering of hot liquid when the oil is
the complete contents of the frypot
heated to cooking temperature.
and discard.
18. Rinse frypot with clean water, drain into stockpot and dry the frypot.
19. Fill with fresh shortening to the lower OIL LEVEL line on the back of the frypot.
20. Replace the filter pan.
21. Press the
button to turn the computer ON. The oil will heat.
6