1
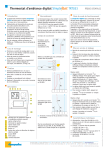
Model RT2
Installation Instructions
SINGLE STAGE HEAT/COOL THERMOSTAT
Please read these instructions completely before attempting installation.
WARNING
Increase
Temperature
Before installing thermostat, turn off all power
to unit. There may be more than one power
disconnect. Electrical shock can cause personal injury or death.
Improper wiring or installation may damage
thermostat. Wiring must conform to local and
national electrical codes.
3.30
Decrease
Temperature
0.8
Selects System Mode:
OFF. HEAT, or COOL
Turns Continuous Fan
On or OFF
4.55
INSTALLATION CONSIDERATIONS
II. INSTALL THERMOSTAT
The thermostat is a wall mounted, low-voltage thermostat,
which maintains room temperature by controlling the operation of a heating and air conditioning system. Batteries are
not required; temperature and mode settings are preserved
with the power off.
1. Turn off all power to unit.
I. THERMOSTAT LOCATION
Thermostat should be mounted:
- Approximately 5 ft. (1.5m) from floor.
- Close to or in a frequently used room, preferably on an
inside partitioning wall.
- On a section of wall without pipes or duct work.
Thermostat should NOT be mounted:
- Close to a window, on an outside wall, or next to a door
leading to the outside.
- Exposed to direct light and heat from a lamp, sun,
fireplace, or other temperature-radiating object which
may cause a false reading.
- Close to or in direct airflow from supply registers and
return-air grilles.
- In areas with poor air circulation, (behind a door or in
an alcove.)
920-162-01 (5-05)
2. If an existing thermostat is being replaced:
A. Remove existing thermostat from wall.
B. Disconnect wires from existing thermostat, one at
a time. Be careful not to allow wires to fall back into
the wall.
C. As each wire is disconnected, record wire color and
terminal marking.
D. Discard or recycle old thermostat.
NOTE: Mercury is a hazardous waste and MUST be
disposed of properly.
3. Separate the thermostat and back plate.
4. Route thermostat wires through hole in back plate. Level
back plate against wall (for aesthetic value only - thermostat need not be leveled for proper operation) and mark
wall through 2 mounting holes.
5. Drill two 3/16-in. mounting holes in wall where marked.
(Note: Mounting holes on back plate are designed to fit on a
horizontal J-box).
III CHECK THERMOSTAT OPERATION
1. Fan Operation
A. Press fan button, starting fan operation. Fan icon turns
on.
B. Press Fan button, stopping fan operation. Fan icon turns
off.
1.587
2.375
2. Heating Operation
A. Press and Release MODE button until HEAT is displayed.
B. Press up button until LCD readout reads 10 degrees
above room temperature. Heating system should begin
to operate within 5 minutes.
3. Cooling Operation
A. Press and Release MODE button until COOL is displayed
B. Press down button until LCD readout reads 10 degrees
below room temperature. Cooling system should begin
to operate within 5 minutes.
2.625
3.275
IV. THERMOSTAT OPERATION
6. Secure back plate to wall with 2 anchors and screws provided making sure all wires extend through hole in back plate.
7. Connect wires to proper terminal of the connector block
8. Push any excess wire back into wall. Excess wire inside
the thermostat plastic case can interfere with proper air flow
across the temperature sensor. Seal hole in wall to prevent
air leaks. Leaks can affect operation.
9. Install thermostat on back plate.
10. Turn on power to the unit.
On initial power up, the LCD readout will display oP.
WIRING DIAGRAMS
NOTE: All excess wire should be pushed back into the wall as far
as possible. Excess wire inside the thermostat plastic case may
interfere with the air flow across the temperature sensor.
SINGLE STAGE HEAT/COOL WIRING
Thermostat
HEAT
W
W
COOL
Y
Y
FAN
G
G
24 VAC HOT
R
R
24 VAC COMM
C
C
Reversing Valve
2
Unit Terminal Strip
B
B
1. TEMPERATURE DISPLAY
The thermostat will display room temperature until the UP or DOWN
button is pressed. The word SET appears when these buttons
are pressed and the current set point is displayed. If no buttons
are pressed for 5 seconds, the display will change back to show
room temperature.
2. TIMEGUARD TIMER
A 5-minute timeguard is built into the thermostat immediately upon
power up, and any time the compressor turns off. The compressor will not turn on until the timeguard has expired. Pressing UP
and FAN buttons simultaneously will override the timeguard for
1 cycle.
3. CYCLE TIMER
In normal heating and cooling operation the thermostat will not
allow more than 4 equipment cycles per hour (or 1 cycle every
15 minutes). Both the Y and W outputs have a 15-minute timer
that starts counting down when the output is turned on, (e.g., if Y
output is turned on for 9 minutes and then satisfies, it cannot turn
back on for another 6 minutes regardless of demand). However,
pressing UP and FAN buttons simultaneously or changing the set
point will override the timer for 1 cycle.
4. MINIMUM ON TIMER
Once the equipment has turned on, it will remain on for a minimum
of 3 minutes regardless of demand. However, the equipment can
turn off in less than 3 minutes if a change in set point, or a change
in mode occurs.
Connection to “B”
terminal required on
Heat Pump models
5. ERROR MESSAGES
E4 will be displayed if the thermostat has an internal memory failure.
If E4 appears, replace the thermostat.
- - (two dashes) will be displayed if the temperature cannot
properly read the room temperature. If - - appears, replace the
thermostat.
V. THERMOSTAT CONFIGURATION
4. Use up and down buttons to change between F and C.
This thermostat has been carefully configured at the factory to provide
optimum operation for most installations. The settings programmed
into it at the factory should NOT be changed unless determined to
be absolutely necessary by a qualified HVAC contractor.
VI. CHANGING THERMOSTAT CONFIGURATION
5. Press MODE button to return to d. Up and down buttons
now move between option choices; or press FAN button
to exit configuration mode.
oF. ROOM TEMPERATURE OFFSET ADJUST Selection
The selected number is the number of degrees, plus or
minus, which will be added to the actual temperature. The
numbers can range between -5 and +5. Factory default is
0. This adjusted value will be used as actual temperature for
both display and control action. The effect is that a positive
number selection will make the room temperature lower, and
vice versa. The thermostat is calibrated within an accuracy
of plus or minus 2 degrees when shipped from the factory; this
adjustment will provide the best accuracy when set to 0.
If it has been determined that re-configuration of the thermostat
is required, the following instructions will assist the professional
HVAC installer in accomplishing this task:
While in configuration mode, three option choices can be made:
A Anticipator Value Adjustment
d Display temperature Fahrenheit/Celsius Selection
oF Offset Adjustment for Room Temperature
Cr Cycle rate. Maximum number of cycles per hour
TO ENTER THE CONFIGURATION MODE:
Press and hold the FAN button for approximately 10 sec until
room temperature disappears and the display reads “A". You
are now in the configuration mode.
TO SELECT:
1. Enter configuration mode (if not already there).
2. Use UP and DOWN buttons to display oF.
3. Press MODE button once to display offset value.
NOTE: If the FAN button is pressed again or if no button is
pressed for 2 minutes, the thermostat will exit the configuration mode and return to normal operation. To re-enter the
configuration mode, the FAN button must be pressed and
held for 10 sec. again.
WHILE IN CONFIGURATION MODE, THE FOLLOWING
OPTIONS ARE AVAILABLE:
A.
ANTICIPATOR - Value Adjustment
This adjustment controls the sensitivity and cycle rate of the
thermostat. Higher numbers decrease the sensitivity and slow
the cycle rate. Lower numbers increase the sensitivity and
increase cycle rate. However, a limiting feature will not allow
more than 4 equipment cycles per hour, regardless of setting.
Values can range from 1 to 3. Factory default setting is 2. This
default selection will provide optimum performance in nearly
all installations. Try it first. Do not change setting unless there
is evidence of need to do so. Unlike conventional anticipators,
this setting is not determined by current draw. There is no need
to measure, know, or compensate for current.
TO ADJUST:
1. Enter configuration mode (if not already there).
2. Use up and down buttons to display A
3. Press MODE button once to display current value.
4. Use up and down buttons to move between values.
5. Press MODE button to return to A. Up and down buttons now move between option choices A, d-, etc. or
press FAN button to exit configuration mode.
d. FAHRENHEIT/CELSIUS Selection
This selection operates the thermostat in either Fahrenheit or
Celsius.
TO SELECT:
1. Enter configuration mode (if not already there).
2. Use up and down buttons to display d
3. Press MODE button once to display current selection of
F or C.
4. Use UP and DOWN buttons to select a value between
-5 and 5.
5. Press MODE button to return to oF. UP and DOWN
buttons now move between option choices; or press
FAN button to exit configuration Mode.
Cr.
CYCLE RATE Selection
This selection selects the cycle rate maximum in cycles per
hour.
TO SELECT:
1. Enter configuration mode (if not already there).
2. Use up and down buttons to display Cr
3. Press MODE button once to display current selection 3
to 6.
4. Use up and down buttons to change.
5. Press MODE button to return to Cr. Up and down buttons now move between option choices or press FAN
button to exit configuration mode.
oP. OPERATING MODE – H/C or HP operation
The selected mode (H/C or HP) will operate the thermostat
as a Heat Cool or as a Heat Pump thermostat.
TO SELECT:
1. Enter configuration mode (if not already there).
2. Use UP and DOWN buttons to display oP.
3. Press MODE button once to display operating mode.
4. Press UP and DOWN buttons to change between HC
and HP.
5. Press MODE button to return to oP. UP and DOWN buttons now move between option choices; or press FAN
button to exit configuration Mode.
NOTE: After changing any thermostat configuration
settings, ALWAYS re-check the thermostat in ALL
modes to verify proper operation.
3
FRIEDRICH AIR CONDITIONING CO. INC.
Post Office Box 1540 · San Antonio, Texas 78295-1540
4200 N. Pan Am Expressway · San Antonio, Texas 78218-5212
(210) 357-4400 · FAX (210) 357-4480
www.friedrich.com
Printed in the U.S.A.
920-162-01 (5-05)