1
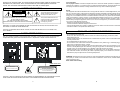
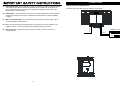
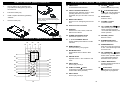
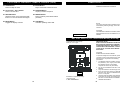
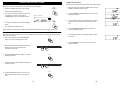
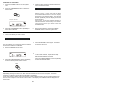
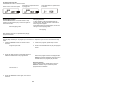
INSTRUCTION MANUAL
SLIM3010
Thank-you for choosing Fisher. This executive audio system includes a built-in CD player, AM/
FM stereo tuner, alarm clock, timer, motorized CD door, removable speakers and remote
control. The unit can be wall mounted in order to save desk or counter space.
FCC information
For CD player section: This device complies with Part 15 of the FCC Rules. Operation is subject to the
following two conditions: (1) This device may not cause harmful interference, and (2) this device must
accept any interference received, including interference that may cause undesired operation.
SAFETY INFORMATION
CAUTION
This symbol indicates that dangerous
voltage constituting a risk of electric
shock is present within this unit.
RISK OF ELECTRIC SHOCK
DO NOT OPEN
CAUTION: TO REDUCE THE RISK OF ELECTRIC SHOCK,
DO NOT REMOVE COVER.
NO USER-SERVICEABLE PARTS INSIDE.
REFER SERVICING TO QUALIFIED SERVICE PERSONNEL
This symbol indicates that there are
important operating and maintenance
instructions in the literature
accompanying this unit.
WARNING: TO AVOID THE HAZARDS OF FIRE OR ELECTRICAL SHOCK, DO NOT EXPOSE THIS
APPLIANCE TO RAIN OR OTHER MOISTURE.
CAUTION: TO PREVENT ELECTRICAL SHOCK, MATCH WIDE BLADE OF PLUG TO WIDE SLOT,
FULLY INSERT.
SAFETY CERTIFICATION
This unit is made and tested to meet exacting safety standards. It meets CSA and FCC requirements and
complies with safety performance standards of the U.S. Department of Health and Human Services.
INVISIBLE LASER RADIATION
DO NOT STARE INTO BEAM OR VIEW
DIRECTLY WITH OPTICAL INSTRUMENTS
CLASS 3A LASER PRODUCT
+
+
NOTE:
This equipment has been tested and found to comply with the limits for a Class B digital device, pursuant to
Part 15 of the FCC Rules. These limits are designed to provide reasonable protection against harmful
interference in a residential installation. This equipment generates, uses and can radiate radio frequency
energy and, if not installed and used in accordance with the instructions, may cause harmful interference to
radio communications. However, there is no guarantee that interference will not occur in a particular
installation. If this equipment does cause harmful interference to radio or television reception, which can be
determined by turning the equipment off and on, the user is encouraged to try to correct the interference by
one or more of the following measures:
- Reorient or relocate the receiving antenna.
- Increase the distance between equipment and receiver.
- Connect the equipment to an outlet on a different circuit from that to which the receiver is connected.
- Consult the dealer or an experienced radio/TV tech.
FOR SAFE AND EFFICIENT OPERATION
- Do not damage the power cord.
- When not in use, disconnect the power cord from the outlet. Grasp the plug, not the cord, when
disconnecting the unit.
- If water should enter the unit, electrical shock or malfunction may result. Use in an area where there is low
humidity and little dust.
- Do not disassemble or alter the unit in any way.
- Do not use the unit in areas where extremes in temperature occur (below 40 F or exceeding 95 F), or
where it may be exposed to direct sunlight.
- Because of the CD player’s extremely low noise and wide dynamic range, there is a tendency to turn the
volume on the amplifier higher than necessary. Doing so may produce an excessively high output from the
amplifier, which can cause damage to your speakers. Please be careful in this regard.
- Sudden changes in the surrounding temperature can cause dew to form on the optical pickup lens inside
unit. Under this condition, the unit may be unable to operate properly. If this should occur, remove the disc
and allow the player to adjust to the surrounding temperature.
WARNING: Handling the cord on this product or cords associated with accessories sold with this product
will expose you to lead, a chemical known to the State or California to cause cancer, and birth defects or
other reproductive harm.
Wash hands after handling.
LASER APERTURE
CLASS 1 LASER PRODUCT
INVISIBLE LASER RADIATION
DO NOT STARE INTO BEAM OR VIEW
DIRECTLY WITH OPTICAL INSTRUMENTS
CLASS 3A LASER PRODUCT
PRODUIT DE LASER DE CLASSE 1.
CAUTION - USE OF CONTROLS OR ADJUSTMENTS OR PERFORMANCE OF PROCEDURES OTHER
THAN THOSE SPECIFIED HEREIN MAY RESULT IN HAZARDOUS RADIATION EXPOSURE.
1
2
1.
Read Instructions - All the safety and operating instructions should be read before the
product is operated.
2.
Retain Instructions - The safety and operating instructions should be retained for future
reference.
3.
Heed Warnings - All warnings on the product and in the operating instructions should be
adhered to.
4.
Follow Instructions - All operating and use instructions should be followed.
5.
Cleaning - Unplug this product from the wall outlet before cleaning. Do not use liquid
cleaners or aerosol cleaners. Use a damp cloth for cleaning.
6.
Attachments - Do not use attachments not recommended by the product manufacturer as
they may cause hazards.
7.
8.
9.
Water and Moisture - Do not use this product near water - for example, near a bath tub,
wash bowl, kitchen sink, or laundry tub; in a wet basement, or near swimming pool, and the
like.
Accessories - Do not place this product on an unstable cart, stand tripod, bracket, or
table. The product may fall, causing serious injury to a child or adult, and serious damage
to the product. Use only with a cart, stand, tripod, bracket, or table recommended by the
manufacturer, or sold with the product. Any mounting of the product should follow the
manufacturer’s instructions and should use a mounting accessory recommended by the
manufacturer.
A product and cart combination should be moved with care. Quick stops, excessive force,
and uneven surfaces may cause the product and cart combination to overturn.
PORTABLE CART WARNING
(symbol provided by RETAC)
S3125A
12. Grounding or Polarization - This product may be equipped with a polarized alternating
current line plug (a plug having one blade wider than the other). This plug will fit into the
power outlet only one way. This is a safety feature. If you are unable to insert the plug fully
into the outlet, try reversing the plug. If the plug should still fail to fit, contact your electrician
to replace your obsolete outlet. Do not defeat the safety purpose of the polarized plug.
13. Power-Cord Protection - Power supply cords should be routed so that they are not likely
to be walked on or pinched by items placed on or against them, paying particular attention
to cords at plugs, convenience receptacles, and the point where they exit from the product.
14. Lightning - For added protection for this product during a lightning storm, or when it is left
unattended and unused for long periods of time, unplug it from the wall outlet. This will
prevent damage to the product due to lightning and power-line surges.
15. Overloading - Do not overload wall outlet, extension cords, or integral convenience
receptacles as this can result in a risk of fire or electric shock.
16. Object and Liquid Entry - Never push objects of any kind into this product through
openings as they may touch dangerous voltage points or short-out parts that could result in
a fire or electric shock. Never spill liquid of any kind on the product.
17. Servicing - Do not attempt to service this product yourself as opening or removing covers
may expose you to dangerous voltage or other hazards. Refer all servicing to qualified
service personnel.
18. Damage requiring Service - Unplug this product from the wall outlet and refer servicing to
qualified service personnel under the following conditions:
a)
When the power-supply cord or plug is damaged,
b)
If liquid has been spilled, or objects have fallen into the product,
c)
If the product has been exposed to rain or water,
d)
If the product does not operate normally by following the operating instructions,
adjust only those controls that are covered by the operating instructions as an
adjustment of other controls may result in damage and will often require extensive
work by a qualified technician to restore the product to its normal operation.
e)
If the product has been dropped or damaged in any way, and
f)
When the product exhibits a distinct change in performance.
10. Ventilation - Slots and openings in the cabinet are provided for ventilation and to ensure
reliable operation of the product and to protect it from overheating, and these openings
must not be blocked or covered. The openings should never be blocked by placing the
product on a bed, sofa, rug, or other similar surface. This product should not be placed in a
built-in installation such as a bookcase or rack unless proper ventilation is provided
according to manufacturer’s instructions.
11. Power Sources - This product should be operated only from the type of power source
indicated on the marking label. If you are not sure of the type of power supply to your
home, consult your product dealer or local power company. For products intended to
operate from battery power, or other sources, refer to the operating instructions.
3
4
CONNECTIONS
19. Replacement Parts - When replacement parts are required, be sure the service technician
uses replacement parts that have been specified by the manufacturer or that have the
same characteristics as the original part. Unauthorized substitutions may result in fire,
electric shock, or other hazards.
LINE (AUX) IN/OUT CONNECTIONS
Press the LINE (AUX) button (34) to select IN or OUT mode.
20. Safety Check - Upon completion of any service or repairs to this product, ask the service
technician to perform safety checks to determine that the product is in proper operating
condition.
5
LINE (R)
23. Nonuse Periods - Unplug the product’s power cord when you will not use it for an
extended period.
AUDIO IN
22. Heat - The product should be situated away from heat sources such as radiators, heat
registers , stoves, or other products (including amplifiers) that produce heat.
LINE (L)
21. Wall or Ceiling Mounting - The product should be mounted to a wall or ceiling only as
recommended by the manufacturer.
AUDIO OUT
Amplifier (for LINE IN)
LOCATION OF CONTROLS - UNIT
8
4
5
6
9
7
10
11
12
13
3
14
16
2
1
18
23
21
22
24
25
27
34
7
33
32
31
30
26
INSTALLATION (Unit)
INSTALLATION (Speakers)
REMOTE CONTROL (Battery Installation)
1.
Remove battery tray by pressing point
(1a) inside then sliding point (1b) area at
the same time.
2.
Pull out the battery tray.
3
Install or replace the button type battery
“CR2032”.
4
LOCATION OF CONTROLS - REMOTE CONTROL (Cont.)
Note: Pull out insulation tag from the
button battery tray before operating the
remote control.
Close the battery tray.
55. TIMER Button
Activates/deactivates the timer
68. FOLDER
Button
Selects MP3 album (reverse)
56. CD Door OPEN/CLOSE Button
Opens the door while the unit is on. Other
operating elements now become
accessible, and you can insert or remove
CDs.
69.
PLAY/PAUSE Button
To play CD, start CD playback / short
interruption of CD playback
70. MUTE Button
Mutes the sound
57. MOOD LIGHT Button
Press to turn on soft lighting from the CD
door.
71. VOLUME (+) Button
Increases volume
3
58. Remote Control Transmitter
1b
1a
2
LOCATION OF CONTROLS - REMOTE CONTROL
56
55
60
58
57
59
4
59. EQ Button
Selects FLAT, POP, ROCK, JAZZ and
DISCO sound effects
Button
72. CD / TUNER SKIP
-Manual tuning up to stations, station
search operation (Forward)
-CD forward title selection, forward
search operation
60. POWER ON/STANDBY Button
Switches the system on or off
73. VOLUME (-) Button
Reduces volume
61. 1 - 9, 0/+10 NUMERIC Buttons
Recalls TUNER preset stations / recalls
CD tracks
74. DYNAMICBASS Button
Press for a rich bass sound
62. MEM/PGM Button
For tuner memory / CD program
75. SURROUND Button
Press to turn the surround sound ON
or OFF. The indicator lights while
surround is ON.
61
63. MP3 MODE Button
Selects title & artist or album in MP3
mode
86
85
84
62
83
63
82
65
81
80
67
78
69
79
64
66
68
77
70
71
76
Button
76. CD / TUNER SKIP
-Manual tuning down to stations,
station search operation (Backward)
-CD backward title selection,
backward search operation
64. REPEAT Button
Repeats 1 track / 1 disc / all discs in CD
mode
77. TUNER / BAND Button
Activates TUNER mode and selects
the reception band
65. DISC-2 Button
Press to play CD tray-2
78.
Button
66. ST/MO / FOLDER
-Stereo/Mono switching for FM stations
-Selects MP3 album (Forward)
72
73
75
74
13
67. DISC-3 Button
Press to play CD tray-3
14
STOP Button
Interrupting the CD playback /
clearing the CD programme
LOCATION OF CONTROLS - REMOTE CONTROL (Cont.)
79. SLEEP Button
Press for sleep to music
83. INTRO Button
Plays 10 seconds of each CD track
80. CD selection - Disc 1 Button
Press to access disc 1
84. RANDOM Button
CD play in random sequence
81. SNOOZE Button
Switches off the unit for 9 minutes while
timer is on. The unit will then start again.
85. PRESET Button
Press to retrieve preset radio stations
(Forward)
82. MODE Button
Toggles the display contents
86. LINE Button
Activates operating mode LINE
POWER SUPPLY
Take the cord out and connect it.
NOTE:
This unit is equipped with a polarized plug. If you
have difficulty inserting the plug, turn it over and
reinsert it.
AC power operation
CAUTION:
TO PREVENT ELECTRICAL SHOCK, MATCH
WIDE BLADE OF PLUG TO WIDE SLOT, FULLY
INSERT.
BATTERY SUPPLY (For Tuner/Clock Memory Back-up)
Install batteries (not supplied).
Observe + and - signs.
IMPORTANT NOTE:
SPENT OR DISCHARGED BATTERIES MUST BE
RECYCLED OR DISPOSED OF PROPERLY IN
COMPLIANCE WITH ALL APPLICABLE LAWS.
FOR DETAILED INFORMATION, CONTACT
YOUR LOCAL COUNTRY SOLID WASTE
AUTHORITY.
CAUTION:
WHEN INSTALLING BATTERIES
To prevent leakage from the batteries, (leakage is
corrosive and can cause personal injury and
damage to the unit) observe the following
precautions:
-
+
+
-
Remember to replace the battery
compartment lid
3 “AA” size batteries
15
1. The batteries must be installed correctly. Match
the polarities (+ and - signs) on the batteries, to
the polarities shown on the battery
compartment of the unit (see above).
2. Do not mix new batteries with old or used
batteries.
3. Only use batteries of the same type and brand.
4. If the unit will not be used for an extended
period of time, remove the batteries and store
them in a cool place.
5. Carefully follow the battery manufacturer’s
instructions for proper use and disposal.
6. DO NOT ALLOW YOUNG CHILDREN TO
HANDLE BATTERIES.
16
OPERATING INSTRUCTIONS
TIMER ON/OFF SETTING
POWER ON/OFF
When the AC power is connected, the clock shows on the LCD display.
NOTE: The clock should be set before the Timer On/Off setting.
1. Press the POWER button to turn the unit 'ON'.
POWER/STANDBY
1. With unit at off mode, press the TIMER button once, the
TIMER ON indicator begins to flash.
Note: The LCD display lights up.
2. Press the MEMORY/PROGRAM button once, the hour
digits begin to flash.
2. You can now select your desired music source
by pressing one of the function buttons:
TUNER/BAND or CD PLAY/PAUSE or AUX.
Example : FM mode
POWER/STANDBY
3. To switch to POWER OFF, press the POWER
button.
3. Press the SKIP forward or backward buttons to adjust
the hour. Be sure to set the hour correctly for AM or
PM.
The LCD display backlit goes off.
NOTE: Please turn off the unit to standby mode before disconnecting main power supply from the unit.
4. Press the MEMORY/PROGRAM button again, the
minute digits begin to flash.
SETTING THE TIME
When the unit is first connected to AC power, the display shows "AM 12:00". To set the clock to the current
time proceed as follows:
5. Press the SKIP forward or backward buttons to adjust
the minute.
MEMORY
1. With unit at off mode, press the MEM/PROG
button once, the hour digits begin to flash.
6. Press the MEMORY button once more, the timer on
setting is finished.
2. Press the SKIP Forward or Backward buttons to
adjust the hour. Be sure to set the hour
correctly for AM or PM.
3. Press the MEM/PROG button again, the minute
digits begin to flash.
MEMORY
4. Press the SKIP Forward or Backward buttons to
adjust the minute.
MEMORY
5. Press the MEM/PROG button once more, the
display stops flashing and the clock begins to
run.
17
18
10. Press the MEMORY button again, the minute digits
begin to flash.
11. Press the SKIP forward or backward buttons to adjust
the minute.
12. Press the MEMORY button once more, the timer off
setting is finished.
Note: Timer “OFF” indicator will stop flashing after
about 3 seconds and then goes off.
13. To cancel the timer on setting, press the TIMER button
until “TIMER” display goes off.
SLEEP SETTING
Pressing the SLEEP button permits settings from 00
minutes to 120 minutes. When the desired time appears,
releasing your finger will set the time.
(Pressing "SLEEP" after the 120-minute position will cancel
the sleep timer)
Change of SLEEP
LISTENING TO THE RADIO
1. Press the POWER button to turn the system
'ON'.
4. Press the SKIP forward or backward buttons to
tune to the desired station.
2. Press the TUNER/BAND button to select the
radio function.
Manual Tuning - Press and hold the SKIP
forward/backward buttons until the display
approaches your desired station. Then tap the
buttons repeatedly until the display shows the
exact frequency.
Auto tuning - Press the TUNING forward or
backward buttons momentarily and release.
The tuner will move up or down to the next
available station.
BAND
Example : FM mode
3. Press the TUNER/BAND button repeatedly to
select AM or FM band.
5. When finished listening, press the POWER/
STANDBY button to shut the system OFF.
STORING PRESET STATIONS
1. Tune to the station you wish to store.
The unit enables you to randomly preset 16 stations
for FM and 16 stations for AM band.
4. Press the MEMORY button again. The station
is stored in channel 2.
2. Press the MEMORY button once.
5. To store other stations, repeat above steps.
RECALLING PRESET STATION
Press the PRESET/REPEAT button repeatedly
to select the desired station.
3. Press the PRESET/REPEAT button repeatedly
to set the desired preset station number.
PRESET/
REPEAT
FM
STEREO / MONO Function
Repeatedly pressing the button “ST / MO” switches between stereo and mono reception. The stereo
reception of a station in the FM band is indicated on the display.
In the case of stereo stations with a bad reception (noise infested reception) we recommend switching the
tuner to mono reception. Press the “ST / MO” button. In the display, the STEREO indicator disappears in
mono mode.
21
To repeat a track or disc
Press REPEAT button on remote control:
Press twice to repeat all tracks
Press once for one track repeat
in playing disc
Random play function
Press RANDOM button on remote control in stop
condition to start random play. Press once again to
cancel the function.
Random playing start
Press three times to repeat tracks
in all discs
Intro play function
In stop condition, press the INTRO button on
remote control. After that the first 10 seconds of
each song will be played.
If the INTRO button is pressed again, the CD will
change to normal playing mode.
Intro playing
Note: Random play can not operate while playing
programmed tracks.
PROGRAMMED PLAYBACK
The CD player enables you to program up to 40 tracks in a sequence of your choice. First select CD stop
mode.
1. Press the MEMORY button on remote control
one time.
Program input mode
4. Continue to program, repeat steps 2 and 3.
5. Press PLAY/PAUSE button to play the program
tracks.
2. Press the SKIP forward or backward buttons to
select the desired track to be programmed.
Choose track 4
Note: If the program function has stopped with
MEMORY indicator displayed, press the PLAY/
PAUSE button, the program play will start.
Clear the program
In stop mode, press the STOP button once, the
MEMORY indicator will go off and the preset
programs will be cancelled.
3. Press the MEMORY button again, then track 4
is stored.
23
CARE AND MAINTENANCE
PROGRAMMED PLAYBACK
The MP3 player enables you to program up to 40 tracks in a sequence of your choice. First select CD stop
mode.
1.
2.
Press the MEMORY button on remote control
once.
4.
Continue to program, repeating steps 1 to
3.
5.
Press PLAY/PAUSE to play the
programed tracks.
Press the SKIP
or
buttons or
Numeric buttons on remote control to select
your desired track.
Note: If the program function has stopped
with MEMORY indicator displayed, press
the PLAY/PAUSE button, the program
play will start.
3.
Clear the program
In the stop mode, press the STOP button once,
the MEMORY indicator will go off and the
preset programs will be cancelled.
Press the MEMORY button again to store the
selected track. (for example, track 38 shown
below)
COMPACT DISC CARE
Treat the disc carefully. Handle the disc only by its edges. Never allow your fingers to come in
contact with the shiny, unprinted side of the disc.
Do not attach adhesive tape, stickers etc., to the disc label.
Clean the disc periodically with soft, lint-free, dry cloth. Never use detergents or adhesive cleaners
to clean the disc. If necessary, use a CD cleaning kit.
If disc skips or gets stuck on a section of the disc, it is probably dirty or damaged (scratched).
When cleaning the disc, wipe in straight lines from the centre of the disc to the edge of the disc.
Never wipe in a circular motion.
To remove a disc from its storage case, press down on the centre of the case and lift the disc out,
holding it carefully by the edges.
Fingerprints and dust should be carefully wiped off the disc's recorded surface with a soft cloth.
Unlike conventional records. compact discs have no grooves to collect dust and microscopic debris,
so gently wiping with a soft cloth should remove most particles.
CLEANING THE UNIT
To prevent fire or shock hazard, disconnect your unit from the AC power source when cleaning.
The finish on the unit may be cleaned with a dust cloth and cared for as other furniture. Use caution
when cleaning and wiping the plastic parts.
If the cabinets become dusty, wipe them with a soft dry dust cloth. Do not use any wax or polish
sprays on the cabinets.
If the front panel becomes dirty or smudged with fingerprints it may be cleaned with a soft cloth
slightly dampened with a mild soap and water solution. Never use abrasive cloths or polishes as
these will mar the finish of your unit.
Caution: never allow any water or other liquids to get inside the unit while cleaning.
25
26
TROUBLESHOOTING GUIDE
Should this unit exhibit a problem, check the following before seeking service.
Possible cause
Symptom
Radio
Noise or sound distorted on AM or Station not tuned properly for AM Retune the AM or FM broadcast
station.
or FM
FM broadcasts.
FM: Line antenna is not extended. Extend FM line antenna.
Rotate unit until best reception is
AM: Unit is not positioned correctly.
obtained.
FM MODE button is set to MONO Set FM MODE to FM STEREO
FM STEREO indicator does not
position.
position.
light
AM or FM, no sound.
TUNER Function button is not Press TUNER function button.
pressed.
Volume at minimum
Compact Disc Player
CD Player will not play.
CD skips while playing.
Disc is inserted but CD player
skips over spot and will not play,
FISHER STUDIO STANDARD
MODEL SLIM-3010 LIMITED WARRANTY
Solution
Increase Volume.
CD Function button is not pressed. Press the CD Function button.
CD is not installed or installed
incorrectly.
Disc is dirty or scratched.
Insert CD with label side out.
Disc inserted upside down.
Insert disc properly.
Wipe disc with cloth or use
another disc.
Disc is dirty.
Clean disc.
Disc is non-standard.
Use correct disc.
OBLIGATIONS
In order to ogtain factory warranty service, call the toll-free number below. The unit must be packed in the original carton or
a well padded sturdy carton in order to avoid shipping damage.
Note: Do not return this unit to the retail store for service.
To obtain factory warranty service product operation or for problem resolution, call
Customer Information 1-800-421-6382
Weekdays 8:00 AM -5:00 PM Pacific Time
THIS WARRANTY IS VALID ONLY ON FISHER PRODUCTS PURCHASED AND USED IN THE UNITED STATES OF
AMERICA.
THIS WARRANTY APPLIES ONLY TO THE ORIGINAL RETAIL USER, AND DOES NOT APPLY TO PRODUCTS USED
FOR ANY INDUSTRIAL, PROFESSIONAL OR COMMERCIAL PURPOSE. THE ORIGINAL DATED BILL OF SALE OR
SALES SLIP MUST BE SUBMITTED AT THE TIME WARRANTY SERVICE IS REQUESTED.
Subject to the OBLIGATIONS above and EXCLUSIONS below, SANYO FISHER COMPANY (SFC) warrants this FISHER
product against defects in materials and workmanship for the periods of LABOR and PARTS specified below. SFC will
repair or replace (at its option) the product and any of its parts which fail to conform to this warranty with new or
reconditioned products or parts.
This warranty period commences on the date the product was first purchased at retail.
LABOR
90 DAYS
SPECIFICATIONS
AC Power
AC 120V, 60Hz
Power Output
10 W CH 10% THD
Dimension of:
Main Section
Radio section
723(W) x 428(D) x
213(H)mm (Approx.)
PARTS
90 DAYS
EXCLUSIONS
CD Section
Vertical Front Loading CD
This warranty does not cover (A) the adjustment of customer-operated controls as explained in the appropriate model's
instruction manual, or (B) the repair of any product whose serial number has been altered, defaced or removed.
Speaker System
Woofer: 5 1/4", 4 ohms
Tweeter: 2", 4 ohms
This warranty shall not apply to the cabinet or cosmetic parts, antenna, knobs, batteries or routine maintenance.
Remote Control
Tuning : PLL with 32 Random
Preset Memory
41 Keys, Battery size “CR2032”
(Battery included)
This warranty does not apply to uncrating, setup, installation, removal of the product for repair or reinstallation of the
product after repair.
This warranty does not apply to repairs or replacements necessitated by any cause beyond the control of SFC including,
but not limited to, any malfunction, defect or failure caused by or resulting from unauthorized service or parts, improper
maintenance, operation contrary to furnished instructions, shipping or transit accidents, modification or repair by the user,
abuse, misuse, neglect, accident, incorrect power line voltage, fire, flood or other Acts of God, or normal wear and tear.
The foregoing is in lieu of all other expressed warranties and SFC does not assume or authorize any party to assume for it
any other obligation or liability.
Freq. Range : AM 530-1710KHz
FM : 87.5-108MHz
THE DURATION OF ANY WARRANTIES WHICH MAY BE IMPLIED BY LAW (INCLUDING THE WARRANTIES OF
MERCHANTABILITY AND FITNESS) IS LIMITED TO THE TERM OF THIS WARRANTY. IN NO EVENT SHALL SFC BE
LIABLE FOR SPECIAL, INCIDENTAL OR CONSEQUENTIAL DAMAGES ARISING FROM OWNERSHIP OR USE OF
THIS PRODUCT, OR FOR ANY DELAY IN THE PERFORMANCE OF ITS OBLIGATIONS UNDER THIS WARRANTY
DUE TO CAUSES BEYOND ITS CONTROL.
SOME STATES DO NOT ALLOW LIMITATIONS ON HOW LONG AN IMPLIED WARRANTY LASTS AND/OR DO NOT
ALLOW THE EXCLUSION OR LIMITATION OF CONSEQUENTIAL DAMAGES, SO THE ABOVE LIMITATIONS AND
EXCLUSIONS MAY NOT APPLY TO YOU. THIS WARRANTY GIVES YOU SPECIFIC LEGAL RIGHTS. YOU MAY HAVE
OTHER RIGHTS, WHICH VARY FROM STATE TO STATE.
For your protection in the event of theft or loss of this product, please fill in the information below for your own personal
records.
Model No.
Date of Purchase
Where Purchased
27
Serial No.
(Located on back or bottom side of unit)
Purchase Price
28