1
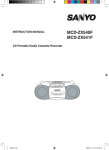
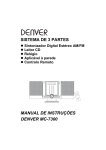
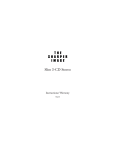
SANYO Canada Inc.
www.sanyo.ca
Thank-you for choosing SANYO. This audio system includes a built-in CD player, AM/FM stereo tuner,
iPod dock, alarm clock, timer, motorized CD door, removable speakers and remote control. The unit can
be wall mounted in order to save desk or counter space.
SAFETY INFORMATION
CAUTION
RISK OF ELECTRIC SHOCK
DO NOT OPEN
The lighting flash with arrowhead symbol
within an equilateral triangle is intended to
alert the user to the presence of uninsulated
“dangerous voltage” within the product’s
enclosure that may be of sufficient
magnitude to constitute a risk of electric
shock to persons.
!
!
CAUTION: TO REDUCE THE RISK OF ELECTRIC SHOCK,
DO NOT REMOVE COVER.
NO USER-SERVICEABLE PARTS INSIDE.
REFER SERVICING TO QUALIFIED SERVICE PERSONNEL
The exclamation point within an equilateral
triangle is intended to alert the user to the
presence of important operating and
maintenance (servicing) instructions in the
literature accompanying the product.
WARNING: TO AVOID THE HAZARDS OF FIRE OR ELECTRICAL SHOCK, DO NOT EXPOSE THIS APPLIANCE TO
RAIN OR OTHER MOISTURE.
CAUTION: TO PREVENT ELECTRICAL SHOCK, MATCH WIDE BLADE OF PLUG TO WIDE SLOT, FULLY INSERT.
SAFETY CERTIFICATION
This unit is made and tested to meet exacting safety standards. It meets CSA and FCC requirements and complies with
safety performance standards of the U.S. Department of Health and Human Services.
CAUTION - USE OF CONTROLS OR ADJUSTMENTS OR PERFORMANCE OF PROCEDURES OTHER THAN
THOSE SPECIFIED HEREIN MAY RESULT IN HAZARDOUS RADIATION EXPOSURE.
THIS UNIT SHOULD NOT BE ADJUSTED OR REPAIRED BY ANYONE EXCEPT QUALIFIED SERVICE
PERSONNEL.
CLASS 1 LASER PRODUCT
PRODUIT DE LASER DE CLASSE 1.
INVISIBLE LASER RADIATION
DO NOT STARE INTO BEAM OR VIEW
DIRECTLY WITH OPTICAL INSTRUMENTS
CLASS 3A LASER PRODUCT
1
FCC information
For CD player section: This device complies with Part 15 of the FCC Rules. Operation is subject to the following two
conditions: (1) This device may not cause harmful interference, and (2) this device must accept any interference
received, including interference that may cause undesired operation.
NOTE:
This equipment has been tested and found to comply with the limits for a Class B digital device, pursuant to Part 15 of
the FCC Rules. These limits are designed to provide reasonable protection against harmful interference in a residential
installation. This equipment generates, uses and can radiate radio frequency energy and, if not installed and used in
accordance with the instructions, may cause harmful interference to radio communications. However, there is no
guarantee that interference will not occur in a particular installation. If this equipment does cause harmful interference to
radio or television reception, which can be determined by turning the equipment off and on, the user is encouraged to try
to correct the interference by one or more of the following measures:
- Reorient or relocate the receiving antenna.
- Increase the separation between equipment and receiver.
- Connect the equipment into an outlet on a different circuit from that to which the receiver is connected.
- Consult the dealer or an experienced radio/TV tech.
FOR SAFE AND EFFICIENT OPERATION
- Do not damage the power cord.
- When not in use, disconnect the power cord from the outlet. Grasp the plug, not the cord, when disconnecting the unit.
- If water should enter the unit, electrical shock or malfunction may result. Use in an area where there is low humidity
and little dust.
- Do not disassemble or alter the unit in any way.
- Do not use the unit in areas where extremes in temperature occur (below 40 F or exceeding 95 F), or where it may
be exposed to direct sunlight.
- Because of the CD player’s extremely low noise and wide dynamic range, there is a tendency to turn the volume on
the amplifier higher than necessary. Doing so may produce an excessively high output from the amplifier, which can
cause damage to your speakers. Please be careful in this regard.
- Sudden changes in the surrounding temperature can cause dew to form on the optical pickup lens inside unit. Under
this condition, the unit may be unable to operate properly. If this should occur, remove the disc and allow the player to
adjust to the surrounding temperature.
WARNING: Handling the cord on this product or cords associated with accessories sold with this product, will expose
you to lead, a chemical known to the State of California to cause cancer, and birth defects or other reproductive harm.
Wash hands after handling.
2
1.
Read Instructions - All the safety and operating instructions should be read before the
product is operated.
2.
Retain Instructions - The safety and operating instruction should be retained for future
reference.
3.
Heed Warnings - All warnings on the product and in the operating instructions should be
adhered to.
4.
Follow Instructions - All operating and use instructions should be followed.
5.
Cleaning - Unplug this product from the wall outlet before cleaning. Do not use liquid
cleaners or aerosol cleaners. Use a damp cloth for cleaning.
6.
Attachments - Do not use attachments not recommended by the product manufacturer as
they may cause hazards.
7.
Water and Moisture - Do not use this product near water - for example, near a bath tub,
wash bowl, kitchen sink, or laundry tub, in a wet basement, or near swimming pool, and the
like.
8.
Accessories - Do not place this product on an unstable cart, stand tripod, bracket, or
table. The product may fall, causing serious injury to a child or adult, and serious damage
to the product. Use only with a cart, stand, tripod, bracket, or table recommended by the
manufacturer, or sold with the product. Any mounting of the product should follow the
manufacturer’s instructions and should use a mounting accessory recommended by the
manufacturer.
9.
A product and cart combination should be moved with care. Quick stops, excessive force,
and uneven surfaces may cause the product and cart combination to overturn.
PORTABLE CART WARNING
(symbol provided by RETAC)
S3125A
10. Ventilation - Slots and openings in the cabinet are provided for ventilation and to ensure reliable
operation of the product and to protect it from overheating, and these openings must not be blocked
or covered. The openings should never be blocked by placing the product on a bed, sofa, rug, or
other similar surface. This product should not be placed in a built-in installation such as a bookcase
or rack unless proper ventilation is provided or the manufacturer’s instruction have been adhered
to.
11. Power Sources - This product should be operated only from the type of power source indicated on
the marking label. If you are not sure of the type of power supply to your home, consult your
product dealer or local power company. For products intended to operate from battery power, or
other sources, refer to the operating instructions.
3
12. Grounding or Polarization - This product may be equipped with a polarized alternating current line
plug (a plug having one blade wider than the other). This plug will fit into the power outlet only one
way. This is a safety feature. If you are unable to insert the plug fully into the outlet, try reversing the
plug. If the plug should still fail to fit, contact your electrician to replace your obsolete outlet. Do not
defeat the safety purpose of the polarized plug.
13. Power-Cord Protection - Power supply cords should be routed so that they are not likely to be
walked on or pinched by items placed upon or against them, paying particular attention to cords at
plugs, convenience receptacles, and the point where they exit from the product.
14. Lightning - For added protection for this product during a lightning storm, or when it is left unattended
and unused for long periods of time, unplug it from the wall outlet. This will prevent damage to the
product due to lightning and power-line surges.
15. Overloading - Do not overload wall outlet, extension cords, or integral convenience receptacles as
this can result in a risk of fire or electric shock.
16. Object and Liquid Entry - Never push objects of any kind into this product through openings as they
may touch dangerous voltage points or short-out parts that could result in a fire or electric shock.
Never spill liquid of any kind on the product.
17. Servicing - Do not attempt to service this product yourself as opening or removing covers may
expose you to dangerous voltage or other hazards. Refer all servicing to qualified service personnel.
18. Damage requiring Service - Unplug this product from the wall outlet and refer servicing to qualified
service personnel under the following conditions:
a)
When the power-supply cord or plug is damaged,
b)
If liquid has been spilled, or objects have fallen into the product,
c)
If the product has been exposed to rain or water,
d)
If the product does not operate normally by following the operating instructions.
Adjust only those controls that are covered by the operating instructions as an importer
adjustment of other controls may result in damage and will often require extensive work by a
qualified technician to restore the product to its normal operation.
e)
If the product has been dropped or damaged in any way.
f)
When the product exhibits a distinct change in performance - this indicates a need for
service.
4
19. Replacement Parts - When replacement parts are required, be sure the service technician has used
replacement parts specified by the manufacturer or have the same characteristics as the original part.
Unauthorized substitutions may result in fire, electric shock, or other hazards.
20. Safety Check - Upon completion of any service or repairs to this product, ask the service technician
to perform safety checks to determine that the product is in proper operating condition.
21. Wall or Ceiling Mounting - The product should be mounted to a wall or ceiling only as
recommended by the manufacturer.
22. Heat - The product should be situated away from heat sources such as radiators, heat registers ,
stoves, or other objects (including amplifiers) that produce heat.
23. Nonuse Periods - Unplug the product’s power cord when you will not be using it for an extended
period.
5
LOCATION OF CONTROLS - UNIT
1
2
3 4
5
6
7
8
9
10
11 12
13
28
14
27
26
15
25
16
17
24
23
18
19
22
20
21
40
39
41
38
29
37
30
31
36
35
34
32
33
6
LOCATION OF CONTROLS - UNIT (cont.)
1.
Detachable Speaker (L)
12. Detachable Speaker (R)
2.
Insert
13. Surround Indicator
3.
CD Door OPEN/CLOSE Button
Open or close the CD door
4.
iPod/CD-SKIP/TUNING/CLOCK Time
Backward Button (
)
-iPod/CD-Skip/search backward
-TUNER-Backward tuning or station
search
-Clock or Timer-Select the time
-SUREWAKE vol level setting
14. SURROUND ON/OFF Button
Press to turn the surround sound ON or
OFF. The indicator lights while surround
is ON
Button
15. iPod PLAY/PAUSE
To start iPod playback/short PAUSE of
iPod playback
16. AUX Button
To activate AUX mode
5.
CD Door
6.
Volume UP Button (+)
To increase volume level
7.
LCD Display
Shows the operating status in all modes
8.
iPod/CD-SKIP/TUNING/CLOCK Time
Forward Button (
)
-iPod/CD-Skip/search forward
-TUNER-Forward tuning or station search
-Clock or Timer-Select the time
-SUREWAKE vol level setting
18. PRESET/FOLDER/SELECT
Button
-Press to retrieve preset radio station
down
-Press to retrieve MP3 folder down
-Press to select iPod menu down
9.
POWER ON/STANDBY Button
To power ON, standby light should be
switched off
Button
19. PRESET/FOLDER/SELECT
-Press to retrieve preset radio station up
-Press to retrieve MP3 folder up
-Press to select iPod menu up
17. MP3 MODE/ST/MO/ENTER Button
-To display ID3 TAG information, if
available during MP3 playback
-To select Stereo or Mono in TUNER FM
mode
-To confirm iPod menu selected
10. Remote Control Sensor
20. iPod DOCK
11. Insert
21. Volume DOWN Button (-)
To decrease volume level
22. Pedestal
7
LOCATION OF CONTROLS - UNIT (cont.)
23. CD/iPod STOP Button (
)
Interrupting the CD/iPod playback/clearing
the CD program iPod charging mode
32. AUDIO OUT for iPod (R)
24. CD PLAY/PAUSE Button
To play or pause CD playback
34. VIDEO OUT for iPod
33. AUDIO OUT for iPod (L)
35. HEADPHONE Jack (3.5mm)
Connect a pair of stereo headphones
(not supplied) for private listening
25. PROG/MENU/CLOCK SETTING Button
-Tuner/CD program/Clock setting button
(in off mode)
-iPod menu selection
36. Speaker Terminal
Connect the speaker wires to left and
right speakers
26. TUNER/BAND Button
Sets to tuner (radio) mode and selects the
AM or FM band
37. Subwoofer Jack
To connect powered subwoofer (not
supplied)
27. DISPLAY ON/OFF Button
To select display backlight on/off
38. AC Input Socket
To connect to AC power cord
Note: The cord was fixed on main unit
28. AUX IN Jack (3.5mm)
AUX input for stereo line level input
29. AUX Socket (L) (LINE OUT)
39. Battery Cover/Compartment
For tuner and clock memory back-up, to
install 1.5V x 2 “AAA” Batteries
30. AUX Socket (R) (LINE OUT)
31. FM Antenna Bracket
Note - Do not connect to external antenna
40. WALL MOUNTING SLOT
41. AM Antenna Socket
AM antenna connection socket (for the
frame antenna included in the
accessories)
8
INSTALLATION (Speakers and Decorative Insert)
DISASSEMBLE AND FIX THE DECORATIVE INSERT
2
1
3
To remove the insert, release 3 pcs
screws (1), then pull out the insert from
the main unit.
To fix the insert, place it with two holes
into main unit speaker holder (2), then fix
it by 3 pcs screws (3).
PLACE AND FIX THE SPEAKER
Insert the speaker stud into the hole of the
main unit (1).
Push the speaker backward to the end until it
clicks (2).
1
2
1
2
DISASSEMBLE THE SPEAKER
Push the speaker forward from the back side
(1).
Release the speaker from the main unit
speaker holder (2).
1
2
2
9
ANGLE ADJUSTMENT (Speakers)
Used to connect the bracket (included) to set the speaker box on an angle.
VERTICAL ANGLE
Insert the bracket with (A) side and push upward to adjust for vertical angle.
1
2
A
B
TILT ANGLE
Insert the bracket with (B) side and push upward to adjust for desired angle.
1
2
B
A
10
INSTALLATION (Wall Mounting)
Installation options:
Wall mount
To mount the center section on the wall:
Position the bracket (supplied) on the wall (as show below) where you want to hang the whole unit. Drill 2 holes
slightly undersized for a firm fit.
Secure the bracket on the wall using 2 dowels and 2 screws (supplied).
The mounting screws should be anchored into solid wall support, such as wood frame or concrete wall.
Mount the center unit onto the wall bracket.
Make sure the mounting tab on the center unit fits securely into the mounting slot on the wall bracket.
Screws and plastic dowels are also provided for speakers if they are to be wall-mounted away from the center
section.
Note: speakers can be wall mounted separately as on below drawing.
11
REMOTE CONTROL
Battery Installation
1.
Remove the battery tray by pressing point
(1a) inside, then sliding point (1b) area at
the same time.
2.
Pull out the battery tray.
3
Install or replace the button-type battery
“CR2032” (supplied).
4
Close the battery tray.
Note: Pull out insulation tag from the
button battery tray before operating the
remote control.
3
1b
1a
2
LOCATION OF CONTROLS - REMOTE CONTROL
42
43
44
45
46
47
65
64
48
63
49
62
50
61
51
60
52
59
53
57
55
58
54
56
12
4
LOCATION OF CONTROLS - REMOTE CONTROL (Cont.)
42. MUTE Button
To mute the sound
56. Volume DOWN Button ( - )
To decrease volume level
43. CD Door OPEN/CLOSE Button
Press to open or close the CD door at CD
mode
57. iPod/CD-SKIP/TUNING/CLOCK time
Backward Button (
)
-iPod/CD-Skip/search backward
-TUNER-Backward tuning or station
search
-Clock or Timer-Select the time
-SUREWAKE vol level setting
44. SUREWAKE/TIMER Button
To activate surewake/deactivate the timer
45. Remote Control Transmitter
58. PRESET/FOLDER/SELECT
Button
-Press to retrieve preset radio station
down
-Press to retrieve MP3 folder down
-Press to select iPod menu down
46. POWER ON/STANDBY Button
Switches the system on or off
47. 0 - 9 NUMERIC Buttons
Tuner: To recall preset stations
CD: To recall tracks
59. CD/iPod STOP Button (
)
Interrupting the CD/iPod playback/clearing
the CD program iPod charging mode
48. REPEAT Button
Repeat 1/ALL function for CD/iPod mode
Button
60. PRESET/FOLDER/SELECT
-Press to retrieve preset radio station up
-Press to retrieve MP3 folder up
-Press to select iPod menu up
49. INTRO Button
Plays 10 seconds of each CD track
50. RANDOM Button
CD play in random sequence
61. PROG/MENU/CLOCK SETTING Button
-Tuner/CD program/Clock setting (in off
mode)
-iPod menu for selection
51. Volume UP Button ( + )
To increase volume level
52. BASSXPANDER Button
Press for a rich bass sound
62. MP3 MODE / ST/MO/ENTER Button
-To display ID3 TAG information if
available during MP3 playback
-To select Stereo or Mono in TUNER FM
mode
-To confirm iPod menu selected
53. PLAY/PAUSE
Button
To start CD/iPod playback/short PAUSE
of CD playback
54. EQ Button
To select “ PASS, CLASSIC, ROCK, POP
and JAZZ” for desired sound effect
63. SLEEP Button
Press for sleep to music function
64. TUNER/BAND Button
Sets to tuner (radio) mode and selects the
AM or FM band
55. iPod/CD-SKIP/TUNING/CLOCK time
Forward Button (
)
-iPod/CD-Skip/search forward
-TUNER-Forward tuning or station search
-Clock or Timer-Select the time
-SUREWAKE vol level setting adjustable
65. SOURCE Button
To select “CD, iPod, AUX, TUNER” mode
13
POWER SUPPLY
The cord is fixed on main unit.
120V AC, 60 Hz
NOTE:
This unit is equipped with a polarized plug. If you
have difficulty inserting the plug, turn it over and
reinsert it.
CAUTION:
TO PREVENT ELECTRICAL SHOCK, MATCH
WIDE BLADE OF PLUG TO WIDE SLOT, FULLY
INSERT.
AC power operation
BATTERY SUPPLY (For Tuner/Clock Memory Back-up)
Install batteries (not supplied).
Observe + and - signs.
+
-
-
+
Remember to replace the battery
compartment lid
2 “AAA” size batteries
CAUTION:
WHEN INSTALLING BATTERIES
To prevent leakage from the batteries, which are
corrosive and can cause personal injury and
damage to the unit, observe the following
precautions:
IMPORTANT NOTE:
SPENT OR DISCHARGED BATTERIES MUST BE
RECYCLED OR DISPOSED OF PROPERLY IN
COMPLIANCE WITH ALL APPLICABLE LAWS.
FOR DETAILED INFORMATION, CONTACT
YOUR LOCAL COUNTRY SOLID WASTE
AUTHORITY.
14
1. The batteries must be installed correctly. Match
the polarities (+ and - signs) on the batteries, to
the polarities shown on the battery
compartment of the unit (see above).
2. Do not mix new batteries with old or used
batteries.
3. Only use batteries of the same type and brand.
4. If the unit will not be used for an extended
period of time, remove the batteries and store
them in a cool place.
5. Carefully follow the battery manufacturer’s
instructions for proper use and disposal.
6. DO NOT ALLOW YOUNG CHILDREN TO
HANDLE BATTERIES.
OPERATING INSTRUCTIONS
POWER ON/OFF
When the AC power is connected, “-- -- : -- --“ shows on the LCD display.
1. Press the POWER/STANDBY button to turn the unit 'ON'.
/ON
Note: The LCD display lights up and “HELLO” greeting
shows on display, the STANDBY LED light goes off.
Volume at 13 (max 30).
2. You can now select your desired music source by
pressing one of the function buttons: TUNER/BAND or
CD PLAY/PAUSE
or AUX or iPod on main console.
Example : FM mode
3. To switch to POWER OFF, press the POWER/STANDBY
button to turn the unit 'OFF'. “GOOD BYE” appears on
display. The STANDBY LED lights.
4. Display back light ON/OFF won’t be affected by power
ON/OFF.
NOTE: Please turn off the unit to standby mode before disconnecting main power supply from the unit.
SETTING THE TIME
When the unit is first connected to an AC power outlet, the display
shows "-- -- : -- --". To set the clock to the current time proceed as
follows:
1. In power off mode, press and hold the PROG button for 2
seconds, the “12” hour digits begin to flash.
2. Press the
/
to select your desire either 12 or 24
hour clock time format.
3. Press the PROG button to hour mode until the hour flashes.
4. Press the
/
to adjust the hour time while it is
flashing. Be sure to set the hour correctly for AM or PM.
5. Press PROG button once to minute mode and the minutes will flash.
6. Press the
flashing.
/
to adjust the minute time while it is
7. Press the PROG button once more, the display
stops flashing and the clock begins to run.
15
/ON
TIMER ON/OFF SETTING
NOTE: The clock should be adjusted before the Timer On/Off setting.
1. Press the SUREWAKE TIMER button on remote control
once, the TIMER ON indicator and hour digit begin to
flash.
2. Press the
/
to adjust the hour time up or
down. Be sure to set the hour correctly for AM or PM.
3. Press the SUREWAKE TIMER button once, the minute
digits begin to flash.
4. Press the
down.
/
to adjust the minute time up or
5. Press the SUREWAKE TIMER button on remote control
again, the TIMER OFF indicator and hour digit begin to
flash.
/
to adjust the hour time up or
6. Press the
down. Be sure to set the hour for correctly for AM or
PM.
7. Press the SUREWAKE TIMER button once, the minute
digits begin to flash.
8. Press
down.
/
button to adjust the minute time up or
9. Press the SUREWAKE TIMER button once;
setting to: TUNER or CD or iPod are selected
by pressing the
/
button.
10. Press the SUREWAKE TIMER button, then press
the
/
to select the volume level.
11. Press the TIMER button on remote control once more, then the Timer On and Off adjustment is finished with the
" " display remaining ON (The SUREWAKE TIMER setting will show you once on display).
Note: Timer function with SUREWAKE starts the music quietly and then increases the volume to room level or your
selected volume level to make sure you are awake.
To cancel the Timer On setting, press SUREWAKE TIMER button on remote control until "
" display goes off.
Note : To turn off the set while timer is on, press POWER button.
SETTING THE SLEEP
Pressing SLEEP button on remote control permits
settings from 10 to 90 minutes. When the desired time
appears, releasing your finger will set the time.
(Pressing "SLEEP" after the 10 minute showed, sleep
timer position will cancel the sleep timer.)
Change of SLEEP Setting
90
80
70
60
50
16
40
30
20
10
BASIC OPERATION
BASSXPANDER Control
Electronic volume control
Press the BASSXPANDER button to get the rich
bass sound.
Electronic volume control display
BASSXPANDER shows on display
1. Press VOL-DOWN (-) button to adjust
sound level down, the volume level (00 - 30)
will be shown in the LCD display.
To switch off the BASSXPANDER function, press
the button once more.
2. Holding down the button will result in
continuous decrease of the sound level.
BASSXPANDER shows on display
3. Similarly, press VOL-UP (+) button to adjust
sound level up.
Muting Function
PRESET EQUALIZATION
If the MUTE button is pressed, the audio output will
be muted, and the current display begins to
flashing.
Press the EQ button on remote control repeatedly
to cycle through the preset EQ showing on the LCD
display -- PASS, CLASSIC, ROCK, POP and JAZZ.
Pressed the MUTE button again to resume.
17
LISTENING TO THE RADIO
Auto tuning - Press the TUNING forward or
backward buttons momentarily and release. The
tuner will move forward or backward to the next
available station.
1. Press the POWER/STANDBY button to turn the
system 'ON'.
2. Press the TUNER/BAND button to select the
radio function.
Manual Tuning - Press and hold the SKIP forward/
backward buttons until the display approaches your
desired station. Then tap the buttons repeatedly
until the display shows the exact frequency.
TUNER/
BAND
5. When finished listening, press the POWER button
to shut the system OFF.
Example : FM mode
Note: For AM reception, plug the supplied frame
antenna into the AM ANT jack. Then adjust the frame
antenna until it is in position with the best reception.
3. Press the TUNER/BAND button repeatedly to
select AM or FM band.
4. Press the SKIP Forward or Backward buttons to
tune to the desired station.
STORING PRESET STATIONS
1. Tune to the station you wish to store.
4. Press the PROG button again. The station is
stored.
The unit enables you to program 30 stations of FM
and 10 stations of AM band.
2. Press the PROG button once, and the preset
station number will be flashing.
5. To store other stations, repeat above steps.
RECALLING PRESET STATION
Press the PRESET
buttons to select the
desired station.
Note: When setting or recalling the preset station by
directly pressing the number, on remote control unit
to press key number 0, 1 to preset station 01; press
0, 9 to preset station 09; press 1, 5 to preset station
15.
3. Press the PRESET button repeatedly to set the
desired preset station number.
or
FM
18
Playing the disc (
)
Press PLAY/PAUSE button to play the CD.
PLAYING COMPACT DISCS
1. Switch on the power and press the CD PLAY/
PAUSE button
to select the CD mode.
Playing track 1
2. If there is no CD inside, a "NO DISC" display
will appear.
When there is no disc
Pause the playing (
)
Press PLAY/PAUSE button while the disc is
playing, the playing time will flash.
Loading a disc
While paused
1. Press the CD DOOR OPEN/CLOSE button to
open the CD door.
Press PLAY/PAUSE button again to resume.
Stopping the disc
2. To load a disc, simply put the disc onto the
center spindle of the player and then press the
CD DOOR OPEN/CLOSE button again to close
the CD door. After that, reading TOC will start.
Press STOP (
)
Stop condition (TOC display)
Ensure that the disc is correctly mounted on the
spindle and locked in place.
After reading TOC
To operate by remote control
Select desired track by pressing 0-9, then press
PLAY/PAUSE button to start playback.
Example: 03=Track 3, 11=Track 11.
The display will show the total number of tracks and
the playing time of the disc.
Skip and Search Function
Press the SKIP Forward or Backward buttons momentarily during play mode or stop mode.
PRESS ONCE
IN PLAY MODE
PRESS TWICE
BACK TO THE
BEGINNING OF THE
CURRENT TRACK
PREVIOUS
TRACK
NEXT TRACK
IN STOP MODE
PRESS ONCE
PREVIOUS
TRACK
NEXT TRACK
Press and hold the SKIP button during playback:
: FAST BACKWARD
19
: FAST FORWARD
To repeat a track or disc
Press REPEAT button on remote control one time,
"one track repeat" will be active. “REPEAT” shows
on display.
With one more press, "all track repeat" will be active.
“REPEAT ALL” shows on display.
All track repeat
One track repeat
With one further press, the repeat mode is
cancelled.
Random play function
Press RANDOM button on remote control during
CD play or stop mode to start random play.
Pressing once again will cancel the function.
Random playing start
Intro play function
In the stop condition, press the INTRO button to start the
intro playing. After that the first 10 seconds of each song
will be played.
If the INTRO button is pressed again, the CD will change to
normal playing mode.
Intro playing
Note: Random play cannot operate while playing
programmed tracks.
PROGRAMMED PLAYBACK
The CD player enables you to program up to 64 tracks in a sequence of your choice. First select CD stop
mode.
1. Press the PROG button one time.
4. Continue to program, repeat steps 2 and 3.
Reviewing programs
Press the PROG button repeatedly. The track number
p r o g r a m m e d o n e a c h p r o g r a m n u m be r w i l l b e
displayed.
Program input mode
5. Press PLAY/PAUSE button to play the program
tracks.
2. Press the SKIP Forward or Backward buttons
to select the desired track to be programmed.
For example:
Note: If the program function has stopped, press the
PROG button and then press the PLAY/PAUSE button,
the program play will start.
Choose track 4
Clear the program
In stop mode, press the PROG button one time and then
press the STOP button. The preset programs will be
cancelled.
3. Press PROG button again; then track 4 is
stored.
20
PLAYING MP3 DISC
1. Switch on the power and press the CD PLAY/
PAUSE
button to select the CD mode.
Loading a MP3 disc.
To repeat a track or album
1.
After reading TOC
Press the REPEAT button on remote control
once, MP3 plays one track repeatedly and
REPEAT is displayed.
One track repeat
2.
Press the FOLDER
select desired album.
or
buttons to
2.
Press this button twice, MP3 plays all tracks
repeatedly and REPEAT ALL is displayed.
All track repeat
3.
4.
Press the SKIP
select desired track.
or
buttons to
3.
Press this button three times, MP3 disc
repeats the current playing album and ALBUM
REPEAT displayed.
Album repeat
4.
To cancel repeat function, Press REPEAT
button on remote control repeatedly until
repeat function display goes off.
Press the PLAY/PAUSE button to play MP3.
Note: When MP3 is playing, press and hold
MP3 MODE button about 2 seconds, the track
no, title and artist information will be shown
repeatedly in the display if disc information is
available.
To resume normal play display, press and hold
MP3 MODE button about 2 seconds.
Random play function
Press RANDOM button on remote control during
playing or stop condition to start random play. Press
once again to cancel the function.
Notice: Because of none-standardized format
definition/production of MP3/CD playback
quality & performance are not guaranteed.
SANYO is not responsible for the playability of
MP3 files due to recording conditions such as
PC performance, writing software, media ability
etc.
Random playing start
Album search (if disc information available)
1.
Press the MP3 MODE button once, title
name is displayed. (If no name is on the disc,
NOTHING is displayed). Press SKIP
or
to select desired title from A to Z, 0
to 9, then press PLAY/PAUSE button to start
playback.
2.
Press the MP3 MODE button twice and
ALBUM is displayed. (If no name is on the
disc, UN_KNOWN is displayed). Press the
SKIP
or
button to select
desired album; then press the PLAY/PAUSE
button to start playback.
Intro play function
During the stop condition, press the INTRO button
to start the intro playing. After that the first 10
seconds of each song will be played.
If the INTRO button is pressed again, the MP3 will
change to normal playing mode.
Intro playing
21
PROGRAMMED PLAYBACK
The MP3 player enables you to program up to 64 tracks in a sequence of your choice. First select CD stop
mode.
1.
Press the PROG button once.
5.
Press the PROG one more time, and
track 10 of folder 3 is stored.
2.
Press the SKIP
or
buttons to
select your desired folder; for example folder 3.
6.
Continue to program, repeating steps
1 to 5.
Reviewing programs
Press the PROG button repeatedly. The
track number programmed on each
program number will be displayed.
7.
3.
4.
Press the PROG button again.
Press the SKIP
or
buttons to
select your desired track, for example,
track10.
Press PLAY/PAUSE button to play the
program tracks.
Note: If the program already exit, function
has already stopped ,press the PROG
button and then press the PLAY/PAUSE
button, the program play will start.
Clear the program
In the stop mode, press the PROG button one
time and then press the STOP button, The
preset programs will be cancelled or power off
or open/close CD door cancelled.
22
iPod OPERATION
When connecting an iPod to this iPod Dock, please ensure that the correct removable insert is used.
iPod dock insert
This iPod Dock comes with 6 removable inserts.
To place a dock insert:
1. Refer to the compatibility table as that follows and select the
correct dock insert for the iPod. Using the correct insert ensures
the proper fit for your iPod. This can help to reduce the stress on
the iPod dock connector when operating the iPod.
2. Carefully align and then gently insert the iPod into the dock.
(The iPod must not be in a case or “skin”).
3. To remove/replace an dock insert, remove the iPod first,
then grip the insert and pull gently upwards.
Note: If iPod unit is PAUSE mode, the main console can’t detect the
iPod to play automatically once connected to the dock, Press the
play key to play on the iPod.
- iPod could be operated directly to TV/Amplifier equipment when power off.
The main console provides the operating power to the iPod.
23
Dock Insert Compatibility
Photo
40 / 60GB
A
5G with
Video
30GB
60GB
80GB
nano
1GB
2GB
4GB
(1st generation)
nano
(2nd generation)
photo
4G
B
C
X
20GB
30GB
40GB
60GB
X
X
X
X
40GB
nano
D
X
X
E
X
X
X
X
X
X
X
X
X
X
X
X
X
4GB
10GB
15GB
20GB
30GB
40GB
20GB
F
20GB
6GB
3G
mini
2GB
4GB
8GB
40GB
mini
20GB (Color)/
Photo 30GB
X
X
24
Charging your iPod
Please ensure you are using the correct insert for your iPod and it is properly docked.
FAILURE TO DO SO MAY CAUSE THE iPod can’t charging result in its inability to charge.
Whilst the iPod is docked in the system, it will recharging (until fully charged) by power on the system unit. Once the
iPod is removed from the dock, the main console will go to standby mode then turn off.
Note: there are no charging function while main console at power off mode.
Listening to your iPod
1. Insert the iPod.
2. With the main console power on, press the iPod PLAY/
PAUSE button, "iPod" will show on the display.
3. Press iPod PLAY/PAUSE button to commence, control playback and stop.
4. For the iPod VIDEO, please connect with other external equipments from the pedestal AUDIO OUT RCA
jacks (R/L) VIDEO OUT RCA jack.
NOTE: The volume control on the iPod is only for adjusting the volume of any headphones connected; it won’t affect the
volume control of the main console.
25
TROUBLESHOOTING GUIDE
Should this unit exhibit a problem, check the following before seeking service.
Symptom
Possible cause
Solution
Radio
Noise or sound distorted on AM or Station not tuned properly for AM Retune the AM or FM broadcast
station.
or FM
FM broadcasts.
FM: Antenna wire is not extended. Extend FM antenna wire.
AM: Frame antenna is not
Placed the frame antenna until
positioned correctly.
best reception is obtained.
FM MODE button is set to MONO Set FM MODE to FM STEREO
FM STEREO indicator does not
position.
position.
light
AM or FM, no sound.
TUNER Function button is not Press TUNER/BAND function
pressed.
button.
Volume at minimum
Compact Disc Player
CD Player will not play.
Increase Volume level.
CD Function button is not pressed. Press the CD Function button.
CD is not installed or installed
Insert CD with label side out.
incorrectly.
CD skips while playing.
Disc is dirty or scratched.
Wipe disc with cloth or use
another disc.
Disc is inserted but CD player
skips over spot and will not play,
Disc inserted upside down.
Insert disc properly.
Disc is dirty.
Clean disc.
Disc is non-standard.
Use correct disc.
iPod Player
Cannot insert the iPod.
The iPod dock insert is not correct. Check the dock insert.
There is dust or obstacles in the
Dock.
Remove dust or obstacles from
the Dock connector, and insert the
iPod again.
If normal operation cannot be recovered, unplug the power cord from the outlet and plug it again.
26
SPECIFICATIONS
AC Power
Power Output
Dimension of:
Unit
Radio section
AC 120V, 60Hz
DC 3V (1.5V x 2 “AAA” batteries
for tuner and clock memory).
Batteries are not supplied.
CD Section
Vertical Front Loading CD
Speaker System
Woofer: 4", 4 ohm
Tweeter: 2", 4 ohm
5 W/CH 10% THD
Remote Control
32 Keys, Battery size “CR2032”
(Battery Included)
619(W) x 200(D) x
315.5(H)mm
Tuning : PLL with 40 Presets
(FM 30, AM 10)
Freq. Range : AM 520-1710KHz
FM : 87.5-108MHz
ACCESSORIES
1 pc
6 pcs
1 pc
1 pc
3 pcs
6 pcs each
2 pcs
Instruction manual
iPod Insert
Remote control handset with battery
AM loop antenna
Wall mounting bracket for main console & speakers
Dowel & screw
Bracket for speaker
27
WARRANTY
WARRANTY APPLICATION
New, unused SANYO Audio products purchased through a SANYO authorized dealer in Canada are warranted against
manufacturing defects in materials and workmanship for ONE YEAR from the date of purchase by the original retail
purchaser. This warranty only applies in favour of the original retail purchaser of the warranted product.
SANYO CANADA INC. 'S RESPONSIBILITY
During the warranty period, SANYO Canada Inc. will repair, or at our option, replace an Audio product which shows
evidence of a manufacturing defect in materials or workmanship. Replacement PARTS are warranted for the remaining
portion of the warranty period.
WHAT IS NOT COVERED
(a) Audio products purchased outside Canada.
(b) Audio products purchased in a used condition.
(c) Problems due to product set up and installation.
(d) Adjustments that are outlined in the Operating Manual.
(e) Accessory items including antenna, batteries.
(f ) Damage in or due to transportation.
(g) Damage due to improper maintenance, improper wiring, accident, abuse, misuse or negligence.
(h) Damage caused by lightning and power surges.
(I ) The cost of removal and reinstallation of an Audio product designed for automobile use.
ORIGINAL RETAIL PURCHASER'S RESPONSIBILITY
You, the original retail purchaser, must present your original, dated bill of sale together with this warranty to SANYO
Canada Inc. or to an authorized SANYO Service Depot when you make a claim under this Warranty. You, the original
retail purchaser, are responsible for any costs of TRANSPORTING the product to and from SANYO Canada Inc. or an
authorized SANYO Service Depot.
You also are responsible for the cost of any MAINTENANCE necessary in respect of the product.
WARRANTY BECOMES VOID
This warranty becomes void if the product's serial numbers are altered or removed or if any repair to the product is
made other than by SANYO Canada Inc. or by an authorized SANYO Service Depot.
LIMITATIONS
(a) SANYO Canada Inc. reserves the right to change or improve the design of the model of the product
warranted hereunder without incurring any obligation to make any modifications to or to install any
improvement in or on the product.
(b) In no event shall SANYO Canada Inc. or any of its Authorized Dealers be liable for special or
consequential damage arising from the use of this product.
STATUTORY WARRANTIES
The above provisions do not preclude the operation of any applicable provincial statute which in certain circumstances
may not allow some of the limitations and exclusions described in this Warranty. Where any terms of this Warranty are
prohibited by such a statute, they shall be deemed null and void but the remainder of this warranty shall remain in
effect.
HOW TO OBTAIN WARRANTY SERVICE
Please contact the SANYO Authorized Dealer from whom the product was purchased, or contact us directly at:
SANYO Canada Inc.
1-300 Applewood Cres.
Concord, Ontario
L4K 5C7
1-800-263-2244
www.sanyo.ca
28
SANYO Canada Inc.
Printed in China