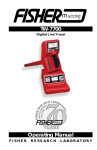
1
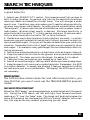
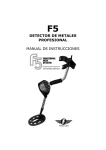
1270
Special Anniversary Edition Metal Detector
Operating Manual
FISHER
RESEARCH
LABORATORY
CONTENTS
About Your Detector ............................................................ pg. 1
Condensed Operating Instructions .................................. pg. 2
Setting Up ............................................................................... pg. 3
Controls & Functions ........................................................... pg. 5
All Metal Mode ....................................................................... pg. 7
Iron Disc Mode ...................................................................... pg. 8
Normal Disc Mode ................................................................ pg. 9
Search Techniques ............................................................... pg. 10
Target Recovery .................................................................... pg. 12
False Signals .......................................................................... pg. 13
Battery Replacement ........................................................... pg. 13
Maintenance ........................................................................... pg. 14
Code of Ethics ........................................................................ pg. 14
Specifications......................................................................... pg. 15
ABOUT YOUR FISHER 1270
The 1270 is a “motion” detector and was designed to offer you
more versatility in a wide range of conditions: Highly mineralized
soil, extremely trashy areas, and deep targets. By utilizing the
various controls on the 1270, you will find more items that were
unreachable until today. We at Fisher Research Laboratory always
strive to give you maximum performance and quality, and have
been doing so since 1931.
FEATURES:
• 3 Search Modes normal discrimination, enhanced iron discrimination,
and all metal ground balanced search.
• Patented Double Derivative, Crystal Locked Circuitry
(U.S. Patent # 4,514,692)
• Enhanced Relic Sensitivity
• Excellent “see through” in iron trash.
• “Cutting Edge” performance in moist soils
• Sensitivity Control to enable silent search or
• Audio threshold
• Silencer for silent (3rd Derivative) discrimination
• Trigger Switch mode change
• Trigger Switch Zero-Motion Pinpointing
• Near Perfect Balance for comfortable use
• Lightweight Cushioned Arm Rest & Grip
• Low Battery Alert - LED blinks automatically
• Drop-in Batteries
• Double Locking lower stem
• 3 piece breakdown handle
• Limited Lifetime Warranty*
*may vary outside of the United States. See your dealer for details.
1
1
CONDENSED OPERATING INSTRUCTIONS
We recommend that you first read this entire operating manual
before taking your new 1270 out for a test drive. You’ll be more
successful, and have a better chance of finding more treasure.
But, we also understand the excitement of the “hunt”, so here
are some simple instructions for setting up the 1270.
Set the controls as follows:
NORMAL DISC = 5 (iron & foil discrimination)
SILENCER switch = ON
IRON DISC switch = OFF
ALL METAL GROUND ADJ. = 0, OFF
(completely counter clockwise)
SENSITIVITY = 8
Turn the 1270 ON with the ON /OFF Volume control.
(adjust volume to a comfortable level)
Take your 1270 outside. There’s normally too much metal inside to perform a proper test. Hold the 1270 as shown in Figure 1, and slowly sweep
the search coil left and right while moving forward slightly with each sweep.
A slight motion is required for the 1270 to detect a target.
It is often helpful to bury a few known targets in the soil to get a “feel”
for how the 1270 responds to different targets at various sweep rates. Remember, at a DISC setting of 5, certain targets such as iron or aluminum
should be ignored.
When the 1270 “beeps”, you’ve passed over a metal target with the search
coil. Swing the 1270 left and right, then forward and back, making an “X”
over the “beep” area. The target will be directly below the center of the
search coil. Because the 1270 is a “motion” detector, with practice, this
may be the only mode of pinpointing you will need.
To use the no-motion pinpoint mode, place the coil on the ground away
from the target, pull and hold the MODE TOGGLE SWITCH (on the bottom of the housing). This switches the 1270 into ALL METAL no motion
PINPOINT mode. Keeping the search coil level with the ground, and moving the coil near the target you will hear an audio increase. Next, move the
1270 in an “X” pattern over the target and stop where the loudest tone is
heard. This will be the center of your target, directly under the center of
the search coil.
Read this instruction manual thoroughly, practice often and you
are in for some exciting treasure hunting. Drop us a line if you have
any questions, comments or good finds to tell us about. In the
meantime...
HAPPY HUNTING!
2
Figure #1
SETTING UP
Your new 1270 comes ready to assemble and use, but first review
the steps below before proceeding.
STEP 1.
Unpack your 1270 carefully, and save the carton: It may come in handy on
the rare occasion that you may need service.
STEP 2.
The coil is attached to the lower stem. Depress the spring lock button on
the lower stem, and slip it into the center handle section until it snaps into
a hole.
STEP 3.
Depress the spring lock button on the upper handle and insert it into the
opposite end of the center handle section and hand tighten the lock nut.
STEP 4.
The search coil angle and stem length may now be adjusted. The stem length
can be adjusted by loosening the lower lock nut and allowing the spring
lock to snap into the desired hole in the middle handle section.
STEP 5.
Adjust the length and the coil angles so that the search coil rests flat on
the ground about 12 inches in front of your foot. Your arm should be straight
and relaxed. Proper length will greatly reduce arm fatigue.
3
SETTING UP
STEP 6.
When the stem length is properly adjusted, tighten the lower lock nut, and
the coil wing nut. CAUTION: Never use a pliers or anything other than
your hand to tighten either lock nut or wing nut.
STEP 7.
Disconnect the search-coil cable from the control housing and wrap it around
the stem. A loose cable near the search coil may cause false signals, but
don’t wrap it so tightly that it pulls against the housing or search coils.
Reconnect the search coil cable to the control housing. Again, finger tighten
only.
STEP 8.
With the coil angle and the shaft length properly adjusted, you should be
able to move into your “search” position. (see figure 1)
STEP 9.
Standing with the 1270, the search coil should be parallel to the ground
and no more than 2 inches off the ground, while your arm is straight. Remember, the closer your coil is to the target, the better chance you have of
detecting it in normal soil conditions (although, there may be occasions
that lifting the coil off the ground an inch or two will be helpful, such as
hunting in heavily mineralized soil).
4
CONTROLS & FUNCTIONS
1. ON / OFF VOLUME: ON /OFF VOLUME:
Allows you turn on the 1270 and adjust the volume to a comfortable level.
No need to have a special headphone with volume controls. Turning this
control clockwise adjusts the volume.
2. NORMAL DISC:
When operating in NORMAL DISC mode, this control gives you the ability
to adjust the rejection point of the 1270 to a wide range of metal objects. At
lower settings, the 1270 will reject most ferrous and low-conductivity metal
objects. At higher settings, more high-conductivity metal objects will be
rejected. At maximum (10), all targets except silver and copper should be
rejected. This is the “primary” mode when both the ALL-METAL GROUND
ADJ. control and the IRON switch are OFF.
3. ALL METAL GROUND ADJUST:
Turning this control clockwise, out of its OFF position (0), allows you to
operate in the All-Metal mode and adjust the 1270 to compensate for various ground mineral conditions. In this All-Metal mode, all DISC mode
control settings will be ignored, but can be momentarily re-engaged without changing the GROUND setting by pushing the MODE TRIGGER switch
forward (the DISC mode engaged will be the one that is presently set on
the panel controls). Turning the GROUND ADJ. control fully counterclockwise into its OFF position will return the unit to the DISC mode set
on the panel controls.
4. IRON DISC ADJUST:
When operating in the IRON DISC mode, this control provides an expanded
discrimination range to fine-tune the rejection point of most small iron
objects (used in conjunction with the IRON switch). This is the “primary”
mode when the IRON switch is ON, and the ALL-METAL GROUND ADJ.
control is OFF
5. HEADPHONE JACK:
Accepts most stereo headphones with 1/4" diameter plugs. When headphones
are used, the speaker is disconnected. Headphones are beneficial when hunting in noisy areas. Faint and deeper signals will be heard better.
6. SENSITIVITY:
This control adjusts the sensitivity level and scan width of the 1270. Turning the control clockwise increases the sensitivity to weak target signals
(from deeply buried or small metal objects). A low audio threshold is provided at higher settings to allow monitoring of weak threshold variations
resulting from deeply buried objects. Reducing the sensitivity is necessary
at times to reduce false signals when working in areas of high trash, highly
mineralized ground, electrical interference, or near large metal objects,
such as buildings, fences, or bleachers
5
CONTROLS & FUNCTIONS
7. IRON DISC TOGGLE:
When this toggle switch is flipped ON, the 1270 will operate in IRON DISC
mode. When operating in this mode, the IRON DISC control becomes active and the NORMAL DISC control will be ignored. The NORMAL DISC
control can be momentarily re-engaged without changing the IRON DISC
setting by pushing the MODE TRIGGER switch forward.
8. SILENCER:
Used in conjunction with the NORMAL DISC control, this feature reduces
the normal clicks and pops heard while going over trash. With the toggle
“off”, you will hear clicks and pops and partial signals for maximum audio
target information. With the toggle “on”, the 1270 operates in a newly developed 3rd derivative SILENCER mode, eliminating the clicks, pops, and
partial target responses for a quieter mode of operation. This mode is especially designed for those who wish to eliminate excessive partial audio responses in high trash areas.
9. LOW BATTERY LED:
This LED will start to blink to alert you when the batteries are nearing
their end of life. When the LED starts to blink you have approximately 1
hour* of usage left before performance degradation begins to occur (*actual
time will vary depending on usage). The first stage of performance degradation is loss of the audio threshold when the SENSITIVITY control is at
maximum.
10. HEADPHONE JACK:
This jack accepts most stereo headphones with ¼ inch diameter plugs. When
headphones are used, the speaker is disabled. Headphones are beneficial
when hunting in noisy areas. Faint and deeper signals will be heard better!
11. MODE TOGGLE SWITCH:
The 1270 MODE TOGGLE switch allows you to conveniently switch between modes of operation without losing your panel control settings. The
switch has three positions: normal (center position), pinpoint (pulled position), and swap (pushed position).
• PINPOINT - Pulling the MODE TRIGGER toward yourself will cause the
1270 to operate in No-Motion, All-Metal Pinpoint mode. This mode allows
you to “pinpoint” the exact location over a buried target for faster and easier
retrieval.
• NORMAL - In the MODE TRIGGER’s center position, the 1270 operates
in “primary” operating mode set by the front panel controls.
• SWAP - Pushing (and holding) the MODE TRIGGER forward causes the
1270 to switch to the “secondary” operating mode set by the front panel
controls
PRIMARY AND SECONDARY OPERATING MODES >
6
CONTROLS & FUNCTIONS
> PRIMARY AND SECONDARY OPERATING MODES
A “primary” operating mode is active when the MODE TRIGGER
switch is in the Normal (center) position, and the “secondary”
operating mode is active when the MODE TRIGGER is in the Swap
position (pushed and held). The following front panel settings will
show you how to achieve your favorite primary and secondary
operating modes. This will allow you to quickly change modes
without losing any settings to gain more information about your
targets.
·
Primary = NORMAL DISC
Secondary = IRON DISC:
ALL-METAL GROUND ADJ. is OFF (0).
IRON switch is OFF.
·
Primary = IRON DISC
Secondary = NORMAL DISC:
ALL-METAL GROUND ADJ. is OFF (0).
IRON switch is ON.
·
Primary = ALL-METAL GROUND ADJ.
Secondary = NORMAL DISC:
ALL-METAL GROUND ADJUST is Ok
(set to proper ground compensation).
IRON switch is OFF.
·
Primary = ALL-METAL GROUND ADJ.
Secondary = IRON DISC:
ALL-METAL GROUND ADJ. is ON
(set to proper ground compensation).
IRON switch is ON.
.
ALL METAL MODE
Your 1270 gives you two ways to search in all-metal operation: (1) by setting your NORMAL DISC to 0, or (2) by turning on the ALL METAL
GROUND ADJUST (rotate knob clockwise). When using the ALL-METAL
GROUND ADJUST mode, only the VOLUME and the SENSITIVITY controls are still active: you have temporarily disabled the other controls on
the 1270 (it becomes the “primary” operating mode, as explained above). In
this mode, you must manually adjust the 1270 for the type of ground you
are searching. Turn the GROUND ADJUST knob switch on (to about “1”),
and the sensitivity to about “8”. Make sure the search coil is not near any
7
ALL METAL MODE
metal. This may be tested quickly by pulling the trigger switch and sweeping over an area of about one square foot. If no signal is detected, release
the trigger switch and raise the search coil off the ground, and lower it back
down two or three times (also known as “bobbing”). If an audible sound is
heard, turn the GROUND ADJUST knob slightly clockwise. Repeat this
procedure until no sound is heard when raising and lowering the coil to the
ground. Once you have the 1270 balanced to the type of ground you are
searching, you may begin sweeping the coil at a comfortable pace. Approximately four feet per second will give you optimal performance. Remember,
the ALL METAL GROUND ADJUST mode is a MOTION mode. Slight
movement of the coil is required to detect an object. While in this mode, if
the IRON DISC toggle is OFF, pushing the MODE TRIGGER forward
switches the 1270 into the NORMAL DISC mode. If the IRON DISC toggle
is ON, pushing the MODE TRIGGER forward switches the 1270 into the
IRON DISC mode. SEE PRIMARY & SECONDARY OPERATING MODES
PG. 7)
IRON DISC MODE
Searching in IRON DISC may be preferred when small iron objects are to
be rejected. In fact, this mode greatly improves the detectors ability to “see
through” iron trash to the good non-ferrous targets often sought after. Make
sure the ALL METAL GROUND ADJUST is OFF; that is, fully counterclockwise until it “clicks” into the “0” position. Flip the IRON toggle switch
up into the ON position. Adjust your sensitivity clockwise to the desired
level (preferably until a slight threshold tone is heard, at about “8” or greater).
Reduce the sensitivity slightly if you prefer silent search. In the IRON
DISC mode, you have two features that enhance the performance of the
1270: the SILENCER and the IRON DISC adjust knob. The IRON DISC
knob gives you the ability to “fine tune” the amount of iron you wish to
reject. Turning the IRON DISC knob clockwise causes larger pieces of iron
to be rejected. You may hear some normal “clicks and pops” when the coil
passes over these targets. In high trash areas, turning the SILENCER
toggle ON will reduce, and in most cases, eliminate the “clicks and pops”.
Remember that the IRON DISC mode is a MOTION mode. Slight movement of the coil is required to detect an object. When IRON DISC is the
primary operating mode, pushing the MODE TRIGGER forward switches
the 1270 into the NORMAL DISC mode. SEE PRIMARY & SECONDARY
OPERATING MODES PG. 7)
8
NORMAL DISC MODE
When rejection of a full range of other non-ferrous trash is desired, the
NORMAL DISC mode will be necessary. Make sure the ALL METAL
GROUND ADJUST is OFF; that is, fully counterclockwise until it “clicks”
into the “0” position. The IRON toggle switch must also be OFF. Adjust
the NORMAL DISC knob to reject the unwanted “trash” targets (see figure
2). When the NORMAL DISC is set at “0”, all metals will be detected. As
you turn the NORMAL DISC knob clockwise, certain metals will be rejected. At the full setting of “10”, most iron, foil, and aluminum will be
rejected, while copper and silver will still yield a good signal. Adjust your
sensitivity clockwise to the desired level (preferably until a slight threshold tone is heard, at about “8” or greater). Reduce the sensitivity slightly if
you prefer silent search. In high trash areas, turning the SILENCER toggle
ON will reduce, and in most cases, eliminate the “clicks and pops” that
result from some rejected targets. Remember that the NORMAL DISC
mode is a MOTION mode. Slight movement of the coil is required to detect
an object. When NORMAL DISC is the primary operating mode, pushing
the MODE TRIGGER forward switches the 1270 into the IRON DISC mode.
SEE PRIMARY & SECONDARY OPERATING MODES PG 7). )
Figure #2
Typical 1270 audio responses (with silencer off) for 2-inch deep targets with
search coil sweeping 1 to 2 inches above ground.
9
SEARCH TECHNIQUES
Good searching techniques are every bit as important as having
a good detector.
1. Adjust your SENSITIVITY control. Only experience will tell you how to
set it in every situation. As general rule, turn up the sensitivity to achieve
maximum depth and detection of small items. You will also get a wider
search scan. Conditions may arise where you’ll need to reduce sensitivity:
(a) when near larger metal objects, (b) when ground mineralization cause
“false signals”, (c) when near sources of interference, such as power lines or
radio towers, (d) when silent search is desired. Minimum sensitivity is
when the knob is turned to “1”, or fully counterclockwise. Maximum sensitivity is when the knob is turned to “10”, or fully clockwise.
2. Decide how much discrimination (trash rejection) you want. In certain
areas you may wish to detect all metals, but in others, you want to discriminate unwanted targets. Only you will be able to determine your particular
situation. Remember that a lot of “good” targets are not necessarily silver
and copper. For example, many gold targets can be missed when discriminating aluminum.
3. Search slow and systematically in a tight semi-circle as shown in figure 3.
4. Keep the search coil as close to the ground, and as parallel as possible
(see figure 4). The closer you are to the target, the easier it is to detect.
5. Take your time, and overlap your sweeps by at least 50%.
6. Search an area thoroughly, taking note of where you have already been.
7. Keep the search coil moving at a comfortable rate. Remember, the 1270
is a motion detector. A sweep rate of about 4 feet per second will suffice,
but make sure your arm is comfortable. “Whipping” the 1270 search coil is
not necessary.
PINPOINTING
The 1270 is a slow motion detector, and after some practice, you
may find that you won’t even use the TRIGGER SWITCH pinpoint
mode.
SLOW MOTION PINPOINT
When the 1270 “beeps”, you have passed over a metal target with the search
coil. Swing the 1270 search coil left and right, then forward and back,
making an “X” over the “beep” area. The target will be directly below the
center of the search coil. Because the 1270 is a “motion” detector, with practice, this may be the only mode of pinpointing you will need.
10
SEARCH TECHNIQUES
NO- MOTION PINPOINT
1. When the target “beep” is heard, make an “X” over the target, as described above, to determine the target area.
2. Move the coil away from the target area, and lower the coil to the ground.
3. Pull, and hold the MODE TRIGGER switch.
4. Raise the coil about 1/2 inch; move back across the target area.
5. Stop the coil at the center of the loudest response.
6. Repeat this one more time, moving your coil from side to side. Your
target should be directly below the center of the coil.
7. For larger targets, place the coil on the ground, closer to the center of the
target. The closer you are to the target center when you pull the MODE
TRIGGER switch, the more of the target will be “tuned-out”. The target
signal response will appear smaller and even easier to pinpoint.
8. IMPORTANT: Be careful not to pull the Pinpoint MODE TRIGGER
switch while directly over the target. This may “tune-out” the entire target, and you will get no target response.
Figure #3
Figure #4
11
TARGET RECOVERY
Once you have pinpointed a target, your objective is to recover
it quickly and neatly, leaving virtually no trace of your excavation.
There are many ways do this, and you will soon discover which
method works best for you. REMEMBER: Always leave the ground
in the same condition as you found it. NEVER leave exposed holes
or damage to vegetation.
RECOVERY TOOLS
1. Many Detectorists use a heavy-duty blunt screwdriver. An expert with
this method can leave virtually no trace of their recovery.
2. A sturdy hunting knife is also preferred my many. By cutting a slit or section of grass, the sod can be replaced easily, and without damage. CAUTION:
A jackknife, or knife without a locking blade is a good way to lose a finger!
3. A narrow trowel or garden tool will work well in soft or sandy soils.
4. A thin probe is preferred by many to precisely pinpoint the target, making for the smallest of holes.
5. There are several well designed sand scoops, trowels, and digging tools made especially for the Hobby of Metal Detecting. See your local dealer for more information.
HEADPHONES
The use of headphones has become almost mandatory for the
“professional”. It helps block out the outside noise, making those
deep weaker signals easier to hear. See your local dealer for more
information about quality Fisher headphones.
12
FALSE SIGNALS
A “False Signal” occurs when something sounds like a good target,
but is not. Your 1270 does a great job of discriminating, but bad
“targets” with similar electrical characteristics can fool it. Large
pieces of trash or items very close to the search coil will
occasionally sound “good”. Experience is the best teacher. As
you accumulate more hours with your 1270, you will soon learn
how to distinguish “false signals”. Initially when you pass over a
target, and get a good response, you will find that crossing over
the target once or twice more, the signal will break up or
completely disappear.
Here are some sources of false signals and the solution.
1. Electrical Interference: Caused by radio and TV towers, power lines, or
other metal detectors.
SOLUTION: Move farther away from the source, slow down the sweep speed,
or lower the sensitivity.
2. Highly Mineralized Soil: Soils with a high iron or salt content.
SOLUTION: Reduce the sensitivity, raise the discrimination level, or if
searching in the ALL-METAL GROUND ADJUST mode, readjust the
ground adjust setting.
3. Extremely Trashy Areas: May result in a lot of “chatter”.
SOLUTION: Utilize the SILENCER mode, adjust the discrimination level
(the use of the IRON DISC mode can be very helpful here), or reduce the
sensitivity. In some areas, a smaller coil will be beneficial to better achieve
target seperation.
4. Metal Interference: The 1270 will pick up metal ABOVE and on the
SIDE of the coil, as well as under. WATCH FOR: Large metal structures,
your digging tool, and your coil cable hanging loose above the coil.
BATTERY REPLACEMENT
Your 1270 comes equipped with two 9-volt standard transistor radio batteries. Should your low battery indicator LED start to blink, replacement
in approximately one hour will be necessary. Locate the two battery compartments on the underside of the CONTROL HOUSING. Gently push the
clip on the front end IN and UP. Pull the nylon tab to remove the batteries.
Make note of the polarity (+ / -) of your new batteries. The (+) or Positive
side is the smaller of the two contacts on the battery. Match that with the
(+) inside the 1270 battery compartment. Slide the top of the battery in
pushing against the copper contacts. Gently push the bottom of the battery
into the compartment. Replace the Battery Cover.
13
MAINTENANCE:
Your 1270 doesn’t require a lot of care, nor does it require regular
“maintenance”. However, you should do a few things to keep
your 1270 in peak operating condition.
1. Remove the batteries if you’re not going to be using your detector for a
while. Batteries can leak, and cause severe damage.
2. Avoid extreme temperatures. When parked in the sun, never leave your
detector in a closed car or in the trunk.
3. If you “scrub” your detector coil on the ground, you will eventually wear
through it. Invest in a coil cover. They are an inexpensive way to protect
your investment.
4. Keep your 1270 clean. Periodically remove the lower stem, and wipe it
down. Keep the lock nuts free of sand and dirt.
5. Keep your 1270 dry. Cover the control housing with a plastic bag or
something similar if you hunting out in the rain, fog, dust, or near the surf.
TREASURE HUNTER CODE OF ETHICS
Laws governing the use of metal detectors are common in some
areas. In many countries, the use of metal detectors is illegal or
severely restricted. DON’T LET THIS HAPPEN IN YOUR COUNTRY!
1. Always get permission to hunt on private property
2. Always leave a site cleaner then you found it. Take your trash with you.
3. Always fill in your holes neatly whether you’re in a city park or remote
wilderness. Leave the land the way it was before you disturbed it.
4. Always obey all laws relating to Treasure Hunting
5. Always return valuable property if you can locate the original owner
6. Always do whatever you can to give the hobby of Treasure Hunting the
good image it needs and deserves.
LET’S PRESERVE OUR TREASURED SPORT
14
SPECIFICATIONS
Subject to improvement or modification without notice.
WEIGHT
3.5 lbs.
LENGTH
Fisher Research Laboratory does not warrnt suitability to specific use. Fisher Research Laboratory shall in no event be liable
for any direct, incidental, consequential or indirect damages.
Extended .................................................................... 52” 2
Collapsed ................................................................... 42” 2
FREQUENCY
VLF-Search ............................................................... 8.2 KHz, Quartz Crystal Controlled
Audio Target Response ............................................... 512 Hz Unipolar 3
SEARCH MODES
Normal Disc .............................................................. VLF-Slow Motion Discrimination 4
Iron Disc ................................................................... VL F-Slow Motion Discrimination 4
Ground Balanced ....................................................... VLF-Slow Motion All Metal
Pinpoint .................................................................... VLF All Metal, No-Motion
No Threshold Operation . ............................................ Yes3/6
OUTPUTS
Low Battery Alert ...................................................... Automatic (LED)
Built-in Speaker ......................................................... Yes
Stereo Headphone Jack ............................................. Yes
SEARCH COILS
Type .......................................................................... Concentric, Co-planar Spider Coil
Diameter ................................................................... 8"
Shielding ................................................................... 100% E.S.I.5
Interchangeable ......................................................... Yes
Submersible ............................................................... Yes
BATTERIES
BATTERY LIFE
(2) 9 Volt
Carbon Zinc ............................................................... 15-25 hours 2
Alkaline ..................................................................... 30-40 hours 2
WARRANTY
Lifetime Limited Warranty*7
*warranty may vary outside of the United States
See your dealer for details
NOTES
1. Subject to modification without notice.
2. Approximate.
3. PULSEGATE UNIPOLAR AUDIO PROCESSING.
Advanced Fisher circuitry which allows silent operation below
the “Audio-Threshold Tone” with no sensitivity loss. (See Note 6 also).
4. The 1270 is a “motion” detector while in the search modes, meaning that
the search coil must be moving at least slightly to detect a target.
5. Electro-Static-Insulated to eliminate certain types of false signals.
6. The 1270 can operate silently with no “Threshold Tone” (See Note 3); how ever, in the “maximum”
sensitivity position, a low audible threshold is provided.
7. Fisher does not warrant suitability to specific use. Fisher shall in no event be liablefor any direct or,
incidental, consequential or indirect damages.
15
QUALITY
Fisher detectors are renowned for their quality.
Each detector is hand crafted in the USA with pride
PERFORMANCE
Treasure Hunters worldwide rely on Fisher.
Our detectors are durable, dependable, and search deeper..
REPUTATION
Fisher produced the first patented metal detector in 1931. For
over 70 years, the Fisher logo has been a mark of excellence.
LIFETIME WARRANTY
Fisher believes in the products we produce and backs this belief
with a lifetime warranty, the best in the industry, on all of our
consumer detectors. Warranty may vary outside of the
United States. See your dealer for details
SERVICE
Fisher is committed to providing you, our valued customer, with
superior service. Each and every instrument is rigidly tested and
carefully inspected during assembly and before shipment.
Should you have any questions or problems, contact:
FISHER RESEARCH LABORATORY
200 West Willmott Road.,
Los Banos, California 93635
Tel 209.826.3292 Fax 209.826.0416
www.fisherlab.com
email:[email protected]
for a dealer near you
1.800.M-SCOPE.1 1.800.672.6731
FRL8704776