1
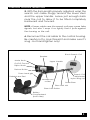
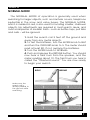
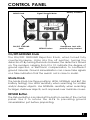
M-96
Value, Pedestal and Box Locator
Operating Manual
FISHER
RESEARCH
LABORATORY
CONTENTS
About Your M-96 ..................................................................... pg. 1
Condensed Operating Instructions ...................................... pg. 2
Factory Preset ‘Turn-On-and-Go’ Marks .......................... pg. 2
Start-Up Procedure ............................................................. pg. 4
Setting Up................................................................................. pg. 6
Fitting The Detector To the Operator ................................ pg. 6
Normal Mode ...................................................................... pg. 7
High Mode ........................................................................... pg. 8
Control Panel .......................................................................... pg. 9
On/Off Grond Knob ............................................................ pg. 9
Mode Knob ......................................................................... pg. 9
Retune Button ...................................................................... pg. 9
Headphone Jack ............................................................... pg. 10
Search Methods ..................................................................... pg. 10
Helpful Hints ......................................................................... pg. 11
Searching In Water ............................................................. pg. 11
Pinpointing ............................................................................... pg. 12
Changing Batteries................................................................. pg. 13
Specifications ......................................................................... pg. 14
ABOUT YOUR DETECTOR
The Fisher M-Scope Model-96 offers the utility industry an
uncomplicated detector for finding paved-over or buried metallic
objects. The waterproof search coil and the rugged electronics
housing make the M-96 an ideal detector for field utility use.
The entire VLF (Very Low Frequency) operation of the M-96
has been reduced to just two control knobs and a pushbutton.
Adjusting these knobs gives the operator maximum depth while
eliminating annoying ground effects, usually caused by
mineralization in the soil.
The M-96 features state-of-the-art, surface-mount electronics
in a sealed control housing.
The Fisher M-96 offers a easy, uncomplicated method of finding
buried metallic objects.
1
CONDENSED OPERATING INSTRUCTIONS
FACTORY PRESET ‘TURN-ON-AND-GO’ MARKS
Your Fisher M-96 is fairly simple to operate, especially when
compared to other metal detectors. Even so, we strongly
recommend that you read this entire manual. You’ll be able to tune
your M-96 to your specific needs and conditions.
But if you just can’t wait any longer, and you’re an experienced
detector user, here’s some quick instructions to get you going:
1. Unpack your M-96 carefully, and save the box. It
may come in handy if you need to ship the instrument.
2. Take a look inside the lock nut on the upper
handle to see if the yellow locking pad is on the
left-hand side for a lower handle with a flat on one
side. Loosen the locking nut by rotating it fully
counterclockwise. This is the configuration for all
M-96’s up to Serial #62230. Units with Serial #62231
and after have a locking pad at the top and a
round lower stem with a stem lock button fitting in
one of the holes at two (2) inch intervals on the
back side of the upper handle.
3. Slip the lower stem into the upper handle, making
sure the flat side of the stem is aligned with the
locking pad inside the lock nut, (Serial No. 62230
and before).
4. Adjust the stem length and coil angle so that the
search coil rests flat on the ground about 6-12
inches in front of and slightly to the right of your
right foot (to the left of your left foot for left handers).
Your arm should be straight and relaxed, the grip
held loosely. The stem length is adjusted by
loosening the nylon wing nut on the search coil.
NOTE: Remember, the longer the shaft, the more you’ll
have to bend your elbow to keep the coil off the ground
and the sooner your arm will get tired. The M-96 is balanced
for comfortable searching in a tight semicircle around
the front of the operator.
2
CONDENSED OPERATING INSTRUCTIONS
5. With the stem length properly adjusted, wrap the
search coil cable snugly around the lower stem
and the upper handle. Leave just enough slack
near the coil to allow it to be tilted completely
backward and forward.
NOTE: A loose cable near the search coil may cause false
signals, but don’t wrap it so tightly that it pulls against
the housing or the coil.
6. Reconnect the coil cable to the control housing.
Be careful not to cross thread it and make sure it’s
snug - but hand tighten only!
8-inch Search Coil
Speaker
Mode Knob
Upper Handle
On/Off Ground
Reject Knob
Retune Button
Foam hand grip
Search Coil
Adjustment
Nylon Wing nut
Padded Arm Rest
Headphone
socket
Lower Stem
Stem Lock Nut
Stem Lock Button
Battery
Compartment
(both sides)
3
CONDENSED OPERATING INSTRUCTIONS
START-UP PROCEDURE
Set Mode Knob
to NORMAL
Set GROUND
control to 5.
Watch the meter (and listen
to the speaker) for
indications of a target.
Press the
RETUNE button
.
Remove protective
plug and insert the
headphone plug to
hear target signals.
Turn-on-and-go factory preset control markers are colored red. The Mode Knob is set
to Normal and the Ground Knob is set to 5.
7. With the shaft length and coil angle properly
adjusted, you should be able to move into your
search position by leaning forward very slightly and
raising your arm.
8. If the arm rest is too wide or narrow, you may
bend it slightly inward or outward to your exact
requirements.
9. Plug your headphones (an accessory) into the
headphone jack (if you don’t use headphones, you
can use the built-in speaker.)
4
CONDENSED OPERATING INSTRUCTIONS
10. The two knobs can be adjusted with your thumb
without removing your hand from the grip,
particularly if you’re right handed. Set the controls
of the MODE and GROUND switches to the red
preset marks: NORMAL for the MODE control and
5 for the Ground control. You should hear a tone.
11. Press the RETUNE button.
12. Begin searching. Walk slowly, sweeping the M-96
search coil in front of you in a tight semicircle. Remember,
the M-96 is a no-motion detector, meaning the search
coil doesn’t have to be moving to detect a target.
13. Keep the search coil parallel to the ground.
14. When you get a good, repeatable signal in your
headphones and on the M-96 meter, pinpoint the
target by passing the search coil over it both sideto-side and top-to-bottom (at 90 degree angles).
15. Watch the meter and listen to the target signal.
The target will lie directly beneath the center of
the coil when the meter and audio signal peak.
16. Although the M-96 is one of the easiest-tooperate metal detectors available today, skill with
a metal detector takes practice. If you’re having
problems with your search, refer to the detailed
operating instructions contained in this manual,
beginning on the next page.
5
SETTING UP
Your search position should be
comfortable and relaxed, with the
detector grasped loosely in your
hand.
FITTING THE DETECTOR TO THE OPERATOR
1. Start by gripping the foam hand grip and letting
your arm hang comfortably by your side.
2. The length of the handle shaft and the angle of the
search coil are both adjustable. Adjust the search coil
angle so that it is parallel to the ground.
3. Loosen the lock nut found midway down the shaft,
and extend the lower shaft slightly. If the serial number
is 62231 or later, there is a stem lock button on the
lower shaft that fits at 2 inch intervals in the backside
of the upper handle to make it a double locking stem.
Be sure that the button engages in the hole closest for
your best operating length. After adjusting the length
of the shaft, tighten the lock nut with your hand. (Refer
to the photo on page 4.) Never use pliers or other
mechanical force to tighten this nut.
4. Again, completely grasp the foam handle and let
your arm hang at your side with the search coil parallel
to the ground. Bring your arm forward and try a few
side-to-side motions with the detector. The search coil
should be about 1 inch above and parallel to the
ground without strain to the operator. If the position
feels strained to you, your hand holding the detector
is too far in front of you or the shaft length adjustment
is too short. Readjust the shaft length as necessary.
6
SETTING UP
NORMAL MODE
The NORMAL MODE of operation is generally used when
searching for larger objects, such as manhole covers, telephone
pedestals in the snow and valve boxes. The NORMAL MODE,
which is marked in red, is also used for locating smaller, shallower
objects. No adjustments are required in most search areas, and
most small pieces of metallic trash – such as bottle caps, pull tabs
and nails – will be ignored.
1. Hold the search coil 3 feet off the ground and
away from any metal objects.
2. To test the batteries, turn the MODE knob to BAT
and turn the GROUND knob to 5. The meter should
read at least 80. If not, replace the batteries.
3. Turn the MODE knob to NORMAL.
4. Push and release the RETUNE button. You should
now hear a faint hum from the speaker, and the
meter reading about 10. The faint hum you hear is
called the “threshold sound.” You are now ready
to begin your search.
Make sure the
search coil is
always parallel to
the ground while
searching.
7
SETTING UP
HIGH MODE
1. Rest the search coil on the ground in an area
you are reasonably sure is free of metal objects.
2. After going through BAT test in the NORMAL
MODE, turn the MODE knob to HIGH.
3. Turn the GROUND knob to 5.
4. Push and releases the RETUNE button. The meter
reading should be about 10 and the speaker should
have a slight hum, or “threshold sound.”
5. Raise the coil straight up about 12 inches and
note any changes in the meter indication and
speaker volume.
6. If there is little or no change in the meter reading
and volume, the M-96 is properly ground adjusted
and you are ready to search. If there is a change,
proceed to step A or B.
A. If the needle and sound level drop when you
raise the coil, set the search coil flat on the
ground, turn the GROUND knob to 4 and push
and release the RETUNE button. Now raise the
coil 12 inches from the ground and repeat steps
4 and 5, making minor adjustments to the
GROUND knob until the meter reading and
sound remain the same whether the search coil
is flat on the ground or 12 inches in the air.
B. If the needle and sound level increase when
you raise the coil, set the coil flat on the ground
and turn the GROUND knob to 6, push and
release the RETUNE button. Raise the coil 12
inches from the ground and repeat steps 4 and
5, making minor adjustments with the GROUND
knob until the meter reading and sound remain
the same whether the search coil is flat on the
ground or 12 inches in the air.
The rule of thumb is this: if the volume increases
when the coil is raised, turn the GROUND knob
up. If the volume decreases, turn the GROUND
knob down.
8
CONTROL PANEL
MODE Knob
ON/OFF GROUND
Knob
Signal Strength Meter
RETUNE Button
Battery Condition
Headphone Jack with
protective plug inserted
On/Off GROUND Knob
The ON/OFF GROUND Rejection Knob, when turned fully
counterclockwise, clicks into the off position, turning the
detector off. By turning the knob clockwise, the detector is turned
on. The numbers, ranging from 0 to 10, indicate the degree of
ground rejection, or electronic compensation, to counteract
ground minerals. Ground mineralization can cause false signals
or a false indication that the search coil is close to metal.
Mode Knob
The Mode Knob has three positions: HIGH, NORMAL and BAT (for
battery testing). Use HIGH sensitivity when searching for smaller
and/or deeper objects. Use NORMAL sensitivity when searching
for larger, shallower objects, such as paved-over manhole covers.
RETUNE Button
The Retune Button is located at the bottom center of the control
panel. Use it to retune the M-96 to prevailing ground
mineralization just before pinpointing.
9
CONTROL PANEL
HEADPHONES Jack
The HEADPHONES Jack is located to the right of the RETUNE Button.
A plastic plug can be inserted into this jack to keep dirt and water
out when not in use.
SEARCH METHODS
It’s a good idea to establish a systematic search pattern for
your selected area. A systematic approach to searching will avoid
aimless wandering, which could cause you to miss the search
object and lengthen the amount of time required to do the job.
As you walk along, your sweep pattern should be in a slow, halfcircle motion from side-to-side and with the coil as close to the
ground as possible. When the M-96 search coil passes over a
conductive (metallic) object, it will be indicated by an increase in
both sound and meter reading. Because of the sensitivity of the M96 search coil, a large and/or close-to-the surface object may be
detected before the search coil is directly above it. Passing the
search coil over the object from several different directions and
marking the edges of the object will indicate its central position.
Your search should be slow
and methodical, sweeping
in a semicircle and
overlapping for maximum
ground penetration
10
SEARCH METHODS
HELPFUL HINTS
Raising the coil vertically in the air is another method of
reducing the target size (as seen by the detector) and pinpointing
the target. Because the area of greatest sensitivity is in the center
of the search coil, it isvery easy to pinpoint the location of any
metallic object, large or small. Also, see the section on
Pinpointing, beginning on page 12.
1. Hold the search coil about 1 inch or less above
the ground and begin your search by sweeping
back and forth as shown on page 10.
2. Keep the search coil parallel to and as close to
the ground as possible.
3. Overlap your sweeps for uniform depth penetration.
4. Search slowly and systematically. Pay attention
to where you are going and where you have been.
5. During your search, the meter reading should
remain at about 10 for maximum sensitivity. However,
as you pass over changing ground mineralization
or metallic trash, the needle may drift up or down
slightly. A quick push of the RETUNE button will
instantly retune the M-96 to its “threshold” sound.
SEARCHING IN WATER
The search coil is waterproof and the lower handle may be
used in water; however, the water must not contract the cable
connection at the box, nor should the box itself be immersed.
If you are searching in salt water, be sure to flush the lower
handle with fresh water after every use. If not, continual exposure
to salt water may cause the nut to freeze up.
11
PINPOINTING
Accurate pinpointing with the M-96 takes some practice but
not much. With a little experience, you should be able to pinpoint
buried targets in just a few seconds.
1. Once the presence of a buried target is
indicated by a sharp increase in the audio signal
and needle movement, continue moving the
search coil from side-to-side across the target area
in a narrower and narrower search pattern.
2. Stop the search coil over the spot where you receive
the loudest response and highest meter reading.
3. Now move the coil slowly forward and straight
back a couple of times, again stopping over the
strongest response.
4. Move the search coil side-to-side one more time and
stop over the strongest signal once again. Your target
should be directly below the center of the search coil.
5. For quick and accurate pinpointing of strong
signals, push the RETUNE button momentarily, close
to, but not over, the target area. This will “detune”
the M-96 so that it responds over a smaller area,
making pinpointing of the object easier. “Detuning”
also reduces depth penetration.
CAUTION:
The ultra-slow auto-tune circuitry is constantly retuning the M96 just fast enough to counteract any drift caused by humidity,
temperature changes, etc. If the search coil is held for a
prolonged period of time over a target, the M-96 will eventually
“tune out” the target and the signal will fade. A brief negativemeter response may also result when the coil is moved away
from the target. In either case, the M-96 may be instantly retuned
to the “threshold” level by pushing the RETUNE button while
holding the coil away from the target area.
12
CHANGING BATTERIES
To change the batteries, slide the side covers on the battery
housing located underneath the arm rest in the direction of the
arrows. Remove the battery holders one at a time. Replace all 6
AA cells, making sure that each one is inserted with polarity
(+ or -) in the same direction as the ones you remove.
The M-96 power supply is located under the arm
rest at the top end of the stem.
Grasp either side of the M-96 battery compartment
by the top and bottom edges.
Slide the cover about half way off toward the
opposite end of the detector.
Grasp the nylon pull tape and dislodge the battery
pack by pulling up. Replace all six AA batteries.
Return the battery pack to the compartment,
making sure it snaps into place. Also, be careful to
keep the nylon pull tape within reach.
Hold the end of the battery pack down, along with
the nylon tape, and slide the cover back i into
position. Repeat steps 1-6 on the other side of the
battery compartment.
13
SPECIFICATIONS
Operating Environment
+33° F to +120° F (0 to 50° C) ................ with carbon zinc batteries
-4° F to +120° F (-20 to 50° C) ....................... with alkaline batteries
Search coil submersible in water
Operating Frequency of Search Coil ........................................ 4.5 KHz
Sensitivity ......................................................... 0.2 mv RMS for full scale
Sensitivity Adjustment Range .......................................................... 12:1
Output Indication ..........Meter ........... 1 milliamp, 0-100 linear scale
Speaker .......................... 16 ohm impedance
Headset (optional) ......... 8 ohm impedance
Audio Frequency ................................... 450 Hz
Power Supply ............................. ±9V, each consists of 12 x 1.5V AA
batteries in (2) 6-battery packs
Power Consumption ................. (-9V) 13.8 mA,
(+9V) 8 mA min
7.5 - 18.5 mA @ audio threshold
5 0 mA max
Threshold ..................................................................... 50 mA max sound
Battery Life .................................. Carbon/Zinc ................... 35-45 hours
Alkaline ............................. 100+ hours
Search Coil Configuration ................................................................. 2-D
Weight......................(with 8-inch coil)........................3.74 lbs. (1.7 kg)
(with 11-inch coil) .......................4.26 lbs. (1.9 kg)
Dimensions......Length.....40 to 54 inches adjustable (101 to 137 cm)
Shipping Weight.......(with 8-inch search coil) ........... 7.0 lbs. (3.2 kg)
(with 11-inch search coil) ............ 7.0 lbs. (3.2 kg)
Shipping Dimensions..............................5 1/2 x 12 1/4 x 34 3/4 inches
(14 x 31 x 88 cm)
14
15
QUALITY
Fisher detectors are renowned for their quality.
Each instrument is hand crafted in the USA with pride
PERFORMANCE
Our detectors are durable, dependable, and search deeper.
REPUTATION
Fisher produced the first patented metal detector in 1931. For
over 70 years, the Fisher logo has been a mark of excellence.
2-YEAR WARRANTY
Fisher believes in the products we produce and backs this
belief with a 2 year limited warranty, Warranty may vary outside the United States. See your dealer for details
SERVICE
Fisher is committed to providing you, our valued customer, with
superior service. Each and every instrument is rigidly tested and
carefully inspected during assembly and before shipment.
Should you have any questions or problems, contact:
FISHER RESEARCH LABORATORY
200 West Willmott Road.,
Los Banos, California 93635
Tel 209.826.3292 Fax 209.826.0416
www.fisherlab.com email:[email protected]
EXPORT DEPARTMENT
P.O. Box 1896
New Haven, CT 06508 USA
Tel 203.288.1638 Fax 203.287.8099
email: [email protected]