1
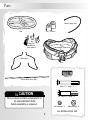
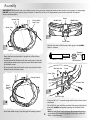
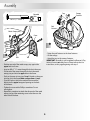
Bounce ‘n Play
Activity Dome
Model Number: 79652
Please keep this instruction sheet for future reference,
as it contains important information.
Tool needed for assembly: Phillips Screwdriver (not included).
Use only for a child who is unable to push up on hands and knees,
pull up or sit unassisted.
Product features may vary from picture above.
w
she
ww.fi
r-p
.c
ri c e
om
Warnings
Consumer Information
WARNING
Occasionally a consumer may experience
a problem with one of our products.
If this should happen, please call us toll-free,
rather than return this product to the store.
Usually, we can solve the problem over the telephone
or send you replacement parts.
Please call Fisher-Price® Consumer Relations,
toll-free at 1-800-432-KIDS,
8 AM - 6 PM EST Monday through Friday.
Hearing-impaired consumers using TTY/TDD equipment,
please call 1-800-382-7470.
Or, write to:
Fisher-Price® Consumer Relations
636 Girard Avenue
East Aurora, New York 14052
Failure to follow these warnings
and instructions could result in
serious injury or death.
To reduce the risk of Sudden Infant
Death Syndrome (SIDS), normal
healthy infants should always sleep
on their backs unless otherwise
advised by a pediatrician.
•1
Infants can suffocate:
-In gaps between an extra pad and
side of the dome
-On soft bedding.
• Never add a mattress, pillow,
comforter or padding. Use ONLY the
pad provided by the manufacturer.
• To prevent falls:
-Do not use this product when
infant begins to push up on hands
and knees.
-Never place product on an
elevated surface.
• To prevent strangulation:
-Never place items with strings, such
as hood strings or pacifier cords,
around a child's neck.
-Never place product near a window
where cords from blinds or drapes
can strangle a child.
• Never move this product with child
in it.
• Never leave child unattended.
2
Parts
Metal Canopy Stay
®
®
Pad
1
2 Covers
1
3 Toys
(Toys may
be different
than shown.)
2 Base Wires
Base
Spring - 4
Plastic Mesh Cover Stay
M5 x 113/16" Screw - 2
CAUTION
M6 x 15/8" Screw - 8
This product contains small parts in
its unassembled state.
Adult assembly is required.
M5 Lock Nut - 2
M6 Lock Nut - 8
ALL SHOWN ACTUAL SIZE
3
Assembly
IMPORTANT! Before each use or assembly, inspect this product for damaged hardware, loose joints, missing parts or sharp edges.
DO NOT use if any parts are missing or broken. Contact Fisher-Price® for replacement parts and instructions if needed.
Never substitute parts.
Button Hole
Frame
Middle Hole
Middle Hole
Plastic Mesh
Cover Stay
Mesh Cover
3
Frame Tubes
• Position the ends of the frame tubes against the middle
holes in a frame.
1
Base
Rounded
Side
• Open the base and position it upright on a flat surface,
as shown.
• Locate the end of the base with the mesh cover. Insert the
entire plastic mesh cover stay into one of the button holes
in the mesh cover.
• Be sure to tuck the plastic mesh cover stay away from the
button hole in the mesh cover.
M6 x 15/8" Screw - 4
M6 Lock Nut
M6 Lock Nut - 4
Frame
Frame Tube
Canopy Tunnel
Frame Tube
Metal
Canopy
Stay
4
Push Base Up
2
• Insert the metal canopy stay through the canopy tunnel.
4
• Insert an M6 x 15/8" screw through each frame tube and into
the frame.
• Fit an M6 lock nut (with the rounded side toward the fabric)
into each middle, hexagonal opening on the back of the
frame.
Hint: You may find it easier to access the hexagonal opening
on the back of the frame if you push the base up, so that the
fabric is out of the way.
Assembly
Frame
5
• Tighten the screws with a Phillips screwdriver. Do not
over-tighten.
• Repeat assembly steps 3 - 5 to attach the other ends of the
frame tubes to the frame on the other side of the base.
5
M6 x 1 /8" Screw - 4
7
Rounded Side
• Fit an M6 lock nut (with the
M6 Lock Nut - 4
rounded side toward the
fabric) into each lower, hexagonal opening on the back
of the frame.
• Tighten the screws with a Phillips screwdriver. Do not
over-tighten.
• Repeat this procedure to attach the other ends of the
base wires to the frame on the other side of the base.
Spring - 4
Frame
Lower Hole
Base
Wire
Spring
6
Base Wire
• Position the base wires around the base so that the ends
point upward and are against the lower holes in a frame.
• Place a spring onto an M6 x 15/8" screw.
• Insert the M6 x 15/8" screw with spring through a base wire
and into the frame.
5
Assembly
Toys
Rounded
Side
Canopy
Fasteners
M5 x 113/16" Screw -2
M5 Lock Nut -2
Pad
Fastener
Metal Canopy Stay
Cover
9
Upper
Hole
8
Slot
®
• Fasten the pad fasteners to the base fasteners.
• Lift the canopy.
• Attach the toys to the canopy fasteners.
IMPORTANT! Assembly is now complete, but Bounce ‘n Play
Activity Dome is not ready for use. Please refer to the Use
instructions, on this page, beginning with step 2.
Tab
• Position one end of the metal canopy stay against the
upper hole in a frame.
• Insert an M5 x 113/16" screw through the hole in the cover.
• Fit the end of the screw through the hole in the metal
canopy stay and into the upper hole in the frame.
• Push on the cover to insert and “snap” the tab on the cover
into the slot in the frame. Make sure you hear a “snap”.
• Fit an M5 lock nut (with the rounded side toward the
fabric) into the upper hexagonal opening on the back
of the frame.
• Tighten the screw with a Phillips screwdriver. Do not
over-tighten.
• Repeat this procedure to attach the other end of the metal
canopy stay and the remaining cover to the frame on the
other side of the base.
6
Use
To Unfold
PUSH
PUSH
Frame
Groove
1
3
Base Wire
Sides of Base Wire
• Position the product upright on a flat surface.
• Grasp both sides of a base wire.
• Pull both sides of the base wire outward and then let the
base wire rotate down.
Note: If the base wire does not freely rotate down, pull the
sides of the base wire further outward.
• Push down on the product to be
sure each side of the base wire is
in the correct position. The base
wire should rest in the groove in
each frame.
• Repeat Use steps 1- 3 to unfold
the other base wire.
CORRECT
Using the Canopy
Canopy Up
Frame
Canopy
Down
Groove
Groove
2
Sides of Base Wire
• Lift the product up slightly so that each side of the base
wire “snaps” into the groove in each frame. Make sure you
hear a “snap”.
4
• Adjust the canopy up or down.
7
®
Use
Use
Using the Mesh Cover
Base Wire
Zipper
Mesh Cover Up
Canopy Up
7
5
®
• Rotate the base wire up.
• Repeat this procedure to fold the other base wire.
• Adjust the canopy and mesh cover up.
• While holding the mesh cover up, fasten the zipper closed.
To Fold for Portability
Care
The pad and toys are machine washable. Wash the pad and
toys separately in cold water on the gentle cycle. Do not use
bleach. Tumble dry separately on low heat and remove
promptly. The fabric and frame may be wiped clean using
a mild cleaning solution and a damp cloth.
Frame
Groove
Groove
6
Sides of Base Wire
• Grasp both sides of a base wire.
• While lifting the product up slightly, pull both sides of the
base wire outward to remove the base wire from the groove
in each frame.
Fisher-Price, Inc., a subsidiary of Mattel, Inc., East Aurora, NY 14052 U.S.A.
©2001 Mattel, Inc. All Rights Reserved. ® and ™ designate U.S. trademarks of Mattel, Inc.
For other countries, outside the United States:
Canada: call 1-800-567-7724, or write to:
Mattel Canada Inc., 6155 Freemont Blvd., Mississauga, Ontario L5R 3W2.
Great Britain: telephone 01628 500303.
Australia: Mattel Australia Pty. Ltd., 658 Church Street, Locked Bag #870,
Richmond, Victoria 3121 Australia.
Consumer Advisory Service 1300 135 312.
New Zealand: 16-18 William Pickering Drive, Albany 1331, Auckland.
Printed in China
79652pr-0920