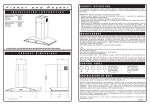
1
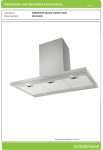
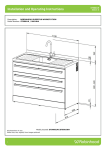
Installation instructions
and User guide
Designer series wall canopy
HC90DXB1, HC90DMB1 models
NZ AU GB IE
Contents
Safety and warnings
Installation instructions
Getting started quickly
Cleaning and maintenance
Manufacturer’s warranty
Customer care
Important!
SAVE THESE INSTRUCTIONS
The models shown in this User Guide may not be available in all markets and are
subject to change at any time. For current details about model and specification
availability in your country, please visit our local website listed on the back cover
or contact your local Fisher & Paykel dealer.
1
2
5
6
7
8
Safety and warnings
1
Important!
Please read the entire set of instructions before installing the wall canopy.
This wall canopy is not intended for use by young children or infirm persons without supervision.
Young children should be supervised to ensure that they do not play with the wall canopy.
There must be adequate ventilation of the room when the wall canopy is used at the same time
as appliances burning gas or other fuels. (A partial vacuum in the room could result in too high a
concentration of gas in the air).
You must read the details concerning the method and frequency of cleaning.
There is a fire risk if cleaning is not carried out in accordance with the instructions.
Do not flambé under the wall canopy.
Exhaust air must not be discharged into an existing flue that is used for exhausting fumes from
appliances burning gas or other fuels.
The minimum distance between the cooktop surface and the filters of the wall canopy shall be
600 mm, or 650 mm if installed over a gas cooktop.
Attention should be given to ensure that any applicable regulations concerning the discharge of
exhaust air is fulfilled.
If the supply cord of this equipment is damaged it must only be replaced by the manufacturer, its
service agent or similarly qualified person in order to avoid a hazard.
Always switch the power off prior to installation, servicing or cleaning the wall canopy.
Never use the wall canopy without the filters in place.
Stainless steel is very easily damaged during installation if abraded or knocked by tools. It
is recommended to protect the top of the canopy with cardboard or polystyrene during the
installation to minimise the risk of damage occurring.
A power outlet should be within 750 mm of the motor assembly and can be either on the wall,
behind the chimney or in the ceiling.
To comply with electrical safety regulations, this canopy must be plugged into a socket near the
appliance. The socket must be accessible, or have an accessible isolating switch, to enable the end
user to isolate the canopy from the power for the purpose of internal cleaning or maintenance.
Ducting accessories are not supplied. All ducting must comply with local requirements and building codes.
WARNING!
Electrical Shock Hazard
All electrical work must be done in accordance with local and/or national
electrical codes as applicable. For safety, this product must be earthed. If
you are unfamiliar with methods of installing electrical wiring, employ the
services of a qualified electrician. Turn off power at service entrance before
installing wiring or servicing this product.
WARNING!
Weight Hazard
The wall canopy is heavy. Please ensure adequate care is taken when installing
the wall canopy to prevent personal injury. The wall canopy must be installed
onto a solid wall, stud, beam or truss. Weight of the product is 22.2 kg.
2
Installation instructions
Thank you for purchasing a quality Fisher & Paykel wall canopy. Each wall canopy is tested and
approved before it leaves the factory, ensuring our high standard of quality control is met.
Contents of packaging
1 x wall canopy
2 x chimney pieces with bracket
1 x installation instructions
3 x aluminium mesh filters
2 x 12 x 2” screw
2 x cup washer
3 x 8 x 1.25” screw
1 x wall anchor
4 x 6 x ¼” self tapping screw
Typical equipment required:
Electric drill
Screwdriver
Duct tape
Jig saw
Ladder
Ducting
Tape measure
Drill bits
Spirit level
Fig.1 Designer wall canopy
Accessories
Accessory
Part Number
Chimney ext 3048 mm (10’) ceiling SS
RR1740
Chimney ext 3657.6 mm (12’) ceiling SS
RR1740
Chimney ext 3048 mm (10’) IR
89092
Chimney ext 3657.6 mm (12’) IR
89093
Recirculation kit
RR1744
Replacement charcoal filter
R104165
Light bulb
R104467
Replacement aluminium filter
R104660
Installation instructions
3
Height of wall canopy
The wall canopy is designed for 2440 mm high ceilings.
The chimney is telescopic and is designed for wall canopy
installations between 650 to 750 mm above the cooking surface.
Ascertain the desired installation height of the wall canopy.
Any installation above 750 mm will compromise the
extraction performance.
The air outlet from the motor requires 150 mm round ducting
which requires a 160 mm (min) diameter hole in the ceiling.
Filter surface
Cooktop
A = 600 min (electric cook top)
A = 650 min (gas cook top)
B = 225 mm
C = 260 mm
Fig.2 Positioning
Ducting options
Recirculation
For recirculation, please purchase a recirculation kit (part no. RR1744). The recirculation kit is
required to channel the air out through the side-vents at the top of the flue.
Note: a ducting hole is not required in the wall or ceiling if a recirculation kit is fitted.
Ducting
For ducted installation, it is recommended that you use 150 mm diameter, rigid or semi-rigid
ducting. This will require a 160 mm (min) round hole in the ceiling, which the decorative chimney
will cover. Care should be taken to align the canopy with the decorative chimney allowing
sufficient clearance to accommodate the ducting.
For optimal efficiency, use smooth-wall, solid galvanized or plastic ducting for reduced noise and
increased airflow. Flexible ducting should only be used as a last resort (ie in difficult installations)
and if used, ensure that it is pulled tight.
The smoother, straighter and shorter the ducting the quieter and more efficient the wall canopy
will perform.
All ducting must comply with local requirements and building codes.
Note: we recommend an Easy Fit by Fisher & Paykel or a UNIDUCT ducting system, products that
have been designed to expel air efficiently.
Preparing the wall canopy for installation
Please read the instructions carefully before installing the wall canopy.
Remove the filters from the canopy to allow access to wall mounting holes. To remove the filters,
pull the relative catch, tilting it downwards until it disengages from the supports. Reverse these
instructions when refitting the filters.
Prior to drilling any holes, check that the area behind the surface to be drilled is clear of any
electrical cables or pipes etc.
Stainless steel/Iridium is very easily damaged during installation if abraded or knocked by tools.
Whenever possible, protect the cooktop with cardboard or the like, to prevent damage
on installation.
4
Installation instructions
1
Before commencement, unpack the wall canopy
and check that it functions correctly.
2
Pre-drill pilot hole 3 mm diameter at dimensions
C and B: B = 225 mm and C = 260 mm.
Note: Fixing to a solid stud is recommended,
see Fig.4.
3
Loosely fix the 12 x 2” screws and 2 x cup
washers in position, check with a spirit level
across the screws to ensure they are level.
4
Mark the position of the decorative chimney at
the ceiling and wall. Cut the cornice moulding
away if required, to enable the chimney to fit
flush against the wall and ceiling.
5
Mark and cut out the hole in the ceiling or wall
to fit the ducting (160 mm (min) diameter). This
is positioned centrally above the wall canopy,
with a centre line 100 mm from the wall (for the
ceiling option).
6
Using the screws supplied, fix the chimney
bracket to the wall or ceiling, checking that it is
centrally located above the canopy.
7
Remove the protective plastic covering from all
parts including the filters.
8
Fit the wall canopy onto the mounting screws
and tighten.
9
Connect and secure the ducting (use duct tape
if required).
Diameter 160 mm (min)
C = 260 mm
100 mm from
centre to wall
Note: fix to
a solid stud
B = 225 mm
See “A” on
page 3
Fig.3 Installation of unit
10 Assemble the chimney pieces to a height that
best suits the installation, leave these screws
loose so that the chimney is free to extend by a
few mm. Place the two pieces onto the canopy
top and secure the lower part to the canopy
sides. Extend the upper chimney to the ceiling
and secure in place with the screws supplied.
Fig.4 Bolt into solid stud
Getting started quickly
Control panel
Fan On/Off
Mid Speed
High Speed
Delay Off Switch
Light On/Off
Fig.5 Control panel
DELAY OFF SWITCH: Enables the wall canopy to remain on a low, mid or high speed for five
minutes, to clear away all residual cooking odours before switching off automatically.
5
6
Cleaning and maintenance
Caution!
Never use abrasive or oil based liquid cleaners.
General maintenance
The manufacturer is not liable for any damage caused by not following these instructions.
The wall canopy should be cleaned regularly using warm water with soap or mild liquid
detergents. This ensures that no build-up of grease occurs as these deposits are corrosive.
Do not use abrasives or harsh detergents/cleaning fluids.
Note: in areas of high humidity and coastal environments cleaning should be carried out frequently.
Aluminium filters
The grease filters must be periodically cleaned (at least every two months).
Remove the grease filters and wash them either by hand using hot soapy water or place them in
the dishwasher using mild detergent. Badly smoked filters may be cleaned with “cookware cleaners”.
Note: some discolouration of the frame may occur.
Charcoal filters
Charcoal filters are designed to remove grease and odours from cooking vapours, prior to the
cleansed air re-entering the kitchen (when the wall canopy is in recirculating mode). Charcoal
filters are disposable items and it is recommended that these should be replaced every three
to six months depending on use.
Note:
Fully saturated charcoal filters can become a barrier to air movement, impeding the wall
canopy’s performance.
In the event of fire, fully grease laden filters could be flammable and therefore regular
replacement is recommended.
In ducted installations, conventional aluminium filters are recommended.
For replacement charcoal filters, ducting accessories,
spare parts and service, please contact your local
supplier or Fisher & Paykel Customer Care Centre.
1
2
3
4
5
Light bulb replacement
(Halogen bulb 12 Volts/20 Watt)
Switch off the power to the canopy hood.
Use a small bladed screwdriver to prise off the light cover,
taking care not to damage the surrounding material.
Remove the defective bulb from the canopy hood.
Replace with a new bulb using a cloth. Do not touch the
bulb with fingers as this will shorten the life of the bulb.
Snap the cover back into place.
Fig.6 Replacing a light bulb
Manufacturer’s warranty
7
You automatically receive a 2 year Manufacturer’s Warranty with the purchase of this Product
covering parts and labour for servicing within the country of purchase.
Fisher & Paykel undertakes to:
Repair or, at its option, replace without cost to the owner either for material or labour any part of
the Product, the serial number of which appears on the Product, which is found to be defective
within TWO YEARS from the date of purchase.
This warranty DOES NOT cover
A
Service calls which are not related to any defect in the Product. The cost of a service call will be
charged if the problem is not found to be a Product related fault. For example:
1. Correcting the installation of the Product.
2. Instructing you how to use the Product.
3. Replacing house fuses or correcting house wiring.
4. Correcting fault(s) caused by the user.
5. Noise or vibration that is considered normal, eg. fan sounds, refrigeration noises or user
warning beeps.
6. Correcting damage caused by pests, eg. rats, cockroaches etc.
B
Defects caused by factors other than:
1. Normal domestic use or
2. Use in accordance with the Product’s User Guide.
C
Defects to the Product caused by accident, neglect, misuse or ‘Act of God’.
D
The cost of repairs carried out by non-authorised repairers or the cost of correcting such
unauthorised repairs.
E
Normal recommended maintenance as set out in the Product’s User Guide.
F
Repairs when the appliance has been dismantled, repaired or serviced by other than a
Fisher & Paykel AUTHORISED CUSTOMER SERVICE CENTRE or the selling dealer.
G
Pick up and delivery.
H
Transportation or travelling costs involved in the repair when the Product is installed outside the
Fisher & Paykel AUTHORISED CUSTOMER SERVICE CENTRE’S normal service area.
This Product has been designed for use in a normal domestic environment. It is not intended for
commercial use. Doing so may affect Product warranty.
Service under this manufacturer’s warranty must be provided by an Authorised Service Agent
(refer to the Customer care section for contact details). Such service shall be provided during
normal business hours. This warranty certificate should be shown when making any claim.
Note:
This Warranty is an extra benefit and does not affect your legal rights.
Please keep this User Guide in a safe place.
8
Customer care
Check the things you can do yourself.
Refer to your User Guide and check:
1
2
Your appliance is correctly installed.
You are familiar with its normal operation.
If after checking these points you still need assistance, please refer to your nearest
AUTHORISED SERVICE CENTRE, or contact us through our local website listed on the back cover.
In New Zealand if you need assistance...*
Call your Fisher & Paykel retailer who is trained to provide information on your appliance, or if we
can be of any further help, please contact our Customer Care Centre,
Toll Free: 0800 FP CARE or 0800 37 22 73
Fax: (09) 273 0656
Email: [email protected]
Postal address: P.O. Box 58732, Greenmount, Auckland
If you need service...*
Fisher & Paykel has a network of independent Fisher & Paykel Authorised Service Centres whose
fully trained technicians can carry out any service necessary on your appliance. Your dealer or
our Customer Care Centre can recommend an Authorised Service Centre in your area.
In Australia if you need assistance...*
Call the Fisher & Paykel Customer Care Centre and talk to one of our Customer Care Consultants.
Toll Free: 13 00 650 590
Fax: (07) 3826 9298
Email: [email protected]
Postal Address: PO Box 798, Cleveland QLD 4163
If you need service...*
Fisher & Paykel Australia Pty Ltd has a network of independent Fisher & Paykel Authorised
Service Centres whose fully trained technicians can carry out any service necessary on your
appliance. Our Customer Care Centre can recommend an Authorised Service Centre in your area.
In United Kingdom if you need assistance...*
Phone: (0845) 066 2200
Fax: (0845) 331 2360
Email: [email protected]
Postal Address: Fisher & Paykel Appliances Limited, Maidstone Road, Kingston,
Milton Keynes, Buckinghamshire, MK10 0BD
In Ireland if you need assistance...*
Phone: 01800 625 174
Fax: 01800 635 012
Email: [email protected]
Postal Address: Fisher & Paykel Appliances (Irl) Ltd, Unit D2, North Dublin Corporate Park,
Swords, Co Dublin
Customer care
9
*If you call or write, please provide: name, address, model number, serial number, date of
purchase and a description of the problem. This information is needed in order to better respond
to your request for assistance.
Product Details
Fisher & Paykel Appliances Ltd
Model/Serial No.
Date of Purchase
Purchaser
Dealer
Suburb
Town
Country
Copyright © Fisher & Paykel 2009. All rights reserved.
The product specifications in this booklet apply
to the specific products and models described at
the date of issue. Under our policy of continuous
product improvement, these specifications may
change at any time. You should therefore check
with your Dealer to ensure this booklet correctly
describes the product currently available.
www.fisherpaykel.co.nz
www.fp.com.au
www.fisherpaykel.co.uk
www.fisherpaykel.ie
NZ AU GB IE
Designer series wall canopy
Installation instructions and user guide
Published: 02/2009
Part No. 400005 D