1
Epson Stylus Photo R320
2 Turn On the Printer
®
Epson Stylus Photo R320
1
3
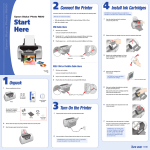
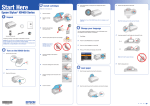
Unwrap the ink cartridges.
Plug the printer’s power cord into a grounded electrical outlet.
Start
Here
Don’t touch the green circuit
board or remove any labels
4
Open the cartridge cover and remove the paper insert.
5
Lower each cartridge into its holder with the green circuit board facing the front.
STOP: Do not connect the printer to your computer yet. Wait until you are instructed
to connect the USB cable in section 5, “Install Software.”
2
Press the
Power button to turn on the printer.
The color of the cartridge label should match the marker above the cartridge holder.
Then gently push each ink cartridge down until it is firmly seated.
CAUTION: Never use an external switch, such as a wall switch or power strip switch,
to turn the printer on or off.
CPD-18377
4050614-00
XXX
Close the cartridge cover.
7
Press the
the
3 Install
Ink Cartridges
1 Unpack
1
6
Remove everything from the box.
Small CD
insert
Ink cartridges
1
Flip open the paper support and pull up the extension.
2
Open the printer cover.
Maintenance button and close the printer cover.
Quick Reference
CD position
check paper
Printer
Printer Software
CD-ROM
CD/DVD tray
2
Remove all the tape and
packing material from
the printer.
Printer Basics
CAUTION: Don’t turn off the printer or interrupt charging while the light is flashing or
you’ll waste ink.
A progress bar is displayed on the LCD panel during ink charging.
8
3
After ink charging is finished, press OK.
Open the output tray and the printer cover.
Then remove the tape.
Make sure the CD/DVD tray guide
is closed completely.
Make sure the tray guide is
up after removing the tape
continue
Turn over
Epson Stylus Photo R320
2 Turn On the Printer
®
Epson Stylus Photo R320
1
3
Unwrap the ink cartridges.
Plug the printer’s power cord into a grounded electrical outlet.
Start
Here
Don’t touch the green circuit
board or remove any labels
4
Open the cartridge cover and remove the paper insert.
5
Lower each cartridge into its holder with the green circuit board facing the front.
STOP: Do not connect the printer to your computer yet. Wait until you are instructed
to connect the USB cable in section 5, “Install Software.”
2
Press the
Power button to turn on the printer.
The color of the cartridge label should match the marker above the cartridge holder.
Then gently push each ink cartridge down until it is firmly seated.
CAUTION: Never use an external switch, such as a wall switch or power strip switch,
to turn the printer on or off.
CPD-18377
4050614-00
XXX
Close the cartridge cover.
7
Press the
the
3 Install
Ink Cartridges
1 Unpack
1
6
Remove everything from the box.
Small CD
insert
Ink cartridges
1
Flip open the paper support and pull up the extension.
2
Open the printer cover.
Maintenance button and close the printer cover.
Quick Reference
CD position
check paper
Printer
Printer Software
CD-ROM
CD/DVD tray
2
Remove all the tape and
packing material from
the printer.
Printer Basics
CAUTION: Don’t turn off the printer or interrupt charging while the light is flashing or
you’ll waste ink.
A progress bar is displayed on the LCD panel during ink charging.
8
3
After ink charging is finished, press OK.
Open the output tray and the printer cover.
Then remove the tape.
Make sure the CD/DVD tray guide
is closed completely.
Make sure the tray guide is
up after removing the tape
continue
Turn over
Epson Stylus Photo R320
2 Turn On the Printer
®
Epson Stylus Photo R320
1
3
Unwrap the ink cartridges.
Plug the printer’s power cord into a grounded electrical outlet.
Start
Here
Don’t touch the green circuit
board or remove any labels
4
Open the cartridge cover and remove the paper insert.
5
Lower each cartridge into its holder with the green circuit board facing the front.
STOP: Do not connect the printer to your computer yet. Wait until you are instructed
to connect the USB cable in section 5, “Install Software.”
2
Press the
Power button to turn on the printer.
The color of the cartridge label should match the marker above the cartridge holder.
Then gently push each ink cartridge down until it is firmly seated.
CAUTION: Never use an external switch, such as a wall switch or power strip switch,
to turn the printer on or off.
CPD-18377
4050614-00
XXX
Close the cartridge cover.
7
Press the
the
3 Install
Ink Cartridges
1 Unpack
1
6
Remove everything from the box.
Small CD
insert
Ink cartridges
1
Flip open the paper support and pull up the extension.
2
Open the printer cover.
Maintenance button and close the printer cover.
Quick Reference
CD position
check paper
Printer
Printer Software
CD-ROM
CD/DVD tray
2
Remove all the tape and
packing material from
the printer.
Printer Basics
CAUTION: Don’t turn off the printer or interrupt charging while the light is flashing or
you’ll waste ink.
A progress bar is displayed on the LCD panel during ink charging.
8
3
Open the output tray and the printer cover.
Then remove the tape.
Make sure the CD/DVD tray guide
is closed completely.
Make sure the tray guide is
up after removing the tape
continue
After ink charging is finished, press OK.
4 Load Paper
7
1
Fan a few sheets of paper and load them against
the right side of the sheet feeder.
8
2
Slide the left edge guide against the paper.
9
NOTE: For instructions on loading and printing
on CDs or DVDs, see your Printer Basics book.
10
When installation is complete, you see this screen:
Mac OS X 10.2.x through 10.3.x
Click each title to learn more about it. If you want to
install the software, follow the on-screen instructions.
1
If you see this screen, click Add.
When you’re done installing software, click Exit. The
registration screen appears.
2
On the Printer List screen, click the Add button.
3
On the next screen, select USB from the pop-up menu.
4
Click Stylus Photo R320.
Follow the on-screen instructions to register your printer.
When you see a message telling you to restart your computer, click OK.
Remove the CD, then restart your computer.
NOTE: Be sure to restart your computer to enable all of your printer software features.
5 Install Software
You’re ready to print! See section 6, “Print.”
Windows
The software works with Mac OS 9.2.x, and Mac OS X 10.2.x through 10.3.x.
NOTE: If the Stylus Photo R320 doesn’t
appear, make sure it is turned on and securely
connected to your Macintosh.
5
Click the Add button. You see the Stylus Photo R320
in the Printer List.
6
Quit Print Center or the Printer Setup Utility.
Macintosh®
®
®
The software works with Windows 98SE, Me, 2000, and XP. Make sure your printer is NOT
connected to your computer, then follow the steps below.
1
Open the Applications folder, then open the Utilities folder and select Print Center, or
Printer Setup Utility.
1
Connect your printer to your computer: connect the
square end of your USB cable
to the printer and the
flat end of the USB cable to your computer. (You can connect
to any open port.)
NOTE: Be sure to restart your Macintosh to
enable all of your printer software features.
You’re ready to print! See section 6, “Print.”
Turn on your computer. Wait for the system
to start up, then insert the Epson® CD-ROM
in your drive.
Mac OS 9.2.x
Open the Chooser from the Apple® menu, then select these options:
• SP R320 Series
• Your USB port
• Background printing (on or off)
NOTE: If you see a screen like this,
click Cancel and disconnect the
printer from your computer. Then
follow the steps below.
2
Read the license agreement that appears
and click AGREE.
3
You see a message like this:
Square end
2
Close the Chooser.
Flat end
NOTE: Be sure to restart your Macintosh to
enable all of your printer software features.
Turn on your Macintosh. Wait for it to start up,
then insert the Epson CD-ROM in your drive.
You’re ready to print! See section 6, “Print.”
3
Double-click the CD-ROM icon, if necessary,
then double-click
EPSON.
4
Read the license agreement that appears
and click AGREE.
6 Print
You see the Install Menu.
Now you’re ready to print. For instructions, use these resources:
Click Install Printer Driver and Utilities and follow
the on-screen instructions. (In Mac OS X, you will need
to enter your Administrator password for each item.)
• Your Printer Basics book
Click OK to begin installing your printer driver.
4
When you see this screen, connect the
square
end of your USB cable to the back of the printer and
the
flat end of the USB cable to your
computer. (You can connect to any open port.)
5
6
NOTE: For Windows XP, if you don’t have USB 2.0,
you see a message. Click the Close button to close
the message.
Learn about loading paper, printing, maintaining your printer,
solving problems, and contacting Epson.
Click Install EPSON Print CD, then click Install
and follow the on-screen instructions.
NOTE: EPSON Print CD is not available for
Mac OS 9.
• Your Quick Reference card
See how easy it is to print without a computer.
7
Square end
Click Install Optional Software.
You see the following menu:
• Your on-screen Reference Guide
Double-click the ESPR320 Reference Guide icon on your desktop
to view more information about your printer.
8
Click each title to learn more about it. If you want to
install the software, follow the on-screen instructions.
9
When you’re finished installing software, close any
open windows on the screen and click Back at the
Optional Software menu.
10
From the Install Menu, click Install Printer Manual to install your on-screen
Reference Guide.
11
When you’re done installing software, click Exit. The registration screen appears.
Follow the on-screen instructions to register your printer.
Flat end
Wait while Windows detects your hardware.
5
When you see this screen, click Continue.
12
6
Follow the on-screen instructions to
install your software.
Go to the section for your operating system to finish setting up your printer.
Epson and Epson Stylus are registered trademarks of Seiko Epson Corporation.
General Notice: Other product names are for identification purposes only and may be trademarks of their respective owners.
Epson disclaims any and all rights in those marks.
continue
continue
© 2004 Epson America, Inc. 7/04
Printed in XXXXXX XX-XX.XX
4 Load Paper
7
1
Fan a few sheets of paper and load them against
the right side of the sheet feeder.
8
2
Slide the left edge guide against the paper.
9
NOTE: For instructions on loading and printing
on CDs or DVDs, see your Printer Basics book.
10
When installation is complete, you see this screen:
Mac OS X 10.2.x through 10.3.x
Click each title to learn more about it. If you want to
install the software, follow the on-screen instructions.
1
If you see this screen, click Add.
When you’re done installing software, click Exit. The
registration screen appears.
2
On the Printer List screen, click the Add button.
3
On the next screen, select USB from the pop-up menu.
4
Click Stylus Photo R320.
Follow the on-screen instructions to register your printer.
When you see a message telling you to restart your computer, click OK.
Remove the CD, then restart your computer.
NOTE: Be sure to restart your computer to enable all of your printer software features.
5 Install Software
You’re ready to print! See section 6, “Print.”
Windows
The software works with Mac OS 9.2.x, and Mac OS X 10.2.x through 10.3.x.
NOTE: If the Stylus Photo R320 doesn’t
appear, make sure it is turned on and securely
connected to your Macintosh.
5
Click the Add button. You see the Stylus Photo R320
in the Printer List.
6
Quit Print Center or the Printer Setup Utility.
Macintosh®
®
®
The software works with Windows 98SE, Me, 2000, and XP. Make sure your printer is NOT
connected to your computer, then follow the steps below.
1
Open the Applications folder, then open the Utilities folder and select Print Center, or
Printer Setup Utility.
1
Connect your printer to your computer: connect the
square end of your USB cable
to the printer and the
flat end of the USB cable to your computer. (You can connect
to any open port.)
NOTE: Be sure to restart your Macintosh to
enable all of your printer software features.
You’re ready to print! See section 6, “Print.”
Turn on your computer. Wait for the system
to start up, then insert the Epson® CD-ROM
in your drive.
Mac OS 9.2.x
Open the Chooser from the Apple® menu, then select these options:
• SP R320 Series
• Your USB port
• Background printing (on or off)
NOTE: If you see a screen like this,
click Cancel and disconnect the
printer from your computer. Then
follow the steps below.
2
Read the license agreement that appears
and click AGREE.
3
You see a message like this:
Square end
2
Close the Chooser.
Flat end
NOTE: Be sure to restart your Macintosh to
enable all of your printer software features.
Turn on your Macintosh. Wait for it to start up,
then insert the Epson CD-ROM in your drive.
You’re ready to print! See section 6, “Print.”
3
Double-click the CD-ROM icon, if necessary,
then double-click
EPSON.
4
Read the license agreement that appears
and click AGREE.
6 Print
You see the Install Menu.
Now you’re ready to print. For instructions, use these resources:
Click Install Printer Driver and Utilities and follow
the on-screen instructions. (In Mac OS X, you will need
to enter your Administrator password for each item.)
• Your Printer Basics book
Click OK to begin installing your printer driver.
4
When you see this screen, connect the
square
end of your USB cable to the back of the printer and
the
flat end of the USB cable to your
computer. (You can connect to any open port.)
5
6
NOTE: For Windows XP, if you don’t have USB 2.0,
you see a message. Click the Close button to close
the message.
Learn about loading paper, printing, maintaining your printer,
solving problems, and contacting Epson.
Click Install EPSON Print CD, then click Install
and follow the on-screen instructions.
NOTE: EPSON Print CD is not available for
Mac OS 9.
• Your Quick Reference card
See how easy it is to print without a computer.
7
Square end
Click Install Optional Software.
You see the following menu:
• Your on-screen Reference Guide
Double-click the ESPR320 Reference Guide icon on your desktop
to view more information about your printer.
8
Click each title to learn more about it. If you want to
install the software, follow the on-screen instructions.
9
When you’re finished installing software, close any
open windows on the screen and click Back at the
Optional Software menu.
10
From the Install Menu, click Install Printer Manual to install your on-screen
Reference Guide.
11
When you’re done installing software, click Exit. The registration screen appears.
Follow the on-screen instructions to register your printer.
Flat end
Wait while Windows detects your hardware.
5
When you see this screen, click Continue.
12
6
Follow the on-screen instructions to
install your software.
Go to the section for your operating system to finish setting up your printer.
Epson and Epson Stylus are registered trademarks of Seiko Epson Corporation.
General Notice: Other product names are for identification purposes only and may be trademarks of their respective owners.
Epson disclaims any and all rights in those marks.
continue
continue
© 2004 Epson America, Inc. 7/04
Printed in XXXXXX XX-XX.XX
4 Load Paper
7
1
Fan a few sheets of paper and load them against
the right side of the sheet feeder.
8
2
Slide the left edge guide against the paper.
9
NOTE: For instructions on loading and printing
on CDs or DVDs, see your Printer Basics book.
10
When installation is complete, you see this screen:
Mac OS X 10.2.x through 10.3.x
Click each title to learn more about it. If you want to
install the software, follow the on-screen instructions.
1
If you see this screen, click Add.
When you’re done installing software, click Exit. The
registration screen appears.
2
On the Printer List screen, click the Add button.
3
On the next screen, select USB from the pop-up menu.
4
Click Stylus Photo R320.
Follow the on-screen instructions to register your printer.
When you see a message telling you to restart your computer, click OK.
Remove the CD, then restart your computer.
NOTE: Be sure to restart your computer to enable all of your printer software features.
5 Install Software
You’re ready to print! See section 6, “Print.”
Windows
The software works with Mac OS 9.2.x, and Mac OS X 10.2.x through 10.3.x.
NOTE: If the Stylus Photo R320 doesn’t
appear, make sure it is turned on and securely
connected to your Macintosh.
5
Click the Add button. You see the Stylus Photo R320
in the Printer List.
6
Quit Print Center or the Printer Setup Utility.
Macintosh®
®
®
The software works with Windows 98SE, Me, 2000, and XP. Make sure your printer is NOT
connected to your computer, then follow the steps below.
1
Open the Applications folder, then open the Utilities folder and select Print Center, or
Printer Setup Utility.
1
Connect your printer to your computer: connect the
square end of your USB cable
to the printer and the
flat end of the USB cable to your computer. (You can connect
to any open port.)
NOTE: Be sure to restart your Macintosh to
enable all of your printer software features.
You’re ready to print! See section 6, “Print.”
Turn on your computer. Wait for the system
to start up, then insert the Epson® CD-ROM
in your drive.
Mac OS 9.2.x
Open the Chooser from the Apple® menu, then select these options:
• SP R320 Series
• Your USB port
• Background printing (on or off)
NOTE: If you see a screen like this,
click Cancel and disconnect the
printer from your computer. Then
follow the steps below.
2
Read the license agreement that appears
and click AGREE.
3
You see a message like this:
Square end
2
Close the Chooser.
Flat end
NOTE: Be sure to restart your Macintosh to
enable all of your printer software features.
Turn on your Macintosh. Wait for it to start up,
then insert the Epson CD-ROM in your drive.
You’re ready to print! See section 6, “Print.”
3
Double-click the CD-ROM icon, if necessary,
then double-click
EPSON.
4
Read the license agreement that appears
and click AGREE.
6 Print
You see the Install Menu.
Now you’re ready to print. For instructions, use these resources:
Click Install Printer Driver and Utilities and follow
the on-screen instructions. (In Mac OS X, you will need
to enter your Administrator password for each item.)
• Your Printer Basics book
Click OK to begin installing your printer driver.
4
When you see this screen, connect the
square
end of your USB cable to the back of the printer and
the
flat end of the USB cable to your
computer. (You can connect to any open port.)
5
6
NOTE: For Windows XP, if you don’t have USB 2.0,
you see a message. Click the Close button to close
the message.
Learn about loading paper, printing, maintaining your printer,
solving problems, and contacting Epson.
Click Install EPSON Print CD, then click Install
and follow the on-screen instructions.
NOTE: EPSON Print CD is not available for
Mac OS 9.
• Your Quick Reference card
See how easy it is to print without a computer.
7
Square end
Click Install Optional Software.
You see the following menu:
• Your on-screen Reference Guide
Double-click the ESPR320 Reference Guide icon on your desktop
to view more information about your printer.
8
Click each title to learn more about it. If you want to
install the software, follow the on-screen instructions.
9
When you’re finished installing software, close any
open windows on the screen and click Back at the
Optional Software menu.
10
From the Install Menu, click Install Printer Manual to install your on-screen
Reference Guide.
11
When you’re done installing software, click Exit. The registration screen appears.
Follow the on-screen instructions to register your printer.
Flat end
Wait while Windows detects your hardware.
5
When you see this screen, click Continue.
12
6
Follow the on-screen instructions to
install your software.
Go to the section for your operating system to finish setting up your printer.
Epson and Epson Stylus are registered trademarks of Seiko Epson Corporation.
General Notice: Other product names are for identification purposes only and may be trademarks of their respective owners.
Epson disclaims any and all rights in those marks.
continue
continue
© 2004 Epson America, Inc. 7/04
Printed in XXXXXX XX-XX.XX