1
ss2500Poster.QX3.3
9/22/99 4:01 PM
Page 1
start here
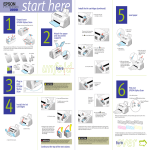
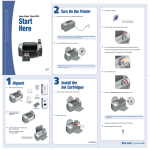
1
Unpack your
EPSON Stylus Scan
5
Install the ink cartridges
1. Press the
Operate button.
The Operate light comes on and
the print head moves.
Remove any tape and packing materials.
6
Load paper in the tray
1. Slide out the edge guide.
2. Open the document and
maintenance covers, if
necessary.
2. Slide out the tray
extension.
Make sure you have all the parts. If any parts are missing, contact EPSON as described in your User’s Guide.
You’ll also need a cable to connect the printer to your computer.
paper
support
software
media pack
ink cartridges
If you have the EPSON Stylus Scan 2500 Pro model, you should also have
these parts:
printer
automatic document feeder (ADF)
ADF paper support
here
User’s Guide
3. Unwrap the ink cartridges. Then
pull off only the yellow part of
the tape seal on top. Don’t pull
off the blue portion or remove
the clear seal on the bottom of
the cartridge.
4. Make sure the paper fits under the
arrow mark inside the edge guide. Slide
the edge guide against the paper.
ADF paper guide
unfold
user’s
guide
3. Place a stack of
paper against the
right side of the
feeder.
If ink gets on your hands, wash them thoroughly with
soap and water. If ink gets in your eyes, flush them
immediately with water. Keep ink cartridges out of the reach of children.
WARNING
4. Lift up the ink cartridge clamps.
5. Insert the ink cartridges with
the labels face-up. Don’t
press down on the cartridges.
2
3
Attach the paper
support
2. Hold down the
6. Press down on the ink
cartridge clamps until they
lock into place.
1. Turn off the printer.
load/eject button.
3. Press the
button.
Operate
Release the transportation lock
1. Open the document cover.
2. Open the maintenance cover.
3. Slide the transportation lock out to
release the scanner carriage.
7. Close the maintenance and document covers.
8. Press the
cleaning button to
begin charging the ink delivery
system.
CAUTION
4
7
Test your
EPSON Stylus Scan
Plug in your
EPSON Stylus
Scan
When you release the buttons, the nozzle check page starts to print. This is
what it should look like:
To avoid damaging the EPSON Stylus Scan, be sure to
lock the transportation lock before you move it.
Charging takes about 2 minutes. The
Operate light flashes and the printer
makes various sounds. Don’t turn off the printer yet. Wait until the
Operate
light stops flashing and stays on.
Make sure you check the system and location
requirements and follow all the safety instructions in
your User’s Guide. Plug the printer into a properly grounded outlet. If you need
help in setting up your printer, see “Solving Problems” in your User’s Guide.
CAUTION
Don’t open the clamps to remove a cartridge except to
replace it with a new one. Once you remove a cartridge,
you can’t reuse it, even if it contains ink. You must install both cartridges and leave
them installed for all types of printing. To avoid damaging the printer, never move
the print head by hand.
CAUTION
If it doesn’t look right, you may need to run a print head cleaning cycle. See
your User’s Guide for instructions. If it doesn’t print, see “Solving Problems”
in your User’s Guide.
over ➱
turn
ss2500Poster.QX3.3
9/22/99 4:01 PM
Page 1
start here
1
Unpack your
EPSON Stylus Scan
5
Install the ink cartridges
1. Press the
Operate button.
The Operate light comes on and
the print head moves.
Remove any tape and packing materials.
6
Load paper in the tray
1. Slide out the edge guide.
2. Open the document and
maintenance covers, if
necessary.
2. Slide out the tray
extension.
Make sure you have all the parts. If any parts are missing, contact EPSON as described in your User’s Guide.
You’ll also need a cable to connect the printer to your computer.
paper
support
software
media pack
ink cartridges
If you have the EPSON Stylus Scan 2500 Pro model, you should also have
these parts:
printer
automatic document feeder (ADF)
ADF paper support
here
User’s Guide
3. Unwrap the ink cartridges. Then
pull off only the yellow part of
the tape seal on top. Don’t pull
off the blue portion or remove
the clear seal on the bottom of
the cartridge.
4. Make sure the paper fits under the
arrow mark inside the edge guide. Slide
the edge guide against the paper.
ADF paper guide
unfold
user’s
guide
3. Place a stack of
paper against the
right side of the
feeder.
If ink gets on your hands, wash them thoroughly with
soap and water. If ink gets in your eyes, flush them
immediately with water. Keep ink cartridges out of the reach of children.
WARNING
4. Lift up the ink cartridge clamps.
5. Insert the ink cartridges with
the labels face-up. Don’t
press down on the cartridges.
2
3
Attach the paper
support
2. Hold down the
6. Press down on the ink
cartridge clamps until they
lock into place.
1. Turn off the printer.
load/eject button.
3. Press the
button.
Operate
Release the transportation lock
1. Open the document cover.
2. Open the maintenance cover.
3. Slide the transportation lock out to
release the scanner carriage.
7. Close the maintenance and document covers.
8. Press the
cleaning button to
begin charging the ink delivery
system.
CAUTION
4
7
Test your
EPSON Stylus Scan
Plug in your
EPSON Stylus
Scan
When you release the buttons, the nozzle check page starts to print. This is
what it should look like:
To avoid damaging the EPSON Stylus Scan, be sure to
lock the transportation lock before you move it.
Charging takes about 2 minutes. The
Operate light flashes and the printer
makes various sounds. Don’t turn off the printer yet. Wait until the
Operate
light stops flashing and stays on.
Make sure you check the system and location
requirements and follow all the safety instructions in
your User’s Guide. Plug the printer into a properly grounded outlet. If you need
help in setting up your printer, see “Solving Problems” in your User’s Guide.
CAUTION
Don’t open the clamps to remove a cartridge except to
replace it with a new one. Once you remove a cartridge,
you can’t reuse it, even if it contains ink. You must install both cartridges and leave
them installed for all types of printing. To avoid damaging the printer, never move
the print head by hand.
CAUTION
If it doesn’t look right, you may need to run a print head cleaning cycle. See
your User’s Guide for instructions. If it doesn’t print, see “Solving Problems”
in your User’s Guide.
over ➱
turn
ss2500Poster.QX3.3
8
9/22/99 4:01 PM
Page 2
6. Click Next, then follow the instructions on
the screen to complete the installation. You
may need to switch between the EPSON
Stylus Scan 2500 software CD-ROM and
your Windows 98 CD-ROM several times.
Connect the EPSON Stylus
Scan to your computer
and install the software
what type of system you have:
■ Windows® 98 with USB connection
■ Macintosh® with USB connection
1. Make sure both the printer and computer are turned off.
2. Plug the parallel cable into
the printer’s parallel connector,
then fasten it with the wire clips.
7. When you see the EPSON Screen
Calibration utility, move the slider right or
left until the stripes match as closely as
possible. Then click OK.
You’ll follow different instructions, depending on
■ Windows 95 or 98 with parallel connection
Connecting Your EPSON Stylus Scan
8. Click Finish. Windows detects the scanner portion of your EPSON Stylus
Scan 2500.
If there is a ground wire at the
end of the cable, connect it to
the ground connector at the
back of the EPSON Stylus Scan.
3. Plug the other end of the cable into your computer’s parallel port.
Connect the EPSON Stylus Scan directly to the parallel
port on your computer. Do not use a pass-through port
on a Zip drive or any other accessory. Do not use the same parallel port as you
use for your Zip drive. If your computer has more than one parallel port, connect
the printer to the built-in port (LPT1). For the fastest scanning and printing, enable
your computer’s ECP/DMA mode, if possible. See your computer documentation
for instructions.
Macintosh with USB:
Making the connection
Before connecting the EPSON Stylus Scan to your Macintosh, you must first
install the software.
To connect the printer, you’ll need a shielded USB “AB” interface cable, not
more than 6.5 feet long.
NOTE FOR iMAC™
If you’re using Mac® OS 8.1, you need to
install the iMac Update 1.0 before
installing the EPSON Stylus Scan software. This update is available online from
the Apple® web site. If you’re running Mac OS 8.5 or 8.51, Apple recommends
that you install iMac Update 1.1.
CAUTION
Finishing the Software Installation
Parallel port
™
1. Click Next, then continue clicking Next on each window that appears.
2. Make sure the EPSON Stylus Scan 2500 software CD-ROM is in your drive.
If you need to specify a location, click Browse, and locate the Epson folder
on your EPSON Stylus Scan 2500 software CD-ROM. Then click Next and
follow the instructions on the screen.
USB port
Before you start, make sure you have the two CD-ROMs that came in the
box with your EPSON Stylus Scan. If you don’t have a CD-ROM drive,
contact EPSON as described in your User’s Guide.
3. When you see a message that setup is complete, click OK, then click
Finish.
4. Double-click My Computer on your desktop.
5. Double-click the Epson_ss2500 CD-ROM icon. Then double-click Cdsetup.
Installing the Software
1. Turn on your Macintosh and make sure any virus protection programs are
turned off.
2. Insert the EPSON Stylus Scan 2500 software CD-ROM and double-click the
EPSON SS2500 CD-ROM icon.
3. To install EPSON Personal Copy, Presto! PageManager for EPSON, and
Acrobat Reader, double-click the appropriate icon. Then double-click the
program’s installer icon and follow the on-screen instuctions.
Installing Your Driver Software
1. Turn on your EPSON Stylus Scan and your computer. Wait until you see the
Windows desktop icons.
4. When you finish installing other software, double-click the EPSON Stylus
Scan Drivers icon.
IMPORTANT: If at any time you see a message that Windows has detected
your printer and asking you to install a driver, ALWAYS select Cancel. You
can’t install your printer software that way.
Windows 98 with USB:
Making the connection
First you’ll connect the EPSON Stylus Scan to your computer, then you’ll
install the software.
1. Make sure your computer is turned on.
2. Turn on the printer by pressing the
Operate button.
3. Connect the square end of the USB
cable to your printer’s USB port.
4. Connect the flat end of the USB cable to
your computer’s USB port or USB hub
port. Windows detects your printer.
4. Double-click the Epson_ss2500 CD-ROM icon. Then double-click Cdsetup.
6. Click the
Add Software button.
7. When you see a message asking to restart your Macintosh, click Restart.
7. Make sure
all items are
checked. Then
click OK.
5. Click the
Add Software button.
The EPSON Screen Calibration utility starts automatically.
8. Move the slider right or left until the stripes match as closely as possible, then
click OK.
Your Macintosh restarts. Follow the instructions in the next section to install
Adobe PhotoDeluxe.
8. Follow the on-screen instructions to install the EPSON Smart Panel™.
6. Make sure
all items are
checked. Then
click OK.
When the installation is complete, you see the EPSON Stylus Scan Setup
window. Click Next.
9. Select USB, then click Next.
Continue with the instructions
in the next section.
5. Follow the instructions in the next section to install your software.
If you’re using a USB hub, connect the printer to a first tier
hub, which is the hub closest to the host computer. If the
printer doesn’t work with the hub, connect it directly to a USB port on your
computer.
6. Click Install, then follow the onscreen instructions. When you see
a message asking for your default
paper size, select Letter, then
click OK.
3. Double-click My Computer on your screen.
To connect the printer, you’ll need a shielded USB “AB” interface cable,
not more than 6.5 feet long.
Connecting Your EPSON Stylus Scan
5. Double-click the EPSON Stylus
Scan 2500 installer icon.
2. Insert the EPSON Stylus Scan 2500 software CD-ROM.
Installing Adobe PhotoDeluxe
1. Insert your Adobe PhotoDeluxe CD-ROM.
2. Double-click the Adobe PhotoDeluxe Installer icon.
7. Follow the on-screen instructions to install the EPSON Smart Panel.
When installation is complete, you see the EPSON Stylus Scan Setup
window.
3. Follow the instructions on the screen to accept the license agreement and
install PhotoDeluxe.
8. Click Next.
For eFax installation instructions, see your User’s Guide.
In Windows 98, you see this window (if you don’t see it, go to the next section):
Follow the instructions in the next section to connect your EPSON Stylus
Scan and select it in the Chooser.
4. When you see a message asking to restart your Macintosh, click OK.
CAUTION
Installing Your Driver Software
1. Follow the on-screen instructions to install Acrobat® Reader and WinFax®.
After each installation is complete, the next one begins automatically.
Don’t restart your computer until all the programs have been installed.
You may need to switch between the EPSON Stylus Scan 2500 software
CD-ROM and your Microsoft Windows 98 CD-ROM again.
Make sure you have your Microsoft® Windows 98 CD-ROM
available. If you don’t have this CD-ROM, make sure you know
where to find the Windows 98 source files on your hard disk (for example, in the
Win 98 folder.) If you need help, contact your computer manufacturer.
2. If you see a message requesting a disk labeled “DLL Installations,” click
OK, click Browse, click OK, then click OK again. (You may have to highlight
the folder whose name begins with mse in the Browse box.)
Your computer will install several USB devices. Don’t click Cancel at any time
during the installation process.
3. After WinFax has installed, click Finish to restart your computer.
Follow the instructions on the screen to configure and register WinFax.
NOTE
4. Insert your Adobe PhotoDeluxe CD-ROM. Follow the instructions to accept
the license agreement and install PhotoDeluxe.
1. Click Next, then continue clicking
Next on each window that appears.
2. If you see a message asking for your
Windows 98 CD-ROM, insert it and click
OK (or select Specify a location, click
Browse, and locate the Windows 98
source files on your hard disk drive.)
3. When you see the message that
Windows has finished installing, click
Finish. Windows detects a USB printer.
9. Select LPT (Printer Port),
then click Next.
Installing Adobe® PhotoDeluxe® and Additional Software
5. When you see another message asking to restart your computer, click OK.
For eFax installation instructions, see you User’s Guide.
Now you’re ready to print, scan, and copy. See your User’s Guide for instructions.
1. Turn on the EPSON Stylus Scan by pressing the
4. Remove the Windows 98 CD-ROM (if necessary) and insert the EPSON Stylus
Scan 2500 software CD-ROM.
First, you’ll connect the EPSON Stylus Scan to your computer, then you’ll
install the software.
5. Repeat step 1. When you see the window shown in the next step, select
Specify a location, click Browse, and locate the Epson folder on your EPSON
Stylus Scan 2500 software CD-ROM.
To connect the printer, you’ll need a high-speed, bidirectional, IEEE-1284
parallel cable, not more than 6 feet long.
If you have a USB port ( Windows 98 only), we recommend using it rather
than the parallel port. See the previous section for instructions.
Operate button.
2. Connect the square end of the USB
cable to your printer’s USB port.
When installation is complete, click OK to start the EPSON Screen Calibration
utility. Then follow the instructions in the next section.
Calibrating Your Screen and Installing Adobe PhotoDeluxe
1. You should now see the EPSON Screen Calibration utility start window.
Click Next.
2. Move the slider right or left until the stripes match as closely as possible.
click OK.
3. When you see a message that setup is complete, click OK. The Acrobat
Reader installation begins. (Your computer does not restart. Don’t restart
your computer until all programs have been installed.)
Windows 95 or 98 with parallel:
Making the connection
Connecting Your EPSON Stylus Scan and
Selecting It in the Chooser
4. Follow the on-screen instructions. After the installation is complete, click OK.
The WinFax installation begins. You may need to insert your Windows
CD-ROM, if you see a message requesting it. If you see a message requesting
a disk labeled “DLL Installations,” click OK, click Browse, click OK, then
click OK again. (You may have to highlight the folder whose name begins
with mse in the Browse box.)
5. Click OK to restart your computer.
6. Insert your PhotoDeluxe CD-ROM. Follow the instructions to accept the license
agreement and install PhotoDeluxe.
7. When you see a message asking to restart your computer, click OK.
For eFax installation instructions, see your User’s Guide.
Now you’re ready to print, scan, and copy. See your User’s Guide for instructions.
EPSON and EPSON Stylus are registered trademarks of SEIKO EPSON CORPORATION. General notice: Other product names are for identification purposes only and may be trademarks of their respective owner. EPSON disclaims any and all rights in those marks. Copyright © 1999 Epson America, Inc. Printed on recycled paper with at least 10% post-consumer content. CPD 8874
3. Connect the flat end of the USB cable to the USB port on your Macintosh or
your USB hub port.
If you’re using a USB hub, connect the printer to a first
tier hub, which is the hub closest to the host computer.
If the printer doesn’t work with the hub, connect it directly to a USB port on your
computer.
CAUTION
4. Select Chooser from the Apple menu.
5. Click the
SS 2500
icon.
6. Click the icon for
the USB port
you’re using.
7. Turn on background
printing if you want
to use it.
8. Close the Chooser.
Now you’re ready to print, scan, and copy. See your User’s Guide for instructions.
ss2500Poster.QX3.3
8
9/22/99 4:01 PM
Page 2
6. Click Next, then follow the instructions on
the screen to complete the installation. You
may need to switch between the EPSON
Stylus Scan 2500 software CD-ROM and
your Windows 98 CD-ROM several times.
Connect the EPSON Stylus
Scan to your computer
and install the software
what type of system you have:
■ Windows® 98 with USB connection
■ Macintosh® with USB connection
1. Make sure both the printer and computer are turned off.
2. Plug the parallel cable into
the printer’s parallel connector,
then fasten it with the wire clips.
7. When you see the EPSON Screen
Calibration utility, move the slider right or
left until the stripes match as closely as
possible. Then click OK.
You’ll follow different instructions, depending on
■ Windows 95 or 98 with parallel connection
Connecting Your EPSON Stylus Scan
8. Click Finish. Windows detects the scanner portion of your EPSON Stylus
Scan 2500.
If there is a ground wire at the
end of the cable, connect it to
the ground connector at the
back of the EPSON Stylus Scan.
3. Plug the other end of the cable into your computer’s parallel port.
Connect the EPSON Stylus Scan directly to the parallel
port on your computer. Do not use a pass-through port
on a Zip drive or any other accessory. Do not use the same parallel port as you
use for your Zip drive. If your computer has more than one parallel port, connect
the printer to the built-in port (LPT1). For the fastest scanning and printing, enable
your computer’s ECP/DMA mode, if possible. See your computer documentation
for instructions.
Macintosh with USB:
Making the connection
Before connecting the EPSON Stylus Scan to your Macintosh, you must first
install the software.
To connect the printer, you’ll need a shielded USB “AB” interface cable, not
more than 6.5 feet long.
NOTE FOR iMAC™
If you’re using Mac® OS 8.1, you need to
install the iMac Update 1.0 before
installing the EPSON Stylus Scan software. This update is available online from
the Apple® web site. If you’re running Mac OS 8.5 or 8.51, Apple recommends
that you install iMac Update 1.1.
CAUTION
Finishing the Software Installation
Parallel port
™
1. Click Next, then continue clicking Next on each window that appears.
2. Make sure the EPSON Stylus Scan 2500 software CD-ROM is in your drive.
If you need to specify a location, click Browse, and locate the Epson folder
on your EPSON Stylus Scan 2500 software CD-ROM. Then click Next and
follow the instructions on the screen.
USB port
Before you start, make sure you have the two CD-ROMs that came in the
box with your EPSON Stylus Scan. If you don’t have a CD-ROM drive,
contact EPSON as described in your User’s Guide.
3. When you see a message that setup is complete, click OK, then click
Finish.
4. Double-click My Computer on your desktop.
5. Double-click the Epson_ss2500 CD-ROM icon. Then double-click Cdsetup.
Installing the Software
1. Turn on your Macintosh and make sure any virus protection programs are
turned off.
2. Insert the EPSON Stylus Scan 2500 software CD-ROM and double-click the
EPSON SS2500 CD-ROM icon.
3. To install EPSON Personal Copy, Presto! PageManager for EPSON, and
Acrobat Reader, double-click the appropriate icon. Then double-click the
program’s installer icon and follow the on-screen instuctions.
Installing Your Driver Software
1. Turn on your EPSON Stylus Scan and your computer. Wait until you see the
Windows desktop icons.
4. When you finish installing other software, double-click the EPSON Stylus
Scan Drivers icon.
IMPORTANT: If at any time you see a message that Windows has detected
your printer and asking you to install a driver, ALWAYS select Cancel. You
can’t install your printer software that way.
Windows 98 with USB:
Making the connection
First you’ll connect the EPSON Stylus Scan to your computer, then you’ll
install the software.
1. Make sure your computer is turned on.
2. Turn on the printer by pressing the
Operate button.
3. Connect the square end of the USB
cable to your printer’s USB port.
4. Connect the flat end of the USB cable to
your computer’s USB port or USB hub
port. Windows detects your printer.
4. Double-click the Epson_ss2500 CD-ROM icon. Then double-click Cdsetup.
6. Click the
Add Software button.
7. When you see a message asking to restart your Macintosh, click Restart.
7. Make sure
all items are
checked. Then
click OK.
5. Click the
Add Software button.
The EPSON Screen Calibration utility starts automatically.
8. Move the slider right or left until the stripes match as closely as possible, then
click OK.
Your Macintosh restarts. Follow the instructions in the next section to install
Adobe PhotoDeluxe.
8. Follow the on-screen instructions to install the EPSON Smart Panel™.
6. Make sure
all items are
checked. Then
click OK.
When the installation is complete, you see the EPSON Stylus Scan Setup
window. Click Next.
9. Select USB, then click Next.
Continue with the instructions
in the next section.
5. Follow the instructions in the next section to install your software.
If you’re using a USB hub, connect the printer to a first tier
hub, which is the hub closest to the host computer. If the
printer doesn’t work with the hub, connect it directly to a USB port on your
computer.
6. Click Install, then follow the onscreen instructions. When you see
a message asking for your default
paper size, select Letter, then
click OK.
3. Double-click My Computer on your screen.
To connect the printer, you’ll need a shielded USB “AB” interface cable,
not more than 6.5 feet long.
Connecting Your EPSON Stylus Scan
5. Double-click the EPSON Stylus
Scan 2500 installer icon.
2. Insert the EPSON Stylus Scan 2500 software CD-ROM.
Installing Adobe PhotoDeluxe
1. Insert your Adobe PhotoDeluxe CD-ROM.
2. Double-click the Adobe PhotoDeluxe Installer icon.
7. Follow the on-screen instructions to install the EPSON Smart Panel.
When installation is complete, you see the EPSON Stylus Scan Setup
window.
3. Follow the instructions on the screen to accept the license agreement and
install PhotoDeluxe.
8. Click Next.
For eFax installation instructions, see your User’s Guide.
In Windows 98, you see this window (if you don’t see it, go to the next section):
Follow the instructions in the next section to connect your EPSON Stylus
Scan and select it in the Chooser.
4. When you see a message asking to restart your Macintosh, click OK.
CAUTION
Installing Your Driver Software
1. Follow the on-screen instructions to install Acrobat® Reader and WinFax®.
After each installation is complete, the next one begins automatically.
Don’t restart your computer until all the programs have been installed.
You may need to switch between the EPSON Stylus Scan 2500 software
CD-ROM and your Microsoft Windows 98 CD-ROM again.
Make sure you have your Microsoft® Windows 98 CD-ROM
available. If you don’t have this CD-ROM, make sure you know
where to find the Windows 98 source files on your hard disk (for example, in the
Win 98 folder.) If you need help, contact your computer manufacturer.
2. If you see a message requesting a disk labeled “DLL Installations,” click
OK, click Browse, click OK, then click OK again. (You may have to highlight
the folder whose name begins with mse in the Browse box.)
Your computer will install several USB devices. Don’t click Cancel at any time
during the installation process.
3. After WinFax has installed, click Finish to restart your computer.
Follow the instructions on the screen to configure and register WinFax.
NOTE
4. Insert your Adobe PhotoDeluxe CD-ROM. Follow the instructions to accept
the license agreement and install PhotoDeluxe.
1. Click Next, then continue clicking
Next on each window that appears.
2. If you see a message asking for your
Windows 98 CD-ROM, insert it and click
OK (or select Specify a location, click
Browse, and locate the Windows 98
source files on your hard disk drive.)
3. When you see the message that
Windows has finished installing, click
Finish. Windows detects a USB printer.
9. Select LPT (Printer Port),
then click Next.
Installing Adobe® PhotoDeluxe® and Additional Software
5. When you see another message asking to restart your computer, click OK.
For eFax installation instructions, see you User’s Guide.
Now you’re ready to print, scan, and copy. See your User’s Guide for instructions.
1. Turn on the EPSON Stylus Scan by pressing the
4. Remove the Windows 98 CD-ROM (if necessary) and insert the EPSON Stylus
Scan 2500 software CD-ROM.
First, you’ll connect the EPSON Stylus Scan to your computer, then you’ll
install the software.
5. Repeat step 1. When you see the window shown in the next step, select
Specify a location, click Browse, and locate the Epson folder on your EPSON
Stylus Scan 2500 software CD-ROM.
To connect the printer, you’ll need a high-speed, bidirectional, IEEE-1284
parallel cable, not more than 6 feet long.
If you have a USB port ( Windows 98 only), we recommend using it rather
than the parallel port. See the previous section for instructions.
Operate button.
2. Connect the square end of the USB
cable to your printer’s USB port.
When installation is complete, click OK to start the EPSON Screen Calibration
utility. Then follow the instructions in the next section.
Calibrating Your Screen and Installing Adobe PhotoDeluxe
1. You should now see the EPSON Screen Calibration utility start window.
Click Next.
2. Move the slider right or left until the stripes match as closely as possible.
click OK.
3. When you see a message that setup is complete, click OK. The Acrobat
Reader installation begins. (Your computer does not restart. Don’t restart
your computer until all programs have been installed.)
Windows 95 or 98 with parallel:
Making the connection
Connecting Your EPSON Stylus Scan and
Selecting It in the Chooser
4. Follow the on-screen instructions. After the installation is complete, click OK.
The WinFax installation begins. You may need to insert your Windows
CD-ROM, if you see a message requesting it. If you see a message requesting
a disk labeled “DLL Installations,” click OK, click Browse, click OK, then
click OK again. (You may have to highlight the folder whose name begins
with mse in the Browse box.)
5. Click OK to restart your computer.
6. Insert your PhotoDeluxe CD-ROM. Follow the instructions to accept the license
agreement and install PhotoDeluxe.
7. When you see a message asking to restart your computer, click OK.
For eFax installation instructions, see your User’s Guide.
Now you’re ready to print, scan, and copy. See your User’s Guide for instructions.
EPSON and EPSON Stylus are registered trademarks of SEIKO EPSON CORPORATION. General notice: Other product names are for identification purposes only and may be trademarks of their respective owner. EPSON disclaims any and all rights in those marks. Copyright © 1999 Epson America, Inc. Printed on recycled paper with at least 10% post-consumer content. CPD 8874
3. Connect the flat end of the USB cable to the USB port on your Macintosh or
your USB hub port.
If you’re using a USB hub, connect the printer to a first
tier hub, which is the hub closest to the host computer.
If the printer doesn’t work with the hub, connect it directly to a USB port on your
computer.
CAUTION
4. Select Chooser from the Apple menu.
5. Click the
SS 2500
icon.
6. Click the icon for
the USB port
you’re using.
7. Turn on background
printing if you want
to use it.
8. Close the Chooser.
Now you’re ready to print, scan, and copy. See your User’s Guide for instructions.