1
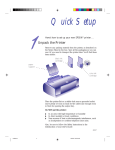
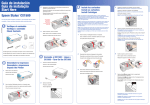
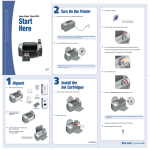
Start Here
EPSON Stylus C43 Series
®
Read these instructions before using the printer.
1 Unpack
4046944-00 XXX
1
6 Install Software
USB Cable Users (Windows or Mac®)
1
3 Load Ink
Note: The ink cartridges that came with your printer have a lower yield
due to the ink loading process. This process is carried out the first time
you turn on your printer and guarantees a better performance.
Caution: Keep ink cartridges out of the reach of children and do not
drink the ink.
1
Remove the tape and packing material from the printer.
2
3
Make sure your computer is turned off. Keep it turned off until
section 6, “Install Software.” (Click Start and select your Shut Down
or Turn Off option.)
Plug the
your printer.
Windows
1
Make sure your printer is connected and turned on, then turn
on your computer.
2
When you see the Found New Hardware Wizard screen, click Cancel.
(If you’re using a parallel cable, you may not see this screen until later.)
square end of the cable into the USB port on
Plug the
flat end of the cable into any available USB port
on your computer.
Open the printer cover.
Caution: Don’t touch the sensor behind
the ink cartridge holders.
2
2
Lift up the ink cartridge clamps.
Click Cancel
Open the cover. Then peel off the tape and remove the insert. Do not
touch or remove the white cable inside the printer.
Flat end
3
Remove
insert
3
Insert the printer software CD-ROM in your CD-ROM or DVD drive.
If you see any other Windows screens, close or cancel them.
4
The installer starts automatically. Select English. If the language
selection screen doesn’t appear, do the following:
Square end
Unpack the ink cartridges that
came with your printer and
remove the yellow tape only.
Windows XP: Click Start, then click
My Computer. Double-click
the EPSON CD-ROM icon, then double-click the EPSON icon.
Parallel Cable Users (Windows only)
Don’t touch the green part
4
Insert both cartridges.
Caution: You must install both
cartridges or the printer won’t work.
2
3
5
Insert the paper support into the three slots on the back of the printer.
6
7
1
2
3
Find the power cord that came in the box and connect
one end to the printer.
Press down firmly on the
comes on.
power button until the green
power light
Plug the end of the cable with the slotted connector into the parallel
port on the side of the printer, then secure it with the wire clips.
You see the license agreement. Read the license agreement
and click Agree.
6
You see the Main Menu.
Click Install Printer Driver and
follow the on-screen instructions.
Plug the end of the cable with the screws on the side into your
computer’s parallel port and secure it.
Press the
maintenance
button. The green
power light
flashes and you hear the printer
charge its ink.
Maintenance
button
End with screws
7
At the end of the installation, click OK.
8
Click on Install Optional Software.
Slotted end
Close the printer cover. When
the green
power light stops
flashing, charging is done.
Select the software you want to
install and follow the on-screen
instructions.
5 Load Paper
1
Set some paper behind the tab on the right edge guide. Don’t force it in.
2
Press in the locking tab on the left edge guide and slide it against
the paper.
9
When you’re done, click Back to return to the Main Menu.
10
Click on Install User’s Guide, then follow the on-screen instructions
to install the printer manual on your desktop.
Note: Turn off your computer before connecting the interface cable.
Don’t turn on your computer until you are instructed to do so.
Note: You need a browser—such as Microsoft® Internet Explorer 4.0
or later or Netscape® 4.0 or later—to view the guide.
Printer cables are not included with your printer. You need only one of the
following cables:
Power button
5
Note: If you see a screen asking you to turn on the printer, make sure
the printer is connected and turned on and wait for the computer
to detect the printer port.
4 Connect the Printer
Plug the other end into a grounded electrical outlet.
Other Windows systems: Double-click
My Computer. Double-click
the EPSON CD-ROM icon, then double-click the EPSON icon.
Press down on the cartridge clamps
until they click shut.
Caution: Never turn off the printer
while the green
power
light is flashing, or you’ll waste ink.
2 Power On
Make sure your computer is turned off. Keep it turned off until
section 6, “Install Software.” (Click Start and select your Shut Down
or Turn Off option.)
Color
Black
Do not touch
or remove the
white cable
3
1
11
• USB cable (Windows® or Macintosh®) or
Click on Register your EPSON Printer to register your printer online.
When you’re done, close your browser and click Exit on the Main
Menu to close the installation program and remove the EPSON CD.
• Parallel cable (Windows only)
You’re ready to print! See your electronic User’s Guide for details.
Note: If you have Windows 95, you must use a parallel cable.
3
Caution: Use only the printer’s
on or off.
power button to turn the printer
continue
Pull out the output tray.
Note: If you’re using special EPSON® paper, make sure you load
the brighter, whiter side face up.
Turn over
continued
Mac OS X 10.1.x to 10.2.x
Macintosh
1
Note: To print from Macintosh Classic applications as well as OS X
applications, follow the steps below in OS X, then restart your Macintosh
in OS 9 and follow the steps below again.
1
Select Stylus C43 in the Printer List window and click the Add or Add
printer icon.
Problems?
Viewing Your Manual
You don’t see the Found
New Hardware screen
when you install the
Windows printer software.
To view your printer manual, just double-click the ES C43 Manual icon on
your desktop.
Note: If your printer does not appear on the Printer List, make sure
the printer is connected and turned on.
Make sure your printer is connected and turned on.
Then turn on your computer.
2
Put the EPSON CD in your CD-ROM or DVD drive and wait a few
seconds for the CD to be recognized.
3
If the CD-ROM window doesn’t open automatically, double-click the
EPSON CD-ROM icon. Then double-click the
EPSON installer icon.
4
Select English.
5
You see the license agreement. Read the license agreement
and click Agree.
6
2
Open the Applications folder on your hard drive, then open the
Utilities folder and select Print Center.
3
If you still don’t see the screen, pull the interface
cable out of the computer’s USB or parallel port
and reinsert it.
Select EPSON USB from the pull-down menu, click Stylus C43,
then select All from the Page Setup drop-down list.
The red
error
light is on (nothing
prints).
If paper is out, load more paper and press the
maintenance button to resume printing.
If paper is jammed, press the
button to eject it.
4
You see the Main Menu. Click Install Printer Driver.
In Mac OS X, enter your administrator password and click OK.
Make sure your printer is on and the interface
cable is securely connected to your printer’s
USB or parallel port.
5
Click Add or Add printer. You see the printer list with the Stylus C43.
maintenance
If the paper doesn’t eject, turn off the printer,
open the cover, and pull the paper out from
the front. Then reload paper, turn the printer
on, and press the
maintenance button.
Close Print Center.
You’re ready to print! See your electronic User’s Guide for details.
Paper jams frequently.
Use new, smooth, high-quality paper.
Don’t load paper
above this mark
Don’t load paper above the arrow mark
inside the left edge guide.
Place the paper against the right edge
behind the tabs. Slide the left edge guide
against it, but not too tightly.
Replacing Ink Cartridges
7
8
9
10
Follow the instructions on the screen to install the software
and restart your Macintosh.
After your Macintosh restarts, double-click the EPSON CD-ROM
icon (if necessary). Then double-click the
EPSON installer.
Select English.
Click Install Optional Software and follow the instructions
on the screen.
Click Install User’s Guide and follow the instructions on the screen
to install the EPSON User’s Guide on your desktop.
Black cartridge:
T038120
Color cartridge:
T039020
Low ink The red
error light flashes and a status screen appears
telling you which cartridge is low.
11
When you’re done, click Back to return to the Main Menu.
Empty cartridge The
error light stays lit and the empty cartridge is
indicated on the screen; you must replace it to continue printing.
12
Click on Register your EPSON Printer to register your printer online.
When you’re done, close your browser and click Exit on the Main
Menu to close the installation program and remove the EPSON CD.
Continue with the instructions in the next column to select your printer
in your operating system.
1
Open the printer cover and press the
maintenance button
for 6 seconds. The print head moves to the cartridge’s replacement
position. (If both cartridges need replacement, the print head moves
to the black cartridge position first.)
2
Lift the ink cartridge clamp and remove the cartridge.
3
Unpack the new ink cartridge and remove the
yellow tape only.
4
Insert the new cartridge.
5
Press down on the
cartridge clamp until it
clicks shut.
Mac OS 8.6 to 9.x
1
Open the Apple® menu and select Chooser.
2
Click the C43 Series icon, click your USB port, and turn on
Background printing.
Windows
1
Put the EPSON CD-ROM in your drive.
2
Select English.
3
You see the Main Menu. Click Install Printer Manual.
Macintosh
1
Put the EPSON CD-ROM in your drive.
2
Select the EPSON CD-ROM icon on your desktop, if necessary.
Then double-click
EPSON Installer in your CD-ROM window.
3
Select English.
4
You see the Main Menu. Click Install Printer Manual.
EPSON Ink and Paper
Use genuine EPSON inks and paper to get the best results from your EPSON
printer! You can purchase ink cartridges, paper, and accessories from your local
retailer.
You see banding (light
lines) or your printout is
blurry or smeared.
Caution: To ensure good results, use genuine EPSON ink cartridges and
don’t refill them. Other products may cause damage to your printer not
covered by EPSON’s warranty.
Note: You need a browser—such as Microsoft Internet Explorer 4.0
or later or Netscape 4.0 or later—to view the guide.
If you did not install your manual, follow the steps below to install it:
The print head nozzles may need cleaning;
see the User’s Manual for instructions.
Here are three EPSON papers designed to work with your printer:
The ink cartridges may need replacing.
See the ink cartridge replacement
instruction in the previous section.
Premium Bright White Paper delivers crisp black
text and vivid, colorful images. It’s perfect for
everyday printing.
Make sure the printable side of the paper
is face up. It’s usually whiter or shinier.
For more solutions to problems, see your on-screen User’s Guide.
High Quality Ink Jet Paper is ideal for printing all types
of documents, including text, photos, digital images,
clip art, etc.
Getting Help
All-Purpose Glossy Paper can be used for all of your
everyday glossy printing needs. Print colorful photos,
presentations, flyers and more on smooth, glossy,
bright white paper.
EPSON provides technical assistance through the electronic support services
and automated telephone services listed below:
World Wide Web
From the Internet, you can reach EPSON at http://www.latin.epson.com.
Here you can download drivers and other files, look at product and
troubleshooting information, and receive technical advice through e-mail.
Don’t touch
the green part
Telephone service
6
7
Press the
maintenance button. (If the other cartridge needs
replacement, the print head moves into loading position. Repeat
steps 2 through 6.) Then close the printer cover.
Wait until ink charging is finished (the green
flashing and the
error light goes out).
power light stops
Note: Do not remove empty cartridges until you are ready to replace
them or the print nozzles may get clogged. Leave the ink cartridges
installed when you transport the printer.
3
Country
Telephone number
Country
Telephone number
Argentina
(54-11) 4346-0300
Chile
(56-2) 230-9500
Mexico
Mexico, D.F.
Other cities
(52-55) 532-84008
(01-800) 506-0700
Colombia
(57-1) 523-5000
Peru
(51-1) 224-2336
Costa Rica
(50-6) 210-9555
(1-800) 377-6627
Venezuela
(58- 212) 240-1111
If your country doesn’t appear on the list, contact your nearest
EPSON distributor.
Close the Chooser.
continue
EPSON and EPSON Stylus are registered trademarks of SEIKO EPSON CORPORATION.
General Notice: Other product names are for identification purposes only and may be trademarks
of their respective owners. EPSON disclaims any and all rights in those marks.
Copyright © 2003 by Epson America, Inc. 11/03
Printed in XXXXXX XX.XX-XX
CPD-16116R1