1
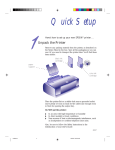
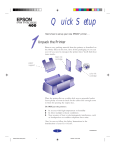
Quick Setup
Here’s how to set up your new EPSON® Stylus Photo
printer . . .
Unpack the Printer
Remove any packing material from the printer, as described on
the Notice Sheet in the box. Save all the packaging so you can
use it if you need to transport the printer later. You’ll find these
items inside:
○
○
○
○
○
○
○
○
○
○
○
○
○
○
○
○
○
paper
support
○
○
black ink
cartridge
color ink
cartridge
Place the printer flat on a stable desk near a grounded outlet.
Leave plenty of room in back for the cables and enough room
in front for opening the output tray.
Do NOT put the printer:
◗
◗
◗
In an area with high temperature or humidity
In direct sunlight or dusty conditions
Near sources of heat or electromagnetic interference, such
as loudspeakers or cordless telephone base units.
Also, be sure to follow the Safety Instructions in the
Introduction of your User’s Guide.
4007082
Quick setup Comoro
1
5/22/97, 10:18 AM
Attach the Paper Support
Insert the paper support in the top slot on the back of the
printer.
Plug In the Printer
First make sure the power is off.
power
○
○
○
○
○
○
Caution:
○
○
○
Do not plug the printer
into an outlet
controlled by a wall
switch or timer, or on
the same circuit as a
large appliance. This
may disrupt the power,
which can erase
memory and damage
the power supply.
○
○
Plug the power cord into a properly grounded outlet.
Quick setup Comoro
2
5/22/97, 10:18 AM
○
○
○
○
○
Install the Ink Cartridges
1.
Lower the output tray and raise the printer cover.
2.
Press the
power button to turn on the printer. The
power
light flashes, the and
ink out lights come on, and the ink
cartridge holders move to the installation position.
3.
Pull up the two ink cartridge clamps.
4.
Open the ink cartridge packages. Remove the disposable
yellow portion of the tape seal on top.
Caution:
You must remove the
tape seal from the top
of the cartridge or you
will permanently
damage it. Don’t
remove the tape seal
from the bottom or ink
will leak.
Quick setup Comoro
black ink
cartridge
○
○
○
○
○
3
○
5/22/97, 10:18 AM
○
color ink
cartridge
5.
Warning:
If ink gets on your
hands, wash them
thoroughly with soap
and water. If ink gets in
your eyes, flush them
immediately with water.
black ink
cartridge
○
○
Lower the ink cartridges into their holders with the labels
face up and the arrows pointing toward the back of the
printer.
○
○
○
○
○
○
○
○
○
○
○
○
○
○
○
○
○
○
○
○
○
○
○
color ink
cartridge
6.
Push down the clamps until they lock in place.
7.
Press the
cleaning button and close the printer cover.
The printer moves the print heads and begins charging the
ink delivery system. Charging can take up to seven minutes.
The
power light flashes, and the printer makes various
sounds.
Caution:
Never turn off the
printer when the
power light is
flashing, unless the
printer hasn’t moved or
made any noise for
more than 5 minutes.
Quick setup Comoro
4
5/22/97, 10:18 AM
Load the Paper
1.
Slide the left edge guide all the way left and pull out the
output tray extensions.
2.
Fan a stack of plain paper and then even the edges.
3.
Load the stack with the printable surface face up. Push the
paper against the right edge guide.
Note:
Keep unused paper in its
original packaging and store
it in a cool, dark place.
○
○
○
○
○
○
○
○
○
○
○
○
arrow
mark
Note:
Don’t load paper above
the arrow mark inside the
left edge guide.
4.
Quick setup Comoro
5
Slide the left edge guide back against the stack of paper.
5/22/97, 10:18 AM
Check the Printer
1.
Turn off the printer.
2.
Hold down the
load/eject button and press the
power button. Hold down the buttons until the
power
light starts to flash. Then release the buttons.
A page prints out showing the ROM version and a nozzle
check pattern.
3.
When it’s finished, turn off the printer. If you have any
problems with the test, see Chapter 6 in your User’s Guide
for more information.
Connect the Printer to Your Computer
You can connect your EPSON Stylus™ Photo to either an IBM®
compatible PC or an Apple® Macintosh®. You’ll need a shielded,
twisted-pair parallel cable to connect to a PC or an Apple
System Peripheral-8 cable to connect to a Macintosh. For a
complete list of system requirements, see the Introduction of
your printer User’s Guide.
Connecting to a PC
Note:
The printer is assigned to
parallel port LPT1; if you
want to use a different
port, see your Windows
documentation for
instructions.
1.
Turn off the printer and your computer.
2.
Connect the cable to the printer’s parallel interface; then
squeeze the wire clips together until they lock in place. (If
your cable has a ground wire, connect it now.)
○
3.
Quick setup Comoro
6
○
○
○
○
○
○
○
○
ground
wire
Connect the other end of the cable to your computer’s
parallel port and secure it as necessary.
5/22/97, 10:18 AM
Connecting to a Macintosh
1.
Turn off the printer and your Macintosh.
2.
Connect one end of the cable to the serial connector on
the back of the printer.
3.
Connect the other end of the cable to either the modem
port
or the printer port
on your Macintosh.
Note:
If you’re using a
PowerBook™, connect your
printer to the modem port.
If your Macintosh has an
internal modem, use the
printer port.
Install the Software
Your EPSON Digital Darkroom CD-ROM includes the software
for both Windows® and Macintosh.® You must install the printer
driver software for the printer to work correctly.
Before your start, make sure both your computer and the printer
are turned off.
Installing the Software for Windows
1.
Note:
If you don’t have a
CD-ROM drive, you can
get the printer driver
software on diskettes or
download it through your
modem. Check out
EPSON’s Home Page at
http://www. epson.com.
For more information, see
your User’s Guide
Introduction.
Quick setup Comoro
7
Turn on the printer first, then your computer. Make sure
Windows 95 or Windows 3.1 is running.
If the Windows 95 New Hardware Found screen appears,
choose Do not install a driver and click OK.
2.
Insert the EPSON Digital Darkroom CD-ROM in your drive.
The EPSON Digital Darkroom main screen appears.
If the EPSON Digital Darkroom doesn’t open automatically
in Windows 95, double-click My Computer, then
double-click your CD-ROM icon.
5/22/97, 10:18 AM
If you’re using Windows 3.1, select Run from the File menu.
Type D:\INSTALL and click OK. (If your drive has a different
letter, substitute it for D.)
3.
When you see the EPSON Digital Darkroom main screen, click
INSTALL PRINTER DRIVERS. Then follow the instructions
on the screen to install your printer driver software.
After installation is complete, you can use the EPSON Digital
Darkroom CD-ROM to install LivePix™ (Windows 95 only) or
print the coupon.
Installing the Software on a Macintosh
1.
Turn on your printer, then turn on your Macintosh. Make sure
you turn off any virus protection programs you may be using.
2.
Insert the EPSON Digital Darkroom CD-ROM and
double-click the EPSON Digital Darkroom icon.
3.
When you see the EPSON Digital Darkroom main screen, click
INSTALL PRINTER DRIVERS. Then follow the instructions on
the screen to install your printer driver software.
After your Macintosh restarts, you can open the EPSON Digital
Darkroom CD-ROM again and install Live Picture® or print the
coupon. But before you can print, you must select your printer in
the Chooser as described below.
Selecting Your Printer
After you install the software, you need to select your printer
using the Chooser.
1.
Open the Chooser and click the EPSON Stylus (EX) icon.
2.
Select the port where you connected your printer.
3.
Turn on background printing if you want to run your
print jobs and use your Macintosh at the same time.
(Background printing is slower and may also slow down
your Macintosh while you’re printing.)
4.
If you’re using the printer port on your Macintosh, make
sure AppleTalk is inactive.
EPSON is a registered trademark and EPSON Stylus is a trademark of SEIKO EPSON CORPORATION.
General Notice: Other product names used herein are for identification purposes only and may be trademarks of their respective owners.
EPSON disclaims any and all rights in those marks.
Copyright © 1997 by Epson America, Inc.
Printed on recycled paper with at least 10% post-consumer content.
Quick setup Comoro
8
5/22/97, 10:18 AM
5/97