1
PictureMate
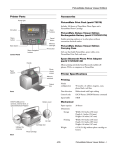
PictureMate Parts
LCD menu screen
Turn PictureMate on or off
Accessories
Save photos to an external
storage drive (CD-R, Zip disk,
or flash memory drive)
PictureMate Print Pack (part# T5570)
Includes 100 sheets of PicureMate Photo Paper and a
PictureMate Photo Cartridge
PictureMate Carrying Case (part# ARC1B)
Soft case that holds PictureMate, power cable, extra
PictureMate Print Pack, and more
Epson Bluetooth Photo Print Adapter
(part# C12C824142)
Go back or
stop
printing
Navigate
menu
options
Click to print
Control Panel
Allows printing wirelessly from Bluetooth-enabled cell
phones, PDAs, or computers to PictureMate
Memory card light
(flashes when reading
card; on when card is
in printer)
Printer Specifications
Printing
Memory card door
Nozzle
configuration
Paper support
90 nozzles × 6: yellow, magenta, cyan,
photo black, red, blue
Print direction
Bidirectional with logic seeking
Control code
ESC/P Raster, EPSON Remote command
Input buffer
64KB
Mechanical
Paper capacity
Output tray
Front
20 sheets of PictureMate Photo Paper
Dimensions
EXT/IF (USB) port for PictBridge
camera, external drive, or
optional Bluetooth Adapter
Storage
Width: 10.0 inches (256 mm)
Depth: 6.1 inches (154 mm)
Height: 6.4 inches (163 mm)
Printing
Width: 10.0 inches (256 mm)
Depth: 12.0 inches (305 mm)
Height: 6.4 inches (163 mm)
USB port for computer
Weight
5.5 lb (2.5 kg) without photo cartridge
Electrical
Handle
Power cable
Photo cartridge door
Input voltage
108 to 132 V
Rated frequency
50 to 60 Hz
Input frequency
49.5 to 60.5 Hz
Rated current
0.4 A
Back
4/04
PictureMate - 1
PictureMate
Power
consumption
Loading Paper
Approx. 13 W
Approx. 4 W in standby mode
Follow these steps to load PictureMate Photo Paper.
Environmental
Caution: Don’t load plain paper; this may damage PictureMate.
Temperature
Operation
50 to 95 °F (10 to 35 °C)
Storage*
−4 to 104 °F (−20 to 40 °C)
1 month at 104 °F (40 °C)
Transit*
–4 to 140 °F (–20 to 60 °C)
120 hours at 140 °F (60 °C)
1. Move the handle to the back and down.
Move handle
to the back
and down
Humidity (without condensation)
Operation
20 to 80% RH
Storage*
5 to 85% RH
Open output tray
Note: Keep the handle to the back and all the way down, to
allow paper to feed through.
* Stored in shipping container
Safety Approvals
2. Open the output tray.
Safety standards
UL 1950, CSA C22.2 No. 950
EMI
FCC part 15 subpart B class B
CSA C108.8 Class B
3. Open the paper support. Slide the top part of the paper
support up gently until it clicks into place.
Load
glossy side
up
Photo Cartridge
Colors
Black, Cyan, Magenta, Yellow, Red, and Blue
Cartridge life
2 years from production date (if unopened)
(within 6 months after opening package, at
77 °F [25 °C])
Storage temperature
−4 to 104 °F (−20 to 40 °C)
1 month at 104 °F (40 °C)
Transit temperature
−22 to 140 °F (−30 to 60 °C)
1 month at 104 °F (40 °C)
120 hours at 140 °F (60 °C)
Freezing temperature*
12.2 °F (−11 °C)
Dimensions
7.7 × 3.6 × 0.7 inches (W × D × H)
196 × 91.5 × 18.8 mm (W × D × H)
Open and
slide up
paper support
4. Place your paper against the right edge, glossy side up.
Note: Make sure paper is glossy side up to prevent smearing.
5. Slide the edge guide against the paper. Make sure it is snug,
but not so tight that paper is bent.
Edge
guide
* Ink thaws and is usable after approximately 3 hours at
77 °F (25 °C).
Caution: To ensure good results, use a genuine PictureMate Photo
Cartridge and do not refill it. PictureMate calculates the amount of ink
remaining using an IC chip on the photo cartridge, so even if the
cartridge is refilled, the IC chip will report that it is empty.
Printing
PictureMate can print photos from these devices:
Do not use a photo cartridge if the date on the cartridge has expired.
❏ Your digital camera’s memory card.
Do not leave PictureMate, a PictureMate Photo Cartridge, or
PictureMate with a PictureMate Photo Cartridge installed exposed to
heat or direct sunlight.
❏ A data storage device, such as a CD, Zip disk, or flash
memory (thumb) drive. See the Using PictureMate Without
a Computer book for details.
❏ A PictBridge- or USBDP-enabled digital camera. See the
Using PictureMate Without a Computer book for details.
2 - PictureMate
4/04
PictureMate
❏ A Bluetooth®-enabled device (requires an optional
Bluetooth Photo Print adapter). See the Using PictureMate
Without a Computer book for details.
3. Insert the memory card into one of the three slots.
❏ Your computer. See the Using PictureMate With a Computer
booklet and the on-screen User’s Guide (included on your
PictureMate CD) for details.
CompactFlash® or MicrodriveTM
(bottom)
SD (Secure Digital) or
MMC (MultiMediaCard)
(middle)
However your photos are stored, make sure the image files
meet these requirements:
❏ JPEG files or uncompressed Tiff files only
❏ The file storage device should comply with DCF (Design
rule for Camera File systems) Version 1.0
Memory Stick®
(middle)
❏ Resolutions ranging from 160 × 160 to 4600 × 4600 pixels
Your PictureMate recognizes and prints the first 999 photos
on your memory card or device.
xD Picture CardTM
(top)
Inserting a Memory Card
SmartMediaTM
(top)
Note: Insert just one card at a time. The card does not go in all the
way. See above for supported photo file formats.
1. Press
4. Push the card in carefully until it stops (it won’t go in all the
way). When it is in, the card light comes on.
On to turn on PictureMate.
2. Open the memory card door.
Card
light
5. Close the memory card door.
Now you can print a proof sheet of all the photos on your card
using the PictureMate Print Wizard (see page 4). You can also
choose photos and layouts for printing from the Main Menu
(see page 5).
Removing a Memory Card
Make sure the card light is not flashing, then pull the card
straight out of the slot.
Caution: Do not remove a card while the card light is flashing; you
may lose photos on your card.
4/04
PictureMate - 3
PictureMate
Printing a Proof Sheet With the Wizard
Choosing and Printing Photos With the
Wizard
When you insert the memory card, you see the PictureMate
Print Wizard with this message:
After you print a proof sheet or cancel it, you see this screen:
Note: If you don’t see the PictureMate Print Wizard, remove and reinsert your card. If you have selected photos with DPOF (see page 6),
you will not see the PictureMate Print Wizard.
1. Press
You can choose the Print All option to print all of the photos
on your card, or Print Some to print one or several photos by
selecting the photo numbers that appear on your proof sheet.
Print to print your proof sheet.
All Photos
Press
Print to start printing all your photos as borderless,
4 × 6-inch prints.
Note: If your card has more than 20 photos, you will need to reload
paper while printing. Load a maximum of 20 sheets at a time. When
you see the message “Try loading paper again,” load more paper and
press OK to continue printing. If you need to cancel printing, press
Cancel.
When printing is complete, you see the Main Menu. To print
from the Main Menu, see page 5.
Photo number
Tip: To start the PictureMate Print Wizard again, remove and
re-insert your card (see page 3).
Press Cancel instead if:
Some Photos
❏ you have already printed a proof sheet for the photos
currently on your card
1. Press OK.
2. Press
or
to highlight the number of the photo you
want to print (find the photo number on the proof sheet),
then press OK to choose it.
❏ you want to print all your photos and don’t need to see
a proof sheet
❏ you are printing with PictBridge or USBDP and you
have already used your camera to choose photos to print
Note: You should print a proof sheet if you’ve deleted photos or
taken new photos since the last time you printed one, as the
photo numbering may have changed.
Tip: Hold down
Your proof sheet includes up to 20 photos per sheet, so it might
print on several sheets of paper, depending on the number of
photos on your card.
or
to scroll quickly.
Note: If you press OK too many times, you will deselect the
photo.
3. Press
or
to choose the number of copies to print for
that photo (up to 10), then press OK.
2. Look at your proof sheet and choose the photo numbers for
the photos you want to print, then continue with the next
section to see how to print them.
Tip: To print more than 10 copies of a photo, use the One Photo
option from the Main Menu to print up to 100 copies at once.
(See page 5.)
4 - PictureMate
4/04
PictureMate
4. Repeat steps 2 and 3 for each additional photo you want to
print.
2. Press
or
to highlight the photo you want to print,
then press OK.
The screen shows the selected photos and the number of
copies for each. (You may need to press
or
to see all
your selected photos.)
Several Photos
1. Press
Print.
6. Confirm your photo choices (press
or
through your selected photos), then press
start printing.
Print again to
to highlight Several, then press OK.
2. Press
or
to highlight the photo number, then press
OK to choose it.
Note: If you chose the wrong photo, you can deselect it.
Highlight the selected photo and press OK to uncheck it. To
change the number of copies, press OK twice and change the
number as described in step 3.
5. When you’re done selecting photos, press
or
to scroll
Tip: Hold down
or
to scroll quickly.
Note: If you press OK too many times, you will deselect the
photo.
3. Press
or
to choose the number of copies to print for
that photo (up to 10), then press OK.
Note: If the Print Confirmation is off, you will not see the screen
above and only need to press
Print once to start printing.
4. Repeat steps 3 and 4 for additional photos. The screen
shows selected photos and the number of copies for each.
(Press
or
to see additional selected photos.)
If you print more than 20 photos, you will need to reload paper
while printing. Load a maximum of 20 sheets at a time. When
you see the message “Try loading paper again,” load more
paper and press OK to continue printing. If you need to cancel
printing, press Cancel.
When printing is complete, you see the Main Menu. To print
from the Main Menu, see below.
To start the PictureMate Print Wizard again, remove and reinsert your card (see page 3).
Note: If you chose the wrong photo, you can deselect it.
Highlight the selected photo and press OK to uncheck it. If you
need to change the number of copies, press OK twice and
change the number as described in step 3.
Choosing Photos
Press
or
to highlight Select Photo, then press OK.
5. When you’re done, press Back.
Range of Photos
1. Press
to highlight Range, then press OK.
2. Press
or
to choose the first photo under From.
(Make sure you choose the smaller number in your range
first.) Then press OK.
All Photos
Press
or
or
to highlight All Photos, then press OK.
One Photo
1. Press
or
to highlight One Photo, then press OK.
Tip: Hold down
4/04
or
to scroll quickly.
PictureMate - 5
PictureMate
3. Press
or
press OK.
2. Press
or
to highlight the number of copies you want
to print for each photo (1 to 100), then press OK.
to choose the last photo under To. Then
Go to “Set the Number of Copies” below to choose a number
of copies.
3. Continue with the next section to choose a layout for your
photos.
Camera-selected DPOF Photos
Choose a Layout
If you have chosen photos in your camera, DPOF is selected as
the Select Photo option by default. The photos that you
chose from your camera to print are automatically selected,
including the number of copies.
Just press
1. On the Main Menu, press
press OK.
or
to choose Layout, then
2. Press
or
to highlight the layout setting you want for
your photo(s), then press OK.
Print to print your DPOF photos.
Deselect DPOF
If DPOF is selected and you want to choose other photos to
print instead, press
or
to highlight Select Photo, press
OK, then choose a different option.
You have four choices:
Set the Number of Copies
Borderless
You can print from 1 to 100 copies of your selected photos.
Keep in mind that if you are printing all photos or a range of
photos, the number of copies applies to every photo.
Border
3. Continue with the next section to confirm your selections
and print.
Note: If you are printing Several photos, you already chose the
number of copies for each photo, so the Copies setting can’t be
changed from the Main Menu. (You can choose up to 10 copies per
photo when printing Several.)
Confirm and Print
If you are printing DPOF photos, the number of copies is selected
from your camera and the Copies setting can’t be changed from the
Main Menu.
1. After selecting photos on the Main Menu, press
highlight Copies, then press OK.
or
Proof Sheet
(20 per sheet)
Wallet
(2 per sheet)
Once you have made all the basic print settings, you are ready
to print.
1. Press
to
Print.
2. Check the selected photos, number of copies, and layout
setting on the Print Confirmation screen. (Press
or
to see additional selected photos.)
❏ If the list is okay, press
photo(s).
Print again to print your
❏ To make changes, press Cancel to go back.
6 - PictureMate
4/04
PictureMate
2. Wait until the LCD screen goes blank, then disconnect the
power cable and USB cable (if connected).
Note: If the Print Confirmation is off, you will not see the screen
above and only need to press Print once.
If you print more than 20 photos, you will need to reload paper
while printing. Load a maximum of 20 sheets at a time. When
you see the message “Try loading paper again,” load more
paper and press OK to continue printing. If you need to cancel
printing, press Cancel.
Doing More With Your PictureMate
The More Options menu on PictureMate lets you modify
your prints, as follows:
3. Flip the handle over to the front.
❏ Print photos in black and white or a sepia tone
❏ Crop and print only part of one photo
❏ Correct or enhance photo prints
❏ Print the time and/or date with photos
See the Using PictureMate Without a Computer book for more
information.
4. Open the cartridge door on the back of PictureMate
Replacing Ink and Paper
When PictureMate is low on ink or you are out of paper, it is
time to buy a new PictureMate Print Pack (includes a
PictureMate Photo Cartridge and 100 sheets of PictureMate
Photo Paper) and replace the Photo Cartridge.
5. Set the lever into the Release position by sliding it in the
direction shown. This releases the cartridge.
Tip: You can check the ink level at any time (see the Using
PictureMate Without a Computer book).
Caution: Refilling the photo cartridge could result in damage to
PictureMate from ink spills.
Note: Use your PictureMate Photo Cartridge within six months of
installing it and before the expiration date on the package. For
PictureMate Photo Paper storage and handling tips, see page 8.
6. Carefully pull out the cartridge.
Remove the Used Photo Cartridge
Make sure you have a new PictureMate Photo Cartridge
before you begin. Once you start replacing a cartridge, you
must complete all the steps in one session.
Warning: Keep ink cartridges out of the reach of children and do
not drink the ink.
Caution: Before you replace the cartridge, read the “Photo Cartridge
Saftey Instructions” in the Using PictureMate Without a Computer
book.
1. If PictureMate is on, press the
If ink gets on your hands, wash them thoroughly with soap and
water. If ink gets in your eyes, flush them thoroughly with
water. If discomfort or vision problems continue after flushing,
see a doctor immediately.
On button to turn it off.
4/04
PictureMate - 7
PictureMate
Insert the New Photo Cartridge
8. Reconnect the power cord. If you’re using a computer or
external drive, reconnect the USB cable to PictureMate.
1. Shake the cartridge four or five times while it is still
wrapped in its packaging.
9. Turn PictureMate back on.
When PictureMate recognizes the new photo cartridge, it
starts charging the ink, and you see an ink charging
message. When charging is complete, you can begin
printing again.
Store and Display PictureMate Prints
2. Unwrap the cartridge.
Photos printed on PictureMate Photo Paper will give you
beautiful, long lasting images. Follow these guidelines to
ensure they will look great for years.
Caution: Don’t touch the green circuit board. Install the photo
cartridge immediately after you remove it from its package. If
you leave a cartridge unpacked for a long time before using it,
normal printing may not be possible.
Store Your Prints
3. Make sure the lever is moved to the left before you insert
the cartridge, then carefully slide the cartridge, label side up,
into the slot.
❏ To avoid scratches or smudging, do not rub the printed side
of the photo.
❏ If you stack photos, do not stack them with the printed
sides touching.
Display Your Prints
❏ To ensure prints will last as long as possible, store them in
glass frames or photo albums.
❏ Keep prints out of direct sunlight to prevent fading.
4. Push the cartridge in slowly in the middle until you hear it
click into place lightly and feel slight resistance.
❏ Let prints sit for 24 hours before framing.
5. Hold the cartridge in place as you move the lever to the
Lock position by sliding it in the direction shown.
Store Unused Paper
Return unused paper to the original package. Store paper away
from extreme temperatures, high humidity, and bright light.
Cleaning the Print Head
If your print quality is not as good as it used to be, your
photos are light or faint, or you are missing colors in your
prints, your PictureMate’s print head nozzles may be clogged.
6. Close the cartridge door.
Follow these steps to clean the print head:
1. On the Main Menu, press
Options, then press OK.
7. Move the handle over to the back.
8 - PictureMate
4/04
or
to highlight More
PictureMate
2. Press
or
to highlight Maintenance, then press OK.
3. Press
OK.
or
to highlight Clean Print Head, then press
2. On the Main Menu, press
Options, then press OK.
4. When you see this message, press OK to begin cleaning the
print head.
The cleaning takes several seconds, during which the
message Cleaning print head. Please wait. appears on the
screen.
or
to highlight More
3. Press
or
to highlight Maintenance, then press OK.
4. Press
OK.
or
to highlight Align Print Head, then press
5. Press
Print when you see the next message.
6. After the pattern prints, look at it to see which line pattern
is the straightest. (You may need to use a magnifying glass.)
5. When cleaning is complete, you see a message asking if you
want to print a nozzle check pattern. If you want to check to
see if the nozzles are clean, load a sheet of photo paper (see
page 2), then press OK to print the nozzle check.
Example of
straightest
line pattern
If you don’t want to print a nozzle check, press Cancel to
go back to the Main Menu.
6. Check the pattern to see if there are any gaps in the lines.
Okay
7. Press
or
to highlight the number for the best pattern
(1 to 15) in set #1, then press OK.
Needs
cleaning
If there are gaps, press OK to clean the print head again. If
there are no gaps, press Cancel to go back to the PictureMate
Main Menu.
8. Press
or
to highlight the number for the best pattern
(1 to 15) in set #2, then press OK.
Aligning the Print Head
9. Press OK to exit the alignment screen. The Main Menu
appears on the screen.
If you have moved PictureMate and print quality is not as
good as it was before—for example, you see misaligned
vertical lines or light or dark horizontal banding—you may
need to align the print head.
1. Load a sheet of photo paper (see page 2).
4/04
PictureMate - 9
PictureMate
Taking PictureMate With You
Related Documentation
The handle on PictureMate makes it easy to carry PictureMate
short distances (from one room to the next, for example). If
you take your PictureMate a longer distance, you should pack
it carefully to make sure it isn’t damaged.
CPD-17894
PictureMate Start Here
CPD-17732
Using PictureMate Without a Computer
book
CPD-17895
Using PictureMate With a Computer book
CPD-17893
PictureMate CD-ROM with electronic
User’s Guide
Caution: To avoid damaging your PictureMate, keep it
out of the sun and don’t leave it in your car or other
location where it can get too hot.
1. If PictureMate is on, press
On to turn it off.
2. Wait until the LCD screen goes blank, then unplug the
power cord from the outlet.
3. Remove paper from the paper support and output tray.
4. Push down the top of the paper support and close it against
PictureMate. Then close the output tray.
5. Disconnect the power cord and any connected USB cable
from the back of PictureMate.
6. Pack PictureMate and its power cable (both parts) into the
box that PictureMate came in, or in the optional
PictureMate Carrying Case.
Caution: Make sure the photo cartridge is installed before
transporting. Don’t place PictureMate on its side or upside
down, or ink may leak.
Note: If your prints don’t look as good after PictureMate has
been moved, try aligning the print head (see page 9).
10 - PictureMate
4/04