1
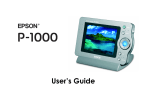
EPSON
®
EPSON P-1000
Quick Reference Guide
Quick Reference Guide
CPD-17374
Printed in USA
Printed in USA
CPD-17374
P-1000 Parts
P-1000 Control Panel
ACCESS light
PRINT button
Flashes orange briefly
when you turn on the
P-1000 or access data
Displays the
Print menu
Eject button
MENU button
Displays the Pop-up menu
Memory card slot
Arrow button
Power switch
Press , , , or to
select a photo or an
option in a menu
Activity light
Flashes during power on
and off, printing, and
certain other operations
CANCEL button
CHARGE light
Flashes green when the
battery is being charged
Cancels the current operation
and returns to the previous
Selects a highlighted
screen or the Main Menu
option, opens the
selected folder or photo,
and zooms into a image
OK button
LCD
P-1000 Main Menu
Video output
connector
Whenever you turn on the P-1000, the Main menu appears.
All functions are started here.
Battery life icon
Control panel
Battery cover
Reset button
USB interface
connector
Shortcut icon for selecting
your favorite albums
AC adapter
connector
Message area
Battery cover
release
If you are viewing pictures or copying or deleting files, you can
return to the Main Menu by pressing Cancel.
Connector cover
This booklet provides a quick reference to using your EPSON
P-1000, including:
❍
Installing and charging the battery, pages 2 and 3
❍
Turning the P-1000 on and off, page 4
❍
Inserting and removing a memory card, page 6
❍
Viewing photos, page 8
❍
Copying photos to the P-1000 from a memory card (and vice
versa), page 13
❍
Managing albums, page 17
❍
Deleting photos, page 21
❍
Installing EPSON Software™ Film Factory™, the online
User’s Guide, and the Windows 98 driver from the CD-ROM,
page 22
❍
Where to get help, page 26
See your online User’s Guide for complete instructions on:
❍
Customizing settings
❍
Printing images to a variety of EPSON Stylus® Photo printers
❍
Archiving pictures to a CD-R/RW
❍
Displaying pictures on an external monitor or video device
❍
Copying pictures from or to a computer
❍
Maintenance, troubleshooting, and specifications
Installing the Battery
The P-1000 comes with a Lithium-ion battery. Follow these steps to
install it:
1 Slide the battery cover release button to unlock the battery cover.
2 Slide the cover off.
3 Insert the battery into the compartment, aligning the + and –
ends with those inside the compartment.
Tip:
Place the battery over the clear plastic strip. If you need to remove the
battery later, use the strip to lift out the battery.
2
4 Replace the battery cover.
5 Slide the battery cover release button as shown below to lock the
cover.
Charging the Battery
After installing the battery, you need to charge
it using the AC adapter. Connect the AC
adapter to the P-1000 as shown. Connect the
other end to an electrical outlet.
Caution:
Do not connect the AC adapter when the battery
is not installed; this can damage the P-1000.
3
A fully charged battery lasts about 1 hour, depending on how you use
the P-1000. The CHARGE light flashes while the battery is being
charged. When the battery is fully charged, the CHARGE light turns
off. It takes about 3.5 hours to fully charge the battery.
Note:
Although the full battery icon (see the next page) may appear before
3.5 hours, leave the AC adapter connected for the entire 3.5 hours to
ensure the battery is fully charged.
Turning On the Power
To turn on the power, slide the power switch as shown below and
release it. After a moment the ACCESS light flashes red briefly and
then the Main Menu appears. (See the inside front cover for more
information about the menu.)
ACCESS light
Note:
It takes a few seconds for the power to come on.
Before you turn off the P-1000, make sure the ACCESS light is off.
Then slide the power switch as shown above, and hold it down for
2 seconds until the power is turned off.
4
Battery Status
The battery status is displayed in the top right corner of the LCD
screen when the P-1000 is on.
Battery is fully charged.
Battery power is about half full.
Battery power is low.
Battery power is running out. The P-1000 is shut down
automatically. Charge the battery using the AC adapter.
Battery is charging.
Conserving Battery Power
To conserve battery power (and protect the LCD), the P-1000 has
two power-saving features:
❍
Auto backlight control
If no button has been pressed and there has been no activity for
3 minutes, the backlight on the LCD screen is turned off.
❍
Auto power off
After 5 minutes, the power is turned off.
If the screen goes dark because the backlight is turned off, press any
button on the P-1000 to resume operation. If the P-1000 has been
powered off, you need to turn it back on with the power switch.
5
To change the number of minutes for these settings, follow these
steps:
1 From the Main Menu, select Settings and press the OK button.
2 Then press u or d on the arrow button to select Power Save.
You see this menu:
Power Save Settings
Auto backlight control duration:
1 min
5 min
Auto power off duration:
1 min
10 min
The LCD screen goes dark when Photo Viewer is idle for this
period of time. Press OK to apply the setting and return to the
previous screen.
3 Press l or r on the arrow button to change the number of
minutes (from 1 to 5) for the Auto backlight control duration.
4 To change the Auto power off duration setting, press d on the
arrow button to select it and then l or r to change the number of
minutes.
Note:
You cannot turn the Power Save options off.
Inserting and Removing a
Memory Card
You can use Type I and Type II CF (CompactFlash®) memory cards
(3.3 V), including Microdrive™ with your P-1000.
Note:
If you have a CompactFlash adapter, you can also use the following types
of memory cards: SD memory card, Memory Stick®, SmartMedia™ (3.3 V
only), MultiMediaCard, and xD PictureCard™.
6
Insert the memory card until it clicks
into place. If you are using a
CompactFlash adapter, put the card
into the adapter and insert the adapter
into the slot.
Make sure the
card is face up
Note:
The eject button may not pop out when
you insert the card.
Caution:
Avoid using or storing the card in direct
sunlight, or in places that are extremely hot, humid, or dusty.
When you are ready to remove a memory card, make sure the
ACCESS light is off. Then push the eject button and pull out
the card. If the button is not sticking out, press it once to pop it out,
and then press it again to eject the card.
Caution:
Never remove a memory card while the ACCESS light is on; this can
damage or erase data on the card or HDD (Hard Disk Drive).
Note:
If you are using a memory card in a CompactFlash adapter, remove
the CompactFlash adapter from the P-1000; do not remove only the
memory card.
7
Viewing Photos
The P-1000 can display JPEG images of up to 6 megapixels, with an
aspect ratio of 6:1.
Note:
Progressive JPEG format files, non-JPEG images, some black and white
or CMYK images, video files, or sound files cannot be displayed or played
on the P-1000. However, it is possible to copy these files to the P-1000’s
HDD (for temporary storage).
RAW images from some digital cameras may be supported by the
P-1000. Depending on the RAW image, you may be able to copy it to
the P-1000 (and from there to a memory card or computer), display it on
the screen, and delete it—but you cannot perform certain operations. For
example, you cannot print or rotate RAW images, include them in a slide
show, or use one as an album thumbnail.
When you view images with an odd number of pixels, such as
1601 × 1201, one line of pixels on the bottom and right sides is not
displayed.
Follow these steps to view photos in thumbnail or full-screen size:
1 Turn on the power.
2 In the Main Menu, select Browse and press the OK button.
Main Menu
Browse
Copy to the
HDD
Slide Show
Settings
Copy to
CD-R/RW
Browse pictures in the HDD, on a memory card, or CD-R/RW.
Press OK to continue.
8
You see the Browse menu:
Shows albums
in the P-1000’s
Album Case
Shows memory card
folders in the
P-1000’s Card Case
Browse
Album Case
Card Case
Memory Card
Shows images
on a memory
card installed
in the P-1000
CD-R/RW
Press OK to browse the Album Case.
Shows images,
albums, or folders on
the CD-R/RW attached
to the P-1000
The Album Case contains albums you have created to organize
your photos. (See page 17 for more information about albums.)
The Card Case contains memory card folders. When you copy a
memory card to the P-1000, it is stored in a folder in the Card
Case.
Select Memory Card to display the photos on a memory card
inserted in the P-1000.
Select CD-R/RW to see the photos on a CD-ROM in a
CD-R/RW drive attached to the P-1000.
3 Press u or d on the arrow button to select the location of the
images you want to view, and press the OK button.
9
4 If necessary, select a folder or album and press OK.
Storage location
Folder or album
Device or
storage icon
1
2
3
20021218.001
20021218.003
20021218.004
Thumbnail of
first photo
Press OK to browse this card folder. Press Cancel to return to
the previous screen.
When you open an album or folder, you see thumbnail versions
of all the photos.
Note:
Any unsupported file types are displayed with this icon:
.
5 To display a photo using the full screen, use the arrow button to
select it and press the OK button.
6 To go to the next photo in the folder or album, press the r button
(or press the l button to display the previous photo).
To return to the Main Menu, press the CANCEL button one or more
times until you see it.
10
Accessing the Pop-up Menu
While you are looking at your photos, you can press the MENU
button to display a Pop-up menu which lets you access a variety of
functions. For example, if you are looking at a folder on a memory
card, and you press the MENU button, you see this Pop-up menu:
2
1
3
09
Delete
Copy All Images to Album
Copy to Memory Card
Slide Show
Lock
Return to Main Menu
PC View Mode
Hide Unsupported Files
Press u or d on
the arrow button to
scroll through the
list or to see more
options
Press OK to view this photo.
Press Cancel to return to the previous screen.
Press Print to print this photo.
The options available depend on what you are doing when you press
the MENU button.
Zooming an Image
1 Display an image in full-screen format.
2 Press the OK button to zoom in, up to 5 times, depending on the
image resolution.
You can use the arrow button to move to another part of the
image.
3 When you’re done, press the CANCEL button to return the image
to its original, full-screen size.
11
Running a Slide Show
To run a slide show of photos stored in an album, follow these steps:
1 In the Main Menu, select
Slide Show and press the OK
button.
2 Select the album you want and press
the OK button to start the slide
show. It continues until you press
the CANCEL button.
Main Menu
Browse
Copy to the
HDD
Slide Show
Settings
Copy to
CD-R/RW
Start album slide show. Press OK to continue.
To see a slide show of photos in the P-1000’s Card Case, Album Case,
or a memory card, follow these steps:
1 Select Browse from the Main Menu and choose the folder (or
album) you want.
2 Press the MENU button to display the Pop-up menu.
3 Select Slide Show and press the OK button. The slide show
starts and continues until all the photos have been displayed or
you press the CANCEL button.
Setting the Slide Show Options
You can change the way a slide show
works. In the Main Menu, select
Settings and press the OK button.
Select Slide Show and press the OK
button. You see this screen:
Slide Show Settings
Slide show effect:
ON
OFF
Slide show duration:
3s
5s
10 s
20 s
30 s
1 min
5 min
Select the desired item and press the OK button.
12
Press u or d on the arrow button to select one of the options and
then l or r to change the setting.
❍
Slide show effect
Select ON for this option to fade from one photo to the next.
Select OFF if you do not want this effect.
Note:
When this setting is ON, the slide show duration setting is invalid.
❍
Slide show duration
If Slide Show Effect is turned off, you can set the length of time
you want each image to remain on the screen before switching to
the next. Press l or r on the arrow button to choose an interval
from 3 seconds to 5 minutes. The default setting is 10 seconds.
Copying Photos
This section describes how to copy photos from a memory card to
the P-1000’s Card Case or Album Case and from the P-1000 to a
memory card.
You can also:
❍
Copy images from the P-1000 to your computer and vice versa
❍
Copy from the P-1000 to a CD-R/RW and vice versa
❍
Copy from the P-1000’s Card Case, a memory card, or a
CD-R/RW to an album.
See your User’s Guide for instructions.
13
Copying Photos From a Memory Card
to the P-1000
You can copy all the photos from a memory card to a folder in the
P-1000’s Card Case or to an album in the Album Case. This is an easy
way to make a backup of the photos on your card. Then you can
delete the photos on the card so you have room for more.
Note:
If the battery is low when you try to copy files, they may not be copied
correctly. Use the AC adapter if this happens.
Some screens may not appear if you’ve changed the Copy Mode settings.
See your User’s Guide for details.
1 Insert the memory card.
Main Menu
2 In the Main Menu, select Copy to
the HDD and press the OK button.
Browse
Copy to the
HDD
Slide Show
Settings
Copy to
CD-R/RW
Copy a memory card into the Card Case. Press OK to start
copying.
3 If you see this message, select Yes to
automatically delete the files from
the memory card after copying or
No to leave them on your memory
card.
Copy to the HDD
Do you want to delete all files
on the memory card? All files
are verified as copied before
deletion.
Yes
No
Press OK to disregard delete command.
14
4 If you see this screen, select the
album in which you want to store
the copied photos. Then press the
OK button.
Copying starts and you see this
message:
Note:
The screen may go blank, but the
ACCESS light will continue to flash
while the photos are being copied.
Copy to the HDD
Copying all files in the memory
card to the 20030214.001 in the
Card Case.
...
Press the Cancel button to cancel copying.
The copied images are stored in a card folder in the Card Case
(and in an album if you selected one). The card folder is named
according to the date you copied the card. For example, if the
folder name is 20040325.001, 2004 is the year, March 25 is the
day, and this is folder number 1 copied on this day. If you copy
the contents of your memory card to the P-1000 several times
during the day, you’ll be able to distinguish them by the order in
which they were copied.
5 Press the CANCEL button to return to the Main Menu.
15
Copying Photos From the P-1000 to a Memory Card
You can copy individual photos or complete Card Case folders from
your P-1000 to a memory card. Although you cannot copy an album
this way, you can copy individual photos from an album.
If you will be copying individual photos, it’s okay if the memory card
already contains photos—as long as there is enough space to hold the
new ones you will copy. If you are copying a Card Case folder, the
memory card must be empty.
Follow these steps:
1 Insert a memory card in the P-1000. If you will be copying
folders, the card must be empty.
2 Select a folder in the Card Case or a single image that you want to
copy.
Note:
You cannot select an album, but you can select individual pictures in
an album.
3 Press the MENU button to display the Pop-up menu. You see this
screen:
Delete
Copy All Images to Album
Copy to Memory Card
Slide Show
Lock
Return to Main Menu
PC View Mode
Hide Unsupported Files
4 Select Copy to Memory Card. Then press the OK button. The
photos are copied to the memory card.
16
Managing Photos in Albums
You can group your favorite images in an album which is stored in the
P-1000’s Album Case. An album named Favorites already exists as a
default. You can add photos to this album and other albums as you
like.
You can also create up to three album shortcuts on the Main Menu to
access your favorite albums quickly. For details, see page 20.
Follow the steps in this section to copy individual photos or complete
folders to an album.
Copying a Single Photo
Follow these steps to copy a single photo to an album:
1 Display the photo in the Card Case, on a memory card, or a
CD-R/RW that you want to copy to an album.
2 Press the MENU button to display
the Pop-up menu.
Model Name
Date
Size
Focus Length
F Number
Shutter Speed(s)
Expousure Bias
Flash
Metering Mode
: PhotoPC 8100Z
: 2001.12.31 22:31
: 1600 × 1200
: 20.20m
: F2.8
Delete
: 1/258 M
Rotate
: 0.0
: off
Copy to Album
: Divided
Copy All Images
to Album
Copy to Memory Card
Slide Show
Lock
Increase Number of Copies
2
3 Select Copy to Album and press
the OK button.
Only three albums are displayed at
a time, so press d on the arrow
button to scroll down to see more.
17
If you want to create a new album
select New from the list, and press
the OK button. You see this screen:
Copy to Album
Select one of the following:
Favorites
4 Select an album name from the list
(you can scroll down to see more),
and press the OK button. After you
press OK, the photo is copied.
Family
Travel
Hobbies
Christmas
Press OK to select the option. Press Cancel to return to the
previous screen.
Note:
If you are creating a new album and select an album name that is
already being used, a number is added to the end of the new album’s
name; for example, Family2. (You cannot create your own name on
the P-1000.)
Copying a Folder
Follow these steps to copy all the photos in a folder in the Card Case,
on a memory card, or on a CD-R/RW to an album:
1 Open the folder you want to copy to the album. (You must open
the folder before you can copy its photos.)
2 Press the MENU button to display the Pop-up
menu:
3 Select Copy All Images to Album
and press the OK button. You see
this screen:
4 Select the album where you want to
store the photos, and press the OK
button.
The photos are copied to the album. It
may take a few moments to copy all of them.
18
Delete
Rotate
20021218.003
20021218.004
Copy to Album
Copy All Images to Album
Copy to Memory Card
Slide Show
Lock
Increase Number of Copies
Changing an Album’s Name
If you want to change the name of an album, follow these steps:
1 Select the album in the Album Case.
2 Press the MENU button to display the Pop-up
menu:
3 Select Change Album Name and
press the OK button.
Delete
Copy All
Christmas
Images
to Album
Travels
Slide Show
Lock
Return to Main Menu
Hide Unsupported Files
Change Album Name
Select to Delete
Copy to Album
Select one of the following:
4 Select the new name from the list,
and press the OK button.
Favorites
Family
Travel
Hobbies
Note:
If you select an album name that is
already being used, a number is added
to the new album’s name, such as
Favorites2.
Christmas
Press OK to select the option. Press Cancel to return to the
previous screen.
You cannot create your own name on the P-1000. If you want to
create a unique name, create a folder on your computer, then copy it
to the Album folder on the P-1000. These albums cannot be selected
as album shortcuts, as described in the next section.
19
Adding an Album Shortcut
You can create shortcuts that let you go straight to your three favorite
albums.
1 First select the photo you want to use as the album thumbnail
picture. To do this, open the album you want the shortcut for and
select a photo to be the thumbnail.
Note:
You can’t create a shortcut to an album that was copied from your
computer or a CD-ROM.
2 Press the MENU button to display the Pop-up menu.
3 Select Set as the Album Thumbnail and press the OK button.
4 Press CANCEL until you see the Main Menu.
5 Select Settings from the Main Menu, and then Album
Shortcut. You see this screen:
Album Shortcut Settings
Shortcut 1:
Favorites
Shortcut 2:
Travel
Shortcut 3:
Hobbies
Use the left or right button to change the album shortcut.
Press OK to apply the setting and return to the previous
screen.
6 Press d or u on the arrow button to select Shortcut 1, 2, or 3.
Then press l or r to scroll through the albums to find the one
you want for that shortcut. Do this for each shortcut you want to
create.
7 Press OK then CANCEL.
The new shortcut(s) appear in the Main Menu.
20
Deleting Photos
There are several ways to delete a photo, folder, or album. The easiest
way is to select the item and then hold down the MENU button for
several seconds. When you see the message “Are you sure you want
to delete the files?”, select Yes to delete or No to cancel.
You can also delete an individual photo, folder, or album as follows:
1 Select an image, folder, or album to delete.
2 Press the MENU button to display the Pop-up menu:
Delete
Copy All Images to Album
Copy to Memory Card
Slide Show
Lock
Return to Main Menu
PC View Mode
Hide Unsupported Files
3 Select Delete and press the OK button.
Note:
If the selected picture, folder, or album is locked, you cannot delete it.
See your User’s Guide for instructions on unlocking it. However, if you
select a folder or album that is not locked but contains one or more
locked photos, the folder will be deleted.
4 If you see a message asking if you want to delete the file(s), select
Yes to delete or No to cancel. Then press OK.
Marking Folders or Albums for Deletion
If you want to delete several folders or albums, you can mark them for
deletion and then delete them all at once. Follow these steps:
1 Select the first folder or album you want to delete.
2 Press the MENU button to display the Pop-up menu.
21
3 Use the arrow button to choose Select to Delete and press the
OK button. A trash can icon appears in the thumbnail for the
folder or album.
4 Repeat step 3 for any other items you want to delete.
5 When you finish marking the items you want to delete, press the
MENU button to display the Pop-up menu and select Delete.
You see the message Are you sure you want to delete the
files?
6 Select Yes to delete them or No to cancel and press the OK
button.
Installing the Software
Your P-1000 CD-ROM includes Film Factory and a User’s Guide.
If you don’t have any photo software already on your computer, you
can install Film Factory to help you copy and manage your photos.
If you’re connecting the P-1000 to a computer running Windows 98,
you need to install a USB driver (included on the CD-ROM); see
page 25 for instructions.
Note:
EPSON will occasionally update the P-1000 firmware and add support for
additional printers. You can download the latest version from EPSON’s
Support web site: http://support.epson.com. Instructions for updating the
firmware in your P-1000 will be included with the download information.
22
Installing Film Factory
1 Insert the P-1000 CD-ROM into your CD or DVD drive.
The CD automatically opens. If it doesn’t open, double-click the
EPSON CD-ROM icon.
If you’re using a Macintosh, double-click the EPSON Installer
icon.
2 Select Install EPSON Software Film Factory, then click
.
3 Follow the instructions on the screen to complete the installation.
4 Click
to close the P-1000 installer.
For information on using Film Factory, see the online help in Film
Factory or open the Getting Started Guide:
❍
Windows: Click Start > Programs or All Programs > Film
Factory > Getting Started Guide
❍
Macintosh: Double-click the Getting Started Guide in the Film
Factory folder
23
Viewing and Installing the
P-1000 User’s Guide
The CD includes an online User’s Guide with detailed instructions on
using the P-1000. You can view the P-1000 User’s Guide from the
CD-ROM or you can install it on your computer and view or print it
from there. The User’s Guide is a PDF manual, which requires
Adobe® Acrobat® Reader or Preview (on Macintosh OS X) to view it.
1 Insert the P-1000 CD-ROM into your CD or DVD drive.
The CD automatically opens. If not, double-click the EPSON
CD-ROM icon.
If you’re using a Macintosh, double-click the EPSON Installer
icon.
2 Select View EPSON P-1000 User’s Guide or Install EPSON
.
P-1000 User’s Guide, then click
3 If you selected View User’s Guide, the manual opens on your
computer screen.
If you selected Install User’s Guide, the manual is installed on
your hard drive. To view it, double-click the EPSON P-1000
User’s Guide icon on your desktop.
4 Click
to close the P-1000 installer.
24
Installing the USB Driver for Windows 98
Before you connect the P-1000 to a computer running Windows 98,
you need to install a USB driver.
If you connect your P-1000 to your computer and see this screen,
click the CANCEL button.
Click Cancel
Follow these steps to install the driver.
1 Insert the P-1000 CD-ROM into
your CD or DVD drive.
The CD automatically opens. If
not, double-click the EPSON
CD-ROM icon.
2 Select EPSON P-1000 USB
Driver, then click
.
3 Follow the instructions on the
screen to complete the installation.
4 Click
to close the P-1000 installer.
Now that the driver is installed, you can connect the P-1000 to your
computer to view and copy images.
25
Resetting the P-1000
If the P-1000 locks up (stops
working) or you want to restore the
default values, you can reset it. Press
the RESET button with a thin object.
RESET button
The P-1000 shuts off, resets its
default values and comes back on.
Cleaning the P-1000
Follow these guidelines when cleaning the P-1000:
❍
Turn the P-1000 off before cleaning.
❍
Use a clean, dry cloth to wipe it clean.
❍
Do not use harsh or abrasive cleaners.
❍
If necessary, clean the battery contacts with a dry cloth.
Where to Get Help
Error Messages
When a problem occurs, an error message usually appears on the
LCD. For a list of error messages and troubleshooting tips, see your
User’s Guide on the CD-ROM.
User’s Guide
The User’s Guide on the CD-ROM contains detailed information on
copying and organizing images, connecting the P-1000 to different
hardware, archiving images to a CD-ROM, and printing from the
P-1000.
26
Contacting EPSON
EPSON provides technical assistance 24 hours a day through the
electronic support services and automated telephone services listed
below:
❍
World Wide Web
From the Internet, you can reach EPSON Support at
http://support.epson.com. At this site, you can download
drivers and other files, look at product documentation, access
troubleshooting information, and receive technical advice
through e-mail.
❍
Automated Telephone Services
A variety of automated help services are available 24 hours a day,
seven days a week. To use these services, you must have a touch
tone telephone and call (800) 922-8911.
To speak to a technical support representative, dial:
❍
U.S.: (562) 276-4365, 6 AM to 6 PM, Pacific Time, Monday
through Friday.
❍
Canada: (905) 709-3839, 6 AM to 6 PM, Pacific Time, Monday
through Friday.
Toll or long distance charges may apply.
Before you call, please have the following information ready:
❍
Product name (EPSON P-1000)
❍
Product serial number (see the bottom edge of the P-1000)
❍
Proof of purchase (such as a store receipt) and date of purchase
❍
Description of the problem
You can purchase ink cartridges, paper, manuals, and accessories from
EPSON at (800) 873-7766, or visit the EPSON StoreSM at
www.epsonstore.com (U.S. sales only). In Canada, please call
(800) 463-7766 for dealer referral.
27
All rights reserved. No part of this publication may be reproduced, stored in a
retrieval system, or transmitted in any form or by any means, electronic, mechanical,
photocopying, recording, or otherwise, without the prior written permission of
SEIKO EPSON CORPORATION. The information contained herein is designed
only for use with this EPSON product. EPSON is not responsible for any use of this
information as applied to other products.
Neither SEIKO EPSON CORPORATION nor its affiliates shall be liable to the
purchaser of this product or third parties for damages, losses, costs, or expenses
incurred by the purchaser or third parties as a result of accident, misuse, or abuse of
this product or unauthorized modifications, repairs, or alterations to this product, or
(excluding the U.S.) failure to strictly comply with SEIKO EPSON
CORPORATION’s operating and maintenance instructions.
SEIKO EPSON CORPORATION shall not be liable for any damages or problems
arising from the use of any options or any consumable products other than those
designated as Original EPSON Products or EPSON Approved Products by SEIKO
EPSON CORPORATION.
SEIKO EPSON CORPORATION shall not be held liable for any damage resulting
from electromagnetic interference that occurs from the use of any interface cables
other than those designated as EPSON Approved Products by SEIKO EPSON
CORPORATION.
Trademarks
EPSON and EPSON Stylus are registered trademarks of SEIKO EPSON
CORPORATION.
EPSON Software is a trademark and EPSON Store is a service mark of Epson
America, Inc.
Film Factory is a trademark of A.I. Soft, Inc.
General Notice: Other product names used herein are for identification purposes
only and may be trademarks of their respective owners. EPSON disclaims any and all
rights in those marks.
© 2003 Epson America, Inc.
11/03
P-1000 Parts
P-1000 Control Panel
ACCESS light
PRINT button
Flashes orange briefly
when you turn on the
P-1000 or access data
Displays the
Print menu
Eject button
MENU button
Displays the Pop-up menu
Memory card slot
Arrow button
Power switch
Press , , , or to
select a photo or an
option in a menu
Activity light
Flashes during power on
and off, printing, and
certain other operations
CANCEL button
CHARGE light
Flashes green when the
battery is being charged
Cancels the current operation
and returns to the previous
Selects a highlighted
screen or the Main Menu
option, opens the
selected folder or photo,
and zooms into a image
OK button
LCD
P-1000 Main Menu
Video output
connector
Whenever you turn on the P-1000, the Main menu appears.
All functions are started here.
Battery life icon
Control panel
Battery cover
Reset button
USB interface
connector
Shortcut icon for selecting
your favorite albums
AC adapter
connector
Message area
Battery cover
release
If you are viewing pictures or copying or deleting files, you can
return to the Main Menu by pressing Cancel.
Connector cover
EPSON
®
EPSON P-1000
Quick Reference Guide
Quick Reference Guide
CPD-17374
Printed in USA
Printed in USA
CPD-17374