1
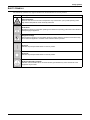
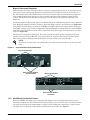
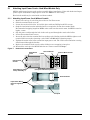
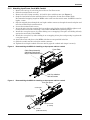
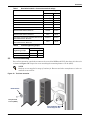
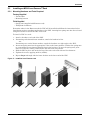
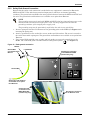
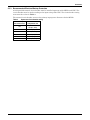
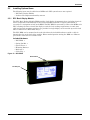
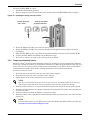
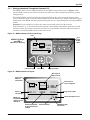
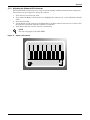
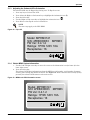
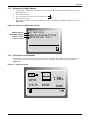
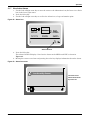
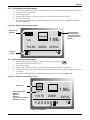
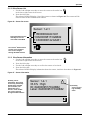
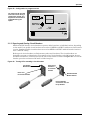
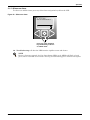
Emerson Network Power® MPH2™ Rack PDU
User Manual
MPH2™Managed Rack
Power Distribution
2.96A RX
MPH2
121.1V
1
359W
2kWh
i
TX
L1
L2
L3
TABLE OF CONTENTS
IMPORTANT SAFETY INSTRUCTIONS . . . . . . . . . . . . . . . . . . . . . . . . . . . . . . . . . . . . . . . . . . . . . . . .1
SAFETY SYMBOLS . . . . . . . . . . . . . . . . . . . . . . . . . . . . . . . . . . . . . . . . . . . . . . . . . . . . . . . . . . . . .3
1.0
INTRODUCTION . . . . . . . . . . . . . . . . . . . . . . . . . . . . . . . . . . . . . . . . . . . . . . . . . . . . . . . . . .4
1.1
General Characteristics . . . . . . . . . . . . . . . . . . . . . . . . . . . . . . . . . . . . . . . . . . . . . . . . . . . . . . . 5
1.2
Model Types . . . . . . . . . . . . . . . . . . . . . . . . . . . . . . . . . . . . . . . . . . . . . . . . . . . . . . . . . . . . . . . . 5
1.3
Appearance and Components . . . . . . . . . . . . . . . . . . . . . . . . . . . . . . . . . . . . . . . . . . . . . . . . . . 6
1.3.1
1.3.2
1.3.3
1.3.4
1.3.5
Controls and Indicators—RPC2™ . . . . . . . . . . . . . . . . . . . . . . . . . . . . . . . . . . . . . . . . . . . . . . . .
Controls and Indicators—LED’s . . . . . . . . . . . . . . . . . . . . . . . . . . . . . . . . . . . . . . . . . . . . . . . . .
Controls and Indicators—Onboard LCD . . . . . . . . . . . . . . . . . . . . . . . . . . . . . . . . . . . . . . . . . . .
Power Components . . . . . . . . . . . . . . . . . . . . . . . . . . . . . . . . . . . . . . . . . . . . . . . . . . . . . . . . . . . .
Hard-Wired Connection Features . . . . . . . . . . . . . . . . . . . . . . . . . . . . . . . . . . . . . . . . . . . . . . . .
6
6
6
7
8
2.0
INSTALLATION . . . . . . . . . . . . . . . . . . . . . . . . . . . . . . . . . . . . . . . . . . . . . . . . . . . . . . . . . .9
2.1
Attaching Input Power Cords—Hard-Wired Models Only. . . . . . . . . . . . . . . . . . . . . . . . . . . 10
2.1.1
2.1.2
Attaching Input Power Cords Without Conduit . . . . . . . . . . . . . . . . . . . . . . . . . . . . . . . . . . . . 10
Attaching Input Power Cords With Conduit. . . . . . . . . . . . . . . . . . . . . . . . . . . . . . . . . . . . . . . 11
2.2
Tool-less Mounting . . . . . . . . . . . . . . . . . . . . . . . . . . . . . . . . . . . . . . . . . . . . . . . . . . . . . . . . . . 12
2.3
Installing an MPH2 in an Emerson® Rack . . . . . . . . . . . . . . . . . . . . . . . . . . . . . . . . . . . . . . . 13
2.3.1
2.3.2
2.3.3
Mounting Hardware and Tools Required . . . . . . . . . . . . . . . . . . . . . . . . . . . . . . . . . . . . . . . . . 13
Safety Earth Ground Connection . . . . . . . . . . . . . . . . . . . . . . . . . . . . . . . . . . . . . . . . . . . . . . . 14
Recommended Electrical Backup Protection . . . . . . . . . . . . . . . . . . . . . . . . . . . . . . . . . . . . . . 15
2.4
Connecting Rack Equipment . . . . . . . . . . . . . . . . . . . . . . . . . . . . . . . . . . . . . . . . . . . . . . . . . . 16
2.5
Installing Optional Items. . . . . . . . . . . . . . . . . . . . . . . . . . . . . . . . . . . . . . . . . . . . . . . . . . . . . 17
2.5.1
2.5.2
RPC Basic Display Module . . . . . . . . . . . . . . . . . . . . . . . . . . . . . . . . . . . . . . . . . . . . . . . . . . . . 17
Temperature/Humidity Sensor . . . . . . . . . . . . . . . . . . . . . . . . . . . . . . . . . . . . . . . . . . . . . . . . . 18
3.0
OPERATION . . . . . . . . . . . . . . . . . . . . . . . . . . . . . . . . . . . . . . . . . . . . . . . . . . . . . . . . . . .19
3.1
Controls and Indicators . . . . . . . . . . . . . . . . . . . . . . . . . . . . . . . . . . . . . . . . . . . . . . . . . . . . . . 19
3.1.1
3.1.2
3.1.3
3.1.4
3.1.5
3.1.6
3.1.7
3.1.8
3.1.9
3.1.10
3.1.11
3.1.12
3.1.13
4.0
Getting Information Through the Onboard LCD . . . . . . . . . . . . . . . . . . . . . . . . . . . . . . . . . . . 20
Adjusting the Onboard LCD’s Contrast . . . . . . . . . . . . . . . . . . . . . . . . . . . . . . . . . . . . . . . . . . 21
Adjusting the Onboard LCD’s Orientation . . . . . . . . . . . . . . . . . . . . . . . . . . . . . . . . . . . . . . . . 22
Obtain MPH2 System Information . . . . . . . . . . . . . . . . . . . . . . . . . . . . . . . . . . . . . . . . . . . . . . 22
Determine IP or MAC Address . . . . . . . . . . . . . . . . . . . . . . . . . . . . . . . . . . . . . . . . . . . . . . . . . 23
View Input Level Information . . . . . . . . . . . . . . . . . . . . . . . . . . . . . . . . . . . . . . . . . . . . . . . . . . 23
View Active Alarms . . . . . . . . . . . . . . . . . . . . . . . . . . . . . . . . . . . . . . . . . . . . . . . . . . . . . . . . . . 24
View Branch Level Information. . . . . . . . . . . . . . . . . . . . . . . . . . . . . . . . . . . . . . . . . . . . . . . . . 25
View Outlet Level Information . . . . . . . . . . . . . . . . . . . . . . . . . . . . . . . . . . . . . . . . . . . . . . . . . 25
View Sensor List . . . . . . . . . . . . . . . . . . . . . . . . . . . . . . . . . . . . . . . . . . . . . . . . . . . . . . . . . . . . . 26
View Sensor Information . . . . . . . . . . . . . . . . . . . . . . . . . . . . . . . . . . . . . . . . . . . . . . . . . . . . . . 26
Opening and Closing Circuit Breakers . . . . . . . . . . . . . . . . . . . . . . . . . . . . . . . . . . . . . . . . . . . 27
Silence an Alarm. . . . . . . . . . . . . . . . . . . . . . . . . . . . . . . . . . . . . . . . . . . . . . . . . . . . . . . . . . . . . 28
EMERSON® MPH2 RACK PDU SPECIFICATIONS . . . . . . . . . . . . . . . . . . . . . . . . . . . . . . . . 29
5.0
TROUBLESHOOTING . . . . . . . . . . . . . . . . . . . . . . . . . . . . . . . . . . . . . . . . . . . . . . . . . . . . . 30
i
FIGURES
Figure 1
Figure 2
Figure 3
Figure 4
Figure 5
Figure 6
Figure 7
Figure 8
Figure 9
Figure 10
Figure 11
Figure 12
Figure 13
Figure 14
Figure 15
Figure 16
Figure 17
Figure 18
Figure 19
Figure 20
Figure 21
Figure 22
Figure 23
Figure 24
Figure 25
Figure 26
Figure 27
Figure 28
Figure 29
Figure 30
Vertical MPH2 rack PDU Configuration . . . . . . . . . . . . . . . . . . . . . . . . . . . . . . . . . . . . . . . . . . . . . . 5
MPH2 major monitoring and management features . . . . . . . . . . . . . . . . . . . . . . . . . . . . . . . . . . . . 6
MPH2 LCD and LED’s . . . . . . . . . . . . . . . . . . . . . . . . . . . . . . . . . . . . . . . . . . . . . . . . . . . . . . . . . . . . 7
Branch and outlet identification—Units with no monitoring . . . . . . . . . . . . . . . . . . . . . . . . . . . . . 7
Branch and outlet identification—Units with individually monitored and managed outlets . . . . 7
Circuit breaker branch identification . . . . . . . . . . . . . . . . . . . . . . . . . . . . . . . . . . . . . . . . . . . . . . . . 8
Hard-wired connections . . . . . . . . . . . . . . . . . . . . . . . . . . . . . . . . . . . . . . . . . . . . . . . . . . . . . . . . . . 10
Disassembling the MPH2 for installing an input power cable in conduit . . . . . . . . . . . . . . . . . . . 11
Disassembling the MPH2 for installing an input power cable in conduit . . . . . . . . . . . . . . . . . . . 11
Tool-less mounting . . . . . . . . . . . . . . . . . . . . . . . . . . . . . . . . . . . . . . . . . . . . . . . . . . . . . . . . . . . . . . 12
Installing in an Emerson rack . . . . . . . . . . . . . . . . . . . . . . . . . . . . . . . . . . . . . . . . . . . . . . . . . . . . . 13
Earth-ground connection . . . . . . . . . . . . . . . . . . . . . . . . . . . . . . . . . . . . . . . . . . . . . . . . . . . . . . . . . 14
RPC BDM . . . . . . . . . . . . . . . . . . . . . . . . . . . . . . . . . . . . . . . . . . . . . . . . . . . . . . . . . . . . . . . . . . . . . 17
Inserting the spring nut into a T-slot . . . . . . . . . . . . . . . . . . . . . . . . . . . . . . . . . . . . . . . . . . . . . . . 18
MPH2 onboard LCD and control keys . . . . . . . . . . . . . . . . . . . . . . . . . . . . . . . . . . . . . . . . . . . . . . . 20
MPH2 onboard LCD layout . . . . . . . . . . . . . . . . . . . . . . . . . . . . . . . . . . . . . . . . . . . . . . . . . . . . . . . 20
Adjust LCD contrast . . . . . . . . . . . . . . . . . . . . . . . . . . . . . . . . . . . . . . . . . . . . . . . . . . . . . . . . . . . . . 21
Flip LCD . . . . . . . . . . . . . . . . . . . . . . . . . . . . . . . . . . . . . . . . . . . . . . . . . . . . . . . . . . . . . . . . . . . . . . 22
MPH2 rack PDU information screen . . . . . . . . . . . . . . . . . . . . . . . . . . . . . . . . . . . . . . . . . . . . . . . . 22
IP address in MPH2 Onboard LCD . . . . . . . . . . . . . . . . . . . . . . . . . . . . . . . . . . . . . . . . . . . . . . . . . 23
Input level screen . . . . . . . . . . . . . . . . . . . . . . . . . . . . . . . . . . . . . . . . . . . . . . . . . . . . . . . . . . . . . . . 23
Alarm icon . . . . . . . . . . . . . . . . . . . . . . . . . . . . . . . . . . . . . . . . . . . . . . . . . . . . . . . . . . . . . . . . . . . . . 24
Alarm list screen . . . . . . . . . . . . . . . . . . . . . . . . . . . . . . . . . . . . . . . . . . . . . . . . . . . . . . . . . . . . . . . . 24
Branch level information screen . . . . . . . . . . . . . . . . . . . . . . . . . . . . . . . . . . . . . . . . . . . . . . . . . . . 25
Outlet level information screen . . . . . . . . . . . . . . . . . . . . . . . . . . . . . . . . . . . . . . . . . . . . . . . . . . . . 25
Sensor list screen . . . . . . . . . . . . . . . . . . . . . . . . . . . . . . . . . . . . . . . . . . . . . . . . . . . . . . . . . . . . . . . 26
Sensor information . . . . . . . . . . . . . . . . . . . . . . . . . . . . . . . . . . . . . . . . . . . . . . . . . . . . . . . . . . . . . . 26
Configuration in progress screen . . . . . . . . . . . . . . . . . . . . . . . . . . . . . . . . . . . . . . . . . . . . . . . . . . . 27
Turning Off or resetting a circuit breaker . . . . . . . . . . . . . . . . . . . . . . . . . . . . . . . . . . . . . . . . . . . . 27
Silence an alarm . . . . . . . . . . . . . . . . . . . . . . . . . . . . . . . . . . . . . . . . . . . . . . . . . . . . . . . . . . . . . . . . 28
TABLES
Table 1
Table 2
Table 3
Hard-wired models—Connection terminal ratings . . . . . . . . . . . . . . . . . . . . . . . . . . . . . . . . . . . . . 12
Terminal tightening torque . . . . . . . . . . . . . . . . . . . . . . . . . . . . . . . . . . . . . . . . . . . . . . . . . . . . . . . 12
Upstream circuit breaker rating . . . . . . . . . . . . . . . . . . . . . . . . . . . . . . . . . . . . . . . . . . . . . . . . . . . 15
ii
Important Safety Instructions
IMPORTANT SAFETY INSTRUCTIONS
SAVE THESE INSTRUCTIONS
This safety sheet contains important safety instructions. Read all safety, installation and operating
instructions before installing the Emerson Network Power MPH2 rack power distribution unit (PDU).
Adhere to all warnings on the unit and in this safety sheet. Follow all operating and user instructions.
• The MPH2 rack PDU is designed for information technology equipment. The MPH2 rack PDU is
not intended for use with life support or other designated critical devices. If uncertain about its
intended application, consult your local dealer or Emerson representative.
• Maximum load must not exceed the rating shown on the MPH2 rack PDU nameplate.
• The rated line voltage must not exceed 240VAC for connection to AC power distribution systems
with an isolated or high-impedance ground.
• Operate the MPH2 rack PDU in an indoor environment only in an ambient temperature range of
32°F to 140°F (0°C to 60°C) for 24A or less input models and 32°F to 122°F (0°C to 50°C) for 40A
and 48A input models.
• Install the MPH2 rack PDU in a clean environment, free of conductive contaminants, moisture,
flammable liquids, gases and corrosive substances.
• The MPH2 rack PDU must be installed in a restricted-access location. A restricted-access location
is an area where access is possible only through the use of a tool or lock and key or other means of
security, and is controlled by the authority responsible for the location.
• The MPH2 rack PDU has no user-serviceable parts. Under no circumstances attempt to gain
internal access due to the risk of electric shock or burn.
• Refer any unexpected behavior or unusual fault conditions to your local dealer, Emerson
representative or Emerson Network Power Applications Engineering.
• Emerson recommends powering only devices with safety agency approval from the MPH2 rack
PDU.
• For permanently connected MPH2 rack PDU’s (hard-wired versions), a readily accessible
disconnect device must be incorporated external to the equipment.
• For MPH2 rack PDU’s with integral plugs, the socket/ outlet must be installed near the
equipment and must be easily accessible.
! WARNING
Opening or removing end caps from an MPH2 rack PDU may expose personnel to lethal
voltages within the rack PDU. Observe all cautions and warnings. Failure to do so may result
in serious injury or death. MPH2 rack PDU units contain no user-serviceable parts. For
service or technical support, contact Emerson Network Power Applications Engineering or
your local Emerson representative. Do not attempt to service this product yourself.
! CAUTION
Connecting an MPH2 rack PDU to a power supply with an incorrect rating in voltage or
amperes may damage the connected equipment and your MPH2 rack PDU. For questions
about the power supply connections, contact Emerson Network Power Applications
Engineering or your local Emerson representative.
! CAUTION
Ensure that the ratings of the electric circuit of each connected device meets the specified
rating at each branch and outlet.
! NOTE
For power management purposes, record the outlet where each piece of equipment is
connected. Outlets on the MPH2 rack PDU have a numeric designation. The MPH2 rack PDU
identifies the outlets with numbers and are grouped by branch with a letter referring to the
proper circuit breaker.
1
Emerson® MPH2™
Important Safety Instructions
! CAUTION
All configuration steps must be completed before attempting to start equipment connected to
the MPH2 rack PDU.
EUROPEAN UNION
Notice to European Union Customers: Disposal of Old Appliances
This product uses components that are dangerous for the environment, such as
electronic cards and other electronic components. Any component that is
removed must be taken to specialized collection and disposal centers. If this
unit must be dismantled, this must be done by a specialized center for
collection and disposal of electric and electronics appliances or other
dangerous substances. This product has been supplied from an
environmentally aware manufacturer that complies with the Waste Electrical
and Electronic Equipment (WEEE) Directive 2002/96/EC. The “crossed-out
wheelie bin” symbol at right is placed on this product to encourage you to
recycle wherever possible.
Please be environmentally responsible and recycle this product through your
recycling facility at its end of life. Do not dispose of this product as unsorted municipal waste. Follow
local municipal waste ordinances for proper disposal provisions to reduce the environmental impact of
waste electrical and electronic equipment (WEEE).
For information regarding the scrapping of this equipment, go to
http://www.eu.emersonnetworkpower.com
(“Products session” or “Contact us” session) or call Emerson’s worldwide technical support at:
• 00 80011554499 (toll free number)
• +39 0298250222 (toll number based in Italy)
ROHS Compliance
The MPH2 rack PDU modules comply with the Restriction of Hazardous Substances directive
(ROHS), prohibiting use of six hazardous materials manufacturing of electronics, including lead-free
solder.
FCC Compliance
This unit complies with the limits for a Class A device pursuant to Part 15 of the FCC Rules.
Operation is subject to the following two conditions:
This device may not cause harmful interference, and
This device must accept any interference received, including interference that may cause undesired
operation.
NOTE
This equipment has been tested and found to comply with the limits for a Class A digital
device, pursuant to Part 15 of the FCC Rules. These limits are designed to provide reasonable
protection against harmful interference when the equipment is operated in a commercial
environment. This equipment generates, uses and can radiate radio frequency energy and, if
not installed and used in accordance with the instruction manual, may cause harmful
interference to radio communications.
Operation of this equipment in a residential area is likely to cause harmful interference that
the user must correct, including the expense of all corrective modifications.
Emerson® MPH2™
2
Safety Symbols
SAFETY SYMBOLS
The following symbols may appear within the documentation or on the product.
Symbol
Meaning
High Temperature
Alerts the user where the enclosure temperature may exceed 158°F (70°C) while operating under
high-ambient temperature and at maximally rated load.
Instructions
Signifies the presence of important operating and maintenance (servicing) instructions in the literature
accompanying the appliance.
Dangerous Voltage
Warns about the presence of uninsulated dangerous voltage within the product’s enclosure that may
be of sufficient magnitude to constitute a risk of electric shock to persons.
Power On
Indicates the principal On/Off switch is in the On position.
Power Off
Indicates the principal On/Off switch is in the Off position.
Protective Grounding Terminal
Indicates a terminal that must be connected to earth ground before any other connections to the
equipment may be made.
3
Emerson® MPH2™
Introduction
1.0
INTRODUCTION
The Emerson Network Power® MPH2™ is the most intelligent, high-availability line of managed rack
PDU’s. It offers remote monitoring and control capabilities as well as environmental sensors with
multiple power input selections and output configurations.
Metering Levels
Four types of MPH2 are available that offer metering of all electrical information including input,
branch and outlet levels, as well as integration with environmental sensors. The available
information varies by type of MPH2.
Mounting
Rack PDU’s are available for mounting in vertical configuration in standard or network enclosures.
Power cords on MPH2 models that mount vertically in a zero-U configuration may be switched from
one end to the other to accommodate top or bottom cable entry into the rack.
Locking Outlets - IEC Type Only
Locking outlets are available on models with IEC outlets. The locking feature requires optional power
cords to be installed on devices powered by the MPH2.
The outlets require no modification to function properly with non-locking power cords.
Overcurrent Protection
All MPH2 rack PDU units with input current rating of 30A and higher feature 100% rated
hydraulic-magnetic breakers. For all UL-listed models, the maximum cord and plug-connected
loading is limited to 80% continuous loading, as required by UL in accordance with the National
Electric Code.
Low-profile circuit breakers are used on all MPH2 rack PDU’s with two or three branch circuits.
Standard-profile circuit breakers are used on MPH2 rack PDU’s that have six branch circuits or have
a 240VAC rating. Each type of circuit breaker is a flush-mount, rocker style (see Figure 29).
Integrated Monitoring and Management
The factory-installed Emerson RPC2™ communications module permits managing the MPH2 rack
PDU over a secure Web page and SNMP-based network management system. The RPC2 permits
interconnecting up to four rack PDU’s for monitoring and management.
NOTE
Refer to the RPC2 communications module user manual, SL-20841, for detailed instructions
on installing and using the RPC2 module. The document is available at Emerson’s Web site:
http://www.emersonnetworkpower.com
A rack PDU can be monitored locally through its onboard LCD, through a Web interface or through
an optional display module, either the RPC BDM (Part# RPCBDM-1000). The display module
connects directly to the RPC2 communications module. It can be handheld, mounted in or on the rack
or mounted on a wall near the rack PDU it is monitoring.
Multiple MPH2 rack PDU’s can be managed with these software applications:
•
•
•
•
•
Avocent® Rack Power Manager software
Avocent DSView™ management software
Emerson’s Trellis™ Real-Time Infrastructure Optimization platform software
Liebert® Nform®, which adds group-based outlet management
Liebert SiteScan®
Emerson® MPH2™
4
Introduction
Figure 1
Vertical MPH2 rack PDU Configuration
Vertical
MPH2
rack PDU
Connected Equipment
Monitoring Station
Network
Connection
(10MB/100M
B/1GB)
RPC™ Basic
Display Module
Rack PDU Array™
Serial Appliance
1.1
Sensors
Integrated and
Modular
General Characteristics
• Input ampacities include 16A or 32A for European Union versions and 16A to 48A for North
American versions.
• Single-phase and three-phase.
• Input voltages include 100-120VAC, 120/208VAC, 200-240/415VAC.
• Outlets types include NEMA 5-20, IEC 320 C13 and IEC 320 C19
• Input connection supports a highly flexible fixed power cord or hard-wired connection to user
accessible terminal block.
1.2
Model Types
There are four types of MPH2 rack PDU.
• Type R—Outlet Metered, Outlet Switched: Supports metering of the overall input, individual
branches and individual outlets; also supports individual On/Off control of each outlet.
• Type M—Outlet Metered: Supports metering of the overall input, individual branches and
individual outlets.
• Type C—Rack PDU Metered, Outlet Switched: Supports metering of the overall input and of
individual branches and supports individual On/Off control of each outlet.
• Type B—Rack PDU Metered: Provides basic power distribution and supports metering of the
overall input and of the individual branches.
5
Emerson® MPH2™
Introduction
1.3
Appearance and Components
1.3.1
Controls and Indicators—RPC2™
The MPH2 rack PDU is monitored and managed by the factory-installed RPC2 communications
module. This manual presents information about the MPH2’s functions and features. For details on
operating the MPH2 through the RPC2 communications module, refer to the RPC2 user manual,
SL-20841. The document is available at Emerson’s Web site:
http://www.emersonnetworkpower.com
The RPC2 is installed near the middle of the MPH2 rack PDU. The central location eases connections
whichever orientation is required for power cabling.
The RPC2’s Web-based interface provides system operating measurements, as well as readings from
optional SN temperature or temperature/humidity sensors. The RPC2 provides basic information
about the MPH2 rack PDU, such as firmware version, unit rating, model number and serial number.
Figure 2
MPH2 major monitoring and management features
USB Port
Serial Port
Sensor Display
Port
Port
Link
Port
Network
Port
Reset Button Access
1.3.2
Controls and Indicators—LED’s
The MPH2 rack PDU also has LED’s that indicate outlet and branch status and system information.
The LED’s flash, pulse or change colors to indicate an event or alarm condition (for details on how
LED’s respond to events and alarms, refer to 5.0 - Troubleshooting.
NOTE
Units with a “B” as the fourth character in the model name (MPHBxxxx) do not have LED’s at
their outlets. The branch and outlet LED behavior in 5.0 - Troubleshooting and elsewhere in
this document does not apply to these units.
Outlets on units with an “M” as the fourth character in the model name (MPHMxxxx) cannot be
turned Off. LED’s at outlets on these models are always either on continuously or flashing
when input power is present.
1.3.3
Controls and Indicators—Onboard LCD
Emerson’s MPH2 has an integrated, onboard LCD that can be used to view information about the
rack PDU. The information available depends on the type of MPH2. For additional information about
the onboard LCD, refer to 3.1.1 - Getting Information Through the Onboard LCD.
Emerson® MPH2™
6
Introduction
Figure 3
MPH2 LCD and LED’s
Onboard LCD
MPH2™Managed Rack
Power Distribution
2.96A RX
MPH2
121.1V
1.3.4
L2
L3
2kWh
359W
i
1
Left Arrow Key
L1
Line Input
Status LED’s
Select Key
TX
Right Arrow Key
Power Components
The component location and type depend on the model of the MPH2 rack PDU. For example, units
with a “B” as the fourth character in the model name do not have LED’s at their outlets; see
Figures 4, 5, 6 and 7.
Figure 4
Branch and outlet identification—Units with no monitoring
Type B Models
Branch Identification
Figure 5
Branch B Outlets
Not shown
Outlet Identification
Branch and outlet identification—Units with individually monitored and managed outlets
Type C, R and M Models
Branch
Identification
Outlet
Identification
Branch
Identification
Outlet
Identification
LED’s at Each Outlet
(Denote Outlet Status)
7
Emerson® MPH2™
Introduction
Branch Overcurrent Protection
Models having more than 16A input current rating are equipped with branch overcurrent protection.
This protects each outlet group against overload and short circuit. The branch circuit breaker is a
UL 489-listed breaker with a flush-mount, rocker-style actuator. The circuit breaker interrupts the
fault current flowing in the line-to-line, line-to-neutral and line-to-PE conductors of the branch
circuits. The branch circuit breaker ratings apply over the full rated operating temperature and
frequency.
The flush-mount breakers guard against accidental trips that could interrupt power to the connected
load. Manually tripping a breaker requires a small, flat blade, such as a screw driver (see Figure 29).
Low-profile circuit breakers are used on all MPH2 rack PDU’s with two or three branch circuits less
than 240V rating in a line-neutral configuration. Standard-profile circuit breakers are used on MPH2
rack PDU’s with six branch circuits or have a 240VAC rating. Each type of circuit breaker is a rocker
style (see Figure 29).
The branch circuit breaker labeling (A, B, C and so on) shows which outlets are protected by each
specific breaker. Outlets on Branch A are protected by the circuit breaker labeled A. Three-phase
PDU’s may also have labeling showing the phase associated with each circuit breaker.
NOTE
The branch circuit breaker is not designed to be used as a disconnect device for the connected
load.
Figure 6
Circuit breaker branch identification
Branch Identification
Branch Circuit Breakers
Standard Profile
Branch Identification
Branch Circuit Breakers
Low Profile
1.3.5
Hard-Wired Connection Features
Emerson’s MPH2 rack PDU may be equipped with either a factory-installed input power cord or
hard-wired connections. The hard-wired connection will be at one end of the unit. A terminal block in
the hard-wired connection compartment is coded to aid in making the connections. A collar secures
the input wire, keeping the strain off the terminal block connections. See Figure 7.
Emerson® MPH2™
8
Installation
2.0
INSTALLATION
An MPH2 rack PDU can be installed in an Emerson rack on the frame members using field-supplied
hardware. The unit can be installed on the face or the side of frame members. The unit can be
mounted so that the power cord exits either the top or bottom of the rack.
NOTE
Follow all local and national electrical codes, standards and recommended practices.
Disconnect Required for Hard-Wired MPH2 Units
A readily accessible input power disconnect device must be installed near the MPH2 rack PDU.
Input Power Location for MPH2 Units with Factory-Installed Power Cords
The input power socket or outlet must be installed near the MPH2 and must be easily accessible.
9
Emerson® MPH2™
Installation
2.1
Attaching Input Power Cords—Hard-Wired Models Only
MPH2’s with integral power cords need no assembly before installation. Units with hard-wired input
power require attachment of input power cords. See Table 1 for wire sizing.
Hard-wired models may be wired with or without conduit.
2.1.1
Attaching Input Power Cords Without Conduit
1.
2.
3.
4.
5.
6.
7.
8.
9.
10.
Figure 7
Remove the end cap. It is held in place with two T10 Torx screws.
Slide the terminal block cover off.
Loosen the strain-relief collar. It is held in place with two Phillips head PH1 screws.
Strip the insulation from the individual wires as required to fit into the terminal block.
Recommended stripping length for MPH2 units rated less than 32A is 9mm; for MPH2’s rated or
higher, 11mm.
Slip the power cord through the hole in the end cap and through the strain-relief collar.
Loosen the terminal block screws.
Insert the wires into the terminal block according to the labeling inside the MPH2; tighten each
terminal block screw after inserting a wire. Refer to Table 2 for tightening torque.
Tighten the strain-relief collar around the input power cord. The cord’s outer insulation covering
should extend through the bracket.
Replace the terminal block cover by either sliding it on or snapping it into place.
Reattach the end cap to the MPH2 with the two screws removed in Step 1.
Hard-wired connections
Strain-Relief
Collar
Terminal Blocks
Terminal Block Screws
Labels
PE
L3
Phillips Head
Screws
L2
L1
Nuts Attaching Cable
Clamp Assembly: 4
Hard-Wired Connections
(Faceplate and End Cap Removed)
Terminal Blocks
Input Power Wiring
Entry Through End
Cap
Faceplate
Emerson® MPH2™
10
Installation
2.1.2
Attaching Input Power Cords With Conduit
1.
2.
3.
4.
5.
6.
7.
8.
9.
10.
11.
12.
Figure 8
Remove the end cap. It is held in place with two T10 Torx screws.
Slide the terminal block cover off.
Remove the cable clamp assembly. It is held in place with four nuts (see Figure 7).
Strip the insulation from the individual wires as required to fit into the terminal block.
Recommended stripping length for MPH2 units rated less than 32A is 9mm; for MPH2’s rated or
higher, 11mm.
Slip the stripped wires through the seal-tight conduit connector, through the metal end plate and
into the terminal block connection box.
Loosen the terminal block screws.
Insert the wires into the terminal block according to the labeling inside the MPH2; tighten each
terminal block screw after inserting a wire. Refer to Table 2 for tightening torque.
Install the cover plate spacer, by either sliding it on or snapping it into place and sliding it firmly
against the main body of the MPH2.
Install the cover plate, by either sliding it on or snapping it into place and pressing it against the
cover plate spacer.
Attach the metal end plate to the MPH2 with four screws provided in the kit.
Slide the conduit into the seal-tight conduit connector.
Tighten the seal-tight conduit connector until it grips the conduit and crimps it securely.
Disassembling the MPH2 for installing an input power cable in conduit
Cover Plate
Cable Clamp Assembly
(Individual parts shown;
may be removed as a unit)
End Cap; attaches
with two screws
Figure 9
Disassembling the MPH2 for installing an input power cable in conduit
Cover Plate Spacer
Cover Plate
Conduit Connector
(field-supplied)
End Cover
(4 screws)
Conduit
(Cable Not Shown)
11
Emerson® MPH2™
Installation
Table 1
Hard-wired models—Connection terminal ratings
MPH2 Rating
≤32A
>32A
Conductor Cross-Section Solid, Minimum
0.2mm
0.5mm²
Conductor Cross-Section Solid, Maximum
6mm²
16mm²
Conductor Cross-Section Stranded, Minimum
0.2mm²
0.5mm²
Conductor Cross-Section Stranded, Maximum
4mm²
10mm²
Conductor Cross-Section, AWG/kcmil, Minimum
24
20
Conductor Cross-Section, AWG/kcmil, Maximum
10
6
Conductor Cross-Section Stranded, With Ferrule
Without Plastic Sleeve, Minimum
0.25mm²
0.5mm²
Conductor Cross-Section Stranded, With Ferrule
Without Plastic Sleeve, Maximum
4mm²
10mm²
Conductor Cross-Section Stranded, With Ferrule
With Plastic Sleeve, Minimum
0.25mm²²
0.5mm²
Conductor Cross-Section Stranded, With Ferrule
With Plastic Sleeve, Maximum
4mm²
10mm²
Table 2
²
Terminal tightening torque
MPH2 Rating
≤32A
>32A
Minimum
0.6 Nm
1.5Nm
Maximum
0.8Nm
1.8Nm
Tightening Torque
2.2
Tool-less Mounting
For tool-less mounting, attach the mounts to the rear of the MPH2 rack PDU, then hang it in the rack
as shown in Figure 10. Torque the screw attaching the mounting button 17 lb-in (2Nm).
NOTE
Brackets are not supplied. A range of brackets for Emerson and other manufacturers’ racks are
available as accessories.
Figure 10 Tool-less mounting
Button Mount
Torque screw
17 lb-in (2Nm)
Insert the Button Mount
into the Keyhole Slot
Emerson® MPH2™
12
Installation
2.3
Installing an MPH2 in an Emerson® Rack
2.3.1
Mounting Hardware and Tools Required
Factory-Supplied
• Two brackets
• Mounting buttons
Field-Supplied
• Spring nuts (supplied with Emerson rack)
• Phillips #2 screwdriver
Determine where in the Emerson rack the PDU will be installed and follow the instructions below.
Installation requires attaching two brackets to the PDU, inserting four spring nuts into the rack and
using the brackets to attach the PDU to the rack.
To install a PDU in a rack:
1. Attach a bracket to each end of the PDU.
2. If mounting on horizontal frame members, attach the brackets in-line.
- or If mounting on a vertical frame member, attach the brackets at a right angle to the PDU.
3. Insert two spring nuts into the appropriate T-slot on the frame member. Position the spring nuts
to accommodate screws inserted through slots in the brackets. To move the spring nuts, press
down on each with a small, pointed object and slide each into position.
4. Hold the PDU in place and attach the top of the unit to the rack with tool-less fasteners.
5. Tighten the screws, applying 46 lb-in (5.2Nm).
6. Repeat Steps 3 through 5 for the lower bracket on the lower end of the PDU.
Figure 11
Installing in an Emerson rack
13
Emerson® MPH2™
Installation
2.3.2
Safety Earth Ground Connection
Ensure that the safety earth connection is made before any equipment is connected to Emerson’s
MPH2 rack PDU. Units with factory-attached input power cords have an internal grounding
conductor. The ground wire establishes the same ground reference between the MPH2 rack PDU and
the rack. The ground-wire and hardware are available as an option from Emerson.
NOTE
The grounding strap may be used with MPH2 rack PDU’s that have integral input power cords
and units that have hard-wired input power cords. The strap supplements the internal
grounding conductor of the integral power supply cord.
The grounding strap may be particularly useful when the rack is on a raised floor.
1. Insert a spring nut into the rack frame near the grounding point on the MPH2 (see Figure 10 for
inserting the spring nut).
2. Attach a ground wire to the rack with a screw, washer and lock washer. The screw is secured to
the rack’s frame with a spring nut. The ground wire and hardware are available as an option from
Emerson.
3. Use a second field-supplied screw, washer and lock washer to secure the ground wire to the
MPH2. The connection point is marked with an earth-ground symbol
(see Figure 12).
Figure 12 Earth-ground connection
Washer
Ground Wire
Connection Screw
M6 x 12
Lock Washer
Ground wire connection
on the MPH2 Rack PDU
(location may vary)
A
L1
Ground wire and hardware
are available as an option
from Emerson.
ON
COMPLETED GROUND WIRE CONNECTION
Ground wire
connection on the
MPH2 Rack PDU
(location may vary)
Emerson® MPH2™
20
OFF
Ground Wire
Ground wire connection
on an Emerson rack
14
Installation
2.3.3
Recommended Electrical Backup Protection
A field-provided external circuit breaker must be installed upstream of the MPH2 rack PDU. The
circuit breaker must be sized according to the input rating of the PDU. The circuit breaker rating
must meet the values in Table 3.
The external circuit breaker serves as the primary input power disconnect for the MPH2.
Table 3
Upstream circuit breaker rating
Maximum Input
Current Per Pole
Rated Current
of Upstream CB
16A
20A (North America)
16A (EU, WW)
24A
30A (NA)
32A
32A (EU, WW)
40A
50A (NA)
48A
60A (NA)
63A
63A (EU, WW)
15
Emerson® MPH2™
Installation
2.4
Connecting Rack Equipment
NOTE
Circuit breakers on Emerson’s MPH2 rack PDU are opened at the factory. The open circuit
breakers help protect against damage to the connected load from high inrush current when
input power is connected.
The circuit breakers must be closed before the unit will supply power to the connected load. Do
not close the breakers until after all rack equipment is connected to the MPH2 rack PDU.
Once the MPH2 rack PDU has been installed in the rack, the unit is ready for connection of
equipment that will be powered by the unit or used for monitoring.
Verify that the equipment to be connected meet these requirements:
•
•
•
•
Input power requirements of each device match the MPH2 output
Equipment will not overload the MPH2 rack PDU
Input power cords match the MPH2 outlets
Equipment is ready for input power (properly installed and prepared)
To connect devices to an MPH2 rack PDU:
1. Verify that all devices to be connected are shut down and unplugged from input power sources.
2. If the MPH2 rack PDU will be monitored over a network, connect an Ethernet cable to the
network port on the factory-installed RPC2.
3. Route the devices’ power cables to the MPH2 rack PDU, following proper procedures and good
practices, such as segregating power cables from control cables and keeping cable bends to
recommended angles.
4. Verify that the branch circuit breakers on the MPH2 rack PDU are open.
5. Connect the devices’ input power cables to the MPH2 rack PDU.
NOTE
All C13 and C19 outlets on MPH2 rack PDU’s are locking outlets. Locking requires use of
special power cords, which may be factory-installed on the equipment or is available from
Emerson.
If non-locking power cords are used, the power cords should be secured through other methods
to prevent unintended power interruption.
6. Record where each piece of rack equipment is connected, using the branch and outlet numbers on
the MPH2 rack PDU.
7. Post the connection information on or near the rack and at any remote monitoring location.
8. Connect input power to the MPH2 rack PDU. On Types R, C and M models, all LED’s will begin
pulsing.
9. Verify that input power is present and the line status LED’s are illuminated.
10. Close the branch circuit breakers. The receptacle LED’s will glow green.
11. Turn on the connected devices one at a time and verify that each is operating properly.
12. Ensure that the specified values found on the MPH2 rack mount PDU’s serial tag are not
exceeded.
13. Monitor and control the MPH2 rack PDU as detailed in the RPC2 user manual, SL-20841,
available at www.emersonnetworkpower.com
Emerson® MPH2™
16
Installation
2.5
Installing Optional Items
The following items may be added to an MPH2 rack PDU system but are not required.
• RPC Basic Display Module
• Liebert® SN temperature/humidity sensors
2.5.1
RPC Basic Display Module
The RPC Basic Display Module (BDM) provides local display of parametric data, including electrical
status, temperature and humidity for all connected MPH2 rack PDU’s. Display information is
accessed via a navigation switch on the BDM. The RPC BDM is connected by cable to the MPH2 rack
PDU, allowing the user to install the display to suit the local reading requirements. A 6.5ft. (2m)
cable and general mounting provisions are provided. A single display can be used for up to four rack
PDU’s connected in a Rack PDU Array™.
The RPC BDM can be mounted in the rack with either the included hardware or with a cable tie
through the slot on the back of the module. Either method permits moving the BDM to a different
place in the same rack or to another rack.
Included Hardware
•
•
•
•
•
•
RPC BDM, 1
Spring Nut M5, 1
Spacer Sleeve, 1
Mounting Button, 1
M5 Screw, 1
Cable Clip, 1
Figure 13 RPC BDM
Scan-Switch
RJ-45 Input
17
Emerson® MPH2™
Installation
To install an RPC BDM in a rack:
1. Determine the mounting location.
2. Insert a spring nut into a T-slot on the frame member where the RPC BDM will be installed.
Figure 14 Inserting the spring nut into a T-slot
Insert a spring nut
into a T-slot...
... then flip it so that it
is square in the slot
3. Insert the MPH2 rack PDU screw into the spacer sleeve.
4. Insert the MPH2 rack PDU screw into the spring nut and tighten securely with a flat-head
screwdriver.
5. Hang the RPC BDM on the screw with the hooded mounting slot on the back of the RPC BDM.
6. Connect the RPC BDM to the RPC2 with an Ethernet cable.
7. Be certain to connect the cable to the correct port on the RPC2.
2.5.2
Temperature/Humidity Sensor
Optional Liebert® SN temperature/humidity sensors are available to assist in monitoring conditions
in the rack. Liebert SN sensors are designed for installation in Emerson racks without tools, but each
may be placed in any area to monitor temperature and humidity levels. Each connects to the RPC2
communications module, which makes readings available to other monitoring methods.
To install a sensor in a rack:
1. Insert the sensor bracket base into one end of the sensor support.
2. Snap the sensor into the other end of the sensor support.
3. Choose where in the rack to install the sensor assembly.
NOTE
Emerson recommends placing the sensor in the area of the rack that is likely to be warmest.
That location helps determine extreme conditions that can cause equipment damage.
4. Hold the sensor bracket on a T-slot on the Emerson rack frame where the sensor will be placed.
5. Insert the included quarter-turn fastener through the rectangular hole in the sensor bracket base
and into the T-slot.
6. Turn the fastener clockwise 90 degrees, a quarter of a turn.
7. Route the sensor cable to the RPC2 communications module and insert it into the card’s external
sensor port.
NOTE
For more information, see the RPC2 user manual, SL-20841, available at Emerson’s Web site,
http://www.emersonnetworkpower.com
Emerson® MPH2™
18
Operation
3.0
OPERATION
Emerson’s MPH2 rack PDU may be monitored and managed by the factory-installed RPC2 communications module. This manual presents information about the MPH2’s functions and features. Refer to
the RPC2 user manual, SL-20841, for details on using the RPC2 communications module to monitor
and manage the MPH2. The document shipped with the MPH2 rack PDU and is available at Liebert’s
Web site, http://www.emersonnetworkpower.com
The MPH2’s onboard LCD and the Web-based interface display system operating measurements, as
well as readings from optional Liebert SN temperature or temperature/humidity sensors. The RPC2
communications module and onboard LCD also display basic information about the MPH2 rack PDU,
such as firmware version, unit rating, model number and serial number.
LED’s on the MPH2 and an audible alarm also assist in monitoring performance with alerts about
events and alarm conditions. The keys under the onboard LCD are used to navigate to various
information and to silence alarms.
3.1
Controls and Indicators
The MPH2 rack PDU also has LED’s that indicate outlet and branch status and system information.
LED’s flash, pulse or change colors to indicate an event or alarm condition (for details on how LED’s
respond to events and alarms, refer to 5.0 - Troubleshooting.
NOTE
Units with a “B” as the fourth character in the model name (MPHBxxxx) do not have LED’s at
their outlets. The branch and outlet LED behavior in 5.0 - Troubleshooting and elsewhere in
this document does not apply to these units.
Outlets on units with an “M” as the fourth character in the model name (MPHMxxxx) cannot be
turned Off. LED’s at outlets on these models are always either on continuously or flashing
when input power is present.
19
Emerson® MPH2™
Operation
3.1.1
Getting Information Through the Onboard LCD
The MPH2’s main screen is displayed when the rack PDU is first powered up; see Figure 3. The
onboard LCD returns to the main screen from any other view after 5 minutes of inactivity (no keys
being pressed).
The Left and Right arrow keys below the onboard LCD move the cursor across the bottom of the
screen. When the cursor is over the desired symbol, press the Select key to display information about
that portion of the MPH2. The keys permit moving one level at a time through the levels of the MPH2
menus.
Example: Use the arrow keys to move the cursor over branch names (A or B) or outlet
names (numbers 1 - 8). Press the Select key and the screen displays information about the selected
branch or outlet. The screen retains the view if no key is pressed for 5 minutes. After 5 minutes of
inactivity, the onboard LCD returns to the main screen.
Figure 15 MPH2 onboard LCD and control keys
LCD
MPH2 LCD Keys
and LED’s
MPH2™Managed Rack
Power Distribution
(Main Screen Example)
2.96A RX
MPH2
121.1V
359W
L2
L3
2kWh
i
1
Left Arrow Key
L1
Line
Input
Status
LED’s
Select Key
TX
Right Arrow Key
Figure 16 MPH2 onboard LCD layout
Bar Graph of
Input Current
Input Level
Metered
Information
Input Current
Level in Amperes
2.96A
MPH2
Phase or
Line Voltage
MPH2 Unit
Identification
(Always shows
numeral 1)
121.1V
2kWh
!i
1
Power Consumption
by Connected Load
in Watts
Emerson® MPH2™
359W
Alarm Indication
20
Energy used in kWh
Link to Receptacle Level
MPH2 Rack PDU
Information
Operation
3.1.2
Adjusting the Onboard LCD’s Contrast
The onboard LCD is factory-set to be easily viewed in lighting conditions found in most work places.
The contrast can be changed. To change the contrast:
1. Press any key to activate the LCD.
2. Press either the Right or Left arrow key to highlight the contrast icon, a circle half dark and half
white.
3. Press the Select key.
4. Use the Right or Left arrow key to highlight the Up or Down contrast icon (each is an arrow). Use
the pattern to determine when the contrast is acceptable.
5. Press Select until the screen’s contrast is satisfactory
NOTE
The same steps apply to the RPC BDM.
Figure 17 Adjust LCD contrast
21
Emerson® MPH2™
Operation
3.1.3
Adjusting the Onboard LCD’s Orientation
The onboard LCD may be flipped for viewing ease. To flip the screen:
1.
2.
3.
4.
5.
Press any key to activate the LCD.
Press either the Right or Left arrow key to highlight the information icon (i).
Press the Select key.
Use the Right or Left arrow key to highlight the orientation icon
.
Press Select to the flip the screen’s orientation.
NOTE
The same steps apply to the RPC BDM.
Figure 18 Flip LCD
Model: MPHM3141
S/N: 4FEB030033 MPHM3
FW Ver: 0.4.1.2
Ratings: 1P3W 120V 16A
Receptacles: 16
3.1.4
Obtain MPH2 System Information
1. Use the Left or Right arrow key to move the cursor to the information icon (the letter i) in the
lower right corner.
2. Press the Select key.
The onboard LCD shows information about the MPH2: model number, serial number, firmware
version, power rating and number of outlets. See Figure 19. After 5 minutes of no activity (no key
pressed), the onboard LCD returns to the main screen.
Figure 19 MPH2 rack PDU information screen
Model: MPHM3141
S/N: 4FEB030033 MPHM3
FW Ver: 0.4.1.2
Ratings: 1P3W 120V 16A
Receptacles: 16
Emerson® MPH2™
22
Operation
3.1.5
Determine IP or MAC Address
1. Use the Left or Right arrow key to move the cursor to the information icon (the letter i) in the
lower right corner.
2. Press the Select key.
3. Use an arrow key to scroll to the Network icon
.
4. Press the Select key.
The onboard LCD will display the MPH2 rack PDU’s IP address and MAC address as shown in
Figure 20.
Figure 20 IP address in MPH2 Onboard LCD
MPH2 IP Address
MPH2 MAC Address
Firmware version
installed on RPC2
3.1.6
IP: 162.1.30.57
MAC ID: 00:00:84:47:31:49
RPC2 FW Ver: 7.0.0.1
View Input Level Information
The input level is the main screen shown by the onboard LCD. The LCD will show the input level
screen if the cursor and arrow keys are not used for 5 minutes. The input screen is shown in
Figure 21.
Figure 21 Input level screen
1.98A
MPH2
119.7V
204W
0kWh
i
1
23
Emerson® MPH2™
Operation
3.1.7
View Active Alarms
1. Use the Left or Right arrow key to move the cursor to the information icon (the letter i on a black
box) in the lower right corner.
2. Press the Select key.
3. Use the Left or Right arrow key to scroll to the Alarm icon, a large exclamation point.
Figure 22 Alarm icon
2.96A
MPH2
121.1V
359W
2kWh
!i
1
Alarm Indication
4. Press the Select key.
The onboard LCD will display a list of active alarms on the MPH2 rack PDU as shown in
Figure 23.
5. Moving the cursor to an alarm and pressing the select key displays information about the alarm.
Figure 23 Alarm list screen
!
Low Humidity Sensor
The most-recent
alarms will be at the
top of the list.
Emerson® MPH2™
24
Operation
3.1.8
View Branch Level Information
1. Use the Left or Right arrow key to move the cursor to the information icon (the letter i on a black
box) in the lower right corner.
2. Press the Select key.
3. Use the Left or Right arrow key to scroll to the letter of the branch to be viewed.
4. Press the Select key.
The onboard LCD will display information about the selected branch of the MPH2 rack PDU as
shown in Figure 24.
Figure 24 Branch level information screen
Branch Level
Indicator
1.98
1-A
119.6V
A
237VA
i
A B
Branches
A and B
3.1.9
202W
Indicates Branch
Circuit Breaker is
Closed (O indicates
open Branch Circuit
Breaker
View Outlet Level Information
1. Use the Left or Right arrow key to move the cursor to the outlet icon
in the lower right corner of the screen.
2. Press the Select key.
3. Use the Left or Right arrow key to scroll to the number of the outlet to be viewed.
4. Press the Select key. The outlet number will begin flashing and remain flashing until a new outlet
is selected.
The onboard LCD will display information about the outlet as shown in Figure 25.
Figure 25 Outlet level information screen
Outlet Level
Outlet Identification:
MPH2 #1
Branch A
Outlet #7
(Cursor is over Outlet #7
at bottom of screen)
1.98A
1-A-7
203W
119.7V
12345678
237VA
i
Cursor over Outlet #7
25
Emerson® MPH2™
Operation
3.1.10 View Sensor List
1. Use the Left or Right arrow key to move the cursor to the outlet icon
in the lower right corner of the screen.
2. Press the Select key.
The onboard LCD will display a list of the sensors as shown in Figure 26. The sensors will be
listed in order of their identification number.
Figure 26 Sensor list screen
Sensor: 1-2-1
T 7B0000024241431
H 8A000095173G6B62
T C3000000122G6431
Two temperature and one
humidity sensors are
connected to the MPH2
The sensors’ default names
are their serial numbers.
This can be changed
through the Web interface.
3.1.11 View Sensor Information
1. Use the Left or Right arrow key to move the cursor to the outlet icon
in the lower right corner of the screen.
2. Press the Select key.
3. Use the Left or Right arrow key to scroll to the sensor to be viewed.
4. Press the Select key.
The onboard LCD will display information about the sensor, similar to that shown in Figure 27.
Figure 27 Sensor information
Humidity sensor
information: Percentage
and severity followed by
identification and label
(serial number). The
default label is the
sensor’s serial number.
This can be changed
through the Web interface.
Emerson® MPH2™
Sensor: 1-2-1
!
33.8% : High
ID: 8A000095173G6B62
Label: 8A000095173G6B62
26
Humidity
sensor triggers
high humidity
alarm
Operation
Figure 28 Configuration in progress screen
The onboard LCD will shift
to the main menu during a
configuration update. The
keys below the LCD will be
inoperable during the
update.
A
MPH2
--V
--W
--kWh
i
3.1.12 Opening and Closing Circuit Breakers
MPH2 rack PDU feature circuit breakers to protect either branches or individual outlets, depending
on the model. Low-profile circuit breakers are used on all MPH2 rack PDU’s with two or three branch
circuits. Standard-profile circuit breakers are used on MPH2 rack PDU’s with six branch circuits or
have a 240VAC rating.
Both types of circuit breakers are flush-mount, rocker-style breakers. The circuit breakers are
designed to prevent accidental trips. To manually trip a circuit breaker to the Off position, insert a
flat-blade screwdriver or similar tool into the slot on the breaker as shown in Figure 29. To reset the
breaker, press the end nearest ON until it clicks into place.
Figure 29 Turning Off or resetting a circuit breaker
Low-Profile
Breaker Switch
Push top of
breaker in
to reset this
breaker
Press here
to reset the breaker
Standard-Profile
Breaker Switch
Press flat-blade
screwdriver into slot
to trip breaker
27
Emerson® MPH2™
Operation
3.1.13 Silence an Alarm
To silence an audible alarm, press any of the three navigation keys below the LCD.
Figure 30 Silence an alarm
IP: 10.301.36.28
MAC ID: 00:00:40:86:68:70
1
Press any of the navigation
keys momentarily to silence
an audible alarm.
5.0 - Troubleshooting tells how the LED interface signifies events and alarms.
NOTE
During a firmware upgrade, the Line Input Status LED’s on the MPH2 will flash red and
green, but the rack PDU will continue receiving and distributing power without interruption.
Emerson® MPH2™
28
Emerson® MPH2 Rack PDU Specifications
4.0
EMERSON® MPH2 RACK PDU SPECIFICATIONS
Input Power Configurations; Vary by Model and Region
Single-Phase Input; CE-Mark
240VAC, 16A; also UL-listed
3.7kW
230V, 32A
7.3kW
230/400V, 16A
11kW
230/400V, 32A
22kW
120VAC 16A
1.9kW
120VAC 24A
2.9kW
208VAC 24A
4.9kW
120/208VAC, 24A
8.6kW
120/208VAC, 40A
14.4kW
120/208VAC 48A; 240/415VAC, 24A
17.3kW
Three-Phase Input; CE-Mark
Single-Phase Input; UL-Listed
Three-Phase Input; UL-Listed
Input Wiring Options
8 to 10 ft. (2.4 to 3m) Non-Detachable Power Supply Cord
Hard-Wired Terminal Block
Outlet Options
NEMA 5-15; NEMA 5-20; IEC 320C13; IEC 320 C19
Number of Outlets, Maximum
48
Power Consumption, Maximum
7.5W
Voltage: ±1% +0.1VAC
Measurement Accuracy
Current: ±1.5% + 0.01A from 1% to 10% of unit rating;
±1% +0.01A from >10% to 125% of unit rating
Insulation
Class I, Reinforced SELV
Dielectric Electric Strength
Overcurrent Protection
Tested up to 4242VDC
UL489-Listed, CSA, TUV, CCC Overcurrent Circuit Breaker,
20A, 5000A A.I.C
32A or Less Input Models: 32 to 140 (0 to 60)
40A and 48A Input Models: 32 to 122 (0 to 50)
Operating Temperature Range, °F (°C)
Storage Temperature Range, °F (°C)
-13 to 185 (-25 to 85)
Humidity, %
10 to 90 non-condensing
Altitude, ft. (m)
6562 (2000)
Factory-Installed Toolless Brackets
Universal Mounting Bracket
Mounting
Low-profile: 2.2 x 1.96 (56x50)
Standard: 2.2 x 2.7 (56 x 70)
Zero-U Units, Width x Depth, in. (mm)
Zero-U Units, Length, in. (mm)
13.1 - 72.2 (333 - 1833)
Safety Standards
(Vary by Model and Region)
IEC 60950-1:2005 (Second Edition) + Amendment 1:2009
CSA C22.2 NO. 60950-1-07 (2nd Edition) + Amendment 1:2009
UL 60950-1 (2nd Edition) + Amendment 1:2009
IECEE CB Full Certification Scheme
EMC Standards
(Vary by Model and Region)
FCC Class A, Part 15, Industrial
EN55022:2006+A1:2007, Class A, Industrial
EN55024:1998+A1:2001+A2:2003, Class A, Industrial
IEC61000-3-2:2006, IEC61000-3-3:1995+A1:2001+A1:2005
IEC61000-4-2/3/4/5/6/8/11
Agency Approvals
(Vary by Model and Region)
UL, cUL, CE, BV, CB, RoHS, REACH, WEEE
29
Emerson® MPH2™
Troubleshooting
5.0
TROUBLESHOOTING
LED Indication
(One or All LED’s)
Color
State/Flash
Speed
Audible
Alarm
Green
Fast
Green
Off
Condition
Status/Recommended Action
—
Receptacle
Identification
Remote user is requesting outlet identification.
The LED should stop flashing after 10 seconds.
Steady On
—
Input Voltage Supported
Receptacle Powered On
Normal Operation
NA
—
Voltage Off
Check power source and input plug’s receptacle
wiring.
Check receptacle power control settings.
Red
Steady On
✔
Line Undervoltage
Alarm
Check power source for power quality problem. If
the MPH2 uses 3-phase power, a single lowvoltage phase may cause one or more
undervoltage alarms. The undervoltage alarm is
factory-set to -10% of the minimum input voltage
range on the nameplate; it cannot be changed.
Red
Fast
✔
Line or Receptacle
Overcurrent Alarm
Check for changing load conditions.
Check overcurrent alarm threshold settings.
Green
Slow
—
Line or Receptacle
Overcurrent Warning
Check for changing load conditions.
Check overcurrent warning threshold settings.
Red
Fast
✔
Line or Receptacle
Undercurrent Alarm
Check for removal of load.
Check undercurrent alarm threshold settings.
Red
(All Receptacle
LED’s)
Pulse
—
Branch Circuit
Breaker Open
Check for changing load conditions; confirm circuit
breaker actuator is closed. If open, correct loading
condition before pressing circuit breaker actuator
closed again.
Green
(All Receptacle
LED’s)
Slow
—
Branch Overcurrent
Warning
Check for changing load conditions.
Check overcurrent warning threshold settings.
Red
(All Receptacle
LED’s)
Fast
✔
Branch Overcurrent
Alarm
Check for changing load conditions.
Check overcurrent alarm threshold settings.
Emerson® MPH2™
30
Technical Support / Service
Web Site
www.liebert.com
Monitoring
[email protected]
800-222-5877
Outside North America: +00800 1155 4499
Single-Phase UPS & Server Cabinets
[email protected]
800-222-5877
Outside North America: +00800 1155 4499
Three-Phase UPS & Power Systems
800-543-2378
Outside North America: 614-841-6598
Environmental Systems
800-543-2778
Outside the United States: 614-888-0246
Locations
While every precaution has been taken to ensure the accuracy
and completeness of this literature, Liebert Corporation assumes no
responsibility and disclaims all liability for damages resulting from use of
this information or for any errors or omissions.
© 2014 Liebert Corporation
All rights reserved throughout the world. Specifications subject to change
without notice.
® Liebert is a registered trademark of Liebert Corporation.
All names referred to are trademarks
or registered trademarks of their respective owners.
SL-20860_REV1_10-14
Emerson Network Power
Liebert
www.emerson.com
United States
1050 Dearborn Drive
P.O. Box 29186
Columbus, OH 43229
Europe
Via Leonardo Da Vinci 8
Zona Industriale Tognana
35028 Piove Di Sacco (PD) Italy
+39 049 9719 111
Fax: +39 049 5841 257
Asia
29/F, The Orient Square Building
F. Ortigas Jr. Road, Ortigas Center
Pasig City 1605
Philippines
+63 2 687 6615
Fax: +63 2 730 9572