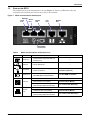
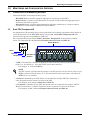
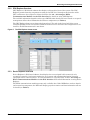
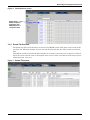
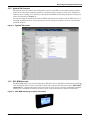
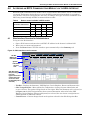
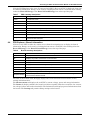
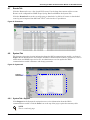
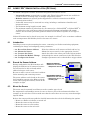
1
RPC2™ Communications Module
User Manual - Network Interface card for the Rack PDU family of power distribution products
TABLE OF CONTENTS
SYMBOLS USED . . . . . . . . . . . . . . . . . . . . . . . . . . . . . . . . . . . . . . . . . . . . . . . . . . . . . . . . . . . . . .1
1.0
INTRODUCTION . . . . . . . . . . . . . . . . . . . . . . . . . . . . . . . . . . . . . . . . . . . . . . . . . . . . . . . . . .2
1.1
1.2
Features and Benefits . . . . . . . . . . . . . . . . . . . . . . . . . . . . . . . . . . . . . . . . . . . . . . . . . . . . . . . . 2
Ports on the RPC2 . . . . . . . . . . . . . . . . . . . . . . . . . . . . . . . . . . . . . . . . . . . . . . . . . . . . . . . . . . . 4
2.0
INSTALLATION . . . . . . . . . . . . . . . . . . . . . . . . . . . . . . . . . . . . . . . . . . . . . . . . . . . . . . . . . .5
2.1
Getting Started. . . . . . . . . . . . . . . . . . . . . . . . . . . . . . . . . . . . . . . . . . . . . . . . . . . . . . . . . . . . . . 5
2.1.1
2.1.2
2.2
2.3
2.4
RPC2 Communications Module Kit Contents. . . . . . . . . . . . . . . . . . . . . . . . . . . . . . . . . . . . . . . 5
Required Cables . . . . . . . . . . . . . . . . . . . . . . . . . . . . . . . . . . . . . . . . . . . . . . . . . . . . . . . . . . . . . . 5
Field-Installation of an RPC2 Communications Module . . . . . . . . . . . . . . . . . . . . . . . . . . . . . 5
Configure an RPC2 Communications Module for Static IP . . . . . . . . . . . . . . . . . . . . . . . . . . . 6
User Level Privileges . . . . . . . . . . . . . . . . . . . . . . . . . . . . . . . . . . . . . . . . . . . . . . . . . . . . . . . . . 7
2.4.1
2.4.2
Group Membership and Access . . . . . . . . . . . . . . . . . . . . . . . . . . . . . . . . . . . . . . . . . . . . . . . . . . 7
Change Administrator’s Password . . . . . . . . . . . . . . . . . . . . . . . . . . . . . . . . . . . . . . . . . . . . . . . 7
2.5
Create a Rack PDU Array™ . . . . . . . . . . . . . . . . . . . . . . . . . . . . . . . . . . . . . . . . . . . . . . . . . . . . 8
3.0
MONITORING AND CONFIGURATION OVERVIEW . . . . . . . . . . . . . . . . . . . . . . . . . . . . . . . . . 10
3.1
3.2
3.3
Liebert Rack PDU Monitoring Structure . . . . . . . . . . . . . . . . . . . . . . . . . . . . . . . . . . . . . . . . 10
Rack PDU Component ID . . . . . . . . . . . . . . . . . . . . . . . . . . . . . . . . . . . . . . . . . . . . . . . . . . . . 10
Liebert Rack PDU Viewing and Browsing . . . . . . . . . . . . . . . . . . . . . . . . . . . . . . . . . . . . . . . 11
3.3.1
3.3.2
3.3.3
3.3.4
3.3.5
3.3.6
Summary Tab . . . . . . . . . . . . . . . . . . . . . . . . . . . . . . . . . . . . . . . . . . . . . . . . . . . . . . . . . . . . . . .
PDU Explorer Overview. . . . . . . . . . . . . . . . . . . . . . . . . . . . . . . . . . . . . . . . . . . . . . . . . . . . . . .
Device Explorer Overview . . . . . . . . . . . . . . . . . . . . . . . . . . . . . . . . . . . . . . . . . . . . . . . . . . . . .
Events Tab Overview . . . . . . . . . . . . . . . . . . . . . . . . . . . . . . . . . . . . . . . . . . . . . . . . . . . . . . . . .
System Tab Overview. . . . . . . . . . . . . . . . . . . . . . . . . . . . . . . . . . . . . . . . . . . . . . . . . . . . . . . . .
RPC BDM Overview . . . . . . . . . . . . . . . . . . . . . . . . . . . . . . . . . . . . . . . . . . . . . . . . . . . . . . . . . .
11
12
12
13
14
14
4.0
ACCESSING AN RPC2 COMMUNICATIONS MODULE VIA THE WEB INTERFACE . . . . . . . . . . . 15
4.1
4.2
4.3
Web Interface Overview for Administrators. . . . . . . . . . . . . . . . . . . . . . . . . . . . . . . . . . . . . . 15
Summary Tab . . . . . . . . . . . . . . . . . . . . . . . . . . . . . . . . . . . . . . . . . . . . . . . . . . . . . . . . . . . . . . 16
PDU Explorer Tab . . . . . . . . . . . . . . . . . . . . . . . . . . . . . . . . . . . . . . . . . . . . . . . . . . . . . . . . . . 17
4.3.1
4.3.2
4.3.3
4.3.4
4.3.5
4.4
4.5
4.6
18
18
19
20
22
PDU Explorer—Branch information . . . . . . . . . . . . . . . . . . . . . . . . . . . . . . . . . . . . . . . . . . . . 23
PDU Explorer—Receptacle Information . . . . . . . . . . . . . . . . . . . . . . . . . . . . . . . . . . . . . . . . . 24
Device Explorer . . . . . . . . . . . . . . . . . . . . . . . . . . . . . . . . . . . . . . . . . . . . . . . . . . . . . . . . . . . . 26
4.6.1
4.7
PDU Explorer Tabs: Measurements . . . . . . . . . . . . . . . . . . . . . . . . . . . . . . . . . . . . . . . . . . . . .
PDU Explorer Tabs: Status . . . . . . . . . . . . . . . . . . . . . . . . . . . . . . . . . . . . . . . . . . . . . . . . . . . .
PDU Explorer Tabs: Settings. . . . . . . . . . . . . . . . . . . . . . . . . . . . . . . . . . . . . . . . . . . . . . . . . . .
PDU Explorer Tabs: Settings-Controlling Sensors. . . . . . . . . . . . . . . . . . . . . . . . . . . . . . . . . .
PDU Explorer Tabs: Information . . . . . . . . . . . . . . . . . . . . . . . . . . . . . . . . . . . . . . . . . . . . . . .
Device Explorer—Receptacle Groups . . . . . . . . . . . . . . . . . . . . . . . . . . . . . . . . . . . . . . . . . . . . 26
Events Tab . . . . . . . . . . . . . . . . . . . . . . . . . . . . . . . . . . . . . . . . . . . . . . . . . . . . . . . . . . . . . . . . 28
i
4.8
System Tab . . . . . . . . . . . . . . . . . . . . . . . . . . . . . . . . . . . . . . . . . . . . . . . . . . . . . . . . . . . . . . . . 28
4.8.1
4.8.2
4.8.3
4.8.4
4.8.5
4.8.6
4.8.7
System Tab—Support. . . . . . . . . . . . . . . . . . . . . . . . . . . . . . . . . . . . . . . . . . . . . . . . . . . . . . . . .
System Tab—Devices . . . . . . . . . . . . . . . . . . . . . . . . . . . . . . . . . . . . . . . . . . . . . . . . . . . . . . . . .
System Tab—Device Change . . . . . . . . . . . . . . . . . . . . . . . . . . . . . . . . . . . . . . . . . . . . . . . . . . .
System Tab—Firmware Update . . . . . . . . . . . . . . . . . . . . . . . . . . . . . . . . . . . . . . . . . . . . . . . .
System Tab—Settings . . . . . . . . . . . . . . . . . . . . . . . . . . . . . . . . . . . . . . . . . . . . . . . . . . . . . . . .
Authentication . . . . . . . . . . . . . . . . . . . . . . . . . . . . . . . . . . . . . . . . . . . . . . . . . . . . . . . . . . . . . .
Authorization Levels . . . . . . . . . . . . . . . . . . . . . . . . . . . . . . . . . . . . . . . . . . . . . . . . . . . . . . . . .
28
29
29
30
30
37
38
5.0
RPC BDM™ (OPTIONAL) . . . . . . . . . . . . . . . . . . . . . . . . . . . . . . . . . . . . . . . . . . . . . . . . .41
5.1
5.2
Orientation of the RPC BDM. . . . . . . . . . . . . . . . . . . . . . . . . . . . . . . . . . . . . . . . . . . . . . . . . . 41
RPC BDM™ Installation . . . . . . . . . . . . . . . . . . . . . . . . . . . . . . . . . . . . . . . . . . . . . . . . . . . . . 41
5.2.1
5.2.2
5.3
5.4
5.5
Placement of the RPC BDM™ . . . . . . . . . . . . . . . . . . . . . . . . . . . . . . . . . . . . . . . . . . . . . . . . . 42
Navigation Tips . . . . . . . . . . . . . . . . . . . . . . . . . . . . . . . . . . . . . . . . . . . . . . . . . . . . . . . . . . . . 43
RPC BDM Operation . . . . . . . . . . . . . . . . . . . . . . . . . . . . . . . . . . . . . . . . . . . . . . . . . . . . . . . . 43
5.5.1
5.5.2
5.5.3
5.6
Set the IP Address for the RPC2 . . . . . . . . . . . . . . . . . . . . . . . . . . . . . . . . . . . . . . . . . . . . . . . . 42
Connect the RPC BDM to the RPC2 Communications Module . . . . . . . . . . . . . . . . . . . . . . . . 42
PDU, Branch and Receptacle Views Overview . . . . . . . . . . . . . . . . . . . . . . . . . . . . . . . . . . . . . 43
Types of Data Available at PDU, Branch and Receptacle Levels . . . . . . . . . . . . . . . . . . . . . . 44
Viewing Active Events . . . . . . . . . . . . . . . . . . . . . . . . . . . . . . . . . . . . . . . . . . . . . . . . . . . . . . . . 44
RPC BDM: PDU Explorer . . . . . . . . . . . . . . . . . . . . . . . . . . . . . . . . . . . . . . . . . . . . . . . . . . . . 44
5.6.1
5.6.2
5.6.3
View PDU Data . . . . . . . . . . . . . . . . . . . . . . . . . . . . . . . . . . . . . . . . . . . . . . . . . . . . . . . . . . . . . 45
View Branch Data . . . . . . . . . . . . . . . . . . . . . . . . . . . . . . . . . . . . . . . . . . . . . . . . . . . . . . . . . . . 46
View Receptacle Data. . . . . . . . . . . . . . . . . . . . . . . . . . . . . . . . . . . . . . . . . . . . . . . . . . . . . . . . . 47
5.7
RPC BDM: Receptacle Information . . . . . . . . . . . . . . . . . . . . . . . . . . . . . . . . . . . . . . . . . . . . . 48
6.0
LIEBERT SN™ SENSOR INSTALLATION (OPTIONAL) . . . . . . . . . . . . . . . . . . . . . . . . . . . . . . 49
6.1
6.2
6.3
6.4
6.5
6.6
Introduction . . . . . . . . . . . . . . . . . . . . . . . . . . . . . . . . . . . . . . . . . . . . . . . . . . . . . . . . . . . . . . .
Record the Sensor Address . . . . . . . . . . . . . . . . . . . . . . . . . . . . . . . . . . . . . . . . . . . . . . . . . . .
Mount the Sensor . . . . . . . . . . . . . . . . . . . . . . . . . . . . . . . . . . . . . . . . . . . . . . . . . . . . . . . . . . .
Connect the Sensor. . . . . . . . . . . . . . . . . . . . . . . . . . . . . . . . . . . . . . . . . . . . . . . . . . . . . . . . . .
Confirm the Module Change . . . . . . . . . . . . . . . . . . . . . . . . . . . . . . . . . . . . . . . . . . . . . . . . . .
Configure the Sensor . . . . . . . . . . . . . . . . . . . . . . . . . . . . . . . . . . . . . . . . . . . . . . . . . . . . . . . .
7.0
RPC2 COMMUNICATIONS MODULE ICONS . . . . . . . . . . . . . . . . . . . . . . . . . . . . . . . . . . . . . 52
8.0
SPECIFICATIONS . . . . . . . . . . . . . . . . . . . . . . . . . . . . . . . . . . . . . . . . . . . . . . . . . . . . . . . .53
ii
49
49
49
50
51
51
FIGURES
Figure 1
Figure 2
Figure 3
Figure 4
Figure 5
Figure 6
Figure 7
Figure 8
Figure 9
Figure 10
Figure 11
Figure 12
Figure 13
Figure 14
Figure 15
Figure 16
Figure 17
Figure 18
Figure 19
Figure 20
Figure 21
Figure 22
Figure 23
Figure 24
Figure 25
Figure 26
Figure 27
RPC2 communications module ports . . . . . . . . . . . . . . . . . . . . . . . . . . . . . . . . . . . . . . . . . . . . . . . . . 4
RPC2 communications module in an MPH2 . . . . . . . . . . . . . . . . . . . . . . . . . . . . . . . . . . . . . . . . . . . 5
Rack PDU Array layout examples . . . . . . . . . . . . . . . . . . . . . . . . . . . . . . . . . . . . . . . . . . . . . . . . . . . 9
Summary Tab components . . . . . . . . . . . . . . . . . . . . . . . . . . . . . . . . . . . . . . . . . . . . . . . . . . . . . . . . 11
The PDU Explorer home screen . . . . . . . . . . . . . . . . . . . . . . . . . . . . . . . . . . . . . . . . . . . . . . . . . . . . 12
Device Explorer screen . . . . . . . . . . . . . . . . . . . . . . . . . . . . . . . . . . . . . . . . . . . . . . . . . . . . . . . . . . . 13
Events Tab screen . . . . . . . . . . . . . . . . . . . . . . . . . . . . . . . . . . . . . . . . . . . . . . . . . . . . . . . . . . . . . . . 13
System Tab screen . . . . . . . . . . . . . . . . . . . . . . . . . . . . . . . . . . . . . . . . . . . . . . . . . . . . . . . . . . . . . . 14
RPC BDM displaying receptacle information . . . . . . . . . . . . . . . . . . . . . . . . . . . . . . . . . . . . . . . . . 14
Web interface overview screen . . . . . . . . . . . . . . . . . . . . . . . . . . . . . . . . . . . . . . . . . . . . . . . . . . . . . 15
Summary tab. . . . . . . . . . . . . . . . . . . . . . . . . . . . . . . . . . . . . . . . . . . . . . . . . . . . . . . . . . . . . . . . . . . 16
PDU Explorer main page . . . . . . . . . . . . . . . . . . . . . . . . . . . . . . . . . . . . . . . . . . . . . . . . . . . . . . . . . 17
PDU Explorer tabs: Measurements . . . . . . . . . . . . . . . . . . . . . . . . . . . . . . . . . . . . . . . . . . . . . . . . . 18
PDU Explorer tabs: Status . . . . . . . . . . . . . . . . . . . . . . . . . . . . . . . . . . . . . . . . . . . . . . . . . . . . . . . . 19
PDU Explorer tabs: Settings . . . . . . . . . . . . . . . . . . . . . . . . . . . . . . . . . . . . . . . . . . . . . . . . . . . . . . 20
Sensor information on Summary Tab and details on Settings Tab . . . . . . . . . . . . . . . . . . . . . . . . 21
Change a sensor value . . . . . . . . . . . . . . . . . . . . . . . . . . . . . . . . . . . . . . . . . . . . . . . . . . . . . . . . . . . 22
PDU Explorer tabs: Information . . . . . . . . . . . . . . . . . . . . . . . . . . . . . . . . . . . . . . . . . . . . . . . . . . . 22
Device Explorer tab. . . . . . . . . . . . . . . . . . . . . . . . . . . . . . . . . . . . . . . . . . . . . . . . . . . . . . . . . . . . . . 26
Receptacle group screen . . . . . . . . . . . . . . . . . . . . . . . . . . . . . . . . . . . . . . . . . . . . . . . . . . . . . . . . . . 27
Creating a receptacle group . . . . . . . . . . . . . . . . . . . . . . . . . . . . . . . . . . . . . . . . . . . . . . . . . . . . . . . 27
Events tab . . . . . . . . . . . . . . . . . . . . . . . . . . . . . . . . . . . . . . . . . . . . . . . . . . . . . . . . . . . . . . . . . . . . . 28
System tab . . . . . . . . . . . . . . . . . . . . . . . . . . . . . . . . . . . . . . . . . . . . . . . . . . . . . . . . . . . . . . . . . . . . . 28
Vertical or horizontal orientation. . . . . . . . . . . . . . . . . . . . . . . . . . . . . . . . . . . . . . . . . . . . . . . . . . . 41
Liebert RPC ports for use with RPC BDM . . . . . . . . . . . . . . . . . . . . . . . . . . . . . . . . . . . . . . . . . . . 42
RPC BDM navigation icons . . . . . . . . . . . . . . . . . . . . . . . . . . . . . . . . . . . . . . . . . . . . . . . . . . . . . . . 43
RPC BDM views . . . . . . . . . . . . . . . . . . . . . . . . . . . . . . . . . . . . . . . . . . . . . . . . . . . . . . . . . . . . . . . . 43
TABLES
Table 1
Table 2
Table 3
Table 4
Table 5
Table 6
Table 7
Table 8
Table 9
Table 10
Table 11
Table 12
Table 13
Table 14
Table 15
Table 16
Table 17
Table 18
Table 19
Symbols on RPC2 communications module and documentation . . . . . . . . . . . . . . . . . . . . . . . . . . . 1
RPC2 communications module port icons . . . . . . . . . . . . . . . . . . . . . . . . . . . . . . . . . . . . . . . . . . . . . 4
Laptop IP settings for RPC module addresses . . . . . . . . . . . . . . . . . . . . . . . . . . . . . . . . . . . . . . . . . 6
IP addresses in a Rack PDU Array™ . . . . . . . . . . . . . . . . . . . . . . . . . . . . . . . . . . . . . . . . . . . . . . . . . 9
Laptop IP settings for RPC2 communications module addresses . . . . . . . . . . . . . . . . . . . . . . . . . . 9
Data or control available in MPH2 models . . . . . . . . . . . . . . . . . . . . . . . . . . . . . . . . . . . . . . . . . . . 15
PDU summary descriptions . . . . . . . . . . . . . . . . . . . . . . . . . . . . . . . . . . . . . . . . . . . . . . . . . . . . . . . 23
Branch summary descriptions . . . . . . . . . . . . . . . . . . . . . . . . . . . . . . . . . . . . . . . . . . . . . . . . . . . . . 23
Receptacle summary descriptions . . . . . . . . . . . . . . . . . . . . . . . . . . . . . . . . . . . . . . . . . . . . . . . . . . 24
SNMPv1/v2 access description . . . . . . . . . . . . . . . . . . . . . . . . . . . . . . . . . . . . . . . . . . . . . . . . . . . . . 35
SNMP V3 access description . . . . . . . . . . . . . . . . . . . . . . . . . . . . . . . . . . . . . . . . . . . . . . . . . . . . . . 35
SNMPv1/v2 trap descriptions. . . . . . . . . . . . . . . . . . . . . . . . . . . . . . . . . . . . . . . . . . . . . . . . . . . . . . 36
SNMPv3 traps descriptions . . . . . . . . . . . . . . . . . . . . . . . . . . . . . . . . . . . . . . . . . . . . . . . . . . . . . . . 36
Monitoring data available on the RPC BDM via PDU Explorer . . . . . . . . . . . . . . . . . . . . . . . . . . 44
PDU view components . . . . . . . . . . . . . . . . . . . . . . . . . . . . . . . . . . . . . . . . . . . . . . . . . . . . . . . . . . . 45
Branch view components . . . . . . . . . . . . . . . . . . . . . . . . . . . . . . . . . . . . . . . . . . . . . . . . . . . . . . . . . 46
Receptacle view components . . . . . . . . . . . . . . . . . . . . . . . . . . . . . . . . . . . . . . . . . . . . . . . . . . . . . . 47
Electrical and physical specifications . . . . . . . . . . . . . . . . . . . . . . . . . . . . . . . . . . . . . . . . . . . . . . . 53
Communication interfaces and agency approval . . . . . . . . . . . . . . . . . . . . . . . . . . . . . . . . . . . . . . 53
iii
iv
Symbols Used
SYMBOLS USED
The following symbols may appear in the documentation or on the product.
Table 1
Symbol
Symbols on RPC2 communications module and documentation
Meaning
High Temperature
Alerts the user where the enclosure temperature may exceed 158°F (70°C) while operating under
high-ambient temperature and at maximally rated load.
Instructions
Signifies the presence of important operating and maintenance (servicing) instructions in the literature
accompanying the appliance.
Dangerous Voltage
Warns about the presence of uninsulated dangerous voltage within the product’s enclosure that may
be of sufficient magnitude to constitute a risk of electric shock to persons.
Power On
Indicates the principal On/Off switch is in the On position.
Power Off
Indicates the principal On/Off switch is in the Off position.
Protective Grounding Terminal
Indicates a terminal that must be connected to earth ground before any other connections to the
equipment may be made.
1
Emerson® RPC2™
Introduction
1.0
INTRODUCTION
The RPC2 communications module is a network interface module that provides network connectivity
to the Liebert® rack PDU family of products.
The RPC2 (Rack PDU card) is factory-installed installed in managed versions of Emerson Network
Power’s MPH2™ Rack PDU’s. It can be field-installed in Liebert MPH™ and Liebert MPX™ rack PDU’s
to provide network monitoring and control capabilities.
The module is factory-set for service in DHCP-based applications. It can be quickly and simply
configured for duty in static IP applications.
The RPC2 serves as the integration point for several rack accessory products. Available options
include a handheld display, the RPC BDM, to view monitoring data and Liebert SN™ sensors that
may be connected to monitor temperature, humidity, door contacts and digital inputs.
1.1
Features and Benefits
Interoperability
The RPC2 communications module integrates network management of the MPH rack PDU family
and environmental sensors with a local display interface. This ensures consistency of information
available to both remote and local users — those in the data center — thus reducing mistakes during
commission/decommission.
Cable Standardization
The RPC2 communications module uses standard cables that are readily available in a data center;
no special cables are required. The LAN port is compatible with 1Gbps Ethernet speeds with the
recommended CAT5E or CAT6 Ethernet cabling. The USB port connection uses standard USB
cabling.
Consolidation of IP Addresses
The RPC2 communications module can be used to create a Rack PDU Array™ by interconnecting
multiple MPH2 Rack PDUs to minimize the number of IP addresses, consolidate monitoring and
reduce overhead.
Receptacle Group Control
The RPC2 communications module enables grouping receptacles to apply the same action to all
receptacles in the group with one operation. It also permits monitoring and management of receptacle
groups through Liebert Nform™ software.
MPH2 Rack PDU Power Conditioning Monitoring
The RPC2 communications module enables monitoring of Emerson’s MPH2, Liebert MPX and Liebert
MPH rack PDU’s collectively known as Liebert and Emerson Network Power rack PDU. It provides
rack PDU receptacle voltage and current draw, provides load balancing capability and monitors rack
environmental conditions.
Energy Metering
The RPC2 communications module reports power consumption (kWh) at the PDU, branch and
receptacle levels as calculated by the MPH2’s circuitry.
Receptacle Load Control
The RPC2 communications module interface permits controlling the power-up / wake-up state and
sequencing of receptacles.
Local Display Support
The RPC2 communications module provides an interface for a display option, the RPC BDM, to
facilitate installation and local troubleshooting of interconnected MPH rack PDUs. The display may
be user-mounted on or near racks for optimal placement and viewing.
Event Notifications
The RPC2 communications module sends comprehensive event notifications via SNMP, e-mail, SMS
text messages and cellular paging. It also provides notification status via a Web page.
Emerson® RPC2™
2
Introduction
MPH2 Rack PDU Management
A user can use the RPC2 communications module to interact with a rack PDU by referencing the
user-assigned receptacle labels or loads.
Wide Range of IT Network Capabilities
The RPC2 communications module provides a flexible set of IT networking capabilities, including
DHCP, BOOTP, DNS, SNTP and SNMP.
Hot Swappable
The RPC2 communications module may be removed and reinserted without interrupting power from
the rack PDU or affecting the connected load.
Flash Upgradeable Firmware
The RPC2 communications module enables the user to easily update the firmware as new features
and capabilities become available.
Web Support
The RPC2 communications module delivers Web management and control to Liebert and Emerson
rack PDU’s. All authorized users will be able to view status information on their network.
SNMP Support
The RPC2 communications module enables SNMP management of Liebert and Emerson rack PDU’s.
To integrate the card into an SNMP implementation, compile the Liebert® Global Products MIB on
the Network Management System (NMS).
The Liebert Global Products MIB can be downloaded from: www.liebert.com
Liebert Nform®
Utilizing the SNMP and Web technologies built into the RPC2 communications module, Liebert
Nform will centrally manage event notifications, access critical system information and manage the
power delivered to the connected load.
A downloadable edition is available online at: nform.liebert.com
Liebert SiteScan Web®
The RPC2 communications module integrates with Liebert SiteScan Web software to monitor and
analyze trends to ensure high availability operation of critical facilities. For more information on
Liebert SiteScan Web, visit the Web page at: sitescan.liebert.com
Monitoring and Configuration Overview
Liebert and Emerson rack PDU’s are managed at three levels:
• At the rack PDU level, it provides aggregate input power monitoring of the rack PDU.
• At the branch level, it provides status information, including branch circuit breaker on some
models, and aggregate power monitoring of branch receptacles.
• At the receptacle level, it provides status information and power monitoring of a single receptacle
on some models.
3
Emerson® RPC2™
Introduction
1.2
Ports on the RPC2
The module has six ports designated by icons (see Figure 1). Connect an Ethernet cable (not
included) to the Network port. Connect that cable to the network.
Figure 1
RPC2 communications module ports
USB Port
Sensor
Port
Serial
Port
Display
Port
Link
Port
Network
Port
Reset Button
Access Hole
Table 2
Icon
RS232
RPC2 communications module port icons
Name
For details, refer to Section:
Serial Port
• Use this port for RS-232 serial
communication using Command Line
Interface (CLI)
—
USB Port
• Future Applications
—
SensorPort
• Use this port ONLY to plug in optional
sensor accessories.
6.0 - Liebert SN™ Sensor
Installation (Optional)
Display Port
• Use this port ONLY to plug in the
RPC BDM (Basic Display Module).
5.2 - RPC BDM™ Installation
Link Port
Use this port ONLY for:
• Local configuration through
interconnection to a computer
• Creating a Rack PDU Array by
interconnecting additional rack PDUs
Network
Port
Emerson® RPC2™
Purpose
Use this port ONLY to:
• Plug in the Local Area Network (LAN) via
an Ethernet cable (not included).
• Create a Rack PDU Array™ by
interconnecting additional rack PDUs
4
2.2 - Field-Installation of an RPC2
Communications Module
2.5 - Create a Rack PDU Array™
2.2 - Field-Installation of an RPC2
Communications Module
2.5 - Create a Rack PDU Array™
Installation
2.0
INSTALLATION
2.1
Getting Started
The RPC2 communications module should be factory-installed on Liebert and Emerson Network
Power® rack PDU’s. If it is being field-installed, refer to 2.1.1 - RPC2 Communications Module Kit
Contents and 2.1.2 - Required Cables to be sure to have all items necessary for proper installation.
Figure 2
2.1.1
RPC2 communications module in an MPH2
RPC2 Communications Module Kit Contents
• RPC2 communications module
• User guide, also available for download at www.emerson.com
2.1.2
Required Cables
These cables are not included but are necessary for RPC2 communications module functionality.
• RJ-45 cable for connection to the Serial port
• RJ-45 CAT5E or CAT6 Ethernet cable for the Network Port connection
• RJ-45 CAT5 or better Ethernet cable for the Link port connection
NOTE
Liebert 1-wire sensors and the local display, the RPC BDM, come with their own cables.
2.2
Field-Installation of an RPC2 Communications Module
Locate the communications card bay on the rack PDU and insert the RPC2 communications module
into the card bay. Secure it with the provided screws.
5
Emerson® RPC2™
Installation
2.3
Configure an RPC2 Communications Module for Static IP
The RPC2 communications module is factory-set for DHCP, making it ready for service immediately.
The module can be configured for operation on a network using static IP or BootP.
To configure a module for a network that uses static IP:
1. Insert an additional Ethernet cable (not included) into the module’s Link port
for the port location).
(see Figure 1
NOTE
The card’s Link port should be used only for local configuration through interconnection to a
laptop. Do not connect the cable from the Link port to your company LAN, to an Ethernet
network or to similar a network.
2.
3.
•
•
•
4.
Insert the other end of the Ethernet cable into a laptop.
Configure the laptop’s IP settings to communicate on a 192.168.1.X network.
IP address: 192.168.1.9
Subnet mask: 255.255.255.252
Default gateway: 192.168.1.1
Open a Web browser to enter the IP address of the Link Port.
NOTE
RPC2 communications module configures sibling connections automatically but must be
rebooted if the connection order is changed. For information about sibling connections, refer to
2.5 - Create a Rack PDU Array™.
5. When prompted for a username and password, enter the default login and password—admin for
both (case-sensitive)—and click the Login icon or press the enter key.
6. Click the System tab, then click Settings>Network in the navigation tree.
7. Click the Edit icon in the right pane
.
8. The default Speed/Duplex for the Ethernet port is Auto 1000 Mbs/Full Duplex (automatic). To
change this, choose from the Speed/Duplex drop-down list.
9. Choose the IPV4 Boot Mode: Static or DHCP. (The default is DHCP.)
10. Click the Save icon, ✔, to save the change or click the Cancel icon X to cancel the change.
11. Configure the IP Address, Subnet Mask and Default Gateway in the System tab; see your
network administrator for these settings.
12. To complete the configuration, click the Reboot icon
in System tab>Settings.
Use Table 3 to make changes to the cards in the array using the Link port.
Table 3
Laptop IP settings for RPC module addresses
IP Address
Rack PDU 1
Rack PDU 2
Rack PDU 3
Rack PDU 4
Laptop Computer
192.168.1.9
192.168.1.5
192.168.1.1
192.168.1.13
Link Port
192.168.1.10
192.168.1.6
192.168.1.2
192.168.1.14
255.255.255.252
255.255.255.252
255.255.255.252
255.255.255.252
Subnet Mask
Emerson® RPC2™
6
Installation
2.4
User Level Privileges
The RPC2 communications module permits four user levels:
•
•
•
•
Administrator—can configure and control all rack PDU’s in the system
Power User—can configure rack PDU’s; no receptacle control
Appliance—can view rack PDU’s; no configuration or control
User—can view rack PDU’s specified by administrator; no receptacle control
Because of the varying authorization levels, the user interface’s appearance will be different for each
level of user. For details on user levels, see 4.8.7 - Authorization Levels.
Access to the RPC2 communications module requires entering a password. The default administrator
level user name and password is admin. Each is case-sensitive. Emerson Network Power recommends
changing the password immediately to prevent unauthorized access to MPH2 rack PDU’s.
2.4.1
Group Membership and Access
Adding a user to a default group automatically sets the user’s access. For example, adding a user to
the Appliance group permits that user to view rack PDU’s to determine the units’ status, but
Appliance group users cannot configure or control a rack PDU.
2.4.2
Change Administrator’s Password
1.
2.
3.
4.
5.
6.
7.
Open a Web browser and enter the IP address of the RPC2 communications module.
Log in with the default username admin and the default password admin.
Click on the System tab > Authorization > Change Password
Enter the new user name.
Enter the new password.
Confirm the new password.
Click on the Save icon, ✔, at the top of the screen to make the change or click the Cancel icon
to discard the change.
Save Icon
X
Cancel Icon
7
Emerson® RPC2™
Installation
2.5
Create a Rack PDU Array™
Up to four MPH2 or Liebert MPX rack PDU’s may be integrated into a Rack PDU Array, which
permits central control and monitoring of each rack PDU through a single Web interface. Each rack
PDU must have an RPC2 communications module installed.
NOTE
Creating a Rack PDU Array does not require powering down either the MPH2 rack PDUs or
the connected load.
The level of monitoring and control depends on the type of MPH2. MPH2 rack PDU’s with
management function permit monitoring and control of either groups of receptacles or individual
receptacles.
To set up a Rack PDU Array:
1. Log in with the privileges required to change these settings.
2. Insert an Ethernet cable connected to a computer or network switch into the Network port
of
the RPC2 communications module that will serve as the master unit.
3. Insert an Ethernet cable into the Link port
of the RPC2 communications module that will
serve as the master unit.
4. Insert the other end of the Ethernet cable into the Network Port of an RPC2 communications
module on a second MPH2; this RPC2 will be a sibling unit, accessible through the master RPC2.
Any of the RPC2 communications modules in the array may be designated as the master unit (see
Figure 3 for an example).
5. Reboot the RPC2 communications module in the sibling MPH2 rack PDU.
a. Insert a paper clip end or stiff wire of similar size into the hole between the Display Port
symbol
and the Sensor Port symbol
(see Figure 1 for the location).
b. Press the reset button and hold it firmly for at least 2 seconds.
6. The second RPC2 communications module will automatically detect the connections and reboot as
a sibling unit.
NOTE
Rebooting the RPC2 communications module causes no interruption of output power from the
MPH2 rack PDU.
7. Connect additional RPC2 communications modules as shown in Figure 3; the Ethernet cable will
attach from the Link Port of an RPC2 that has been added to the array to the next module’s
Network Port.
8. Reboot each RPC2 after connection.
Emerson® RPC2™
8
Installation
Figure 3
Rack PDU Array layout examples
TO
NETWORK
Ethernet cable
between Link
Port and
Network Port
RPC2 communications
module in MASTER PDU
Ethernet cable
between Link
Port and
Network Port
RPC2 communications
module in Sibling PDU
Ethernet cable
between Link
Port and
Network Port
RPC2 communications
module in Sibling PDU
RPC2 communications
module in Sibling PDU
Ethernet cable between
Link Port and Network Port
Ethernet cable
between Link
Port and
Network Port
RPC2 communications
module in Sibling PDU
Table 4
Ethernet cable
between Link
Port and
Network Port
RPC2 communications
module in Sibling PDU
TO
NETWORK
RPC2 communications
module in MASTER PDU
RPC2 communications
module in Sibling PDU
IP addresses in a Rack PDU Array™
IP Address
Rack PDU 1
Rack PDU 2
Rack PDU 3
Rack PDU 4
192.168.1.10
192.168.1.6
192.168.1.2
192.168.1.14
Network Port
User Determined
192.168.1.9
192.168.1.5
192.168.1.1
Subnet Mask
255.255.255.252
255.255.255.252
255.255.255.252
255.255.255.252
Link Port
Table 5
Laptop IP settings for RPC2 communications module addresses
IP Address
Rack PDU 1
Rack PDU 2
Rack PDU 3
Rack PDU 4
Laptop Computer
192.168.1.9
192.168.1.5
192.168.1.1
192.168.1.13
Link Port
192.168.1.10
192.168.1.6
192.168.1.2
192.168.1.14
255.255.255.252
255.255.255.252
255.255.255.252
Subnet Mask
9
255.255.255.252
Emerson® RPC2™
Monitoring and Configuration Overview
3.0
MONITORING AND CONFIGURATION OVERVIEW
3.1
Liebert Rack PDU Monitoring Structure
Liebert Rack PDUs are managed at three levels:
• Rack PDU Level—provides aggregate input power monitoring of rack PDU’s
• Branch Level—provides status information of a branch circuit breaker and aggregate power
monitoring of branch receptacles
• Receptacle Level—provides status information and power monitoring of a single receptacle
(available on certain models of MPH2 and Liebert MPX™)
3.2
Rack PDU Component ID
An alphanumeric ID consisting of up to three parts helps users identify components when displayed
on the Web interface or the RPC BDM display unit (see 3.2 - Rack PDU Component ID). The
branch and receptacles on an MPH2 are numbered.
The component ID uses the format PDU# - Branch# - Receptacle#. As the following example
shows, the component ID 1-A-3 identifies Receptacle #3 on Branch A of PDU #1.
Branch Numbers
ID
1-A-3
PDU #
Branch #
Receptacle #
Receptacle
Numbers
• A PDU is identified by a number designating its interconnected position in a Rack PDU Array,
from 1 to 4; the default is 1. Up to four PDUs can be interconnected.
For example, “1” indicates PDU #1.
NOTE
The PDU number will automatically update in the Web interface, but the number shown in the
MPH2’s onboard LCD will always be 1. The onboard LCD shows information only about the
MPH2 where it is installed.
• A branch is identified by the PDU where it is attached (for example, PDU #1), followed by a
letter designation of the branch’s location on the PDU.
For example, “1-A” indicates Branch A on PDU #1.
• A receptacle is identified by the PDU and branch where it is attached (for example, PDU #1,
Branch A), followed by a numeric designation of the receptacle’s location on the branch.
For example, “1-A-3” indicates Receptacle #3 on Branch A of PDU #1.
Emerson® RPC2™
10
Monitoring and Configuration Overview
3.3
Liebert Rack PDU Viewing and Browsing
This manual covers the following methods of viewing and browsing information on a Liebert
Rack PDU. Control functions are available via the Web interface but not with the RPC BDM.
Method
3.3.1
Monitoring
Control
Configuration
For details, refer to:
Summary
✔
—
—
3.3.1 - Summary Tab
4.2 - Summary Tab
PDU Explorer™
✔
✔
✔
3.3.2 - PDU Explorer Overview
4.3 - PDU Explorer Tab
Device Explorer™
✔
✔
—
3.3.3 - Device Explorer Overview
4.6 - Device Explorer
Events Tab
✔
—
—
3.3.4 - Events Tab Overview
4.7 - Events Tab
System Tab
—
—
✔
3.3.5 - System Tab Overview
4.8 - System Tab
RPC BDM display unit
✔
—
—
3.3.6 - RPC BDM Overview
5.0 - RPC BDM™ (Optional)
Summary Tab
The Summary tab displays aggregate information about the MPH2’s status, including:
• Recent Events
• Primary Sensor and
• PDU Status
Hyperlinks in each portion of the Summary tab window shifts the view to more detailed information..
In Figure 4, for example, the Recent Events information has hyperlinks that open the PDU Explorer
to Branch A.
Figure 4
Summary Tab components
Hyperlinks to
Branch A Details
System
Status
Link to
Events
Log
Hyperlinks
to Sensor
Details
Hyperlinks
to PDU
Details
11
Emerson® RPC2™
Monitoring and Configuration Overview
3.3.2
PDU Explorer Overview
PDU Explorer is Web-based software that displays a hierarchical view of the system. The PDU
Explorer permits browsing components starting at the PDU level, through to the branches of the
PDU, and down to the receptacles of those branches. See 4.0 - Accessing an RPC2
Communications Module via the Web Interface for details on using PDU Explorer.
The available information depends on the type of MPH2; units that do not have branch or receptacle
management will not have information about those components (see Table 6).
The PDU Explorer home screen shows the System level. The tabs in the lower half of the screen
change depending on the level selected. When the Sensor level is selected in the navigation tree, for
instance, the Measurements tab is not shown.
Figure 5
3.3.3
The PDU Explorer home screen
Device Explorer Overview
Device Explorer is Web-based software that displays the user-assigned labels (names) of each
receptacle to provide a load-centric method to access status and metering information about the
associated load or connected device. To view information on a specific PDU, see 4.0 - Accessing an
RPC2 Communications Module via the Web Interface for detailed information on using Device
Explorer.
The RPC2 communications module presents only available data. If the MPH2 does not have branch
and receptacle management, the RPC2 will display grayed-out entries and that information will not
be shown (see Table 6).
Emerson® RPC2™
12
Monitoring and Configuration Overview
Figure 6
Device Explorer screen
Details about
MPH2 receptacles
Hyperlinks open
PDU Explorer to a
receptacle’s data
3.3.4
Events Tab Overview
The Events tab lists events that have occurred on the MPH2 system, with more recent events at the
top of the list. When the number of events exceeds the limit of 1024, the oldest events are removed
first.
Information available includes the date and time of occurrence, the event code, receptacle or branch
where the event occurred, name or description of the event, severity level and the event status (active,
notification sent, clear, etc.).
Figure 7
Events Tab screen
13
Emerson® RPC2™
Monitoring and Configuration Overview
3.3.5
System Tab Overview
The System tab is the control and configuration center for the RPC2 rack communications module.
Pages on the tab permit updatinge firmware, joining networks, setting security levels, adding and
removing users, setting access privileges and alarm threshholds and setting automatic messages for
events and alarms (see Figure 8).
The tab also displays information about the RPC2 communications module and the PDU where it is
installed, including location, contact personnel, technical support, firmware version, serial number
and MAC address.
Figure 8
3.3.6
System Tab screen
RPC BDM Overview
The RPC BDM display may be attached with an Ethernet cable to the RPC2 and mounted outside the
rack allowing the user to locally view PDU, branch and receptacle information. See 5.0 - RPC BDM™
(Optional) for a detailed description of its functions. It may also be carried by monitoring personnel
and used as a handheld viewing screen that is more easily viewed than an onboard LCD screen.
Figure 9
RPC BDM displaying receptacle information
Emerson® RPC2™
14
Accessing an RPC2 Communications Module via the Web Interface
4.0
ACCESSING AN RPC2 COMMUNICATIONS MODULE VIA THE WEB INTERFACE
Emerson’s RPC2 communications module can be accessed with a Web browser once it is connected to
a network. The browser obtains direct access to the RPC2 communications module via a graphical
user interface. The data and appearance will vary according to the types of Liebert or Emerson rack
PDU being viewed through the RPC2 communications module.
Table 6
Data or control available in MPH2 models
MPH2 Type
4.1
Available Data/Control
R
M
C
B
Input Measurement
✔
✔
✔
✔
Branch Measurement
✔
✔
✔
✔
Receptacle Measurement
✔
✔
X
X
Receptacle Control
✔
X
✔
X
Web Interface Overview for Administrators
To log in to the Web interface:
1. Open a Web browser and enter the rack PDU’s IP address in the browser’s address field.
2. Enter your user name and password.
3. Press the Enter button. The Web interface opens automatically to the Summary tab.
Figure 10 Web interface overview screen
Tab Bar
MPH2 rack
PDU status
System
Information
Content
Area
Side Navigation
Bar (has navigation
tree with
hyperlinks to other
content. No links
are shown when
the Summary tab is
selected.)
• Tab Bar—Displays the Summary, PDU Explorer, Device Explorer, Events and Systems tabs.
• Side Navigation Bar—Menu options for configuration, viewing of system information and
access to devices. The options change based on user rights. When the Summary tab is selected, as
in Figure 10, the Side Navigation Bar shows system information; when other tabs (PDU
Explorer, Device Explorer, Events and System) are selected, the area shows a navigation tree
with hyperlinks to additional content.
• Content Area—Content changes based on the options selected in the Side Navigation Bar.
15
Emerson® RPC2™
Accessing an RPC2 Communications Module via the Web Interface
4.2
Summary Tab
Click the Summary tab (Figure 11) to view recent events as well as rack PDU status information.
This tab gives access to a rack PDU’s ID, status, number of receptacles and how many are turned On
as well as measurements and utilization information. Click on a rack PDU under the PDU Status
heading to open it in the PDU Explorer tab (refer to 4.3 - PDU Explorer Tab for more information).
Events information include:
• Date/Time: Date and time of occurrence
• Code—Identifier for troubleshooting
• 100-113—System level events
• 200-207—PDU level events
• 300-305—Branch level events
• 400-407—Receptacle level events
• 500-512—Sensor level events
• Level—Where event occurred: Receptacle, Branch, System
• ID—Identifying information of where event occurred
• Event—Severity of Event: Notification, Warning or Alarm
• State—Whether event notification has been sent (notified); for alarms, either active or cleared
• Description—Information about the event
Figure 11 Summary tab
State shows
status of event
Event Code
Events Table
Overall
Status
System
Information
(IP address,
firmware
version, contact
information for
events and
alarms)
Click here to
view a rack
PDU’s status
in the PDU
Explorer tab
Emerson® RPC2™
Status of this rack PDU
16
Accessing an RPC2 Communications Module via the Web Interface
4.3
PDU Explorer Tab
The PDU Explorer displays data from connected equipment, starting with the rack PDU view at the
highest level, allowing users to browse down one level to view branches, then another to view the
receptacles. It also permits viewing sensors and editing sensor settings.
Figure 12 PDU Explorer main page
MPH2 rack PDU
being viewed;
clicking this
hyperlink will
display the
branch level
Data shown at
rack PDU level
Clicking on a
branch will
show data for
that branch
The PDU Explorer main page shows available information about the MPH2 on the lower tabs:
Measurement (shown at the main page), Status, Settings and Information.
The Measurements tab displays the rack PDU’s current, voltage, power, energy and frequency
information. The Status tab displays whether the rack PDU is within acceptable limits for
overcurrent, low current and low voltage thresholds. The Information tab displays general
information about the rack PDU. Settings on the rack PDU can be edited under the Settings tab.
17
Emerson® RPC2™
Accessing an RPC2 Communications Module via the Web Interface
4.3.1
PDU Explorer Tabs: Measurements
The PDU Explorer’s Measurements tab presents available data about the rack PDU. At the system
level and PDU level, the page permits resetting energy for the PDU or for a branch. At the branch
level, the page permits turning power On or Off to a branch or receptacles, locking and unlocking a
branch or receptacles and causing a receptacle’s LED to blink.
Figure 13 PDU Explorer tabs: Measurements
PDU Explorer at
PDU level
Up One
Level
Enable
Power
Disable
Power
Cycle
Power
Lock and Unlock Blink LED
Receptacle
PDU Explorer
at branch level
4.3.2
PDU Explorer Tabs: Status
The PDU Explorer’s Status tab presents the condition of the MPH2. Figure 14 shows data for a
monitored and managed MPH2 rack PDU.
Emerson® RPC2™
18
Accessing an RPC2 Communications Module via the Web Interface
Figure 14 PDU Explorer tabs: Status
A white checkmark on a green
background indicates normal
operation.
A white X on a red background
indicates an abnormal condition.
Data shown are:
Over Current
Under Current
Under Voltage
Channel OK
Information is
shown at branch
level
4.3.3
PDU Explorer Tabs: Settings
The PDU Explorer’s Settings tab permits entering a customized name for a PDU or receptacle, setting
how long the PDU delays before power is available to a receptacle at startup, setting whether a
receptacle is critical, adjusting the threshold for alarms and other events, locking or unlocking
receptacles and performing other functions as shown in Figure 15. To edit a rack PDU’s settings:
1. Log in with the privileges required to change these settings.
2. From the PDU Explorer tab, highlight the rack PDU to be edited by clicking in one of its fields.
NOTE
Clicking a rack PDU will open its branch page.
3.
4.
5.
6.
In the table at the bottom of the page, click the Settings tab.
Check the box or boxes next to the settings to be edited.
Click the Edit icon
.
Enter the new values or use the drop-down menu to enable or disable software overcurrent
protection. At the branch level view, a drop-down menu also permits designating a receptacle as
critical or non-critical
7. When finished, click the Save icon, ✔, to make the change or click the Cancel icon X to abort
the change. The icons will be in the column formerly occupied by the Edit icon.
19
Emerson® RPC2™
Accessing an RPC2 Communications Module via the Web Interface
Figure 15 PDU Explorer tabs: Settings
Settings Tab at
Rack PDU Level
One item or all may be
selected for changing
by putting a
checkmark in the
boxes. Clicking in the
top box puts a
checkmark in all the
boxes.
The Edit icon is a pencil.
Pencil is replaced by Save and Cancel
icons after the Edit icon is clicked.
X
Settings Tab
at Branch
4.3.4
PDU Explorer Tabs: Settings-Controlling Sensors
Sensor information is displayed on the RPC2 communications module’s Main Page. Clicking on a
displayed sensor opens the PDU Explorer’s Setting page to the sensor information.
The PDU Explorer Settigns tab permits labeling sensors and setting an alarm to sound dpending on
whether the sensor contact is open or closed.
Emerson® RPC2™
20
Accessing an RPC2 Communications Module via the Web Interface
Figure 16 Sensor information on Summary Tab and details on Settings Tab
Sensor
Information
(Summary Tab)
Click on a Sensor to open the
PDU Explorer to the sensor
information on the Settings tab.
21
Emerson® RPC2™
Accessing an RPC2 Communications Module via the Web Interface
To edit sensor information:
1. Put a checkmark, ✔, in the box to the left of the portion to be changed.
2. Click the Edit icon
• If assigning a label: Enter the new label (the default is the sensor’s serial number).
• If changing the Asset (sensor in this case): Enter a new name for the sensor (default names are
Tag01 and Tag02.
• If changing the Alarm Config, click on the drop-down menu and choose Alarm when close,
Alarm when open or None.
3. Click the Save icon,✔, to save the change or click the Cancel icon X to discard the change.
Figure 17 Change a sensor value
Put a check
mark in the box
for the value to
be changed
Choose a setting from
the drop-down menu
4.3.5
PDU Explorer Tabs: Information
The PDU Explorer’s Settings tab displays information about the MPH2 as shown in Figure 18. The
information on the tab is read-only.
Figure 18 PDU Explorer tabs: Information
Emerson® RPC2™
22
Accessing an RPC2 Communications Module via the Web Interface
Click the PDU Explorer tab to view all connected rack PDU’s. Each rack PDU is displayed along with
its summary information. Energy can be reset by checking the box next to a rack PDU then clicking
either the Reset All Energy or the Reset Selected Energy icon at the top of the page.
Table 7
PDU summary descriptions
Item
4.4
Description
Label
The rack PDU name.
ID
The position in an array of the rack PDU.
Status
The status of the rack PDU.
State
Whether the branch overcurrent breaker is open or closed.
Line
The label of the currently viewed input line.
Current Available
The available current until alarm.
Current Used
The current being used.
Current Utilization
Percentage of the current being used.
Graphical Display
Graphical representation of the low current alarm threshold, overcurrent warning threshold and
overcurrent alarm threshold.
PDU Explorer—Branch information
Click on a rack PDU in either the content area or from the navigation tree to display its branch
information. Energy can be reset by checking the box next to a rack PDU, then clicking either the
Reset All Energy or the Reset Selected Energy icon at the top of the page.
Table 8
Branch summary descriptions
Item
Description
Label
Displays the branch name.
ID
Displays the position of the branch on the rack PDU.
Status
Displays the status of the branch.
State
Displays the state of the circuit breaker for the branch.
Line
Displays the label of the currently viewed input line.
Available Current
Displays the available current for the branch.
Utilized Current
Displays the current being used by the branch.
Utilization
Displays percentage of the current being used by the branch.
Graphical Display
A graphical representation of the low current alarm threshold, overcurrent warning threshold
and overcurrent alarm threshold.
The table at the bottom of the Web page displays the selected branch’s measurements, status,
settings and information.
The Measurements tab displays the rack PDU’'s current, voltage, power and energy information.
The Status tab displays whether the branch is within acceptable limits for overcurrent, low current,
low voltage, failure and breaker thresholds. The Information tab displays general information about
the branch. The Settings tab permits editing settings on the branch.
23
Emerson® RPC2™
Accessing an RPC2 Communications Module via the Web Interface
To edit a branch:
1. Log in with the privileges required to change these settings.
2. From the PDU Explorer tab, click the rack PDU with the branch to be edited.
3. Highlight the branch to be edited by clicking in one of its fields.
NOTE
Clicking a branch will open its receptacle page.
4. In the table at the bottom of the page, click the Settings tab.
5. Check the box or boxes next to the settings to be edited.
6. Click the Edit icon
.
7. Enter the new values or use a drop-down menu to enable or disable software overcurrent
protection or change whether the branch is designated critical.
8. When finished, click the Save icon, ✔, to make the change or click the Cancel icon X to abort
the change. The icons will be in the column formerly occupied by the Edit icon.
Drop-Down Menus
4.5
PDU Explorer—Receptacle Information
Click on a branch in either the content area or from the navigation tree to display its receptacles.
Check the box beside the receptacles to be managed and use the icons at the top of the page to Reset
Energy, Enable Receptacle(s) Power, Disable Receptacle(s) Power, Cycle Receptacle(s) Power, Lock
Receptacle(s), Unlock Receptacle(s) or Blink Receptacle(s) LED.
Table 9
Receptacle summary descriptions
Item
Description
Label
Displays the receptacle name.
ID
Displays the position of the receptacle on the rack PDU.
Type
Displays the type of the receptacle.
Status
Displays the status of the receptacle.
State
Displays whether the receptacle is On or Off.
Lock
Displays whether the receptacle is locked or unlocked.
Available Current
Displays the available current for the receptacle.
Utilized Current
Displays the current being used by the receptacle.
Utilization
Displays percentage of the current being used by the receptacle.
Graphical Display
A graphical representation of the low current alarm threshold, over current warning threshold
and overcurrent alarm threshold.
The table at the bottom of the screen displays the selected receptacle's measurements, status, settings
and information.
Emerson® RPC2™
24
Accessing an RPC2 Communications Module via the Web Interface
The Measurements tab displays the receptacle’s current, voltage, real power, apparent power, power
factor, energy and crest factor information. The Status tab displays whether the receptacle is within
acceptable limits for overcurrent and low current thresholds. The Information tab displays general
information about the receptacle. The Settings tab permits editing settings on a receptacle.
To edit a receptacle:
1. Log in with the privileges required to change these settings.
2. From the PDU Explorer tab, click the rack PDU with the branch containing the receptacle to be
edited.
3. Click the branch with the receptacle to be edited.
4. Highlight the receptacle to be edited by clicking on it.
5. In the table at the bottom of the page, click the Settings tab.
6. Check the box or boxes next to the settings to be edited.
7. Click the Edit icon
.
8. Enter the new values or use the drop-down menu to enable or disable software overcurrent
protection or change whether the receptacle is designated critical.
9. When finished, click the Save icon, ✔, to make the change or click the Cancel icon X to discard
the change.
25
Emerson® RPC2™
Accessing an RPC2 Communications Module via the Web Interface
4.6
Device Explorer
The Device Explorer tab permits viewing the status of all receptacles on a rack PDU. As with the
PDU Explorer, place a check mark (✔) in the box or boxes next to receptacles and then use the icons
at the top of the page to Reset Energy, Enable Receptacle Power, Disable Receptacle Power, Cycle
Receptacle Power, Lock Receptacle, Unlock Receptacle or Blink Receptacle LED.
Clicking on a receptacle will open the PDU Explorer view of the selected receptacle.
Figure 19 Device Explorer tab
ID is a three-character
designation, showing rack
PDU number, branch
designation letter and
receptacle number.
List level shows
all receptacles
Group levels show groups of
receptacles in the selected
range (Groups 1-16, 17-32 ... .)
4.6.1
Device Explorer—Receptacle Groups
Receptacles on rack PDU’s with receptacle-level control may be grouped for management and
monitoring. No receptacles are grouped in the factory-default setup of the RPC2 communications
module. Grouping enables applying the same change to all receptacles in a group in a single
operation. For example, all receptacles in a group may be turned On or Off with one action, instead of
having to be switched On or Off separately.
Up to 64 receptacle groups are possible. Group names may be changed, except the standard
Noncritical group name.
Noncritical Group
The Noncritical group is intended for linking receptacles powering non-essential equipment. This
receptacle group can be shut down for power conservation and similar purposes, such as when utility
power fails and a UPS is powering rack equipment.
All receptacles are critical by default. No receptacles will in the Noncritical Group unless they are
added by a user with administrative privileges.
Emerson® RPC2™
26
Accessing an RPC2 Communications Module via the Web Interface
Figure 20 Receptacle group screen
All Receptacles in
RGROUP2 are On
Receptacles in My Group is Mixed
(some On, some Off); My Group is
a custom-named receptacle group
Edit Group icon
All Receptacles in
RGROUP3 are Off
Click to display the
groups from 1 to 16;
clicking on subsequent
ranges in the list
reveals other groups
Create a Receptacle Group
1.
2.
3.
4.
5.
Navigate to the Device Explorer tab.
Click the Edit Group icon.
A list of all receptacles will be displayed.
Put a checkmark (✔) beside each receptacle to be added to the group.
Name the group or use one of the default group names.
Click the Save icon, ✔.
Figure 21 Creating a receptacle group
Enter a name for the
receptacle group or
use a default name
Put a checkmark next
to each receptacle to
be added to a group
27
Emerson® RPC2™
Accessing an RPC2 Communications Module via the Web Interface
4.7
Events Tab
Click the Events tab to see a list of rack PDU events. Use the drop-down menus to filter events.
Events can be configured for SNMP Traps, Syslog, Email and SMS in the System Tab.
Click the Download icon at the top of the page to download a log file for all events. A downloaded
event log can be imported into Microsoft® Excel® and viewed as a spreadsheet.
Figure 22 Events tab
4.8
System Tab
The System tab permits viewing information about the RPC2 communications module, as shown in
Figure 23. An administrator can configure the RPC2 communications module’s parameters, such as
notifications and SNMP traps and access. An administrator can also update the RPC2
communications module’s firmware and change passwords.
Figure 23 System tab
Support
Information
4.8.1
System Tab—Support
Click Support in the System tab navigation tree to view information about the RPC2
communications module. Click the Print icon at the top of the page to print the summary table.
NOTE
This is a read-only page.
Emerson® RPC2™
28
Accessing an RPC2 Communications Module via the Web Interface
4.8.2
System Tab—Devices
Click Devices in the System tab navigation tree to view a read-only page about the MPH2 rack PDU
and the RPC2 communications module. Available information includes the System Name (userspecified), system location, system description, contact personnel names, MPH2 manufacturer, the
RPC2 serial number and firmware label and the MPH2 model, serial number and firmware version.
Click the Print icon at the top of the page to print the summary table.
4.8.3
System Tab—Device Change
Click Device Change in the System tab navigation tree to to view device changes, such as a Rack
PDU Array™ being added or removed, a rack PDU being added to an array, sensors being added or
removed or a module added to a Liebert MPX. This page displays module serial number and type and
shows when modules were added and removed. Click the Acknowledge icon to acknowledge changes
and remove them from the page.
NOTE
A large white X on a red background is displayed in the upper left corner when a device change
has not been acknowledged by the user. This will occur at initial startup, when the RPC2
communications module is installed for the first time, when a sensor is added or removed and
in similar instances. After an event or change has been acknowledged, the event may take a few
seconds to clear and the X should change to a white checkmark (✔) on a green background.
An X is also displayed if alarms are present.
29
Emerson® RPC2™
Accessing an RPC2 Communications Module via the Web Interface
4.8.4
System Tab—Firmware Update
Firmware updates may be downloaded from the Downloads section of the Emerson Network Power®
Web site (www.emerson.com). Once downloaded, the update may be applied to all RPC2
communications modules in an installation through the RPC2 communications module’s Web
interface.
The RPC2 communications module permits unattended firmware updates. The browser being used
may be closed after the progress bar is displayed.
1. Log in with the privileges required to perform an update.
2. Click on the System tab, then Support>Firmware Update in the navigation tree.
3. Select the method of updating from the list:
• Web (http)
• FTP
• TFTP
4. Click the Browse button to find and open the downloaded .epm file on the host PC or network.
The selected file name is displayed in a text box.
5. Click the Start Firmware Update icon
to begin updating or click the Cancel icon X to
clear the file name and begin again.
6. The firmware update progress will be shown in the on-screen status. Once the process is finished,
the system will resume displaying rack PDU information.
4.8.5
System Tab—Settings
Click Settings in the System tab’s navigation tree to configure the settings for the RPC2
communications module. Use the icons at the top of the page to save or cancel the changes. The
Settings page also permits resetting the RPC2 communications module to factory defaults, rebooting
the system and opening a command line interface session. To manage RPC2 communications module
settings:
1.
2.
3.
4.
5.
6.
7.
8.
Log in with the privileges required to change these settings.
From the System tab, click Settings in the side navigation bar.
Enter a System Name and Description for the RPC2 communications module.
Enter a Contact Name and Location.
Use the drop-down menu to display the temperature in either Celsius or Fahrenheit.
Enter the SWOTP Delay (how long the module waits before turning Off receptacles) in seconds.
Use the drop-down menu to select either a 12-hour or 24-hour time format.
Click the Save icon, ✔, when finished.
Network
The Network page permits configuring the speed/duplex and hostname as well as IPv4 and IPv6
static routes. To configure network parameters:
1.
2.
3.
4.
5.
6.
Log in with the privileges required to change these settings.
From the side navigation bar of the System tab, click Network.
Use the drop-down menu to select Speed/Duplex.
Enter the host name in the Host Name field.
IPv4 is selected by default; to use IPv6, put a check mark (✔) the box next to IPv6.
For IPv4 or IPv6, select either Static or DHCP for the boot mode and enter the IP Address, Subnet
Mask and Default Gateway in the appropriate fields.
7. Click the Save icon when done.
Emerson® RPC2™
30
Accessing an RPC2 Communications Module via the Web Interface
DNS
From the Domain Name Server (DNS) settings menu, an administrator can configure the servers the
RPC2 communications module will use for hostname resolution. When configured, host addresses for
SNMP, Network Time and Email/SMS can be specified in either full Domain Name format or hostonly format, provided that the appropriate Domain Name Suffix is used.
The DNS menu is used to set parameters for network access to the RPC card. Consult your network
administrator for these settings.
To configure DNS Server settings:
1.
2.
3.
4.
5.
Log in with the privileges required to change these settings.
From the side navigation bar of the System tab, click Network>DNS.
Select whether to obtain DNS server addresses automatically or to enter them manually.
If they will not be obtained automatically, enter the primary and secondary DNS addresses.
Use the drop-down menu to select in hours how long the RPC2 communications module retains
resolved addresses.
6. Enter the Domain Name Suffix. This suffix is used for assembling a fully qualified domain name
when a host-only name is specified.
7. Click the Save icon when finished.
DNS Test
The DNS Test function checks whether the RPC2 communications module will resolve a hostname to
an IP address.
To run a DNS test:
1. Log in with the privileges required to change these settings.
2. From the side navigation bar of the System tab, click Network>DNS.
3. Under the DNS Test heading, use the drop-down menu to select a fully qualified domain name or
an IP address.
4. In the Question field, enter a value for the DNS to answer.
5. Click the Query icon at the top of the page to attempt a lookup with the provided information.
Time (SNTP)
The RPC2 communications module provides two options for setting the date and time. It can retrieve
the date and time from a simple network time protocol (NTP) server, or the date and time can be set
manually so that the rack PDU’s internal clock is used to provide time and date information.
To set the date and time:
1. Log in with the privileges required to change these settings.
2. From the side navigation bar of the System tab, click Network.
3. Under the SNTP heading, select NTP Server to use a NTP server.
-or- Select Local to manually set the date and time.
4. If using NTP, enter an NTP server site in the Time Server field.
5. Select either Hourly or Daily for the synchronize rate.
6. Use the drop-down menu to select the time zone.
7. If manually setting the date and time, enter the time in YYYY-MM-DD HH:MM:SS format in the
System Date and Time field.
8. Click the Save icon, ✔..
NOTE
To re-sync the time immediately, click the Sync Time Now icon at the top of the page.
31
Emerson® RPC2™
Accessing an RPC2 Communications Module via the Web Interface
Notification
The RPC2 communications module will generate notifications for a wide variety of events. It can be
configured to direct or store those event notifications for immediate use or for analysis later. To
configure notifications:
1. Log in with the privileges required to change these settings.
2. From the side navigation bar of the System tab, click Notification.
3. For each notification type, check the box or boxes next to the type of notification to be sent: e-mail,
SMS, SNMP Trap or SysLog notifications.
NOTE
Check the box next to the heading to select that type of notification for all events in the list.
4. Click the Save icon, ✔, when finished.
Messaging
An administrator can configure e-mail and SMS settings to be used for notifications from the
Messaging page. To verify the settings once configuration is complete:
1.
2.
3.
4.
5.
6.
7.
8.
Log in with the privileges required to change these settings.
From the side navigation bar of the System tab, click Notification>Messaging.
Check the box the next to Email to enable configuration of e-mail settings.
Enter the address the e-mail notification will be sent from and the address or addresses it will be
sent to.
Check the radio button to either use the event or to create a custom subject for the e-mail.
Enter the SMTP server and port number.
Click the Save icon, ✔, at the top of the page.
To verify the e-mail configuration, click the Verify Email icon at the top of the page.
To configure SMS settings:
1.
2.
3.
4.
5.
6.
7.
8.
Log in with the privileges required to change these settings.
From the side navigation bar of the System tab, click Notification>Messaging.
Check the box the next to SMS to enable configuration of SMS settings.
Enter the address the SMS notification will be sent from and the address or addresses it will be
sent to in the appropriate fields.
Check the radio button to either use the event or to create a custom subject for the e-mail.
Enter the SMTP server and port number.
Click the Save icon, ✔, at the top of the page.
To verify the SMS configuration, click Verify SMS at the top of the page.
Customize Message
An administrator can customize an e-mail or SMS message as well as configure e-mails and SMS
event consolidation. To customize a message:
1. Log in with the privileges required to change these settings.
2. From the side navigation bar of the System tab, click Notification>Messaging>Customize
Message.
3. Under the Customize Message heading, check the items to be included for e-mail and/or SMS
messaging.
4. Click the Save icon, ✔, at the top of the page.
Emerson® RPC2™
32
Accessing an RPC2 Communications Module via the Web Interface
To configure e-mail and SMS event consolidation:
1. From the side navigation bar of the System tab, click Notification>Messaging>Customize
Message.
2. Under Configure Email/SMS Event Consolidation, check the boxes to enable e-mail or SMS
consolidation.
3. Enter the consolidation time limit in number of seconds and enter the consolidation event limit in
number of events.
4. Click the Save icon, ✔, at the top of the page.
Syslog
Syslog notifications can be sent to up to four IPv4 or IPv6 addresses. To enable Syslog notifications:
1.
2.
3.
4.
Log in with the privileges required to change these settings.
From the side navigation bar of the System tab, click Notification>Syslog.
Check the box to enable either IPv4 or IPv6 addressing and enter up to four addresses.
Click the Save icon, ✔.
Datalog
An administrator can enable data logging for rack PDUs, branches or receptacles and export the data
log to an FTP site. To enable data logging:
1.
2.
3.
4.
5.
6.
Log in with the privileges required to change these settings.
From the side navigation bar of the System tab, click Notification>Datalog.
Under the Datalog heading, check the box to enable data logging.
Use the drop-down menus to enable or disable PDU, branch or receptacle data logging.
Use the drop-down menu to enter the data logging interval in number of minutes.
Click the Save icon, ✔, when finished.
To export a data log:
1. Log in with the privileges required to change these settings.
2. From the side navigation bar of the System tab, click Notification>Datalog.
3. Under the Export heading, enter the IP address, username and password for the FTP site where
the data log will be exported.
4. Enter the path and filename for the data log.
NOTE
The default filename is sys-data.log.
5. Click the Export icon
Clicking the Flush
the data log.
when finished.
or Download
icon at the top of the screen will either clear or download
33
Emerson® RPC2™
Accessing an RPC2 Communications Module via the Web Interface
Backup and Restore
An administrator can configure an FTP site to backup a configuration file or restore configuration
from a backup file. To configure where the backup will be stored:
1. Log in with the privileges required to change these settings.
2. From the side navigation bar of the System tab, click Notification>Backup and Restore.
3. Check the radio button next to FTP Site and enter the IP address, username and password for
the FTP site where the data log will be exported. Then enter the path and filename for the
configuration file.
-or- Check the radio button next to Local, click Choose File, browse to the location where the file
will be saved and enter a name for the configuration file.
4. Click the Save icon, ✔, when finished.
To backup the configuration, click the Save Configuration icon
at the top of the page, then
click OK. To restore from the last saved configuration, click the Restore Configuration icon
at
the top of the page and click OK.
Manage Protocol
From the Manage Protocol page, an administrator can enable or disable the Velocity Server, SNMP
agent, SSH support, Telnet and Web Server. From this page an administrator can also disable or set
the inactive timeout and configure the maximum number of Telnet sessions allowed.
Modifying Velocity or SNMP will require rebooting the RPC2 communications module. The RPC2
communications module can be rebooted by accessing System>Settings>Reboot.
SNMP
An administrator can configure SNMP, which is needed if notifications are to be sent to an SNMP
management application. The RPC2 communications module supports SNMP v1, v2 and v3. To
configure SNMP:
1.
2.
3.
4.
5.
6.
Log in with the privileges required to change these settings.
From the side navigation bar of the System tab, Click Manage Protocol>SNMP.
Use the drop-down menu to enable or disable SNMP v1/v2.
Use the drop-down menu to select either SNMPv1 or SNMPv2 for the SNMP traps.
Enter the port number for the SNMP UDP port and the SNMP Traps UDP port.
Use the drop-down menu to enable or disable the Liebert Global Products (LGP) MIB and MIB
traps for querying information in that MIB.
7. Use the drop-down menu to enable or disable the authentication trap. If enabled, an SNMP
authentication trap will be sent to all trap targets.
8. Use the drop-down menu to enable or disable the System Notify trap for system traps to be sent
per the LGP MIB.
NOTE
LGP MIB must also be enabled to enable system notify traps.
9. Disable or set the heartbeat interval in number of minutes. This specifies how often a heartbeat
trap will be sent to show that a device is online and functioning normally.
10. Use the drop-down menu to enable or disable SNMPv3.
11. Click the Save icon, ✔, when finished.
Emerson® RPC2™
34
Accessing an RPC2 Communications Module via the Web Interface
SNMPv1/v2 Access
From the side navigation bar of the System tab, click SNMP-v1/v2 Access to configure the SNMP
v1/v2 communities settings. Up to 20 devices can be configured with permission to access the RPC2
communications module, identified by IP address or hostname, read/write privileges and community
string.
Table 10
SNMPv1/v2 access description
Parameter
Description
Entry
As many as 20 devices may be configured for access.
Network Name
The IP address of the target to receive traps.
Access
Click the Read radio button to allow users to view but not change data. Click the Write
radio button to give full permissions for configuration, control and viewing.
Community
The community string used the by IP host for this entry.
Clear
Click Clear to delete all values for this entry.
NOTE
A network name of 0.0.0.0 with write access and a public community will grant access to any
host computer.
SNMPv3 Access
From the side navigation bar of the System tab, click SNMP>V3 Access to configure the SNMPv3
communities settings. Up to 20 devices can be configured with permission to access the RPC2
communications module, identified by IP address or hostname, read/write privileges and community
string.
Table 11
SNMP V3 access description
Parameter
Description
Entry
As many as 20 devices may be configured for access.
User Enable
User Enable must be checked for each user to be configured for access. A maximum of 20
devices may be configured for access.
User Name
The IP address of the network host to receive access to device information or traps.
Authentication Type
Options are none, MD-5 or SHA.
Authentication Secret
Password between 8-64 characters for SNMPv3 request.
Privacy Type
Options are no encryption or DES.
Privacy Secret
Password of 8-64 characters for SNMPv3 request.
Access
No Access provides no access, ReadOnly provides only the ability to view data.
Read/Write provides full permissions for configuration, control and viewing.
Source
Either an IP address or the network name of the host. To enable multiple hosts, enter
network names separated by a comma.
Clear
Click Clear to delete all values for this entry.
NOTE
A configuration with sources set to 0.0.0.0 with write access and no authentication will grant
access to any host computer.
35
Emerson® RPC2™
Accessing an RPC2 Communications Module via the Web Interface
SNMPv1/v2 Traps
An administrator can configure up to 20 users to receive notifications from the RPC2 communications
module, identified by IP address or hostname, trap listen port and community string. To configure
SNMPv1/v2 Traps:
1.
2.
3.
4.
5.
From the side navigation bar of the System tab, click Manage Protocol>SNMP>V1V2 Traps.
Enter the network name, port number and community string in the appropriate fields.
Check the box to enable the heartbeat feature.
Click the Save icon, ✔, at the top of the page when finished.
To verify the configuration, click the Verify icon at the top of the page.
Table 12
SNMPv1/v2 trap descriptions
Parameter
Description
Entry
Enter up to 20 targets to receive traps.
Network Name
The IP address or network name of the target to receive traps.
Port
The Trap Listen Port where traps will be sent. Use 162 if the host computer uses standard ports.
Community
The community string used the by the IP host for this entry (case sensitive, up to 32 characters).
Heartbeat
Check the box to enable a heartbeat check.
Clear
Click Clear to delete all values for this entry.
SNMPv3 Traps
An administrator can configure up to 20 users to receive notifications from the RPC2 communications
module. Users must be identified by IP address or hostname, trap listen port and community string.
To configure SNMPv3 Traps:
1.
2.
3.
4.
5.
6.
From the side navigation bar of the System tab, click Manage Protocol>SNMP>V3 Traps.
Enter the user name, port number and destinations.
Use the drop-down menu to enable or disable notifications.
Check the box to enable the heartbeat feature.
Click the Save icon, ✔, at the top of the page when finished.
To verify the configuration, click the Verify icon at the top of the page.
Table 13
SNMPv3 traps descriptions
Parameter
Description
Entry
Enter up to 20 targets to receive traps.
User Name
The IP address or network name of the host to receive traps.
Notify
Enable or disable notifications being sent to the user from the module.
Destination
The IP address or the network name of the network host that will receive notifications from the
module. Use a comma to separate multiple hosts.
Heartbeat
Check the box to enable a heartbeat check.
Port
The Trap Listen Port where traps will be sent. Use 162 if the host computer uses standard ports.
Clear
Click Clear to delete all values for this entry.
Web Server
An administrator can configure access to the module through the Web interface.
To configure access through the Web interface:
1.
2.
3.
4.
5.
From the side navigation bar of the System tab, click Manage Protocol>Web Server.
Use the drop-down menu to select either HTTP or HTTPS for the Web Server.
Enter the port number for the HTTP or HTTPS server.
Enter the amount of time in seconds the RPC2 communications module refreshes.
Click the Save icon, ✔, at the top of the screen when finished.
Emerson® RPC2™
36
Accessing an RPC2 Communications Module via the Web Interface
4.8.6
Authentication
Authentication can be performed locally or on a remote Kerberos, LDAP, Radius or TACACS+
authentication server. If the rack PDU is managed by an Avocent® DSView server, DSView
authentication is also supported.
The rack PDU also supports remote group authorizations for the LDAP, Radius and TACACS+
authentication methods.
An administrator can configure authentication using the Web interface or the command line
interface. The default authentication method for the rack PDU is Local. Any authentication method
that is configured for the rack PDU is used for authentication of any user who attempts to log in
through Telnet, SSH or the Web manager
To select an authentication type:
1. From the side navigation bar of the System tab, click Authentication.
2. Use the drop-down menu to select the authentication type.
3. Click the Save icon, ✔, at the top of the page.
Remote Servers
Using a remote server requires configuring its IP address and, in most cases, other parameters before
it can be used. The following remote servers require configuration:
•
•
•
•
•
DSView
RADIUS
TACACS+
LDAP(S) AD
Kerberos
To configure a DSView authentication server:
1. From the side navigation bar of the System tab, click Authentication>Remote
Servers>DSView.
2. Enter IP Address 1 - 4 for the DSView servers.
3. Click the Save icon, ✔, at the top of the page.
To configure a RADIUS authentication server:
1. From the side navigation bar of the System tab, click Authentication>Remote
Servers>Radius.
2. Enter the IP addresses of the First Authentication Server and First Accounting Server.
3. If used, enter the IP addresses for the Second Authentication Server and Second Accounting
Server.
4. Enter the secret word or passphrase in the Secret field (applies to both first and second
authentication and accounting servers), then re-enter the secret word or passphrase in the
Confirm Secret field.
5. Enter the desired number of seconds for server time-out in the Timeout field.
6. Enter the desired number of retries in the Retries field.
7. Click the Save icon, ✔, at the top of the page.
37
Emerson® RPC2™
Accessing an RPC2 Communications Module via the Web Interface
To configure a TACACS+ authentication server:
1. From the side navigation bar of the System tab, click Authentication>Remote
Servers>TACACS+.
2. Enter the IP addresses for the First Authentication Server and First Accounting Server.
3. If used, enter the IP addresses of the Second Authentication Server and Second Accounting
Server.
4. Select the desired service (PPP, raccess or shell) from the Service drop-down menu.
5. Enter a secret word or passphrase in the Secret field (applies to both first and second
authentication and accounting servers), then re-enter the secret word or passphrase in the
Confirm Secret field.
6. Enter the desired number of seconds for server time-out in the Timeout field.
7. Enter the desired number of retries in the Retries field.
8. Use the drop-down menu to select the TACACS+ version.
9. Click the Save icon, ✔, at the top of the page.
To configure an LDAP(S)|AD authentication server:
1. From the side navigation bar of the System tab, click Authentication-Remote ServersLDAP(S)|AD.
2. Enter the IP address of the server.
3. Enter the Base.
4. At the Secure drop-down menu, select Off, On or Start_TLS.
5. Enter the Database User Name.
6. Enter a Database Password, then re-type the database password in the Confirm Password field.
7. Enter the desired Login Attributes.
8. Click the Save icon, ✔, at the top of the page.
To configure a Kerberos authentication server:
1. From the side navigation bar of the System tab, click Authentication>Remote
Servers>Kerberos.
2. Enter the IP address (Realm) of the server.
3. Enter the Realm Domain Name (example: liebert.com).
4. Enter the Domain Name (example: liebert.com).
5. Click the Save icon, ✔, at the top of the page.
4.8.7
Authorization Levels
User groups are given access and authorizations either by default or as assigned by an administrator.
Administrators can alter the permissions and access rights of users belonging to the appliance or user
groups, or create additional groups with custom permissions and access rights. Administrators can
add, delete or modify permissions and access rights for users from any group at any time.
There are four default user groups on an RPC2 communications module module.
• Admin
• Poweruser
• System User
• Custom User
Groups
An administrator can create a custom group and assign receptacles to users in the custom group. A
user in a custom group will be able to view only the receptacles to which he’s been given access; the
other receptacles will not appear. A user in a custom group can lock and unlock only the receptacles
he has access to.
A user can belong to more than one group. Members can be added or deleted from any group, but none
of the default groups—administrator, power user or system user—can be deleted.
NOTE
Only one group may be modified at a time.
Emerson® RPC2™
38
Accessing an RPC2 Communications Module via the Web Interface
To add a group:
1.
2.
3.
4.
From the System tab’s navigation tree, click Authorization>Groups.
To add a group, click the Add icon at the top of the page, enter the name for the new group.
Set the access level for members of the group by granting access to receptacles.
Click the Save icon, ✔.
To delete a group:
1. Check the box next to the group to be deleted
2. Click the Delete icon.
To add a user to a group:
1.
2.
3.
4.
From the System tab’s navigation tree, click Authorization>Groups.
Check the box next to the group to be edited.
Click the Edit User icon.
In the Local User List or the Remote User List, select the user to be added and click the right
arrow.
5. Click the Save icon, ✔.
To delete a user from a group:
1.
2.
3.
4.
5.
From the System tab’s navigation tree, click Authorization>Groups.
Check the box next to the group to be edited.
Click the Edit User icon.
In the Group User List, select the user to be removed and click the left arrow.
Click the Save icon, ✔.
To add a user to a group:
1.
2.
3.
4.
From the System tab’s navigation tree, click Authorization>Groups.
Check the box next to the group to be edited.
Click the Edit User icon.
In either the Local User List or the Remote User List, select the user to be added and click the
right arrow.
5. Click the Save icon, ✔.
To delete a user from a group:
1.
2.
3.
4.
5.
From the System tab’s navigation tree, click Authorization>Groups.
Check the box next to the group to be edited.
Click the Edit User icon.
In the Group User List, select the user to be removed and click the left arrow.
Click the Save icon, ✔.
To assign receptacles to a user group:
1. From the System tab’s navigation tree, click Authorization>Groups.
2. Check the box next to either the user group or a custom group where the receptacles will be
added.
NOTE
Receptacles cannot be assigned to the administrator, poweruser or system user groups. Each of
these default groups has its access level set in the software.
3. Check the boxes next to the receptacles to be added to the group. To assign all receptacles, click
the box at the top of the column.
4. Click the Save icon, ✔, when finished.
39
Emerson® RPC2™
Accessing an RPC2 Communications Module via the Web Interface
Users
From the User Names page, an administrator can add or delete users and change user passwords.
NOTE
The administrator’s user password cannot be changed on this page.
To add a user:
1.
2.
3.
4.
From the System tab’s navigation tree, click Authorization>Users.
Click the Create Local User icon.
Enter the username and password and confirm the password.
Click the Save icon, ✔.
To delete a user:
1.
2.
3.
4.
From the System tab’s navigation tree, click Authorization>Users.
Check the box next to the user to be deleted.
Click the Delete Local User icon.
Click OK when prompted.
To change a user password:
1. From the System tab’s navigation tree, click Authorization>Users.
2. Check the box next to the user whose password to be changed.
3. Click the Change Local User’s Password icon.
-or- To change your own password, from the side navigation bar of the System tab, click
Authorization>Change Password.
4. Enter and confirm the new password.
5. Click the Save icon, ✔.
Emerson® RPC2™
40
RPC BDM™ (Optional)
5.0
RPC BDM™ (OPTIONAL)
The RPC BDM is a small monitoring device that displays data from an MPH2, Liebert MPX™ or
Liebert MPH™ units through a connection to an RPC2 communications module. The unit provides
another way to browse PDU data using the PDU Explorer and Device Explorer, as in the Web
interface.
Views shown by the RPC BDM are essentially the same as those shown by the MPH2’s onboard LCD.
NOTE
The RPC BDM is a read-only display that may be used to view data but not to control or
configure devices.
To perform control and configuration functions, use the Web or SNMP interface .
The display unit, which can be carried as a handheld device or mounted on a wall or in the rack,
permits users to:
•
•
•
•
•
•
•
•
5.1
View monitoring data
Identify the load of PDU input lines, branch circuit breakers and receptacles (varies by model)
Identify the load of PDU devices using the user-assigned label
View Liebert SN™ sensor readings for areas monitored by connected sensors
Identify the IP address and MAC address of the PDU
Browse user-assigned receptacle labels to view parametric information
View active events list
Balance PDU line loads
Orientation of the RPC BDM
The RPC BDM may be rotated for vertical or horizontal display, as shown in Figure 24.
To set the orientation, hold down the scroll button when first connecting the RPC BDM to the RPC2.
Figure 24 Vertical or horizontal orientation
Port (on top)
for connection
to RPC2
Scroll button
Hold down when
first connecting
to RPC2
Port (on side)
for connection
to RPC2
VERTICAL
ORIENTATION
5.2
HORIZONTAL
ORIENTATION
RPC BDM™ Installation
Installing the RPC BDM requires two steps described in the following sections:
• 5.2.1 - Set the IP Address for the RPC2
• 5.2.2 - Connect the RPC BDM to the RPC2 Communications Module (in an MPH2 or a
Liebert MPX™).
The RPC BDM comes with a factory-supplied Ethernet cable for connection to the RPC2. If additional
or longer cables are needed, use standard Ethernet cables.
41
Emerson® RPC2™
RPC BDM™ (Optional)
5.2.1
Set the IP Address for the RPC2
The RPC2 and the RPC BDM may be used on a network or on stand-alone rack PDU’s. Either mode
requires initializing the RPC2 with an IP address before the RPC BDM can display data.
Follow the appropriate steps to initialize the RPC2 in a networked or stand-alone environment. Refer
to Figure 25 for location of ports on the RPC2.
Figure 25 Liebert RPC ports for use with RPC BDM
Display Port
RPC2
RPC BDM
Side Port
Network Port
Link Port
To Network
To Laptop
To Initialize Emerson’s RPC2 in a Network Environment:
1. Use an Ethernet cable to connect the Network Port to the network.
2. Obtain an IP address for the RPC2:
a. If DHCP is used, the Network Port port will receive an IP address automatically.
b. If DHCP is not used:
• Use an Ethernet cable to connect the Expansion/Management port to a laptop.
• Assign a static IP address to the Network Port port, then click Restart to initialize the
RPC2, as described in 2.3 - Configure an RPC2 Communications Module for Static
IP.
To Initialize Liebert RPC in Stand-Alone Mode (Non-Networked):
1. Use an Ethernet cable to connect the Link Port to a laptop.
2. Assign a static IP address to the LAN port, then click restart to initialize the RPC2, as described
in 2.3 - Configure an RPC2 Communications Module for Static IP.
After the RPC2 is initialized, the IP address may be viewed on the RPC BDM. Proceed to 5.2.2 Connect the RPC BDM to the RPC2 Communications Module to connect the RPC2
communications module to the RPC BDM.
5.2.2
Connect the RPC BDM to the RPC2 Communications Module
To connect the RPC BDM to an RPC2 communications module:
• Connect one end of the factory-supplied Ethernet cable into the RPC BDM port.
• Connect the other end of the cable into the display port of the RPC2.
Once the PDU is turned On with these connections made, the RPC BDM is fully operational.
5.3
Placement of the RPC BDM™
The RPC BDM may be mounted in various locations inside a rack for easy access and viewing. It may
also be hand-held and used as a portable device for connecting to different rack PDU’s.
The unit may be rotated for vertical or horizontal display, as described in 5.1 - Orientation of the
RPC BDM.
Emerson® RPC2™
42
RPC BDM™ (Optional)
5.4
Navigation Tips
The RPC BDM has a scroll button for navigation (see Figure 24).
To navigate and select items:
• Use the scroll button to move the cursor to highlight an item on the screen.
• Depress the scroll button to select the highlighted item.
Figure 26 RPC BDM navigation icons
PDU LEVEL VIEW
1.98A
MPH2
Shows the ID numbers of available
PDUs, branches or receptacles,
depending on level
119.7V
204W
RPC BDM Operation
5.5.1
PDU, Branch and Receptacle Views Overview
Figure 27 RPC BDM views
The PDU Explorer hierarchy provides three levels for
viewing Rack PDU data: PDU, branch and receptacle.
The PDU level is the default view.
Figure 27 at right shows examples of the three views.
For details on each view, see 5.6 - RPC BDM: PDU
Explorer.
• An icon in the top left corner identifies the
component type—PDU, branch or receptacle.
Icon
Use the icons in this area
to scroll to other screens.
i
1
5.5
Level
0kWh
Label in example shows:
PDU
level
A Rack PDU with the
user-assigned label MPX1
Branch
level
Branch #3 on Rack PDU #1
Receptacle
level
Receptacle #5 on Branch #3
of Rack PDU #1 (The
receptacle image varies by
type of receptacle on the rack
PDU.)
PDU LEVEL VIEW (default)
1.98A
MPH2
119.7V
204W
0kWh
i
1
BRANCH LEVEL VIEW
1.98
1-A
119.6V
202W
A
237VA
i
A B
RECEPTACLE LEVEL VIEW
1.98A
1-A-7
119.7V
203W
12345678
237VA
i
• The highlighted ID number in the bottom left corner indicates which component is currently
displayed—e.g., PDU #1, Branch #3, Receptacle #5. A selected component will blink while data
about it is displayed.
• The component data includes a graph, amperage and status (V, W; VA for branch/receptacle).
• Navigation buttons appear in the bottom right corner of each screen.
• When any events are detected, the display changes to the PDU view and an Active Events icon
appears at bottom right. See 5.5.3 - Viewing Active Events for details.
43
Emerson® RPC2™
RPC BDM™ (Optional)
5.5.2
Types of Data Available at PDU, Branch and Receptacle Levels
The following table shows the types of data available at each level.
Table 14
Monitoring data available on the RPC BDM via PDU Explorer
Data available
PDU
Branch
Receptacle
Graph of power utilization
✔ (each phase)
✔
✔
Amperage of selected module
✔ (each phase)
✔
✔
✔
✔
✔
Wattage of selected module
✔
✔
✔
VA of selected module
—
✔
✔
State: On/Off
—
✔
✔
Voltage of selected module
NOTE: Branch and Receptacle data may vary depending on the MPX BRM model and Liebert
5.5.3
MPH™
capabilities.
Viewing Active Events
When an event is detected, the display switches to the PDU view with an Active Events icon in the
bottom right corner of the screen, shown below left.
• Scroll to the Active Events icon (see below left), then press the scroll button to select it.
• The information view displays a list of events with icons to indicate severity (below right).
• To view details for any listed event, scroll to that event, then press the scroll button.
PDU View
Active Events
24°C
MPH2
119.7V
1
!
1.98A
204W
Low Humidity Sensor
0kWh
!
i
Active Events Icon
5.6
RPC BDM: PDU Explorer
The PDU Explorer uses a hierarchy to display data from connected equipment, starting with the PDU
view at the highest level (default opening view), allowing users to browse down one level to view
branches, then down another level to the receptacle view.
Emerson® RPC2™
44
RPC BDM™ (Optional)
5.6.1
View PDU Data
To view data for a PDU:
• Select a PDU number in the bottom left corner. The selected number will be highlighted.
• The screen displays information for the selected PDU. The example below shows data for PDU #1,
one of two PDUs that are communicating with the RPC BDM unit.
• The PDU view displays information collected at the PDU input point for each of the three input
phases: L1, L2 and L3. Up to three phases may be used.
• See Table 15 for explanations of components that appear on the screen.
2
1
Active Event icon
3
X
2.96A
MPH2
4
121.1V
5
1234
359W
!i
6
Table 15
#
2kWh
7
9
8
PDU view components
Item
Item Description
Purpose
1
Component
Identification
Displays an icon to indicate the type of component selected—PDU in
this example—as well as the user-assigned name (e.g., MPX1).
2
Power Utilization
Graph
Graphically displays the approximate power utilization of each input
phase. The display automatically scrolls from phase to phase. The bar
for the selected phase appears dark, with the input phase number
displayed below the bar.
Amperage
Displays the amperage of the selected phase.
Voltage, Total Power
Displays voltage of each line and total power for the selected PDU.
Rack PDU ID Number
Select a PDU to view its information.
3
4
2.96A
119.7V
203W
5
1234
6
!
Active Events
7
i
Information*
Go to a screen to view active events for the selected component. This
button appears only when active events are detected.
Select to view ratings and serial number information for the Rack PDU
and access screens providing temperature and IP address information.
See example of PDU level information screen* below.
8
Network
Select to view other rack PDU’s on the network.
9
Device Explorer
Select to view a list of user-assigned labels of receptacles. See 5.7 RPC BDM: Receptacle Information for more detail.
* Example of PDU
level information
screen
121.1V
1
IP: 162.1.30.57
MAC ID: 00:00:84:47:31:49
RPC2 FW Ver: 7.0.0.1
2.96A
MPH2
359W
2kWh
!i
View IP & MAC addresses
and firmware information
45
Emerson® RPC2™
RPC BDM™ (Optional)
5.6.2
View Branch Data
The availability of branch information depends on the capabilities of the PDU. Branch information
and PDU information are the same for rack PDU’s without branch management; that information is
seen at the PDU view level.
To view data for a branch module:
• Select a branch in the bottom left corner. The selected letter will be highlighted.
• The screen displays information for the selected branch module. The example below shows data
for Branch A, one of two branches on PDU #1 that are communicating with the RPC BDM unit.
• See Table 16 for explanations of components that appear on the screen.
1
2
Active Event
icon
3
X
1.98
1-A
119.6V
4
5
202W
8
A
237VA
i
A B
6
Table 16
#
7
Branch view components
Item
Item Description
Purpose
1
Component
Identification
Displays an icon to indicate the type of component selected—branch in
this example—as well as the branch ID, which is in the format:
PDU# - Branch#
(See 3.2 - Rack PDU Component ID for details.)
2
Power Utilization
Graph
Graphically displays the approximate power utilization of the selected
components.
Amperage
Displays the amperage of the selected module.
Voltage, Power,
Apparent Power
Displays voltage, power and apparent power for the selected branch.
Branch ID
Select a given branch to view its information.
Information*
Select to view information about the selected branch. See example of
branch level information screen* below.
7
Up One Level
Move up one level—in this example, from branch to PDU view.
8
On/Off status
Displays an icon to indicate whether the module is On
3
4
2.96A
119.7V
203W
5
AB
6
i
* Example of branch
level information
screen
IP: 162.1.30.57
MAC ID: 00:00:84:47:31:49
RPC2 FW Ver: 7.0.0.1
Model: MPHM3141
S/N: 4FEB030033 MPHM3
FW Ver: 0.4.1.2
Ratings: 1P3W 120V 16A
Receptacles: 16
View IP & MAC
address information
and firmware version
Emerson® RPC2™
or Off
46
.
RPC BDM™ (Optional)
5.6.3
View Receptacle Data
The availability of receptacle information depends on the capabilities of the PDU.
To view data for a receptacle:
• Select a receptacle number in the bottom left corner. The selected number will be highlighted.
• The screen displays information for the selected receptacle. The example below shows data for
Receptacle #7, one of eight receptacles on Branch #A of PDU #1 that are communicating with the
RPC BDM unit.
• See Table 17 for explanations of components that appear on the screen.
• A list of receptacles may be viewed (see 5.7 - RPC BDM: Receptacle Information for details).
2
1
3
Active Event
icon
8
X
1.98A
1-A-7
4
119.7V
5
12345678
203W
237VA
i
7
6
Table 17
#
Receptacle view components
Item
Item Description
Purpose
1
Component
Identification
Displays an icon to indicate the type of component selected—
receptacle in this example—as well as the receptacle ID, which is in
the format:
PDU# - Branch# - Receptacle#
(See 3.2 - Rack PDU Component ID for details.)
2
Power Utilization
Graph
Graphically displays the approximate power utilization of the selected
components.
3
Amperage
Displays the amperage of the selected module.
4
Voltage, Power,
Apparent Power
Displays voltage, power and apparent power for the selected
receptacle.
5
Receptacle ID Letter
Select a given receptacle to view its information.
6
Information*
Select to view information about the selected receptacle. See example
of receptacle level information screen* below.
7
Up One Level
Move up one level—in this example, from receptacle to branch view.
8
On/Off status
Displays an icon to indicate whether the module is On
* Example of receptacle
level information
screen
View Receptacle
Information
1.98A
1-A-7
119.7V
203W
12345678
237VA
i
or Off
.
IP: 162.1.30.57
MAC ID: 00:00:84:47:31:49
RPC2 FW Ver: 7.0.0.1
View IP & MAC addresses
and firmware information
47
Emerson® RPC2™
RPC BDM™ (Optional)
5.7
RPC BDM: Receptacle Information
The RPC BDM displays a list of all receptacles on a single rack PDU.
To access the receptacle list:
• Select the Information icon in the Receptacle view, shown below left.
• Select the Receptacle to be viewed, below right.
Selected component ID
1.98A
1-A-7
119.7V
203W
12345678
Scroll Bar
(view more
receptacles)
MPH2 1-A-1
Receptacle 1
Receptacle 2
Receptacle 3
Receptacle 3
237VA
i
View Receptacle
List
Page Up/Down icons
• Use the RPC BDM’s scroll button to highlight a receptacle in the list. If a scroll bar appears on the
right, use the Page Up and Page Down icons to display the rest of the list.
• Press the scroll button to select the highlighted receptacle.
• The screen displays the PDU Explorer view for the selected receptacle (see 5.6.3 - View Receptacle Data for details).
Emerson® RPC2™
48
Liebert SN™ Sensor Installation (Optional)
6.0
LIEBERT SN™ SENSOR INSTALLATION (OPTIONAL)
The RPC2 is designed to monitor Liebert SN integrated and modular sensors.
• Integrated sensors are attached to a single cable. These Liebert SN sensors are available in
several varieties, including single or multiple temperature sensors.
• Modular sensors are separate probes shipped with a cable for connection to the RPC2
communications module.
• Liebert SN sensors may be connected in a string, including a combination of modular and
integrated sensors.
• The maximum string length is 65.6 ft. (20m).
• The maximum number of probes that may be connected to a Liebert MPH™ or Liebert MPX™ is
10. Refer also to the quick-start guides for integrated (SL-20840) and modular (SL-52405)
sensors. See the sensor quick-start guides for details on the number of probes in each type of
sensor.
Liebert SN sensors may be placed in any area—for example, in a Knurr® rack—to monitor conditions
such as temperature and humidity levels or the state of a contact.
6.1
Introduction
Installing a sensor requires mounting the sensor, connecting it to Liebert monitoring equipment,
confirming the change and configuring sensor parameters:
•
•
•
•
•
6.2
6.2 - Record the Sensor Address
6.3 - Mount the Sensor
6.4 - Connect the Sensor
6.5 - Confirm the Module Change
6.6 - Configure the Sensor
-
Write the addresses of all sensors on labels and in a log
Mount the sensor securely in the appropriate location
Attach the cable to the sensor port on the Liebert product
Acknowledge the sensor connection via the Web interface
Configure parameters such as thresholds to trigger alarms
Record the Sensor Address
During configuration, the Web interface will
display the addresses of all connected sensors.
You will need to be able to identify which
address belongs to each sensor.
MODULAR SENSOR
Address for one sensor:
1 temperature sensor (T)
Be sure to make a note of each sensor’s address
before mounting and connecting sensors.
INTEGRATED SENSOR
The sensor address can be found on the sensor Addresses for four sensors:
3 temperature (T1, T2, T3)
itself (modular sensors) or the RJ45 end of the
1 humidity (H2)
sensor cable (integrated sensors), shown in the
examples at right.
6.3
Mount the Sensor
The sensor may be mounted in an Emerson rack or another type of rack.
For temperature and humidity sensors, be sure to choose a place with unobstructed airflow—for
example, on the rack door. Check to make sure that the sensor does not cover any vents that might
impede airflow.
Refer to the sensor quick-start guide for detailed instructions for each of the following four options:
•
•
•
•
Mount on a Knurr rack frame or 19-inch rail
Mount the sensor on the rack door
Mount the sensor on a flat surface
Mount the sensor on the rack rails
49
Emerson® RPC2™
Liebert SN™ Sensor Installation (Optional)
6.4
Connect the Sensor
Each sensor is shipped with a cable to connect to the Liebert SN™ port on your Liebert product. The
RPC2 (Rack PDU Card) must be installed before the sensor can be connected (see 2.0 - Installation
for more information).
To connect the sensor:
• After securely mounting the sensor (see 6.3 - Mount the Sensor), determine the location of the
Liebert SN port, identified by the icon shown below.
Icon
Description
Liebert SN
Port
Purpose
Use this port ONLY to plug in optional
sensor accessories.
• Insert the RJ45 connector end of the sensor cable into the Liebert SN port on the Liebert product,
as in the example shown below.
Liebert SN port on
Liebert product
RJ45 connector end
of sensor cable
NOTE
When adding sensors to a string, disconnect the entire string from the sensor port and wait one
minute, then reconnect the string to the port.
When the string is reconnected to the sensor port, all information will be retained for sensors
existing in a string prior to adding the new sensor.
Emerson® RPC2™
50
Liebert SN™ Sensor Installation (Optional)
6.5
Confirm the Module Change
After connecting the sensor, you must acknowledge the change via the Web interface before the
sensor may be monitored. You will need the sensor address recorded in 6.2 - Record the Sensor
Address.
First connect a laptop to the Web interface across an existing network connection:
• Login as Administrator
• Click on System tab, then Device Change in the left pane to display a list of PDU components that
have been added or removed but not yet acknowledged.
• The viewing area in the right pane displays the following data.
Element
Description
Module Serial Number
Displays the serial number for each listed module.
This is the sensor address recorded in Section 6.2.
Module Type
Indicates the kind of component—e.g., auxiliary sensor string.
Added
Added indicates a module has been connected to the PDU.
Removed
Removed indicates a module has been disconnected from the PDU.
• Module changes must be acknowledged before remote management is enabled or disabled. Click
the Acknowledge icon (✔) for the changes to take effect.
NOTE
After a module is disconnected from the PDU and the change is acknowledged in the Device
Change page of the System tab, the module’s information is removed from the system.
If that same module is later reinstalled, it must be reconfigured as a new module. First,
acknowledge the addition of the reconnected module in the Module Changes option of the
Control tab, then make other configuration changes as needed.
6.6
Configure the Sensor
After connecting the sensor and acknowledging the change via the Web interface. Make changes as
needed—for example, assign a label for the sensor and configure temperature or humidity thresholds
to trigger warnings and alarms.
Changes must be acknowledged before they will take effect.
51
Emerson® RPC2™
RPC2 Communications Module Icons
7.0
RPC2 COMMUNICATIONS MODULE ICONS
Icon
X
SMS
Emerson® RPC2™
Description
Icon
Description
Save
System OK
Normal Operation
Download
Cancel/Alarm/Unacknowledged Change
Export
Abnormal Operation
Flush
Reset Energy
Mixed State of Receptacles
Enable Receptacle Power
Open CLI
Disable Receptacle Power
Print
Cycle Receptacle Power
Reboot
Edit
Edit Group
Reset to Factory Default Setings
Lock Receptacle
Restore Configuration
Unlock Receptacle
Save Configuration
Blink Receptacle LED
Verify SNMPv3 change
Synchromize Tiime Now
Verify Email
Verify SMS
Edit Group-Receptacle
Start Firmware Update
Edit User
52
Specifications
8.0
SPECIFICATIONS
Table 18
Electrical and physical specifications
Parameter
Limits
Voltage
7-12VDC
Power
4W Maximum
Operating Temperature Range, °F (°C)
41 to 140 (5 to +60)
Ambient Storage Temperature Range, °F (°C)
-4 to 140 (-20 to +60)
Relative Humidity
0% to 95% (non-condensing)
Maximum Operating Altitude, ft. (m)
6560 (2000)
Dimensions, WxDxH, in. (mm)
4.0 x 0.84 x 1.78 (101.6 x 21.3 x 45.2)
Table 19
Communication interfaces and agency approval
Description
Communication Ports
Ethernet
2
IC
EIA562 RS-232
1-Wire
USB
2 (one 10/100/1000Mbps Port; one 10/100Mbps Port)
1 (Interface to the RPC BDM)
1 (Interface to Avocent Appliances)
1 (Interface to Liebert 1-Wire Sensors)
1 (Reserved for Future Applications)
Safety Standards
(Vary by Model and Region)
IEC 60950-1:2005 (Second Edition) + Amendment 1:2009
CSA C22.2 NO. 60950-1-07 (2nd Edition) + Amendment 1:2009
UL 60950-1 (2nd Edition) + Amendment 1:2009
IECEE CB Full Certification Scheme
EMC Standards
(Vary by Model and Region)
FCC Class A, Part 15, Industrial
EN55022:2006+A1:2007, Class A, Industrial
EN55024:1998+A1:2001+A2:2003, Class A, Industrial
IEC61000-3-2:2006, IEC61000-3-3:1995+A1:2001+A1:2005
IEC61000-4-2/3/4/5/6/8/11
Agency Approvals
(Vary by Model and Region)
UL, cUL, CE, BG, CB, RoHS, REACH, WEEE
53
Emerson® RPC2™
Technical Support / Service
Web Site
www.liebert.com
Monitoring
[email protected]
800-222-5877
Outside North America: +00800 1155 4499
Single-Phase UPS & Server Cabinets
[email protected]
800-222-5877
Outside North America: +00800 1155 4499
Three-Phase UPS & Power Systems
800-543-2378
Outside North America: 614-841-6598
Environmental Systems
800-543-2778
Outside the United States: 614-888-0246
Locations
While every precaution has been taken to ensure the accuracy
and completeness of this literature, Liebert Corporation assumes no
responsibility and disclaims all liability for damages resulting from use of
this information or for any errors or omissions.
© 2014 Liebert Corporation
All rights reserved throughout the world. Specifications subject to change
without notice.
® Liebert is a registered trademark of Liebert Corporation.
All names referred to are trademarks
or registered trademarks of their respective owners.
United States
1050 Dearborn Drive
P.O. Box 29186
Columbus, OH 43229
Europe
Via Leonardo Da Vinci 8
Zona Industriale Tognana
35028 Piove Di Sacco (PD) Italy
+39 049 9719 111
Fax: +39 049 5841 257
Asia
29/F, The Orient Square Building
F. Ortigas Jr. Road, Ortigas Center
Pasig City 1605
Philippines
+63 2 687 6615
Fax: +63 2 730 9572
SL-20841_REV0_09-14
Emerson Network Power
Liebert
www.emerson.com
www.EmersonNetworkPower.com