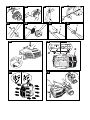
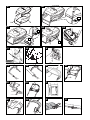
1
PETROL WHEELED ROTAR Y LA WNMOWER
SICHELMÄHER MIT BENZINMOTOR
TONDEUSE THERMIQUE
COR TACÉSPED ROTATIVO DE GASOLINA A RUEDAS
TOSAERBA A SCOPPIO CON RUOTE
BENZINE WIELMAAIER
HJULGÅENDE , BENSINDREVET ROTORGRESSKLIPPER
BENSIINIKÄYTTÖINEN RUOHONLEIKKURI
GRÄSKLIPPARE MED HJUL OCH BENSINMOTOR
BENZINDREVET ROTORPLÆNEKLIPPER PÅ HJUL
Please Note :- This manual covers various products. Please read the user
instructions carefully to fully identify, assemble and use the features that apply to
your petrol wheeled rotary lanwmower
Hinweis: Dieses Handbuch ist für verschiedene Produkte bestimmt. Diese
Betriebsanleitung muß sorgfältig durchgelesen und die einzelnen Bestandteile,
die auf Ihren Rasenmäher zutreffen, identifiziert, zusammengesetzt und
verwendet werden.
Note: Ce manuel couvre plusieurs appareils. Veuillez lire attentivement les
instructions pour identifier, assembler et utiliser les pièces de votre tondeuse
thermique
Nota:- Este manual cubre varios productos. Lea cuidadosamente las
instrucciones del usuario para identificar totalmente, ensamblar y utilizar las
caracteristicas aplicables a su cortacésped rotativo de gasolina a ruedas.
Si prega di voler notare che questo manuale si occupa di vari prodotti. Si prega
di voler leggere con attenzione le istruzioni d’uso per identificare, montare e
usare a fondo le caratteristiche corrispondenti al vostro tosaerba a scoppio
rotativo con ruote.
Let op: In deze handleiding worden verschillende producten beschreven. U dient
de handleiding dan ook in zijn geheel grondig door te lezen voor identificatie,
montage en het juiste gebruik van de voorzieningen die van toepassing zijn op
uw Benzine Wielmaaier.
OBS! Denne håndboken omhandler ulike typer gressklippere. Les
bruksanvisningen nøye, slik at du kan identifisere, montere og bruke den
klipperen du har kjøpt.
Huom: Tämä käyttöohje kattaa useita tuotteita. Lue ohje huolella, jotta varmasti
tunnistat oman koneesi, osaat koota sen ja voit hyvin käyttää leikkurisi
ominaisuuksia hyódyesesi.
OBS: Denna handbok behandlar olika produkter. Läs bruksanvisningen
omsorgsfullt så att du har fullt klart för dig vilken maskin det gäller, hur du sätter
samman den och hur du använder de olika funktionerna på din gräsklippare med
hjul och bensinmotor.
Bemærk: Denne manual gælder for flere forskellige produkter. Læs
brugsvejledningen nøje for at identificere, samle og anvende de enheder, som er
relevante for Deres benzindrevne rotorplæneklipper.
A1
A2
C1
C2
B1
B2
D
E
1
1
F1
F2
B
A
F3
F4
G
H1
1
A
2
3
H2
H3
H4
A
B
A
J1
J2
K
L2
M
Tecumseh
Vantage
L1
2
N
1
2
1
2
1
O1
O2
Q1
Q2
3
P
B
A
R
S
T1
T2
T3
V4
V5
V6
W1
W2
X1
X2
X3
'0'
Y
3
2
Z2
1
Z3
Z4
V7
SAFETY PRECAUTIONS
If not used properly this lawnmower can be dangerous! This lawnmower can cause
serious injury to the operator and others, the warnings and safety instructions must be
followed to ensure reasonable safety and efficiency in using this lawnmower. The
operator is responsible for following the warning and safety instructions in this manual
and on the lawnmower. Never use the mower unless the grassbox or guards provided
by the manufacturer are in the correct position.
Explanation of Symbols on the Petrol Wheeled
Rotary Lawnmower
Warning
Read the user instructions carefully
to make sure you understand all the
controls and what they do.
Always keep the lawnmower on
the ground when mowing. Tilting
or lifting the lawnmower may
cause stones to be thrown out.
Keep bystanders away. Do not mow
whilst people especially children or
pets are in the mowing area.
Beware of severing toes or hands.
Do not put hands or feet near a
rotating blade.
Disconnect the spark plug before
attempting any maintenance,
cleaning or adjustment, or if you
are going to leave the lawnmower
unattended for any period.
STOP
Blade continues to rotate after the
machine is switched off. Wait until all
machine components have completely
stopped before touching them.
General
1. Never allow children or people unfamiliar with
these instructions to use the mower. Local
regulations may restrict the age of the operator.
2. Only use the lawnmower in the manner and for
the functions described in these instructions.
3. Never operate the lawnmower when you are
tired, ill or under the influence of alcohol, drugs
or medicine.
4. The operator or user is responsible for accidents
or hazards occurring to other people or their
property.
Fuel Safety
WARNING - Petrol is highly flammable
- Wear protective clothing when handling any
fuels and lubricants.
- Avoid contact with skin. If affected, wash
liberally with soap and water.
- Remove petrol and engine oil before
transporting the product.
- Store fuel in a cool place in a container
specifically designed for the purpose. In general
plastic containers are unsuitable
ENGLISH - 1
-
refuel outdoors only and do not smoke while
refuelling
- add fuel BEFORE starting the engine. Never
remove the cap of the fuel tank or add fuel while
the engine is running or when the engine is hot
- if petrol is spilled, do not attempt to start the
engine but move the machine away from the
area of spillage and avoid creating any source of
ignition until petrol vapours have dissipated
- replace all fuel tanks and container caps
securely
- move the product away from the fuelling area
before starting
- Fuel should be stored in a cool place away from
naked flames
Preparation
1. Do not mow barefoot or in open sandals. Always
wear suitable clothing, gloves, and stout shoes.
2. The use of ear protection is recommended.
3. Make sure the lawn is clear of sticks, stones,
bones, wire and debris; they could be thrown by
the blade.
4. Before using the machine and after any impact,
check for signs of wear or damage and repair as
necessary.
5. Replace worn or damaged blades together with
their fixings in sets to preserve balance.
6. Have faulty silencers replaced.
Use
1. Do not operate the engine in a confined space
where exhaust fumes (carbon monoxide) can
collect.
2. Use the lawnmower only in daylight or good
artificial light.
3. Avoid operating your lawnmower in wet grass,
where feasible.
4. Take care in wet grass, you may lose your
footing.
5. On slopes, be extra careful of your footing and
wear non-slip footwear.
6. Mow across the face of slopes, never up and
down.
7. Exercise extreme caution when changing
direction on slopes.
8. Mowing on banks and slopes can be dangerous.
Do not mow on banks or steep slopes.
9. Do not walk backwards when mowing, you could
trip. Walk, never run.
10. Never cut grass by pulling the mower towards
you.
11. Release the Operator Presence control (OPC) to
stop the engine before pushing the mower
across surfaces other than grass and when
transporting the lawnmower to and from the area
to be mowed.
12. Never operate the lawnmower with damaged
guards or without guards in place.
SAFETY PRECAUTIONS
13. Do not overspeed the engine or alter governor
settings. Excessive speed is dangerous and
shortens lawnmower life.
14. Disengage all blade and drive clutches before
starting. (page 6)
15. Keep hands and feet away from the cutting
means at all times and especially when
switching on the motor.
16. Do not tilt lawnmower when starting the engine
17. Do not put hands near the grass discharge chute
whilst engine is running.
18. Never pick up or carry a lawnmower while the
engine is running
19. Spark plug wire may be hot - handle with care.
20. Do not attempt any maintenance on your
lawnmower when the engine is hot.
21. Release the Operator Presence Control, to stop
the engine, and wait until the blade has stopped:- before leaving the mower unattended for any
period;
22. Release the Operator Presence Control, to stop
the engine, wait until the blade has stopped,
disconnect the spark plug lead and wait until the
engine has cooled:- before refuelling
- before clearing a blockage;
- before checking, cleaning or working on the
appliance;
- if you hit an object. Do not use your lawnmower
until you are sure that the entire lawnmower is in
a safe operating condition.;
-
if the lawnmower starts to vibrate abnormally.
Check immediately. Excessive vibration can
cause injury.
23. Reduce the throttle setting during engine shut
down and, if the engine is provided with a shutoff valve, turn the fuel off at the conclusion of
mowing.
Maintenance and storage
1. Keep all nuts, bolts and screws tight to be sure
the lawnmower is in safe working condition.
2. Check the grassbox/grassbag frequently for
wear or deterioration.
3. Replace worn or damaged parts for safety.
4. Only use the replacement blade, blade bolt,
spacer and impeller specified for this product.
5. Never store the lawnmower with fuel in the tank
inside a building where fumes can reach an
open flame or spark.
6. Allow the engine to cool before storing in any
enclosure.
7. To reduce fire hazard, keep the engine, silencer,
battery compartment and fuel storage area free
of grass, leaves or excessive grease.
8. If the fuel tank has to be drained, this should be
done outdoors.
9. Be careful during adjustment of the machine to
prevent entrapment of the fingers between the
blade and fixed parts of the machine.
ASSEMBLY INSTRUCTIONS
WHEEL ASSEMBLY (WHERE NECESSARY)
1. Select one of the holes in the mounting plate and
note its position, as all four wheels will need to be
adjusted to the same position (A1).
2. Locate the fixing bolt through hole in hub cap,
wheel and selected hole in mounting plate.
3. Turn the wheel hub in a clockwise direction until
the wheel assembly is securely located to the
deck (A2).
HANDLES
Lower Handles
1. If your product has Cutting Height with levers
(see Adjustment, page 5), ensure the lever is at
the Highest Cut Height before following steps 2 &
3.
2. Insert each side of the lower handle into deck as
shown in Fig B1.
3. Push each side of the handle firmly down until it
is located securely into the deck (B2).
4. Insert screw through the washer and into holes
using a pozidrive screwdriver and tighten fully
into deck as shown in Fig B2.
Upper Handles
1. Fit the upper handle to the lower handle with the
bolts, washers and handle knobs. (C1)
2. Fit the cables to the handles with the cable ties
provided, making sure the cables are not trapped
between the upper and lower handles.
Handle Adjusters fitted to product
1. Adjust handle assembly to the most comfortable
operating position and tighten handle adjuster
knob (C2) on both sides of the product.
ENGLISH - 2
ASSEMBLY INSTRUCTIONS
RECOIL STARTER
• You must release the brake by pulling the OPC
lever to the handle before pulling out the cord.
1. Disconnect the spark plug lead.
2. Pull the OPC lever to release the brake on the engine.
3. Extend the pull cord fully (D1).
4. Locate the cord in the pull cord guide positioned
on handle (E1).
GRASSBOX ASSEMBLY - PLASTIC BOX
Please Note Ensure no gap remains between the safety flap and the grassbox/bag
Where grass collection is not required you can use the lawnmower without the grassbox/bag. Ensure
the safety flap is fully closed
1. Insert the grassbox handle into the top of one of the
grassbox halves. Press firmly down and forward
until the handle clicks into position (F1)
2. Turn the grassbox half over and insert screw into
hole (as illustrated in fig F1) and tighten fully.
3. Position the two grassbox halves together and press
each location point (F2-A) into position without fully
connecting the clips. When the location points are
matched correctly firmly press the grassbox together
until all clips are securely connected.(F2-B)
4. To attach the grassbox to your lawnmower, lift the
safety flap (F3) and make sure the discharge
chute is clean and free from debris.
5. Locate fully assembled grassbox onto 2 location
points at the rear of the deck F4).
6. Locate safety flap onto the top of the grassbox.
Ensure the grassbox is securely located.
• Removal is the reverse procedure.
GRASSBOX ASSEMBLY - FABRIC BAG
G1 - Top
G2 - Fabric Bag
G3 - ‘U’ Frame
1. Insert ‘U’ frame through side sleeves of fabric bag
and then into the hard top, ensuring the small
metal pip (H1-A) is securely located (H2-A).
2. Attach lower sleeve of fabric bag to ‘U’ frame
(H2-B).
3. Starting at front end of the top (H3), insert the
fabric bag rim into the inside edge of the top until
it clicks into each of the location points (H3-A).
Keep inserting the rim around the top until the
fabric bag is secure.
4. Locate fully assembled grassbox onto 2 location
points at the rear of the deck.
5. Locate safety flap onto the top of the grassbox
(H4). Ensure the grassbox is securely located.
• Removal is the reverse procedure
ENGINE NOTES
Oil
1. To fill with oil:a) Remove oil filler cap.
b) Fill to the FULL mark on the dipstick.
2. Use a good quality SAE 30 four stroke oil.
3. Check oil level periodically and after every five
hours of operation.
4. Add oil as necessary to keep the level to the
FULL mark on the dipstick.
5. Change the oil after the first five hours operation
and thereafter every 25 working hours.
6. Always change the oil while the engine is warm but not hot - never attempt any maintenance on a
hot engine.
Petrol
1. Use fresh regular grade lead free petrol.
2. NEVER use leaded petrol.
Using leaded petrol will make the exhause smoke
and cause irreparable damage to engines fitted
with a catalytic converter.
3. Do not fill the fuel tank when the engine is hot.
4. Do not fill the fuel tank while smoking.
5. Do not fill the fuel tank while the engine is running.
6. To avoid introducing dirt into the fuel system,
wipe all grass and dirt from the petrol filler cap
before unscrewing it.
ENGLISH - 3
7. It is recommended that you fill the tank through a
funnel with a filter.
8. Wipe away spillages before starting.
Tecumseh Vantage Only
To fill with oil
• Oil Capacity: 1 pint (0.6 litre)
a. Unscrew the oil filler plug.
b. Remember to pour the oil slowly.
c. Fill to the overflow point in the oil fill hole (J1).
d. Install oil fill plug. Tighten securely.
• Change oil after the first 2 hours of operation and
then after every 25 working hours.
To drain oil.
• Disconnect spark plug and allow engine exhaust
to cool.
• Turn machine on its side with the exhaust
uppermost.
• Remove drain plug (J2).
• Place suitable container under product.
• Turn machine back on its wheels and the oil will
drain into the container.
STARTING - PRIMING
Please Note:- When starting the engine for the first time, fill with oil and petrol as described above in the
Oil and Petrol section.
Priming is usually unnecessary when restarting a warm engine. However, cool weather may require priming
to be repeated.
Briggs and Stratton Engines
1. Advance throttle to FAST or RUN as illustrated in
Throttle Control section.
2. Push primer bulb (K) firmly five times
3. Following instructions in the Use - starting and
stopping section.
4. If engine fails to start after three pulls of the pull cord,
push primer bulb three times and repeat step 3.
Tecumseh Engines
1. Move throttle control to FAST or RUN position
2. Push primer three times. Wait about two seconds
between each push. In cold weather (55oF/13oC or
below) push primer five times.
3. Following instructions in the Use - starting and
stopping section.
• DO NOT USE PRIMER TO RESTART WARM
ENGINE.
Starting engine thereafter
1. Move throttle control (if fitted) to RUN or FAST
position and push primer bulb firmly three times
before starting engine. (if engine stopped because it
ran out of fuel, refuel engine - push primer bulb three
times.
USE
STARTING AND STOPPING
PUSH
Please Note : Your upper handles may look different from those shown but the procedure remains
the same
1. Connect the spark plug lead.
2. If fitted move the throttle control to the FAST
position.
3. Pull the OPC to the handle (L1), this releases the
brake.
4. Pull the recoil starter fully towards you until you feel
the full resistance, return the handle slowly then pull
the handle firmly towards you to its full extent (L2).
5. After the engine has started, allow to run for 30
seconds before commencing to use.
To stop your lawnmower - release the OPC lever
POWERDRIVE
1. Follow the above procedure for Push lawnmowers
2. Forward drive is engaged and disengaged with the
Powerdrive lever at the top of the handle (M1).
3. Releasing the Powerdrive Lever stops the
forward drive automatically.
To stop your lawnmower - release the Powerdrive
lever, then the OPC lever.(M2)
DUAL SPEED
Before starting the engine for the first time, ensure free
movement of the rear wheels by moving the machine
backwards and forwards without operating the powerdrive
lever (N1). Whilst moving backwards and forwards
operate the gear change lever (N2) from low to high
speed, if the rear wheels lock, the cable will require
adjusting. Adjusting is achieved by turning the adjuster
(N3) left or right until the machine can be pulled
backwards without the wheels locking.
KEY START
Key Start Only - During mowing, your engine will recharge the battery
Please note:- Your lawnmower can be started manually by following steps 1-5 in the PUSH section
The Powerdrive may be engaged by following steps 2-3 in the Powerdrive section.
1. Follow steps 1-3 for the Push lawnmower.
2. Turn the key and hold until the engine starts (O1
and O2). The key will return to the original
position when released.
THROTTLE CONTROL -
IF FITTED
3. If the engine fails to start when you turn the key
your battery may need charging.
To stop your lawnmower - release the powerdrive
lever, then the OPC lever.
(P)
1.
represents the FAST (run) position.
2.
represents the SLOW (idle) position.
ENGLISH - 4
USE
STARTING AND STOPPING
BLADE, BRAKE, CLUTCH (BBC)
If you have a BBC model you will be able to keep the engine running while the brake is on.
Forward drive is engaged and disengaged with the Power Drive lever at the top of the handle (Q2-B).
1. Connect the spark plug lead.
2. If fitted move the throttle control to the FAST
position.
3. Pull the recoil starter fully towards you until
you feel the full resistance, return the handle
slowly then pull the handle firmly towards you
to its full extent.
4. After the engine has started, allow to run for
30 seconds before commencing to use.
5. Pull the BBC arm to the handle (Q1).
6. While holding the BBC arm, push forward
BBC control lever until a click is heard (Q2-A).
HOW
TO
7. Release the BBC control lever which will
return to its original position.
8. Releasing the BBC arm will stop the blade
from rotating.
Please note:
Leaving the engine running without the blade
rotating for an extended length of time could
lead to the engine overheating.
To stop the lawnmower - release the
powerdrive lever then the BBC arm. Move
throttle control to stop position.
MOW
Please Note:Do not overload your Lawnmower
When mowing in long thick grass a first cut with the cutting height adjusted to its highest setting, see
Cutting Height, will help reduce motor overload and will help prevent damage to your lawnmower.
1. Start mowing from the outside edge of the lawn,
mowing in strips in alternate directions (R).
2. Mow twice a week in the growing season,
your lawn will suffer if more that one third of its
length is cut at one time and this may also
result in poor collection.
POWERDRIVE CABLE
Ensure the Powerdrive cable is not twisted and runs freely down the handles.
1. If the drive does not engage when the
powerdrive lever is pulled towards the handle
screw adjuster anti-clockwise (S).
2. Screw adjuster in opposite direction if the
powerdrive does not disengage with the
powerdrive lever free (S).
ADJUSTMENT
CUTTING HEIGHT (WITHOUT
LEVERS)
If your lawnmower has wheel hubs as illustrated
in T1, the height of cut is adjusted by following
steps T1- T3.
1. Remove the wheel by turning the wheel hub in
an anticlockwise direction (T1) and relocate in
new hole (T2) turning the wheel hub in a
clockwise direction to tighten (T3). Repeat for
other wheels adjusting to the same position.
CUTTING HEIGHT (WITH LEVERS)
Please Note : Your petrol wheeled rotary may be fitted with a mixture of cutting heights.
Levers Fitted, Lowest Cut Height - (V1)
Levers Fitted, Highest Cut Height - (V2)
Levers Fitted, Semi Central - (V3)
Levers Fitted, Central - (V4)
1. If you have Height of Cut levers (Figs. V), the
height of cut is altered by pulling the
adjustment lever away from the location slots
and moving to the selected position.
2. If your petrol wheeled rotary is fitted with more
than one lever then these must be adjusted to
the same position (Figs V).
ENGLISH - 5
MAINTENANCE
CLEANING
IMPORTANT
Never use water for cleaning your lawnmower. Do not clean with chemical, including petrol, or
solvents - some can destroy critical plastic parts.
• Disconnect spark plug and allow engine
exhaust to cool.
• Turn machine on its side with the exhaust
uppermost.
1. Remove grass from under the deck with a
brush (W1).
2. Using a soft brush - remove grass clippings
from all air intakes, the discharge chute and
the grass box (W2).
3. Wipe over the surface of your lawnmower with
a dry cloth.
CUTTING SYSTEM
Always handle the blade with care - sharp edges could cause injury. USE GLOVES
Renew your metal blade after 50 hours mowing or 2 years whichever is the sooner - regardless of condition.
If the blade is cracked or damaged replace it with a new one.
Please note
If you have a machine fitted with BBC then you must remove both blade bolts (X3)
Removing the Blade
• Disconnect spark plug and allow engine
exhaust to cool.
• Turn machine on its side with the exhaust
uppermost.
1. Use spanner to loosen blade bolt by turning
anti-clockwise (X1).
2. Remove the blade bolt, blade and washer.(X2)
3. Inspect for damage and clean as necessary.
BATTERY SAFETY (KEY
Fitting the Blade
1. Fit the blade to the machine with the sharp
edges pointing away from the machine.
2. Re-fit the blade bolt through the washer
ensuring that the side stamped with ‘0’ on the
washer is facing away from the blade (X2).
3. Hold firmly and tighten blade bolt firmly with a
spanner. Do not over tighten.
START MODELS ONLY)
Safety Procedures when Charging the Battery
1. Check the charger cable regularly for damage
or deterioration due to age.
2. Do not use the lawnmower if the charging
cable is not in good condition.
3. Do not attempt to charge other products with
the charger from this unit.
4. Do not attempt to use this battery with any
other charger.
5. Charging should only be carried out in a safe
location where neither battery nor cord cable
can be trodden on or tripped over.
6. Location should be well-ventilated.
7. During charging, the battery charger
becomes warm. This is normal and means
the charger is operating properly.
8. Do not cover the battery charger with
anything during charging.
9. Ensure that neither the charger nor the
battery are exposed to moisture.
10.Avoid extreme temperatures.
11.The charger will not operate below freezing
point nor above 40oC.
12.Do not short circuit the battery terminals.
General Guidance on Rechargeable Battery
1. Charging time is 24 hours.
2. Under normal usage the battery will be
charged during the running of the engine.
3. To keep in prime condition the battery should
be charged at least once every six months.
4. Exceeding the charging period may shorten
the battery life.
5. Protect electric cable. Never carry the
battery charger by the electric cable only.
6. If after an extended usage period the battery
quickly runs down after a full 24 hour
charging period, a replacement battery is
probably needed.
7. Do not attempt to open the main body casing.
8. Clean only with a dry soft cloth.
9. Never use a damp cloth or flammable liquids
such as petrol, white spirits, thinners etc.
10.Dispose of old batteries safely.
ENGLISH - 6
MAINTENANCE
CHARGING
THE
BATTERY (KEY
START MODELS ONLY)
IMPORTANT:-Replacement batteries will need to be charged before use.
Ensure that neither the charger nor the battery are exposed to moisture
The battery pack can be replaced by unclipping the
battery pack from the battery leads.
How to Charge the Battery
1. Stop your lawnmower.
2. Disconnect the spark plug.
3. Remove the cap from the charging point at the
bottom of the wiring loom.
Y1- Cap, Y2 - Charging Point, Y3 - Wiring Loom.
4. Plug charger lead into connection on battery loom
5. Plug the battery charger into a domestic electric
socket.
6. Charging will then commence.
7. Charge for 24 hours.
CARING
At the End of the Mowing Season
1. Replace blade, bolts, nuts or screws, if necessary.
2. Clean your lawnmower thoroughly. Do not clean
with chemicals, including petrol or solvents - some
can destroy critical plastic parts.
3. Ask your local Service Centre to clean the air
filter thoroughly and carry out any service or
repairs required.
4. Drain engine of oil and petrol.
Storing your Lawnmower
1. Do not store your lawnmower immediately after use.
2. Wait until the engine has cooled to avoid a
potential fire hazard.
3. Clean your lawnmower
4. Store in a cool, dry place where your lawnmower
is protected from damage.
battery from its housing and disconnecting the
8. After charging, disconnect the charger from the
socket and charging point.
9. Replace the cap on the charging point.
10. The unit is now ready for use.
Battery Replacement
1. The battery is located underneath a cover
behind the engine (Z1).
2. Stop the lawnmower and disconnect the spark plug.
3. Remove the screws from the cover (Z2).
4. Remove cover (Z3) to gain access to the battery.
Engine Maintenance Schedule
Follow the hourly or calendar intervals, whichever
occur first. More frequent service is required when
operating in adverse conditions
First 5 hours - Change oil.
Every 5 hours or daily - Check oil level. Clean
finger guard. Clean around silencer.
Every 25 hours or every season - Change oil if
operating under heavy load or high ambient
temperature. Service air cleaner.
Every 50 hours or every season - Change oil.
Inspect spark arrester, if equipped.
Every 100 hours or every season - Clean cooling
system*. Replace spark plug.
* Clean more often under dusty conditions, or when
airborne debris is present or after prolonged operation
cutting tall, dry grass.
FAULT FINDING
Engine Will Not Start
1. Ensure OPC Lever is in the start position.
2. Check that the control lever is in the Fast (run)
position
3. Check that there is sufficient fuel in the tank and
the cap air vent is clear.
4. Remove and dry the spark plug.
5. Petrol may be stale, replace. Once petrol has
been replaced it may take a little time for fresh
petrol to filter through.
6. Check that the blade bolt is tight. A loose bolt
could cause difficult starting.
7. If the engine will still not start, immediately
disconnect the spark plug lead.
CONSULT YOUR LOCAL APPROVED SERVICE
CENTRE.
Engine Will Not Turn Over (Electrostart only)
1. Ensure OPC Lever is in the start position.
2. Battery flat - start your lawnmower manually.
3. If the engine will still not turn over,
immediately disconnect the spark plug lead.
CONSULT YOUR LOCAL APPROVED SERVICE
CENTRE.
Lack of Engine Power and/or Overheating
1. Check that the control lever is in the Fast (run) position.
ENGLISH - 7
2. Disconnect the spark plug lead and allow the
engine to cool down.
3. Clean grass clippings and debris from around the
engine and air inlets and the underside of the
deck including the chute and the fan.
4. Clean the engine air filter (Ask your local Approved
Service Centre to clean the engine air filter thoroughly).
5. Petrol may be stale, replace. Once petrol has
been replaced it may take a little time for fresh
petrol to filter through.
6. If the engine still lacks power and/or is
overheating, immediately disconnect the
spark plug lead.
CONSULT YOUR LOCAL APPROVED SERVICE
CENTRE.
Excessive Vibration
1. Disconnect the spark plug lead.
2. Check that the blade is correctly fitted see page
6.
3. If the blade is damaged or worn replace it with a
new one.
4. If vibration persists, immediately disconnect
the spark plug lead.
CONSULT YOUR LOCAL APPROVED SERVICE
CENTRE.
MAINTENANCE
ENGINE SERVICING & GUARANTEE
The engine fitted to your lawnmower is guaranteed
by the Engine Manufacturer. To obtain further
information contact your dealer as detailed below
Briggs and Stratton
A list of authorised Briggs and Stratton Service
Dealers is given on the back of this book.
Tecumseh
A list of authorised Tecumseh Service Dealers is
given on the back of this book.
SERVICE RECOMMENDATIONS
1. We strongly recommend that your product is
serviced at least every twelve months, more often
in a professional application.
2. Always use genuine Spare Parts.
3. Prepacked spares are available from most
authorised stockists.
4. Your product is identified by a silver and black
product rating label
5. If you have a problem with your machine contact
your local Approved Service Centre ensuring you
have full details of your product as described on
the product rating label.
6. Should it be necessary for work to be carried out
by your Service Centre, it is important to take
your complete petrol wheeled rotary lawnmower.
To obtain service on your product simply telephone
or visit your local Service Centre. Should you
require service under the terms of our guarantee the
Service Centre will require proof of purchase.
All of the centres stock genuine Spare Parts.
NOTE: Our Service Repairers act on their own
behalf and are not empowered to commit or
legally bind Electrolux Outdoor Products in any
manner whatsoever.
GUARANTEE
AND
GUARANTEE POLICY
If any part is found to be defective due to faulty
manufacture within two years of original purchase,
Electrolux Outdoor Products, through its Authorised
Service Repairers will effect the repair or replacement to
the customer free of charge providing:
(a) The fault is reported directly to the Authorised Repairer.
(b) Proof of purchase is provided.
(c) The fault is not caused by misuse, neglect or faulty
adjustment by the user.
(d) The failure has not occurred through fair wear and tear.
(e) The machine has not been serviced or repaired,
taken apart or tampered with by any person not
authorised by Electrolux Outdoor Products.
(f) The machine has not been used for hire.
(g) The machine is owned by the original purchaser.
(h) The machine has not been used outside of the
country for which it was specified.
(i) The machine has not been used commercially.
* This guarantee is additional to, and in no way
diminishes the customers statutory rights.
Failures due to the following are not covered, therefore
it is important that you read the instructions contained in
this Operator's Manual and understand how to operate
and maintain your machine:
Failures not covered by guarantee
* Replacing worn or damaged blades
* Failures as a result of not reporting an initial fault.
* Failures as a result of sudden impact.
* Failures as a result of not using the product in
accordance with the instructions and
recommendations contained in this Operator's Manual.
* Machines used for hire are not covered by this guarantee.
* The following items listed are considered as wearing
parts and their life is dependent on regular
maintenance and are, therefore not normally subject
to a valid warranty claim: Blades, drive belts.
* Caution!
Electrolux Outdoor Products does not accept liability
under the warranty for defects caused in whole or
part, directly or indirectly by the fitting of replacement
parts or additional parts that are not either
manufactured or approved by Electrolux Outdoor
Products, or by the machine having been modified in
any way.
ENVIRONMENTAL INFORMATION
Electrolux Outdoor Products are manufactured under an
Environmental Management System (ISO 14001)
using, where practical, components manufactured in the
most environmentally responsible manner, according to
company procedures, and with the potential for
recycling at the end of the products’ life.
• Packaging is recyclable and plastic components have
been labelled (where practical) for categorised recycling.
• Awareness of the environment must be considered
when disposing of ‘end-of-life’ product.
• If necessary, contact your local authority for disposal
information.
BATTERY DISPOSAL
• The battery should be taken to an Approved Service
Centre or your local Recycling Station.
• Do NOT dispose of used battery with household
waste
• Lead/Acid batteries can be harmful and should be
disposed of through the recognised recycling
facility in accordance with European Regulation
• Do NOT dispose of battery to water.
• Do NOT incinerate
DISPOSAL OF FUELS AND LUBRICATING OILS
• Wear protective clothing when handling any fuels and
lubricants.
• Avoid contact with skin.
• Remove petrol and engine oil before transporting the
product.
• Contact your local authority for information of your
nearest Recycling/Disposal Station.
• Do NOT dispose of used fuels/oils with household
waste
• Waste fuels/oils are harmful, but can be recycled
and should be disposed of through the recognised
facilities.
• Do NOT dispose of used fuels/oils to water.
• Do NOT incinerate
ENGLISH - 8
BELGIQUE/BELGIË
Flymo Belgique/België
Tel: 02 363 0311, Fax: 02 363 0391
ČESKÁ REPUBLIKA
Electrolux, spol. s.r.o., oz Electrolux Outdoor Products,
Dobronická 635, 148 25 Praha 4
Tel: 02/6111 2408-9, Info-linka: 0800/110 220
Internet: www.partner-flymo.cz E-mail: [email protected]
DANMARK
Electrolux Outdoor Products, Flymo/Partner A/S,
Lundtoftegårdsvej 93A, DK 2800 Kgs.Lyngby
Tel: 45 877577, www.flymo-partner.dk
DEUTSCHLAND
Flymo Deutschland
Tel: 097 21 7640, Fax:097 21 764202
ESTONIA
Electrolux Estonia Ltd (Electrolux Eesti AS)
Tel: (372) 6650010
FRANCE
Flymo France SNC
Tel 01 46 67 8141, Fax 01 43 34 2491
FINLAND SUOMI
Flymo Finland Suomi
Tel: 00 39611, Fax: 00 39 612632
ITALIA
McCulloch Italiana s.r.l. - Via Como 72, 23868 Valmadrera
(LECCO) - ITALIA
Tel: 800 017829, Fax: 0341 581671
IRELAND
Flymo Ireland
Tel: 01 4565222, Fax: 01 4568551
MAGYARORSZÁG
Electrolux Lehel Kft
Tel: 00 36 1 251 41 47
NORGE
Flymo/Partner, div. av Electrolux Motor a.s.
Tel: 69 10 47 90
NEDERLAND
Flymo Nederland
Tel: 0172-468322, Fax: 0172-468219
ÖSTERREICH
HUSQVARNA Zentralwerkstätte, Industriezeile 36, 4020 LINZ,
Tel: 0732 770101-60, Fax: 0732 795922
POLSKA
Electrolux Poland Sp. z.o.o. Husqvarna, 01-612 Warszawa
Myslowicka 10/2
Tel:- (22) 8332949
SLOVENIJA
SKANTEH d.o.o.
Tel:- (061) 133 70 68, Fax:-(061) 133 70 68
SLOVENSKA
Electrolux Slovakia s.r.o., Borova Sihot 211, 033 01 Lipt. Hradok
Tel: 044 522 14 19, Fax: 044 522 14 18, www.flymo-partner.sk
SCHWEIZ/SUISSE/SUIZZERA
Flymo Schweiz/Suisse/Suizzera
Tel 062 889 93 50 / 889 94 25, Fax 062 889 93 60 / 889 94 35
SVERIGE
Electrolux Outdoor Products, Sverige
Tel: 036 – 14 67 00, Fax: 036 – 14 60 70
UNITED KINGDOM
Electrolux Outdoor Products United Kingdom
Tel: 01325 300303, Fax: 01325 310339
Tecumseh
Briggs & Stratton
UK - United Kingdom
Tecumseh UK Ltd
152 Commercial Road
Staines
Middlesex
TX18 2QP
England
Tel: (44) 1784 460684
Fax: (44) 1784 453563
D - Germany
Tecumseh Deutschland GmbH
Virmondstr. 137
47887 Willich-Neersen
Germany
Tel: (49) 21 56 9588 0
Fax: (49) 21 56 9588 18
F - France
Tecumseh Service France
Parc des Bellevues,
Immeuble “Le Minnesota”
Allée Rosa Luxembourg
B.P. 242 - ERAGNY SUR OISE
95615 CERGY-POTOISE CEDEX
France
Tel: (33) 1 343 04484
Fax: (33) 1 346 44415
E - Spain
Tecna S.A. de Motores y Repuestos
C/Ciclón, 20
P. Ind. San Jose de Valderas II
28918 Leganés (Madrid)
Tel: (34) 91 611 0461
Fax: (34) 91 611 2953
I - Italy
Tecumseh Europa S.p.A.
Via Delle Cacce 99
10135 Torino
Italy
Tel: (39) 011 391 8411
Fax: (39) 011 391 0031
NL - Netherlands
OSMA
Ultrechtseweg 117
6871 DR Renkum
Netherlands
Tel: (31) 31 731 9008
Fax: (31) 31 731 8762
N - Norway
Bergsto Motor A/S
Kongsgård
4602 Kristiansand S
Norway
Tel: (47) 380 96028
Fax: (47) 380 95031
SF - Finland
Oy Inter-Motor Ab
Laivanrakentajantie 2
00981 Helsinki
Finland
Tel: (358) 9 341 2570
Fax: (358) 9 341 2580
S - Sweden
Swed Motor AB
Rärvägen 6
137-21 Västerhaninge
Sweden
Tel: (46) 8 500 12140
Fax: (46) 8 500 26800
DK - Denmark
Elano-Odense A/S
Holkebjergvej 67
DK-5250 Odense SV
Denmark
Tel: (45) 66 175253
Fax: (45) 66 170153
UK - United Kingdom
Briggs & Stratton U.K. Limited
Unit 10 Ashton Gate
Ashton Road, Harrold Hill
Romford, Essex, RM3 8UF
England
Tel: (44) 1708 335640, 335620,
335600
Fax: (44) 1708 335641, 335621,
335601
D - Germany
Briggs & Stratton Germany GmbH
Schwetziner Str. 19
D-68519 Viernheim
Tel: (49) 6204 60010
Fax: (49) 6204 600180/600181
F - France
Briggs & Stratton France, S.A.R.L.
B.P. 8
78184 St. Quentin en Yvelines Cedex
43, avenue des trois Peuples
78180 Montigny-le-Bretonneux
Tel: (33) 1 3012 5700
Fax: (33) 1 3012 5729
E - Spain
Industrias Fita, S.A.
Apartado 177
Passeig del Cementiri s/n
E-17600 Figueras
Tel: (34) 972 500504
Fax: (34) 972 509372
I - Italy
RAMA MOTORI S.p.A.
Via Agnoletti (Zona Annonaria), 8
I-42100 Reggio Emilia
Tel: (39) 522 930 711
Fax: (39) 522 930 730
NL - Netherlands
Motor Snelco, B.V.
Bedrijfsweg 130
NL-8304 AA Emmeloord
Tel: (31) 527 615151
Fax: (31) 527 699121
N - Norway
Safe Motor A/S
Olaf Schous Vei 6
P.O. Box 6569 Rodelokka
N-0501, Oslo
Tel: (47) 23 23 48 20
Fax: (47) 22 385832
SF - Finland
Oy. Promotor AB
Sahaajankatu 41
SF-00880 Helsinki
P.O. Box 32
SF 00880 Helsinki
Tel: (358) 9 755 4633
Fax: (358) 9 755 4025
S - Sweden
Briggs & Stratton Sweden AB
Ellipsvägen 11-13
S-141 70 Huddinge
P.O. Box 151
S-127 23 Skaerholmen
Tel: (46) 8 449 5630
Fax: (46) 8 449 5631
DK - Denmark
Ketner Teknik/Axel Ketner
Brødby A/S
Vibeholms Allé 15
Postbox 43
Brødby
Tel: (45) 43 27 11 66
Fax: (45) 43 96 10 14
Electrolux Outdoor Products
Aycliffe Industrial Park
NEWTON AYCLIFFE
Co.Durham DL5 6UP
ENGLAND
Telephone - (00) 44 1325 300303 Fax - (00) 44 1325 310339
UK Telephone - 01325 300303 Fax - 01325 310339
Our policy of continuous improvement means that the specification of products may be altered from time to time without prior notice.
Electrolux Outdoor Products manufactures products for a number of well known brands under various registered patents, designs and
trademarks in several countries.
© Electrolux Outdoor Products Ltd. Registered Office, Electrolux Works, Oakley Road, Luton LU4 9QQ
Registered number 974979 England
The Electrolux Group. The world’s No.1 choice.
The Electrolux Group is the world’s largest producer of powered appliances for kitchen, cleaning and outdoor use. More than 55 million
Electrolux Group products (such as refrigerators, cookers, washing machines, vacuum cleaners, chain saws and lawn mowers) are
sold each year to a value of approx. USD 14 billion in more than 150 countries around the world.
5119285-02(02/02)