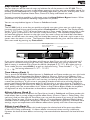
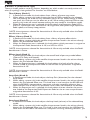
1
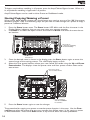
Integrated
Effects Switching
System
Owner’s
Manual
1
If you want to dispose this product, do not mix it with general household waste. There is a
separate collection system for used electronic products in accordance with legislation that
requires proper treatment, recovery and recycling.
Private household in the 25 member states of the EU, in Switzerland and Norway may return their used
electronic products free of charge to designated collection facilities or to a retailer (if you purchase a similar
new one).
For Countries not mentioned above, please contact your local authorities for a correct method of disposal.
By doing so you will ensure that your disposed product undergoes the necessary treatment, recovery and
recycling and thus prevent potential negative effects on the environment and human health.
Disclaimer: DigiTech, X-Edit, Production Modeling, Grunge, Death Metal, Jimi Hendrix™ Artist Series Pedal, DOD, Gonkulator,
DigiTech Whammy, Multi Chorus, Auto Ya,YaYa, Synth Talk, Lexicon, Johnson Amplification and AudioDNA are trademarks of
Harman International Industries Inc. *Other product names modeled in this product are trademarks of their respective companies that do not endorse and are not associated or affiliated with DigiTech or Harman International Industries, Inc. ADA Flanger,
Arbiter Fuzz Face, Boss CE-2 Chorus, Boss CS-2, Boss DM-2, Boss DS-1, Boss Metal Zone, Boss OC-2 Octaver, Boss OD-1,
Boss SD-1, Celestion, Carvin Legacy, Demeter Fuzzulator, Dunlop Cry Baby, EH Big Muff ?, EH Electric Mistress, EH Small Clone,
EH SmallStone, EMT 240 Plate, Fender Blackface Deluxe Reverb, Fender Blackface Twin Reverb, Fender Blonde Bassman, Fender
Brownface Bassman, Fender Opto Tremolo, Fender Tweed Bassman, Fender Tweed Champ, Fender Tweed Deluxe, Fender Twin
Reverb, Fulltone OCD Overdrive, Gibson GA-40, Guyatone Overdrive, Hiwatt, Ibanez Tube Screamer, Jensen Blue Backs, Laney
Supergroup, Maestro EP-2, Marshall, Marshall JTM-45, Marshall JumpPanel, Marshall Master Volume, Marshall Super
Lead, Matchless, Matchless Chieftain, Mesa/Boogie, .22 Caliber, Mark II, Mark IV, Dual Rectifier, Triple Rectifier, MXR, MXR
Distortion +, MXR DynaComp, MXR Flanger, MXR Phase 100, Orange OR120, Peavey 5150, ProCo Rat, Randall HT-100, Roger
Mayer Octavia, Roland JC-120, Soldano, Sunn 100S, TC Electronic Chorus, Unicord Uni-Vibe,VHT Amplification,Voodoo Labs
Analog Chorus,Voodoo Labs Sparkle Drive,Vox,Vox Bias Tremolo,Vox Clyde McCoy Wah, and Vox Top Boost are trademarks or
trade names of other manufacturers and were used merely to identify products whose sounds were reviewed in the creation of
this product. All other trademarks are the property of their respective holders. ©2008 Harman International Industries, Inc. All
Rights Reserved.
Table of Contents
Section One - Introduction.............1
Getting Acquainted...........................................................1
Included Items....................................................................1
About the RP1000............................................................1
Preset Mode and Pedalboard Mode........................1
Bypass ...........................................................................1
Amp/Cabinet Bypass .................................................2
Tuner..............................................................................2
Tone Library (Knob 1)...............................................2
Effects Library (Knob 2)............................................2
Effects Level (Knob 3)................................................2
Amp Gain/Effect Parameter (Knob 4)....................3
Amp Level/Effect Parameter (Knob 5)...................3
Master Level (Knob 6)...............................................3
X-EditTM Editor/Librarian...........................................3
Presets...........................................................................3
Create Your Sound in Three Easy Steps.......................3
A Guided Tour of the RP1000........................................4
Front Panel...................................................................4
Rear Panel.....................................................................7
Getting Started..................................................................8
Making Connections...................................................8
Amp/Cabinet Bypass..................................................8
Amp Loop.....................................................................8
Stomp Loop..................................................................8
Connection Setups.....................................................9
Applying Power ..........................................................14
Section Two - Editing Functions......14
Preset Mode and Pedalboard Mode.............................14
Editing/Creating Presets..................................................15
Editing Amp/Cabinet Models..........................................15
Amp/Cabinet Bypass........................................................15
Storing/Copying/Naming a Preset.................................16
Section Three - Effects and
Parameters.......................................17
About the Effects..............................................................17
Effect Definitions...............................................................17
Wah................................................................................17
Compressor ................................................................17
Distortion.....................................................................18
Amplifier........................................................................20
EQ...................................................................................22
Noise Gate/Auto Swell..............................................22
Chorus/FX....................................................................22
Chorus.....................................................................22
Flanger.....................................................................23
Phaser......................................................................24
Vibrato.....................................................................24
Rotary Speaker......................................................24
VibroPan..................................................................25
Unicord Uni-VibeTM..............................................25
Tremolo/Panner.....................................................25
Envelope Filter.......................................................26
DOD FX25.............................................................26
AutoYa™.................................................................26
YaYa™......................................................................26
SynthTalkTM.............................................................26
Step Filter................................................................27
Sample Hold...........................................................27
DigiTech Whammy®..............................................27
Pitch Shift................................................................28
Detune.....................................................................28
Harmony Pitch Shifting .......................................28
Boss® OC-2 OctaverTM........................................29
Delay .............................................................................29
Reverb ..........................................................................30
Section Four - Other Functions......31
Expression Pedal...............................................................31
Footswitch Assign.............................................................31
LFOs.....................................................................................31
Wah Min/Max.....................................................................32
Expression Update............................................................32
Factory Reset.....................................................................32
Expression Pedal Calibration..........................................32
Preset Level........................................................................33
Bypass..................................................................................33
Looper.................................................................................33
Tuner....................................................................................35
USB Setup...........................................................................35
Section Five - RP1000 Effects
Descriptions . ...................................37
Wahs....................................................................................37
Compressors.....................................................................37
Noise Gates.......................................................................37
EQ........................................................................................38
Chorus Stompbox Models..............................................38
Flanger.................................................................................38
Phasers................................................................................39
Pitch.....................................................................................39
Vibrato / Rotary................................................................40
Tremolo...............................................................................40
Envelope / Special..............................................................41
Delays..................................................................................41
Reverbs................................................................................42
Distortions.........................................................................42
Amps....................................................................................44
Cabinets..............................................................................48
Section Six - Appendix.....................50
Specifications......................................................................50
Tone Library.......................................................................51
Effects Library....................................................................51
Warranty
We at DigiTech® are very proud of our products and back up each one we sell with the following
warranty:
1. The warranty registration card must be mailed within ten days after purchase date to validate this
warranty.
2. DigiTech warrants this product, when used solely within the U.S., to be free from defects in materials and workmanship
under normal use and service.
3. DigiTech liability under this warranty is limited to repairing or replacing defective materials that show evidence of defect,
provided the product is returned to DigiTech WITH RETURN AUTHORIZATION, where all parts and labor will be
covered up to a period of one year. A Return Authorization number may be obtained from DigiTech by telephone. The
company shall not be liable for any consequential damage as a result of the product’s use in any circuit or assembly.
4. Proof-of-purchase is considered to be the burden of the consumer.
5. DigiTech reserves the right to make changes in design, or make additions to, or improvements upon this product without
incurring any obligation to install the same on products previously manufactured.
6. The consumer forfeits the benefits of this warranty if the product’s main assembly is opened and tampered with by anyone other than a certified DigiTech technician or, if the product is used with AC voltages outside of the range suggested
by the manufacturer.
7. The foregoing is in lieu of all other warranties, expressed or implied, and DigiTech neither assumes nor authorizes any
person to assume any obligation or liability in connection with the sale of this product. In no event shall DigiTech or
its dealers be liable for special or consequential damages or from any delay in the performance of this warranty due to
causes beyond their control.
NOTE: The information contained in this manual is subject to change at any time without notification. Some information
contained in this manual may also be inaccurate due to undocumented changes in the product or operating system since
this version of the manual was completed. The information contained in this version of the owner’s manual supersedes all
previous versions.
Declaration of Conformity
Manufacturer’s Name:
Manufacturer’s Address:
declares that the product:
Product name:
Product option:
DigiTech
8760 S. Sandy Parkway
Sandy, Utah 84070, USA
RP1000
all (requires Class II power adapter that conforms to the requirements of
EN60065, EN60742, or equivalent.)
conforms to the following Product Specifications:
Safety:
EMC:
IEC 60065 (7th ed. 2001)
EN 55013 (2001 + A1)
EN 55020 (1998)
Supplementary Information:
The product herewith complies with the requirements of the Low Voltage Directive 2006/95/EC and the EMC
Directive 2004/108/EC.
Vice-President of Engineering
8760 S. Sandy Parkway
Sandy, Utah 84070, USA
Date: December 15, 2008
European Contact:
Your local DigiTech Sales and Service Office or
Harman Music Group
8760 South Sandy Parkway
Sandy, Utah 84070 USA
Ph: (801) 568-8800
Fax: (801) 568-7583
Section One - Introduction
Getting Acquainted
Congratulations on your purchase of the RP1000. The RP1000 Integrated Effects Switching
System takes your tone to the next level giving you the control that you need over your
external amp and stompboxes while packing in the power of a multi-effects processor. Use the
RP1000 to control and spice up your tone without any compromises. The RP1000’s vast pallet
of stompboxes, effects, amps and cabinets allow you to get any sound imaginable and then some.
Easily dial up a sound using the Tone and Effects Library knobs. You will appreciate the tone and
dynamic interaction of each of the amps, stompboxes, and effects with your system. Add USB
support for computer recording and you have the RP1000: the key to unlock your creative
potential.
Included Items
Before you get started, please make sure that these things are in the box:
• RP1000
• Cubase LE 4 DVD
• PS0913B Power Supply
• Warranty Card
We took a lot of care when we put this product together. Everything should be included and in
perfect working order. If anything’s missing, contact the factory at once. Help us get to know
you by filling out the warranty card and sending it to us, or register online at www.digitech.com.
You’ll be glad you did if you have any questions about your RP1000 down the road.
About the RP1000
Do yourself a favor and read the next couple pages before you start playing with your new
RP1000. It’ll help you get the most out of it without having to read the whole manual.
Preset Mode and Pedalboard Mode
There are two different ways to use the footswitches with the presets: Preset Mode and Pedalboard Mode. Push the Pedalboard button (just to the right of the knobs below the Display) to
toggle between these two modes.
Preset Mode
In Preset mode (Pedalboard button is off), each of the 10 numbered footswitches loads a
preset, and you can’t turn individual models on or off with the footswitches. The Up/Down
footswitches select banks of 10 presets.
Pedalboard Mode
In Pedalboard mode, footswitches 1-5 select presets, and footswitches 6-10 act like pedals
on a pedalboard. That means you can turn the distortion, chorus, etc. on and off within each
preset. The first time you power up the RP1000 when you take it out of the box (or after
doing a factory restore), it’s in Pedalboard mode.
The RP1000 remembers which mode you’re in when you turn it off, and keeps it in that
mode when you turn it back on.
Bypass
You can bypass all the internal amps and effects in the RP1000 by stepping on the currently
active preset’s footswitch. In bypass mode, your guitar’s clean signal comes through without any
processing. To exit bypass mode and re-activate the preset you were in, just step the same footswitch again. To exit bypass mode and activate another preset, step on a different footswitch.
If you’re using the Amp Loop and/or the Stomp Loop when you go into bypass mode, any devices connected to the Amp Loop and Stomp Loop are still active. So you can use bypass to kill
all the effects in the RP1000 without bypassing your amp/preamp connected to the Amp Loop.
1
Amp/Cabinet Bypass
You can also turn off the internal amps and cabinets for all the presets in the RP1000. This is
really useful when you just want to add effects processing to your own core amplifier sound. So
basically the RP1000 becomes a straight multi-effects box when you do this, and only Wah, Compressor, Distortion, Equalizer, Noise Gate, Chorus/FX, Delay, and Reverb are used.
To bypass amp/cabinet modeling in all presets, press the Amp/Cabinet Bypass button. When
that button is lit, amp/cabinet modeling is bypassed in all presets.
You can use amp/cabinet bypass in Preset or Pedalboard mode.
Tuner
The RP1000’s built-in tuner lets you quickly and easily tune your guitar, even on a dark stage.
Just press and hold the currently active preset’s Footswitch for 2 seconds. The Display briefly
shows bypass then tuner to let you know you’re in Tuner mode. To begin tuning, play a note
on your guitar (a harmonic at the 12th fret usually works best). The Numeric Display shows
the note being played. Arrows on the right mean the note is sharp and should be tuned down.
Arrows on the left mean the note is flat and should be tuned up. A left and a right arrow in the
center mean the note is in tune. The Expression Pedal controls the guitar volume while tuning.
Exit tuner mode by pressing any Footswitch.
Left and right arrows
in the center indicate
note is in tune
Note being played
A
If you use an alternate tuning, like down a half-step or drop D, you can still use the tuner as if
you were in standard tuning. Just go into Tuner mode and change your tuning reference. The
default setting is standard tuning, where A=440 Hz (displayed as A=440). But when you’re in
Tuner mode, you can rotate Knob 1 to pick an alternate tuning. These include A = A , A =
G, A = G , and tuning references A=427 - A=453.
Tone Library (Knob 1)
This is one of the RP1000’s coolest features. In Pedalboard and Preset modes, you turn this knob
to pick from a list of amp tones like Blues or Metal or Country. Each one has different Compressor, Distortion, Amp/Cabinet type, EQ, and Noise Gate settings, but you don’t have to mess
with any of those settings if you don’t want to, they just load up automatically when you pick
a tone from the library. If you’re into it, you can go ahead and refine the sound by editing the
preset (see Editing/Creating Presets on page 15), but the thing is you don’t have to. The Tone Library doesn’t change the Chorus/FX, Delay or Reverb, so you can experiment with different amp
styles quickly with the current effect chain. When in Amp/Cabinet Bypass Mode, the amplifiers
are bypassed, so only the distortion and overdrive stompboxes are providing distortion.
Effects Library (Knob 2)
This knob works hand-in-hand with the Tone Library knob. In Pedalboard and Preset modes, this
knob selects from a variety of post-amplifier effect chains (Chorus, Chorus + Delay, Delay + Reverb, etc.). And just like with the Tone library, you can edit the preset if you want to (see Editing/
Creating Presets on page 15), but you don’t have to. Changing between different Effects Library
selections doesn’t change the Compressor, Distortion, Amp/Cabinet types, EQ, and Noise Gate
settings, so you can experiment with different effect chains quickly with the current amp tone.
Effects Level (Knob 3)
In Pedalboard and Preset modes, this knob changes the relative level of the post-amp effects
(Chorus/FX, Delay, and Reverb). It’s like an effects mix control, where turning it clockwise
increases the level of these effects and turning it counter-clockwise decreases the level of these
effects.
2
Amp Gain/Effect Parameter (Knob 4)
This knob adjusts the Gain (distortion) for the selected Amp (not available for Acoustic) and is
also used to adjust parameters of other effects in the matrix. The amplifier and cabinets can’t be
adjusted when the Amp/Cabinet Bypass button is enabled.
Amp Level/Effect Parameter (Knob 5)
This knob adjusts the Level (volume) of the selected amp and adjusts other effect parameters in
the matrix. Amp Level can’t be adjusted when the Amp/Cabinet Bypass button is enabled.
Master Level (Knob 6)
This knob controls the overall output volume of all of the RP1000’s presets and adjusts other
effect parameters in the matrix.
X-EditTM Editor/Librarian
You can edit your RP1000 with your computer, using the X-EditTM Editor/Librarian, which you
can download from www.digitech.com.
Presets
Presets are named and numbered locations of programmed sounds which reside in the RP1000
(in case you didn’t know). You load Presets with the Footswitches (see Preset Mode and Pedalboard Mode on page 14 for more information about that). The active effects in each preset are
indicated by lighted LEDs in the Effect Matrix, and if you’re in Pedalboard mode, the LEDs over
footswitches 6-10 show you which of those effects are on or off. The RP1000 comes with 100
User presets (1-00) and 100 Factory presets (F1-F00). You can save changes to the User presets,
but not the Factory presets. From the factory, the 100 User presets are exact duplicates of the
100 Factory presets. That way you can create your own presets without losing the sounds that
came with the RP1000.
Create Your Sound in Three Easy Steps
1.
Tone Library
Select one of 40 different tones from rock, metal, blues, country, and
more. The tones consist of a combination of Compressor, Distortion
Stompbox, Amplifier/Cabinet, EQ, and Noise Gate.
For a complete list of available tones, see page 51.
2.
Effects Library
Select one of 40 different effects chains. The effects consist of a combination of Chorus/FX, Delay, and Reverb.
For a complete list of available effects chains, see page 51.
3.
Effects Level
Adjust the overall level of the post-amp effects to your liking.
To make further edits, refer to page 15. To store the preset, refer to page 16.
3
A Guided Tour of the RP1000
Front Panel
1
2
345 6
7
8 9 10
11
12
13
1. Tap Tempo Footswitch
Step on this footswitch repeatedly in time with your music to get the delay to sync up with the
music’s rhythm.
2. Stomp Loop Footswitch
This footswitch enables and disables the mono stompbox effects loop.
3. Edit Up/Down Buttons
These buttons navigate up and down the rows of the matrix for editing presets.
4. Amp Loop Button
This button enables and disables the external Amp/Preamp loop. The button lights when the
Amp/Preamp loop is active. If no connections are made to the loop, NO loop appears in the
display briefly when the button is engaged or disengaged.
5. Stomp Loop LED
This LED lights when the Stomp Loop is activated using the Stomp Loop footswitch. When
the LED is off, the Stomp Loop is inactive. Note that the Stomp Loop button’s LED turns red
when its position is pre amp model and amp loop, and green when it’s post amp model and amp
loop.
6. Effects Matrix
The matrix provides information regarding the current preset and parameter edit functions. In
Performance mode, the LEDs running down the left side of the Matrix provide a visual indication
of which effects are in use for the selected preset. While editing a preset, the LEDs indicate that
the Effect row is selected for editing.
4
7. Displays
The RP1000 has two sets of displays. The 8 character alpha-numeric display shows preset names,
bank names, and effects names while editing. The 2 character numeric display shows preset
numbers and effects parameters while editing and shows the note being tuned when the Tuner is
enabled.
8. Knobs 1-6 (From left to right)
These six knobs perform various functions, depending on which mode is currently active and
what (if anything) is being edited. The functions are listed below:
Tone Library (Knob 1)
1. In Performance mode, this knob selects from a library of preset amp tones.
2. When editing a preset, this knob changes the Amp or Effect model for the selected
row and pressing the knob will turn the effect row on or off. When editing an Effect
row, press this knob to turn the effect on or off. When editing the Amp/Cabinet row,
pressing this knob will switch between editing the amp model or the cabinet model.
3. When the Expression row is selected, this knob selects the Expression Pedal, LFO 1,
and LFO 2 parameter links, footswitch 6-10 assignments, Wah pedal range, Expression
Pedal update, and Stomp Loop position.
*NOTE: the assignments selected for footswitches 6-10 are only available when the Pedalboard button is active.
Effects Library (Knob 2)
1. In Performance mode, this knob selects from a library of preset effect chains.
2. When editing a preset, this knob modifies the parameter listed in the column directly
above it for the selected Effect row.
3. When the Expression row is selected, this knob selects which parameter is assigned to
the Expression Pedal, footswitches 6-10*, and LFO1or LFO2.
*NOTE: the assignments selected for footswitches 6-10 are only available when the Pedalboard button is active.
Effects Level (Knob 3)
1. In Performance mode, this knob adjusts the overall level of post amp model effects
(Chorus/FX, Delay, and Reverb).
2. When editing a preset, this knob modifies the parameter listed in the column directly
above it for the selected Effect row.
3. When the Expression row is selected, this knob selects the heel value for the parameter linked to the Expression Pedal or the off state are parameters assigned to
footswitches 6-10*.
*NOTE: the assignments selected for footswitches 6-10 are only available when the Pedalboard button is active.
Amp Gain (Knob 4)
1. In Performance mode, this knob adjusts the Amp Gain (distortion) for the selected
Amp model.
2. When editing a preset, this knob modifies the parameter listed in the column directly
above it for the selected Effect row. This knob also is used to adjust the RP/USB mix
when the RP1000 is connected to a computer and using recording software. Just
select the Wah row to adjust this parameter when USB is connected to the RP1000.
3. When the Expression row is selected, this knob selects the toe value for the parameter linked to the Expression Pedal Expression Pedal or the on state are parameters
assigned to footswitches 6-10*.
*NOTE: the assignments selected for footswitches 6-10 are only available when the Pedalboard button is active.
Amp Level (Knob 5)
1. In Performance mode, this knob adjusts the Amp Level (volume) of the selected Amp
model.
2. When editing a preset, this knob modifies the parameter listed in the column directly
above it for the selected Effect row. This knob is also used to adjust the USB Record
Level when the RP1000 is connected to a computer and using recording software. Just
5
3.
select the Wah row to adjust this parameter when USB is connected to the RP1000.
When the Expression row is selected, this knob selects the LFO waveform. LFO 1or
LFO 2 must first be selected with Knob 1 for this parameter to be available.
Master Volume (Knob 6)
1. In Performance mode, this knob adjusts the output level of the RP1000.
2. When editing a preset, this knob modifies the parameter listed in the column directly
above it for the selected Effect row.
3. When the Expression row is selected, this knob sets the LFO speed. LFO 1or LFO 2
must first be selected with Knob 1 for this parameter to be available.
9. Looper Button
This button enables and disables the RP1000’s loop phrase sampler. The Looper can be used
at any time during RP1000 operation and offers the ability to create mono loop phrases of up
to 20 seconds in length. Three LEDs (Record/Play/Overdub) indicate the status of the Looper
during use. While the Looper is active, the Bank Up/Down footswitches change function to
control the Looper record, overdub, playback, and loop clear functions.
10. System Buttons
There are three system buttons: AMP/CABINET BYPASS, PEDALBOARD, and STORE.
1. Amp/Cabinet Bypass – When this button is lit, amp and cabinet modeling is bypassed in all RP1000 presets
2. Pedalboard – When this button is lit, the 5 numbered footswitches turn the effects
labeled above them on and off. When the button is not lit, these footswitches select
the five presets in the active bank.
3. Store – Press this button to begin the store/copy procedure.
11. Bank Up/Down Footswitches
These Up/Down footswitches select preset banks. When Pedalboard mode is active, there are
20 banks of 5 presets. When Preset mode is active (Pedalboard button is disabled) there are 10
banks of 10 presets. When the Looper is active, these footswitches control Record, Playback,
Overdub, Stop, and Loop Clear functions. Refer to page 33 for more information on using the
Looper.
12. Expression Pedal
The Expression Pedal provides real-time control of the RP1000’s Volume, Wah, or any assigned
effect parameter. Almost every parameter is available for Expression Pedal control. The Expression Pedal is equipped with a V-switch that turns on and controls the Wah effect when you apply
extra pressure to the toe.
13. 1-10 / Effects Footswitches
In Preset Mode, these 10 footswitches select between 10 different presets in the active bank
(10 banks of 10 presets). The footswitch LED will light to indicate which preset is active. When
Pedalboard mode is active, footswitches 1-5 will select between 5 different presets in the active
bank (20 banks of 5 presets) while footswitches 6-10 are used to turn Compressor, Distortion,
Chorus/FX, Delay, and Reverb effects on and off. Effects that are on will have their footswitch
LED lit.
6
Rear Panel
1 2 3 4 5 6 7 8 9 10 11 12 13
1. Amp Loop Ground Lift
This Ground Lift switch can be enabled to help prevent unwanted hum or buzz caused by ground
loops between the RP1000 and external amplifiers/preamps.
2. Input
High impedance 1/4” instrument input.
3. Amp Loop
These 1/4” send and return jacks let you connect to an external preamp or amplifier and use
the tone from these components instead of the internal amplifiers of the RP1000. A Ground Lift
switch is provided and can be enabled to help prevent unwanted hum or buzz caused by ground
loops between the RP1000 and external amplfiers/preamps.
4. Stomp Loop
These 1/4” send and return jacks let you connect to an external stompbox effect pedal into one
of 2 different positions of the RP1000 effects path.
5. Ground Lift Switch
This switch lifts pin 1 from the XLR Mixer Outputs from all ground references. This may be necessary to help solve troublesome ground loops that can cause hum in the system, especially when
both XLR and 1/4” outputs are used together.
6. Amp/Mixer Switch
This switch optimizes the 1/4” Line Outputs for connecting to either a guitar amp system or
directly into the inputs of a mixer.
7. 1/4” Line Outputs
These 1/4” outputs can be plugged into a guitar amplifier or into inputs of a mixer or recording
device. The front panel Output Level controls the level of these outputs.
8. XLR Mixer Outputs
The XLR outputs are designed for connecting to a recording device or mixing console. These
outputs always have speaker compensation active as they are intended to be sent into full a range
audio system.
9. Headphone Output
Connect headphones here. Output optimized for use with headphones having 60 Ohms of
impedance or less.
10. Looper Control Input
This 1/4” TRS jack allow the optional FS3X footswitch to be connected for remote control of the
RP1000’s Looper feature.
11. USB Jack
The USB jack connects the RP1000 to a computer and provides two purposes. First it is used to
provide communication between the RP1000 and the X-Edit editor librarian software. Second,
it is used to stream four channels of audio (2 up / 2 back) to and from the computer when using
the RP1000 to record via the included Cubase® LE4 recording software or any DAW recording
application.
12. Power Jack
Connect the included power adapter here.
13. Power Switch
Used to turn the RP1000’s power on and off.
7
Getting Started
Making Connections
There are lots of ways to connect the RP1000 to amps, effects, mixers, and ot