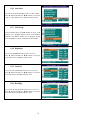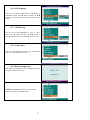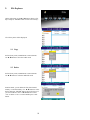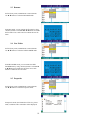
1
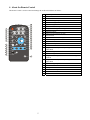
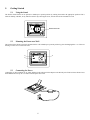
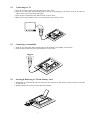
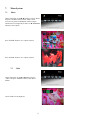
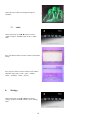
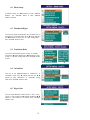
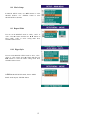
Model NV-800
User Manual
Table of Contents
1.
Introduction ......................................................................................................................................................................................3
2.
Package Contents .............................................................................................................................................................................3
3.
About the Digital Picture Frame.......................................................................................................................................................4
4.
About the Remote Control ...............................................................................................................................................................5
5.
Getting Started..................................................................................................................................................................................6
5.1
Using the Stand............................................................................................................................................................................6
5.2
Mounting the Frame on a Wall....................................................................................................................................................6
5.3
Connecting the.............................................................................................................................................................................6
5.4
Connecting to a TV.....................................................................................................................................................................7
5.5
Connecting to an Amplifier .........................................................................................................................................................7
5.6
Inserting & Removing a CF Flash Memory Card........................................................................................................................7
5.7
Inserting Other Types of Cards (SD/MMC/XD/MS/MS )...........................................................................................................8
5.8
Removing a Memory Card ..........................................................................................................................................................8
6.
Replacing Remote Control Battery ..................................................................................................................................................8
7.
Menu System....................................................................................................................................................................................9
7.1
Photo...........................................................................................................................................................................................9
7.2
Video ...........................................................................................................................................................................................9
7.3
Audio .........................................................................................................................................................................................10
8.
Settings...........................................................................................................................................................................................10
8.1 Photo Setup ......................................................................................................................................................................................11
8.2 Thumbnail Digest.............................................................................................................................................................................11
8.3 Transition Mode...............................................................................................................................................................................11
8.4 Orientation .......................................................................................................................................................................................11
8.5 Digest Style......................................................................................................................................................................................11
8.6 Music Setup .....................................................................................................................................................................................12
8.7 Repeat Mode ....................................................................................................................................................................................12
8.8 Movie Setup.....................................................................................................................................................................................13
8.9 Repeat Mode ....................................................................................................................................................................................13
8.10 Digest Style....................................................................................................................................................................................13
8.11 Slideshow Setup.............................................................................................................................................................................14
8.12 Slideshow Mode.............................................................................................................................................................................14
8.13 Folder Repeat.................................................................................................................................................................................14
8.14 Interval Time..................................................................................................................................................................................14
8.15 Transition .......................................................................................................................................................................................14
8.16 Auto Start.......................................................................................................................................................................................15
8.17 LCD Setup .....................................................................................................................................................................................15
8.18 Brightness ......................................................................................................................................................................................15
8.19 Contrast..........................................................................................................................................................................................15
8.20 Backlight........................................................................................................................................................................................15
8.21 Setup Values ..................................................................................................................................................................................16
8.22 Preferences.....................................................................................................................................................................................16
8.23 TV Type.........................................................................................................................................................................................16
8.24 TV Display.....................................................................................................................................................................................16
8.25 Video Output..................................................................................................................................................................................16
8.26 OSD Language...............................................................................................................................................................................17
8.27 OSD Message ................................................................................................................................................................................17
8.28 Setup Values ..................................................................................................................................................................................17
8.29 Mode Not Supported.......................................................................................................................................................................17
9.
File Explorer..................................................................................................................................................................................18
9.1 Copy.................................................................................................................................................................................................18
9.2 Delete ...............................................................................................................................................................................................18
9.3 Rename ............................................................................................................................................................................................19
9.4 New Folder ......................................................................................................................................................................................19
9.5 Properties .........................................................................................................................................................................................19
10.
Troubleshooting.........................................................................................................................................................................20
11.
Specifications ............................................................................................................................................................................20
2
1.
Introduction
Congratulations! You are the proud owner of a NuVuetm Digital Picture Frame. Boasting high-quality image resolution, the NuVuetm is the
perfect product for displaying your favorite digital photos. With its ease of use and configuration, you can now display all your favorite
pictures for everyone to see!
Safety Instructions
2.
Package Contents
Before using the NuVuetm, be sure to check all the accessories contained in the package. NuVuetm comes with the following items:
1.
NuVuetm unit with desktop stand
2.
A.C. Power Adapter
3.
AV Out Cable
4.
User Manual
3
3.
About the Digital Picture Frame
This section describes the various parts of the NuVue Picture Frame.
Items
Functions
1
Power On/Off/Menu
2
Enter
Turn the NuVue Picture Frame On and Off, or press to
display Menu
To confirm a setting or function
3
4
Forward
Up
Used to navigate Forward
Used to navigate Up
5
Down
Used to navigate Down
6
Back
Used to navigate Back
7
CF Card Slot
Slot for CF card
8
3 in 1 Card Slot
Slot for SD/MMC/MS
9
DC In Receptacle
Power Connection to the adaptor
10
Desktop Stand
Placing the NuVue Picture Frame on a desk
11
IR Sensor
Remote Control
12
AV Out
To TV
4
4. About the Remote Control
The Remote Control is used to control and manage the media and slideshows as follows:
18
17
16
15
1
2
3
4
5
6
7
8
9
10
11
12
13
14
15
16
17
14
18
19
20
27
1
2
3
4
5
6
7
Photo
Zoom
Vol -
Vol +
Mute
Video
Confi g
Files
Menu
Rotate
Enter
File
Detail
M_SLI DESHOW
8
9
10
11
12
EQ Set
Cancel
26
25
24
23
22
21
20
19
TV/LCD
13
21
22
23
24
25
26
27
5
Turn the power on and off
Video mode
Photo mode
Rotate the image in photo mode
Zoom the image
Used to navigate backwards
Show the file detail in photo mode
Play MP3 as background during slideshow
Equalizer setting
Skip to previous chapter or track
Fast forward
Repeat slideshow & video playback
Set video output in TV or LCD
LED
Skip to next chapter or track
Fast reverse
Stop the functionality currently running and return to
Main Menu
Used to navigate downwards
Used to navigate forwards
Play, Pause & Display menu or to confirm a setting or
function
Stop the functionality currently running and return to
Main Menu
Used to navigate upwards
Files mode
Set-up mode
Mute the audio output
Increase volume
Reduce volume
5.
Getting Started
5.1
Using the Stand
The NuVue Picture Frame can be placed in a landscape or portrait position by rotating the stand to the appropriate position. This is
ideal for desktop, end table, or any other flat surface. By removing the screw, the unit can also be mounted on a wall.
Remove the screw
5.2
Mounting the Frame on a Wall
The NuVue Picture Frame can also be mounted on the wall in landscape or portrait position by place the hanging holes “A” of the rear
housing over the screw or nail in the wall.
'A'
'A'
'A'
5.3
Connecting the Power
Connect the AC Power adaptor to AC outlet and plug in the other end of the adaptor to the DC-IN jack of NuVue Picture Frame. Press
the POWER button for up to 3 seconds to turn the power On or Off.
6
5.4
Connecting to a TV
1. Insert the AV cable (yellow) video plug into the TV video socket.
2. Insert the AV cable (white and red) audio plugs into the TV’s corresponding AV IN sockets. If the TV only has one
audio in socket, insert either of the audio plugs.
3. Insert the other end into the NuVue Picture Frame AV OUT socket.
4. Make sure the NuVue Picture Frame is set to the right TV system, NTSC or PAL.
AV IN
R
5.5
L
VIDEO
Connecting to an Amplifier
1. Insert the AV cable (white and red) audio plugs into the amplifier corresponding AV IN sockets.
2. Insert the other end into the NuVue Picture Frame AV OUT socket.
AMPLIFIER
AV IN
R
5.6
L
Inserting & Removing a CF Flash Memory Card
1. Position the CF card so that the pin-hole connections are facing the CF flash memory card slot. Place the card with
the label side up.
2. Slide the card gently into the slot until it touches the bottom.
7
5.7
Inserting Other Types of Cards (SD/MMC/XD/MS/MS )
1. Position the SD/MMC/XD/MS/MS cards so that the pin hole connections are
facing the MMC flash memory card slot. Place the card with the label side up.
2. Slide the card gently into the slot until it touches the bottom.
5.8
Removing a Memory Card
To remove a memory card, gently pull the card out of the slot.
6.
Replacing Remote Control Battery
1- Remove the battery compartment by pulling the cover in the direction of the arrow.
2- Remove the battery
3 -Insert the replacement battery must follow the correct polarity (+/-).
8
7.
Menu System
7.1
Photo
On the main menu, use the►/◄ buttons to choose “Photo”
and press “ENTER” button to enter “Photo” mode.
You can view photos as thumbnails in matrix images
which can be set in Digest Style mode. Use ►/◄ & ▲/▼
buttons to select a photo.
Press “ENTER” button to view a photo selected.
Press “ENTER” button to view a photo selected.
7.2
Video
On the main menu, use the ►/◄ buttons to choose
“Video” and press “ENTER” button to enter Movie
Folders.
Movie folders will be displayed.
9
Choose the movie folder to be displayed and press
“ENTER”.
7.3
Audio
On the main menu, use the►/◄ buttons to choose
“Audio” and press “ENTER” button to enter “Audio”
mode.
Press “File Detail” button on remote control to enter Music
Library.
Press “EQ Set” button on remote control to select Music
2Equalizer types such as “rock”, “pops”, “ballad”,
“dance”, “standard”, “classic”, & “jazz”.
8.
Settings
On the main menu, use the ►/◄ button to choose
“Setting” and press “ENTER” button to enter “Setting”
menu.
10
8.1 Photo Setup
In SETUP menu, use ▲/▼ buttons to select “PHOTO
SETUP”. Use “ENTER” button to enter “PHOTO
SETUP” submenu.
8.2 Thumbnail Digest
You can view photos as thumbnails. This is another way of
browsing for a particular photo. Press ► button and then
use ▲/▼ buttons to select “ON” or “OFF” setting mode.
Press “ENTER” button to enter.
8.3 Transition Mode
You can set the transition mode in “FAST” or “SLOW”
speed. Press ► button and then use ▲/▼ buttons to select
“FAST” or “SLOW” setting mode. Press “ENTER” button
to enter.
8.4 Orientation
You can set the ORIENTATION in “DEFAULT” or
“IGNORE” mode. Press ► button and then use ▲/▼
buttons to select “DEFAULT” or “IGNORE” setting
mode. Press “ENTER” button to enter.
8.5 Digest Style
You can set the DIGEST STYLE mode in “2X2”, “3X3”,
“4X4” or “5X5” matrix. Press ► button and then use▲/▼
buttons to select Matrix size desired. Press “ENTER”
button to enter.
11
To Exit the PHOTO SETUP menu, choose “MAIN
PAGE” mode & press “ENTER” button.
8.6 Music Setup
In MUSIC SETUP menu, use ▲/▼ buttons to select
“MUSIC SETUP”. Use “ENTER” button to enter
“MUSIC SETUP” submenu.
8.7 Repeat Mode
You can set the REPEAT mode in “ONE”, “OFF” or
“ALL”. Press ► button and then use ▲/▼ buttons to
select “ONE”, “OFF” or “ALL” setting mode. Press
“ENTER” button to enter.
To Exit the REPEAT mode, choose “MAIN PAGE”
mode & press “ENTER” button.
12
8.8 Movie Setup
In MOVIE SETUP menu, use ▲/▼ buttons to select
“MOVIE SETUP”. Use “ENTER” button to enter
“MOVIE SETUP” submenu.
8.9 Repeat Mode
You can set the REPEAT mode in “ONE”, “OFF” or
“ALL”. Press ► button and then use ▲/▼ buttons to
select “ONE”, “OFF” or “ALL” setting mode. Press
“ENTER” button to enter.
8.10 Digest Style
You can set the DIGEST STYLE mode in “2X2”, “3X3”,
“4X4” or “5X5” matrix. Press ► button and then use
▲/▼ buttons to select the matrix setting mode. Press
“ENTER” button to enter.
To Exit the MOVIE SETUP mode, choose “MAIN
PAGE” mode & press “ENTER” button.
13
8.11 Slideshow Setup
In SETUP menu, use ▲/▼ buttons to select
“SLIDESHOW SETUP”. Use “ENTER” button to enter
“SLIDESHOW SETUP” submenu.
8.12 Slideshow Mode
You can set the SLIDESHOW MODE in “MANUAL” or
“AUTO” mode. Press ► button and then use ▲/▼ buttons
to select “MANUAL” or “AUTO” setting mode.
Press “ENTER” button to enter.
8.13 Folder Repeat
You can set the FOLDER REPEAT in “ON” or “OFF”
mode. Press ► button and then use▲/▼ buttons to select
“ON” or “OFF” setting mode. Press “ENTER” button to
enter.
8.14 Interval Time
You can set the INTERVAL TIME 1, 3, 5, or 10 second
mode. Press ► button and then use ▲/▼ buttons to select
the interval time desired. Press “ENTER” button to enter.
8.15 Transition
You can set the TRANSITION in 9 effect modes as shown
in display screen. Press ►button and then use▲/▼
buttons to select the slideshow effect desired. Press
“ENTER” button to enter.
14
8.16 Auto Start
You can set the AUTO START in “ON” or “OFF” modes.
Press ► button and then use ▲/▼ buttons to select the
“ON” or “OFF” modes. Press “ENTER” button to enter.
8.17 LCD Setup
In LCD SETUP menu, use ▲/▼ buttons to select “LCD
SETUP”. Use “ENTER” button to enter “LCD SETUP”
submenu. LCD SETUP enables you to configure settings
such as brightness, contrast, saturation, hue & backlight.
8.18 Brightness
You can set the BRIGHT mode in level 1 to level 6.
Press ► button and then use ▲/▼ buttons to select the
level desired. Press “ENTER” button to enter.
8.19 Contrast
You can set the CONTRAST mode in level 1 to level 6.
Press ► button and then use ▲/▼ buttons to select the
level desired. Press “ENTER” button to enter.
8.20 Backlight
You can set the BACKLIGHT mode in level 1 to level 6.
Press ► button and then use ▲/▼ buttons to select the
level desired. Press “ENTER” button to enter.
15
8.21 Setup Values
You can set the SETUP VALUES mode in DEFAULT
Press ► button and then “ENTER” button to enter.
8.22 Preferences
In SETUP menu, use ▲/▼ buttons to select
“PREFERENCES”. Use “ENTER” button to enter
“PREFERENCES” submenu.
8.23 TV Type
You can set the TV TYPE in “MULTI SYSTEM”,
“NTSC” or “PAL” modes. Press ►button and then use
▲/▼ buttons to select the modes desired.
Press “ENTER” button to enter.
8.24 TV Display
You can set the TVDISPLAY in “NORMAL/PS”,
“NORMAL/LB” or “WIDE” modes. Press ►button and
then use ▲/▼ buttons to select the modes desired.
Press “ENTER” button to enter.
8.25 Video Output
You can set the VIDEO OUTPUT in “S-VIDEO”,
“COMPONENT”, “P-SCAN YPBPR”, “VGA” or
“INTERLACE RGB” modes. Press ► button and then use
▲/▼ buttons to select the modes desired.
Press “ENTER” button to enter.
16
8.26 OSD Language
You can set the OSD LANGUAGE in “ENGLISH” or
“CHINESE” modes. Press ► button and then use ▲/▼
buttons to select the modes desired. Press “ENTER” button
to enter.
8.27 OSD Message
You can set the OSD MESSAGE in “ON” or “OFF”
modes. Press ► button and then use ▲/▼ buttons to
select the modes desired. Press “ENTER” button to enter.
8.28 Setup Values
You can set the SETUP VALUES only in DEFAULT
mode. Press “ENTER” button to enter.
8.29 Mode Not Supported
If the “Mode Not Supported” screen is displayed, press the
“TV/LCD” button on the remote.
To Exit the PREFERENCES menu, choose “MAIN
PAGE” mode & press “ENTER” button.
17
9.
File Explorer
On the main menu, use the ►/◄ button to choose “File
Exp” and press “ENTER” button to enter “File Library”.
File Library menu will be displayed.
9.1 Copy
In File Library menu, use ► button to enter submenu.
Use ▲/▼buttons to select the COPY mode.
9.2 Delete
In File Library menu, use ► button to enter submenu.
Use ▲/▼ buttons to select the DELETE mode.
In Delete mode, you can delete the files from internal
memory or external memory. Use ▲/▼ buttons to select
the file and press “ENTER” button and it will ask you if
you want to delete or not. Use ►/◄ buttons to select
“Yes” to delete or “No” to cancel and then press “OK”
button.
18
9.3 Rename
In File Library menu, use ► button to enter submenu.
Use ▲/▼ buttons to select the RENAME mode.
In Rename mode, you can rename the file name by using
virtual keyboard. Use the ►/◄ & ▲/▼ buttons to rename
the file name. Press “OK” button to confirm the new file
name.
9.4 New Folder
In File Library menu, use ► button to enter submenu.
Use ▲/▼ buttons to select the NEW FOLDER mode.
In NEW FOLDER mode, you can rename the NEW
FOLDER name by using virtual keyboard. Use the ►/◄
& ▲/▼ buttons to rename the file name. Press “OK”
button to confirm the new file name.
9.5 Properties
In File Library menu, use ► button to enter submenu.
Use ▲/▼ buttons to select the Properties mode.
In Properties mode, the information of file size, picture
mode, resolution & file created date will be displayed.
19
To Exit the submenu, choose CANCEL mode & press
“ENTER” button.
10.
Troubleshooting
Problem
No display on LCD
screen.
No picture on TV
Colors not coming on
TV
Not reading the flash
memory card or there
are on files.
11.
Possible Causes
What to do
No power supply
LCD Brightness at min level.
LCD connector or LCD gone bad
TV condition
Cable connection
Check the connection of AC adaptor and the unit.
LCD Brightness might be at min level, toggle brightness up switch.
Contact Authorized Customer Care
Check AV setting of the TV,
Check proper connection of cable at TV side, yellow color RCA jack
should connect to video input (yellow input) of TV.
When AV out cable is connected to TV then LCD should be switched
off, if no video then press LCD on/off switch once.
The AV cable used may be faulty. Try with another cable.
Contact Authorized Customer Care
Set TV standards settings to NTSC or in AUTO mode. Default output
is NTSC.
Insert the flash memory card correctly.
LCD on/off switch is on.
Faulty A/V cable
A/V jack Faulty
TV condition
The flash memory card hasn’t been
insert correctly.
Faulty flash memory card.
Use a different flash memory card.
Specifications
Display
Photo Viewer
View Photo
Display Area
External Memory slot
Communication
Interfaces
Brightness Control
AC Adapter
Unit Dimension (WxDxH)
Weight
Accessories
8 inch color TFT LCD Panel
JPEG (Up 6M pixels resolution)
MPEG4 Resolution up to 720X480 pixels at 30fps.
MPEG4 file format compatible with DVD (640X480 in NTSC) and digital-TV.
162.2 x 121.7 mm
CF card slot & 4 in 1 (SD/MMC/MS/XD) card slot
USB Streaming (USB 2.0 Host & Device)/AV Out/Earphone
Input: DC In , USB 2.0 Host
Output: AV Out
OSD Software control
Input: AC 100~240V 50/60Hz , Output: DC 12V 2A
262 x 198 x 39 mm
860 gm
Power Adapter, Power Cable, AV Cable, Remote Control , Desktop Stand with screw & Printed
User Manual
20
21
Digital Spectrum, Inc.
17811 Mitchell North
Irvine, Ca. 92614
www.dsicentral.com
1862-N8-YG-0
22