1
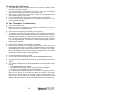
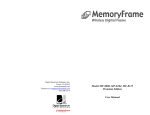
Table of Contents
MF-801, MF-801B, MF-1041
User Manual
1.
2.
3.
4.
5.
6.
7.
8.
9.
10.
11.
12.
13.
14.
15.
16.
17.
18.
19.
20.
21.
22.
24.
25.
26.
27.
1.
2.
3.
4.
5.
6.
7.
8.
9.
10.
11.
12.
13.
28.
29.
30.
31.
32.
33.
Package Contents .............................................................................. 3
Features ............................................................................................... 3
Product Specifications ........................................................................ 3
Product Registration ........................................................................... 4
Safety Instructions............................................................................... 4
Connections and Slots ........................................................................ 5
Installing and Removing the Desktop Stand ................................... 6
Setting Up the Frame........................................................................... 6
Turning the Frame On and Off. ........................................................... 6
Auto Play.............................................................................................. 6
Connecting to the USB Ports .............................................................. 7
Rechargeable Battery .......................................................................... 7
On-Screen Menu .................................................................................. 7
Playing Content .................................................................................. 7
Remote Control................................................................................... 8
Joystick and Button Controls ........................................................... 8
Files, Folders, Filmstrip View ............................................................ 9
Play a Slideshow ................................................................................ 9
Play an Audio Slideshow ................................................................. 10
On Screen Controls for Slideshows ............................................... 10
Play Music ......................................................................................... 10
Play Video.......................................................................................... 11
Calendar/Clock ................................................................................. 11
On Screen Controls for Calendar ................................................... 12
Setting the Calendar and Clock ........................................................ 12
Settings.............................................................................................. 12
Slide Show Transition ...................................................................... 13
Slide Show Interval........................................................................... 13
Display Image Size ........................................................................... 13
Audio Repeat .................................................................................... 14
Video Repeat ..................................................................................... 14
Picture Copy Type ............................................................................ 14
Date & Time Setting.......................................................................... 15
Auto Power On.................................................................................. 15
Auto Power Off ................................................................................. 15
Adjust LCD Color.............................................................................. 16
Language........................................................................................... 16
Frame Orientation............................................................................. 16
Reset Settings................................................................................... 17
File...................................................................................................... 17
Changing the Frame......................................................................... 17
Changing the Bezel .......................................................................... 18
Changing the Remote Control Battery ........................................... 18
Cleaning the LCD Screen................................................................. 19
Tips, Techniques, Troubleshooting................................................ 19
2
4.
Congratulations
Product Registration
tm
You are the proud owner of a MemoryFrame Digital Frame. Boasting high-quality image
resolution, the MemoryFrametm is the perfect product for displaying your favorite digital
photos. With its ease of use and configuration, you can now display all your favorite pictures,
even with background music for that added dimension!
To receive full service benefits, it is recommended that the Product Warranty Card be
completed and returned as early as possible. Often new product features are added and
can be downloaded. If your product is registered, you will receive alerts when updates are
available. You may also register your product at www.memoryframe.com.
1.
This product is rated for Class B Equipment (Information Communication equipment for
residential use) standards and complies with the Electromagnetic Compatibility
Directives for residential Use and can be used in all areas including common residential
areas. (Class B equipment radiates less electromagnetic influences than class A
equipment.)
Package Contents
Before using the MemoryFrametm, be sure to check that all the accessories are contained in
the package. MemoryFrametm comes with the following items:
1. MemoryFrametm unit
2. Removable Desktop Stand
3. AC Power Adapter
4. Remote Control
5. USB Cable
6. User Manual
2.
Safety Instructions
Please observe the safety precautions below. Make sure to follow the directions to
prevent accidents and damage to the product.
Insert the power plug correctly until it is firmly in
place. Failing to do so may cause fire.
Features
High resolution TFT display
Plays images in slide show format
Plays audio
Plays video
Plays audio slide show
Built-in multi-format card reader
SD/MMC/XD/MS
Generous internal memory for local storage
USB port for easy transfer
3.
5.
Do not use a damaged power plug, cord or outlet,
as this may cause electric shock or fire.
Product Specifications
Feature
Screen size
Aspect ratio
Internal memory
Images
Audio
Video
Card Reader
AC Input power
DC Unit power
Built-in speakers
USB to PC
USB to Device
Remote Control
Rechargeable Battery
MF-801, MF-801B
8.4”
4:3
512MB
JPG
WMA
MPEG, AVI
MMC/SD/XD/MS
100-240 V AC, 50/60 Hz
5VDC, 2A
9
9
9
9
MF-801B
3
MF-1041
10.4”
4:3
512MB
JPG
WMA
MPEG, AVI
MMC/SD/XD/MS
100-240 V AC, 50/60 Hz
12VDC, 1.5A
9
9
9
9
NA
Do not touch the power plug with wet hands, as
this may cause electric shock.
Do not connect more than one appliance to a
single outlet, as an overheated outlet may cause
fire.
4
7.
Do not use force to pull the power cord. Don't
place anything heavy on the power cord, as this
may cause electric shock or fire.
Installing and Removing the Desktop Stand
The desktop stand is removable for convenience in wall mount environments. When
installed, the stand can be adjusted whether the frame is in landscape or portrait
orientation. When in either landscape or portrait orientation the stand has additional
fine adjustments so that the tilt angle of the display face can be adjusted to a wide
variety of look and appeal. Use the following procedure for best results:
Installing the Stand
1.
2.
Make sure to turn the power off and disconnect the
power plug from the outlet before moving the
product. Make sure to disconnect the connection
cables from other devices as well. Moving the
product without disconnecting the power cord may
damage it while moving, and may cause electric
shock or fire.
3.
4.
5.
Lay the frame with the display face down on a soft cloth to avoid scratches.
Insert the stand so that the arrow point of the stand matches to the arrow point of
the stand receptacle.
Turn the stand counterclockwise until the first click. The stand is now locked into
the receptacle with the smallest tilt angle.
When you continue to turn the stand counterclockwise further, additional clicks will
be felt. Each click increases the tilt angle slight for about 2 clicks yielding maximum
tilt angle.
Turning counterclockwise another click will become the maximum tilt angle when
the frame is in portrait orientation. With each additional counterclockwise click, the
tilt angle will decrease accordingly until the hard stop is felt.
Removing the Stand
1.
2.
Do not install the product near any heating
appliance. There is a risk of fire.
8.
Lay the frame with the display down on a soft cloth to avoid scratches.
Move the stand clockwise until the stand unlocks.
Setting Up the Frame
Use the following procedure and pictorial below to prepare the unit to play content.
1
2
6.
Connections and Slots
The diagrams below indicate the locations of the media card slots, USB ports, Power
control and how to install the desktop stand.
3
9.
Plug one end of the AC adapter into the
digital photo frame and plug the other end
into a standard AC electrical outlet.
Insert a memory card into the appropriate
slot.
Slide the power switch to the ON position.
The frame will auto play the content, unless
there is no content, in which case the Main
Menu will appear.
Turning the Frame On and Off.
You can turn the frame on and off two ways.
1. Locate the On/Off Switch on the back of the unit. Slide up to turn On. Slide down
to turn Off.
2. Using the remote: Press the Power button.
SD/MMC/XD/MS Slot
USB to Device Port
USB to PC Port
10.
Power Switch
Power Receptacle
Removable Desktop Stand
5
Auto Play
By default, the frame will automatically play a slideshow when power is applied. External
media will be checked first starting with the card media slot, followed by the USB port. If
there is no media or content externally, the frame will play from internal memory. If there is
no content internally, the Main Menu will be displayed. A complimentary slideshow is
included so you may instantly see it operate while you become familiar with the operation
and controls. If a slideshow is playing from internal memory, and external media is inserted,
the frame will halt the current slideshow and automatically begin to play the new inserted
media. When the media card is removed, the frame will halt and play from internal memory.
6
11.
Connecting to the USB Ports
15.
The frame has a mini-USB port for connection to a PC. When connected to the PC, you can
drag-n-drop content into the internal memory of the frame. When connected to the PC, the
frame will halt, and the display will present a “PC connection established. Remote is
temporarily inoperative” message. The PC recognizes the frame as a USB storage class
device. The internal memory and the media slot are shown as separate drive letters. The
frame also has a USB port for connecting other USB devices such as
thumbdrives/flashdrives, card readers, and cameras. When connecting a USB device the
frame will display the device as USB. When connected, you can play directly from the
device by selecting USB option from the Media Menu
USB to Device
USB to PC
12.
Remote Control
The remote control is a convenient way to access external devices and internal
memory or manage the way the content is played. The layout of the user interface is
designed for maximum ease of use. Because the menu functions all operate in a
similar manner, navigation is quick and easy to learn.
Name
POWER
MENU
SLIDESHOW
CLOCK
BACK «
PLAY/PAUSE/ENTER
UP
DOWN
LEFT
RIGHT
MUSIC SLIDESHOW
Rechargeable Battery
Certain models are equipped with an internal rechargeable battery. This allows full
operation of the frame when disconnected from main power. This option has high value
when mobility and portability are desired, such as sharing with groups, on vacation, or
quickly connect to a USB port to download more content. The battery charges when power
is applied. As with all rechargeable devices, occasionally the frame should be operated only
from the battery until the battery is fully discharged. This maintains the best performance of
the battery over time.
VOL+
VOL-
13.
COPY/DELETE
On-Screen Menu
MemoryFrame includes an on-screen Menu system to personalize the way content is
presented and played. The Main Menu can be activated by the remote control or builtin button and joystick controls, on the back of the unit, for this purpose. On the remote
control press the BACK button until the Main Menu is displayed. Use the navigation to
locate the desired function. Use the ENTER button to select. If the desired function is
Clock/Calendar or Settings, the Enter button will advance directly to the controls for that
function. Otherwise, ENTER causes the Media Menu to be displayed so you can select
the location of the content (internal memory, media cards, USB, etc.).
14.
Playing Content
ZOOM & PAN
ROTATE
SELECT
16.
Function
Power On/Off
On screen options
Play slideshow
Play Clock/Calendar
Go back one step
Play/Pause/Enter
Navigate Up
Navigate Down
Navigate Left
Navigate Right
Play slideshow with audio
background
Increase Volume
Decrease Volume
Zoom by 25% each press.
Pan all quadrants
Rotate image 900 each
button press
Tag content for
Copy/Delete
Copy and Delete content
Joystick and Button Controls
MemoryFrame products come equipped with joystick and button controls to activate the
onscreen menu and make adjustments as desired. The joystick is used for
up/down/left/right and depress for ENTER. The two buttons are used for MENU and
BACK. See below for a pictorial of the joystick/button combination.
Content such as images, music, and video are played using the following steps:
1. On the Main Menu navigate to the type of content to be played and ENTER.
2. On the Media Menu navigate to the location of the content and ENTER.
3. On the Thumbnail Menu navigate to the desired content and ENTER.
Main Menu
Media Menu
7
Thumbnail Menu
8
17.
Files, Folders, Filmstrip View
19.
The frame recognizes files and folders. When in Thumbnail View, folders will be
presented by a Folder icon. When a Folder icon is highlighted, a filmstrip view of the
content of the folder moves across the screen from right to left, pausing briefly for easy
viewing, The upper left corner of the display will present the location of the folder (i.e.
Memory, SD, etc.) followed by the name of the folder. The upper right corner of the
display will present the item number that is highlighted followed by the total number of
items recognized.
Highlighted
Folder
Images not in
Folders
Filmstrip of
Images in Folder
18.
Play a Slideshow
1. At the Main Menu screen navigate to PHOTO and ENTER.
2. On the Media Menu navigate to the location of the images to be played and
ENTER
3. On the Thumbnail Menu press ENTER to start the slideshow.
Play an Audio Slideshow
You can play a slideshow and music at the same time. Press the MUSIC SLIDESHOW
button on the remote control which will cause the slideshow to begin playing with the
music. How music that is played is based on the music setting in the Settings Menu.
Volume can be adjusted using the VOL+ and VOL- buttons on the remote control.
Make sure that there is both image and music content on the target media when
playing an audio slideshow. Otherwise a “can not find content” message will be
displayed.
20.
On Screen Controls for Slideshows
When Images
a Slideshow
playing, on screen controls are available so that quick changes
notis in
can be made, then continue the slideshow. To activate the on screen controls, press
folders
the MENU
button on the Remote Control. The Menu will appear over slideshow as
shown below. Use the navigation buttons to highlight the function. Press ENTER to
select.
1. The control(s) for that function are displayed adjacent to the function. Use the
up/down navigation buttons to change the setting.
2. If there is more than one setting, such as setting times, use the left/right
navigation buttons to go to the next setting, then use the up/down buttons to
make changes.
3. Press the ENTER button to save the setting and return to the On Screen
Menu
4. When finished with all setting changes, press the MENU or BACK button to
exit. The slideshow will continue based on the new settings.
Name
You can use the SLIDESHOW button on the remote control as a shortcut to play a
slideshow of the currently selected media anytime. Once the slideshow begins, use the
ENTER button to Play/Pause the slideshow.
Screen Controls
Slideshow Interval
Slideshow
Transition
Main Menu
Media Menu
Rotate
Zoom
Thumbnail Menu
While a slideshow is playing, you have access to on demand buttons located on the
remote control. These are used to change the look of an image which includes
Zoom/Pan and Rotate as noted below:
Zoom/Pan - Each press of the Zoom button will enlarge the image by 25%. Once in Zoom
mode you can use the navigation buttons to Pan to a particular location on the zoomed
image.
21.
Play Music
You can play Music by selecting MUSIC from the Main Menu. The thumbnail view
shows the name of each track. As each track is highlighted other information is
presented such as Title, Artist, Bit Rate, and File Size. Press the ENTER button to
Pause/Play. While the track is playing the display will present the time played. Use the
VOL+ and VOL- buttons on the remote control to adjust volume.
0
Rotate - Each press of the rotate button will rotate the image by 90 . If the camera has
recorded the orientation information on the image, the frame will recognize this and
automatically orient the image accordingly. If not, use this function to orient the image as
desired. If the image is in internal memory, the frame will store the setting and rotate
accordingly during a slideshow. If the image is in external memory, copy to internal memory
first if you want the frame to remember the rotation setting.
9
Description
You can adjust brightness,
contrast, tint, and color. This
is so you can tailor the look
for the environment
Change the display time
during a slideshow
Change the transition
between images in the
slideshow
Rotate image 900.
Zoom the image
10
22.
Play Video
25.
You can play Video by selecting VIDEO from the Main Menu. The thumbnail view
shows the name of each clip. As each clip is highlighted other information is presented
such as Title and File Size. Press the ENTER button to Pause/Play. Use the VOL+ and
VOL- buttons on the remote control to adjust volume.
On Screen Controls for Calendar
When the calendar is playing, on screen controls are available so that quick changes
can be made, then continue the calendar. To activate the on screen controls, press the
Menu button on the Remote Control. The Menu will appear over the calendar as shown
below. Use the navigation buttons to highlight the function. Press ENTER to select.
1.
2.
3.
4.
23.
The control(s) for that function are displayed adjacent to the function. Use the navigation
buttons to change the setting.
If there is more than one setting, such as setting times, use the left/right navigation
buttons to go to the next setting, then use the up/down buttons to make changes.
Press the ENTER button to save the setting and return to the On Screen Menu
When finished with all setting changes, press the MENU or BACK button to exit. The
calendar will continue based on the new settings.
On Screen Controls for Video
When a video is playing, on screen controls are available so that quick adjustments can
be made, then continue the video. To activate the on screen controls, press the MENU
button on the Remote Control. The Menu will appear over slideshow as shown below.
Use the Up/Down navigation buttons to highlight the function. Use the Left/Right
navigation buttons to change the value. Press BACK to return to the video.
Name
Date & Time Setting
Music Play
Auto Power On
Auto Power Off
26.
24.
Description
Change the clock year/date/time
On/Off control for music with
Calendar
Set the On time
Set the Off time
Setting the Calendar and Clock
In the Main Menu navigate to SETTINGS function and press ENTER to start. Select
DATE & TIME SETTINGS. To set the clock and calendar, use the settings in the
SETTINGS Menu. Use the Left and Right buttons to navigate between hour and
minute, and the UP and DOWN buttons to modify the time. When complete press
ENTER.
Calendar/Clock
The frame includes a Calendar and Clock function that also plays a slideshow and
music. In the Main Menu navigate to CALENDAR function and press ENTER to start.
The calendar is displayed in the left section to include the date, day, and time. The right
pane is used to play the slideshow. To set the clock and calendar, use the settings in
the SETTINGS Menu.
27.
Settings
This function is used to personalize the way the frame operates to your taste. On the
Main Menu navigate to SETTINGS and ENTER. The table of settings is displayed as
follows. Navigate to the desired function and ENTER to activate.
11
12
1. Slide Show Transition
4. Audio Repeat
This is used to select the type of transition in between images during a slideshow. One
of the settings is Random which randomizes transitions.
2. Slide Show Interval
This is used to set the display time of the image during a slideshow. The settings are
Slow, Normal, or Fast.
This is used to set the repeat function for Audio. When set to Repeat One the selected
music track will play in a loop. When set to Repeat All, all music tracks will be played in
a loop. When Set to Repeat Off, all music tracks will play once.
5. Video Repeat
This is used to set the repeat function for Video. When set to Repeat One the selected
video will play in a loop. When set to Repeat All, all video clips will play in a loop. When
Set to Repeat Off, all video clips will play once.
3. Display Image Size
When set to Original the image will be displayed based on the original image settings.
When set to Optimal the frame will optimize the image for the screen characteristics.
6. Picture Copy Type
This is used to define what is to be done with an image when copying from external
memory to internal memory. When pictures are taken with the camera set for the
highest resolution, the size of the image may be very large. Although these large
images may be useful for other tasks, it is not necessary to have such high density for
playing on the frame. This function is used to resize the original image for best fit on the
display, usually resulting in reducing image storage needs or storing more images in
internal memory. Check the Question and Answer section in the rear of this manual.
13
14
7. Date & Time Setting
10. Adjust LCD Color
This is used to set the date and time. These settings are used in several other areas to
include Clock, Calendar, Auto Power On, and Auto Power Off. Use the Up and Down
buttons to change each setting. Use the Left and Right buttons to go from setting to
setting. When complete press ENTER.
This is used to adjust the LCD screen for Brightness, Contrast, Tint, and Color. Use the
Up and Down buttons to navigate between functions. Use the Left and Right buttons to
increase and decrease the selected values. Once complete use the BACK button to
return to the Settings Menu.
11. Language
8. Auto Power On
This is used to set the time for the frame to automatically turn On everyday. Use the Left
and Right buttons to navigate between hour and minute, and the UP and DOWN
buttons to modify the time. When complete press ENTER.
This is used to set the on screen language. Use the Up and Down buttons to select the
language. Press ENTER to change.
12. Frame Orientation
9. Auto Power Off
This is used to set the time for the frame to automatically turn Off everyday. Use the Left
and Right buttons to navigate between hour and minute, and the UP and DOWN
buttons to modify the time. When complete press ENTER.
15
This is used to set the frame orientation to either Landscape or Portrait orientation. In
this manner the images will appear properly based on the orientation of the unit.
16
13. Reset Settings
30.
This is used to reset the settings to default. If you press the right arrow button 2 times,
the revision code of the unit will be displayed above the “Yes/No” selection.
28.
File
Removing the bezel
This is the function used to view all files types that the frame recognizes. This is also
where files are tagged for Copy/Delete.
1. From the Main Menu navigate to FILE and ENTER.
2. On the Media Menu select the location of the desired files and ENTER.
3. The result is a listing of the located folders and files including name extension.
Press ENTER to play.
4. You may also use the navigation buttons and the SELECT button on the
remote control to “tag” files for Copy or Delete.
5. Once finished, press the COPY/DELETE button on the remote control. A
secondary screen will appear to select either Copy or Delete.
6. Navigate to the desired choice and ENTER to execute.
You may copy files from external memory to internal memory. You may delete files
from either external or internal memory.
29.
Changing the Bezel
Certain configurations allow for changing the decorative bezel that surrounds the
display. The decorative bezel is designed with embedded magnetic discs that match up
to magnetic discs also embedded on the bezel channel of the unit. Changing the bezel
is very easy and quick to do, needing only a common paperclip or the supplied Bezel
Removal Tool to free the bezel from the unit. See below.
Changing the Frame
MemoryFrametm has the ability to mount a standard open frame so that you can
change the look of the frame to suit your decor. Standard 8”x10” open frames mount on
8.4” MemoryFrame and 9”x12” open frames mount on 10.4” MemoryFrame. Although
there are a wide variety of 8x10 and 9x12 frames, typical open frames have these
common cavity dimensions. The difference in cavities is typically the depth and whether
to accommodate matte, glass, and backing. The way the backing is attached to the
cavity determines how easy the frame can be used with the MemoryFrame. Refer to
the Frame Mounting Guide on our website www.memoryframe.com.
17
1.
2.
With the back of the frame facing you, use the Bezel Removal Tool or a
paperclip, slide it flat side through one of the slots in the frame. See above
pictorial.
Push the tool/paperclip through until the bezel is released from the unit and
remove the bezel.
Replacing the bezel
1.
2.
3.
31.
Be sure that there is no bezel currently installed on the display.
Note that the IR remote control iris is located at the top of the bezel and
matches to the IR sensor at the top center of the frame. Care should be taken
to assure this iris is located at the top of the frame when inserting another
bezel. Otherwise the Remote Control operation may become unstable.
With the unit laying flat on a surface with the display facing up at you, place
the bezel on top of the front of the unit with the shiny side facing out, the
magnetic discs match up together, and the iris is in the upper center of the
frame.
Changing the Remote Control Battery
The Remote Control operates from battery power. The battery for the Remote Control
is mounted into a cavity that can be opened for convenient battery replacement. The
Remote Control uses a conventional CR2025 3VDC battery that is easily changed
using the guideline below:
1. Using your finger, press the release arm and slide the battery tray out
simultaneously. Note the orientation of the battery and holder.
2. Remove and replace with a new battery into the battery tray with the proper
orientation.
3. Slide the battery tray closed until the release level locks. The Remote Control
is now ready for operation.
18
32. Cleaning the LCD Screen
1.
2.
3.
4.
5.
The digital frame should be treated with care. The screen is made of glass
and can be scratched or broken.
To clean fingerprints or dust from the LCD screen, use a soft, non-abrasive
cloth such as a camera lens cloth to clean the LCD screen.
When using a commercial LCD cleaning kit, apply the cleaning liquid to the
cloth, not directly to the LCD screen.
Do not use liquids that contain alcohol or other caustic cleaning solution.
For the outer surface of the digital frame (excluding the screen) use a soft
cloth dampened with water.
33. Tips, Techniques, Troubleshooting
Q. The unit does not turn On.
A Make sure the unit is plugged into a working AC outlet. Make sure the DC
power connector is securely connected.
Q. The unit does not operate from the battery when first tried.
A. To maintain the optimal life of the battery, it is discharged when shipped.
When connected to the AC adapter, the battery will charge. When first used,
the battery should charge for at least 24 hours. During the normal course of
use, it is always recommended that occasionally the unit operate on battery
only until fully discharged. In this manner, when recharged again, maximum
and life can be expected.
Q. Sometimes I see folders, but the filmstrip view is blank.
A. When you are in Photo mode, all folders will be shown, even if they do not
have images inside. When you navigate to a folder that does not have images,
the filmstrip will be blank, indicating that there are no images in this folder.
When you highlight a folder that has images, the filmstrip view will activate
presenting 5 images at a time, scrolling right to left.
Q. If I need Tech Support, how do I contact.
A. You can reach Technical Support by email at [email protected]
Q. I don’t get as many images stored in memory as expected. What can be the
cause?
A. The number of images that can be stored depends on several factors. These
include:
• The megapixel rating of the camera
• The resolution setting of the camera when pictures are being taken
• The setting of Copy Picture Type in the Settings Menu
All of these factors together determine the number of images that can be
stored in the memory of the frame. By setting the camera to the lowest
resolution, the original images will be smaller, and when the Picture Copy
Type is also set to Resize when copying, additional compression will be
applied. This will maximize the number of stored images for the camera used.
19
The contents of this manual and the specifications of this product are subject
to change without notice. Digital Spectrum Solutions reserves the right to
make changes without notice in the specifications and materials contained
herein and shall not be responsible for any damages (including consequential)
caused by reliance on the materials presented, including but not limited to
typographical and other errors relating to the publication.
20
www.memoryframe.com
700-0028