1
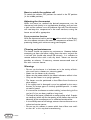
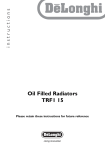
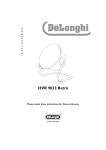
instructions
RETRO OIL FILLED RADIATOR
MTR2000
Please retain these instructions for future reference
Indicator light
Carry handle
Display
Switch
Thermostat knob
1
1
1
1
1
1
Cord storage
Fig.1
2
Retrò
Thank you for choosing this De’Longhi radiator. To get the
very best out of your new radiator it is advisable to read
these instructions before using it.This will ensure that you
gain optimum results and use the appliance safely.
General instructions
1. Take the radiator out of its packaging and remove any polystyrene pieces or any other packaging material that might be
lodged inside it.
2. Check that neither the radiator nor the power cable has been
damaged in any way during transportation.
3. Do not operate the radiator if damaged.
Easy wheel system
Turn the radiator upside-down on a rug or a soft surface in order to
prevent damaging the paint finish.
Fully unfold the castors by turning them outwards (Fig.1).
Turn the radiator back to its upright position.
Electrical connection
- Before plugging the radiator into the mains, check that your supply
voltage is the same as that shown on the rating plate of the radiator.
- If using more than one appliance at a time, it is important to
ensure that the ring main is adequate to cope with the power
requirements.
- It is important to ensure that the socket is adequately earthed.
- This appliance complies with EEC directive 89/336 regarding
electromagnetic compatibility.
Instruction for use
Using for the first time
On using the radiator for the first time we advise that you turn it
on to the maximum power setting for up to 8 hours. This is to
eliminate the heater’s “new odour”. During this time ensure that
the room is well ventilated.
Operation and use
Turning the appliance on
Insert the plug into the mains socket and switch on turning the thermostat knob clockwise until it can be turned no further, then position the switch up in the I position (minimum power) or down in the
II position (maximum power).The indicator light will come on.
We suggest that on days when temperatures are not praticularly
cold. Select minimum output to optimize savings on energy consumption.
3
Retrò
How to switch the radiator off
To switch the radiator OFF position the switch in the "0" position
(in the middle position).
Adjusting the thermostat
When the room has reached the desired temperature, turn the
thermostat knob slowly in an anticlockwise direction until you hear
a click and the radiator turns off (indicator light off).The thermostat
will now keep the temperature in the room constant, turning the
heater on and off as appropriate.
Frost protection function
With the thermostat knob in position and the switch in the II position, the radiator maintains the room at a temperature of about 5˚C,
preventing freezing with minimum energy consumption.
Cleaning and maintenance
The heater should not require any maintenance. However before
attempting to clean the heater, unplug from the mains and wait for
it to cool (this should take around 30 minutes). It is sufficient to
remove external dust with a soft, dry cloth. Never use abrasive
powders or solvents. If necessary, remove concentrated areas of
dirt with a vacuum cleaner.
Warnings
- Do not use the heater in a bathroom or in the vicinity of bathtubs, wash basins, showers or swimming pools.
- Never use the heater to dry laundry.
- Never rest the power cable on the heater’s elements while it is hot.
- Only use the heater in an upright position.
- The heater must be positioned at least 50cm from furniture or
other objects.
- If the supply cord is damaged, it must be replaced by the manufacturer, its service agent or similarly qualified persons in order
to avoid a hazard.
- It is normal for the heater to make ‘crackling’ noises during its first
use (or if it has not been used for a long time).
- The body of the heater is filled with an exact quantity of oil. If repairs
are necessary which call for the opening of the heater, they must be
done only by the manufacturer or an authorised service centre.
- In the unlikely event of oil leakage, contact the manufacturer or an
authorised service centre.
- Do not use this radiator in rooms which have a floor area smaller than 4m2 as this may lead to overheating.
4
Retrò
- The heater must never be placed immediately under a fixed mains
socket.
- When scrapping the radiator, respect legislation on the disposal of oil.
- The use of an extension lead is not recommended, however if it is
necessary then follow carefully the extension lead’s instructions,
and most importantly ensure that the extension lead is correctly
rated in accordance with the radiator being used and NEVER
overloaded.
- In order to avoid any danger caused by an accidental resetting of
the safety system, this radiator must not be powered through an
external timer.
- As with any electrical radiator, whilst the instructions aim to cover
as many eventualities as possible, caution and common sense
should be applied when operating your radiator, particularly in the
vicinity of young children.
The radiator is fitted with a safety device which turns the radiator
off in case of accidental overheating. To reset, disconnect the plug
from the power for 30 minutes, remove the cause of overheating
then plug the radiator in again.
IMPORTANT: never for any reason cover the radiator
during operation as this could lead to dangerous
overheating.
IMPORTANT INFORMATION FOR CORRECT DISPOSAL
OF THE PRODUCT IN ACCORDANCE WITH EC
DIRECTIVE 2002/96/EC.
At the end of its working life, the product must not be
disposed of as urban waste.
It must be taken to a special local authority differentiated waste collection centre or to a dealer providing this
service. Disposing of a household appliance separately
avoids possible negative consequences for the environment and health deriving from inappropriate disposal
and enables the constituent materials to be recovered to
obtain significant savings in energy and resources.As a
reminder of the need to dispose of household appliances
separately, the product is marked with a crossed-out
wheeled dustbin.
5
Retrò
Warning - this appliance
must be earthed
Green and Yellow to Earth
13 amp
Fuse
Brown
to Live
Blue to
Neutral
Cord Clamp
Electrical requirements
Before using this appliance ensure that the voltage indicated
on the product corresponds with the main voltage in your
home, if you are in any doubt about your supply contact your
local electricity company.
The flexible mains lead is supplied connected to a B.S. 1363 fused plug
having a fuse of 13 amp capacity. Should this plug not fit the socket outlets in your home, it should be cut off and replaced with a suitable plug,
following the procedure outlined below.
Note: Such a plug cannot be used for any other appliance and should
therefore be properly disposed of and not left where children might find
it and plug it into a supply socket - with the obvious consequent danger.
N.B. We recommend the use of good quality plugs and wall sockets that
can be switched off when the machine is not in use.
Important: the wires in the mains lead fitted to this appliance are
coloured in accordance with the following code:
GREEN ANDYELLOW EARTH
BLUE
NEUTRAL
BROWN
LIVE
As the colours of the wires in the mains lead of this appliance may not
correspond with the coloured markings identifying the terminals in your
plug, proceed as follows:
The wire which is coloured green and yellow must be connected to the
terminal in the plug which is marked with the letter E or by the earth
symbol
or coloured green or green and yellow.
The wire which is coloured blue must be connected to the terminal
which is marked with the letter N or coloured black.
The wire which is coloured brown must be connected to the terminal
which is marked with the letter L or coloured red.
When wiring the plug, ensure that all strands of wire are securely
retained in each terminal. Do not forget to tighten the mains lead clamp
on the plug. If your electricity supply point has only two pin socket outlets, or if you are in doubt, consult a qualified electrician.
Should the mains lead ever require replacement, it is essential that this
operation be carried out by a qualified electrician and should only be
replaced with a flexible cord of the same size.
After replacement of a fuse in the plug, the fuse cover must be refitted.
If the fuse cover is lost, the plug must not be used until a replacement
cover is obtained. The colour of the correct replacement fuse cover is
that of the coloured insert in the base of the fuse recess or elsewhere
on the plug. Always state this colour when ordering a replacement fuse
cover.
Only 13amp replacement fuses which are asta approved to B.S. 1362
should be fitted.
This appliance conforms to the Norms EN 55014 regarding the suppression of radio interference.
6
Retrò
5785012900/04.07