1
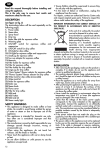
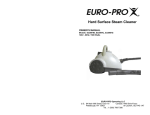
COFFEE MACHINE
Owner’s instructions
READ AND SAVE THESE INSTRUCTIONS
CC80
2
D
B
C
A
E
V
F
G
U
T
H
S
I
R
O
Q
M
P
Z
L
N
3
1
2
3
4
5
6
7
8
10
MAX
4
9
10
11
12
B
A
13
14
5
IMPORTANT SAFEGUARDS
When using electrical appliances, basic safety precautions should always be followed, including the
following:
• Read all instructions.
• Do not touch hot surfaces. Use handles and knobs.
• To protect against fire, electrical shock and personal injury, do not immerse cord, plug or appliance in
water or other liquid.
• Close supervision is necessary when any appliance is used by or near children.
• Unplug from the outlet when not in use and before cleaning. Allow to cool before fitting or taking off
parts, and before cleaning the appliance.
• Do not operate with a damaged cord or plug, or after the appliance malfunctions, or has been damaged
in any manner. Return the appliance to the nearest authorized service facility for examination, repair or
adjustment.
• The use of accessory attachments or spare parts not recommended by the appliance manufacturer may
result in fire, electrical shock or personal injury.
• Do not use outdoors.
• Do not let the cord hang over the edge of the table or counter, or touch hot surfaces.
• Do not place on or near a hot gas or electrical burner, or in a heated oven.
• To disconnect the appliance, turn any control to “off”, then remove plug from wall outlet.
• Do not use the appliance for other than the intended use.
• This appliance is for household use only.
SAVE THESE INSTRUCTIONS
SHORT CORD INSTRUCTIONS
-
-
6
A short power cord is provided to reduce risks resulting from becoming entangled in or tripping over a longer
cord.
Longer, detachable power supply cords or extension cords are available and may be used if care is exercised
in their use.
If an extension cord is used, the marked electrical rating should be at least as great as the electrical rating of
the appliance. The longer cord should be arranged so that it will not drape over the counter-top or table top
where it can be pulled on by children or tripped over.
Your product is equipped with a polarized alternating current line plug (a plug having one blade wider than
the other). This plug will fit into the power outlet only one way. This is a safety feature. If you are unable to
insert the plug fully into the outlet, try reversing the plug. If the plug should still fail to fit, contact your
electrician to replace your obsolete outlet. Do not defeat the safety purpose of the polarized plug.
DESCRIPTION OF APPLIANCE
CHLORINE FILTER
(See drawing on page 3)
These terms are referred to in the following pages.
A. Water tank
This filter removes the taste of chlorine from the water.
Install as follows:
• Remove the chlorine filter from its plastic bag and
rinse under the tap.
• Raise the coffee lid and lift out the filter holder (fig. 1).
• Open the holder by pushing where indicated
PUSH and fit the filter carefully as shown in fig. 2.
• Close the holder and replace by pushing down well.
• After 80 cycles or six months operation, the
chlorine filter must be changed. The filter is of
vegetable origin and can therefore be discarded
with normal household rubbish.
B. Coffee lid
C. Chlorine filter
D. Boiler cap
E. Steam boiler
F. Steam knob
G. Emulsifier
H. Milk tank
I.
Measure spoon
L. Anti-spray hood
M. “ON/OFF cappuccino” switch (steam boiler)
N. Steam temperature OK light
O. “ON/OFF cappuccino” light (steam boiler)
P. Main “ON/OFF” coffee switch
Q. Main “ON/OFF” coffee light
R. Coffee filter
S. Hot plate
T. Water level indicator
U. Carafe
V. Filter holder
Z Cleaning rod
PREPARING THE COFFEE
• Fill the carafe with cold water up to the level
(marked on the carafe) which corresponds to the
number of cups of coffee required (fig. 3).
Warning: never exceed the 10 cup line to avoid
water leaking from the machine's rear slots.
• Pour the water into the tank (fig. 4). (The amount
of coffee obtained will be slightly less than the
amount of water poured into the tank because
some of the water remains in the coffee powder
and some is lost in steam).
• Place the carafe on the hotplate (S) making sure
the lid is on. The perforations in the lid serve to
preserve the coffee's aroma, which is why the lid
should be raised on the handle side in order for it
to be opened. (fig.3)
• Put the coffee in the filter by using the measuring
spoon supplied and level it off uniformly (fig. 5).
As a general rule, use a level measure of coffee
(approx. 7 gr.) for each cup required (e.g. 10
measures to obtain 10 cups). However, the
amount of coffee to be used can vary according
to personal taste.
• Use good quality medium ground coffee specially
for coffee percolators.
• Close the lid and press the "coffee" switch (fig. 6).
The red "ON" light on the left of the switch shows
that the machine is working. The coffee will begin
to brew after a few seconds and will finish doing
so at the sound of the characteristic gurgle which
means the process has finished.
It is entirely normal for the machine to emit steam
during the coffee percolating or for a few drops of
condensation to form around the lid. By leaving the
"coffee" switch pressed after brewing, the hotplate (S) will
keep the coffee in the carafe at just the right hot
temperature.
7
PREPARING A CAPPUCCINO
Filling the Boiler with Water
• Unscrew the boiler cap (D) by turning it in an
counter clockwise direction.
• Fill the carafe with 6 oz (170 gr) maximum of
water, corresponding to the amount needed to
make one coffee (fig. 7).
• Pour the water slowly into the boiler,first making
sure that the “cappuccino” switch is off and that
the steam knob is turned off.
• WARNING: In order to fill the boiler when it is
hot - for example immediately after the water
contained in it has run out while a cappuccino is
being made - no more than the above
mentioned quantity of water (6 oz./170gr.)
should be poured in, corresponding to the
amount of water needed to make a coffee and
never try to fill the boiler up to the MAX line (fig.
8) while it is still hot, otherwise the appliance
will fail to froth the milk properly the next time.
• Next close the steam boiler cap by turning it firmly
clockwise.
Note: for safety reasons it is not possible to open
the cap when the steam boiler is warm because it
turns without unscrewing; it is necessary to wait
for all the water contained in the steam boiler to
be completely used up in order to fill it, or else to
wait for the boiler to cool down.
• Be sure to add water in the boiler only once it is
completely empty.
Preparing the Milk for Cups of Cappuccino
• Before dispensing milk, the boiler must be preheated for 10 minutes. Therefore, press the
“CAPPUCCINO” button before preparing coffee;
doing so, the boiler will heat right up.
• Prepare the coffee as illustrated in the paragraph
headed “PREPARING THE COFFEE” and pour
about 2 fl. oz. (50-60 gr.) of coffee into each cup.
• To make a cappuccino, pour into the tank milk
which is neither boiling nor hot. With the tank
filled to the “MAX” line, 2 or 3 cappuccinos can
be made. Never exceed the little mark which is
placed immediately above the word “MAX” (fig.
10) or the milk may continue to drip from the
pipe after the cappuccino has been prepared.
• Place the cup containing coffee under the milk tank
pipe, check that the milk tank is firmly attached, wait
for the “OK” pilot lamp (N) to come on, the turn the
steam knob at least a full turn counter-clockwise. The
“frothed” milk will begin to trickle out of the milk
tank pipe (fig. 11). To avoid the milk splashing if
8
small cups are used, the anti-spray hood should be
fitted on the milk tank pipe (fig. 12).
• Fill the cup with the desired amount of frothed milk.
To ensure that the milk froths properly, always
close the steam knob and wait for the OK pilot
lamp to come on between one cappuccino and the
next. As soon as the tank is empty and the machine
begins to puff, turn off the steam by turning the
steam knob in a clockwise direction.
• The following proportions are recommended in
order to obtain a perfect cappuccino: 1/3 coffee,
1/3 hot milk and 1/3 frothed milk.
Suggestion: to make a hotter cappuccino when
more than one cup is required, it is better to pour
one cup of coffee at a time before immediately
filling it with frothed milk, rather than pouring all
the cups of coffee at the same time first and then
filling them with frothed milk..
• Before switching the boiler off it is necessary to
clean the red emulsifier, so that it does not become
blocked by the milk when it solidifies: to do so, fill
the milk tank with a little water and turn the steam
knob. In this way the steam cleans all the holes
and emulsifier pipes and empties the internal
circuits of any traces of milk.
WARNING: to eliminate the “new” smell and above
all to ensure that the appliance functions properly, a
few coffee cycles should be completed without
coffee powder the first time the appliance is used,
and the steam boiler should be washed in the
following way: fill it with water, press the ‘ON/OFF’
cappuccino switch and after 5 minutes turn the
steam knob
and leave it on until all the steam has been used up
(about 15 minutes).
CLEANING AND MAINTENANCE
Before carrying out any cleaning or maintenance,
disconnect the appliance from the electric power
supply by pulling out the plug.
Cleaning the Milk Frother
Remember to clean the milk frother after each use as follows:
• Remove the milk tank by pressing the lever
marked “PRESS” and pulling it upwards at the
same time; wash the tank with hot water.
• Remove the emulsifier (fig. 13) by pressing on the
lever (A) and pulling it upwards at the same time.
Remove the rubber mixer, especially wash and
clean with warm water the holes shown in fig. 14
(clean them using a needle). Check that the hole
marked with the arrow B is not blocked (fig. 14).
Once they have been cleaned, all the pieces
must be reassembled correctly. Pay attention
that the rubber mixer is firmly pushed down and
the red emulsifier is pushed till you hear click. If
the appliance is not cleaned this way every time
it is used the milk may fail to froth properly or
may fail to be sucked up, or it may drip from the
milk tank pipe.
Warning: to facilitate the cleaning of the milk tank
pipe, it is possible to use the pipe brush supplied.
Other Cleaning
• The carafe, filter holder and permanent filter
should be cleaned regularly.
• Neither solvents nor abrasive detergents may be
used for the cleaning of the machine's plastic
components. A damp cloth is sufficient.
• The machine must NEVER be immersed in water.
DESCALING
With the passing of time the calcium contained in the
water will cause blocking which will prevent the
machine from working properly. The machine should
therefore be descaled at least every 40 cycles.
Descaling should be carried out using the special
coffee descalers which are on sale in most stores.
White wine vinegar may be used as an alternative
using the following procedure:
• remove the anti-chlorine filter from the appliance
(in order not to pollute it with vinegar);
• pour 2 cups of white wine vinegar and 3 cups of
water into the water tank;
• place the carafe on the hotplate and the filter
holder without the ground coffee;
• press the "coffee" switch, allow the equivalent of
one cup to percolate and then turn off the
appliance;
• leave the vinegar to work for an hour;
• turn the machine back on and allow the rest of the
solution to percolate;
• rinse, using the appliance only with water for at
least 3 cycles (3 complete tankfulls of water).
Warning: never discale the boiler.
SERVICE AND REPAIR
If the appliance should break down or fail to work
properly, contact the nearest authorized technical
service centre. Repairs carried out by unauthorized
staff will invalidate the guarantee.
Limited Warranty
What Does This Warranty Cover? We warrant each Espresso Coffee Machine to be free from defects in
material and workmanship. Our obligation under this warranty is limited to replacement or repair, free of charge at
our factory or authorized service centers, of any defective part or parts there of other than parts damaged in transit,
which shall be returned to us, transportation prepaid. This warranty shall apply only if the Espresso Coffee Machine
is used in accordance with the factory directions which accompany it.
How Long Does The Coverage Last? This warranty runs for one year from the date of delivery and applies
only to the original purchaser.
What Does This Warranty Not Cover? This warranty does not cover defects or damage of the Espresso Coffee
Machine which result from repairs or alterations to the machine outside our factory or authorized service centers, nor
shall it apply to any Espresso Coffee Machine which has been subject to abuse, misuse, negligence or accidents.
Also, consequential and incidental damages resulting from the use of this product or arising out of any breach of
contract or breach of this warranty are not recoverable under this warranty. Some states do not allow the exclusion
or limitation of incidental or consequential damages, so the above limitation may not apply to you.
How Do You Get Service? If repairs become necessary or spare parts are needed, please write to:
DeLonghi America Inc.
625, Washington Avenue
Carlstadt N.J. 07072
or call Service Tel. No. 800-322-3848
The above warranty is in lieu of all other express warranties and representations; All implied warranties are limited
to the applicable warranty period set forth above. This limitation does apply if you enter into an extended warranty
with DeLonghi. Some states do not allow limitations on how long an implied warranty lasts, so the above exclusions
connection with the sale or use of its Espresso Coffee Machine.
How Does State Law Apply? This warranty gives you specific legal rights, and you may also have other rights
which vary from state to state.
9