1
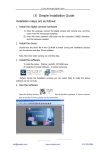
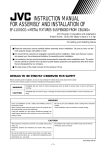
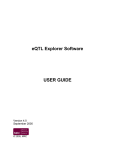
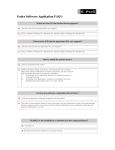
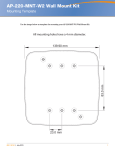
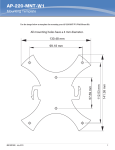
AP-220-MNT-W2 Wall Mount Kit Installation Guide This mount kit supports multiple AP models. All installation images show the 225 AP. Package Contents AP-220-MNT-W2 Mounting Bracket 2x Ethernet Cable Adapter T8 Torx Security Screw Installation Complete the following steps to install your access point using the AP-220-MNT-W2. Ethernet Cable Routing Options There are three options for routing the Ethernet cable depending the placement of your AP in relation to the source of the Ethernet cable. Ethernet Cable From Below AP 1. Route the Ethernet cable(s) through the channel in the rear of the mount. 2. Loop the Ethernet cable(s) over the top of the mount and direct the cable(s) through the opening leading to the AP’s Ethernet ports. 3. If required, route the power cable through the bottom right of mounting bracket. 4. Install the mounting bracket as described in “Installing the Mounting Bracket” on page 3. AP-220_22 Figure 1 Ethernet cable from below the AP 0511290-02 | August 2013 1 Ethernet Cable Behind AP 1. Route the Ethernet cable(s) through the large opening in the center of the mount. 2. If required, route the power cable through the bottom right of mounting bracket. 3. Install the mounting bracket as described in “Installing the Mounting Bracket” on page 3. AP-220_23 Figure 2 Ethernet cable behind AP Using The Ethernet Cable Adapter 1. Install Ethernet cable adapter(s) by sliding the female end of the adapter into the slot behind the access on the side of the mounting bracket. The adapter is secured when it clicks into place. 2. If required, route the power cable through the bottom right of mounting bracket. 3. Install the mounting bracket as described in “Installing the Mounting Bracket” on page 3. AP-220_24 Figure 3 Using the Ethernet cable adapter 2 AP-220-MNT-W2 Wall Mount Kit | Installation Guide Installing the Mounting Bracket 1. Install any necessary wall anchors. Wall anchors are not included in this kit. 2. Align the screw holes in the mounting bracket with the previously installed anchors or demarcated screw points. 3. Insert the screws to secure the mounting bracket. Screws are not included in this kit. Ensure that no Ethernet cable(s) are obstructing the screw holes. AP-220_19 Figure 4 Attaching the Adapter to a Wall 4. Attach any necessary cables and/or antennas to the AP. 5. If using the Ethernet cable adapter, connect Ethernet cable(s) through the openings on the side of the mounting bracket. To disconnect Ethernet cable(s) from the adapter after the installation is complete, you must remove the AP from the bracket to access the RJ45 locking tab. 6. Push the metal slider up to allow the AP to connect. 7. While still pushing the metal slider, align the mounting posts on the bracket with the mounting holes shown in Figure 5. 8. Install the T8 Torx security screw into the screw hole on the bottom of the mounting bracket, next to slider to complete the installation. AP-220-MNT-W2 Wall Mount Kit | Installation Guide 3 AP-220_20 Figure 5 Attaching the AP to the Mounting Bracket AP-220_21 Figure 6 Completed Installation 4 AP-220-MNT-W2 Wall Mount Kit | Installation Guide