1
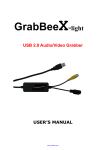
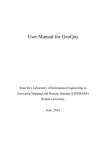
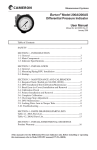
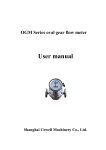
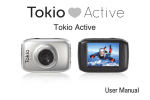
S-View Microscope Digital Camera
(I)Simple Installation Guide
Installation steps are as follows:
1. Install the digital camera hardware
1) Open the package, connect the digital camera with camera lens, and then
insert it into the microscope eyepiece;
2) Insert the video camera's USB cable into the computer's USB2.0 interface,
and the hardware installed.
2. Install the driver
Double-click the driver file in the CD-ROM to install. During the installation process
can choose the next step. Driver installed.
Note: Non-drive video camera can omit this step.
3. Install the software
1) install the codec,ffdshow_rev3452_20100524.exe;
2) Install the S-Viewer software,S-Viewer setup.exe.
Default, during the installation process you can select Next to install the above
software can be correctly.
4. Use the software
Open the desktop shortcut
,Into the interface operation. S-Viewer concrete
how to use the S-Viewer, please see the instructions.
[email protected]
www.ysctech.com
510.226.0889
S-View Microscope Digital Camera
(II)User Manual of S-Viewer
[email protected]
www.ysctech.com
510.226.0889
S-View Microscope Digital Camera
Part 1. Overview
S-Viewer is a kind of professional software specially exploited for the application of digital
microscope, belonging to the S-VIEW Digital Micro-software series. It satisfies the demand for
visualization of operating morphology on PC in the field of medical, education, scientific research,
industrial production, material, chemical engineering, metallurgy & mining, etc., playing an
important role in the interaction between human beings and digital microscope of every kind.
After a long period of use by experts in the fields mentioned above, it improves gradually in the
aspects of functionality, easy operability, stability, etc.. In the meanwhile, the micro-digital camera
and microscope which go with it also develop to a higher level, thus promoting the development
of digital microscope to a large extent.
Characteristics (real-time processing, real-time measurement, several RGB
alternatives)
·Applicable for all kinds of USB 2 .0 interfaces, supportive of cam of DIRECTSHOW
·With the functions of real-time video processing, including Flip horizontal, flip vertical,
grayscale,
emboss,
sharpen,
binary,
negative
image,
all
of
which
adopt
effective
algorithm—hardly affect video’s frame rate.
·Supportive of measurement of dynamic video, and it lessens measuring steps and shortens the
time for measurement .
·With memorable RGB adjustment, it makes color rendition to be lifelike to the largest extent; it’s
available to set several RGB alternatives and brings great convenience to users as well as the
perfect solution of color rendition.
·Easy to handle, able to inosculate measured data, file headlines, dates and rulers into the images,
and it’s supportive of fast preservation.
·Feasible for writing in detailed information about file while maintaining the image, strengthening
the description of imaging files.
Functions
·Video selection, video previewing setting
[email protected]
www.ysctech.com
510.226.0889
S-View Microscope Digital Camera
·Video previewing, photograph, continuously shoots, video
·Adjustment of video parameter (luminance, contrast, saturation, chroma, gamma, clarity)
·Automatic white balance (AWB),automatic exposure
·Real-time video processing: flip horizontal, flip vertical, grayscale, emboss, sharpen, binary,
negative image
·RGB tricolor real-time match, memorable, controllable
·Full-screen displaying
·Measurement calibration, measurement setting
·Dynamic real-time measurement (straight line, angle, circle, three-point circle, rectangle)
·Static image measurement (straight line, angle, circle, three-point circle, rectangle)
·Document loading, preservation
[email protected]
www.ysctech.com
510.226.0889
S-View Microscope Digital Camera
Part 2. Operating Instructions
·Chapter 1. Basic Operation of Capturing Video Previewing
1. Use this software for the first time
After you have downloaded the software and start it up for the first time, you will see a device for
video capturing for video previewing, the image is as follows:
2. Select the target video device
When more than one video device appears on computer, this software allows you to select the
target video device. Select menu—>options—>select video device. When the dialog box “select
video device” pops up, you can select the target video device in the list of devices. Click OK to
preview.
3. Set video previewing size
Select menu—>options—>set video previewing, and when the dialog box “attribute” pops up, you
can change the video previewing size by choosing from the options in the list of output size.
4. Set video attribute
Select menu—>options—>set video attribute to adjust the basic parameter of video.
5. Capture the video
Save: select menu—>file—>save, it will save automatically according to the information in “set to
be saved”.
Set to be saved: select menu—>options—>set to be saved, then the dialog box of “set to be saved”
will pop up.
[email protected]
www.ysctech.com
510.226.0889
S-View Microscope Digital Camera
Save as: select menu—>file—>save as, then the dialog box of “Save As” pops up.
·chapter 2 Detailed Operating Instructions
2.1 Menu Bar
·File:
[email protected]
www.ysctech.com
510.226.0889
S-View Microscope Digital Camera
1)
:Whe
n video previewing is turned off, you can
select this to start a new video previewing;
2)
: Load
pictures from local disk, and it will display
in windows; operations like dynamic
measurement can also carry on.
3)
: Close
the
current
video
windows
pictures-displaying windows;
4)
or
:
Automatically save an image of the current
video or save the current images to the
default path.
About principles of taking out files, see menu
—>options—>set to be saved;
5)
: See
the dialog box of “Save As” on the left;
6)
:
Quit.the application.
[email protected]
www.ysctech.com
510.226.0889
S-View Microscope Digital Camera
·View
1)
: Display or conceal the status bar;
2)
: Display or conceal the consequently-used tool bar;
3)
: Display or conceal the measuring tool bar;
4)
: Display video in full screen.
·Video:
1)
: Adjust video parameter (Luminance, contrast, saturation, clarity,
gamma, chroma, etc.);
[email protected]
www.ysctech.com
510.226.0889
S-View Microscope Digital Camera
2)
: Start using or closing real-time processing or real-time
measurement;
3) All of the effects of processing are as follows:
Original Image
Grayscale
[email protected]
Flip Horizontal
Negative Image
www.ysctech.com
Flip Vertical
Sharpen
510.226.0889
S-View Microscope Digital Camera
Original Image
4)
Emboss
Binaryzation
: If you want binaryzation on video, you can adjust the threshold value
of
binaryzation (1 to 255) to display dynamically. Start using check box to use or close the
binaryzation real-time processing effect.
5)
: Start or close RGB real-time alternative video;
: Start or close RGB
adjustment;
:
Display
high-level panel;
:
Conceal
high-level panel
Pitch on check box, adjust the
red-green-blue sliding road for
video tricolor match;
Apply: Select options from list
box and then apply them to the
current video;
Add: Click “add”, input option
names,
add
the
adjusted
red-green-blue value to the
database, and it will display in
[email protected]
www.ysctech.com
510.226.0889
S-View Microscope Digital Camera
the list;
Delete: Select options from list box, then delete options from the list or database;
· Measure:
[email protected]
www.ysctech.com
510.226.0889
S-View Microscope Digital Camera
Operation Type
Operation Instruction
Displaying Value
Movement
First, select the image to be moved, now the image
displays in dotted line, then mark the accumulation of
movable points, movable points or the whole.
Display the length
of the line
Line-measurement
Select the starting point, click the left button of the mouse
and keep it, then move it till the end; finally, release the
mouse.
Click three points in different positions with the mouse to
form an angle.
Display the angle
Display the area
of the rectangle
Rectangle-measurement
Select the top left corner of a rectangle, click the left button
of the mouse and keep it, then move it till the lower right
corner of the rectangle; finally, release the mouse.
Display the radius
Circle-measurement
Select the centre of a circle, click the left button of the
mouse and keep it, then move it till the point on the arc;
finally, release the mouse.
Click three points in different positions with the mouse to
form a circle.
Display the radius
Angle-measurement
Three-point
Circle-measurement
Click the image to be deleted.
Delete
Delete all the images.
Eliminate
:
[email protected]
www.ysctech.com
510.226.0889
S-View Microscope Digital Camera
Unit: um/mm/cm/inch
X Direction: the length in the direction of X in scaleplate
Y Direction: the length in the direction of Y in scaleplate
Demarcation Adjustment: Move the movable points (in the blue circle) of demarcating ruler on the
Image, the value of trim size (unit length per pixel) will change.
Save: Save the currently demarcated parameter to hardware;
Load: Load the demarcated-parameter file from the hardware.
: Set the colors of measuring lines, movable points and words.
[email protected]
www.ysctech.com
510.226.0889
S-View Microscope Digital Camera
·Options:
:
1)
: Set the size for video previewing, etc.
2)
3)
: Adjust parameters like Luminance, contrast, chroma,
saturation, clarity, gamma, white balance,automatic exposure, etc.
4)
: Set saving parameters, including save path, file name,
summary information, etc.
[email protected]
www.ysctech.com
510.226.0889
S-View Microscope Digital Camera
File Name: Prefix +postfix +file format,
e.g., Image1.bmp, Image2.jpg
Folder: Select the place to save files
Image Type: Bitmap files or Jpeg files
Save with Title: Put the title under
description into images
Save with Date/ Time: Put the date/ time into images
Save with Measurement: Put the measured data into
images
Save with Demarcation: Put the measured
demarcation into images
Description: Put contents about title and the
author into the summary information
about the file
·Window:
1)
[email protected]
: Effects of Cascading
www.ysctech.com
510.226.0889
S-View Microscope Digital Camera
2)
: Effects of Tiling
·Help:
[email protected]
www.ysctech.com
510.226.0889
S-View Microscope Digital Camera
1)
: Display document of software-operation-help;
: Display information and instructions about software versions;
2)
2.2. Tool Bar
·Constantly Used Tool Bar
1)
2)
3)
4)
: See the file submenu in menu 2.1;
: Come back to the video previewing
: Pause the video previewing
: Video captured, capture video images
to display in the newly-opened window;
5)
: Interval Capture
Wait(sec): Several seconds later, this
function is set to work
Interval: Several seconds later,
another photo is available to be taken
Images: The amount of photos that
have been taken
[email protected]
www.ysctech.com
510.226.0889
S-View Microscope Digital Camera
6)
: Record
Select path: Select the address for saving video files and file names
Start: Start videoing
Pause: Pause the video
Stop: Stop videoing
7)
: Video attribute adjustment, see “video adjustment” in video submenu in menu 2.1
8)
: Display the video in full screen
·Processing Tool Bar
See the video submenu in menu 2.1
·Measuring Tool Bar
See the measurement submenu in menu 2.1
[email protected]
www.ysctech.com
510.226.0889
S-View Microscope Digital Camera
·part
3 Problem shooting
1. Previewing fails, blank screen
1) Check whether there is source of light or not, and whether the exposure value of video
attribute is normal;
2) Check whether video device is connected, and video device driver is installed in Device
Manager;
3) Check the dialog box of “select video device” to make sure the correct target video device is
selected;
4) Close the software and restart it;
5) Close the software, pull the cam out and plug it in again, then restart the software;
6) Close the software, restart computer and the software;
Please operate in line with the steps above, till you can preview normally. But if it still cannot
work after you have followed all of the six steps, please contact Customer Service.
[email protected]
www.ysctech.com
510.226.0889