1
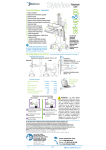
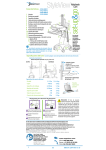
Setting Up Your Network Management Card
About Your Network Management Card
1
4
1
5
2
2
6
w
w
l.c
el
.d m
w o
w .c
w ell
.d
w
om
3
3
MAC address
book.book Page 1 Monday, May 5, 2008 11:15 AM
Safety, Environmental, and
Regulatory Information
EXAMPLE
1
4
Verify the package contents
1. Network Management Card
2. Serial cable
3. Setup instructions
4. Safety, Enviromental, and
Regulatory Information
2
Note the MAC address on the card
3
Remove the cover from the
UPS communication bay
1. Ethernet port (10/100BaseT)
4. Settings port
2. ACT LED (green)
5. UPS Data LED (green)
3. 100M LED (orange)
6. RS232 LED (orange)
Ethernet Port (10/100BaseT)
ACT LED (green)
UPS Data LED flashing
100M LED (orange)
Off
Card is not connected
to the network
On
Card is connected
to the network,
but no activity
Flashing
Port is sending/
receiving
Off
Port is operating
at 10 Mbits/s
On
Port is operating
at 100 Mbits/s
Off
Card is starting
On
Card is communicating
with the UPS
Flashing
Normal operation;
communication with
the UPS is operational
On
Configuration menu
is activated
Off
Normal operation;
Configuration menu
is not activated
Settings Port
ACT
100M
UPS Data
RS232
UPS Data LED (green)
RS232 LED (orange)
4
Insert and secure the card
with the retaining screws
5
Connect an Ethernet cable to the card
and to the network (not supplied)
NOTE: You can set the card parameters
via the Settings Port even if the network is
not connected
www.dell.com | support.dell.com
6
Wait approximately two
minutes until the UPS Data
LED flashes regularly,
indicating normal operation
Configuring the Card
Accessing the Card
If your network is not equipped with a BOOTP/DHCP server
IP Default Settings:
IP Network
Configure the card manually. To set the network configuration:
BOOTP/DHCP enabled
3. The home page displays:
2. Press the 2 key for Modify Network settings.
Subnet mask: 255.255.0.0
2. Enter the card’s IP address in the address bar:
https://xxx.xxx.xxx.xxx/ (for example, https://166.99.1.82/)
1. Press the 2 key for Network configuration.
IP address: 192.168.1.2
1. Run a Web browser.
Follow the instructions and enter the IP parameters:
Gateway: 0.0.0.0
NTP server: pool.ntp.org
__________________________________________________
Web page access control
ser name: admin
U
Password: admin
NETWORK SETTINGS :
Settings port access control
Password: admin (not modifiable)
Date and time
Synchronize with an NTP server (GMT)
__________________________________________________
1. Connect the serial cable to the card’s Settings port and the computer’s COM port.
2. Start a terminal emulator, such as HyperTerminal®, with these settings:
Bits per
second
Data bits
Stop bits
Parity
Flow control
9600
8
1
none
none
“Echo typed characters locally” option: disabled.
3. Type admin.
__________________________________________________
NETWORK
MANAGEMENT CARD :
__________________________________________________
1 : Reset
2 : Network configuration
3 : Set Login Password to Default
4 : Return to Default Configuration
0__________________________________________________
: Exit
1 : Read Network settings
2 : Modify Network settings
3 : Set Ethernet speed
0 : Exit
__________________________________________________
For each of the following questions, you can press
<Return> to select the value shown in braces, or you can
enter a new value.
Should this target obtain IP settings from the network?
[N] N
Static IP address [172.17.21.94]? 172.17.21.21
Subnet Mask IP address [255.255.248.0]? 255.255.255.0
Gateway address IP address [172.17.17.1]? 172.17.17.1
Done
__________________________________________________
4. Set the time by clicking the Time command.
5. Continue configuration via the sections in the Settings menu.
Wait until Done displays, indicating that the IP parameters have been saved.
3. Press the 0 key to exit.
If your network is equipped with a BOOTP/DHCP server (default)
The card automatically collects the IP parameters from the server.
To view the parameters:
4. Press the 1 key to reset.
5. Press the 2 key to restart.
The card restarts with the new IP settings in approximately one minute.
1. Press the 2 key for Network configuration.
2. Press the 1 key for Read Network settings.
The card displays the settings supplied by the server.
__________________________________________________
NETWORK
CONFIGURATION :
__________________________________________________
MAC address : 00:20:85:FD:1C:07
Mode : DHCP
IP address : 192.168.1.2
Subnet mask : 255.255.248.0
Gateway
: 166.99.17.1
__________________________________________________
3. To exit, press the 0 key twice.
Information in this document is subject
to change without notice.
© 2009 Dell Inc. All rights reserved.
This setup document and the Dell Network
Management Card User’s Guide are available
in other languages at: support.dell.com
Reproduction of these materials in any
manner whatsoever without the written
permission of Dell Inc. is strictly forbidden.
Français
Ce document de configuration et le
Guide d’Utilisation de la Carte de Gestion
de Réseau Dell sont disponibles dans
d’autres langues sur : support.dell.com
Dell and the DELL logo are trademarks of Dell Inc.
Dell disclaims proprietary interest in the marks and
names of others.
May 2009
www.dell.com | support.dell.com
Deutsch
Das vorliegende Dokument zur Konfiguration
sowie die Bedienungsanleitung für die
Dell Network Management Karte sind in
weiteren Sprachen unter der folgenden
Adresse erhältlich: support.dell.com
日本語
このセットアップ用説明書および Dell
Network Management Card ユーザー
ガイド はこちらのリンクにて他の言語でも
ご覧いただけます:support.dell.com
한국어
이 설치 문서와 Dell 네트워크
관리 카드 사용자 가이드는 아래의
사이트에서 다른 언어로도 입수할
수 있습니다: support.dell.com
Русский язык
Данная инструкция по настройке ,
а также Руководство пользователя
платой сетевого администрирования
Dell доступны на других языках
по адресу: support.dell.com
简体中文
本安装手册和戴尔网络管理卡
用户指南在网站上提供下列语
言版本: support.dell.com
Español
Este documento de instalación y la Guía del
Usuario de la Tarjeta de Manejo de Redes
de Dell se encuentran disponibles en otros
idiomas tales como: support.dell.com
繁體中文
此安裝文件和戴爾網路管理卡使用
者指南的下列語言版本,可在網
站上取得: support.dell.com