1
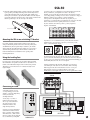
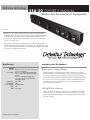
Definitive Technology
SSA-50 OWNER’S MANUAL
Mythos Solo Surround Array Loudspeakers
Thank You
Thank you for choosing the Definitive Technology Mythos Solo Surround Array
Loudspeaker System. The Mythos SSA-50 is a unique speaker that provides a stunning
5-channel surround experience from just one speaker. This extraordinary speaker
makes enjoying a high performance surround audio system more convenient than
ever before. You chose wisely.
Our engineers spent many years developing this product. In order to ensure that you
experience the finest performance possible, we encourage you to take a moment to fully
read this owner’s manual and familiarize yourself with the proper installation and set-up
procedures for your Mythos SSA-50 speaker.
Unpacking Your SSA Speakers
Specifications
SSA-50
Dimensions:
Driver Complement:
Frequency Response:
Nominal Impedance:
Rec. Assoc. Amplification:
Sensitivity:
Weight:
461/4" W (117.45 cm) x 41/8" D (10.48 cm) x 53/8" H (13.65 cm)
(speaker only, not including bracket)
Three 41/2" (11.4 cm) BDSS High-output drivers with coincident
array 1" (25 mm) ferro-magnetic fluid damped pure aluminum
dome tweeter.
Two 41/2" (11.4 cm) BDSS High-output full-range drivers.
Four 31/4" (8.3 cm) full-range high-output surround drivers
with butyl rubber surrounds.
50 Hz – 30 kHz
8 Ohms
20 – 200 Watts/channel
90 dB
31 lbs. (4.52 kG)
Please Inspect For Shipping Damage
Each loudspeaker leaves our plant in perfect condition. Any visible or concealed
damage most likely occurred in handling after it left our plant and should be reported
at once to your Definitive dealer or the delivery company that delivered your loudspeaker. Please unpack your system carefully. Save all cartons and packing materials in
case you move or need to ship your system. Record the serial number found on the
back of the Mythos SSA in the appropriate place on the product registration card,
answer all questions and send it in.
VERY IMPORTANT: Accessories
Various parts and accessories that you will need to use your Mythos SSA are in the
carton but are easy to overlook. Open both ends of the shipping carton. Carefully
examine the contents of the shipping carton and packing material to find the plastic
bags with accessories.
Specifications subject to change without notice.
SSA-50 OWNER’S MANUAL
Definitive Technology
Positioning the SSA
If placed on a shelf under a TV, adjust the
leveling feet (screwed all the way in) to
aim the speaker up towards the listeners.
The SSA speaker may be mounted on
the wall above or below the video screen.
It may be SSA-50
placed on
a table orTemplate
shelf
Mounting
Revised
in front of the TV.
The SSA speaker may be placed directly
on top of TVs that have at least 5-inches
(13 cm) of flat surface on top. Do not
place the SSA speaker on top of any
surface that is not large or stable enough
to securely support the speaker. If the
speaker seems at all unstable or “tipsy”
place the speaker somewhere else. The
warranty does not cover damage
caused by falls due to improper
positioning of the speaker. If the
speaker is above seated listener height,
extend the leveling feet to point the
speaker downward [See Using the Leveling
Feet on page 3].
Even if you intend to place the SSA speaker on a TV or shelf you must attach the wall-mount bracket to the speaker. See Using the Leveling Feet on page 3.
Wall Mounting the SSA
•
We recommend that the SSA speaker be wall mounted
by professional installers or by those appropriately skilled in the
use of power tools and who have knowledge of building codes
and structural issues.
•
We recommend that you determine a suitable location for
your speaker installation, and that you complete all wiring
(especially
“hidden”
SSA-50 Mounting
Screw
Diagram in-wall wiring) before mounting the
bracket to your wall.
•
Mythos Brackets are not suitable for ceiling mounting.
5. Use a bubble level to make sure the template is level. If the
TV is wall mounted and not level, the speaker will look better
if it is off-level in exactly the same way as the TV.
6. Use push pins to secure the template to the wall.
The Mythos Solo Surround Array loudspeaker comes with a wall
mounting bracket and template that makes secure mounting a breeze.
Follow these directions for installing the wall mounting bracket.
THREADED INSERTS
1/4"
– 20 SCREWS
BACK OF SPEAKER
TOP OF SPEAKER
7. Mark the location of pilot holes noted on the Mounting
Template with a pencil; remove the template.
8. Pre-drill the pilot hole locations for mounting screws
(not included). Use screws rated to hold securely in the
wall material (we recommend #10 screws).
9. It is best if at least one screw hits a wall stud. If there is no
stud behind the pilot hole location, install wall anchors (not
included) to secure the bracket screws. Follow the wall anchor
manufacturer’s directions. Each wall anchor should be rated
to hold at least one-half of the product net weight
[see specifications on front cover].
1. Two 1⁄4"–20 screws have been factory installed on the back of the
speaker. Gently hand-turn the screws to make sure they are in as
far as they can go. Do not force them beyond the “stop” point.
The screws cannot screw all the way into the speaker and should
protrude as shown in the illustration.
2. Make sure the location you have selected for wall-mounting
does not conceal behind-wall electrical wiring or plumbing.
3. Hold the cardboard template (included) in the intended
location. Make sure the speaker clears the ceiling, adjacent
walls, corners, beams, lighting fixtures and door/window
frames. Leave at least 11/2" (38 mm) above the speaker location
to allow the speaker to slide down onto the bracket.
2
4. Make sure the center of the template is perfectly centered with
the TV screen.
10. For masonry walls, use a masonry drill bit to pre-drill holes,
and use masonry anchors and screws (not included).
11. Pull the five sets of speaker wires through the hole in the bracket.
12. Screw the bracket to the wall.
SSA-50 OWNER’S MANUAL
13. When the wall mounting bracket is securely screwed to the wall, line
up the speaker’s protruding Mounting Screws with the keyhole slots
on the wall mounting bracket. Let the speaker slide straight down,
allowing the screw heads to slip behind the smaller end of the keyhole
slots. Gently push the bottom front edge of the speaker toward the wall
until the speaker snaps onto the lower lip of the bracket.
or receiver to the red (+) terminal on your speaker and the wire from the
black (–) terminal of your amplifier or receiver to the black (–)
terminal on your speaker. Most speaker wire has some indicator (such as
color-coding, ribbing or writing) on one of the two conductors to help you
maintain consistency. It is essential to connect all channels
of the speaker to the amplifier in the same way (in phase). If you
experience a poor surround effect, it is likely that one or more of the channels is connected in incorrect polarity and needs to be rewired.
Pay close attention and connect positive to positive; negative to
negative on all channels.
+
–
FRONT
LEFT
RIGHT
SURROUND
RIGHT
LEFT
CENTER
SSURR. BACK/REARR
RIGHT
LEFT
FT
SPEAKERS
Mounting the SSA to an articulating TV bracket
If you have a 6.1 or 7.1 channel receiver, connect the SSA’s surround
channel inputs to the “Surround” outputs of your receiver, not the
“Rear” or “Surround Back” outputs.
If you have a Plasma or LCD TV that is attached to the wall via a
swing-out articulating bracket such as those offered by Chief, Sanus
and OmniMount, the SSA speaker may be attached to the bracket
without using the SSA wall-mount plate. Simply use 1⁄4"–20 screws to
attach the SSA speaker directly to the TV bracket. Consult the TV
bracket manufacturer’s user manual for more specific speaker
mounting instructions.
To connect wire to the binding post [see figure above], unscrew the knurled
nut and insert the bare wire into the hole near the base of the binding
post. Do not insert the insulated part of the wire into the hole as this will
not give you a good connection. Twist the nut back down the binding post
until it firmly meets the wire. Do not over tighten.
Using the Leveling Feet
If you are going to use the speaker on a TV, shelf or table, first attach
the wall-bracket to the speaker as described above. Attach the two “L”
brackets to the wall-bracket using two M4 x 10 mm screws provided.
Thread the foot screws into the two “L” brackets and adjust to the
required height.
Connect a single RCA cable from the “SUB OUT” of your receiver
to the LFE input of the subwoofer (not included). This connecting
method bypasses the subwoofer’s internal “crossover” or low pass
filter and relies on the crossover filter built into your receiver.
NOTE: Make no other signal connections. Do not use speaker wire to make
the connection to the subwoofer
SSA-50
+
–
Connecting the SSA
Your Mythos SSA has one pair
of 5-way binding posts for each
channel — Left Front, Right Front,
Center, Left Surround
and Right Surround.
SURROUND FRONT
RIGHT
RIGHT
95
Left
High Level
CENTER
FRONT
LEFT
Right
+
150
Variable
Low Pass Crossover
40
In
–
LFE
IN
–
To start, strip 1/2" (3 mm) of
insulation from each speaker
wire to expose the bare metal
wire and twist each of the
individual conductors into
single un-frayed strands.
Note that one of the terminals for
each channel is marked with red
band (+) and the other is marked
with black band (–). Make certain
that you connect the wire from the
red (+) terminal of your amplifier
SURROUND
LEFT
COMPONENT VIDEO
Out
MULTI INPUT
+
Automatic
Power
ON/OFF
AUDIO
VIDEO
ProCinema®
Subwoofer
Active Crossover
and Power Amplifier
120V 80Hz
T 3.2A L 250V
SUBWOOFER
(LFE)
OUTPUT
AUDIO
FRONT LEFT
FRONT RIGHT
SURROUND RIGHT SURROUND LEFT
+ – + – + – + –
–
+
IMPEDANCE SELECTOR
CENTER
RECEIVER
SUBWOOFER
3
SSA-50 OWNER’S MANUAL
Receiver/Speaker Set-up
Service
DO NOT USE THE “AUTO SETUP” FEATURE IF IT IS INCLUDED
IN YOUR RECEIVER. Because the SSA produces surround sound from
a single front mounted speaker, the auto setup feature will not operate
correctly and will actually make your system sound worse.
Service and warranty work on your Definitive loudspeakers will
normally be performed by your local Definitive Technology dealer.
If, however, you wish to return the speaker to us, please contact us
first, describing the problem and requesting authorization as well
as the location of the nearest factory service center. Please note
that the address given in this booklet is the address of our offices only.
Under no circumstances should loudspeakers be shipped to
our offices or returned without contacting us first and
obtaining return authorization.
Access Your Receiver’s “Speaker Set-up” or
“Speaker Configuration” menu
1. In the Speaker Set-up/Configure function of your
receiver, set all channels to “Small.”
2. Select “Yes” when asked if you are using a subwoofer.
3. Set the subwoofer crossover frequency on the receiver to 120 Hz.
In the receiver’s “Speaker Distance” Set-up Menu, select the same
distance for all channels. If your receiver or processor uses a
“Channel delay” setup function that requires a delay-time entry,
use the minimum setting (in Ms) that it allows for the center and
surround channels.
Surround Sound Settings
Dolby Digital or DTS on all 5.1 channel programming; Dolby
ProLogic or Dolby ProLogic II for all 2 channel sources such
as radio and CDs.
Set Surround Volume Levels:
1. Set Left, Center and Right to “Zero” (0dB).
2. Set Left and Right surround levels to a minimum of “+5” dB.
Don’t hesitate to set surround channels to “+7” dB or higher in
order to hear enveloping surround sound.
Optional 6.1 and 7.1 Channel Hookup
If you choose to use additional speakers with a 6.1 or 7.1 channel
receiver, connect those speakers to the "Rear" channel outputs of your
receiver. Consult the receiver owner's manual for specific information
about 6.1 or 7.1 channel operation.
Technical Assistance
It is our pleasure to offer assistance if you have any questions
regarding your Mythos SSA or its set-up. Please contact your nearest
Definitive Technology dealer or call us directly at (800) 228-7148
(US & Canada), 01 (410) 363-7148 (all other countries) or e-mail
[email protected].
4
EJAT 012309
For more information on Definitive Technology Loudspeakers and accessories,
visit www.definitivetech.com, or email [email protected].
Definitive Technology, Owings Mills, Maryland, USA. 800-228-7148
Definitive Technology Offices
11433 Cronridge Drive, Owings Mills, Maryland 21117
Phone: (800) 228-7148 (US & Canada),
01 (410) 363-7148 (all other countries)
Limited Warranty:
5-Years for Drivers and Cabinets,
3-Years for Electronic Components
Definitive Technology warrants to the original retail purchaser only that this
Definitive Technology Loudspeaker Product (the “Product”) will be free from
defects in materials and workmanship for a period of five (5) years covering the
drivers and cabinets, and three (3) years for the electronic components from the
date of the original purchase from a Definitive Technology Authorized Dealer.
However, this warranty will automatically terminate prior to the expiration of
five (5) years for the drivers and cabinets and three (3) years for the electronic
components if the original retail purchaser sells or otherwise transfers the
Product to any other party. The original retail purchaser shall hereinafter be
referred to as “you.” Defective Products must be shipped, together with proof of
date of purchase, prepaid insured to the Authorized Dealer from whom you purchased the Product, or to the nearest factory service center. Product(s) must be
shipped in the original shipping container or its equivalent; in any case the risk
of loss or damage in transit is to be borne by you. If, upon examination at the
Factory or a Definitive Technology Authorized Dealer, it is determined that the
unit was defective in materials or workmanship at any time during this Warranty
period, Definitive Technology or the Definitive Technology Authorized Dealer
will, at its option, repair or replace this Product at no additional charge, except as
set forth below. All replaced parts and Product(s) become the property of
Definitive Technology. Product(s) replaced or repaired under this Warranty will
be returned to you, within a reasonable time, freight collect.
This Warranty does not include service or parts to repair damage caused by
accident, misuse, abuse, negligence, inadequate packing or shipping procedures,
commercial use, voltage in excess of the rated maximum of the unit, cosmetic
appearance of cabinetry not directly attributable to defects in materials or workmanship, or service, or repair or modification of the Product which has not been
authorized by Definitive Technology. Definitive Technology makes no Warranty
with respect to its Products purchased from dealers or outlets other than
Definitive Technology Authorized Dealers. This Warranty is in lieu of all other
expressed Warranties. If this Product is defective in material or workmanship as
warranted above, your sole remedy shall be repair or replacement as provided
above. In no event will Definitive Technology be liable to you for any incidental
or consequential damages arising out of the use or inability to use the Product,
even if Definitive Technology or a Definitive Technology Authorized Dealer has
been advised of the possibility of such damages, or for any claim by any other
party. Some states do not allow the exclusion or limitation of consequential damages, so the above limitation may not apply to you.
All implied warranties on the Product are limited to the duration of this
expressed Warranty. Some states do not allow limitation on how long an implied
Warranty lasts, so the above limitations may not apply to you. This Warranty
gives you specific legal rights, and you also may have other rights which vary
from state to state.
This product complies with the essential requirements
of the EMC directive 89/336/EEC.