1
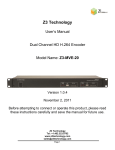
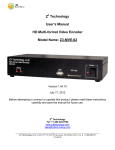
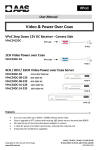
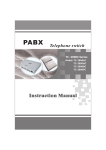
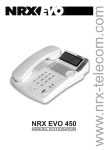
TID991
OWNER'S MANUAL
AND
OPERATING INSTRUCTIONS
FEATURES:
• Up to 99 Message Memories
• English/Spanish/French Selectable
• Name and Number Display
• Redial The Displayed Number
• Date and Time Stamp
• Real Time Clock
• 6 Levels of LCD Contrast Adjustment
• 3 One-touch Dialing Memories
• 10 Two-touch Dialing Memories
• Ringer Volume (HI/LO/OFF) Selectable
• Speakerphone Volume Control (Max to Min)
• Tone/Pulse Switchable
• Flash Time Selectable
• Mute Function
• Low Battery Indicator
Location of Controls
Data Jack
Tel Iine Jack
DC 9V Jack
Up
Caller ID
LCD Screen
Down
Mute Button
Store Button
Receiver switch
STORE
MUTE
DEL
DIAL
AUTO
M1
M2
M3
Handset holder
Auto Button
Scroll Up Button
Scroll Down Button
Tone/Pulse Switch
Delete Button
Ringer Hi/Lo/Off Switch
Dial Button
One-touch Memory Button
(M1-M3)
Volume Switch
Speaker
Ringer
Indicator
RINGER
Keypad
IN USE
FLASH
Flash Button
Redial Button
REDIAL
KER
SPEA
In Use LED
Microphone
Speakerphone Button
Microphone
DATA JACK
It can let you connect to PC or Fax machine.
WALL MOUNTING ON A TELEPHONE WALL PLATE
•
The telephone can be mounted on a wall phone plate. (Fig .1)
•
When the telephone is mounted on the wall, the reversible handset holder must
be adjusted so it will hold the handset.
•
Attach the wall mount bracket into bottom of the phone. (Fig .2)
•
Using the short line cord supplied plug one end into the Tel Line jack on the back
of the phone.
•
Plug the other end of the cord into the wall jack.
•
place the phone, over the wall plate making sure both posts fit into slots on the
back of the phone. Then push down to lock the phone into place on the wall plate.
AC ADAPTOR FOR DC JACK
SPECIFICATION:OUTPUT-DC 9V 100MA
POLARITY OF PLUG
+
–
+
Fig.1
Fig.2
SETTING UP
You must finish the pre-setting before using the unit. Install 3pcs AA batteries (Not Included)
or DC adapter (Not Included), then press and hold [UP] and [DOWN] button for six seconds
until the LCD display Adjust Contrast to enter the setting manual including LCD Contrast
Adjustment, Language Selectable, Area Code Setting and Time/Date Setting:
A.
LCD Contrast Adjustment
- When Adjust Contrast display on LCD, use [▲] and [▼] to select the contrast
level. There are totally six levels to select.
- Press [DEL] to confirm
B.
Language Selectable
- After LCD contrast adjustment, the LCD will display ENG, ESP, FRA
(ENG=English, ESP=Spanish, FRA=French), use [▲] and [▼] to select the
desire language mode.
- Press [DEL] to confirm
C.
Area Code Setting
- After language setting, the LCD will display ENTER AREA CODE, use
[▲] and [▼] to set the first digit of area code.
- Press [DEL] to confirm
- Use the same method to set the rest of digits.
D.
Time/Date Setting
- After area code setting, the LCD will display ENTER TIME DATE, use
[▲] and [▼] to set time.
- Press [DEL] to confirm
- Use the same method to set Date
Note: If you want to reset the Press and hold [▲] and [▼] and [DEL] for six seconds
at the same time, all of the present setting will be cleaned.
DESCRIPTION OF DISPLAYING
A. 3 line LCD displaying, upper line displays the basic information, middle
line displays the number of in-coming call and bottom line displays the
name of caller
• "NEW" appears when there are new incoming calls
• "CALL #" means the total amount of incoming calls
• "RPT#" means the total amount of repeated incoming calls
• "XX:XX AM/PM XX/XX" means Hour:Minute Morning/Afternoon
Month/Day respectively
• "MGS" means Message
B. If a number was received more than once, the LCD will only display
the time and date of the last call when review the incoming calls.
C. If the time and date of incoming call is different from the Telephone
Company, the telephone will adjust the time and date automatically
according to Telecom Provider when receiving calls.
D. If there is no operation or no incoming calls more than 30 seconds,
LCD only displays time and date, total amount of received calls and
amount of new incoming calls
E. Ringer LED will light when there is a new call coming in until any
functional keys be pressed.
F. This telephone can store up to 99 incoming calls. If there is a new call
after the 99th call, the oldest one will be erased automatically and the
new call will be stored.
CALLER ID STATUS INDICATIONS
'UNAVAILABLE'
The call is made through a telephone company which does not offer Caller
ID service.
'PRIVATE'
The call was blocked. For privacy reason, many states allow callers the
option to prevent his or her telephone data from being displayed on the
other part's Caller ID display. If you receive a call which was blocked in
this way, "PRIVATE" will be shown on the display.
'LINE ERROR'
An error data was received. When ERROR is shown on the display, the
telephone number may include some error digits.
OPERATION INSTRUCTION
Viewing the caller ID list
This unit can store up to 99 calls received
Press [▲] and [▼], the display shows the previous (older) data of call. When
the oldest data is viewed. "END OF RCV" will appear on the display. If the
received number contains your own area code, the area code will not appear
on the screen.
Erasing data from the caller ID list
This unit maintains the data of last 99 calls in memory. If there is a new
call after those 99 calls, the oldest data will be automatically erased and
the new call will be stored.
To erase one stored number at a time
1. Press [▲] and [▼] button to select the data
2. Press [DEL] twice continuously and the displayed data will be erased.
If you press [DEL] for more than 6 seconds, the entire list will be deleted.
Calling back a number from the caller ID list
- Press [▲] and [▼] to select the wanted number
- Pick up the handset, press [DIAL] twice to dial the displayed
number out
- Or press [DIAL] key once, then press [DEL] key once and press [DIAL]
key once again, the displayed number with adding '1' as first digit will
be dialed out automatically (add "1" before dialed number)
Tone/Pulse Selector
Select the type of dialing that you desire or that your telephone system
requires.
TONE.... The unit will operate using tone dialing.
PULSE....The unit will dial using rotary dial type pulses.
Ringer Volume Control (Hi/Lo/Off)
- Slide the [RINGER] switch to 'HI' position or 'LO' position to turn the
ringer on. 'HI' for high volume and 'LO' for low volume
- Slide the [RINGER] switch to 'OFF' position to turn the ringer off. You
still can dial out, but cannot hear ringer sound of any incoming calls.
(Ringer LED will still flash to remind you there is incoming call.) Don't
forget to switch the ringer to 'ON' (i.e. 'HI' or 'LO' position), otherwise,
you cannot hear the ringer on next time.
Speakerphone Volume Control (Max to Min)
- Slide the "SPEAKER" switch from the right side of the base unit to
adjust the speakerphone volume from maximum (Max) to minimum
(Min).
In Use Indicator
This bulb will light if you lift the receiver-showing you the phone is connected
properly and will remind you the handset if off the hook or not seated in
the base properly.
Last Number Redialing
The last number you called can be redialed automatically. This is useful
especially if lines is busy.
1. Get a new dial tone and press REDIAL button.
2. To get a new dial tone press the HOOK SWITCH or hang up the phone
for 2 seconds. Then press REDIAL. This phone will remember the last
number dialed even overnight.
Flash Time Selectable
When in an office equipped with PABX, your unit makes it easy to transfer
calls.
-
Ask calling party to wait.
Press and release FLASH button.
Dial number to which call is intended.
When the party answers, announce the call and hang up
If you receive a busy or no answer:
Press and release FLASH button to re-connect to calling party.
You may select the flash time by following steps:
- Under on-hook or off-hook state, Press [STORE] and [FLASH] key
at the same time.
- The LCD will display 'FLASH', press the number among 0-9 to select
the flash time:
1: 100ms
7: 700ms
2: 200ms
8: 800ms
3: 300ms
9: 900ms
4: 400ms
5:500ms
0: 1200ms
6: 600ms
Mute Function
Holding down the 'MUTE' button prevents the other party from hearing your
conversation with other people on your side until the button is released.
To Store 3 One-Touch (M1/M2/M3) Dialing Memories
-
Get the dial tone
Press [STORE] button
Enter the number you want to store
Press the desire one-touch button (M1/M2/M3)
To Store 10 Two-Touch Dialing Memories
-
Get the dial tone
Press [STORE] button
Enter the number you want to store
Press [AUTO] button
Press the desire location among the digit 0-9
To Dial 3 One-Touch (M1/M2/M3) Dialing Memories
- Get the dial tone
- Press M1/M2/M3 (the location which was stored) to dial out the
number
To Dial 10 Two-Touch Dialing Memories
- Get the dial tone
- Press [AUTO] button
- Press the digit among 0-9 (the location which was stored) to dial out
the number
IMPORTANT NOTES
To operate the unit, you must have 'CALLER ID SERVICE' setup with your local telephone company.
Some functions such as 'CALLER NAME INDICATION' will only operate if such services are included
in the user's Caller I.D. program with the local telephone company.
1. Name
2. Number
3. New calls
4. Number of calls
5. Number of Repeat Call
6. Clock
7.AM/PM
8. Date
9. On Call Indicator
10. Message
11. Low Battery Indicator
12. Speakerphone
IMPORTANT SAFETY INSTRUCTIONS
When you use this telephone, follow these safety precautions to reduce
the risk of fire, electric shock and injury.
- Read and understand all instructions
- Unplug the phone from the wall jack before cleaning with a damp cloth
- Do not use liquid or aerosol cleanser. Do not use this phone near water
for example, near a bath tub, sink, or pool
- To reduce the risk of electric shock, do not push objects through the
phone's slot or disassemble the phone. Pushing objects in the phone
or opening or removing covers might expose you to dangerous voltages
or other risk. Take it to a service person when service to repair is required.
Incorrect reassemble can cause electric shock when you use the telephone
- Do not place the phone on a bed, rug, and any similar surface or near
a heater. The phone has slots and openings for ventilation that must not
be blocked or covered.
- Do not place this phone on an unstable cart, stand or table. The phone
might fall and be seriously damaged
- Unplug the phone from the phone line jack and refer service to
service person under the following conditions.
a. If the phone is exposed to rain or water
b. If the phone fails to operate normally
c. If the phone is dropped or the cabinet is damaged
d. If the phone exhibits a distinct change in performance
- Avoid using the phone during electrical storms. There is a risk of electric
shock from lightning
- Do not use the phone to report a gas leak in the vicinity of the leak
- Follow all safety rules and use with caution when installing or modifying
telephone lines. For example:
a. Do not install telephone wire during a lightning storm
b. Only install telephone jacks in dry locations unless the jack is specifically
designed for wet locations
c. Avoid touching uninsulated telephone wires or terminals unless the
telephone line is disconnected at the network interface.
SAVE THESE INSTRUCTIONS