1
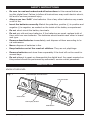
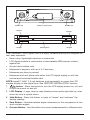
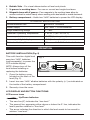
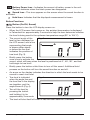
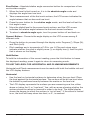
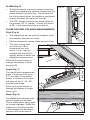
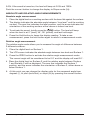
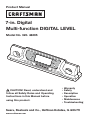
Product Manual
®
7-in. Digital
Multi-function DIGITAL LEVEL
Model No. 320. 48295
CAUTION! Read, understand and
follow all Safety Rules and Operating
Instructions in this Manual before
using this product.
•
•
•
•
•
•
Warranty
Safety
Description
Operation
Maintenance
Troubleshooting
Sears, Roebuck and Co., Hoffman Estates, IL 60179
www.craftsman.com
TABLE OF CONTENTS
Warranty
Page 2
Safety Instructions
Page 3
Description
Page 3-5
Operation
Page 5-9
Maintenance
Page 10
Troubleshooting
Pages 10
Sears Repair Parts Phone Numbers
Back Cover
ONE YEAR FULL WARRANTY ON CRAFTSMAN ® TOOL
If this Craftsman tool fails to give complete satisfaction within
one year from the date of purchase, return it to any Sears
store or other Craftsman Outlet in the United States for free
replacement.
This warranty does not include expendable parts, such as blades
and lamps.
This warranty applies for only 90 days from the date of purchase if
this product is ever used for commercial or rental purposes.
This warranty gives you specific legal rights, and you may also
have other rights, which vary from state to state.
Sears, Roebuck and Co., Hoffman Estates, IL 60179
SAVE THESE INSTRUCTIONS!
READ ALL INSTRUCTIONS!
48295 Manual_Revised_07-0620
Page 2
SAFETY INSTRUCTIONS
•
B
e sure to read and understand all instructions in this manual before using this digital level. Failure to follow all instructions may result electric shock,
fire and/or serious personal injury.
•
A
lways use two “AAA” size batteries. Use of any other batteries may create
a risk of fire.
•
Insert the batteries correctly. Match the polarities, positive (+) to positive and
negative (-) to negative, as marked on the inside of the battery compartment.
•
D
o not short-circuit the battery terminals.
•
D
o not mix old and new batteries. If the batteries are weak, replace both of
them with two new batteries. The batteries should match each other in brand
and type.
•
R
emove dead batteries immediately, and dispose of them according to local ordinances.
•
N
ever dispose of batteries in fire.
•
K
eep batteries out of the reach of children. They are not playthings.
•
R
emove batteries and store them separately if the level will not be used for
several days.
•
D
o not attempt to repair or disassemble the digital level. Any repair required on
this product should be performed by authorized, service-center personnel.
description
KNOW YOUR LEVEL
Fig. 1
Power/Beeper Activate Button
Convert Button
Zero Button
LCD Display Screen
Hold Button
48295 Manual_Revised_07-0620
Page 3
Bubble Vial
Battery compartment
Magnet
Magnet
Bubble Vial
Magnet
Working base
Magnet
This Craftsman 7-inch Digital Level is a highly versatile leveling tool designed for
fast, easy operation:
•
Heavy-duty, lightweight aluminum construction
•
LCD digital module is constructed of unbreakable ABS polymer, sealed
against dirt
•
Acrylic block bubble vials
•
Measures in degrees, with up to 0.1°accuracy
•
Measures any slope in percent
•
Measures level and plumb with either the LCD digital display or with the
vertical and horizontal bubble vials.
NOTE: Install 2 “AAA” 1.5-volt batteries (sold separately) to power the LCD
module display of this digital level. See ‘BATTERY INSTALLATION “section.
1. button - Press the button to turn the LCD display screen on, off, and
to turn the sound on and off.
2. L
CD Display – Large, easy-to-read display screen reads right side up, even
when the level is upside down.
3. Hold Button - Press this button in order to “freeze” and “unfreeze” the
display reading.
4. Z
ero Button – Absolute/relative angle conversion for the comparison of two
work-surface angles.
5. C
onvert Button - Use this button to convert measurements to different units.
48295 Manual_Revised_07-0620
Page 4
6. B
ubble Vials - For visual determination of level and plumb.
7. V
-groove in working base - For use on curved and angled surfaces
8. M
agnetic base with V groove - Four magnets in the working base allow for
secure contact to metal: handy when working with steel studs or metal ductwork.
9. B
attery compartment - Holds two “AAA” batteries to power the LCD display.
TECHNICAL SPECIFICATIONS
Recommended Use
Indoors or Outdoors
Power supply
Two “AAA” 1.5-volt batteries
Angle Measuring Range
0º - 360º
Optimum Operating Temperature
0º to 40º C (32º to 104º F)
Accuracy of vials
±0.029º (level or plumb)
Accuracy of digital display
±0.1º (level or plumb)
Estimated battery life
12 hours with 2 AAA alkaline batteries
OPERATION
BATTERY INSTALLATION (Fig. 2)
This multi-function digital level
uses two “AAA” batteries
(sold separately), to power the
LCD module display.
Fig. 2
NOTE: Always turn off the
level before installing or
replacing the batteries.
1. O
pen the battery cover,
located on the back of the
level (Fig. 2).
2. Insert two new “AAA” alkaline batteries with the polarity (+/-) as indicated on
the inside of the battery compartment.
3. Securely close the cover.
LCD DISPLAY AND BUTTON FUNCTIONS
LCD screen icons
Up/Down Indicator:
•
The zero line (0º) indicates the “true level.”
•
The second line, appearing either above or below the 0° line, indicates the
level’s position relative to “true level.”
•
The arrow indicates the direction in which the level needs to be moved to
achieve “true level.”
48295 Manual_Revised_07-0620
Page 5
attery Power Icon - Indicates the amount of battery power in the unit.
B
Replace batteries when the black power bar disappears.
Sound Icon - This icon appears on the screen when the sound function is
activated.
Hold Icon: Indicates that the displayed measurement is frozen.
Button Functions
Button (On/Off, Sound)
Press the button to turn the LCD display screen on.
•
When the LCD screen first comes on, the ambient temperature is displayed
in Fahrenheit for approximately 2 seconds to help the user determine whether
the level is being used in the optimum temperature range (32º to 104º F).
•
The current angle of the
level is then displayed on
the LCD screen, and a line
representing that angle
is shown either above
or below the line that
indicates the position of
true level (Fig. 3).
•
Briefly press the button
once more to activate the
sound, which will beep when the level is positioned at 0°, 45°, 90°, and last
hold angle to true level.
•
Briefly press the button a third time to turn off the sound. Additional brief
presses on the button will turn the sound function on and off.
•
An arrow on the display indicates the direction in which the level needs to be
moved to reach true level.
•
True level is indicated
when the angle line and
the level line in the display
are together, and the
angle shows 0 (Fig. 4).
•
Turn off the level by
pressing the button
and holding it in for
approximately 3 seconds.
•
The level will shut itself off when it has not been used for 5 minutes.
48295 Manual_Revised_07-0620
Fig. 3
Fig. 4
Page 6
Zero Button - Absolute/relative angle conversion button for comparison of two
work surface angles.
1. W
hen the level is first turned on, it is in the absolute angle mode and
displays the angle from true level.
2. T
ake a measurement of the first work surface; the LCD screen indicates the
angle between that surface and true level.
3. P
ress the zero button for the relative angle mode, and the level will set the
first angle to zero.
4. M
ove the digital level to the second work surface, and the LCD screen
indicates the relative angle between the first and second surfaces.
5. To return to absolute angle again, turn the power button off and back on.
Convert Button – Converts the angle display on the LCD screen among 3
different units.
•
Press the button to proceed through the display units: Degrees (º), Slope (%),
and Pitch (in/ft).
•
Pitch readings are in increments of 1/8-in. per ft. Plus and minus signs
indicate whether the pitch is slightly more (+) or slightly less (-) than the pitch
that is shown on the display.
Hold Button
To hold the information of the current reading, press the Hold button to freeze
the displayed reading; press it again to return to measuring mode.
TO USE THE LEVEL FOR HORIZONTAL AND PLUMB MEASUREMENTS
Horizontal and Plumb measurements can be made with both the bubble vial and
the LCD display features
Horizontal
•
Use the level on horizontal surfaces to determine when they are level. Place
the level against the horizontal surface. The surface will be at true level when
the bubble is positioned exactly between the marks on the level vial.
•
The LCD display represents the surface you are measuring as a line, either
above or below the 0, or “true level,” line, with an arrow showing whether the
surface should be raised or lowered in order to be level. The digital display
shows the degree to which the surface is “out of level.” If the sound is turned
is on, the level will beep when true level, or 0°, is reached.
48295 Manual_Revised_07-0620
Page 7
PLUMB (Fig. 5)
Fig. 5
•
T
o find the plumb of a work surface, place the
digital level against the vertical surface with the
plumb bubble vial at the top. The surface will
be at true plumb when the bubble is positioned
exactly between the marks on the vial.
•
T
he LCD display will show the actual angle of
the surface. 90° is “plumb;” a beep will sound
at 90°, if the sound function is turned on.
TO USE THE LEVEL FOR ANGLE MEASUREMENTS
Pitch (Fig. 6)
•
The digital level can be used to measure pitch,
for example, the pitch of a roof.
•
Pitch is measured in inches of rise per foot of run.
•
The pitch will be read
as inches (in 1/8-in.
increments) per foot,
with a + or a - sign to
indicate that the pitch is
slightly above or below the
displayed measurement.
Fig. 6
Push the convert button to
change the display to Pitch
mode (in/ft).
Angle (Fig. 7)
Fig. 7
The digital level measures any
angle in degrees, with up to
0.1° accuracy. If the sound
button is turned on, the level
will beep at the 0°, 45°, 90°,
and last hold angle.
Push the convert button to
change the display to Angle
mode ( º).
Fig. 8
Slope (Fig. 8)
The digital level measures the
percent slope of a surface.
This is useful when laying pipe
for proper drainage. When the
display is in the slope mode,
it will measure the surface in
percent, with exact level a
48295 Manual_Revised_07-0620
Page 8
0.0%. If the sound is turned on, the level will beep at 0.0% and 100%.
Push the convert button to change the display to Slope mode (%).
ABSOLUTE AND RELATIVE ANGLE MEASUREMENTS
Absolute angle measurement
1. Place the digital level on a working surface with the base flat against the surface.
2. T
he display indicates the absolute angle between “true level” and the working
surface. The zero line indicates the level position, and the arrow indicates the
orientation of the working surface: either above or below true level.
3. T
button. The level will beep
o activate the sound, briefly press the
when the level is at 0° (level), 45°, 90° (plumb), and last hold angle.
4. P
ress the Hold button to freeze the display reading. To take a new
measurement, press the hold button again to return to measurement mode.
Relative angle measurement
The relative angle mode allows you to measure the angle of difference between
2 different surfaces.
1. Place the digital level on Surface 1.
2. The LCD screen indicates the absolute angle between true level and Surface 1.
3. P
ress the ZERO button to activate the relative-angle measurement mode.
The current angle will be considered to be 0.0° and the display will read 0.0°.
4 P
lace the digital level on Surface 2, and the relative angle between Surface
1 and Surface 2 will be displayed. The zero line indicates the Surface 1
position, and the arrow indicates the orientation of Surface 2, either above or
below Surface 1.
5. A
t this point you can change the display units for the measured angle from
degrees (°), to pitch (inch/foot), or slope (%) by pressing the convert button.
48295 Manual_Revised_07-0620
Page 9
MAINTENANCE
This digital level has been designed to be a low-maintenance tool. However, in
order to maintain its performance, follow these steps:
1. H
ANDLE the tool with care. Treat it as a precision optical device, such as a
camera or binoculars.
2. A
VOID exposing the tool to shock, continuous vibration, or extreme hot or
cold temperatures.
3. S
TORE the tool indoors and in a safe place.
4. T
he Level is designed to be weather resistant and construction-site tough. If
the level is splashed with mortar or other construction-site residue, simply
wipe it clean with a damp cloth.
5. D
O NOT immerse the level in water.
6. Aluminum surfaces can be cleaned with a non-abrasive powder.
7. R
EMOVE the batteries from the tool if it is not going to be used for an
extended period.
8. D
O NOT attempt to take the level apart.
TROUBLESHOOTING
PROBLEM
The LCD screen
will not turn on.
CAUSE
SOLUTION
• Batteries are installed
incorrectly.
• Reinstall batteries with
correct polarity.
• Battery voltage is low.
• Replace with new batteries.
• The LCD screen is
damaged.
• Take tool to Sears Service
Center.
48295 Manual_Revised_07-0620
Page 10
Notes
48295 Manual_Revised_07-0620
Page 11
Get it fixed, at your home or ours!
Just Call:
1-800-4-MY-HOME®
(1-800-469-4663)
24 hours a day, 7 days a week
For the repair of major brand appliances in your own home …
no matter who made it, no matter who sold it!
For your nearest Sears Parts & Service location,
to bring in products like vacuums, lawn equipment and electronics.
For Sears Parts & Service, to order the replacement parts,
accessories and owner’s manuals that you need to do-it-yourself.
www.sears.ca
__________________________________________________
To purchase or inquire about a
Sears Maintenance Agreement, call:
1-800-361-6665
9 a.m. – 8 p.m. Mon. – Fri. EST, 9 a.m. – 4 p.m. Sat.
__________________________________________________
Pour service en francais:
1-800-LE-FOYERMD
(1-800-533-6937)
www.sears.ca
®/ TM Trademarks
of Sears, Roebuck and Co. used under license by Sears Canada Inc.
Marque déposée/ MCMarque de commerce de Sears, Roebuck and Co. utilisée en
vertu d’une licence de Sears Canada Inc.
MD