1
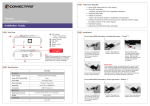
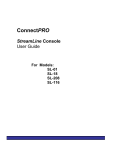
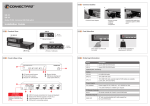
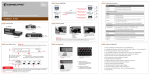
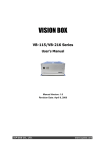
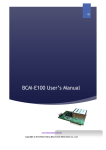
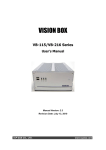
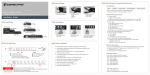
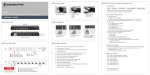
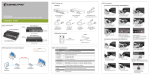
Features & Benefits
TM
Store EDID information for DVI display
True DDC emulation
- Support dual page DDC for compatible resolutions
Standard EDID data
Installs in seconds
- Easy and Compact design for installation and operation
External supply by USB connector or 5V power supply
Full EDID Cloning
Default and Cloned EDID data selectable
DVI-EDID
DVI-to-DVI DDC/EDID Emulator
Installation Guide
Unit View
Installation
DDC indicator
* Green = Default EDID
* Orange = Cloned EDID
Display
DDC button
USB B
System
USB A
TM
DVI-to-DVI
DDC/EDID
Emulator
USB B
DDC
Power input regulated
DC 5V 2000 mA
DVI-to-DVI
DDC/EDID
Emulator
TM
5V DC in
USB A
Note :
Default EDID information is not optimal for the
particular display being used. It is a generic
configuration with standard resolutions that
might function with a variety of displays.
To use cloned EDID information ( Orange light means “ Cloned ” )
1
If power is unavailable from
the computer via the DVI
pin 14, connect the optional
DC 5V power adaptor or
USB cable
DVI-EDID
Power supply
Power LED / Default EDID
Clone EDID
Clone indication
Connect DVI cable from
display to DVI port
4
Specification
Connect DVI cable between
system and DVI port
Functional
3
2
Press the DDC button.
(The light will flash 3 times
when a display is initially
cloned. When the light
changes from green to solid
orange, the clone has
succeeded. )
Special note :
In the majority of cases, the emulator should be used in "clone"
mode to provide optimal display settings for the display being
used. In the event that this is not possible (the display does not
provide DDC/EDID information, or it is otherwise not possible),
the emulator should be used in default mode. The EDID
information used in default mode is not for optimal viewing, but
rather to still provide a stable operating environment.
If required, USB or 5V DC adaptor
Green
Push button switch
Change to Orange color
Resolution
Up to 1920 x 1200@60 Hz, 2K, and 3840x 2400 ( dual link )
Connectors
DVI-I Female x 2
To use default EDID information ( Green light means ” Default ” )
1
3
2
Mechanical
Dimensions H x W x D
Weight
22 x 45 x 70 mm ( 0.87 x 1.77 x 2.76 inch )
70 g ( 0.15 lb )
Certification
FCC, CE
If power is unavailable from
the computer via the DVI
pin 14, connect the optional
DC 5V power adaptor or
USB cable
Connect DVI cable from
display to DVI port
Connect DVI cable between
system and DVI port
Application Connection Diagram
Ordering Information
Step 1
To clone EDID information first. Connect emulator to the monitor.
Model
Description
DVI-EDID
DVI-to-DVI DDC/EDID Emulator
Optional part / accessory
Cables
DDC In
TM
UC-AB-04
4-ft USB A-to-B cable
DVI-202-01
1-ft Male-to-Male DVI cable
Power Adaptor
DDC Emulator
3A-111WX05
Monitor
Power supply DC 5V ( 2000 mA ) - AC 110/220V for USA
* Any other interface is available upon request
Special note:
emulator’s power supply has to be connected via DC jack or USB-A/B first
Step 2 for KVM
Video In
Video Out
Traditional KVM Switches
Which DOES NOT provide two-way DDC communication
will need DDC Emulator(s) placed between KVM switch
and each connected PC.
TM
TM
KVM Switch
TM
Display
TM
TM
DDC Emulator
PC
Step 2 for Video / KVM extender
Old Video or KVM extender
Legend
Which DOES NOT provide two-way DDC communication
will need DDC Emulator placed between extender unit and PC.
Video In
CATx Cable
ConnectPRO - USA, Taiwan
www.connectpro.com
Corporate Office
Video Out
TM
Video / KVM
Extender
20525 Paseo Del Prado Walnut, CA 91789, USA
Tel +1-909-444-9288
Fax +1-909-444-9289
Video / KVM
Extender
Design Center and Operational Hubs
DDC Emulator
PC
Display
7F., No.122, Sec. 1, Sanmin Rd., Banciao City,
Taipei County 220, Taiwan, R.O.C.
Tel +886-2-8964-2700 Fax +886-2-8964-2977
Doc:IG-DVIEDID_V1-1