1
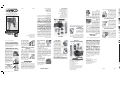
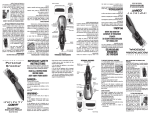
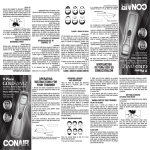
There are three key factors that determine
which beard or mustache style is most suitable
for your face:
1. The shape and dimensions of your face.
2. The natural growth of your beard/
mustache.
3. The thickness of your beard/mustache.
If you are unsure of the type of beard or mustache that most suits your face, speak with a
professional hair stylist and ask for an opinion
on what style would be best. Once your beard
or mustache has been styled, it is essential
that you maintain its appearance. To do this,
GROWING A BEARD
OR MUSTACHE
1. It is always best to
begin with a clean, slightly
damp beard.
2. After you have
combed through your
beard in the direction
OUTLINING YOUR BEARD
triangle on the trimmer head is aligned with
the dash on the side of the handle (Fig. 2).
At this point you should be able to easily lift
the trimmer head from the handle (Fig. 3). To
replace a trimmer head, align the triangle on
the trimmer head with the dash on the side
of the handle and turn clockwise until the two
triangles are aligned.
Fig. 1
Fig. 2
Fig. 3
Begin with trimmer in locked position (Fig. 1).
Hold the handle of the trimmer while turning
the trimmer head counterclockwise until the
TYPES OF BEARDS/MUSTACHES
TO SWITCH TRIMMER HEADS
GETTING STARTED
9/13/06
2:28:26 PM
TO TRIM YOUR MUSTACHE
1. To use the 5-position comb, slide it over the
trimmer blades and snap
down into position. At first,
until you become familiar with the adjustments,
use the longest comb and
trim setting (5/8”). (You
can always go back and
make your beard a little
shorter.)
2. Begin trimming your
beard using smooth,
even strokes. Start with
your sideburns and work
downward toward your
chin. (Never attempt to
trim against the natural growth of your beard,
because the hair will be cut too short.)
3. If you decide you want a closer trim, you can
now adjust the 5-position comb to a shorter
setting and go over your beard again until you
achieve the desired length.
NOW YOU’RE READY
TO TRIM YOUR BEARD
INSTRUCCIONES DE OPERACIÓN
PARA SU RECORTADORA RECARGABLE MN251CS
ADVERTENCIA– Para reducir el riesgo
de quemaduras, descarga eléctrica, incendio
o lesiones:
1. Nunca deje sin atención un aparato enchufado.
2. Supervise atentamente a cualquier niño
o inválido que esté usando la unidad o se
encuentre cerca de la misma.
3. Use la unidad únicamente para el fin previsto y de acuerdo al manual correspondiente.
Use sólo los accesorios recomendados por el
fabricante. No use un cable de extensión para
operar la unidad.
4. Nunca use la unidad si el cordón o enchufe
están dañados, no funciona correctamente, se
ha caído o dañado, o fue sumergida en agua.
En estos casos, hágala examinar y reparar en
un Centro de Servicio Conair.
5. Mantenga el cordón alejado de superficies
calientes.
6. No tire del cordón, no lo retuerza ni lo enrolle
sobre la unidad.
7. Nunca deje caer ni inserte un objeto en una
abertura de la unidad.
8. No coloque la unidad sobre una superficie
mientras esté en funcionamiento.
9. No use la unidad si el peine está roto o
dañado, o si faltan dientes en una cuchilla,
ya que podría lastimarse. Antes de cada uso,
verifique que las cuchillas estén bien alineadas
y aceitadas.
10. No use la unidad en exteriores ni la opere
en un lugar donde se esté usando un producto
en aerosol o administrando oxígeno.
use your shaper to trim your beard/mustache
weekly.
For the best trimming results, your beard
should be slightly damp (not wet) before
using the trimmer. This will prevent
the trimmer from removing more hair
than desired.
it grows naturally, you will want to outline
the desired shape, beginning under your jawline.
3. Attach the 3/4" trimmer head. Begin defining
your beard’s shape under your chin and work
upward on each side of your face toward your
ears. Then define the upper outline of your
beard across your cheeks, past your sideburns
and toward your hairline.
INSTRUCCIONES
IMPORTANTES
DE SEGURIDAD
Cuando se usen aparatos eléctricos, especialmente en presencia de niños, se deben
adoptar ciertas medidas de seguridad, entre
ellas las siguientes:
LEER ATENTAMENTE LAS
INSTRUCCIONES ANTES DE
USAR LA UNIDAD
NO EXPONER LA UNIDAD AL
AGUA
*The MN250 requires 1 “AA” battery (not included).
We recommend using alkaline batteries in your trimmer
because they last longer. If you are not going to use
your trimmer for a long period of time, or if the battery
is dead, remove the battery from the unit. This will
increase the life of your trimmer.
6. For your convenience, the trimmer comes
with a storage base to hold the trimmer and
accessories.
LOCALIZACIÓN DE FALLAS
Si la recortadora no funciona, hay varios puntos que se pueden examinar:
1. Verifique que esté encendida.
2. Verifique que la batería esté correctamente
insertada en su receptáculo. Pruébela, para
cerciorarse de que esté en buen estado.
3. Verifique que las cuchillas no estén
trabadas con recortes de pelo. Si fuera necesario, use el cepillo de limpieza para quitarlos.
4. Si la unidad aún no funciona, llévela o envíela
a un Centro de Servicio Conair (Consulte el procedimiento y las direcciones bajo “Garantía”).
Si su recortadora recargable no parece cargarse, verifique los siguientes puntos antes de
devolverla para reparación:
1. Verifique que el tomacorriente esté activo.
Pruébelo enchufando otro aparato en él.
2. Verifique que la unidad no esté enchufada a
través de un interruptor que corta la corriente
cuando se apagan las luces.
3. Cerciórese de insertar la unidad correctamente en la base de carga, que todas las
conexiones estén firmes y que el interruptor de
la unidad se encuentre APAGADO.
PARA USO DOMÉSTICO
ÚNICAMENTE
BATTERY REMOVAL
PELIGRO– Cualquier aparato eléctrico
puede estar activo, aun con el interruptor
apagado.
Para reducir el riesgo de lesión o muerte por
descarga eléctrica:
1. Desenchufe la unidad inmediatamente
después de usarla (Excepto cuando se está
cargando).
2. No guarde la unidad en un lugar desde el
cual pueda caer o ser arrastrada a una bañera
o lavabo.
3. No use la unidad mientras se baña o
ducha.
4. No sumerja ni deje caer la unidad en agua
u otro líquido.
5. Si la unidad ha caído en agua, no trate de
alcanzarla. Desenchúfela inmediatamente.
vez, insértela en la base de carga. Enchufe la
unidad en un tomacorriente y déjela cargar
durante 16 horas.Cuando coloque la recortadora en su base, el interruptor de encendido/apagado debe estar en la posición de
APAGADO (“OFF”).
2. Verifique siempre que el indicador de
carga esté encendido cuando el cordón está
conectado a la recortadora y la unidad no está
en uso.
3. Enchufe la unidad en cualquier tomacorriente de 120V, 60Hz.
4. La recortadora puede quedar enchufada
permanentemente, sin que se dañe la batería.
5. Para usar la unidad, deslice el interruptor de
encendido/apagado hacia arriba, a la posición
de ENCENDIDO (“ON”).
6. Después de usar la recortadora, deslice el
interruptor hacia abajo para apagarla.
7. Si la unidad parece quedarse sin carga
mientras está en uso, sencillamente coloque
el interruptor de encendido/apagado en la
posición de APAGADO. Inserte la unidad en
su base de carga y enchúfela. Permita que la
batería se recargue durante varias horas.
8. Para conservar la capacidad de carga y prolongar la vida útil de la batería, debe permitirse,
en ocasiones, que ésta se descargue totalmente en uso normal, hasta que se detenga.
Luego, recárguela.
9. La base de carga puede estar tibia durante
el ciclo de carga. Esto es normal.
MN251CS ONLY:
Battery Version Trimmer
Check to be sure which model
you have purchased.
1. Remove the battery cover by rotating the
bottom cap to the left and lifting straight off.
2. Being careful not to bend the clips, insert the
positive end of the battery
first, so it will slip easily
into position.
3. Return the battery cover
to its original position by
pushing it in and rotating
clockwise until you hear
a small click as it locks
into place.
4. To use your trimmer, push ON/OFF switch
upwards to ON position.
5. After you finish using your trimmer, push
down on the ON/OFF switch to turn the trimmer off.
OPERATING INSTRUCTIONS
FOR YOUR MN250CS
Remove
the
battery cap and push the
batteries out. Bring the batteries to the
nearest collection center for proper disposal.
DO NOT throw the battery into the normal
municipal waste system.
NICKEL
CADMIUM
BATTERY. MUST BE COLLECTED,
RECYCLED OR DISPOSED OF
PROPERLY. DO NOT DISPOSE OF IN
THE MUNICIPAL WASTE.
C ONTAINS
MODELO MN251CS
ÚNICAMENTE:
CÓMO QUITAR LA BATERÍA
TROUBLESHOOTING
mendamos usar baterías alcalinas. Saque la batería de
la unidad si no la usará durante un período prolongado
o si la batería está descargada. Esto prolongará la vida
útil de su recortadora.
LAS BATERÍAS SON DE NÍQUEL CADMIO Y
DEBEN SER RECICLADAS O DESECHADAS
EN FORMA APROPIADA. NO LAS DESECHE
JUNTO CON LA BASURA COMÚN.
Quite la tapa y deslice las baterías hacia
afuera. Llévelas al centro de recolección más
cercano para que sean desechadas adecuadamente. NO arroje las baterías al sistema de
basura municipal.
OPERATING INSTRUCTIONS
FOR YOUR MN251CS
RECHARGEABLE TRIMMER
Verifique el modelo de la unidad
que ha adquirido.
1. Antes de usar la recortadora por primera
FOR HOUSEHOLD
USE ONLY
There are several things to look for if your trimmer fails to operate:
1. Be sure the trimmer is turned ON.
2. Make sure that the battery is properly placed
in the battery compartment. Test the battery to
be sure it is working.
3. Check the blades to see if they are clogged
with hair clippings; if so, use the cleaning brush
to remove hair.
4. If the trimmer still fails to operate, take or
send it to a Conair Service Center (see warranty procedure and addresses).
If your rechargeable trimmer does not
seem to be taking a charge, take the
following troubleshooting steps before returning it for repair:
1. Be sure the electrical outlet is working, by
plugging in another appliance to test it.
2. Make sure the electrical plug is not
connected to a switch which turns power off
when lights are turned off.
3. Be sure you have inserted the trimmer properly into the charging stand, that
all connections are secure, and that the
trimmer switch is in the “OFF” position.
Check to be sure which model
you have purchased.
1. Before using your trimmer for the first time,
insert the trimmer in the charging base and
then plug into wall outlet and charge it for 16
hours. Always place the trimmer in the stand
with the ON/OFF switch in the OFF position.
2. Always check to see if the charging light is
on when the cord is connected to the trimmer
and the unit is not in use.
3. Plug unit into any 120V, 60hz wall outlet.
4. The trimmer can remain plugged into the
power source at all times without damage to
the battery.
5. To use your trimmer, push On/Off switch
upwards to “On” position.
6. After you finish using your trimmer, push
down on the On/Off switch to turn the trimmer off.
7. If, while trimmer is in use, the charge seems
to be running down, simply put ON/OFF switch
in OFF position. Then, insert the trimmer in the
charging base and plug into wall outlet. Allow
battery to recharge for several hours.
8. To maintain the full charging capacity and
extend the life of the battery, it must be periodically run down during normal use until it stops,
then recharge.
9. The charge base may become warm while
charging – this is normal.
SAVE THESE
INSTRUCTIONS
GUARDE ESTAS
INSTRUCCIONES.
INSTRUCCIONES DE
OPERACIÓN
Para la recortadora modelo
MN250CS, con batería
Verifique el modelo de la unidad
que ha adquirido.
1. Quite la tapa de la batería (en la parte inferior) girándola hacia la izquierda y levantándola.
2. Teniendo cuidado de no doblar los contactos,
inserte primero el extremo positivo de la batería, para que caiga en su posición correcta.
3. Vuelva a colocar la tapa empujándola hacia
abajo y girándola en sentido horario, hasta que
un “clic” le indique la posición correcta.
4. Para usar la recortadora, deslice el interruptor de encendido/apagado hacia arriba, a la
posición de ENCENDIDO (“ON”).
5. Después de usar la recortadora, deslice
el interruptor hacia abajo
para apagarla.
6. Para su comodidad,
la recortadora viene con
una base para guardar
la unidad junto con sus
accesorios.
* El modelo MN250 requiere 1 batería tipo “AA”
(No se incluye). Debido a su vida útil más larga, reco-
TIPOS DE BARBA Y BIGOTE
CÓMO DEJAR CRECER UNA
BARBA O BIGOTE
Hay tres factores fundamentales que determinan el estilo de barba o bigote más adecuado
para su cara:
1. La forma y dimensiones de su cara.
2. El crecimiento natural de su barba o bigote.
3. La densidad de su barba o bigote.
Si no está seguro del estilo que sería más
adecuado para su cara, consulte a un estilista
profesional y solicite su opinión. Una vez que
dose hacia la línea del cabello.
CONSIDERACIONES
INICIALES
INTERCAMBIO DE CABEZALES
Comience con el cabezal de su recortadora
en posición de trabajo (Fig. 1) Sostenga la
manija de la unidad mientras gira el cabezal
en sentido antihorario hasta que el triángulo
del cabezal quede alineado con la rayita en el
costado de la manija (Fig. 2). En esta posición
podrá quitar fácilmente el cabezal de la manija
(Fig. 3). Para insertar otro cabezal, alinee el
triángulo marcado en el mismo con la rayita
en el costado de la manija. Gire en sentido
horario hasta que los dos triángulos queden
alineados.
DELINEACIÓN DE LA BARBA
1. Siempre es aconsejable comenzar con una
Fig. 1
haya logrado el estilo apropiado, es esencial
que conserve la buena apariencia de su barba
o bigote. Para ello, recórtelos semanalmente
con su máquina CONAIR.
Se obtendrán mejores resultados si la barba
está ligeramente húmeda (pero no mojada)
antes de recortar. Con esto evitará que
la recortadora corte más pelos que los deseados.
1
WARNING–To reduce the risk of burns,
electric shock, fire, or injury to persons:
1. Never leave a plugged-in appliance
unattended.
2. Use close supervision when the appliance is
used by, on, or near children or invalids.
3. Use appliance only for its intended use as
described in this manual. Only use attachments recommended by the manufacturer.
Do not use an extension cord to operate the
appliance.
4. Never operate the appliance if it has
a damaged cord or plug, is not working
properly, has been dropped or damaged,
or dropped into water. Return the appliance to
a Conair service center for examination and
repair.
5. Keep the appliance cord away from
heated surfaces.
6. Do not pull, twist or wrap the cord around
the appliance.
7. Never drop or insert any object into any
opening of the appliance.
8. Do not place the appliance on any surface
while it is operating.
9. Do not use the appliance with a damaged
or broken comb or with teeth missing from the
blades, as injury may result. Before each use,
make certain the blades are aligned properly
and oiled.
10. Do not use the appliance outdoors or operate where aerosol (spray) products are being
used or oxygen is being administered.
NO TRATE DE ALCANZAR
LA UNIDAD EN EL AGUA
06ng9010_mn251cs.indd
DO NOT REACH
INTO THE WATER
even when the switch is off.
To reduce the risk of death or injury by
electric shock:
1. Always unplug appliance from electrical
outlet immediately after using (except when
charging unit).
2. Do not place or store appliance where it can
fall or be pulled into a tub or sink.
3. Do not use appliance while bathing or in
the shower.
4. Do not place appliance in, or drop into water
or other liquid.
5. If appliance has fallen into water, do not
reach for it. Unplug immediately.
DANGER–Any appliance is electrically live,
READ ALL INSTRUCTIONS
BEFORE USING
KEEP AWAY FROM WATER
When using electrical appliances, especially
when children are present, basic safety precautions should always be taken, including
the following:
IMPORTANT SAFETY
INSTRUCTIONS
Fig. 2
Fig. 3
barba limpia y ligeramente húmeda.
2. Después de peinar su barba en la dirección
de su crecimiento natural, deberá delinear
la forma deseada, comenzando debajo del
mentón.
3. Coloque el cabezal recortador de 3/4" (19
mm). Comience a definir la forma de su barba
debajo del mentón y diríjase hacia arriba, en
cada costado de la cara, hacia las orejas.
Defina luego la línea superior de la barba, en
las mejillas, pasando por las patillas y dirigién-
¡YA ESTÁ LISTO
PARA
RECORTAR SU
BARBA!
1. Para usar el peine de 5
posiciones, deslícelo sobre
las cuchillas de la recortadora y fíjelo a presión.
Inicialmente, hasta que se familiarice con los
ajustes, use el ajuste de peine y recorte más
largo (5/8" - 16 mm) (Siempre podrá acortar
su barba más adelante).
2. Comience a recortar con pasadas parejas y
uniformes. Comience por las patillas y prosiga
hacia abajo, hacia el mentón (Nunca intente
recortar su barba a contrapelo porque cortará
los pelos demasiado cortos).
3. Si se decide por un corte más ceñido,
podrá ajustar el peine en una posición más
corta y volver a recortar,
hasta lograr la longitud
deseada.
CÓMO RECORTAR
EL BIGOTE
1. Para obtener mejores
resultados, comience con
un bigote limpio y ligeramente húmedo.
2. Peine su bigote en la
dirección de su crecimiento natural.
3. Coloque el peine de
5 posiciones sobre las
cuchillas de la unidad y fíjelo a presión. Es
aconsejable comenzar con el ajuste más largo
(Siempre podrá acortar su bigote más adel-
insert trimmer more than 1" into ear canal.
7.
1.
To Clean The 1/4" Detail Trimmer
Gently brush away any loose hair with cleaning brush provided. (Note: the blades on this
attachment are not removable.)
10.
TAKING CARE
OF YOUR TRIMMER
9.
2.
6.
To promote the long life
of the appliance, use
your trimmer only for the
purpose intended by the
manufacturer.
3.
use smooth even strokes.
Never attempt to trim
against the natural growth
of your eyebrow, because
the hair will be cut too
short. With the comb
removed, you can shape
and define your eyebrow. Move the unit slowly
so as not to cut any hairs you do not intend
to trim.
TWO YEAR LIMITED
WARRANTY
9.
TO TRIM YOUR NOSE HAIR
Conair will repair or replace (at our option) your
unit free of charge for 12 months from the date
of purchase if the appliance is defective in work-
2.
1. For best results, start with a clean, slightly
damp mustache.
2. Comb through your mustache in the direction it grows.
3. Place the 5-position comb over the trimmer blades and snap it into position. It is
a good idea to start with the longest trim
setting adjustment. (You
can always go back and
cut your mustache more
closely with a shorter setting.)
10.
3.
8.
ALWAYS TRIM
YOUR MUSTACHE
FROM THE TOP DOWN
11.
4.
8.
5.
MN250/251
BEARD/MUSTACHE TRIMMER
GARANTÍA LIMITADA
7.
6.
Attach the 1" trimmer head to the trimmer
handle. Turn unit on. Gently insert trimmer
head into nostril. Gently
move trimmer in and out
of the nostril as you rotate
the trimmer in a circular
motion around the nostril
opening. Avoid inserting
the trimmer more than 1"
to ensure safe trimming.
Para obtener máxima vida
útil de su unidad, use la
recortadora únicamente para los fines previstos por el fabricante.
5.
4.
TO TRIM YOUR EAR HAIR
Conair wants to thank you for
choosing our beard/mustache trimmer.
We know it will provide you with
years of reliable service.
©Conair 2001
FOR MUSTACHE
BROW AND NOSE
Conair Corporation
Service Department
7475 North Glen Harbor Blvd.
Glendale, AZ 85307
3
2
Mantenimiento de las cuchillas
Como las cuchillas de corte se fabrican con
alta precisión para un uso muy especial, siempre deben manipularse con cuidado. Cada vez
que termine de usar la unidad, limpie, con el
cepillo provisto, los pelos sueltos que se hayan
juntado sobre las cuchillas. Luego guarde la
recortadora en su base, hasta el próximo uso.
1.
COMERCIABILIDAD Y ADECUACIÓN PARA UN
FIN DETERMINADO, QUEDARÁ LIMITADA AL
PERÍODO DE 12 MESES DE ESTA GARANTÍA
LIMITADA, QUE SE OTORGA POR ESCRITO.
Algunos estados no permiten limitar la duración
de una garantía implícita, por lo cual es posible
que las limitaciones mencionadas anteriormente
no correspondan en ciertos casos.
CONAIR NO SERÁ RESPONSABLE, EN
NINGÚN CASO, POR DAÑOS ESPECIALES,
INCIDENTALES NI CONSECUENTES, DE
LA NATURALEZA QUE FUERAN, POR
VIOLACIÓN DE ESTA O CUALQUIER OTRA
GARANTÍA, EXPRESA O IMPLÍCITA.
Algunos estados no permiten excluir ni limitar
daños especiales, incidentales o consecuentes,
por lo cual es posible que las limitaciones mencionadas anteriormente no correspondan en ciertos casos. Esta garantía otorga derechos legales
específicos, pero se podrán tener otros derechos,
que varían de un estado a otro.
After your mustache has been trimmed to the
desired length, remove the
5-way trimming attachment and, using the
blades only, define the
outline of the bottom of
your mustache.
®
IN ONE
TRIMMER
06ng9010_mn251cs.indd
MANTENIMIENTO DE
LA RECORTADORA
manship or materials.
To obtain service under this warranty, return the
defective product to the service center listed
below that is nearest you, together with your
purchase receipt and $3.00 for postage and
handling. California residents need only provide
proof of purchase and should call 1-800-3660937 for shipping instructions. In the absence of
a purchase receipt, the warranty period shall be
12 months from the date of manufacture.
ANY IMPLIED WARRANTIES, OBLIGATIONS,
OR LIABILITIES, INCLUDING BUT NOT
LIMITED TO THE IMPLIED WARRANTY OF
MERCHANTABILITY AND FITNESS FOR A
PARTICULAR PURPOSE, SHALL BE LIMITED
IN DURATION TO THE 12 MONTH DURATION
OF THIS WRITTEN, LIMITED WARRANTY. Some
states do not allow limitations on how long an
implied warranty lasts, so the above limitations
may not apply to you.
IN NO EVENT SHALL CONAIR BE LIABLE FOR ANY
SPECIAL, INCIDENTAL, OR CONSEQUENTIAL
DAMAGES FOR BREACH OF THIS OR ANY
OTHER WARRANTY, EXPRESS OR IMPLIED,
WHATSOEVER. Some states do not allow the
exclusion or limitation of special, incidental, or
consequential damages, so the above limitation
may not apply to you.
This warranty gives you specific legal rights, and
you may also have other rights, which vary from
state to state.
Models MN250CS & MN251CS
Coloque el cabezal de 1"
(25 mm) sobre la manija y
encienda la unidad. Inserte
lentamente el cabezal en
Coloque el cabezal de 1" (25 mm) sobre la
manija y encienda la unidad. Inserte lentamente el cabezal en el canal auditivo exterior, pero no más de 1" (25 mm). Deslícelo
despacio hacia adentro y afuera, mientras gira
la unidad con un movimiento circular alrededor
de la abertura del canal.
Guíe el cabezal alrededor
de la superficie externa de
la oreja para cortar pelos
salientes. Nunca inserte el
cabezal más de 1" (25
mm) en el canal auditivo.
MN250/251
BEARD/MUSTACHE TRIMMER
TO TRIM YOUR EYEBROW
IB-3820
CÓMO RECORTAR LOS PELOS DE
LA NARIZ
CÓMO RECORTAR LOS PELOS DE
LAS OREJAS
DE DOS AÑOS
Durante el término de 12
meses siguientes a la fecha
de compra, Conair reparará
o reemplazará (a su criterio)
esta unidad, sin cargo alguno, en caso de presentar
defectos de materiales o fabricación.
Para obtener servicio bajo esta garantía, devuelva
el producto defectuoso al Centro de Servicio
listado a continuación que
le quede más cercano, junto
con el recibo de compra y
$3.00 para franqueo y procesamiento. Los residentes
de California sólo deben
proveer comprobante de
compra y llamar al 1-800366 0937 para recibir instrucciones de envío.
En ausencia de un comprobante de compra, el
período de garantía será de 12 meses contados a
partir de la fecha de fabricación.
TODA
GARANTÍA,
OBLIGACIÓN
O
RESPONSABILIDAD IMPLÍCITA, INCLUSIVE,
SIN LIMITACIÓN, LA GARANTÍA IMPLÍCITA DE
BLADE CARE
Because the trimmer blades are precision
made for a very special use, they should
always be handled with care. Each time you
finish using the trimmer, take the cleaning
brush provided and brush away any loose hair
that has collected in the blades. Then store the
trimmer in its storage stand until the next use.
To Clean The 3/4" Trimmer
Hold attachment firmly, using your thumb.
Push gently upward on blade. The hinged blade
assembly will rotate upward. Brush away any
loose hair with the cleaning brush provided. Gently
snap blade assembly back
to operating position.
To Clean The 3/8"
Attachment
Hold attachment firmly,
using your thumb. Push small latch down to
release blade assembly. Gently push away
and lift up blade assembly. Brush away any
loose hair with cleaning
brush provided. To replace
blade assembly, realign
with small latch and slide
blade into place. Push
latch upward to lock blade
into position.
01NP061
Coloque el cabezal de 3/8" (10 mm) y luego el
peine de cejas sobre este accesorio angular.
Este peine tiene dos posiciones. Inicialmente use el
ajuste más largo (Siempre
podrá acortar sus cejas
más adelante). Deslice el
peine sobre el accesorio hasta que quede fijo.
Comenzando en el centro
de la frente, recorte con pasadas parejas y
uniformes. Nunca intente recortar a contrapelo
porque cortará sus cejas
demasiado cortas. Quite el
peine para dar forma a sus
cejas y definirlas. Deslice
la unidad lentamente, para
no cortar cejas que no
desee recortar.
Service Centers:
Conair Corporation
Service Department
150 Milford Road
East Windsor, NJ 08520
CÓMO RECORTAR LAS CEJAS
Para
limpiar
el
accesorio recortador
de 3/4"
Sostenga el accesorio
firmemente con el pulgar.
Empuje la cuchilla suavemente hacia arriba para
girar el conjunto abisagrado en ese sentido.
Use el cepillo provisto para limpiar los pelos
sueltos. Vuelva a colocar las cuchillas en su
posición de operación.
Para limpiar el accesorio de 3/8"
Sostenga el accesorio firmemente con el pulgar. Empuje el retén hacia abajo para liberar
el conjunto de cuchillas. Empuje suavemente
hacia afuera y levante el conjunto. Use el
cepillo provisto para limpiar los pelos sueltos.
Para volver a colocar las cuchillas, alinéelas
con el retén y deslícelas a su posición. Empuje
el retén hacia arriba para fijarlas.
Para limpiar el accesorio recortador de
detalle, de 1/4"
Use el cepillo provisto
para limpiar suavemente
los pelos sueltos (Nota: las
cuchillas de este accesorio no son removibles).
Attach the 1" trimmer head to the trimmer
handle. Turn unit on. Gently insert trimmer
head no more than 1" into
outer ear canal. Gently
move trimmer in and
out of the outer ear and
rotate trimmer in a circular motion around the ear
canal opening. Guide the
trimmer around the outer
surface of ear to trim protruding hairs. Never
Una vez recortado el bigote a la longitud
deseada, quite el accesorio de 5 posiciones
y, usando las cuchillas únicamente, defina la
línea inferior de su bigote.
1. 3/4" Trimmer Attachment
2. On/Off Switch on Body
3. Battery Compartment
4. Comb Attachment
5. Eyebrow Comb Attachment
6. Comb Attachment
7. 3/8" Eyebrow Attachment
8. 1/4" Detail Attachment
9. Recharging/Storage Base
10. Cleaning Brush
11. Mustache Comb
RECORTE SU BIGOTE SIEMPRE
DESDE ARRIBA HACIA ABAJO
una de las ventanas nasales y deslícelo despacio
hacia arriba y abajo mientras gira la unidad con
un movimiento circular
alrededor de la ventana.
Para evitar lastimarse, no
inserte el cabezal más de
1" (25 mm).
Attach the 3/8" trimmer head and then the
eyebrow comb to 3/8" angled attachment. This
comb has two positions. At
first, use the longest trim
setting (you can always
go back and make your
eyebrows a little shorter).
Slide the eyebrow comb
over the attachment until
it sits securely in position. Starting from the center of your brow,
ante, con un ajuste más corto).
3
RECORTADORA
EN UNA
PARA BIGOTE,
CEJAS Y NARIZ
©Conair 2001
11.
1. Accesorio recortador de 3/4" (19 mm)
2. Interruptor de Encendido/Apagado
3. Receptáculo de la batería
4. Accesorio: peine
5. Accesorio: peine de cejas
6. Accesorio: peine
7. Accesorio de 3/8" (10 mm) para las cejas
8. Accesorio de detalle, de 1/4" (6 mm)
9. Base de carga y para guardar la unidad
10. Cepillo de limpieza
11. Peine de bigote
Centros de Servicio:
Conair Corporation Service Department
150 Milford Road
East Windsor, NJ 08520
Conair Corporation Service Department
7475 North Glen Harbor Blvd.
Glendale, AZ 85307
Conair le agradece su selección de
nuestra recortadora de barba y bigote.
Estamos seguros de que le prestará
muchos años de servicio confiable.
®
01NP061
IB-3820
Modeols MN250CS y MN251CS
9/13/06
2:28:27 PM