1
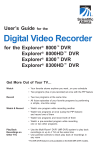
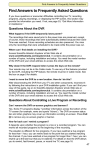
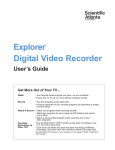
1676-DVR SA USER GUIDE R20
12/8/03
1:45 PM
Page 1
BECAUSE EVERY
HOME DESERVES A
WELL-TRAINED TV
DIGITAL VIDEO RECORDER
USER GUIDE
1676-DVR SA USER GUIDE R20
12/8/03
1:45 PM
Page 2
YOU’RE WATCHING THE BIG GAME IN THE DEN. SUDDENLY,
YOU HAVE A DESPERATE URGE FOR A TURKEY SANDWICH.
SO YOU HIT PAUSE. WALK TO THE KITCHEN. MAKE YOUR
SANDWICH. GRAB A COLD ONE. WALK BACK TO THE DEN.
PRESS PLAY. AND THE LIVE GAME PICKS UP RIGHT WHERE YOU LEFT OFF.
WITHOUT MISSING A SINGLE, HEART-POUNDING PLAY. WELCOME TO DVR
FROM COMCAST DIGITAL CABLE.
1676-DVR SA USER GUIDE R20
12/8/03
1:46 PM
Page 4
CONTENTS
CONTENTS
INTRODUCING DVR
4
RECORD AND PLAY BACK PROGRAMS
20
Get More Out of Your TV
5
Save Your Recorded Programs
21
Take Control of Live Programs
6
Record a Program That You Are Watching Live
21
Record a Single Program or All Episodes of a Future Program
23
Record Two Programs at Once
25
Display a List of Your Recorded Programs
26
GETTING STARTED
7
Prepare Your Remote Control
8
Play Back a Recorded Program
26
Manage Your DVR Box
8
Display a List of Programs You Have Scheduled To Be Recorded
27
FIND OUT WHEN YOUR FAVORITE PROGRAMS ARE ON
9
Cancel a Scheduled Recording
27
Cancel a Recording That’s in Progress
28
MANAGE PROGRAMS AND RECORDINGS
29
Display the Program Guide
10
Select a Program from the Program Guide
10
Search for a Program by Channel, Title, or Theme
11
Keep Others from Watching a Program
30
Search for a Program by Date
11
Keep Others from Watching a Recording
32
Maximize Your Storage Space
35
Copy Recordings to a VCR Tape
35
Change the Default Save Time Setting for Future Recordings
36
CONTROL LIVE TV AND RECORDINGS
12
Pause a Live Program or a Recording
13
Change the Save Time of a Recording You Have Saved
37
Use Instant Replay
13
Erase a Recording
37
Rewind or Fast-Forward a Live Program or Recording
14
Use Slow Motion
15
Watch Action Frame by Frame
15
Catch Up with a Live TV Program
15
WATCH TWO PROGRAMS AT ONCE
16
Turn PIP On and Off
17
Change the Channel of the PIP Screen
17
Move the Location of the PIP Screen
17
Swap the Main Screen and the PIP Screen
18
FREQUENTLY ASKED QUESTIONS
29
Questions about DVR
38
Questions about Controlling a Live Program or a Recording
38
Questions about Watching Two Programs at Once
39
Questions about Recording Programs and Playing Them Back
39
Index
Remote Control Quick Reference
41
43
1676-DVR SA USER GUIDE R20
12/8/03
1:46 PM
Page 4
INTRODUCING DVR
INTRODUCING DVR
You’ll never watch TV the same way again. Now you can:
Control live programs as if they were recordings
Easily record your favorite shows — at least 30 hours of programming
Watch your recordings anytime you want
Use the Picture-In-Picture (PIP) feature
Get More out of Your TV
With DVR, you can use your TV to:
WATCH
one live program
two live programs at the same time with the PIP feature
one pre-recorded program
one live and one pre-recorded program at the same time
RECORD
one live program
two live programs at the same time
at least 30 hours of programs
all future episodes of your favorite programs, just by performing
a one-time setup
SIMULTANEOUSLY
watch two programs and record one of them
watch two programs and record both of them
watch a pre-recording while you record two other programs
OOPS — YOU JUST MISSED THE BIG CLIFFHANGER ON THE SEASON FINALE OF YOUR
FAVORITE SHOW. IF ONLY YOU COULD REWIND THAT LIVE SHOW AND SEE IT AGAIN. IF ONLY
YOU COULD WATCH THAT SHOW, PLUS YOUR FAVORITE SITCOM AT THE SAME TIME. IF ONLY
YOU COULD RECORD ONE SHOW AND WATCH ANOTHER AT THE SAME TIME. IF ONLY YOU
COULD RECORD TWO SHOWS AND WATCH ANOTHER AT THE SAME TIME. IF ONLY YOU
COULD PAUSE LIVE TV FOR UP TO AN HOUR WITHOUT MISSING A MINUTE. NOW YOU CAN.
WELCOME TO DVR. AND A LIFE OF TV WITHOUT “IF ONLY.”
5
1676-DVR SA USER GUIDE R20
12/8/03
1:46 PM
Page 6
INTRODUCING DVR
GETTING STARTED
Take Control of Live Programs
Anytime you tune to a live program, DVR begins “buffering” it — that is, making a temporary
recording of it — so you can:
Pause the live program or rewind it
Fast-forward through the portion you have rewound
Replay live TV anytime you want
Save the buffered program to the DVR’s hard drive to access it again later
Buffered Programs
DVR automatically buffers the last hour of the program that you’re watching and continues
to buffer the channel until you:
Watch the channel for longer than an hour
After an hour, DVR removes the earlier minutes of the program from its buffer
so that only the most recent hour is kept in the buffer.
Tune to another program
When you change channels, DVR begins to buffer the program you have just
tuned to. It removes the program you were watching from the buffer.
NEVER BEFORE HAS A REMOTE CONTROL FELT SO POWERFUL. WITH JUST ONE CLICK,
YOU’LL CONTROL RECORDINGS, LIVE TV, PICTURE-IN-PICTURE — THE WORKS. AND HEY,
Turn off the DVR
When you turn off the DVR, it erases everything from its buffer.
Have DVR record the program
When you press Record , DVR records the portion of the live program
it has buffered, and begins recording the rest of the live program as it
is broadcast.
When recording, the red Record light turns on.
YOU CAN EVEN MAKE IT DO SOME FUN TRICKS.
7
1676-DVR SA USER GUIDE R20
12/8/03
1:46 PM
Page 8
GETTING STARTED
FIND OUT WHEN YOUR FAVORITE PROGRAMS ARE ON
Prepare Your Remote Control
After you’ve connected DVR to your TV, here’s how to prepare
your remote control.
Refer to the guide that came with your remote control to make DVR work
with the make and model of your TV. Follow those instructions first, and then:
CABLE
Press Cable
.
The Cable key blinks red when you press it and the green Power
indicator on the front of DVR turns on or off depending on the current
status of the DVR.
Note: Your Comcast Installer may have already placed the DVR in Cable
mode for you. Verify this by pressing the Power key on your remote
control to see how the DVR responds. Each time you press a key on the
remote, one of the three mode keys, Cable, TV, or AUX, blinks red to
indicate the mode the remote is in.
Manage Your DVR Box
To extend the life of the DVR, turn Off the DVR each night before going to bed.
When the DVR is powered Off (and plugged into an active electrical outlet), all scheduled recordings will
be performed automatically — and your recordings will be protected.
Powering Off your DVR automatically activates the Parental Controls you have set up.
Each night before you go to bed, make sure that the green Power indicator is off.
THE PROGRAM GUIDE WILL BE YOUR NEW BEST FRIEND. CONSIDER IT THE ULTIMATE
SEARCH ENGINE FOR YOUR TV. NO MORE ENDLESS SCROLLING THROUGH COUNTLESS
SHOWS TILL YOU FIND SOMETHING YOU LIKE. NOW YOU CAN SEARCH BY PROGRAM TITLE,
THEME, CHANNEL NUMBER, OR BROADCAST DATE. WHEN YOU FIND WHAT YOU WANT TO
WATCH, JUST CLICK TO IT DIRECTLY FROM THE GUIDE.
The time LED will remain on when the DVR is plugged into an active outlet.
9
1676-DVR SA USER GUIDE R20
12/8/03
1:46 PM
Page 10
FIND OUT WHEN YOUR FAVORITE PROGRAMS ARE ON
FIND OUT WHEN YOUR FAVORITE PROGRAMS ARE ON
Display the Program Guide
Search for a Program by Channel, Title, or Theme
1. Press Guide
DVR automatically lists programs by channel number, but you can customize it to list programs
by title or theme.
. The Program Guide appears and lists programs for the next 7 days.
2. To close the guide, press Guide
highlighted in the Program Guide.
. The Program Guide closes, displaying the program that was
1. Press Guide
The Program Guide
The Information area
displays information
about the program that
is highlighted in the
Program Guide.
2. Press Browse By
.
3. Press Move Up
or Move Down
4. Press Select
The Quarter Screen
shows the program
you are tuned to.
HDLN
36
Headline News
to select your new search criteria.
Browse By Options
Up-to-the-minute coverage of the
latest events.
4:00pm
36
4:30pm
DSC
34 Great Chefs Great Chefs
CNN
35 Inside Politics Early Prime
HDLN
36 ' Headline News
ESPN
37 Bikes, Blades & Boards
TOON
38 Yu-Gi-Oh!
Yu-Gi-Oh!
Browse By
Date WED 6/18
Wed 6/18
4:02pm
5:00pm
5:3
Travelers
Hollywo
Headline News
NFL's Greatest
Pokemon
Pokemo
The Broadcast Time
Bar lists the times
programs are shown.
HDLN
36
Headline News
4:00-5:00pm
Up-to-the-minute coverage of the
latest events.
CHANNEL
The Programs area
displays the title of
each program.
4:00pm
36
Wed 6/18
4:30pm
DSC
34 Great Chefs Great Chefs
CNN
35 Inside Politics Early Prime
HDLN
36 ' Headline News
ESPN
37 Bikes, Blades & Boards
TOON
38 Yu-Gi-Oh!
Yu-Gi-Oh!
Browse By
Date WED 6/18
The Options area displays additional options.
4:02pm
5:00pm
5:3
Travelers
Hollywo
Channel lists programs numerically by channel number.
HDLN
36
Browse By Title
4:00-5:00pm
Up-to-the-minute coverage of the
latest events.
TITLE A-Z
36
Wed 6/18
PROGRAM
Hawaii Five-0
Hawthorne
Headline News
Health & Fitness
Hometime
Date WED 6/18
H
Select a Program from the Program Guide
Browse By Channel
Headline News
NFL's Greatest
Pokemon
Pokemo
Headline News
1. Press Guide
to highlight Channel, Title, or Theme.
4:00-5:00pm
CHANNEL
The Browse By area
automatically lists
programs by channel
number, but you can
choose to list programs
by title, theme, or date
by hitting
or
.
. The Program Guide appears and lists programs for the next 7 days.
Browse By
4:02pm
TIME
CH
10:00pm
8:30pm
4:00pm
4:00pm
5:30pm
31
16
36
41
56
Title lists programs alphabetically by title.
Note: A star next to a program indicates that the program
is currently being broadcast.
. The Program Guide appears and lists programs for the next 7 days.
2. Press the directional keys
to navigate program listings and highlight your selection.
3. Press Select
. If the program is currently on, the Program Guide closes and the program
you selected appears in full-screen TV. If the program is on in the future, a future program
option screen appears.
HDLN
36
Headline News
Browse By Theme
4:00-5:00pm
Up-to-the-minute coverage of the
latest events.
THEME
News
Browse By
36
Wed 6/18
4:02pm
PROGRAM
TIME
CH
Headline News
Close-Up on C-SPAN
Headline News
Early Prime
Headline News
Date WED 6/18
3:00pm
4:00pm
4:00pm
4:30pm
5:00pm
36
25
36
35
36
Theme lists programs by theme, such as adventure, comedy,
sports, or news.
Search for a Program by Date
1. Press Guide
2. Press Date
. The Program Guide appears and lists the next 7 days of programs.
B
. The next 7 dates are displayed.
3. Press Move Up
4. Press Select
or Move Down
to highlight a date.
to list programs that will be broadcast on that date.
11
1676-DVR SA USER GUIDE R20
12/8/03
1:46 PM
Page 12
CONTROL LIVE TV AND RECORDINGS
CONTROL LIVE TV AND RECORDINGS
Pause a Live Program or a Recording
1. Press Pause
to freeze the action. The Status Bar appears briefly in the Pause position at the
bottom of the screen. For programs that you’re watching live, DVR will remain in pause mode for up
to 1 hour.
2. Press Pause
again or press Play
to resume playing the program.
Status Bar
The Status Bar appears whenever you pause, rewind, or fast-forward a live program or a recording.
For a live program, red indicates missed
programming (from the time the program
began until the time you tuned to it).
For a recording, red indicates the portion
of programming that was not recorded.
Green indicates the
portion of the program
that DVR has buffered
or saved.
For a live program,
beige indicates the
portion of the program
not yet broadcast.
Pause
American Idol
This area represents
the current status
(paused in this case).
YOU’RE WATCHING THE SEASON FINALE OF YOUR FAVORITE SHOW OF ALL TIME. YOUR BEST
FRIEND CALLS. AND FOR THE FIRST TIME EVER, YOU DON’T HAVE TO CHOOSE BETWEEN THE
TWO. JUST PRESS PAUSE. AND EVEN THOUGH THE PROGRAM IS LIVE, YOU CAN TALK FOR
AN HOUR, PRESS PLAY, AND NOT MISS ONE MOMENT OF YOUR SHOW. AND THAT IS JUST
THE BEGINNING OF WHAT YOU CAN DO.
The name of the
program appears
beneath the bar.
8:00 – 9:00pm
The yellow pointer
indicates where you
are in the program.
For a live program,
the time of the
broadcast displays.
For a recording,
the program length
displays.
Use Instant Replay
Press Instant Replay
to watch the last 8 seconds of a live program or a recording again.
Every additional press jumps back 8 more seconds. Never miss a moment of your favorite show again!
13
1676-DVR SA USER GUIDE R20
12/8/03
1:46 PM
Page 14
CONTROL LIVE TV AND RECORDINGS
CONTROL LIVE TV AND RECORDINGS
Rewind or Fast-Forward a Live Program or Recording
Status Bar Speed Indicator
Rewind a live program or a recording to watch a portion of it again, or fast-forward through
portions you don’t want to watch. You can rewind or fast-forward in any of three different speeds,
as explained in the box on the next page.
1. Make sure that the program or recording is not in Pause mode. If it is paused, press Play
2. Rewind or fast-forward the live program or recording by following the instructions below.
To
Press
Rewind
Note: When you rewind a
live program or recording to
the point where you first
tuned to it, the recording
automatically begins
replaying at normal speed.
To
Fast-forward
Press
Fast Fwd
.
A green arrow ( or ) indicates how fast you are advancing or rewinding
a program. Each time you increase the speed, another arrow appears.
Result
Action reverses and the Status Bar appears in the
Rewind position at the bottom of the screen. The pointer
on the Status Bar moves to the left as you rewind
the program.
Speed up: Press Rewind
one or two more times to
incrementally increase the speed. Press it again and
the program resumes playing at normal speed.
When you reach the portion of the program you wish to watch
at normal speed, press Play
. The Status Bar indicates
the Play position and the program plays at normal speed.
Rewind
Rewind or fast-forward in any of three speeds:
• Press once and increase the speed to approximately 4 times the normal play speed.
• Press twice and increase the speed to approximately 10 times the normal play speed.
• Press three times and increase the speed to approximately 32 times the normal play speed.
Use Slow Motion
1. While watching live TV or playing a recording at normal speed, press Play
The action is shown in slow motion.
Result
Action speeds up and the Status Bar appears
in the Fast-forward position at the bottom of the
screen. The pointer on the Status Bar moves to the
right as you fast-forward the program.
Speed up: Press Fast-forward
one or two more times
to incrementally increase the speed. Press it again and
the program resumes playing at normal speed.
When you reach the portion of the program you wish to watch
at normal speed, press Play
. The Status Bar indicates
the Play position and the program plays at normal speed.
Live TV: When you reach the end of the buffered
program and catch up with the live broadcast, the
Status Bar briefly indicates Live and the program
automatically begins playing at normal speed.
Recordings: When you reach the end of a recording,
the Playback Status screen appears to give you the
option to erase the recording. If you do not wish to view it
again, you may erase it to allow space for your future
recordings. To exit from this screen and return to live TV,
+
press Last
or press Channel Up
or Channel Down - .
CH
CH
2. To resume play in normal speed, press Play
once.
again.
Watch Action Frame by Frame
Analyze sports events and other programs by watching the action frame by frame — one second
at a time.
1. Press Pause
. The action pauses.
2. Press Fast-forward
or Rewind
to make action move one frame at a time.
3. To resume play at normal speed, press Play
.
Catch Up with a Live TV Program
When you pause or rewind a live program, the program continues to be broadcast and stored in the buffer.
You can continue watching the buffered program (delayed from the live broadcast), or you can catch up
with the live broadcast by pressing Live LIVE .
Note: The Live key is inactive when you are playing back a recording.
15
1676-DVR SA USER GUIDE R20
12/8/03
1:46 PM
Page 16
WATCH TWO PROGRAMS AT ONCE
WATCH TWO PROGRAMS AT ONCE
17
Turn PIP On and Off
DVR has built-in picture-in-picture (PIP). When you turn on PIP,
you can watch two channels at once. One channel appears as a
full-screen image. The other appears as a small image within
the full-screen image.
25
GOLF
Note: If your television came with PIP functionality, you may
wish to deactivate it, as the PIP images with DVR become twice
as small if PIP functions are activated.
1. While watching a program, press PIP On
.
The PIP screen appears within the full screen, and a channel
banner appears briefly under the PIP screen.
Full-screen image
in main TV screen
Channel Banner appears
briefly under PIP screen
Note: You will only hear the sound of the program that is
shown in the full screen.
2. To turn off the PIP screen, press PIP Off
PIP screen within the
full-screen image
.
Note: If you press Info
when the PIP feature is on,
a channel banner appears for both screens. If either program
is currently being recorded, its channel banner will show the
REC
Recording Now
or
symbol.
Info
Change the Channel of the PIP Screen
1. Press PIP On
(unless already in PIP mode).
2. Press PIP Channel Up
or PIP Channel Down
+
.
Note: Pressing the main Channel Up
or Channel Down
program that is shown in the main TV screen.
CH
SO YOU WANT TO WATCH THE BIG GAME. AND YOUR DAUGHTER WANTS TO WATCH
CH
-
key changes the channel of the
Move the Location of the PIP Screen
If the PIP screen blocks action in the main TV screen, move the PIP screen by pressing Move
NICKELODEON. YOU HAVE A CHOICE BETWEEN SEEING HISTORY MADE OR SEEING THE
APPLE OF YOUR EYE CRY HER EYES OUT. NO PROBLEM. WITH PICTURE-IN-PICTURE (PIP),
YOU BOTH GET YOUR WAY. AND YOUR TV DOESN’T EVEN NEED A BUILT-IN PIP FEATURE.
Possible Positions of the PIP Screen
Each time you press Move
, the PIP screen
moves clockwise to the next corner of the main
TV screen as shown here.
.
1676-DVR SA USER GUIDE R20
12/8/03
1:46 PM
Page 18
WATCH TWO PROGRAMS AT ONCE
WATCH TWO PROGRAMS AT ONCE
The PIP Screen and the Quarter Screen
Swap the Main Screen and the PIP Screen
To move the full-screen program shown in the main TV screen to the PIP screen, press Swap
.
Certain DVR screens, such as the Recorded Program Options screen shown here, show a
reduced version of the main TV screen, known as a Quarter screen — which is not to be
confused with a PIP screen.
Full-screen program
in main TV screen
Recorded Program Options
"The Jungle Book"
To control the program in the
Quarter screen or Main TV screen,
use the main keys on the remote
control, such as Pause, Rewind,
or Fast-forward.
Wed: 6/11 7:00pm 2hr 0min
Save: 1 Day
Options
Change save time
Play "The Jungle Book"
Block "The Jungle Book"
Erase
Choose Highlighted Item
Recorded List
PIP screen
To control the program in the PIP
screen, use the PIP keys, such
as Swap or Move.
Note: You must swap the PIP screen to the full screen in order to pause, rewind, or fast-forward.
19
1676-DVR SA USER GUIDE R20
12/8/03
1:46 PM
Page 20
RECORD AND PLAY BACK PROGRAMS
RECORD AND PLAY BACK PROGRAMS
21
Save Your Recorded Programs
DVR can save at least 30 hours of recorded programs. To maximize your
storage space, keep the length of your Save Time setting to a minimum.
Whether you record a program you’re watching live, or schedule a program
to be recorded in the future, you can select how long you want the recording
to be saved in three ways:
• Use the default Save Time setting. This is the quickest way to save recordings
because you don’t need to select the save time each time you record a
program. DVR will save the recording using the length of time established by
the default setting.
SAVE TIME
2 Days
7 Days
14 Days
Until erased
1 Day
• Select the Save Time when you schedule a new recording.
• Change the Save Time after recording a program.
Note: DVR is not a long-term storage device. To further maximize your storage space, review your list
of recordings regularly and erase the recordings you no longer wish to save. For long-term storage,
a program can be transferred to your VCR (see “Copy Recordings to a VCR Tape” on page 35).
SAVE TIME
Save Time Setting
NOW THE REAL FUN BEGINS. WHAT YOU ONLY WISHED YOU COULD DO WITH YOUR VCR
The DVR default Save Time setting is set to automatically save each
recording for 14 days. Then DVR erases the recording to make space for
other programs you want to record. You can change the default setting
from 14 days to 1, 2, or 7 days — or to “until erased.” “Until erased”
means it will be saved until you erase it yourself.
2 Days
7 Days
14 Days
Until erased
1 Day
NOW YOU CAN DO WITH DVR. RECORD DATELINE WHILE YOUR KIDS WATCH DISNEY.
RECORD DATELINE AND THE SIMPSONS WHILE YOUR KIDS WATCH A RECORDING OF
DISNEY. AUTOMATICALLY RECORD THE ENTIRE SEASON OF THE SOPRANOS. IT’S ALL
POSSIBLE WITH A CLICK-CLICK-CLICK OF A FEW BUTTONS.
Record a Program That You Are Watching Live
To record a program that you are watching live, make sure that you tune to the channel when the program
begins, then press Record . This ensures that you record the entire program from its beginning.
Otherwise, you’ll record only part of the program.
DVR cannot determine whether a live program will end at its scheduled time. If there is a chance that
the event you are recording may continue past its scheduled time, you can allow for this uncertainty by
extending the stop time on the Confirm Recording screen.
1676-DVR SA USER GUIDE R20
12/8/03
1:47 PM
Page 22
RECORD AND PLAY BACK PROGRAMS
RECORD AND PLAY BACK PROGRAMS
While DVR records you are free to:
Recording a Program
If you want to record a program that you are watching and save it according to your default
Save Time setting:
• Continue to watch the channel while the recording is being made.
• Pause, fast-forward, or rewind the program without affecting the recording.
REC
1. Press Record
on the remote control. The Confirm Recording screen appears.
• Change channels (as long as only one program is being recorded).
• Turn off the TV without affecting the recording.
• Turn on the PIP feature. Note: The PIP screen will not appear in the recording.
Confirm Recording
• Display the Recorded List screen or the Program Guide.
"The Jungle Book"
The default Save Time appears
here in the Information area.
USA (Ch 67)
Wed 6/18 7:00-9:00pm
Record: 1 Episode
Save: 14 Days
Press
or press
2. Press Select
to
record with the default
Save Time setting and skip
steps 3, 4, and 5.
- or Press Options
to change the default
Save Time setting.
Record
to record this program
for more recording options.
Options
Cancel
When recording, the red Record light is on.
Record a Single Program or All Episodes of a Future Program
3. Press Move Left
once. The Save Time options are highlighted.
To record programs when you are away, or to schedule future recordings, start from the Program Guide.
1. If the Program Guide is not shown, press Guide
4. Press Move Up
or Move Down
of time you want to save the recording.
to highlight the length
.
2. Press the directional keys
to move through the listings in the guide and highlight the program
you want to record. Or, press Browse By
and look for a program by title, channel, or theme.
REC
3. Once the program is highlighted, press Record
5. Press Accept Recording
. DVR records the program using the
Save Time option that you selected.
4. Press Select or press
Edit Recording
To Record
Press
. The Confirm Recording screen appears.
to edit recording options.
Result
"The Jungle Book"
REC
Wed: 6/18
Save: 1 Day
START
Select Save Time from the Edit
Recording screen to save a recording
for that specific length of time.
7
8
7:00pm
10
11
A single
program
STOP
Press
9:00pm
or press
Accept recording
RECORD
SAVE TIME
14 Days
Until erased
episode
1 Day
forOne
more
recording options.
2 Days
7 Days
Preferences
to record this program
Options
Cancel changes
DVR saves this information and displays the Program Guide,
highlighting the program title in red, indicating that a program
is scheduled to be recorded.
To record all episodes of a program, follow the instructions
in the table on the next page.
23
1676-DVR SA USER GUIDE R20
12/8/03
1:47 PM
Page 24
RECORD AND PLAY BACK PROGRAMS
To Record
Press
RECORD AND PLAY BACK PROGRAMS
Record Two Programs at Once
Result
DVR gives you different ways to record two programs at once:
All episodes
The Edit Recording screen appears.
• Schedule two programs to record at the same time by following either of the procedures in “Record a
Single Program or All Episodes of a Future Program” on page 23 and 24.
twice
The Record options are highlighted.
or
Each option is highlighted as you move up or down the list.
Stop when All episodes is highlighted.
The Record options show All episodes and the Save Latest
options are now highlighted.
or
Each option is highlighted as you move up or down the list.
Stop when the option you want to select is highlighted.
The Save Latest options show your selection.
• Record two live programs at the same time by recording one program and then tuning to another
channel and recording a second program. The first program begins recording as soon as you tune
REC
to it and press Record
. The second program begins recording when you tune to it and press
REC
Record
. For details on recording programs live, see “Record a Program That You Are Watching
Live” on page 21.
Note: When recording two programs live at the same time, you can watch them while they record, or you
can play back a recording and watch it as well, but you cannot tune to another channel and watch a third
program live.
DVR saves this information so that it can record episodes as
they are broadcast.
Important: Whenever you set up DVR to record all episodes of a program, it records indefinitely until
you cancel the recordings or run out of storage space.
Save Latest Options
When scheduling a recording of All episodes, you can
choose to save the 2, 3, 4, or 5 most recent episodes.
Or, you can save every episode until you cancel the
recordings or run out of storage space.
For example, let’s say that you choose to save the
2 most recent episodes of a program that is broadcast
every weeknight Monday through Friday. First, DVR would
record Monday and Tuesday night’s episodes. Then, when
DVR records the program on Wednesday, it automatically
deletes the program it recorded on Monday. So the
Tuesday and Wednesday recordings are now saved.
Then, on Thursday, the Thursday episode will be recorded,
the Tuesday recording will be erased, and so on.
SAVE LATEST
4 Episodes
5 Episodes
All Episodes
2 Episodes
3 Episodes
Note: Music Choice and ON DEMAND cannot be recorded.
Recording and Watching Programs
If, while recording two programs, you try to tune to another channel,
DVR displays a Channel Change Notice to let you know that you
must stop a recording to change channels. For details, see “Cancel a
Recording That’s in Progress” on page 28.
You can always press My DVR
to access your
recordings and change scheduled recordings.
25
1676-DVR SA USER GUIDE R20
12/8/03
1:47 PM
Page 26
RECORD AND PLAY BACK PROGRAMS
RECORD AND PLAY BACK PROGRAMS
Display a List of Your Recorded Programs
To display a list of your Recorded Programs, press My DVR
27
Display a List of Programs You Have Scheduled To Be Recorded
1. If the Recorded List screen is not displayed, press My DVR
.
To exit from the Recorded List screen and display full-screen TV, press My DVR
or press Exit
.
. The Recorded List screen appears.
2. Press Scheduled Recordings
. The Scheduled Recordings screen appears with a list of all
the programs you have scheduled to record.
again
Exit
Scheduled Recordings
Recorded List
"Headline News"
"The Jungle Book"
Recorded List Screen
Scheduled Recordings Screen
USA (Ch 67)
Record: 1 Episode
Save: 1 Day
HDLN (Ch 36)
Record: 1 Episode
Save: 1 Day
Scheduled Recordings
Recorded Programs
Scroll through your list
of recorded programs,
as well as those currently
being recorded.
PGA Golf Press
The Jungleor
Book
press
Dr. Phil
Options/Play
Date
Time
to record
program
Sun this
6/15
2:30pm
Length
1hr 30min
Wed
7:00pm
for
more6/18
recording
options. 2hr 0min
Fri
6/13
3:10pm
Scheduled Recordings
50min
Preferences
If a program is currently being recorded,
the Recording Now
symbol
appears in the Information area of
the screen when that title is
highlighted below.
Press
Law & Order
SVU
Headline News
or press
Time
9:00-10:00pm
Thurecording
6/19 options.
4:00-5:00pm
for more
Dr. Phil
Edit
Date
to recordWed
this program
6/18
Fri
6/20
Recorded List
3:00-4:00pm
Preferences
Programs that are scheduled to be
recorded appear in this list along
with any programs that are currently
being recorded.
Play Back a Recorded Program
Play back your recorded programs whenever you want. You can even record one or two programs live
while you play back a program you recorded earlier.
Cancel a Scheduled Recording
1. If the Recorded List screen is not displayed, press My DVR
You can cancel a scheduled recording at any time:
2. Press Move Up
or Move Down
. The Recorded List screen appears.
to highlight the recording you want to watch.
1. If the Recorded List screen is not displayed, press My DVR
3. Press Select
. If you select the recording that you have most recently watched, the recording
begins playing immediately. Otherwise, the Recorded Program Options screen appears with the option
“Play [title of program]” highlighted.
2. Press Scheduled Recordings
4. Press Select
. The recording begins playing. You can use pause, rewind, fast-forward, or any
other keys on the remote.
4. Press Select
5. When the recording finishes (or when you fast-forward to the end of the recording), the Playback Status
screen appears to give you the option to erase the recording. If you do not wish to view it again, you
may erase it to allow space for future recordings. To exit from this screen and return to live TV, press
+
Last
or press Channel Up
or Channel Down - .
CH
CH
3. Press Move Up
. The Recorded List screen appears.
. The Scheduled Recordings screen appears.
or Move Down
to highlight the recording you want to cancel.
. The Edit Scheduled Recordings screen appears.
5. Press Cancel Recording
. The Confirm Cancel screen appears, displaying the question,
“Are you sure you want to cancel recording this program?”
B
6. Press Yes, Cancel
.
1676-DVR SA USER GUIDE R20
12/8/03
1:47 PM
Page 28
RECORD AND PLAY BACK PROGRAMS
MANAGE PROGRAMS AND RECORDINGS
Cancel a Recording That’s in Progress
You can stop a recording in progress at any time.
When you stop a recording, you can save what has been recorded or erase the entire recording.
1. If you are not watching the recording, tune to the channel that is being recorded.
2. Press Stop
. The Stop Recording screen appears.
3. Press Move Up
4. Press Select
or Move Down
to highlight the option you want.
. The red Record indicator on the front of the DVR turns off.
Forget what program you’re recording?
DVR gives you three ways to find programs that are currently being recorded:
• Turn on the PIP feature and press Info Info . Both channel banners appear, and the Recording Now
symbol is displayed if one of the channels is currently recording.
• Display the Recorded List screen and, as you move up or down the list, look in the Information area
of the screen for a recording with the Recording Now
symbol.
• Display the Program Guide and look for a program that is highlighted in red.
If you want to view the program that is being recorded, select the program either from the
Recorded List or from the Program Guide, and then press Select
.
NOW YOU CAN EASILY MANAGE YOUR PROGRAMS WITHOUT MAKING IT A CHORE. GOT
KIDS? CONTROL WHAT THEY WATCH — EVEN WHEN YOU’RE NOT AROUND. WANT TO
RECORD EVERY FRIENDS EPISODE BUT DON’T WANT TO STORE THEM FOREVER? SET
DVR TO AUTOMATICALLY DELETE THEM WHEN SPACE IS NEEDED.
29
1676-DVR SA USER GUIDE R20
12/8/03
1:47 PM
Page 30
MANAGE PROGRAMS AND RECORDINGS
MANAGE PROGRAMS AND RECORDINGS
Keep Others from Watching a Program
Select Programs to Be Blocked
You can prevent children or anyone else from watching specific programs by using the Parental Control
feature. Blocking programs using Parental Controls is a 3-step process. First, you must turn Parental
Control on; second, you must enable your PIN; and third, you must select programs to be blocked.
You can select programs to block by channel, rating, time of day, or any combination of these methods:
Menu
. The Quick Settings menu appears.
2. Press Move Up
or Move Down
3. Press Select
screen appears.
to change the Parental Control setting to ON or OFF. The PIN Entry
to highlight the option Turn OFF/ON Parental Control.
• When Parental Control is on, only those who know your PIN can view programs that you’ve
selected for blocking.
• When Parental Control is off, anyone can view any program.
4. Press the numeric keys on the remote control and enter your 4-digit PIN. The PIN Entry
screen disappears.
Note: These symbols indicate the status of the Parental Control feature:
A Closed Lock on the channel banner indicates that the Parental Control feature
is on and that this channel or program is blocked.
An Open Lock indicates that the Parental Control feature is off and that this
channel or program is set to be blocked, but is not currently blocked.
Note: The Parental Control feature must be on in order to block programs. However, as a precaution, DVR
automatically activates the Parental Control feature whenever the DVR is powered off and powered on
again. When the Parental Control feature is on, you must enter your 4-digit personal identification
number (PIN) to watch a blocked program.
Enable your PIN for Parental Control
1. Press Menu
Menu
twice on your remote control to access the General Settings menu.
2. Press Move Down
Menu
twice on your remote to access the Settings menu.
2. Press Move Up
or Move Down
to highlight one of the following options:
• Block:Channels blocks all programs on a specific channel.
Turn Parental Control On and Off
1. Press Menu
1. Press Menu
to highlight Block: PIN.
3. If PIN shows “Enabled,” just hit exit and proceed to step 6. If PIN shows “Disabled,” then press
to select “Enabled.”
4. When prompted for a PIN, enter a 4-number code.
5. You will be prompted to re-enter your PIN to confirm the code.
6. Press exit or, if you wish to block programs, go to Select Programs to be Blocked.
• Block:Rating blocks all programs according to the rating assigned to the program, such
as G, PG, PG-13, or R.
• Block:Time New blocks all programs broadcast during a specific time of day.
3. Press Select
. A Pin Entry screen appears.
4. Press the number keys to enter your 4-digit Personal Identification Number (PIN) or create one.
A block menu (for the option you selected in step 2) appears.
5. To block by channel or rating, select Block:Channels or Block:Rating. Press Move Up
or
Move Down
to highlight the channel, rating, or date you want to block. Or, if your local Comcast
system allows, you may select a channel by pressing the numeric keys on your remote control.
6. Press Select
. DVR indicates the channel or rating is blocked. If you’re blocking a broadcast
time, skip to step 8.
Note: DVR indicates a blocked channel or blocked rating in the following ways:
• Blocked channels: The channel number is listed in the right column on the General Settings menu, and
a Closed Lock symbol appears in the CHANNELS column next to the channel you selected.
• Blocked ratings: A Closed Lock
symbol appears in the RATING column next to the rating you selected.
7. Continue this process of highlighting and selecting the channels or ratings you want to block. When all
those channels and ratings have a Closed Lock symbol next to them, press Accept
to have
DVR accept your blocks. Go to step 10.
8. To block by time, select Block:Time New. In the START column on the General Settings menu, change
the time shown to the time you want the block to start by following this process:
A. Press Move Left
and A.M. or P.M.).
or Move Right
to highlight the one you want to change (hours, minutes,
B. Press Move Up
or Move Down
to change the setting. Or, if your local Comcast system
allows, you may select a setting by pressing the numeric keys on your remote control.
C. Repeat this process to change each setting as necessary.
D. When the correct START time is shown, press Select
. The time you want to start blocking
programs appears in the START column and the cursor moves to the STOP column.
31
1676-DVR SA USER GUIDE R20
12/8/03
1:47 PM
Page 32
MANAGE PROGRAMS AND RECORDINGS
9. In the STOP column, change the time shown to the time you want the block to end by following
this process:
MANAGE PROGRAMS AND RECORDINGS
Recording Options Screen
33
Recorded Program Options
"Soul Food"
A. Press Move Left
and A.M. or P.M.).
or Move Right
to highlight the one you want to change (hours, minutes,
B. Press Move Up
or Move Down
to change each setting. Or, if your local Comcast
system allows, you may select a setting by pressing the numeric keys on your remote control.
C. Repeat this process to change each setting as necessary.
D. When the correct STOP time is shown, press Accept
times you have entered.
to have DVR accept the start and stop
10. Turn on the Parental Control feature to have DVR block the programming you selected.
(See “Turn Parental Control On and Off” on page 30.)
Recorded: Fri 6/13
7:00pm 1hr 0min
Save: Until erased
After you block a recording, the Closed Lock
symbol appears in the Information area to
indicate that the recording can be played
only by entering a PIN.
Options
Change save
time
Press
to record this program
Play "Soul Food"
or press
Unblock "Soul Food"
for more recording options.
Erase
In addition to blocking a program from this
screen, you can also play or erase a program,
or you can change the Save Time of a program.
Preferences
Choose Highlighted Item Options
Recorded List
Remove Blocks from Programs
Follow the same steps as “Select Programs to Be Blocked” and deselect those programs you wish to be
unblocked. The Closed Lock symbol will disappear, indicating that the programming is no longer
selected for blocking.
Playing Back Blocked Recordings
From Recorded Program Options or Recorded List, you can watch a blocked program by either:
Keep Others from Watching a Recording
PIN Entry
You can keep others from watching a recording by using the Block feature when Parental Controls are
turned on. Keep in mind you can only block recordings that you’re not watching. This feature is useful if
children also use DVR and you do not want them to watch certain recordings.
Note: To block a program that’s scheduled to be recorded, block the program from the General Settings
menu. DVR will record the program, but the recording can only be watched after you enter your 4-digit
Parental Blocking PIN.
1. If the Recorded List screen is not displayed, press My DVR
screen appears.
2. Press Move Up
3. Press Select
4. Press Move Down
or Move Down
Selecting “Unblock [title of program].” The
Program PIN Entry screen appears. Enter your
4-digit PIN to turn off blocking only for this
recording. Other recordings and programs
continue to be blocked if Parental Control is on.
This program is blocked.
Enter your PIN to unblock
Clear PIN Entry
Cancel
. The Recorded List
Recorded Program Options
"Soul Food"
Recorded: Fri 6/13
7:00pm 1hr 0min
Save: Until erased
to highlight the recording you want to block.
. The Recording Options screen appears.
Options
Change save
time
Press
Play "Soul Food"
or press
Unblock "Soul Food"
. The option “Block [title of program]” is highlighted.
to record this program
for more recording options.
Erase
5. Press Select
.The PIN Entry box appears.
6. Press the number keys to enter your 4-digit PIN. The PIN Entry screen disappears, and the
Closed Lock symbol appears in the Information area of the Recorded List screen.
Choose Highlighted Item Options
Preferences
Recorded List
PIN Entry
Enter your PIN to turn OFF Parental Control
and ALLOW viewing of All programs.
Clear PIN Entry
Cancel
Selecting “Play [title of program].” The Parental
Control PIN Entry screen appears. Enter your
4-digit PIN to turn off Parental Control. When
Parental Control is off, all recordings and
programs can be viewed.
1676-DVR SA USER GUIDE R20
12/8/03
1:47 PM
Page 34
MANAGE PROGRAMS AND RECORDINGS
MANAGE PROGRAMS AND RECORDINGS
View a Blocked Recorded Program
Maximize Your Storage Space
1. Press My DVR
DVR can save at least 30 hours of recorded programs, depending on the programming source, but it
is not intended as a long-term storage device. To make the most efficient use of your storage space,
follow these guidelines:
to view your Recorded List.
2. Highlight the Program Title you wish to watch.
3. Press Select
.
4. Press Move Down
5. Press Select
• Set your default Save Time setting to 14 days or less. Setting it to “until erased” causes the storage
space to fill up more quickly.
to highlight Unlock.
.
• After you watch a recording, decide to either erase it or keep it permanently by transferring it
to a VCR tape and then erasing it from DVR.
6. Enter your 4-digit PIN.
7. Highlight Play.
8. Press Select
.
Copy Recordings to a VCR Tape
Reblock a Recorded Program
1. When you are done viewing the recorded program, press My DVR
.
2. Highlight another title (any program other than the one you wish to block).
3. Press Select
.
4. Press Move Down
to highlight Unblock.
1. Connect the VCR to the Cable Out or OUT 1 (TV) connection on the back of the DVR. (In the near future,
you’ll be able to use the VCR Port for recording to a VCR tape.)
2. Put a tape in your VCR and prepare the VCR to record.
5. Press Stop.
6. Press My DVR
When you copy recordings to a VCR tape, make sure that the recording is displayed on the main TV screen
for the entire time that the recording is being copied. If you change channels or display other DVR screens
during the copying process, your tape copy will contain these images and you will not have a complete
copy of the recording.
3. Press My DVR
.
. The Recorded List screen appears.
7. Highlight the show you wish to block.
4. Press Move Up
8. Press Select
5. Press Select
. The Recording Options screen appears with the option “Play
[title of program]” highlighted.
.
9. Highlight Block.
10. Press Select
.
11. Enter PIN.
Note: Comcast is in the process of simplifying this procedure. We appreciate your understanding.
or Move Down
to highlight the recording you want to copy to the VCR.
6. Start recording on the VCR.
7. Press Select
. As the recording plays, it is taped to your VCR.
35
1676-DVR SA USER GUIDE R20
12/8/03
1:47 PM
Page 36
MANAGE PROGRAMS AND RECORDINGS
MANAGE PROGRAMS AND RECORDINGS
Change the Default Save Time Setting for Future Recordings
Change the Save Time of a Recording You Have Saved
The DVR default Save Time setting is set to automatically save each recording for 14 days. DVR then
erases the recording to make space for other programs you want to record. You can change the default
setting from 14 days to 1, 2, or 7 days — or to “Until erased.”
After recording a program, you can change how long DVR will save the recording:
Important: When you change the default Save Time setting, all future recordings recorded with the default
Save Time will be saved according to the new Save Time setting.
1. Press My DVR
2. Press Move Up
want to change.
3. Press Select
To change the default Save Time setting:
4. Press Move Up
1. Press My DVR
screen appears.
5. Press Select
2. Press Preferences
3. Press Move Up
Future Recordings.”
4. Press Select
5. Press Move Up
if the Recorded List screen is not displayed. The Recorded List
B
6. Press Move Up
. The Preferences screen appears.
or Move Down
. The Recording Options screen appears.
. The option Change Save Time is highlighted.
. The Save Time screen appears.
or Move Down
to highlight the new Save Time.
Permanently erasing programs that you no longer want to watch creates space to record and store other
programs. If DVR becomes full, some programs may be partially saved or not saved at all. DVR holds at
least 30 hours of programs.
1. Press My DVR
2. Press Move Up
3. Press Select
Preferences
4. Press Move Down
Save time is 1 Day
5. Press Select
Press
to set how long future
recordings will be saved.
if the Recorded List screen is not displayed. The Recorded List screen appears.
or Move Down
to highlight the recording you want to erase.
. The Recording Options screen appears.
twice. The option Erase is highlighted.
. The message “Are you sure you want to erase this recording?” appears.
6. Press Yes, Erase
. The message “One moment please” appears in the Information area of the
screen, and the program is removed from the list.
Preferences Screen
Options
Sort Recorded List alphabetically
Change Save Time for future recordings
Schedule a new Manual Recording
Schedule Recordings
to highlight the recording with the Save Time you
Erase a Recording
to highlight your desired Save Time.
6. Press Select
. The Save Time options disappear, the Preferences screen appears, and the
new default Save Time setting appears in the Information area of the screen.
After you select a new default Save Time,
DVR displays your new selection in the
Information area.
or Move Down
7. Press Select
. In the Information area of the screen, the message “One moment please”
appears, and the new Save Time displays on the Recorded List screen.
to highlight “Change Save Time for
. The options for Save Time appear.
or Move Down
if the Recorded List screen is not displayed. The Recorded List screen appears.
Recorded List
37
1676-DVR SA USER GUIDE R20
12/8/03
1:47 PM
Page 38
FREQUENTLY ASKED QUESTIONS
FREQUENTLY ASKED QUESTIONS
Questions about DVR
Questions about Watching Two Programs at Once
What happens if DVR temporarily loses power?
If a program is being recorded in the PIP screen and I turn off the PIP feature, will the
recording continue?
All recordings that were saved prior to the power loss are preserved, as well as future recording
schedules. You miss only the recordings that were scheduled to be made while the power was out.
Yes. DVR will continue to record the program even if you turn off the PIP feature.
Where can I find details on installing DVR?
Go to www.comcast.com to find helpful information on a number of topics, including installation
What if my TV doesn’t have the PIP feature?
and setup. Just click on “Digital Cable.” Then select “Digital Video Recorder.” Or, you may also
visit www.sciatl.com. (You will need the serial number of your DVR to access the information.)
See page 40 for details on locating the serial number.
My TV has the PIP feature; why is PIP so much smaller now?
That’s no problem. You can still use the PIP feature because DVR provides the PIP feature, not your TV.
If your television came with PIP functionality, you may wish to deactivate it, as the PIP images with DVR
become twice as small if your TV’s PIP functions are activated.
Why doesn’t DVR respond when I press the keys on the remote control?
You may not be in the Cable mode. To use any of the DVR features, including the PIP feature,
DVR must be in Cable mode. See page 8 for details.
Questions about Recording Programs and Playing Them Back
Can I record the program that is shown in the PIP screen?
Questions about Controlling a Live Program or Recording
How far back can I rewind a program?
It depends on whether it’s a live or recorded program. For live programs you have watched less than one
hour, you can rewind back to the point where you started watching. If you have watched a live program
for longer than an hour, you can rewind up to the last hour that you’ve watched. For recorded programs,
you can rewind to the beginning of the recording. For details, see page 14.
Can I pause, rewind, or fast-forward a program in the PIP screen?
No. Those keys only control the program shown in the main TV screen so you can swap the PIP screen
and the main screen and then use pause, rewind or fast-forward. See page 18 for details.
Can I pause, rewind, or fast-forward a program shown in the upper right corner of DVR
screens like the Program Guide or the Recorded List screen?
Yes. The small screen shown in the upper right (a.k.a. the Quarter screen) is actually the main TV screen.
It is reduced to fit while viewing other information. Keys such as pause, play, rewind, and fast-forward
control the main TV screen — whether the screen fills the monitor of your TV or whether it is reduced to
fit in another information screen.
Sometimes I am able to record much more than 30 hours of programs. Why?
The amount of programming that you are able to record depends on the type of program you are
recording. Analog programming (generally, channels 2 through 78) takes up more space than digital
programming (generally, channels 100 and above). So if you only record digital programming, you will
be able to record more hours of programs.
How will I know that recording space is low?
A message will appear when remaining recording space is 5% or less. The Recording Space Low message
will appear when you schedule a new recording.
What happens when I run out of recording space while I’m recording a program?
When the DVR runs out of disk space, it will stop recording the program. When you go to your Recording
List, you will receive a message stating that your last recording was not complete.
You can record a program that is shown in the PIP screen, but you must start the recording from the
main TV screen. For details, see “Record Two Programs at Once” on page 25.
Can I play back more than one recording at the same time?
No. You can play only one recording at a time.
Can I recover a recording that was erased from DVR?
Unfortunately, no. Once it’s been erased from the Recorded List, it’s gone. However, you can copy programs
to a VCR tape. You can also extend the length of time a program is saved. For details, see “Copy Recordings
to a VCR Tape” on page 35 and “Change the Save Time of a Recording You Have Saved” on page 37.
Can I record two programs at the same time and watch the playback of a third program?
Yes. However, if, while recording two programs, you try to tune to another live channel, DVR displays a
Channel Change Notice to let you know that you must stop a recording to change channels. For details,
see “Cancel a Recording That’s In Progress” on page 28.
What happens if a sports event that I scheduled to record goes into overtime?
DVR cannot determine whether a live program will end at its scheduled time. If there is a chance that
the event you are recording may continue past its scheduled time, you can allow for this uncertainty by
extending the stop time on the Confirm Recording screen.
If I’ve used the Parental Control feature to block a rating or channel in the guide, will
recordings of these programs also be blocked?
Yes. If you have blocked programs by channel or rating in the General Settings menu, recordings of
these programs will also be blocked if the Parental Control setting is on. They will be recorded, but to play
them back, you must enter your 4-digit PIN. For details, see “Playing Back Blocked Recordings” on
page 33.
39
1676-DVR SA USER GUIDE R20
12/8/03
1:47 PM
Page 40
FREQUENTLY ASKED QUESTIONS
INDEX
41
Can I record ON DEMAND programs?
B
E
P
ON DEMAND programs cannot be recorded by DVR. But keep in mind that you can watch ON DEMAND
programs as often as you want over a specified period and start them any time you choose.
Blocked programs or channels
blocking recordings, 31
playing blocked recordings, 33
turning blocking on and off, 30
watching blocked recordings, 34
Blocking programming, 31
Browse By options, 11
Buffering, 6
Buttons, See Remote control
Erasing recordings, 37
Parental Control
blocking programs, 31
blocking recordings, 31
enabling and disabling PIN, 30
how to use, 27
playing blocked recordings, 33
turning on and off, 30
watching blocked recordings, 34
Pause
live programs, 13
quarter screen, 19
recordings, 13
PIP (picture-in-picture) feature
and main TV screen, 18
and the quarter screen, 19
changing channel of, 17
explanation of, 17
moving location of, 17
recording while using, 23
turning on and off, 17
TV requirements for, 39
swapping with main TV screen, 18
PIN, See Parental Control
Playing
and recording simultaneously, 25
blocked recordings, 33
live TV, 15
recorded programs, 26
Power indicator, 8
Power loss
and Parental Control, 30
and recordings, 38
Program Guide
Browse By options, 11
displaying, 10
searching for programs in, 11
selecting a program from, 10
Programs
blocking with Parental Control, 30
fast-forwarding, 14
pausing, 13
recording, 22
removing blocking from, 30
rewinding, 14
Can I record high-definition (HDTV) programs?
Not just yet, but stay tuned as this feature is coming soon!
Why did DVR record only part of a program?
If the beginning of the program is missing, you may have started recording the program after it began.
For an explanation of how DVR records live TV, see page 13.
If the end of the program is missing, DVR may have reached its storage capacity or the program may have
continued past its scheduled end time.
If there is a chance that the program you are recording may continue past its scheduled time, you can
allow for this uncertainty by extending the stop time on the Confirm Recording screen.
To determine if DVR has reached its storage capacity, display the Recorded List screen and highlight the
program in question. The Information area indicates one of the following reasons:
• User stopped recording early
• Reached storage capacity
If you determine that DVR has reached its storage capacity, you can make space by erasing recordings
that you no longer want or by copying those you want to keep to a VCR tape and then erasing them from
DVR. For details, see “Copy Recordings to a VCR Tape” on page 35 or “Erase a Recording” on page 37.
I watched two back-to-back programs on the same channel, but when I pressed
Record, DVR recorded only the second program. Why didn’t it record both since it
“buffered” both?
It recorded the second program because it was the live program at the time that you pressed Record. DVR
does buffer all programs on a channel for up to one hour. However, when you are watching live programming,
DVR assumes that you want to record a specific program, not a specific channel. For that reason, DVR
records only the program that’s currently being broadcast at the time you press Record.
For example, let’s say that you tune to a channel for 45 minutes and during that time watch a 30-minute
Friends episode and then watch the first 15 minutes of Will & Grace. You can rewind to the beginning of
Friends, but if you press Record, DVR will only record Will & Grace because that was the live program at
the time you pressed Record.
Can I erase part of a recording?
No. DVR can only erase the entire recording.
Where can I get more information?
Please visit www.comcast.com, call 1-888-COMCAST, or visit www.sciatl.com. If you visit the latter
site, please have the serial number ready. To locate the serial number, look on the back of the DVR for a
label. The serial number begins with
SA and is located in the lower left
corner of the barcode. See example
0003B4287797
at the right.
Sample serial number
SABDQXTL
N0006246618
C
Cable mode
placing remote control in, 8
Canceling
recordings in progress, 28
scheduled recordings, 27
Changing
channel of PIP screen, 17
channels from Program Guide, 10
Save Time of a recording, 36, 37
Channel banner, displaying, 17
Channel Change Notice screen, 25
Channels, selecting to be blocked, 31
Closed lock symbol, 30
Confirm Recording screen, 22
Copying recordings to VCR tape, 35
Current recordings, displaying, 26
D
Default Save Time setting
explanation of, 21
for future recordings, 36
for saved recordings, 37
Displaying
blocked recordings, 34
Browse By options, 11
channel banner, 17
Parental Control, 30
PIP screen, 17
Program Guide, 10
Recorded programs list, 26
Scheduled recordings list, 27
F
Fast-forward
changing speed of, 15
live programs and recordings, 14
quarter screen, 19
recordings, 14
Finding programs,
See Program Guide
Frame-by-frame viewing, 15
I
Installation, instructions for, 38
Instant replay, 13
L
List
of recorded programs, 26
of scheduled recordings, 27
Live TV
buffering, 6
catching up with, 15
Lock symbols
closed lock, 30
open lock, 30
Loss of power
and Parental Control, 30
and recordings, 38
M
Main TV screen
and PIP screen, 18
and quarter screen, 10
swapping with PIP screen, 17
O
Open lock symbol, 30
ON DEMAND, recording of, 40
Overtime in sporting events,
recording of, 39
1676-DVR SA USER GUIDE R20
12/8/03
1:47 PM
Page 42
COMCAST REMOTE CONTROL QUICK REFERENCE
INDEX
Q
Quarter screen
and the PIP screen, 19
definition of, 10
keys used to control, 19
R
Recorded programs
copying to VCR tape, 35
displaying list of, 26
erasing, 37
playing, 26
playing blocked recordings, 33
pausing, 13
rewinding, 14
scheduled, 27
Recording
a live program, 21
a program, 23
all episodes of a program, 23
and changing channels, 25
and fast-forwarding, 14
and pausing, 13
and playing, 22, 23
and rewinding, 14
and storage space, 21
and turning off TV, 23
and watching TV, 23
blocked programs or channels, 30
ON DEMAND, 40
programs that continue past
scheduled times, 39
two programs at once, 25
two programs at once and
watching a live program, 25
Remote control
explanation of keys, 43
placing in Cable mode, 8
preparing for use with DVR, 8
Rewinding
from PIP screen, 19
live programs, 14
recordings, 14
speeds, 15
S
Save Latest options, 24
Save Time setting
changing for future recordings, 36
changing for saved recordings, 37
default, 21
Saving recordings, 12
Scheduled recordings
canceling, 27
displaying list of, 27
Serial number, 40
Slow motion, 15
Speed indicator on Status Bar, 15
Status Bar, 13
Storage space, 21, 35
Swap PIP and main TV screens, 18
Support, 40
T
Troubleshooting
loss of power, 38
non-responsive remote control, 8
program partially recorded, 37
V
VCR tape, copying recordings to, 35
W
Watching
live TV you are recording, 23
recordings, 26
two programs at once, 17
Power
Press to individually turn on or off the DVR,
TV, or Aux component.
Cable
Press to enable control of your digital cable
/ DVR box.
TV
Press to enable control of your TV. (Note:
This feature requires the digital remote to
be programmed to operate your TV.)
Instant Replay
Press to jump back 8 seconds for an
instant replay.
My DVR
Press to display a list of your
recorded programs.
Live
Press to skip forward to live programming.
Aux
Press to enable control of your VCR, DVD, or
Audio Device. (Note: This feature requires
the digital remote to be programmed to
operate the desired device.)
Lock
Press while watching a program or while
in a listings menu to restrict viewing
or purchase.
Guide
Press for a shortcut to program listings
organized by start time.
Exit
Press any time to return to watching TV.
Arrows
Press to move the highlight to the next
field in a menu or screen. Also use to
browse what’s on other channels while
watching TV.
Info
Press to see a description of the
highlighted program, if available.
Fav
Press to view your FAVORITE channels,
if programmed.
© 2003 Comcast. All rights reserved. Comcast and the Comcast logo are registered trademarks of Comcast Corporation.
All other trademarks are the property of their respective owners. Television programs, films, programs, and other materials may be
copyrighted. Unauthorized recording of such material may be in violation of applicable laws, including United States copyright laws,
and violations of such laws may result in criminal and/or civil penalties.
43
Help
When using the Guide, press for helpful
on-screen information.
Input (TV/VCR)
In the CABLE mode, press to bypass the
digital cable converter. In the TV & AUX
modes, press to select available inputs.
All On
Press All On to turn on or off all the devices
programmed into the digital remote control.
Setup
Used to program your remote to control
your TV, VCR, DVD player, or audio
component during setup.
ON DEMAND
Press ON DEMAND to access the menu of
available ON DEMAND programming.
(Not available in all areas.)
Video Control Buttons
In CABLE mode, the buttons pause, fastforward, rewind, and stop any DVR or ON
DEMAND program you select. In the AUX
mode, these buttons will control a VCR or
DVD player, if programmed.
PPV
Press PPV to access information on
available pay-per-view selections.
Page (+/-)
Press to see the next/previous page of
listings.
Menu
Press to go to Settings.
Last
Press to return to the previous channel or
screen.
OK/Select
Press to select a highlighted item. Also
shows or hides program information while
watching TV.
Enter/HD Zoom
In TV & AUX mode, press to enter channels
on some TVs or information on menu
screens.
1676-DVR SA USER GUIDE R20
12/8/03
1:47 PM
Page 44
For more information,
call 1.888.COMCAST or click www.comcast.com
For use with the Scientific-Atlanta DVR box.
UG-DVR-SA