1
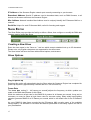
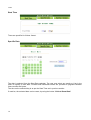
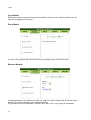
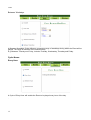
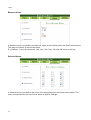
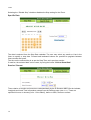
Front Page Front Page 1 Package Contents Package Contents Your E-Streamer Mk2 package should contain these items: • E-Streamer Mk2 (Part No 70710 or 70711) • Cat 5 data cable 1.8m (Part No. 79102) • IEC power cable • This user manual If any item is missing or damaged, please contact your supplier immediately. To be sure that you are using the latest revision of the E-Streamer Mk2 firmware, please visit the Downloads section of the Enttec website at www.enttec.com to get the current version. Safety Instructions Do not expose this device to rain and moisture, or expose it to the risk of dripping or splashing. Do not use this device near water. Do not block any ventilation apertures on this device. Do not install this device near heat sources such as heaters, stoves, monitors, amplifiers, dimmers, luminaries or any other equipment that produces heat. Do not expose the power adapter or power cables of this device to damage from being, crushed, walked on or being pinched by protective cabinets, enclosures or cases. Use only attachments, accessories or fixings specified by ENTTEC. Unplug this device from the mains supply and external data links during electrical storms or when the device will not be used for a long time. Servicing this device should be undertaken only by suitably qualified service technicians. Contacting ENTTEC Email: Telephone: Facsimile: Postal Address: [email protected] +61 3 9763 5755 GMT+10 +61 3 9763 5688 ENTTEC Pty Ltd Unit 17/5 Samantha Court Knoxfield Vic 3180 Australia Getting Support If you require support for the E-Streamer Mk2, please visit the Support area of our website at www.enttec.com. There you can fill out a support request ticket for prompt assistance with your enquiry. 2 Table of Contents Table of Contents Front Page ............................................................................................................................................................................1 Package Contents..................................................................................................................................................................2 Safety Instructions................................................................................................................................................................2 Contacting ENTTEC............................................................................................................................................................2 Getting Support.....................................................................................................................................................................2 Glossary of E-Streamer Mk2 Terms ..................................................................................................................................5 Typographic conventions used in this manual...................................................................................................................5 Getting to know your E-Streamer Mk2..............................................................................................................................6 Layout .................................................................................................................................................................................6 Features..................................................................................................................................................................................6 System Architecture..............................................................................................................................................................7 System File Storage.............................................................................................................................................................7 Show Data Storage..............................................................................................................................................................7 Fast track guide to the E-Streamer Mk2............................................................................................................................8 Lcd Menu...............................................................................................................................................................................9 The Main Menu .................................................................................................................................................................9 1-Show Select ...................................................................................................................................................................10 Show Control Screen.........................................................................................................................................................10 2-Setup ..............................................................................................................................................................................11 Change IP..........................................................................................................................................................................11 Factory Reset.....................................................................................................................................................................11 USB Backup/Restore.........................................................................................................................................................11 USB Backup......................................................................................................................................................................11 USB Restore......................................................................................................................................................................12 3-Status..............................................................................................................................................................................13 4-Restart............................................................................................................................................................................13 Web Interface......................................................................................................................................................................14 Menu System.......................................................................................................................................................................15 E-Streamer Mk2 Home......................................................................................................................................................16 System Information...........................................................................................................................................................16 Network Information.........................................................................................................................................................16 Show Editor.........................................................................................................................................................................17 Creating a New Show .......................................................................................................................................................17 Show Options....................................................................................................................................................................17 Enable Art-Net Control................................................................................................................................................18 Subnet...........................................................................................................................................................................18 Universe........................................................................................................................................................................18 Control Channel...........................................................................................................................................................18 Show Master Channel...................................................................................................................................................18 Enable Recording Control Channel..............................................................................................................................18 Select Stream................................................................................................................................................................18 Channel.........................................................................................................................................................................18 Value............................................................................................................................................................................19 Data Streams......................................................................................................................................................................19 ESP....................................................................................................................................................................................20 Universe........................................................................................................................................................................20 Send Type.....................................................................................................................................................................20 IP Address....................................................................................................................................................................20 Channel Range..............................................................................................................................................................20 Art-Net...............................................................................................................................................................................21 Subnet...........................................................................................................................................................................21 Universe........................................................................................................................................................................21 Send Type.....................................................................................................................................................................21 IP Address....................................................................................................................................................................21 Channel Range..............................................................................................................................................................21 DMX Port..........................................................................................................................................................................22 Input Port......................................................................................................................................................................22 3 Table of Contents Channel Range..............................................................................................................................................................22 Copying a Show.................................................................................................................................................................23 Deleting a Show.................................................................................................................................................................23 Saving a recorded Show....................................................................................................................................................23 Show Control.......................................................................................................................................................................24 Show Selection..................................................................................................................................................................24 Show ID.............................................................................................................................................................................24 Show Name........................................................................................................................................................................24 Show Controls...................................................................................................................................................................25 Status.................................................................................................................................................................................26 Show Master......................................................................................................................................................................26 Duration.............................................................................................................................................................................26 Group Control....................................................................................................................................................................26 Select All......................................................................................................................................................................26 Show Selection.............................................................................................................................................................26 Event....................................................................................................................................................................................28 New Event.........................................................................................................................................................................28 Run Loop Options.............................................................................................................................................................29 SHOWS: Select Shows for Event .....................................................................................................................................29 START: Event Start Settings.............................................................................................................................................29 CYCLE: Event Cycle Settings...........................................................................................................................................31 Every Month.................................................................................................................................................................32 Between Months...........................................................................................................................................................32 Selected Months...........................................................................................................................................................33 Every Day.....................................................................................................................................................................33 Between Days...............................................................................................................................................................34 Selected Weekdays.......................................................................................................................................................34 Between Weekdays......................................................................................................................................................35 Every Hour...................................................................................................................................................................35 Between Hours.............................................................................................................................................................36 Selected Hours..............................................................................................................................................................36 Every Minute................................................................................................................................................................37 Between Minutes..........................................................................................................................................................37 Selected Minutes..........................................................................................................................................................38 STOP: Event Stop Settings................................................................................................................................................38 Scheduler.............................................................................................................................................................................41 Stream Monitor ..................................................................................................................................................................42 Backup / Restore.................................................................................................................................................................43 Settings Backup.................................................................................................................................................................43 Settings Restore.................................................................................................................................................................43 Backup & Restore Shows using a FTP client....................................................................................................................43 Factory Restore..................................................................................................................................................................44 Settings.................................................................................................................................................................................45 Firmware Updates using USB......................................................................................................................................45 System Date / Time...........................................................................................................................................................46 Date Range...................................................................................................................................................................46 Year Range...................................................................................................................................................................46 Time Format.................................................................................................................................................................46 Geolocation:......................................................................................................................................................................46 Offset from GMT.........................................................................................................................................................46 Geographic Location....................................................................................................................................................46 Today's Sunrise and Sunset..........................................................................................................................................46 Location Data...............................................................................................................................................................46 Network Interface: DHCP.................................................................................................................................................47 IP Address....................................................................................................................................................................47 Gateway........................................................................................................................................................................47 DMX Port Parameters.......................................................................................................................................................48 System Customization.......................................................................................................................................................48 RS232 Remote Control......................................................................................................................................................48 4 Glossary of E-Streamer Mk2 Terms Glossary of E-Streamer Mk2 Terms Show: A set of recorded DMX512 data sequences that form a lighting presentation. Event: An entry in the E-Streamer Mk2's schedule that specifies a Show and the times it is to be replayed. Slot: The 8-bit (0-255) data for a single DMX512 Channel. Frame: A packet of DMX512 data containing up to 512 data slots. Stream: A sequence of DMX frames (1- 44.3 frames per second). Also known as a DMX Universe. Start Frame: The DMX512 frame that is output by the E-Streamer Mk2 at startup. ESP: Enttec's DMX over Ethernet communications protocol. Art-Net: Artistic Licence's DMX over Ethernet communications protocol. LAN: A Local Area Network is a network of computers, usually in a single building or small group of buildings, linked by a high speed network such as an Ethernet. DHCP: The Dynamic Host Configuration Protocol is a method for network devices to automatically obtain configuration information from a server on the network. Data provided consists of an IP address for use on the local network, and may also include such parameters as the default router, network gateway, subnet mask, IP address expiry time and addresses for Domain Name Servers. Typographic conventions used in this manual Buttons: Web page button names and Navigation Bar buttons appear in a special typeface. E.g., The name of the Windows™ "Start" button is printed as Start. Data boxes: The names of the boxes where data is entered appear in a different typeface. E.g., the name of the "Frame Rate" entry box is printed as Frame Rate. Panel buttons: The names of the front panel buttons used to navigate the E-Streamer Mk2's menu system appear in a specific typeface. File and Folder names: The names of data files and folders appear in a different typeface. E.g., the name of the file "2.shwl" is printed as 2.shw E-Streamer Mk2 Screens: The messages displayed on the LCD display are printed in a dot matrix typeface, in a shaded box. E.g. ES_Mk2 ACTIVE: 3 IP: 192.168.10.200 10:10:25 3.65 GB press a key to enter This process may take a few minutes, possibly long enough to take a coffee break. This process could take some time, quite possibly enough time to make and eat a snack. 5 Getting to know your E-Streamer Mk2 GETTING TO KNOW YOUR E-STREAMER MK2 Thank you for purchasing the E-Streamer Mk2. At Enttec we are proud of our products and we hope you will enjoy using them as much as we enjoy designing and building them. The E-Streamer Mk2 is a powerful DMX512 recorder and playback device, capable of recording up to 64 Streams of DMX per show. Multiple shows can be recorded or played back simultaneously with virtually unlimited triggering and scheduling options. E-Streamer Mk2 can meet the needs of highly complex shows in even the largest of lighting installations. Layout The E-Streamer Mk2 is 1 Unit rack case, designed to be mounted in a standard 19-inch (482.6mm) equipment rack using the supplied mounting brackets. I E-Streamer Mk2 front E-Streamer Mk2 rear 1. IEC Power input socket - Accepts AC voltages in the range 100V – 260V, at frequencies from 50Hz to 60Hz. 2. RJ45 socket - Ethernet network port 3. USB type A sockets - USB mass storage for backup and restore 4. DB9 RS-232 socket - Serial data connector for remote control. The following only available on Part No (70711) 5. DIN-TEC sockets – Connect DIN-TEC devices to control 6. 4 DMX Output Ports 7. 4 DMX Input Ports Features The E-Streamer Mk2 provides: • Up to 64 universes per show • Unlimited simultaneous show playback (HTP merging between shows) • Unlimited number of shows • SD Card based recording • DMX input/output through Ethernet port 6 Features • • • • DMX input/output through DMX Ports (only on Model D) Art-Net & ESP protocol support Control and configuration using inbuilt web interface Show replay can be triggered on: power up Art-Net & ESP control (slave from other lighting control) day, date, month and time of day remote serial command astronomical clock simple TCP/IP network protocol Easy firmware upgrades • System Architecture The E-Streamer Mk2 system consists of two components, the main Streamer Engine, an embedded system, running a highly customised Unix-type operating system, and an independent microcontroller-driven LCD terminal which is linked to the Streamer Engine. Communications with the E-Streamer Mk2 can take place over three paths: Through the E-Streamer Mk2's Web Interface. Connection is via the web browser on a computer located on the same Ethernet network as the E-Streamer Mk2. (Used for configuring the Streamer Engine and all Show set-up, recording, replay and scheduling functions.) Via the LCD panel and buttons on the front of the E-Streamer Mk2's case. (Used for starting and stopping the Streamer Engine and basic control of Show recording and replay functions.) Via RS232 port – Commands can be sent to start, pause & stop shows. System File Storage All operating system and E-Streamer Mk2 program files are stored on internal flash memory for high reliability and rapid start up. Show Data Storage The E-Streamer Mk2 stores Show data on a user serviceable SD Card . For data stability and reliability, the drive is formatted under the Unix File System (JFS) and is not readable by Windows or Macintosh operating systems. To backup and restore the recorded show files, a USB mass storage drive is needed to be plugged into the USB slot on the rear of the unit. 7 Fast track guide to the E-Streamer Mk2 FAST TRACK GUIDE TO THE E-STREAMER MK2 To record and replay a show on E-Streamer Mk2: • Connect the E-Streamer Mk2 to a power supply and an Ethernet Network. • From the front LCD Menu, obtain the IP Address of E-Streamer Mk2 • Open the E-Streamer Mk2's Web Interface in a web browser on any computer. • Set up your Show data input sources. (see Show Editor ) • Record your Show data from either: the Show Control page (see Show Control 24), or the Show Menu on the LCD panel (see LCD Menu). • Replay your Show from either: the Show Control page (see Show Control 24), or the Show Menu on the LCD panel (see LCD Menu) 8 Lcd Menu LCD MENU The LCD Menu is navigated through the four panel buttons on the front of the E-Streamer Mk2. The Menu button acts as the “Back” button, which takes you to the previous Menu/screen. The Enter button goes into the selected option on the screen, and activating the option. The Top & Bottom button are used to navigate/scroll through the options on any screen. The currently selected option is highlighted with a white background on the screen. The Main Menu ES_Mk2 ACTIVE: 0 IP: 192.168.10.200 10:10:25 3.65 GB press a key to enter Line1: displays the E-Streamer System Name and Number of Active Shows Line2: displays either the current IP address / DHCP Failed / disconnnected, highlighting the current status of the network interface. The IP address is where the web interface can be accessed. ES_Mk2 ACTIVE: 0 DHCP FAILED 10:10:25 SD Error press a key to enter Line3: displays the current time of the system, and the free disk space on the SD Card. If the free space drops to less than 10MB, the line will be highlighted. And if the SD Card cannot be accessed, “SD ERROR” will be displayed. Pressing any of the panel buttons/keys will activate the next screen on the LCD: The Selection Menu While on the Selection Menu, you can select the option by pressing the Enter button, when that option is highlighted. 1-Show Select 2-Setup 3-Status 4-Restart 9 Lcd Menu 1-Show Select Lists all available shows on the E-Streamer Mk2, list can be scrolled using up & down keys. Scrolling indicator is visible when the list allows scrolling. Show 11 Black Room Show Show 9 New Year Show ^ v When a show is selected by pressing the Enter button, the Show Control Screen is shown, this is where one can Start, Stop, Pause or Record the show. Depending on what status the Show is in, only 2 options are available. Pressing Enter will activate the selected action, and current status will be updated. Show Control Screen BLACK ROOM: PLAY RECORD STOPPED next show >> Show Control screen allows cycling through the Show List, by using the “Next Show >>” option. Activating Record on an existing recording will prompt for “Overwrite Prompt”: RECORD & OVERWRITE ? 1-Yes 2-No All the other actions (Play,Pause,Stop) happen instantly, and current Show status is visible on the top right of the Show Control screen. Pressing Menu button will take you back to Show Select screen, and pressing it one more will take you back to the Selction Menu. 10 Lcd Menu 2-Setup Setup Screen, allows the following three options: 1-Change IP 2-Factory Reset 3-USB Backup/Restore Change IP This screen further gives two options DHCP or Static IP. When Static IP is selected, the screen allows you to change the IP address using the top and bottom button to scroll the digits and the menu & enter buttons to select the segment. Once you are on the last segment of the IP address, pressing the Enter button, will activate the IP address. It will take a few seconds for the change to go through, please wait 30 seconds, before attempting to try again. Change IP Address IP: 192.010.111.123 Factory Reset Activating Factory Reset, leads to a simple prompt confirming your action. Once confirmed, the Factory Reset will take a few seconds to run. It will end up deleting all your shows & events, as well as any saved settings. Please use this only when needed. USB Backup/Restore This screen further gives two options USB Backup or USB Restore. For both Backup & Restore to succeed, you must have a USB Mass storage device (FAT or FAT32 only) connected to any of the rear USB ports. USB Backup If the free space of the USB device is less than the size of the shows, the backup will fail, please use a bigger usb devcie than needed to ensure that backup is successful. Before starting backup you will need to confirm, and an indication of how big the usb device should be is given: 11 Lcd Menu 1-YES 2-NO * usb free > 890 MB Looking for usb device please wait ... Depending on the size and number of recorded shows, the backup could take a while (few minutes). The E-Streamer Mk2 will stop any active shows and, engine will be stopped, while the backup is in process. Once the backup is complete, the engine will be restarted. Please do not attempt to control any shows while the backup is being processed. Backup in progress please wait ... Once backup is complete, you may remove the usb device safely. Please do not remove the usb device until the progress screen is visible. USB Restore Please do not modify the files that were backed up on the usb device in any way, or the restore might not succeed. Upon selecting Restore, once you plug in the usb device and confirm on the screen, the Restore will start. Restoring shows could take a while, depending on the size and the number of shows backed up. Restoring system please wait ... 12 Lcd Menu Once restore is complete, you may remove the usb device safely. Please do not remove the usb device until the progress screen is visible. 3-Status Status Screen, allows the following two options: 1-System 2-Network Both the Status screens are read-only and provide information about the system and Networking. These require no user-input and serve as a way of checking the performance of the E-Streamer Mk2. 4-Restart Restart Screen, when activated, prompts for the user to confirm the selection. 1-YES 2-NO Once confirmed the, E-Streamer will stop all the active shows, stop the engine and restart the system. While rebooting the LCD screen will change between a couple of screens, and the LCD Main Menu will be visible, once the system is fully ready. System Restarting Please wait … 13 Web Interface WEB INTERFACE The E-Streamer Mk2 is configured, controlled and programmed through a web browser interface running on a computer system located on the same Local Area Network. Any graphical web browser, such as Chrome, Firefox, Internet Explorer, Safari or Opera, running under any operating system, including Windows XP or Vista, Mac OS X or Linux can be used. It is recommended that a recent version of web browser be used to ensure full compatibility to display the web interface. Throughout the Web Interface, helpful hints are displayed when a user hovers the mouse over the “Help” icon ? 14 Menu System Menu System The web interface is navigated via a main menu displayed in a panel on the left of screen, while all programming and control pages are shown on the right of the screen E-Streamer Mk2 Home Show Configuration Show Control Playlist Backup / Restore E-Streamer Mk2's operational status and information. Show configuration and modification Record and replay Shows Events configuration and modification Current Scheduler Status for Events Current DMX Data for the selected Show & stream Backup and Restore shows & system configuration Settings Change various System settings (Date/Time, Networking, Firmware & Licensing) The Menu system remains same on all the pages. The selected menu is highlighted depending on the page user is on. 15 E-Streamer Mk2 Home E-STREAMER MK2 HOME This page is automatically displayed when connection is established between a web browser and the E-Streamer Mk2. It shows the operational status of E-Streamer Mk2 and a summary of some basic system settings. Although the time display updates continuously, system operational statistics are only updated every 5 seconds. System Information Activity This is the number of E-Streamer Mk2 Shows that are currently active: either being played or recorded, as a result of all actions including automated, scheduled and manually triggered events. CPU Load Percentage of the Streamer Engine's central processor capacity being used by all system activities. Free Disk Space Displays the current free disk space on the SD Card. If this ever drops to very low level, the system will forcibly disable show recordings. To free space, either delete recorded shows or replace the SD card with a bigger capacity one. Network Information 16 E-Streamer Mk2 Home IP Address of the Streamer Engine network port currently connecting to your browser. Broadcast Address Special IP address used to broadcast data, such as DMX Streams, to all devices on the same subnet as the Streamer Engine. Mac Address Network interface Mac Address used to uniquely identify the E-Streamer Mk2 on a network. Serial No Unique for each E-Streamer Mk2, useful for licensing and support SHOW EDITOR The Show Editor page provides the facility to define a Show, then configure or modify the DMX data streams used to control the Show. Creating a New Show Enter the show name in the “Save as..” text box which accepts standard text up to 25 characters. Please note, only English characters are supported for the show name. The Save button will save the Show with selected options, and streams. Show Options Play on power up Selecting this option will automatically play the Show when the Streamer Engine has completed its power-up sequence (approximately a minute after the unit is turned on). Frame Rate The Frame Rate setting [1 - 44 frames per second] adjusts the frequency at which updates are made to the DMX data streams for this Show. While the maximum refresh rate for the DMX512-A protocol is 44 frames per second, it may not be necessary to record a Show at high frame rates for accurate replay. Many widely-used lighting consoles generate DMX512 at 25 frames per second, which is the default rate for the E-Streamer Mk2. As every DMX512 data frame recorded by the E-Streamer Mk2 occupies some of the available storage space, it is advisable to record as little data as practicable to accurately capture the look of your presentation. 17 Show Editor If the changes in a Show are slow or very rapid, recording at lower frame rates may have no impact on the presentation, while conserving storage in the E-Streamer Mk2. It is advisable to make a test recording of the DMX data streams to verify that your selected frame rate does not cause any problems with the look of the presentation. Irrespective of the Frame Rate setting for a Show, E-Streamer Mk2 uses Run length Encoding, a lossless data compression technique, to avoid recording redundant duplicate DMX512 data. Instead it records only unique frames and the time for which each frame is to be replayed. Art-Net Control Channel A single Art-Net DMX channel can be used to control the replay for a Show. The values (levels) for the channel override the Play, Pause and Stop functions for that Show on a Latest Takes Precedence basis. DMX Values Percent (approx) 0 - 85 86 - 170 171 - 255 0% - 33% 34% - 67% 68% - 100% Command Executed Stop Pause Play Art-Net is Artistic Licence's DMX over Ethernet protocol. This protocol is used by products from Artistic Licence, Enttec and nearly forty other members of the Art-Net Alliance throughout the world. The Art-Net protocol can transport up to 256 universes or streams of DMX512 data over an Ethernet network. These are divided into 16 Subnets [0 - F (hexadecimal)] each containing 16 Universes [0 - F (hexadecimal)]. Enable Art-Net Control Selection of the Enable box activates Art-Net control for the Show. Subnet The Subnet selected for the control channel [0 - F] should match the output configured on an ArtNet device connected to the network. Universe The Universe selected for the control channel [0 - F] should match the output configured on an ArtNet device connected to the network. Control Channel The control channel [1 - 512] in the designated universe is selected from the Channel list. Show Master Channel The master channel [1 - 512] in the designated universe is selected from the Channel list. Recording Control Channel A single DMX channel can be used as an override control for the recording of a Show. Any channel, in any of the Show's DMX streams, can be assigned as the Recording Control Channel for that Show. As this includes channels that may lie outside the range of channels being recorded for a stream, it is possible to use a channel for recording control that will not be recorded into the Show. Recording begins only when a Record button has been pressed and the assigned control channel reaches the set threshold value. Recording will continue until the level of the control channel falls below the threshold value. This function can not be activated until the DMX data streams have been allocated for the Show. 18 Show Editor Enable Recording Control Channel Selection of the Enable box activates recording control for the Show. Select Stream The stream containing the Control Channel is selected from the list of data streams defined for the Show. Channel The control channel in the selected data stream is selected from the Channel list Value The trigger threshold level [0 -255] is selected from the Value list. The values used are DMX levels, not channel percentages. (1% is approximately 2.5 DMX steps). Data Streams Although the E-Streamer Mk2 is an Ethernet based system, the DMX data streams recorded by EStreamer Mk2 can be the output of virtually any lighting control system. The streams may originate as standard DMX512, be generated directly onto the Ethernet network from Art-Net or ESP compatible controllers, or may be converted from DMX to an Ethernet protocol by Art-Net or ESP compatible interface devices. Direct DMX input and output is possible via up to four of DMX Output Ports4 An E-Streamer Mk2 show may have up to 64 data streams, each of which can contain a continuous range of channels from a DMX universe. E-Streamer Mk2 streams can be different ranges from the same DMX universe. Eg. Stream Fx1 can be channels 1 to 96 from universe 1 on the console, while stream Fx2 can be channels 385 to 512 from that same universe. Add Stream The Add Stream button creates a new data stream with the title [UnNamed] and opens the Stream Editor panel. Stream Editing Selecting an existing entry from the streams list will open the Stream Editor panel for that stream. 19 Show Editor Stream Name The stream name is the label used to identify the data stream Stream Type E-Streamer Mk2 can accept DMX data in ESP, Art-Net and standard DMX formats. ESP Enttec's public domain DMX over Ethernet protocol (Enttec Show Protocol) ESP is used by all Enttec Ethernet products and some third party controllers such as LightFactory. Universe The ESP protocol can transport up to 256 universes or streams of DMX512 data over an Ethernet network. The Universe selected for the stream [0-255] should match the output configured on an ESP device connected to the network. Send Type The output for this stream can be sent either by Broadcast messages sent to the entire IP network or to a specific IP address on the network. IP Address Where a specific IP address is required, it should be entered in the standard IP version 4 nnn.nnn.nnn.nnn format (where nnn is a decimal number between 0 and 255. Eg. 172.16.103.254). Channel Range The channel range is the block of DMX channels from the current data stream that will be recorded and relayed as part of the Show. Any continuous range of DMX512 channel numbers [1-512] may be entered for the stream. 20 Show Editor Art-Net Art-Net is Artistic Licence's DMX over Ethernet protocol. Art-Net is used by products from Artistic Licence, Enttec and nearly forty other members of the Art-Net Alliance throughout the world. Subnet The Art-Net protocol can transport up to 256 universes or streams of DMX512 data over an Ethernet network. These are divided into 16 Subnets each containing 16 Universes. The Subnet selected for the stream [0 - F] should match the output configured on an Art-Net device connected to the network. Universe The Universe selected for the stream [0-F] should match the output configured on an Art-Net device connected to the network. Send Type The output for this stream can be sent either by Broadcast messages sent to the entire IP network or to a specific IP address on the network. IP Address Where a specific IP address is required, it should be entered in the standard IP version 4 nnn.nnn.nnn.nnn format (where nnn is a decimal number between 0 and 255. Eg. 172.16.103.254). Channel Range The channel range is the block of DMX channels from the current data stream that will be recorded and relayed as part of the Show. Any continuous range of DMX512 channel numbers [1-512] may be entered for the stream. 21 Show Editor DMX Port Based on the configuration of your E-Streamer MK2, there are 4 DMX Input and 4 DMX Output Ports on the rear of the Unit, for the purpose of recording the input ports are used, and for the purpose of playback of the show the output ports are used. Input Port Select from the 4 Input ports available. Channel Range The channel range is the block of DMX channels from the current data stream that will be recorded and relayed as part of the Show. Any continuous range of DMX512 channel numbers [1-512] may be entered for the stream. Save Stream The Save Stream button saves all configuration information for the current stream. Delete Stream The Delete Stream button deletes all configuration data for the current stream. Pressing the Delete Stream button produces a dialogue box to confirm the removal operation. 22 Show Editor Copying a Show The Copy button copies the streams and configuration of the selected show into another show, as named by the user. It can be useful to copy all streams into another show and make changes as desired, without changing the existing show. Deleting a Show Pressing the Delete button produces a dialogue box to confirm the deletion. The Delete button completely and permanently deletes all configuration and stream data for the show, as well as the recorded show file. Warning: Once deleted the show files are completely removed from the system, please refer to “Backup & Restore” in order to backup recordings. Saving a recorded Show If the show has already been recorded, and changes made afterwards to its configuration, the existing recording will be deleted. A warning is displayed on the Show Editor screen, so that the user does not delete the show by accident. 23 Show Editor SHOW CONTROL This page gives basic push-button control of the recording and playback of the Shows that have been configured from the Show Configuration page (See Show 17). All status information is updated every 3 seconds. Show Selection The selection box sets the Shows that will be controlled by the next Group Control operation. Selection is automatically cleared after each group control operation. Show ID The Show's ID number is used in place of its name for Show data storage and remote Show control commands via RS-232 and TCP/IP. Clicking on the ID will open the Show in the Show Configuration editor. 24 Show Control Show Name The Show name displayed is allocated during Show configuration. Clicking on the Show Name will open the Show in the Status Screen. Show Controls These Show control buttons are similar in function to the record and replay functions found on audio and video recorders. Each row of buttons controls a single Show. Play The Play button only functions when the Show already has recorded DMX data. Pressing the Play button starts the Show's output streams from the first frame of the recording and flashes the Play symbol. The Show will repeat continuously until stopped or paused. To play a Show once only then stop, use the Play Once function in Group Control. Pause The Pause function is only available when the Show is either playing or recording. Pressing the Pause button temporarily stops the record or play process and flashes the Pause symbol. When Pause is pressed in play mode, output is frozen at the last frame in each DMX stream. When Pause is pressed in record mode, recording is stopped at the last frame in each DMX stream. When paused, pressing the Pause button a second time, continues the previously paused record or play process. If Pause was pressed in play mode, output in each DMX stream continues from the frame playing at the time the button was pressed. If Pause was pressed in record mode, recording continues from directly after the last recorded frame in each DMX stream. Stop The Stop function is only available when the Show is playing, recording or paused. Pressing the Stop button terminates the record or replay session for the show. Subsequent Play or Record operations commence at the start of the recorded Show data. Record Pressing the Record button erases all recorded data for the Show, commences to record the DMX streams defined in the Show Configuration screen, and flashes the Record symbol. The length of the recording is limited only by the available free disk space in the Streamer Engine. If an existing recording exists, starting the Record process produces a dialogue box to confirm the recording operation. 25 Show Control Precise control over the Show data recording process can be achieved by configuring a Recording Control Channel on the Show Configuration page (See Recording Control Channel 18 ). This facility allows the level of a single designated DMX channel to control the start and finish of a Show recording session. Status The Show's current play status is displayed as STOPPED, PLAYING, PAUSED, or RECORDING. Show Master The Show Master acts as proportional master fader over all data in all Streams in the Show. This function is useful for a temporary reduction in Show levels, but it also proportionally reduces data values to other devices including effects equipment and robotic luminaries. The Master Fader is only visible when the Show is playing. The Fader can be dragged to any level between 1-100%. While dragging the fader the relative percentage level is visible. Duration This is the playing time of the Show in hours, minutes, seconds and hundredths of seconds. HH:MM:SS:ss. If the show action (play or record) is triggered from the web interface, the interface estimates the duration of the show being recorded or played, and displays this in real-time. Once the show has finished recording, the actual duration is visible. Group Control Group control provides simultaneous manual triggering of the replay functions for one or more shows. Selection Select All All Shows can be selected simultaneously for inclusion in the next Group Control operation by selecting the top checkbox. Selections are cleared after each operation. Show Selection Shows can be included in the next Group Control operation by selecting the box next to the Show ID. Selections are cleared after each operation. 26 Show Control Play Once The Play Once button only functions on Shows with recorded DMX data. Pressing the Play Once button starts the selected Shows' output streams from the first frame of the recording and flashes the Play symbol. The Shows will play only until the end of their recorded data. Play Forever The Play Forever button only functions on Shows with recorded DMX data. Pressing the Play Forever button starts the selected Shows' output streams from the first frame of the recording and flashes their Play symbol. The selected Shows will repeat continuously until stopped or paused. Pause The Pause button functions only on Shows that are playing or already in pause mode. Pressing the Pause button temporarily freezes the play process and flashes the Pause symbol on selected Shows that are in play mode. Output is frozen at the last frame generated in each DMX stream. On Shows that were already in Pause mode, the Pause button continues the previously paused play process. Stop The Stop button functions only on selected Shows that are playing or paused. Pressing the Stop button terminates the replay session for the selected Shows. Subsequent Play operations on the selected Shows commence at the start of the recorded Show data. 27 Event Event Defining Events are crucial to scheduling shows using the E-Streamer MK2. Events allow the user to define various conditions, specify start & stop times and provide the ability to create complex events that can be scheduled and controlled as needed. Event Structure Each event consists of: • a list of Shows to be played • the number of times to repeat the Shows • conditions to start the Show • conditions to stop the Show (optional) Examples of E-Streamer Mk2's scheduling possibilities include: Starting a Show at midnight every night and having it repeat continuously until 45 minutes before dawn. Starting a Show whenever the lighting system is powered up. Starting a Show each time a new customer enters a showroom, even if the previous Show has not yet completed. Starting a Show at 18:15:32 on July 4th and repeating it four times. Starting a Show on the hour, at 20 past the hour, and 45 minutes past the hour on Tuesdays between Sunset and 23:00 - only during the months of August and November. Starting a Show whenever the Newsroom cameras are switched on, then changing Shows when the weather graphics are put to air. Starting alternate Shows on the half hour and quarter hour, until 23:30, on weekend nights, from January to March. Starting a Show and repeating it continuously, whenever the building management computer system draws the blinds. Starting a Show every time a Jackpot is scored on Thursday evenings during the winter. Starting a Show at sunrise every Tuesday and repeating it continuously until an hour and five minutes after sunset. Starting a different, continuously-repeating Show each weeknight at 20:15, that runs until 00:30. New Event Simply enter an event name in the “Event Name” textbox. Names may contain letters, numbers or spaces, but the first character must be a letter. 28 Event Run Loop Options A Show may be set to run its lighting sequence • once only • repeat the sequence a fixed number of times • continuously loop through the sequence until interrupted by some other event. SHOWS: Select Shows for Event Any Show recorded in the E-Streamer Mk2 system can be included in any scheduled Event. Shows are added or removed from the Event by selecting or de-selecting the relative Show Name. START: Event Start Settings An Event may be scheduled to start at: a specified time of day (Start Time). a specified time on a specified day (Specific Date). a time relative to the sunrise or sunset at the E-Streamer Mk2's location. 29 Event Start Time Times are specified in 24 hour format. Specific Date The date is selected from the Start Date calendar. The user may select any month or Year in the future to specify a start date. Forward and backward buttons are provided to paginate between future months and years. The time on the selected day is as per the Start Time set in previous section. If need be, the selected date can be unset, by using the button “Click to Reset Date” 30 Event Sunrise/ Sunset Times relative to sunrise and sunset are calculated daily by the E-Streamer Mk2 from the Latitude, Longitude and Local Time information entered from the Settings page (See G 46 ). Times are specified in hours or minutes [1min - 12hrs 59min], before or after, sunrise or sunset. To unset the Sunrise/Sunset option, change the occurrence to “None” - as set by default. CYCLE: Event Cycle Settings In addition to simple daily repetition of Events and Events scheduled for specified days and times, E-Streamer Mk2's powerful Cycle processor can schedule Events to run in almost any pattern feasible. Cycle settings allow: • specific months and days to be selected for Event activation • Event triggering to be activated at given time patterns during each day. By default, all the cycle settings are disabled. So the user must go through all the cycle options to select the options as needed for the event. Cycle Year Determines whether or not the event will be cycled on per year basis. 31 Event Cycle Month Determines which months the Event will be enabled. Only one of the following options can be selected and applied to the Event. Every Month A Cycle of Every Month will enable the Event to be played every month of the year. Between Months A Between Months Cycle defines a continuous range of months during which the Event will be played. The range is inclusive of the selected months. E.g. Between April and September, includes April, May, June, July, August & September. 32 Event Selected Months A Selected Months Cycle defines the specific months during which the Event will be played. Cycle Day Determines which days the Event will be enabled. Only one of the following options can be selected and applied to the Event. Every Day A Cycle of Every Day will enable the Event to be played every day of the week. 33 Event Between Days A Between Days Cycle defines a continuous range of days during which the Event will be played. The range is inclusive of the selected days. E.g. Between 5 and 11, includes days 5,6,7,8,9, 10 and 11 of the month. Selected Weekdays A Selected Weekdays Cycle defines the specific days of the week during which the Event will be played. 34 Event Between Weekdays A Between Weekdays Cycle defines a continuous range of weekdays during which the Event will be played. The range is inclusive of the selected days. E.g. Between Tuesday and Friday, includes Tuesday, Wednesday, Thursday and Friday. Cycle Hours Every Hour A Cycle of Every Hour will enable the Event to be played every hour of the day. . 35 Event Between Hours A Between Hours Cycle defines a continuous range of hours during which the Event will be played. The range is inclusive of the selected hours. E.g. Between 13 and 18 includes the 13th, 14th, 15th, 16th, 17th and 18th hours of the day. Selected Hours A Selected Hours Cycle defines the hours of the day during which the Event will be played. The hours correspond to the 24 hour format, where 0 signifies midnight. 36 Event Cycle Minutes Every Minute A Cycle of Every Minute will enable the Event to be played every minute of the hour. Between Minutes A Between Minutes Cycle defines a continuous range of minutes on which the Event will be triggered. The range is inclusive of the selected minutes. E.g. Between 16 and 26 includes minutes 16, 17, 18, 19, 20, 21, 22, 23, 24, 25 and 26 of the hour. 37 Event Selected Minutes A Selected Minutes Cycle defines the specific minutes of the hour during which the Event will be played. STOP: Event Stop Settings A stop setting is optional. It may be required to terminate an event that would otherwise loop for ever. An Event may be scheduled to stop at: a specified time of day. a specified time on a specified day. a time relative to the sunrise or sunset at the E-Streamer Mk2's location. Stop Time Times are specified in 24 hour format. 38 Event Selecting the “Disable Stop” checkbox disables the Stop setting for the Event. Specific Date The date is selected from the Stop Date calendar. The user may select any month or Year in the future to specify a stop date. Forward and backward buttons are provided to paginate between future months and years. The time on the selected day is as per the Stop Time set in previous section. If need be, the selected date can be unset, by using the button “Click to Reset Date” Sunrise / Sunset Times relative to sunrise and sunset are calculated daily by the E-Streamer Mk2 from the Latitude, Longitude and Local Time information entered from the Settings page (See G 46 ). Times are specified in hours or minutes [1min - 12hrs 59min], before or after, sunrise or sunset. 39 Event Save Event Options: Event Details The user can save the Event Options at any time by using the “Save Event Options” button. Once saved the Event Summary box is shown, so that the user can confirm that the changes made were as selected. Event Summary also serves as a reference to see the current selected options for that Event, also useful while Editing an existing Event. 40 Scheduler SCHEDULER The scheduler at the heart of all E-Streamer Mk2 Show replay. It holds a list of Events that can be started and stopped by a range of methods, enabling very flexible scheduling. The Scheduler screen allows the editing of existing events, click on the Event Name to expand its Event Details box, the user can then click on the “Edit Event” button to be taken to the Events Screen to edit that particular Event. The Scheduler screen also supports a quick hover view to show Cycle Options in detail. Hover over the cycle icon and a helpful tip will be highlighted on the screen, summarizing the Cycle Option. Event status symbols Symbol Meaning The Event is scheduled to start in the future. The Event cycle is currently active. The Event will be triggered according to Start and Cycle settings. The Event cycle is currently inactive. The Event is either scheduled to start in the past, or the stop time is in the past. 41 Stream Monitor Stream Monitor The Status Screen shows the current DMX recorded/playing data on the 512 channels for the selected Show and Stream. The data is refreshed every 3 seconds so as to give an idea of the data currently being processed by the selected Stream. This screen can be used to determine whether or not the show is recording or playing back what it is intended to. The current channel no. is visible through a tool-tip, activated by a mouse hover action on any cell. 42 Backup / Restore BACKUP / RESTORE This page allows you to save and restore external backup copies of the System data on the EStreamer Mk2's flash drive and the recorded shows stored on the SD Card. Settings Backup The Settings Backup includes all the user settings, show configurations and events for this EStreamer Mk2. It is always a good idea to create a backup, once the unit has been configured and setup as required. Clicking the button produces a zip file that includes all the system data. The Settings backup does not include any recorded shows, these can be backed up separately using the USB port or using FTP as explained later. Settings Restore The Settings Restore allows the E-Streamer Mk2 to be restored to the saved settings. Upload the backup file that was generated for an E-Streamer Mk2 and restore using the “Restore Settings” button. Restore might take a while to be executed, and it will also refresh the Network interface as setup in the backup. This might change the I.P address on the E-Streamer Mk2, which is why the backup file name has the I.P address it should resort to. However, in the case of DHCP, if the unit gets a new address from the DHCP Server, please get the new I.P address from the front LCD screen of the unit. Backup & Restore Shows using a FTP client E-Streamer Mk2 includes a public File Transfer Protocol (FTP) server on port 21that provides access to the Show data stored on the SD Card. This enables file backup and restore operations to 43 Backup / Restore be performed using any available FTP client. Recent browsers are also capable of browsing the FTP link provided. Thus allowing anyone to copy recorded shows and transferring them back when needed. The recorded show files are stored in their respective folders with an extension of .shw It is recommended to copy the folder, rather than individual files, since the folder also holds the show configuration which will be required to restore the show later. Ftp login credentials username: ftp password: ftp Suitable clients include the powerful (but not for the faint-hearted) command line tool ftp that is available on most operating systems, and much friendlier applications such as WS_FTP and FileZilla for Windows, Fetch for the Mac, and gFTP and dozens of others that run on Linux. Sources for downloading FTP clients Client Platform Source Filezilla Windows filezilla.sourceforge.net WS_FTP Windows www.ipswitch.com Fetch Mac www.fetchsoftworks.com gFTP Linux gftp.seul.org Factory Restore Factory Restore resets the E-Streamer and will delete all the user data, including the recorded shows. Use this option if ENTTEC support asks you to, or if the E-Streamer Mk2 has been corrupted or has lost its settings that are needed for the correct operation of the unit. 44 Settings SETTINGS The System Settings page allows configuration of a range of Streamer Engine system, network and communications settings. Firmware Update The Firmware Update function provides a facility to update the firmware (internal software) that runs the E-Streamer Mk2. To obtain the latest revision of this software, visit the E-Streamer Mk2 page in the Downloads section of the Enttec website at www.enttec.com and download the latest version to your computer. The Update process will terminate all Recording and Playback activities. The upload file/browse button opens a standard file selection dialogue to locate the packed archive file containing the new version of the E-Streamer Mk2 software. The file is usually named es_update_date.tgz Selecting the Upload Firmware button transfers the update file to the E-Streamer Mk2 and initiates the installation process. When the upload is complete, the unit will process the firmware update and displays a progress bar until the update is complete. Please do not attempt to refresh or change the web page, while the unit is updating the firmware. After a successful update, E-Streamer Mk2 will automatically restart and the following reboot screen will be displayed on the browser: The Streamer Engine will go offline for approximately two minutes while shutting down and rebooting. During this time, the web browser will report that the server is unavailable. Firmware Updates using USB Alternatively, you can also update the E-Streamer Mk2 firmware using a USB mass storage device. • Copy the update file into the root directory of a USB mass storage device. • Plug the mass storage device into any USB port on the rear of the E-Streamer Mk2 • From the S ETUP => U SB B ACKUP /R ESTORE menu on the LCD panel (see LCD Menu) select the USB R ESTORE button and confirm the restore process when prompted. The Streamer Engine will then go offline for approximately two minutes while shutting down 45 Settings and rebooting. During this time, the web browser will report that the server is unavailable. System Date / Time The date and time are used by the E-Streamer Mk2 for scheduling calculations, and should be set to match the time zone where the E-Streamer Mk2 is located. Adjustments for local daylight savings/summer time are not automatically calculated by E-Streamer Mk2 and should be included in the time entered. Date Range The E-Streamer Mk2 only accepts valid dates, rolling over where dates such April 31 are entered. Year Range Only the years immediately before or after the current system year may be selected. Time Format All E-Streamer Mk2 times are in 24 hour format To upload the new time and date settings to the Streamer Engine, select the adjacent Change » button. All running and recording Shows are terminated when time and date settings are changed. Geolocation: To use E-Streamer Mk2's astronomical scheduling capabilities for triggering events in relation to Sunrise and Sunset times, the time zone and geographic location of the E-Streamer Mk2 are required. Offset from GMT The time zone entry required is the offset from GMT (UTC) for the E-Streamer Mk2's current location. Adjustments for local daylight savings/summer time are not automatically calculated by EStreamer Mk2 and should be included in the offset. Geographic Location The latitude and longitude of the E-Streamer Mk2's location should be entered to the nearest minute. Today's Sunrise and Sunset The times displayed are calculated daily for the current location and time zone. Location Data Information on latitude and longitude, time zones and daylight savings times, is available from www.timeanddate.com. It may also be available from a nearby GPS receiver or navigation system. 46 Settings To upload new location settings to the Streamer Engine, select the adjacent Change » button. Network Interface: DHCP The E-Streamer Engine has one Gigabit Ethernet network interface If the interface has been allocated its IP address by a DHCP server, it will be identified by the label DHCP. “Reset DHCP Now” might lead to renewal of the I.P address depending on how the DHCP Server is configured on the network. Network Interface: Static IP Address Any valid IP address may be entered manually into the IP Address and Net Mask boxes, then uploaded by selecting the adjacent Change IP Now» button. E-Streamer Mk2 expects IP addresses to be entered in the standard IP version 4 nnn.nnn.nnn.nnn format (where nnn is a decimal number between 0 and 255. Eg. 172.16.103.254). Any other entry will be ignored. To access the Web Interface, you will need to direct your browser to the new primary IP address. The current IP address is displayed on the LCD screen of E-Streamer MK2. Gateway The Gateway Address is the IP address of the LAN device that provides a gateway to other networks and possibly also to the Internet. This address is relevant only if your DMX-over-Ethernet network requires connections outside the LAN. If DHCP is enabled for the Primary Interface, the Gateway Address will be supplied automatically by the network DHCP server. 47 Settings DMX Port Parameters This option is only available if your E-Streamer was configured to include DMX Input/Output. Users can change the DMX Port Parameters to suit their needs. Default values are recommended for normal usage. All DMX Ports share the same parameters. System Customization Change the display Name, enable or disable “Hovering Help” and assign a Web password to the EStreamer MK2 Web screens. With the password enabled, only the home screen and Stream Monitor pages are public, the other pages are protected with a password. RS232 Remote Control E-Streamer Mk2 can be remotely controlled via RS232 through the serial port on the rear of the panel of the E-Streamer Mk2. 48 Settings RS232 command string: H-[command][show_id] where, [command] is '0' for STOP, '1' for PLAY, '2' for PAUSE and '4' for STATUS . [show id] is a 3 digit string, for exmaple show 4 would be "004", show 145 would be "145" A successful command, would return ! , and error would return ? To Test the connection, command V would return the version info string RS232 Connection Information: baud rate : 9600, Data : 8 bit, Parity : none, Stop: 1 bit, Flow Control: none Example: PLAY Show id 045 => "H-1045" Example: STOP Show id 167 => "H-0167" Example: GET STATUS Show id 008 => "H-4008" Please beware the E-Streamer Mk2 is a DTE in RS232 terms, that means that if you wish to communicate with another DTE device such as a PC, you will need a null modem cable. 49 Troubleshooting E-streamer mk2 TROUBLESHOOTING E-STREAMER MK2 E-Streamer Mk2 startup procedure Please connect a Cat5 cable to the network interface, and trun on the unit. The LCD will display ENTTEC Logo, until the unit is ready to be used (usually a minute or two) Once the unit is started and ready, the LCD Menu is displayed, and the current IP address is shown on the LCD Menu. Please use that IP in your browser to manage your E-Streamer Mk2. Can't connect to the E-Streamer Mk2 or web page shows blank page or Networking issue By default, the E-Streamer Mk2 is shipped configured for DHCP, so if your network is not setup for auto-addressing, please use the LCD Menu to change the IP address to static. If the LCD Menu shows an IP address, it means the E-Streamer Mk2 is connected on the network. However, if the LCD shows “disconnected” or “DHCP Failed”, there might be a problem with your network setup. Try to isolate the unit to a simple network if possible. If you still can't connect to the E-Streamer Mk2, please restart the unit, and try again. If the screen does not show the LCD Menu, or is blank, the E-Streamer Mk2 needs to be reset by an ENTTEC support technician, please contact support for help. Can't record any new shows Please check the home page to see if the Free Disk Space is not too low (shown in red if it is), and that the System Status is Active. If the disk space is low, please delete any recorded shows to free up enough space. The recorded show size is shown on the Show Control page. If you are unable to record with enough disk space, please re-create the show or restart the Streamer engine. Can't create new shows or save any content Please restart the unit, and try again. Failing which, please follow the steps to do a System Restore Scheduled Event and shows did not start at set time Please confirm via the Scheduler page, that the Event in question has correct shows assigned to it, and that the shows do playback individually (recording exists for the selected shows). Make sure that the Start Date is not set to a past date, or if a Cycle is set, it is correctly defined. Sunrise and Sunset times do not work as expected Out of the box, E-Streamer has default geolocation set, you will need to customize these to your local city. Please get the required coordinates and GMT offset, from http://www.timeanddate.com/ . Find your city on that website, and retrieve the GMT offset and coordinates, and save that on the Settings page under Geolocation. 50 Troubleshooting E-streamer mk2 Web page goes blank during Firmware update Since the unit restarts after a succesful firmware update, on a few occassions the browser reacts too late, and a blank page is shown, since the unit is rebooting. Simply refresh the page once E-Streamer Mk2 restarts (when LCD Menu is running), and verify the firmware update Date on the Home page. Web page says License is invalid You will need to upload a correct license file for your E-Streamer Mk2, please contact support with the Serial No. (SN) displayed on the page to receive a license for your unit. Shows recording and playback: data not correct Please check the size and duration of your show recording via the Show Control page. You can check the streams data, through the Stream Monitor page to audit the DMX data that comes in during recording, and goes out during playback. If you know the data that you intend to record, you can verify that the same show is being played back through Stream Monitor. Alternatively use an Artnet Viewer (Artnet streams) to see what data is being sent out on the universe selected for the show, and compare with what is recorded. Doesn't output DMX (License) Your E-Streamer Mk2 must be equipped with DMX Ports (License) to output DMX streams Please ensure that the show(s) being played have DMX streams correctly configured. E-Streamer Mk2 will output on the respective Port that is set up in the Stream Configuration, only if there is recorded data. You can confirm with Stream Monitor. Restart the Streamer Engine, and play the Show again, to see if that makes any difference. 51