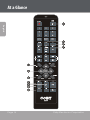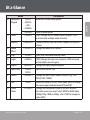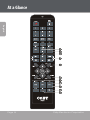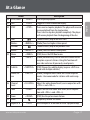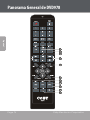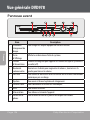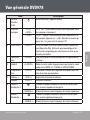
1
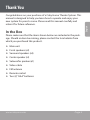
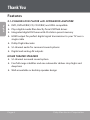
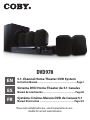
DVD978 EN 5.1-Channel Home Theater DVD System ES Sistema DVD Home Theater de 5.1 Canales FR Système Cinéma-Maison DVD de Canaux 5.1 Instruction Manual.........................................................Page 2 Manual de la instrucción...............................................Page 60 Manuel d’instruction.................................................. Page 124 Please read carefully before use • Léa el manual antes de usar • Veuillez lire ce livret avant utilisation Table of Contents THANK YOU.......................................................................... 5 In the Box......................................................................................................................... 5 Features............................................................................................................................ 6 English ABOUT OPTICAL DISCS....................................................... 7 Disc Requirements....................................................................................................... 7 DVD Features.................................................................................................................. 7 DVD Region Codes....................................................................................................... 8 Disc Care and Maintenance....................................................................................... 8 Handling a Disc............................................................................................... 9 Cleaning a Disc................................................................................................ 9 AT A GLANCE...................................................................... 10 Front Panel.................................................................................................................... 10 Rear Panel...................................................................................................................... 11 Remote Control........................................................................................................... 12 Using the Remote Control......................................................................... 18 Battery Installation....................................................................................... 18 CONNECTIONS................................................................... 19 Video System................................................................................................................ 19 Composite Video Out (Standard)............................................................20 HDMI Video Out (Best)...............................................................................20 Audio System............................................................................................................... 21 Speakers..........................................................................................................22 Coaxial Digital Audio Out (Optional, Best)...........................................22 Stereo Line Input..........................................................................................23 Power Supply & Installation.................................................................................... 24 Power Supply................................................................................................. 24 Power Management.................................................................................... 24 Installation...................................................................................................... 24 Page 2 Coby Electronics Corporation Table of Contents Turning the Unit On...................................................................................................25 Select the TV Input Source......................................................................................25 Select the DVD978 Source Mode..........................................................................25 Load a Disc (or other media)................................................................................... 26 Basic Playback Instructions...................................................................................... 26 Play/Pause/Stop............................................................................................ 26 Previous/Next (Skip).................................................................................... 27 Forward/Reverse (Scan)............................................................................. 27 Step................................................................................................................... 27 Repeat Playback............................................................................................ 27 Adjusting the Sound..................................................................................................28 OPERATION MODES........................................................... 29 DVD/CD Discs...............................................................................................................29 Additional DVD Controls............................................................................29 Digital Media Discs.....................................................................................................30 Menu Operation...........................................................................................30 JPEG Picture Discs.......................................................................................................30 Thumbnail Mode Operation..................................................................... 31 USB Flash Drives.......................................................................................................... 32 Menu Operation........................................................................................... 32 Tuner (FM Radio)......................................................................................................... 33 SYSTEM SETUP................................................................... 34 General Setup Page...................................................................................................34 TV Display.......................................................................................................34 Angle Mark..................................................................................................... 35 OSD Language.............................................................................................. 35 Screen Saver................................................................................................... 35 Last Memory.................................................................................................. 35 Closed Captions............................................................................................36 www.cobyusa.com Page 3 English GETTING STARTED............................................................. 25 Table of Contents English Audio Setup Page.......................................................................................................36 Analog Audio Setup....................................................................................36 Digital Audio Setup.....................................................................................38 Channel Delay............................................................................................... 39 Equalizer.......................................................................................................... 39 3D PROCESSING............................................................................................40 HDCD................................................................................................................ 42 Karaoke Setup............................................................................................... 42 Dolby Digital Setup..................................................................................... 43 Video Setup Page.......................................................................................................44 Video Output.................................................................................................44 Resolution.......................................................................................................44 Color Setting..................................................................................................44 HDMI Setup.................................................................................................................. 45 HDMI.................................................................................................................46 Preference Page..........................................................................................................46 TV Type............................................................................................................46 PBC (Play Back Control)..............................................................................46 Audio, Subtitle and Disc Menu................................................................ 47 Parental............................................................................................................ 47 Password........................................................................................................................48 Password Mode............................................................................................48 Password.........................................................................................................48 Default.............................................................................................................48 SPECIFICATIONS................................................................. 49 TROUBLESHOOTING.......................................................... 50 SAFETY NOTICES................................................................ 54 Page 4 Coby Electronics Corporation Thank You English Congratulations on your purchase of a Coby Home Theater System. This manual is designed to help you learn how to operate and enjoy your new system for years to come. Please read this manual carefully and retain it for future reference. In the Box Please make sure that the items shown below are included in the package. Should an item be missing, please contact the local retailer from which you purchased this product. Main unit Front speakers (x2) Surround speakers (x2) Center speaker (x1) Subwoofer speaker (x1) Video cable FM antenna Remote control Two (2) “AAA” batteries www.cobyusa.com Page 5 Thank You Features 5.1-CHANNEL DVD PLAYER with INTEGRATED AMPLIFIER English DVD, DVD±R/RW, CD, CD-R/RW, and JPEG compatible Plays digital media files directly from USB flash drives Integrated digital FM tuner with 40-station preset memory HDMI output for perfect digital signal transmission to your TV over a single cable Dolby Digital decoder 5.1-channel audio for surround sound systems Digital and analog AV outputs HOME THEATER SPEAKERS 5.1-channel surround sound system Five full-range satellites and one subwoofer deliver crisp highs and deep bass Wall-mountable or desktop speaker design Page 6 Coby Electronics Corporation About Optical Discs Disc Requirements Type Disc Mark English This DVD player supports playback of the following media types and discs. Content Type DVD Audio + Video MP3 Audio CD Audio Video CD (VCD) Audio + Video Picture CD (JPEG) Still Picture MPEG-4 Audio + Video This unit can play back optical discs or memory cards that contain MP3, MPEG-4, or JPEG files. Discs and media types not listed above are not supported by this unit (e.g., PC CD-ROM, CD-Extra, CD-G, CD-I, etc.) DVD Features Each DVD disc contains features that may vary depending upon the production of the disc. Some of the icons you may see that represent these features are shown below. Number of Audio Tracks Number of Subtitles Angle Indicator Screen Format (Aspect Ratio) www.cobyusa.com Page 7 About Optical Discs Zoom English Some of the DVD features enabled by this player depend on how the DVD was produced. Some features may not be enabled if the disc does not support the feature, or it may require special settings. Check the features printed on the DVD package or follow the instructions found on the disc’s on-screen menu. DVD Region Codes DVD discs and DVD players are manufactured under a compulsory worldwide agreement, the DVD Regional Code System. DVD players will only operate with DVD discs encoded with the same corresponding Regional Code. Region Code Region 1 Canada, USA 2 Europe (including Poland, Romania, Czech Republic), Japan, Middle East (including Saudi Arabia, Egypt, Iran, South Africa) 3 East Asia (including Hong Kong, Taiwan, South Korea), Southeast Asia 4 Australia, Caribbean, Central America, South America, Mexico, New Zealand 5 Africa, the former Soviet Union, India, North Korea, Pakistan, Turkmenistan 6 China Disc Care and Maintenance Optical discs (DVDs, CDs) contain high-density compressed data and need proper handling. Page 8 Coby Electronics Corporation About Optical Discs Hold a DVD/CD by its edges. Avoid touching the recorded side of the disc. To remove a DVD/CD from its storage case, press down on the center retention mechanism of the case and lift the disc out. Do not bend or press discs. Do not subject discs to prolonged exposure to direct sunlight, high humidity, or high temperatures. To reduce the risk of scratches, always put discs back in their case after use. Store discs vertically in a cabinet. Do not place stickers or labels on either side of a disc. Cleaning a Disc Use a dry, soft cloth to wipe off any fingerprints and dusts from the playing surface of the disc. Wipe in a straight line radially from the center to the outside edge of the disc. Small dust particles and light stains will not affect playback quality. Never use chemicals such as record sprays, anti-static sprays, benzene, or thinners to clean a disc. Doing so will damage the surface of the disc permanently. www.cobyusa.com Page 9 English Handling a Disc At a Glance Front Panel English Name Description 1 Disc Tray Load optical discs into the open tray for playback. 2 Display Screen Displays system status information. 3 Power Indicator Lights red when power is connected and the system is in standby (off) mode. 4 Master Volume Turn clockwise to increase the volume level; turn counter-clockwise to Knob decrease the volume level. 5 USB port Connect a USB flash drive to play supported digital media files. 6 Open/ Close Open or close the disc tray. 7 Play/Pause Start or pause playback. 8 Stop Stop playback. 9 Power Turn the unit on or off. 10 Microphone Connect microphones to enjoy karaoke discs. input Page 10 Coby Electronics Corporation At a Glance English Rear Panel 1 2 3 4 5 6 Name Speaker Output Panel Line input HDMI output Coaxial Digital Audio Output Composite Video Output Description Connect the front, surround, center, and subwoofer speakers for 5.1-channel surround sound. Connect and play stereo audio from external devices. Connect to an HDTV or other display equipped with HDMI input. Connect to a receiver or other device capable of decoding digital audio streams. Connect to a TV or other display equipped with composite video input. FM Antenna Connector Connect the FM antenna to receive FM radio signals. www.cobyusa.com Page 11 At a Glance Remote Control English Page 12 Coby Electronics Corporation At a Glance 1 POWER 2 Numeric Keypad 3 GOTO 4 5 SETUP Audio Output Mode Program Volume + Volume – Forward / Search + 6 7 8 Reverse / Search – 9 Title Description Turn the unit on or off (standby). <1-9, 0/10> Use the numeric keypad to input numbers where appropriate. <+10> Add 10 to input numbers higher than 10. For example, press <+10> twice and then press <5> to input the number “25”. <GOTO> Enter Direct Access mode to go to a specific part of a movie. Use the numeric keypad and navigation keypad to enter a specific title or chapter to go to. <SETUP> Enter the main setup menu of the system. <A-MODE> Press to switch the audio mode between 5.1-CHANNEL OUTPUT and STEREO OUTPUT. <PROG> Enter Program mode to create a custom playlist. <VOL+> Increase the volume level. <VOL–> Decrease the volume level. [Video & Music] Change the forward play speed to scan quickly through a track. <SEARCH+> [Radio] Tune to a higher station frequency. [Video & Music] Change the reverse play speed to scan quickly through a track. < SEARCH–> [Radio] Tune to a lower station frequency. <TITLE> [DVD] Access the DVD Title menu. www.cobyusa.com Page 13 English Name At a Glance English Page 14 Coby Electronics Corporation At a Glance 10 Navigation Keypad 11 Audio Description <LEFT> <RIGHT> <UP> <DOWN> <ENTER> <AUDIO> Memory <MEMORY> <S.EFFECT> 13 14 Sound Effect Step Angle 15 Repeat <REPEAT> 16 Open/Close 17 Source <OPEN/ CLOSE> <SOURCE> 18 USB <USB> 19 Video Mode <V-MODE> 12 <STEP> <ANGLE> www.cobyusa.com Browse on-screen menu options. Select a menu option. [DVD] Change the DVD audio channel (requires a DVD mastered with multiple audio channels). [Radio] Manually save the current frequency as a preset station. Change the sound effect options. [DVD} Play DVD video frame by frame. [DVD] Change the angle view (requires a DVD mastered with multiple camera angles). Change the repeat playback options. Open/Close the disc tray. Change the source input mode of the unit (e.g., DVDVIDEO, LINE, TUNER). When the system is in DVD-VIDEO mode, press to change the source input mode between DVD and USB. Change the video output mode of the unit to match the video connection used. Select HDMI for HDMI video (1080p/720p, 1080i, or 480p); select CVBS for composite video (480i). Page 15 English Name At a Glance English Page 16 Coby Electronics Corporation Name 20 PLAY/PAUSE <PLAY> 21 OSD <OSD> 22 STOP <STOP> 23 Next Radio + Previous Radio – 24 Menu Auto 25 Subtitle Mono/Stereo 26 Channel Level 27 Tone 28 Zoom 29 Mute 30 Repeat A-B <RADIO+> <RADIO–> <MENU> <AUTO> <SUBTITLE> <MO/ST> <CH-LEVEL> <TONE> <ZOOM> Description Start or pause playback. Toggle on-screen information display. Press once to stop disc playback. The player will save and resume playback from the stop location. Press twice to stop disc playback completely. The player will resume playback from the beginning of the disc. [Video & Music] Skip to the next track. [Radio] Tune to a higher station preset. [Video & Music] Skip to the previous track. [Radio] Tune to a lower station preset. [DVD] Access the DVD Root menu. [Radio] Automatically scan for and save stations within reception as preset stations. Using this function will over-ride and erase all previously saved presets. [DVD] Change the subtitle display (requires a DVD mastered with multiple subtitles). [Radio] Change between mono and stereo reception modes. Use mono mode for stations with weak reception. Adjust the audio channel levels (use in conjunction with <VOL+> and <VOL–>. Adjust the bass and treble tone levels (use in conjunction with <VOL+> and <VOL–>). [DVD] Use the picture zoom feature. Temporarily disable the sound. <A-B> www.cobyusa.com Use the Repeat A-B function to create a playback loop. Page 17 English At a Glance At a Glance Using the Remote Control English The remote control transmits a directional infrared beam. Be sure to aim the remote control directly at the infrared remote sensor during operation. The sensor may not be able to receive signals properly if the sensor is covered, if there is a large object between the remote control and the sensor, or if it is exposed to direct sunlight or a strong artificial light (e.g., fluorescent or strobe lights). If possible, change the position of the light source or reposition the unit to avoid direct lighting. To use the remote, point it at the remote sensor of the player. Operate the remote within 15 feet of the sensor and at an angle of ± 60 degrees. Battery Installation 1. Remove the battery compartment cover located on the rear of the remote control. 2. Insert two (2) “AAA” batteries, making sure to match their polarities (+/-) to the markings on the inside of the compartment. 3. Replace the cover. Page 18 Batteries in the remote will last for approximately 1 year. Replace the batteries if the remote control does not work. Always dispose of batteries according to your local municipal regulations. The batteries used in the remote control may present a fire or chemical burn if mistreated. Do not recharge, disassemble, incinerate, or heat the battery (~212°F). Do not mix old with new batteries, or different types of batteries. Remove the batteries from the remote if it will not be used for a long period of time. Keep batteries away from children. Coby Electronics Corporation Connections Choose the best available video connection. Avoid using more than one connection at the same time to prevent signal interference. The video settings of the unit must match the video connection used. Press <V-MODE> on the remote to change the video setting, or change the video settings in the System Setup menu (please refer to the System Setup section of this manual for more information). www.cobyusa.com Page 19 English Video System Connections Composite Video Out (Standard) Using the supplied AV cable: English 1. Connect one end of the yellow cable to the yellow Video Out jack of the unit. 2. Connect the other end of the yellow cable to the yellow Video In jack of a TV. Press <V-MODE> on the remote until you see “CVBS” on the TV screen to set the unit to the composite video mode. The maximum output resolution for the composite video connection is 480i. HDMI Video Out (Best) HDMI output presents the highest possible resolutions and video quality. If an HDMI input jack is present on your television, use it. 1. Connect one end of an HDMI cable (not supplied) to the HDMI output of the player. 2. Connect the other end of the HDMI cable to the HDMI input of your TV/monitor. You may also press <V-MODE> on the remote until you see “HDMI” on the TV screen to set the unit to the HDMI video mode. Page 20 The maximum output resolution for the HDMI video connection is 1080p. Coby Electronics Corporation Connections Choose the best available audio connection. Avoid using more than one connection at the same time to prevent signal interference. The audio settings of the unit must match the audio connection used. Change the audio settings in the System Setup menu (please refer to the System Setup section of this manual for more information). TV/Monitor/Amplifier Audio Input &+$XGLR,QSXW 'LJLWDO$XGLR,QSXW F L S P E AK E R S L S P E AK E R F R S P E AK E R &2$;,$/ S R S P E AK E R 5 C E NT E R S P E AK E R / S UB WOOF E R S pe a ke r O utput / 5 &2$;,$/ &+$XGLR2XWSXW 'LJLWDO$XGLR2XWSXW DVD Audio Output www.cobyusa.com Page 21 English Audio System Connections Speakers This unit has an integrated amplifier. Connect the supplied speakers to enjoy your movies with 5.1-channel surround sound! English The speaker cables and the terminals located on the rear of the DVD978 are color-coded for your convenience. The chart below shows the terminal each speaker should be connected to. Plug each speaker to its corresponding terminal. The tab on each of the cables should face up; the cables will click into place when they have been inserted correctly. Terminal SW CEN SR SL FR FL Speaker Subwoofer Center Surround Right Surround Left Front Right Front Left Color Black Yellow Blue Gray Red White Disconnect the power cord from the wall outlet before making any connections. The cables plug into the terminals in one direction only. Do not force the cables into the terminals. Coaxial Digital Audio Out (Optional, Best) For use with a digital decoding external amplifier/audio system. Using an optional coaxial digital audio cable: 1. Connect one end of the coaxial cable to the black Digital Audio Out jack of the unit. Page 22 Coby Electronics Corporation Connections Please refer to the documentation included with your external audio system for further help using this connection. Stereo Line Input For use with an external playback device with stereo audio output (e.g., a VCR, MP3, or CD player). Using an optional RCA stereo audio patch cable: Audio Output of Extra Devices 2-CH AUDIO OUTPUT L R L R 1. Connect one end of the white and red cables to the white and red Line Input jacks of the unit (L, R). 2. Connect the other end of the cable to the output jack(s) of an external audio playback device. After this connection has been made, press <SOURCE> on the remote to switch to “LINE” mode to enjoy audio from the external device. LINE IN DVD AudioInput Depending on the type of patch cable used, you can use this connection with external devices with a 3.5mm stereo output jack or RCA stereo output jacks. Please refer to the documentation included with your external audio system for further help using this connection. www.cobyusa.com Page 23 English 2. Connect the other end of the coaxial cable to the Digital Audio In jack of an external audio system. Connections Power Supply & Installation Power Supply English Plug the power cord of this unit into an AC 110-120V 60Hz wall outlet, only. Make all video, speaker, and audio connections before connecting the power. Do not connect the power plug to a power outlet other than that which is indicated here and on the rating label as this may result in the risk of fire or electric shock. Do not handle the power plug with wet hands. Doing so may cause electric shock. Power Management If the unit will not be in use for a long period of time, turn the unit off and unplug it from the AC power supply, and remove the batteries from the remote control. Installation Install the unit on a level, flat and firm surface with good ventilation. Never block the cabinet vents; blocked vents will cause the unit to overheat and malfunction. Do not install the unit in a place exposed to heating sources or direct sunlight. Do not install the unit in a place exposed to moisture or rain. Page 24 Coby Electronics Corporation Getting Started 1. Press to turn the player on. 2. Press to turn the player off and place it in standby. English Turning the Unit On Unplug the system from power to turn it off completely. Select the TV Input Source 1. Press <V-MODE> on the remote to set the video mode that corresponds to the video connection used (e.g., HDMI or Composite video). See the Connections section for details. 2. Set your TV to display the input that the DVD978 is connected to (e.g., HDMI, AV1, Composite, etc.) The Coby logo will be displayed on the TV screen when the proper input has been selected. TVs usually have a button labeled “Source” or “Input” that will change its input source when pressed. To learn how to change the input source of your TV, refer to its instruction manual. Select the DVD978 Source Mode For more information about each of the source modes, please refer to their respective sections in this manual. Press <SOURCE> on the remote to switch between DVD-VIDEO, TUNER, and LINE modes. Select DVD-VIDEO mode to play optical discs from the disc tray (e.g., DVD, CD). Select TUNER to enjoy FM radio broadcasts. www.cobyusa.com Page 25 Getting Started Select LINE mode to enjoy audio from an external device connected to the LINE IN jacks (optional). Press <USB> to switch between USB and DVD-VIDEO modes. English Select USB to play digital media from USB flash memory drives connected to the USB Port. USB mode is available only when the system is in DVD-VIDEO mode. Press <SOURCE> to switch to DVD-VIDEO mode first, then press <USB> on the remote to change between USB and DVDVIDEO modes. Load a Disc (or other media) Press <OPEN/CLOSE> to open the disc tray. Insert a disc with the labelside up. Press <OPEN/CLOSE> again to close the disc tray. If a single-sided disc is inserted upside-down, the unit will display “NO DISC” or “BAD DISC”. To play from media other than a disc, connect a USB flash drive, then press <USB> on the remote to change to USB mode. Basic Playback Instructions Press <PLAY> to start playback. Some discs may start playing automatically or display a DVD menu specific to the disc. If a menu appears, use the <Navigation Keypad> to select a desired feature or option and then press <ENTER> to confirm. Play/Pause/Stop Press <PLAY> to play the disc for the first time Page 26 Coby Electronics Corporation Getting Started To stop playback, press <STOP> once during playback (“Pre-Stop”). The system will remember when you stopped the disc and playback will resume from that point when you press <PLAY>. To stop playback completely, press <STOP> twice during playback. Playback will start from the beginning of the disc when you press <PLAY> again. Previous/Next (Skip) Press to skip to the next track (DVD, CD, etc). Press to return to the previous track (DVD, CD, etc). Forward/Reverse (Scan) Press to forward-scan through the current track. Each successive press will change the scan speed. Press <PLAY> to resume normal playback. Press to reverse-scan through the current track. Each successive press will change the scan speed. Press <PLAY> to resume normal playback. Step Press <STEP> for frame-by-frame playback. Each successive press of <STEP> will advance the video one frame. Press <PLAY> to resume normal playback. Audio will be muted during fast-forward, fast-reverse, and stepped playback. Repeat Playback Press <REPEAT> to change the repeat playback mode. www.cobyusa.com Page 27 English To pause playback, press <PLAY>. Press <PLAY> again to resume playback. Getting Started Adjusting the Sound Press <VOL +> to increase the volume level. Press <VOL –> to decrease the volume level. English Press to disable the sound. Press the previous level. again to restore the sound to Press <A-MODE> to toggle between audio output modes (5.1-channel surround and 2-channel stereo). Press <CH-LEVEL> to select an audio channel to adjust and then use the <VOL +>/<VOL –> keys to adjust the selected level. Audio Channel Front Left Front Right Left Surround Right Surround Center Subwoofer All Channels TV Screen VOL_FL VOL_FR VOL_LS VOL_RS VOL_CEN VOL_SW VOL Display Screen FL Fr LS rS Cn S_ VL When the Audio Mode is set to 2-channel stereo, only the Front Left and Front Right channels can be adjusted. Press <TONE> to select BASS or TREBLE and then use the <VOL +>/<VOL –> keys to adjust the selected tone. Press <S.EFFECT> to change the sound effects mode. Set the sound effects mode to NORMAL when playing a Dolby 5.1-channel disc to avoid interference with Dolby Digital decoding. Page 28 Coby Electronics Corporation Operation Modes DVD/CD Discs 2. Load a compatible DVD-video or CD-audio disc into the disc tray. A content menu will appear on screen. 3. Press <PLAY> to start playback. Some discs may start playing automatically or display a DVD menu specific to the disc. If a menu appears, use the <Navigation Keypad> to browse the menu options; press <ENTER> to select an option. Additional DVD Controls See the Getting Started section for basic playback controls (Play/Pause, Next/Forward, etc.) On the remote… Press <TITLE> Press <MENU> Press <OSD> Press <SUBTITLE> Press <AUDIO> Press <ANGLE> Press <ZOOM> www.cobyusa.com Function Access the title menu of the DVD. Return to the root menu of the DVD. Change the on screen display of information. Change the subtitle display (requires a DVD mastered with multiple subtitles). Change the audio track (requires a DVD mastered with multiple audio channels). Change the angle display (requires a DVD mastered with multiple camera angles). Change the magnification level of the image. When the magnification level is greater than “1” (Zoom), use the Navigation Keypad to pan across the image (up, down, left, right). Page 29 English 1. Press <SOURCE> to place the unit in DVD source mode (LOADING/ DVD-VIDEO will appear on screen). Operation Modes Digital Media Discs 1. Press <SOURCE> to place the unit in DVD source mode (LOADING/ DVD-VIDEO will appear on screen). English 2. Load a disc with compatible MP3 files into the disc tray. A content menu will appear on screen. Menu Operation Press the <UP> or <DOWN> arrows of the navigation keypad to browse folders and files, then press <ENTER> to select a folder or to start playing a file. (You can also use the numeric keypad to enter folders and files.) Press tively. or to skip to the previous or next menu page, respec- Press the <LEFT> arrow to return to the previous folder level. Press <PROG> to toggle between FOLDER and FILELIST view. Press <MENU> to return to the content menu when playing a disc (if available). See the Getting Started section for basic playback controls (Play/ Pause, Next/Forward, etc.) JPEG Picture Discs 1. Press <SOURCE> to place the unit in DVD source mode (LOADING/ DVD-VIDEO will appear on screen). 2. Load a JPEG picture CD into the disc tray; the unit will load the disc contents automatically. 3. Press <STOP> to enter the thumbnail mode to preview the pictures. Page 30 Coby Electronics Corporation Operation Modes Thumbnail Mode Operation To start a picture slide show, use the navigation keypad to select the “Slide Show” option and then press <ENTER>. To go to the previous or next page, use the navigation keypad to select the “Previous” or “Next” option, and then press <ENTER>. To view a list of Remote Key functions, use the navigation keypad to select the “Menu” option and then press <ENTER>. The remote key functions are as follows: On the remote… Press <PLAY> Press <PROG> Press or Press <STOP> Press <RIGHT> or <LEFT> Press <UP> or <DOWN> Press <ZOOM> www.cobyusa.com Function Start or pause slideshow playback. Change the slide show transition effect. Available during a slide show only. View the next or previous picture, respectively. Return to thumbnail mode. Rotate the picture. Flip the picture. When viewing a picture, press <ZOOM> to activate zoom mode, and then press or to increase or decrease the magnification level, respectively. • When the magnification level is above 100%, use the navigation keypad to pan around the magnified picture. • Press <ZOOM> again to exit and return to normal viewing mode. Page 31 English To view a picture, use the navigation keypad to select a picture and then press <ENTER>. Operation Modes USB Flash Drives 1. Press <SOURCE> to place the unit in DVD-VIDEO source mode (LOADING/DVD-VIDEO will appear on screen). English 2. Load a USB flash drive with compatible MP3 files into the USB port. 3. Press <USB> to place the unit in USB mode (USB will appear on screen). The system will read the contents of the USB drive and a file browser menu will appear on screen. If the unit should freeze when reading a USB drive or memory card, turn off the unit and unplug the power cord from the AC outlet. When you turn the unit back on the unit will return to normal status. The USB drive or memory card may not be compatible; this unit will only read certified USB drives/memory cards. Menu Operation Press the <UP> or <DOWN> arrows of the navigation keypad to select a folder or a file, then press <ENTER> to enter the selected folder or play the selected file. (You can also use the numeric keypad to select and confirm folders and files.) Press tively. or to skip to the previous or next menu page, respec- Press the <LEFT> arrow to return to the previous folder level. Press <PROG> to toggle between FOLDER and FILELIST view. Press <MENU> to return to the file browser menu. Page 32 See the Getting Started section for basic playback controls (Play/ Pause, Next/Forward, etc.) Coby Electronics Corporation Operation Modes Press <SOURCE> to place the unit in Tuner source mode (INPUT: TUNER will appear on screen). Use the following remote keys to control the tuner: On the remote… Press <MO/ST> Function Toggle between Mono and Stereo reception modes. Use Mono reception to stabilize weak radio signals. Press <MEMORY> To save a preset station: • Tune to the desired station (e.g., “92.7”) • Press <MEMORY> • Use the numeric keypad to enter the desired twodigit preset station number (e.g., 02). The radio station “92.7” has now been saved as preset number 2. Press <AUTO> Automatically scan for and save stations within reception as preset stations. Using this function will over-ride and erase all previously saved presets. You may press <STOP> to interrupt the auto-scan process. Numeric Keypad Input a two-digit preset station number to tune to it directly. (e.g., press <0> then <2> to tune to Preset 2; press <1> then <5> to tune to Preset 15. Press <RADIO +> or < RADIO –> Tune to a higher or lower preset station number, respectively. Press < SEARCH +> or < SEARCH –> Tune to a higher or lower station frequency, respectively. www.cobyusa.com Page 33 English Tuner (FM Radio) System Setup Use the System Setup menu to adjust your player’s system options. In DVD-VIDEO mode, press <SETUP> on the remote control to access the System Setup menu. English Press the <LEFT> or <RIGHT> navigation keys to browse the setup pages at the top of the menu (i.e., GENERAL, AUDIO, DOLBY, VIDEO, PREFERENCE). Press <ENTER> to select a page and browse its menu options. Press <UP> or <DOWN> to browse the menu options. Press <ENTER> to select an option or press <LEFT> to return to the previous menu level. Press <SETUP> to exit the System Setup menu. General Setup Page TV Display If the system is connected to an HDTV, select 16:9. If it is connected to a conventional TV set, select 4:3 PANSCAN or 4:3 LETTERBOX. The 4:3 image will be displayed in full screen in its native aspect ratio. 4:3 PANSCAN: The wide-screen image will be displayed on the screen in its native aspect ratio with some part on the left and right cut off. 4:3 LETTERBOX: The wide-screen image will be displayed in its native aspect ratio with black bands on the upper and lower sections of the screen. 16:9: If the unit is connected to a widescreen TV set, select this option. The widescreen image will be displayed in full screen in its native aspect ratio while the 4:3 image will be stretched out horizontally to fit in the screen. Page 34 Coby Electronics Corporation System Setup Set this item to ON. When a disc encoded with multiple camera angles is playing, the angle mark will display on the screen. Then you can view the video of different camera angles by pressing <ANGLE> on the remote control. Set this item to OFF to disable this function. This function only works with those discs mastered with multiple camera angles. OSD Language Set the language of the on-screen display and system menus with this item. Screen Saver ON: If the image remains motionless on the screen for several minutes, (e.g., the disc is paused, stopped etc.,) a screen saver will appear on the screen. You can press any key or button except <STANDBY> to wake it up. The unit will go into the standby mode after about 20 minutes being in the screensaver mode. You can press <STANDBY> to switch it on. OFF: Disable the screen saver function. Last Memory ON: During playback or in the paused/stopped mode when you open the disc tray, the unit will memorize the last playback time. The next time that you insert the same disc and close the disc tray to load the disc, the unit will play from the memorized point. OFF: Disable the Last Memory function. www.cobyusa.com Page 35 English Angle Mark System Setup Closed Captions Set this item to ON. When a disc is encoded with closed captions, the closed captions will be shown on the screen. English Set this item to OFF to hide it. You can also press <SUBTITLE> on the remote control to show or hide the closed captions. This function only works with those discs encoded with closed captions. Audio Setup Page Analog Audio Setup Downmix LT/RT: The 5.1-channel audio is mixed into left and right channels and is output via the front speakers. STEREO: The 5.1-channel audio is mixed into a stereo signal and is output via the front speakers. 3D SURROUND: This mode attempts to create a virtual surround effect with the front speakers. 5.1CH: Turn off the DOWNMIX mode and use all speakers. This option should be selected for the DVD978. Page 36 This function only applies to the Dolby AC -3 encoded 5.1-channel discs. Coby Electronics Corporation System Setup The options that are adjustable depend on which downmix mode has been seelcted. To adjust all of the speakers, set DOWNMIX mode to 5.1CH. The FRONT SPEAKER may be set to LARGE or SMALL (small is recommended). The CENTER SPEAKER may be set to LARGE, SMALL or OFF (small is recommended). The REAR SPEAKERS may be set to LARGE, SMALL or OFF (small is recommended). The SUBWOOFER may be set to ON or OFF. If the speaker is set to LARGE, the output level will be higher than that of SMALL. If the speaker is set to SMALL, the output level will be lower than that of LARGE. If a speaker is set to OFF, no audio is output from it. DIALOG When DOWNMIX mode is set to LT/RT or STEREO, this item is available. Adjust the value of this item to control the dialog volume (e.g., spoken audio). When playing a disc encoded with 5.1 channels, this item can be used to adjust the volume of the speakers. www.cobyusa.com Page 37 English Front, Center, Rear Speaker and Subwoofer System Setup D.R.C. (Dynamic Range Control) English You can set this item to AUTO, ON or OFF. When D.R.C. is set to on, the system will automatically adjust the audio levels to minimize the difference between the softest sounds and the loudest sounds. The volume will be reduced for loud sounds, and the volume will be increased for quiet sounds. Digital Audio Setup Digital Output Set this option to SPDIF/RAW or SPDIF/PCM to activate the coaxial digital audio output connection. SPDIF/OFF: There will be no digital audio signal output. (Coaxial off) SPDIF/RAW: The digital audio signal output will be in its raw format. This mode is usually used for DTS & Dolby Digital 5.1 signals. SPDIF/PCM: The digital audio signal output will be in PCM format. This mode is usually used for audio CD signals. LPCM Out When the DIGITAL OUTPUT option is set to SPDIF/PCM, this item is available. Select a sample rating for the analog audio output. There are two options, 48KHz and 96KHz. Page 38 Use the standard 48 KHz option unless your amplifier/receiver can support a sample rate of 96 KHz over a coaxial digital connection. Coby Electronics Corporation System Setup Set the delay time for the center, rear speakers and the subwoofer. You may need to set a delay to compensate for the difference in audio propagation times caused by the distance of the speakers to the listener. Use the navigation keys <UP> or <DOWN> to select a speaker, then use the navigation keys <LEFT> or <RIGHT> to adjust the distance differential. This unit does not support delays for when the distance between the center or surround speakers and the listener are greater than that between the front speakers and the listener. In case the channel delay settings cannot match your speaker configuration, set all distances to 0 cm. Equalizer Sound Mode Select a sound mode in this item. Bass Boost Set it to ON to boost the bass sound. Super Bass Set it to ON for an extreme super bass sound effect Treble Boost Set it to ON to boost the treble sound. www.cobyusa.com Page 39 English Channel Delay System Setup 3D PROCESSING 3D processing provides a virtual surround sound experience using just two speakers. English PRO LOGIC II This unit allows you to configure Dolby Pro Logic II to expand 2-channel source audio into full -channel surround sound. Pro Logic II functionality is effective only when DOWNMIX is set to 5.1CH and DIGITAL OUTPUT is set to SPDIF/RAW. PRO LOGIC II This item is used to turn on or off the Pro Logic II processing. ON: Pro Logic II processing is always on. OFF: Pro Logic II processing is disabled AUTO: Pro Logic II processing is on only when Dolby Pro Logic II encoded content is detected. When the Pro Logic II processing is turned off, all the following items (MODE,PANORAMA, DIMENSION and CENTER WIDTH) are unavailable. Mode This item is used to set the processing mode of Pro Logic II. MUSIC: The surround experience is tailored for multi-channel music playback. Page 40 Coby Electronics Corporation System Setup PRO LOGIC: This activates decoding and processing of the original Dolby Pro Logic processing with mono-surround channel. We recommend using the Dolby Pro Logic Movie mode instead of this 4-channel surround format. AUTO: Automatically selects processing mode based on the input format. Panorama This item is used to turn on/off panorama mode and is available only when MODE is set to MUSIC. When panorama mode is turned on, the front stereo audio is partially fed into the surround channels for an enveloping effect. Dimension This item is available only when MODE is set to MUSIC. This item allows gradual adjustment of the soundfield either towards the front or towards the rear. This is useful in setting a more even balance from all speakers with some rooms. Center Width This item is available only when MODE is set to MUSIC. This item can be used to control the width of the center channel sound effect by blending the center speaker to the left and right speakers. As the level number increases, the center channel sound moves toward the left and right speakers. Reverb Mode Select a reverb effect mode. www.cobyusa.com Page 41 English MOVIE: Emphasis is given to the center channel as two-channel audio is decoded and played back into your surround system. System Setup HDCD Enable High Definition Compatible Digital (HDCD) processing. For use with HDCD audio discs. English High Definition Compatible Digital (HDCD) is a patented encode/decode process for delivering full, rich, detailed sound from HDCD-encoded CDs. Karaoke Setup Adjust the microphone options. Connect microphones to the system to sing over karaoke tracks. MIC Turn the microphone input connectors on or off. MIC VOL Adjust the microphone input level. Increase the level to make the microphone louder in the audio mix; decrease the level to make the microphone quieter. ECHO LEVEL Adjust the reverb effect level of the microphone. Page 42 Coby Electronics Corporation System Setup Dolby Digital Setup STEREO: The player outputs the left-channel audio and right-channel audio via the FL and FR speaker respectively. L-MONO: The player outputs the left-channel audio only via both the FL and FR speaker. R-MONO: The player outputs the right-channel audio only via both the FL and FR speaker. MIX-MONO: The player outputs the average signal of the left-channel and right channel audio via the FL speaker and the FR speaker. This function only applies to Dolby AC -3 and 2-channel encoded discs. Dynamic When you watch films with large dynamic audio range at low volume (at night, for example) you can increase the dynamic value to avoid losing sonic detail resulting from the low volume. www.cobyusa.com Page 43 English Dual Mono System Setup Video Setup Page Video Output English CVBS: Set the composite video signal format for the yellow video output connector. Resolution Select the resolution of the video output signal to match your TV. If you don’t know the native resolution and refresh rate of your TV, please refer to the documentation provided by its manufacturer. Select 480i/480P for NTSC systems. Select 576i/576P for ATSC systems. Select 720P, 1080i, or 1080P for HDTVs. Select 60Hz resolutions in the United States; you may need to select 50Hz resolutions in other parts of the world. Color Setting Sharpness There are three options (HIGH, MEDIUM and LOW) for you to choose in this item. Brightness, Contrast, Hue and Saturation Adjust the brightness, contrast, hue, and color saturation of the picture. Page 44 Coby Electronics Corporation System Setup HDMI Setup HDMI (High-Definition Multimedia Interface) is the newest interface for audiovisual equipment such as high-definition television and home theater systems. With 19 wires wrapped in a single cable that resembles a USB wire, HDMI is able to carry a bandwidth of 5 Gbps (gigabits per second). This is more than twice the bandwidth needed to transmit multi-channel audio and video, future-proofing HDMI for some time to come. This and several other factors make HDMI much more desirable than its predecessors, component video, S-Video and composite video. HDMI is an uncompressed, all-digital signal, while the aforementioned interfaces are all analog. With an analog interface, a clean digital source is translated into less precise analog, sent to the television, then converted back to a digital signal to display on screen. At each translation, the digital signal loses integrity, resulting in some distortion of picture quality. HDMI preserves the source signal, eliminating analog conversion to deliver the sharpest, richest picture possible. HDMI supports standard video formats, enhanced video and high-definition. It is also backwards compatible with DVI (Digital Video Interface). High-end graphics cards featuring a DVI port can connect to a HDMI interface via a DVI/HDMI cable. This is simply a cable with a DVI connector on one end and a HDMI connector on the other. As a rule, HDMI cables should not run longer than 15 feet (5 meters), or degradation of the signal could occur. www.cobyusa.com Page 45 English About HDMI System Setup HDMI English Set this item ON or OFF to enable/disable the HDMI connection. You may want to disable HDMI when it is not being used to avoid interference with the composite video signal. Preference Page This setup page is available when there is no disc in the disc tray, the disc tray is open, or when disc playback is stopped completely. TV Type This product supports both NTSC (National Television System Committee) and PAL (Phase Alternating Line) television broadcasting standards. PAL: Select this mode if the unit is connected to a PAL-format TV (used in China, Hong Kong, Europe, etc). It will convert the video signal of an NTSC disc and output in PAL format. AUTO: Select this mode to have the system detect the video signal of the disc and match the video signal output format to it. NTSC: Select this mode if the unit is connected to an NTSC-format TV (used in Taiwan, America, Canada, etc). It will convert the video signal of a PAL disc and output in NTSC format. Selecting the wrong TV Type will cause the quality of the image to be extremely poor. Be sure to select the correct TV Type. PBC (Play Back Control) ON: Activate the PBC function. When playing a disc encoded with PBC function, press <MENU> to return to the PBC menu. Page 46 Coby Electronics Corporation System Setup This function only works with those discs encoded with PBC function. DVD and CD formats do not support PBC menus. Audio, Subtitle and Disc Menu Select a preferred audio language, subtitle language and disc menu language in these items. You can select the audio language by pressing the <AUDIO> key and the subtitle language by pressing the <SUBTITLE> key on the remote control. If the selected language is not available for the disc, the disc’s default setting will remain enabled. Parental This item allows the user to set a maximum rating for which viewing is permitted. Movies rated higher than the level set cannot be viewed without inputting the correct password. The password must also be entered to reset or change the parental control level. The default password is 136900. This function works only with those discs that are encoded with a rating level. www.cobyusa.com Page 47 English OFF: Disable the PBC function. System Setup Password Password Mode English Switch the password function on/off. You must key in the correct password and press <ENTER> to confirm before you change the option in this item. The default password is 136900. Password Change the password. You will need to enter the old password first, and then enter the new password twice. The default password (136900) will always be recognized even if the password has been changed or reset. Default Enter to restore all options to their factory-default state. The PARENTAL settings and PASSWORD will not be reset. Page 48 Coby Electronics Corporation Media Support Format Support Digital Audio Decoders DVD Video System Tuner FM Range Amplifier Power Output (Max) Frequency Response Connections Power Operating Environment DVD, DVD±R/RW, CD, CD±R/RW, USB Flash Drive Video: MPEG-1, MPEG-2 (DVD), MPEG-4 (XviD) Audio: CD, MP3 Photo: JPEG Dolby Digital NTSC/PAL 87.5 MHz – 108 MHz 15W x 5 (speakers) 30W x 1 (subwoofer) 20 – 20,000 Hz HDMI Coaxial digital audio Composite video 5.1-channel speaker Input RCA stereo 6.3mm microphone (x 2) Supply AC 100-240, 50/60Hz Consumption 105W Temperature Approx -10º – +35º C (14º – 95º F) Relative Humidity Approx 5% – 90% Output Specifications and manual are subject to change without notice. www.cobyusa.com Page 49 English Specifications Troubleshooting If you have a problem with this device, please read the troubleshooting guide below and check our website at www.cobyusa.com for Frequently Asked Questions (FAQs) and firmware updates. If these resources do not resolve the problem, please contact Technical Support. English Address Coby Electronics Technical Support 150 Knowlton Way Savannah, Georgia 31407 Email [email protected] Web www.cobyusa.com Phone 800-727-3592: Monday to Friday, 8:30AM–9:00PM EST Saturday, 9:00AM–5:30PM EST Page 50 Coby Electronics Corporation Symptom No Power There is no picture or the picture is distorted Cause The AC power cord is not connected to the power supply or is not connected securely The Video Input mode of the connected TV is set incorrectly. Remedy Please check that the AC power cord is connected securely. The volume is set at the lowest level. The sound is switched off (MUTE is active). The disc is in forward or reverse scan mode. Turn up the volume. Set the TV to the correct source mode. Most TVs have a “Source,” “Input,” or “TV/Video” button that changes the source mode. Please refer to the documentation provided by the TV manufacturer for further assistance. The Video Output mode is Press <V-MODE> repeatedly until the set incorrectly. picture becomes normal again. The video cable connecConnect the video cable securely. tion is loose. There is no sound or The audio cable connecConnect the audio cables securely. the sound is distorted tions are loose. www.cobyusa.com Press [MUTE] on the remote control to re-enable the sound. Press [PLAY] to resume normal playback. Page 51 English Troubleshooting Troubleshooting Symptom Unable to play a disc English The buttons on the unit don't work The remote control does not function Page 52 Cause The disc is loaded incorrectly in the disc tray The disc is incompatible with the unit. The rating of the disc is higher than permitted by the parental control rating. System Setup menu. Static electricity may have interfered temporarily with the operation of the unit. There are no batteries in the remote control. The batteries have lost their charge. The remote control isn't pointed at the remote sensor. The remote control is beyond its working distance. The unit has shut down. Remedy Check that the disc is placed in the disc tray with its label side upwards. Load a compatible disc. Refer to the About Optical Discs section of this manual to review disc compatibility requirements. Reset or lower the Parental Control settings in the Clean the disc. Switch off and unplug the unit. Then connect the unit to the AC supply and switch it on again Install two AAA/1.5V batteries in the remote. Replace the batteries with new ones. Make sure that there are no large objects between the remote control and the sensor on the front panel of the unit. Make sure the remote control is within 15 feet of the sensor. Switch the unit off and disconnect it from the AC outlet. Then, reconnect the power and switch it on again. Coby Electronics Corporation Symptom The player freezes when a USB drive is connected to the player Cause The USB drive is not compatible with this system. www.cobyusa.com Remedy If the player should freeze or otherwise malfunction, switch it off and unplug it from the AC power outlet. Remove the incompatible USB drive. Then, reconnect the power and switch it on again. The player will return to normal operation. Page 53 English Troubleshooting Safety Notices English The lightning flash with arrowhead symbol within an equilateral triangle is intended to alert the user to the presence of uninsulated “dangerous voltage” within the product’s enclosure that may be of sufficient magnitude to constitute a risk of electric shock. The exclamation point within an equilateral triangle is intended to alert the user to the presence of important operation and servicing instructions in the literature accompanying the appliance. On Protection Against Laser Energy Exposure • As the laser beam used in this product is harmful to the eyes, do not attempt to disassemble the casing. • Stop operation immediately if any liquid or solid object should fall into the cabinet. • Do not put anything in the safety slot. If you do, the laser diode will be ON when the disc compartment door is still open. • If the unit is not to be used for a long period of time, make sure that all power sources are disconnected from the unit. Remove all batteries from the battery compartment, and unplug the AC-DC adapter from the wall outlet. Make it a practice to remove the AC-DC adapter by grasping the main body and not by pulling the cord. • This unit employs a laser. The use of controls or adjustment or performance of procedures other than those specified here may result in exposure to hazardous radiation. Page 54 Coby Electronics Corporation Safety Notices 1. 2. 3. 4. 5. 6. 7. 8. 9. Read Instructions: All the safety and operating instructions should be read before the product is operated. Retain Instructions: The safety and operating instructions should be retained for future reference. Heed Warnings: All warnings on the product and in the operating instructions should be adhered to. Follow Instructions: All operating and usage instructions should be followed. Cleaning: Unplug this product from the wall outlet before cleaning. Do not use liquid cleaners or aerosol cleaners. Use a damp cloth for cleaning. Attachments: Use only attachments recommended by the manufacturer. Use of other attachments may be hazardous. Water and Moisture: Do not use this product near water (e.g., near a bath tub, washbowl, kitchen sink, laundry tub, in wet basements, or near a swimming pool and the like). Accessories: Do not place this product on an unstable cart, stand, tripod, bracket, or table. Use only with carts, stands, tripods, brackets, or tables recommended by the manufacturer or sold with the product. Any mounting of the product should follow the manufacturer’s instructions and should use a mounting accessory recommended by the manufacturer. A product and cart combination should be moved with care. Quick stops, excessive force, and uneven surfaces may cause the product and cart combination to overturn. Ventilation: Slots and openings in the cabinet are provided for ventilation to ensure reliable operation of the product and to protect it from overheating. These openings should never be blocked by placing the product on a bed, sofa, rug, or other similar surface. This product should not be placed in a built-in installation such as a bookcase or rack unless proper ventilation is provided or the manufacturer instructions have been adhered to. www.cobyusa.com Page 55 English Important Safety Instructions Safety Notices English 10. Power Sources: This product should be operated only from the type of power source indicated on the rating label. If you are not sure of the type of power supply to your home, consult your product dealer or local power company. For products intended to operate from battery power or other sources, refer to the operating instructions. 11. Grounding or Polarization: This product may be equipped with a polarized alternating-current line plug that has one blade wider than the other. This plug will only fit into the power outlet in one direction. This is a safety feature. If you are unable to insert the plug fully into the outlet, try reversing the direction of the plug. If the plug should still fail to fit, contact an electrician to replace the obsolete outlet. Do not defeat the safety purpose of the polarized plug. Power-Cord Protection: Power supply cords should be routed so that they are not likely to be walked on or pinched by items placed upon or against them, paying particular attention to cords at plugs, convenience receptacles, and at the point which they exit from the product. Protective Attachment Plug: The product may be equipped with an attachment plug with overload protection. This is a safety feature. See the operating instructions for replacement or directions to reset the protective device. If replacement of the plug is required, be sure the service technician has used a replacement plug that has the same overload protection as the original plug as specified by the manufacturer. Outdoor Antenna Grounding: If an outside antenna is connected to the product, be sure the antenna system is grounded so as to provide some protection against voltage surges and built-up static charges. Article 810 of the National Electrical Code, ANS/NFPA 70 provides information with regard to proper grounding of the mast and supporting structure, grounding of the lead-in wire to an antenna-discharge unit, size of grounding conductors, location of antenna-discharge unit, connection to grounding electrodes, and requirements for the grounding electrode (see figure). 12. 13. 14. Page 56 Coby Electronics Corporation 15. Lightning: For added protection for this product, unplug it from the wall outlet and disconnect the antenna or cable system during a lightning storm or when it is left unattended and unused for long periods of time. This will prevent damage to the product due to lightning or power-line surges. 16. Power Lines: An outside antenna system should not be located in the vicinity of overhead power lines or other electric light or power circuits, or where it can fall into such power lines or circuits. When installing an outside antenna system, extreme care should be taken to keep from touching such power lines or circuits, as contact with them might be fatal. Overloading: Do not overload wall outlets, extension cords, or integral convenience receptacles as this can result in a risk of fire or electric shock. Object and Liquid Entry: Never push objects of any kind into this product through openings as they may touch dangerous voltage points or shout-out parts that could result in a fire or electric shock. Never spill liquid of any kind on the product. Servicing: Do not attempt to service this product yourself as opening or removing covers may expose you to dangerous voltage or other hazards. Refer all servicing to qualified service personnel. Damage Requiring Service: Unplug this product from the wall outlet and refer servicing to qualified service personnel under the following conditions: a) when the power-supply or plug is damaged; b) if liquid has been spilled or if objects have fallen into the product; c) if the product has been exposed to rain or water; d) if the product does not operate normally by following the operating instructions. Adjust only those controls that are covered by the operating instructions as improper adjustment of other controls may result in damage and will often require extensive work by a qualified technician to restore the product to its normal operation; e) if the product has been dropped or damaged in any way; f) when the product exhibits a distinct change in performance—this indicates a need for service. Repl