1
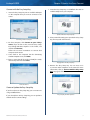
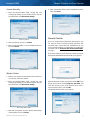
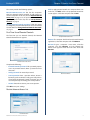
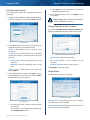
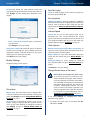
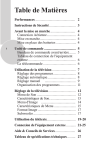
Cisco Connect
High Performance
Performance
Wireless-N
Wireless-N
Router
Router
Linksys
Linksys
E4200
E3000Maximum
Linksys E4200
Table of Contents
Contents
Chapter 1: Installation
1
Installation . . . . . . . . . . . . . . . . . . . . . . . . . . . . . . . . . . . . . . . . . . . . . . . . . . 1
Chapter 2: How to Use Cisco Connect
3
How to Access Cisco Connect . . . . . . . . . . . . . . . . . . . . . . . . . . . . . . . . . . . . . . 3
Main Menu . . . . . . . . . . . . . . . . . . . . . . . . . . . . . . . . . . . . . . . . . . . . . . . . . . 3
Computers and Other Devices . . . . . . . . . . . . . . . . . . . . . . . . . . . . . . . . . . . . . . 4
Parental Controls . . . . . . . . . . . . . . . . . . . . . . . . . . . . . . . . . . . . . . . . . . . . . . 6
Router Settings . . . . . . . . . . . . . . . . . . . . . . . . . . . . . . . . . . . . . . . . . . . . . . . 9
How to Exit Cisco Connect . . . . . . . . . . . . . . . . . . . . . . . . . . . . . . . . . . . . . . . 11
Maximum Performance Wireless-N Router
i
Linksys E4200
Chapter 1: Installation
Chapter 1: Installation
Mac OS X
To install Cisco Connect on your computer, run the setup
software on the CD. Then follow these instructions.
Installation
1. Insert the CD into your CD-ROM drive.
a. Double-click the CD on your desktop.
b. Double-click Setup.
3. To read the License Terms, click I have read and accept
the License Terms for using this software. To accept
the agreement and continue with the installation,
select I have read and accept the License Terms for
using this software. Click Next.
License Agreement
Insert CD
2. Click Set up your Linksys Router.
DVD/CD-RW Drive (E:) Linksys
Router Setup
4. The connection steps are displayed.
Always do this for software and games:
AutoPlay
DVD/CD-RW Drive (E:) Linksys
Router Setup
Install or run program
Always do this for software and games:
Install or run program
Set up your Linksys Router
Published by Cisco Consumer Products LLC
General options
Open folder to view files
using Windows Explorer
Speed up my system
using Windows ReadyBoost
Set up your Linksys Router
Published by Cisco Consumer Products LLC
General options
Set AutoPlay defaults in Control Panel
Open folder to view files
using Windows Explorer
Speed up my system
using Windows ReadyBoost
Connection Overview
Set AutoPlay defaults in Control Panel
Set Up Your Linksys Router
If you do not see this, access the setup software on the
CD directly. To do so, perform the following steps for
your specific operating system:
Windows 7
a. Connect the power cord to the Power port on the
back of the router.
1
2
Ethernet
3
4
Internet
USB
Reset
12VDC
Power
a. Go to Start > Computer.
b. Double-click your CD-ROM drive.
Windows Vista
c. Go to Start > Computer.
d. Double-click your CD-ROM drive.
Windows XP
a. Go to Start > My Computer and select your
CD‑ROM drive.
Connect to Power Port
b. Double-click Setup.exe.
Maximum Performance Wireless-N Router
1
Linksys E4200
Chapter 1: Installation
b. Connect the power adapter to an electrical outlet.
6. The router name and password are displayed. (The
router name is the name of your wireless network,
which is also known as an SSID, Service Set IDentifier.)
You can change them later in Cisco Connect.
Click Next.
1
2
Eth
ern
et
3
4
Inte
rnet
USB
Rese
t
12V
DC
Powe
r
Connect to Electrical Outlet
c. Connect one end of an Ethernet cable to the
yellow port labeled Internet on the back of the
router. Connect the other end of the Ethernet
cable to your broadband modem or existing
router/gateway. Click Next.
Linksys Router Settings
7. Please wait while the setup software is finishing the
setup.
1
2
Ethernet
3
4
Internet
USB
Reset
12VDC
Power
Connect Ethernet Cable
NOTE: To view detailed connection steps, click
in the setup software.
5. Please wait while the setup software is setting up the
router.
Finishing the Setup
8. The installation is complete. Click OK.
Installation is Complete
Setting Up the Router
Maximum Performance Wireless-N Router
After installation, Cisco Connect starts automatically. For
information on using Cisco Connect to manage the router
and your network, go to “How to Use Cisco Connect” on
page 3.
2
Linksys E4200
Chapter 2: How to Use Cisco Connect
Chapter 2: How to Use Cisco Connect
Status information is displayed in the upper right corner:
Cisco Connect provides an easy way to manage your router
and network. You can connect computers or devices to
your router, give Internet access to guests in your home,
and change the router’s settings.
NOTE: A group of computers or other devices
connected to a router is a local network. The
router allows these devices to communicate.
••
online secure
Your local network is secure, and your Internet
connection is available.
••
offline secure
Your local network is secure; however, your Internet
connection is not available. To repair your Internet
connection, follow the on-screen instructions.
NOTE: For more information, click Need help?
How to Access Cisco Connect
Local Access versus Guest Access
Windows
You can connect computers or devices to your router by
giving them local access (Computers and Devices option)
or guest access (Guest Access option).
Go to Start > All Programs > Cisco Connect.
Mac
Go to Go > Applications > Cisco Connect.
Main Menu
When Cisco Connect starts up, the main menu appears
and offers four options: Computers and Devices, Parental
Controls, Guest Access, and Router Settings.
Computers and devices with local access have access to
the Internet and to other devices on your local network,
including shared computers and printers connected to
the router. Local access can be given to a wired or wireless
device. Refer to “Computers and Other Devices” on page
4 for more information.
Guest access gives Internet access to guests in your home
but does not let them access your computers or personal
data. You provide the guest network name and password,
and your guests will use them to wirelessly connect to
your router. Refer to “Main Menu – Guest Access” on page
4 and “Guest Access” on page 8 for more information.
For example, in the diagram (“Local Access and Guest
Access Diagram” on page 3), the local network includes
the wired network and the local wireless network, which
is represented by yellow waves between the router and
the wireless printer in the office and the notebook in the
bedroom. The Guest Access feature is represented by the
purple waves between the router and the notebook in the
living room.
Main Menu
Office
Bedroom
Living Room
_
File Edit
View
Go
Shortcuts
Options
X
Help
X
http://mynetwork/guest/login
Enter the Guest Password
for Internet Access:
Login
Wireless
Printer
Done
Network
Storage
web browser
- guest
access
login
http://mynetwork/guest - Linksys
Notebook
Router
Local Network
/login
Enter
the
for InternetGuest
Password
Access:
E4200
Notebook
Login
Modem
Internet
Guest Network
Local Access and Guest Access Diagram
Maximum Performance Wireless-N Router
3
Linksys E4200
Chapter 2: How to Use Cisco Connect
Main Menu – Computers and Devices
Computers and Other Devices
Use this option to connect another computer or device to
the router.
The Computers and other devices screen appears.
There are x device(s) connected to your router The
number of devices connected to the router is displayed.
Add device To connect another computer or device to
the router, click Add device and go to “Computers and
Other Devices” on page 4.
Main Menu – Parental Controls
Parental controls restrict Internet access for up to five
computers. For the computers you select, you can block or
limit Internet access to specific times. You can also block
specific websites.
Parental controls restrictions are being applied to x
device(s) The number of devices with Parental Controls
restrictions is displayed.
Change To enable parental controls or change settings,
click Change and go to “Parental Controls” on page 6.
Main Menu – Guest Access
Guest Access provides Internet access only; it does not
provide access to the local network and its resources. For
example, the guest computer cannot print to a printer on
the local network or copy files to a computer on the local
network.
Guest Access helps minimize exposure of your local
network. To give Internet access to friends or family,
provide the guest network name and password displayed
on this screen.
Guests can connect to x-guest using the password
xyz When a guest wants Internet access in your home,
have the guest do the following:
1. Connect to the wireless guest network, which is the
name of your wireless network followed by -guest.
2. Open a web browser.
3. On the login screen, enter the password of your guest
network. Then click Login.
Computers and Other Devices
Computer Click this option to connect another computer
in your home. Go to “Computer” on page 4.
Wireless printer Click this option to connect a wireless
printer. Go to “Wireless Printer” on page 6.
Other devices Click this option to connect a device that
is not a computer, such as a smartphone or game console.
Go to “Connect Manually” on page 6.
Computer
You can use a USB flash drive to create an Easy Setup Key,
which holds the wireless settings for the router. Then
you can use the Easy Setup Key to connect additional
computers to the router. Select the appropriate option:
••
Yes, I have an Easy Setup Key If you already have an
Easy Setup Key, select this option. Click Next and go to
“Connect with the Easy Setup Key” on page 5.
••
No, I don’t have an Easy Setup Key — create a new
one now If you want to create or update an Easy
Setup Key, select this option. Click Next and go to
“Create or Update the Easy Setup Key” on page 5.
••
I want to connect manually using my wireless
settings If you want to connect manually (without an
Easy Setup Key), select this option. Click Next and go
to “Connect Manually” on page 6.
Change To disable Guest Access or change settings, click
Change and go to “Guest Access” on page 8.
Main Menu – Router Settings
Use this option to personalize the router’s settings.
Router name is x The name of the router is displayed.
Change To change settings, click Change and go to
“Router Settings” on page 9.
Do You Have an Easy Setup Key?
Maximum Performance Wireless-N Router
4
Linksys E4200
Chapter 2: How to Use Cisco Connect
Connect with the Easy Setup Key
1. Insert the Easy Setup Key into an available USB port
on the computer that you want to connect to the
router.
1. Insert the Easy Setup Key or a USB flash drive into an
available USB port on your computer.
Update or Create an Easy Setup Key
Connecting Another Computer
2. Please wait while settings are copied to the Easy Setup
Key. This may take a few minutes.
2. On that computer, click Connect to your Linksys
router. (If you do not see this, access the Easy Setup
Key through Windows Explorer or the Finder, and
double‑click Connect.)
Follow the on-screen instructions to connect that
computer to the router.
3. Come back to this computer. On the Connecting
another computer screen, click Next.
4. Enter a name that will be used to identify the newly
added computer. Then click Finish.
Copying Files to the Easy Setup Key
3. Remove the Easy Setup Key. You can now use it
to connect other computers to the router (for more
information, refer to “Connect with the Easy Setup
Key” on page 5). Click Close.
Name Your Device
Create or Update the Easy Setup Key
If you do not have an Easy Setup Key, you can create one
using a USB flash drive.
If you already have an Easy Setup Key, you can update it
with the router’s current settings.
Maximum Performance Wireless-N Router
Easy Setup Key Has Been Updated
5
Linksys E4200
Chapter 2: How to Use Cisco Connect
Connect Manually
1. Enter the Network Name (SSID), Security Key, and
Security Type settings on your wireless device. To print
this information, click Print these settings.
4. Enter a name that will be used to identify this printer.
Then click Finish.
Name Your Printer
Connecting a Device
2. After your device connects, click Next.
3. Enter a name that will be used to identify this device.
Then click Finish.
Parental Controls
If you are using Parental Controls for the first time, you
are asked to create a Parental Controls password. This
password helps ensure that only authorized users can
access Parental Controls. For information on creating the
password, refer to “First-Time Use of Parental Controls”
on page 7.
If you have already created a Parental Controls password,
the Enter the Parental Controls password screen appears.
Name Your Device
Wireless Printer
1. Refer to your printer’s documentation to learn how to
connect it to a wireless network.
2. Enter the Network Name (SSID), Security Key, and
Security Type settings on your wireless printer. To print
this information, click Print these settings.
Enter the Parental Controls Password
Enter the Parental Controls password and click OK. (If you
forgot the password, click I forgot my password and
enter the answer to your secret question. Then enter a
new password, verify it, and click OK.)
The Parental controls main screen appears.
Connecting a Wireless Printer
3. Wait until your printer connects. On the Connecting a
wireless printer screen, click Next.
Maximum Performance Wireless-N Router
Parental Controls
6
Linksys E4200
Chapter 2: How to Use Cisco Connect
The screen provides the following options:
Restrict Internet access on This lists the computers
that have Parental Controls enabled. To add, remove, or
rename computers on this list, refer to “Restrict Internet
Access List” on page 7. To set up Parental Controls on a
specific computer on this list, refer to “Set Up Parental
Controls” on page 8.
Add To apply parental controls to a computer that is not
in the list, click Add, and the Set up parental controls for
screen appears. Select the computer and click OK.
Change parental controls password Click this option
to change the password that protects access to Parental
Controls. Refer to “Change Parental Controls Password”
on page 8.
First-Time Use of Parental Controls
The first time you use Parental Controls, the Parental
Controls Password screen appears.
Set Up Parental Controls For
Remove If a computer should not have Parental Controls
applied to it, select the computer and click Remove.
Rename To give a computer a new name, select the
computer and click Rename, and the Rename the
device screen appears. Enter the new name. Then click
Rename.
Parental Controls Password
Complete the following:
••
Parental controls password This password protects
access to parental controls. Enter a password of 4-32
characters.
••
Verify password Re-enter the password.
••
Secret question Enter a question whose answer is
known by you but cannot be easily guessed by others.
If you forget the Parental Controls password, you can
reset it by correctly answering your secret question.
••
Answer Enter the answer to your secret question.
Rename the Device
Click OK to save your settings.
Restrict Internet Access List
Parental Controls
Maximum Performance Wireless-N Router
7
Linksys E4200
Chapter 2: How to Use Cisco Connect
Set Up Parental Controls
To set up Parental Controls for a computer, follow these
instructions:
1. Select the computer from the Restrict Internet access on
list. (If the computer is not listed, click Add to select it.)
b. Click Save to save your blocked sites and return to
the Parental Controls screen.
4. On the Parental controls screen, click Finish to save
your settings.
NOTE: Repeat steps 1-4 to set up parental
controls for different computers.
Change Parental Controls Password
If you clicked Change parental controls password, the
Change your parental controls password screen appears.
Parental Controls
2. In the Block Internet access section, specify when the
computer’s Internet access will be blocked:
•• Always To block Internet access at all times, select
this option.
••
Specific times To block Internet access only during
specific times of the day, select this option and set the
schedule:
••
Old password Enter the old password.
–– School nights Select the appropriate start and
••
New password Enter a new password of 4-32
characters.
••
Verify password Re-enter the new password.
Change Your Parental Controls Password
end times.
–– Weekends Select the appropriate start and end
times.
••
Never To never block Internet access, keep the
default, Never.
3. In the Block specific sites option, click Edit to create a
list of websites you want to block. The default is None.
Click Change to save your setting.
Guest Access
The Guest access settings screen appears.
The Block these sites screen appears.
Guest Access Settings
Block These Sites
a. On a blank line, enter a website address that you
want to block.
For example, to block http://www.example.com,
enter example.com on a line.
Maximum Performance Wireless-N Router
Allow guest access By default, guest access is enabled.
To disable guest access, select no.
Guest network name By default, the setup software sets
up the name of the guest network.
8
Linksys E4200
Chapter 2: How to Use Cisco Connect
Password By default, the setup software assigns the
password for the guest network. To change the password,
click Change, and the Change guest password screen
appears.
Rear Port Lights
on/off To allow the lights on the router’s back panel to
turn on, keep the default, on.
Easy Setup Key
Update or create key The Easy Setup Key is a USB flash
drive that holds the wireless settings for the router. If you
want to create or update an Easy Setup Key, click this
option and go to “Create or Update the Easy Setup Key”
on page 5.
Internet Speed
Change Guest Password
••
Enter a new guest password Enter a password of
4-32 characters.
••
Click Change to save your setting.
Total guests allowed By default, 5 guests are allowed
Internet access through the guest network. Select the
appropriate number of guests allowed on your guest
network; you can select up to 10 guests.
Click Finish to save your settings.
Router Settings
The Router settings screen appears.
Launch Test You can use the Internet speed test to
determine your ISP’s current download and upload
speeds. Connection speed depends on many factors, and
may change throughout the day. To run the speed test,
click this option and go to “Speed Test” on page 10.
Other Options
Register now to receive special offers and updates To
sign up to receive special offers and updates from Cisco
and Cisco partners, click this option.
Router details To view more information about the
router, click this option and go to “Router Details” on
page 10.
Advanced settings To access settings for advanced
users, click this option and go to “Advanced Settings” on
page 11.
Click Finish to save your settings.
Change Router Name or Password
Router Settings
Personalize
Router name The name of the router is displayed (this
is also the name of your wireless network). To change the
name, click Change and go to “Change Router Name or
Password” on page 9.
Password The password that protects access to the
router’s settings is displayed (this also protects wireless
access to your local network). To change the password,
click Change and go to “Change Router Name or
Password” on page 9.
Maximum Performance Wireless-N Router
NOTE: When you change the router name
or password, the name or password of your
wireless network also changes, and the router is
reset. ALL computers and devices connected to
your router will momentarily lose their Internet
connection. Wired computers and devices will
reconnect automatically; however, you will
need to reconnect all wireless computers and
devices using the wireless network’s new name
or password. For more information, refer to
“Computers and Other Devices” on page 4.
If you clicked Change, the Changing router name or
password screen appears.
1. To change the router name or password, click Yes.
Otherwise, click No.
9
Linksys E4200
Chapter 2: How to Use Cisco Connect
Changing Router Name or Password
2. Complete the following:
•• Router name Enter a name of 1-32 characters.
••
Password Enter a password of 8-63 characters.
••
Click Change to save your settings.
Internet Speed Test
2. Click Begin Test. After several seconds, your ISP’s
download (data receive) speed and upload (data send)
speed appear.
3. Click Finish to close the screen.
Personalize
Router name The name of the router is displayed (this
is also the name of your wireless network). To change the
name, click Change and go to “Change Router Name or
Password” on page 9.
Router Details
Change Router Name and Password
Speed Test
The Internet Speed Test information screen appears.
The Router details screen appears, displaying the Model
name, Model number, Serial number, Firmware version,
Operating system, Software version, Connection type
(WAN), IP address (LAN), IP address (WAN), and Computer
IP address. (WAN stands for Wide Area Network, such as
the Internet. IP stands for Internet Protocol. LAN stands for
Local Area Network.)
Router Details
Internet Speed Test
1. Click Next. The Internet Speed Test screen appears.
Copy To copy the details to a text file, click Copy and
follow these instructions:
1. Open a text editor, such as Microsoft Word or Notepad.
2. Go to Edit > Paste.
3. Go to File > Save As.
4. The Save As window displays default values for the file
name, file type, and location. Make any changes as
needed. Then click Save.
3245-01479
Maximum Performance Wireless-N Router
11011010NC-JL
10
Linksys E4200
Chapter 2: How to Use Cisco Connect
5. Click Close to return to the Router settings screen.
Advanced Settings
If you are an advanced user familiar with router
administration, you can use the browser-based utility to
manage the router’s advanced settings. The Advanced
settings screen displays the information needed to log
into this utility.
Username Enter this username in the browser‑based
utility’s login screen.
Password Enter this password in the browser‑based
utility’s login screen.
Copy password To copy the password to the Clipboard,
click this option.
Advanced Settings
Click OK to open the web browser and access the
browser‑based utility. For more information on the
browser-based utility, refer to your router’s User Guide.
How to Exit Cisco Connect
To exit Cisco Connect, click Close on the main menu.
Main Menu
Maximum Performance Wireless-N Router
11
www.linksys.com/support
Cisco, the Cisco Logo, and Linksys are trademarks or registered trademarks of Cisco and/or its affiliates in the U.S. and other countries. A listing of Cisco’s
trademarks can be found at www.cisco.com/go/trademarks. Third‑party trademarks mentioned are the property of their respective owners. The use of the
word partner does not imply a partnership relationship between Cisco and any other company.
© 2011 Cisco and/or its affiliates. All rights reserved.