1
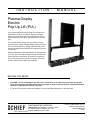
INSTRUCTION
MANUAL
Plasma Display
Electric
Pop-Up Lift (PUL)
Your Plasma Display Electric Pop-Up Lift is designed for
installation in furniture or cabinets. Display mounting is
made easy using the Q-latch mounting system and your
PUL provides a smooth, quiet and reliable lift for your display.
The versatile Q-latch system not only makes mounting
safe and easy, it makes changing display makes and models quick and inexpensive. Simply install the PSB mounting bracket designed specifically for the display and mount
it on the PUL.
Superior performance and dependability are designed into
your PUL. The lift is made using heavy duty steel and aluminum extrusion construction. All electrical components
are UL/TUV listed and the use of low voltage, solid state
circuitry controls ensure safety and reliability.
BEFORE YOU BEGIN
• CAUTION: To prevent damage to the PUL, which could affect or void the Factory warranty, thoroughly
study all instructions and illustrations before you begin to install or operate the unit. Pay particular attention to the “Important Precautions” on Page 1.
• If you have any questions about this installation, contact Chief Manufacturing at 1-800-582-6480.
CHIEF MANUFACTURING INC.
1-800-582-6480 952-894-6280 FAX 952-894-6918
8401 EAGLE CREEK PARKWAY, STE. 700
SAVAGE, MINNESOTA 55378 USA
PART NO. 8805-000009 (Rev. C)
©2000 Chief Manufacturing
www.chiefmfg.com
05-05
Instruction Manual
Plasma Display Electric Pop-Up Lift
IMPORTANT WARNINGS and CAUTIONS!
WARNING:
A WARNING alerts you to the possibility of serious injury or death if you do not follow the instructions.
CAUTION:
A CAUTION alerts you to the possibility of damage or destruction of equipment if you do not follow the corresponding instructions.
•
WARNING: Be aware during the installation that this is a motorized device, and there are pinch points for people and
for electrical wiring.
•
WARNING: Be aware of the potential for personal injury or damage to the unit if it is not adequately mounted. The
lift (without a projector) weighs approximately 150 lbs (68 kg).
•
WARNING: Be sure the lift is installed square and parallel in all dimensions to avoid damage to the lift. Avoid stressing the unit at any time during installation.
•
WARNING: Electrical outlets must be installed by a qualified electrician. Follow all electrical codes.
•
CAUTION: Vertical travel adjustment must always be made with the shelf in the middle of travel position and the power
switch OFF.
•
CAUTION: The unit must always be able to reach its own limit switches and turn itself off.
•
CAUTION: Test the unit for shipping damage. See “Inspect and Test the unit before installing,” on page 5.
TOOLS REQUIRED FOR INSTALLATION
• Phillips screwdrivers, No. 1 and No. 2
• Electric drill and 17/64” drill bit
• Socket set with extension
• Allen wrench set
NOTE: Other tools may be required depending on the
method of installation.
WEIGHT, SIZE, AND VERTICAL TRAVEL SPECIFICATIONS
See Table 1 on page 3 for the weight, size, and vertical travel specifications of your specific model.
1.
Determine size and weight of the equipment to be lifted.
2.
Determine the vertical travel height required for presentation
viewing.
1
Instruction Manual
Plasma Display Electric Pop-Up Lift
CONTENTS
WEIGHT, SIZE, AND VERTICAL
TRAVEL SPECIFICATIONS ............................. 3
DIMENSIONAL DRAWING ............................. 4
INSPECT AND TEST THE UNIT
BEFORE INSTALLING ..................................... 5
Inspect The Unit ................................................... 5
Test The Unit ....................................................... 5
PREPARE THE FURNITURE/CABINET
AND INSTALL THE LIFT ................................. 6
General Guidelines ...............................................
Prepare the Furniture/Cabinet ..............................
Furniture Opening Finish Piece Options .............
Extended Position Finish Piece Option ...............
Retracted Position Finish Piece Option ...............
Install the PUL into the Cabinet ..........................
6
6
6
6
7
9
INSTALL THE DISPLAY ON THE LIFT ......... 10
Attach Brackets to the Display ............................ 10
Mount the Display ............................................... 10
ADJUSTMENTS ................................................. 11
Width Adjustment ................................................ 11
Adjust Vertical Travel .......................................... 11
WIRING ............................................................... 13
Pushbutton ........................................................... 13
Extend and Retract Terminals to beTriggered by
Separate Dry Contacts ......................................... 13
Remote (RC-10) ................................................... 15
12 Volt Out Supply .............................................. 17
24 Volt Out Supply .............................................. 17
Two Dry Contact Closures .................................. 17
Low Voltage Sensing ........................................... 17
TROUBLESHOOTING .......................................... 19
2
Instruction Manual
3.
Plasma Display Electric Pop-Up Lift
Determine the inside dimensions available in your furniture/
cabinet (see Table 2, “Adjustable Width).
Table 1: Weight, Size, and Vertical Travel
Model
Lift
Capacity
Outside
Dimensions
PUL4228
230Lbs
104.3Kgs
33.75”x7.7”
25.5”x54.125”x6.5”
28”
(857.3mmx195.6mm)
(647.7mmx1374.8mmx165.1mm)
711.2mm
PUL4233
230Lbs
104.3Kgs
38.75”x7.7”
30.5”x54.125”x6.5”
33”
(984.3mmx195.6mm)
(774.7mmx1374.8mmx165.1mm)
838.2mm
230Lbs
104.3Kgs
44.75”x7.7”
36.5”x54.125”x6.5”
39”
(1136.7mmx195.6mm)
(927.1mmx1374.8mmx165.1mm)
990.6mm
230Lbs
104.3Kgs
50.75”x7.7”
42.5”x54.125”x6.5”
45”
(1289.1mmx195.6mm)
(1079.5mmx1374.8mmx165.1mm)
1143.0mm
230Lbs
104.3Kgs
56.75”x7.7”
48.5”x54.125”x6.5”
51”
(1441.5mmx195.6mm)
(1231.9mmx1374.8mmx165.1mm)
1295.4mm
230Lbs
104.3Kgs
62.75”x7.7”
54.5”x54.125”x6.5”
57”
(1593.9mmx195.6mm)
(1384.3mmx1374.8mmx165.1mm)
1447.8mm
PUL4239
PUL4245
PUL4251
PUL4257
Max. Equipment Size
HxWxD
Vertical
Travel
Table 2: Adjustable Width
Model
Outside
Inside
PUL4228
44.125” to 56.125”
1120.8mm to 1425.6mm
42.125” to 54.125”
1070.0mm to 1374.8mm
PUL4233
44.125” to 56.125”
1120.8mm to 1425.6mm
42.125” to 54.125”
1070.0mm to 1374.8mm
PUL4239
44.125” to 56.125”
1120.8mm to 1425.6mm
42.125” to 54.125”
1070.0mm to 1374.8mm
PUL4245
44.125” to 56.125”
1120.8mm to 1425.6mm
42.125” to 54.125”
1070.0mm to 1374.8mm
PUL4251
44.125” to 56.125”
1120.8mm to 1425.6mm
42.125” to 54.125”
1070.0mm to 1374.8mm
PUL4257
44.125” to 56.125”
1120.8mm to 1425.6mm
42.125” to 54.125”
1070.0mm to 1374.8mm
3
Instruction Manual
Plasma Display Electric Pop-Up Lift
DIMENSIONAL DRAWING
See Table 1 on page 3 for outside adjustable width, dimension “H” and dimension “W”.
Front View
Side View
1.48
24.25
4" MIN 11" MAX
ADJUSTMENT
2.459
5.000
2.3
4.88
DIMENSION "H"
OUTSIDE
ADJUSTABLE
WIDTH
44.125 NIM - 56.125 MAX
26.5
5.0
Top View
4
7.730
Instruction Manual
Plasma Display Electric Pop-Up Lift
INSPECT AND TEST THE UNIT BEFORE INSTALLING
Inspect The Unit
1.
Carefully inspect the Plasma Display Electric Pop-Up Lift
(PUL) for shipping damage. If any damage is apparent, call
your carrier claims agent and do not continue with the installation until the carrier has reviewed the damage.
NOTE: Read all assembly instructions before starting assembly.
2.
Carefully inspect PUL components for damage, checking vertical extrusion arms to make sure they are parallel.
Figure 1. Connection to Housing
IMPORTANT: Before mounting the lift in the furniture/cabinet,
make the following tests to be sure that it operates properly and has
not been damaged in shipping.
Test The Unit
1.
Set the PUL on a clean, level surface.
2.
Connect the motor control box to the control circuit housing
(see Figure 1, Figure 2, and Figure 3).
3.
Install two terminal blocks in control box (see Figure 2).
NOTE: The lift is supplied with a momentary push button on
the end of a cable to help you pretest the operation.
3.
Connect the momentary push button (provided) cable leads to
terminals #6 and #1 and add a jumper wire (provided - electrical wire about 4 in. long with 1/4 in. stripped at each end)
between terminals #2 and #5 on the same terminal block (see
Fig. 4).
4.
Plug the lift’s power cord (see Figure 3) into a 110V 60 Hz or
220V 50 Hz (as appropriate) 15-amp outlet.
Figure 2. Front Connection to Control Box
NOTE: The lift draws approximately 1.5 amps.
WARNNG: Be aware during the
installation that this is a motorized
device, and there are pinch points for
people and for electrical wiring.
Keep hands and electrical wiring
away from internal components of
the mechanism
5.
To
Operate the lift much like a garage-door opener: press the button when the lift is at its “bottom” position and it will move
“up”; press again when it is at its “top” position and it will
move “down”; press while moving and it will stop.
Use the push button to check that the lift runs to the top and
bottom of its travel without any interference that might indicate
damage during shipment.
6.
Figure 3. Back Connection and Power Cord
to Control Box
To push button
To jumper
Unplug the lift’s power cord.
Figure 4. Test Wiring
5
Instruction Manual
Plasma Display Electric Pop-Up Lift
PREPARE THE FURNITURE/CABINET AND INSTALL THE LIFT
Because of the wide variety of possible mounting situations, Chief Manufacturing can only provide general guidelines
for lift installation. Study the following information carefully, and adapt it as necessary to fit your specific installation.
WARNING: Be especially aware of the weight of the unit, and
the potential for personal injury or of damage to the unit if it is
not adequately mounted. The lift (without a projector) weighs
approximately 150 lbs (68 kg).
The “General Guidelines” below and the information on the following pages cover the most common mounting situations:
General Guidelines
• Compare the inside dimensions of the furniture/cabinet in which the lift will be installed with the dimensional requirements of
your display and any additional space required for your application. Allow for movement of the lift and the display.
Prepare the Furniture/Cabinet
WARNNG: Be aware during the installation that this is a motorized device,
and there are pinch points for people
and for electrical wiring. Keep hands
and electrical wiring away from internal components of the mechanism
1.
Determine size and weight of display to be lifted. See
“Weight, Size, and Vertical Travel” on page 3 for weight
limitations.
2.
Determine vertical travel height required for presentation
viewing. See Table 1 for height limitations.
Furniture Opening Finish Piece Options
Because of the wide variety of possible mounting situations, Chief Manufacturing can only provide general guidelines for finish options. Study the following
information carefully, and adapt it as necessary to fit
your specific installation.
NOTE: Always leave access to the lift for maintenance purposes.
Extended Position Finish Piece Option
A finish piece, covering the opening when the unit is
in the fully extended position, may be installed for
estetic purposes. Using the material cut slight smaller
than the opening size, install the finish piece as follows:
1.
Measure the width of the finish piece.
2.
Measure the distance between the verticle extrusion arms and
subtract a nominal amount for clearance.
CAUTION: Failure to allow clearance for the finish piece to
retract to the fully lowered position may result in damage to the finish piece, damage to the lift, and damage to the plasma.
6
Instruction Manual
Plasma Display Electric Pop-Up Lift
3.
Make sure the finish piece measured in step 1 is smaller than
the clearance distance measured in step 2 and note any cord
management access holes that may be necessary.
4.
Measure the thickness of the finish piece, add this thickness to
the length of the five capscrews used to secure the plasma
mounting assembly when a backing is not used, and obtain the
five longer 3/8-16 capscrews for assembly with backing.
5.
Place the finish piece on the shelf, making sure it is correctly
positioned to allow clearance when lowered, and transfer the
pattern of the five access holes onto the finish piece.
6.
Drill five through holes, with clearance for 3/8” bolts, in the
finish piece and any cord management holes that may be necessary.
7.
Place the finish piece on the shelf.
8.
Place the plasma mounting assembly on top of the finish piece
(see Figure 5).
9.
Using a 5/16” Allen wrench inserted through the five access
holes on the bottom of the shelf (see Figure 6), install five
longer 3/8-16 cap screws.
10. With the aid of another person, lift the display up to the mount,
aligning the PSB mounting buttons on the display with the
teardrop slots on the mount, set the plasma into place and
adjust mounting assembly to ensure proper clearance is
achieved.
Plasma Mounting
Assembly
Shelf
Figure 5. Plasma Mounting Assembly
Access Holes
11. Measure and record clearance dimensions and, with the aid of
another person, remove plasma.
WARNNG: Be aware during the installation that this is a motorized device, and
there are pinch points for people and for
electrical wiring. Keep hands and electrical wiring away from internal components
of the mechanism
12. Carefully, without plasma mounted on lift, operate lift to
ensure finish piece has sufficient clearance during full travel.
Figure 6. Access Holes
Retracted Position Finish Piece Option
A finish piece, covering the opening when the unit is
retracted, may be installed for estetic purposes. Install
the finish piece as follows:
1.
Complete the instructions in “Extended Position Finish Piece
Option” on page 6.
2.
Cut two side pieces, matching the width of the extended position finish piece, to a length slightly longer than the distance
the plasma will travel (this will be trimmed later).
3.
Cut a top piece, matching the dimensions of your extended
position finish piece (see Figure 7).
7
Instruction Manual
4.
With the extended position finish piece and the plasmamounted, lower the unit to its fully retracted position.
5.
Place the side pieces in position (do not attach).
6.
Place the top piece in position (do not attach).
7.
Measure the distance from the top surface of the top piece to
the top surface of your furniture and cut this dimension from
each side piece (see Figure 8).
8.
Remove and assemble finish pieces (bottom, sides and top),
making sure your finished box is square.
Plasma Display Electric Pop-Up Lift
Retracted Position
Finish Piece
Backing
Side Pieces
Plasma
CAUTION: A backing is recommended for support. Frame movement could result in damage to the frame, damage to the lift, and
damage to the plasma.
CAUTION: Check plasma ventilation requirements. Provide ventillation for your application.
9.
Measure box, construct a backing for lateral support, and
install backing.
Extendeded Position
Finish Piece
Figure 7. Retracted Position Finish Piece
WARNNG: Be aware during the installation that this is a
motorized device, and there are pinch points for people and for
electrical wiring. Keep hands and electrical wiring away from
internal components of the mechanism
CAUTION: Failure to allow clearance for the finish pieces to
retract to the fully lowered position may result
in damage to the finish pieces, damage to the
lift, and damage to the plasma.
10. Carefully, without plasma mounted on
lift, operate lift to ensure the finish pieces
have sufficient clearance during full travel
and that top finish piece is flush with the furniture top when
fully retracted.
8
Finish Piece
Furniture
Figure 8. Side Piece Dimensions
Instruction Manual
Plasma Display Electric Pop-Up Lift
Install the PUL into the Cabinet
1.
Adjust motor/control box unit (see Figure 9).
NOTE: The motor/control box unit is factory set to the narrowest horizontal position.
a.
Loosen the six 5/16”-18X5/8” hex head bolts on the front
of each half of the motor/control box and eight 1/4-20
socket head allen screws (4 front and 4 back) on the
bracket mounting crossbrace. Slide both halves of the lift
all the way in and out to ensure the lift can be adjusted
freely.
c.
Measure the width of the inside enclosure where the lift
will be mounted.
d.
Adjust the width of the lift, allowing for clearance, and
hand tighten all bolts loosened in step a.
NOTE: The unit must be installed square and parallel in ALL
dimensions for smooth and reliable operation. The extrusions
housing the chains must also remain exactly square to the
power box and parallel to each other after it has been installed.
Shims may be required between the unit and the enclosure to
maintain parallel dimensions between the extrusions.
2.
Place the unit into the enclosure so the load to be lifted is centered over the vertical extrusion beams.
3.
With the lift in place, use the base of the lift mechanism as a
template to transfer 4 holes (17/64” diameter) to the enclosure
bottom.
Eight 1/4-20 Socket
Head AllenScrews
Bracket Mounting Crossbrace
Six Hex Head Bolts
Motor/Control Box
Figure 9. Motor/Control Box
Optional holes requiring spacers between
the lift and the bottom of the enclosure
NOTE: If desired, you can use the additional four holes in the corners of the lift, but you must fill the space between the lift and
enclosure bottom to prevent warping.
4.
Remove the lift mechanism from the enclosure.
5.
Drill the 4 holes (17/64” diameter) in the bottom of the enclosure.
6.
Place the unit into the enclosure so the holes in the mechanism
line up with the holes in the enclosure.
7.
Secure the unit into the enclosure using 4 thru bolts (1/4-20 or
larger), 8 fender washers, and 4 Nyloc nuts (see Figure 10).
Tighten securely.
Thru bolt, two fender washers
and Nyloc Nut two places
each side
Figure 10. Secure Lift
9
Instruction Manual
Plasma Display Electric Pop-Up Lift
INSTALL THE DISPLAY ON THE LIFT
Attach Brackets to the Display
1.
Follow the instructions accompanying the PSB brackets
designed for your display.
Remove screws
Mount the Display
1.
Remove 4 screws and slide back panel cover up and out (see
Figure 11).
2.
Make sure the latch on the mount is lowered to the side before
attempting to place the display on the mount (see Figure 12).
3.
With the aid of another person, lift the display up to the mount,
aligning the PSB mounting buttons on the display with the
teardrop slots on the mount, and set the plasma into place.
CAUTION: If the latch does not travel to the full upright position,
remove and reset the display.
4.
While supporting the display, raise the latch.
5.
Install Q-clamp (see Figure 13).
6.
Install back panel cover and secure using 4 screws.
Figure 11. Back Panel Cover Removal
Latch Lowered
Raise Latch to Secure Display
Tear Drop Slots
Figure 12. Latch and Tear Drop Slots
Q-clamp
Figure 13. Install Q-clamp
10
Instruction Manual
Plasma Display Electric Pop-Up Lift
ADJUSTMENTS
WARNING: Be aware during the
installation that this is a motorized
device, and there are pinch points for
people and for electrical wiring.
Width Adjustment
Eight 1/4-20 Socket
Head AllenScrews
Adjust width as follows (see Figure 14):
1.
2.
Loosen the six 5/16”-18X5/8” hex head bolts on the front of
each half of the motor/control box and eight 1/4-20 socket head
Allen screws (4 front and 4 back) on the bracket mounting
crossbrace.
Bracket Mounting Crossbrace
Motor/Control Box
Six Hex Head Bolts
Slide the halves of the lift to the disired width and secure by
tightening the bolts and socket head Allen screws loosened in
Step 1.
Adjust Vertical Travel
Figure 14. Width Adjustmentr
WARNING: Be aware during the
installation that this is a motorized
device, and there are pinch points for
people and for electrical wiring.
CCW
CAUTION: Vertical travel adjustment must always be made with
the shelf in the middle of travel position and the power switch OFF.
CW
There are two knobs for setting the travel limits, which are located
at one end of the base controller housing (see Figure 15). The knob
closest to the outside is the down stop limit adjustment. The knob
closest to the center is the up stop limit adjustment
1.
With the shelf in the middle of travel position and the power
switch OFF, adjust the down limit to the desired height by turning the down stop adjustment knob (clockwise = higher position, counterclockwise = lower position).
CAUTION: The unit must always be able to reach its own limit
switches and turn itself off.
2.
Check to be sure the limit switch stops the unit and the unit is
not being stopped due to interference.
3.
With the shelf in the middle of travel position and the power
switch OFF, adjust the up limit to the desired height by turning
the down stop adjustment knob (clockwise = higher position,
counterclockwise = lower position)
Figure 15. Vertical Travel Adjustment
11
Instruction Manual
Plasma Display Electric Pop-Up Lift
THIS PAGE INTENTIONALLY BLANK
12
Instruction Manual
Plasma Display Electric Pop-Up Lift
WIRING EXAMPLES
The information on the following pages cover the most common wiring options:
• Pushbutton
• Extend and Retract Terminals to be Triggered By
Separate Dry Contacts
• Remote (RC-10)
• 12 Volt out supply
• 24 Volt out supply
Figure 16. 12 Volt Supply Jumper
• Two dry contact closures
• Voltage Sensing
Pushbutton
Wire for pushbutton operation as follows:
1.
Install a wire between terminal 5 (extend/retract common) and
ground terminal 3 (see Figure 16).
2.
Connect one wire from pushbutton to terminal #4
(12 VDC power supply) and the other wire from the pushbutton to terminal #6 (extend/retract) (see Figure 17).
Figure 17. Pushbutton Wires
With the unit plugged in, push the button once and the unit should
extend. Push the button during travel and the unit will stop at that
location. Push the button after the unit is extended or stopped in
mid-travel and the unit will retract.
Extend and Retract Terminals to be Triggered By
Separate Dry Contacts
These terminals can be used with a wall switch or a separate set of
dry contacts for dedicated extend and dedicated retract. Momentary
contacts are preferable.
NOTE: The connection between the ground (#13) and any other
terminal connection must be broken (open) before completing the
next circuit.
1.
Connect the common to terminal #13 (see Figure 18).
2.
Connect the extend to terminal #11 (see Figure 19).
3.
Connect the retract to terminal #12 (see Figure 20).
Common
Figure 18. Common for Extend and Retract Contacts
Service Extend
Extend
Figure 19. Extend Contact Wiring
Completing the circuit between terminal #13 and terminal #11 will
cause the unit to extend to the show position (see “Adjust Vertical
Travel” on page 11 to change height setting). Completing the circuit between terminal #13 and terminal #12 will cause the unit to
retract to the closed position.
Retract
Figure 20. Retract Contact Wiring
13
Instruction Manual
Plasma Display Electric Pop-Up Lift
THIS PAGE INTENTIONALLY BLANK
14
Instruction Manual
Plasma Display Electric Pop-Up Lift
Remote (RC-10)
RC-10 Controller
Circuit Board Box Assembly
RC-10 Remote
Figure 21. Contacts Connection
Wire for remote (RC-10) operation as follows (see Figure 21):
1.
Install a jumper wire between terminals #6 and
terminal #2 (see Figure 22).
2.
Connect the white wire of the RC-10 controller unit to
terminal #1 (see Figure 23).
3.
Connect the red wire of the RC-10 controller unit to
terminal #2.
4.
Connect the black wire of the RC-10 controller unit to
terminal #5.
5.
Connect the power source to the lift.
Figure 22. Contacts Connection
Red lead
Black lead
NOTE: If the unit does not activate, check to make sure the 9 volt
battery is working and make sure the dip switches in the sending unit match the dip switch settings in the controller unit (see
Figure 24).
Figure 23. Contacts Connection
Figure 24. Dip Switches
15
Instruction Manual
Plasma Display Electric Pop-Up Lift
THIS PAGE INTENTIONALLY BLANK
16
Instruction Manual
Plasma Display Electric Pop-Up Lift
12 Volt Out Supply
This internal power supply can be used to power external
devices &/or to initiate specific functions (see Pushbutton
operation and Figure 25).
1. Connect one lead to 12 VOLT GROUND (terminal #9).
2. Connect one lead to 12 VOLTS OUT (terminal #10).
24 Volt Out Supply
Figure 25. 12 Volts
This internal power supply can be used to power external
devices & remote controllers (see Figure 26).
1. Connect one lead to 24 VOLT COMMON (terminal #2).
2. Connect one lead to 24 VOLTS OUT (terminal #1).
Two Dry Contact Closures
NOTE: Dry contacts are rated for 1 Amp @ 24 volts.
Figure 24. 26 Volts
These contacts can be used to complete circuits to external
devices (see Figure 27 and Figure 28).
1. Connect one lead to terminal #17 (extend limit common).
2. Connect one lead to terminal #16 (closes when unit
reaches full extension).
3. Connect one lead to terminal #19 (retract limit common).
Figure 27. Extend Dry Contacts
4. Connect one lead to terminal #18 (closes when unit is
fully retracted).
Low Voltage Sensing
1. Connect positive lead (5 - 30 volts AC/DC) to terminal #7
and ground of switching device to terminal #8 (see
Figure 29). Unit extends when voltage is sensed, retracts
when voltage ceases.
Figure 28. Retract Dry Contacts
Example using internal 12 volt DC supply (Figure 30):
1 2 3 4 5 6 7 8
Figure 29. Low Voltage Sensing
Figure 30. 12 Volt DC Supply
17
Instruction Manual
Plasma Display Electric Pop-Up Lift
THIS PAGE INTENTIONALLY BLANK
18
Instruction Manual
Plasma Display Electric Pop-Up Lift
TROUBLESHOOTING
If the lift is installed according to these instructions, it should operate trouble-free indefinitely. If you do encounter a problem, and
it isn’t covered by the troubleshooting suggestions below, call the Technical Services Department at Chief Manufacturing:
1-800-582-6480
952-894-6280
Symptom(s)
No Movement and No
Sound
Possible
Causes
No Power
Faulty Circuit Board
Unit Operates Noisily
(Squeeling or grinding)
Track Misalignment
Suggested Action
1. Check power to unit (supply, cord, activation
control, and connections).
No power: Provide power, repair cord, tighten
connections or repair activation control.
Power:
Check fuse on circuit board. If fuse is OK,
proceed to next step.
2. Check circuit board as follows:
Make three jumper wires with ends stripped.
Install one jumper wire on terminal 11.
Install one jumper wire on terminal 12.
Install one jumper wire on terminal 13.
Momentarily touch jumper wire from terminal 11 to
terminal 13. Unit should extend.
Momentarily touch jumper wire from terminal 12 to
terminal 13. Unit should retract.
Activates
In both
Directions: Circuit board OK, faulty activation
interface. Check remote switch, circuit, or
batteries in remote control.
Unit
Fails
Both/Either
Direction: Call Chief Manufacturing.
1. Check for noise and/or metal shavings in track
Noise or
Shavings: Check and adjust track and/or shelf as
necessary.
No Track
Noise:
Possible brake problem, call Chief
Manufacturing
19
Instruction Manual
Plasma Display Electric Pop-Up Lift
TERMINAL FUNCTION DEFINITIONS
TERMINAL
NUMBER
FUNCTION
DESCRIPTION
1
24 VOLT AC
24 volt AC output
2
24 VOLT AC
COMMON
24 volt AC common
3
GROUND
Ground
4
12 VOLT DC
12 volt DC
5
EXTEND/
RETRACT
Initiates movement if lift is static, or
stops movement if lift is in motion.
Direction of travel will be opposite
of last direction of travel.
6
7
8
20
EXTEND/
RETRACT
COMMON
VOLTAGE
SENSOR
VOLTAGE
SENSOR
COMMON
9
SERVICE
EXTEND
10
GROUND
Used in conjunction with
Extend/Retract when using an
external power source to initiate
movement.
When terminal senses voltage, unit
will extend.
When terminal senses cessation of
voltage, unit will retract.
Used in conjunction with Voltage
Sensor when using an external
power source to initiate movement.
Extends unit to maximum limit,
bypassing normal-use travel setting.
Often used for servicing projectors
in ceiling lifts on PCL and MD
models
Ground
WIRING OPTIONS
NOTES
This is an internal power supply for
powering external devices & Remote
Controllers.
Chief Mfg. offers the RC-10 Radio
Frequency Remote Controller which runs
off of this power supply.
This is an internal power supply for
powering external devices &/or used for
initiating specific functions
(Extend/Retract 5 or Voltage Sensor 7).
To Operate using Internal Power
Source
Connect terminals 3 & 6 with
Jumper Wire. Connect
Momentary Switch to terminal 4.
Connect other line of Momentary
Switch to terminal 5.
Function operates on momentary switch
only.
To Operate using External Power
Source
Connect External Power Supply’s
Common to terminal 6. Connect
initiating signal to terminal 5.
NOT TO BE USED AS GROUND FOR
FUNCTION OTHER THAN
EXTEND/RETRACT TERMINAL 5.
Voltage Sensing
Connect positive lead to terminal
7. Connect Ground of switching
device to terminal 8.
Single-Pull/Throw Latching
Switch
Connect terminals 3 & 8 with
Jumper Wire. Connect first
Switch Terminal to terminal 4.
Connect other Switch Terminal to
terminal 7.
Operating range is 5 – 30 Volts AC or DC
Operating range is 5 – 30 Volts AC or DC
NOT TO BE USED AS GROUND FOR
FUNCTION OTHER THAN VOLTAGE
SENSOR TERMINAL 7.
Feature not available on all models.
Momentary or Latching contact to
Ground terminals 3, 10, 13, or 20.
If using Latching Switch, be sure to
disengage Switch prior to initiating any
other function.
Instruction Manual
Plasma Display Electric Pop-Up Lift
Extends unit to preset travel limit.
11
EXTEND
Customer within a preset maximum
range may adjust travel limits.
Retracts unit to preset travel limit.
12
RETRACT
Travel limits may be adjusted by
customer within a preset maximum
range.
13
GROUND
Ground
14
EXTEND
ERROR
Immediately reverses direction of
travel when triggered while unit is
extending.
15
RETRACT
ERROR
16
EXTEND
LIMIT
RELAY
17
EXTEND
LIMIT
RELAY
COMMON
18
RETRACT
LIMIT
RELAY
19
RETRACT
LIMIT
RELAY
COMMON
20
GROUND
If using Latching Switch, be sure to
disengage Switch prior to initiating any
other function.
Momentary or Latching contact to
Ground terminals 3, 10, 13, or 20.
If using Latching Switch, be sure to
disengage Switch prior to initiating any
other function.
Momentary contact to Ground
terminals 3, 10, 13, or 20.
Immediately reverses direction of
travel when triggered while unit is
retracting.
Closes set of internal dry contacts
when unit reaches full extension.
Closes set of internal dry contacts
when unit reaches full retraction.
Chief Mfg. offers the SS-10 Pressure
Sensitive Safety Strip to provide this
function.
Please specify how many inches required
spanning entire pinch zone.
The SS-10 must be ordered with the ST-15
Terminals.
RATED FOR 1 AMP @ 24 VOLTS
RATED FOR 1 AMP @ 24 VOLTS
Ground
WIRING THE RC-10
Connect white lead to terminal 1, red lead to terminal 2, and black lead to terminal 5.
Place jumper wire from terminal 2 to terminal 6
WIRING A MOMENTARY PUSH BUTTON
Connect terminals 3 & 6 with Jumper Wire. Connect Momentary Switch to terminal
4. Connect other line of Momentary Switch to terminal 5.
21