1
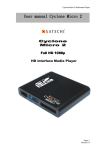
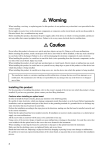
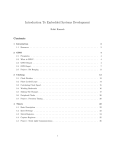
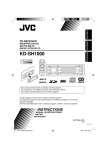
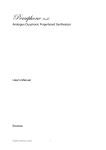
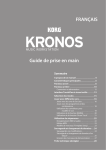
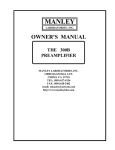
TUTORIAL ON MUSICAL SYNTHESIS
FOR THE KORG TRITON SERIES OF SYNTHESIZERS
Last Updated 20 March 2010 – Copyright Stuart Pryer 2003
Introduction
This tutorial is written for Korg Triton and Karma owners who use the Triton Controller T.C.
program which I developed. I wrote the programme because I felt the interface on the Triton
series could be made more intuitive and be laid out in a more orderly way – like older analogue
synths such as the Korg MS20/10 & Mini-Moog. Their sound creation process was done in a ‘linear
fashion’ on the control panel. The software is available at http://myweb.tiscali.co.uk/pryer/ Other
synth users might find this tutorial of interest as well even if they don’t use the software. But the
T.C. software does what no small keyboard screen can do, that is lay out all of the controls in a
logical manner and it adds many novel features not on the synth at all !
Tip…T.C. users should save this pdf document in the same directory as triton.exe so you can access
t from within the T.C. program from T.C. version 7.0 onward.
Index
Part 1
A Little History of Musical Synthesis
Midi Setup - Connecting the Synthesizer to the P.C
Making your first Edits using the Triton Controller T.C. Software – Program Play Mode
Multi sample synthesis
Program Edit Mode
So What is Moss ?
MOSS parameters in detail
PCG files and the PCG Reader
Part 1
A Little History of Musical Synthesis
The ‘King of Instruments’ is the church organ. By the 14th century they were relatively common
and were the first instrument which mimicked other instruments. There vast array of ‘stops’
from the flute to the gemshorn were generated by differently constructed pipes. Some of wood
and some of metal and of varying shapes. The ‘synthesis’ was done mechanically and stops could
be combined. It took 700 years for the first electronic device to attempt the same feat.
The first electronic ‘synthesizer’ was Thadeus Cahill’s Telharmonium an enormous instrument
built way back in the early 1900’s. Although hardly meant for the home user it was the first
electronic musical instrument. In fact it was so big it had to be transported in railroad cars.
Then came the Theramin, a weird device consisting of a pair of aerials and played by the
musician moving his hands by them. The varying electromagnetic inductance provided the control
source. The next major development was the Hammond organ, invented by Laurens Hammond, a
Chicago clock maker in 1933. It used mechanical tonewheels placed near electronic pickups to
generate sine waves. By adding a harmonic set of sine waves it is possible to generate complex
waveforms by a process called fourier or additive synthesis.
A pure tone or Sine wave. 2 cycles are shown above. It sounds a bit like a soft flute and by
definition contains no harmonics. By adding multiple frequencies most wave forms can be
generated by a process called fourier synthesis.
Listen to Sine wave A 1 second sample.
A Pianos waveform looks and sounds different. 3 Cycles are shown above. The spectrum
analysis below shows the relative magnitude of the various harmonics which make up the piano
waveform. Notice that there are 11 significant harmonics !
A harmonic series for a Piano. Each peak represents a sine wave at multiples of the
fundamental (lowest) frequency 320Hz component. 1x, 2x, 3x etc. By adding a few sine wave
you can generate most waveforms. A Hammond Organ could create the first 8 harmonics which
could be individually adjusted by the drawbars. The Moss board does a nice representation of
a classic Hammond organ with virtual drawbars ! In fact you can simulate 6 drawbars by using
its 2 oscillators.
New keyboards were invented in the 1960’s such as the fender Rhodes electric piano and
Mellatron, an interesting instrument which relied on endless loops of magnetic tape to playback
instruments. 1 loop per key ! Technology moved on in the 1970’s with the Moog and the first
analog synths such as the E.M.S. Synthi-A. By the early 1980’s synths like the Korg MS10,
MS20, Roland SH1000 and Moog used analogue electronic circuitry, based solely on transistors
rather than valves. These synths produced square waves, pulse waves, triangular waves and
sine waves and when modified with simple filters and envelope generators added some interest
to what seems now a very electronic, yet classic sound. The process was one of subtractive
synthesis; that is the filters generally subtracted harmonics from the waveforms.
Electronic Music Studios London Ltd. Circa 1970 – All of this now fits into the Tritons case !
Things have come a long way since the 1900’s and professional synths, using large scale
integrated digital circuitry are now available for £2,000 which would have cost £50,000 back in
1975 ! The Fairlight was one of the first sampling synths, as was the Disclaver in the late
1970’s, but they did then, what the Triton does now but at 100 times the price the price of a
Triton in real terms. Also the Triton is a lot more complex and contains countless features not
found on its precursors. The Korg Triton series of synthesizers use the Triton ‘Hyper
Integrated Synthesis System’ - HiSys chip set (and the optional Moss Board) and are some of
the most powerful workstations on the market today. The fact that the Triton series (Classic,
Studio, Karma, LE and Rack) use the same chip and basically the same MIDI implementation
makes computer programming for the range a lot easier.
MIDI stands for Musical Instrument Digital Interface and allows externally generated signals to
control an instrument. Not only can MIDI control what notes sound, but also most of the
controls on a MIDI enabled instrument. It has been pivotal in the development of electronic
music. Originally developed in 1983, the standard is largely unchanged and has enabled
computers to fully integrate with synthesizers. MIDI enables one instrument to control another
or a computer to control, or be controlled, by an electronic instrument. It’s the basis of
countless sequencers and the way the Triton Controller program controls the Triton Synth. The
first sequencer program I wrote was for the Korg MS10 in 1982. Without Midi I had to use
analog to digital converters to send the monophonic instructions to the synth. It was not an easy
task and something MIDI handles with ease.
The very latest synthesizers are called software or soft synths. They exist only as a program
running on a computer and this approach is immensely powerful but dependson the quality of the
sound card in the PC. They have not replaced hard wired synths yet, but will probably do so in
the future. The Triton could exist as a program, but somehow playing a PC on the stage is not
the same !
A quick lesson on Midi System Exclusive.
Sysex is the way Midi can send instructions to a synth to change parameters on it. Note that ‘note
on’ and ‘note off’ commands are used to send notes (key and velocity), which are shorter and simpler
commands. These are what sequencers mainly use. Now the full sysex message for changing a GE say
on the Karma looks like this:F0 42 30 5D 41 mo 00 cc 00 aa msb lsb F7
….13 parameters in all – wow!
1. Now - F0 42 30 5D 41 is just the synth identifier – F0 is always the start of a sysex message, 42
for manufacturer Korg, 30 is the midi channel and 5D means it’s a Karma here. 41 means that it’s a
parameter change message.
2. mo is just 2 characters - a number representing mode in this case. Comb play is 00, Comb edit is
01, Prog Play 02. etc...
3. cc is a parameter defining a particular control on synth – here it’s a karma module 09 = A, 0A =
B, 0B = C and 0D = C
4. aa is another parameter defining the control - for GE's this is 0
5. msb/lsb - Midi data bytes by definition have values between 0 and 127, so sysex splits bigger
numbers into 2 parameters so they can be represented ......
0 has a msb of 0 and lsb of 0
1 has a msb of 0 and lsb of 1
128 has a msb of 1 and lsb of 0
129 has a msb of 1 and lsb of 2
130 has a msb of 1 and lsb of 3
256 has a msb of 2 and lsb of 0
257 has a msb of 2 and lsb of 1 etc……..
See the pattern...... MSB Steps by 1 at multiples of 128 LSB values
6. F7 is the standard midi end of message - it is always F7.
All the parameters mo, cc, aa, msb, lsb, are in the Korg midi implementation for the particular synth
model. Its not as complicated as it looks.
Tip….The best book on Midi is – Midi for Professionals by Paul Lehrman and Tim Tully, published by
Amsco 1993.
Tip….Midi Tools – The best utility on the market is Midi Ox – You can find it at www.Midiox.com
Lets start……Firstly, if you want to use the T.C. you need to connect your PC to your synth.
Midi Setup - Connecting the Synthesizer to the P.C
If you want to get up and running quickly and prefer to read the detailed instruction later in
the Help file, then this is what you need to do after obtaining a copy of the Triton
Controller:1.
Connect the Korg Synth to the PC using midi leads ( Midi out from the synth to midi in on
the PC, and midi in on the synth to midi out on the PC) or a Korg PCIF serial lead (you will
need to load the Korg PCIF driver for the latter to work).
2. Load and run the Triton Controller software. Click Midi Set Button (Red midi symbol main
toolbar). Set model to the model of synth you use, set midi channel to correct channel –
default on synth/software is 1. Select PCIF for midi in and midi out in the text boxes if
you are using PCIF cable.
3. On the synth goto ‘Global Mode – Midi settings and set Midi receive for sysex, bank
change etc. Tick boxes to enable. If you use PCIF make sure data rate is set to 38kb/sec
for the PC.
4. Also make sure that the Triton bank map is set to Korg and not general MIDI. (Otherwise
you will only have access to general Midi.) To do this - On the Triton, Goto global mode system preferences (page 2) , and set bank map there to Triton.
If you click between ‘PCM edit’ and ‘Combi play’ on the T.C. for instance, the mode on the synth
will change. (See lights above mode buttons). You should now also be able to goto an edit page
in the software, change a parameter on the PC and as you do you should see the parameter
change on the Triton/Karma’s screen. You will have to manually goto the particular edit screen
on the synth as midi will not alter the screen on the synth automatically - it will however goto
the correct mode.
Making your first Edits using the Triton Controller T.C. Software – Program Play Mode
NB. When you first open the T.C. you will see a small window in the top left with the various modes
of the Triton listed. By clicking on the various radio buttons you can switch modes on the synth.
The sub window also allows the user to open and close the midi port, very useful if you use PCIF and
you want another application to take over the PC port. Just close the T.C. port first.
The Triton Controller Software is designed to make editing sounds on the Korg synth a lot easier
than using the small screen that comes with the synth. This is even more true for those models
without a touch screen. The best and simplest page to start with is Program Play mode – a mode
especially for simple adjustments during a performance. Click the Icon at the top left of the T.C.
menu bar. If the synth is not in that mode already, then the T.C. will force the synth to goto that
mode and you should see the program play mode button light up and that mode appear on the tritons
screen. (If it does not, then the midi connection needs checking. Goto step 1 above – midi setup.).
The P.C. screen will display a new window containing various controls. Now this is the fun bit!
1.
With almost any program loaded on the synth – slide the octave slider on the T.C. up or
down. Play the synth and you will hear the note go up or down an octave. This is true for
most programs, but not all. Move the slider again and play the synth again.
2. Next – do the same thing with the pitch slider – notice what happened to the sound.
3. The Osc Balance changes the respective volumes of the 2 oscillators which make up most
Triton programs. Sliding it will change the timbre or nature of the sound.
4. The amp level slider changes the output level of the synth. Try sliding it up and down and
hear the volume change.
5. The Attack and Decay time changes the speed at which a sound builds up and dies away –
classic controls on synths since the 1970’s
6. The IFX slider refers to Internal Effects and MFX master effects. Changing this slider
will alter the filters modifying the synths sound.
You will see that by just changing these few sliders you can create many different sounds !
Tip….If you want to play the synth from the PC keyboard click the mauve button bottom right –
Audition sound using the P.C. keyboard – and use the Z-M keys and Q-U to play it. Handy if the
synth is out of reach from the PC.
If you want to choose a program/bank – ie. Sound from the synth, just use the Orange Program/bank select button top right. Select a bank, select a program and press the button below.
The synth will then be told by the T.C. to change the program accordingly. You should see the
synths display change and when you play the synth the sound will be different.
You can also save a sound – edited in the synths buffer – to a program/bank location of your choice.
Use the Red – Write section of the window of the T.C. for this.
Finally you can adjust arpeggio parameters – assuming your model has arpeggios – Karma uses G.E.
instead so this section is not visible on the P.C..
PS…The Load PCG file will be covered later in the tutorial.
Multi sample synthesis.
The Triton is prepacked with over 400 multisamples – these are mainly digital recordings of
instruments which have been assigned to the groups of keys on the synth. You can also sample your own
sounds if you own a Triton Classic or Studio. The Triton allows the user to combine multisamples – so
by pressing one note you can sound up to 2 multisamples in a typical program. By combining Programs
you can create Combinations which are rich sounds. So you can see the Triton offers vast numbers of
ways of making sounds by addition.
The PCM edit page on the T.C. lays out neatly all of the editing controls – much in the way of earlier
synths of the 70’s/80’s did on their control panel. When you want to create a new sound its always
easiest to start with an existing one – from one of the Korg PCG files which came with the synth and
which sound similar to the sound you want. Just tweak it as necessary. So how do you do that ?
You need to understand what the various controls do. Controls are generally grouped into:1.
2.
3.
4.
5.
Oscillators – These are Multisamples really, but early synths just had square wave generators,
sawtooth, Sine wave etc. Not real samples and you made the sound different by filtering them.
Although you can only sound 2 oscillators at once in a triton program you can velocity switch
samples. So if you press the key lightly you get one multisample and press harder you hear
another. Don’t worry too much about this now but that’s why there are 2 multisample options
per oscillator.
Filters – Typically high pass or low pass (High pass just let high frequencies through) and
resonance accentuates the frequencies around the resonant frequency. Overdoing this will
cause feedback – and a whistling sound will be heard.
Amplifiers – How loud will the sound be and what will the balance be between the two
oscillators 1 and 2.
Envelope Generators – an envelope is a graph whose intensity varies with time. You can make
sounds amplitude build slowly and end quickly or vice versa. You can also apply envelopes to
filters.
Effects – ways of further manipulating the sound such as vibrato, overdrive, leslie speaker etc.
– these will be covered later.
The best way of learning about these controls is literally to play around. Start by adjusting just one
control at a time and observe how it affects the sound.
Tip……A quick way of generating new sounds is to press the ‘Random program’ button in the centre of
the PCM edit window – it uses random values to move various controls, you never know what you will end
up with and its great fun ! This feature is only found on the T.C. software.
Program Edit Mode
The are many different parameters which the user can edit to change the sound of a program. All of
these except the effects can be accessed from this mode. So exactly how do you create a sound from
scratch ? The colours in the steps below are the same as used withing the T.C. programs flow charts.
1
The first step is to decide what type of sound you want to create as you will need to select a
multi sample whose wave form is similar to the sound you want. The samples wave form shape
defines the ‘timbre’ or character of the sound. That is partly what distinguishes a violin from a
trumpet. The shape will change with time and volume in a real instrument and in you can make
this happen on the Triton as well to improve realism. The T.C. enables the user to search over
400 wave forms by name. The name of the multi sample normally gives the clue as to its timbre.
3 cycles of a Piano waveform showing that it is not a pure sine wave but comprises various
harmonics.
To do this goto PCM Edit / MultiSample/Drum Sample edit button in the middle left of the
form. You can search by type of instrument or by name. You can assign 2 oscillators per note
and also change from 1 oscillator to another across the range of the keyboard ! Select
Multisample 0 – Piano for Osc 1 Hi & Lo and Piano M1 for Osc 2 Hi & Lo.
See how a real Flutes waveform varies with volume !
2
The next step involves adjusting the filters – normally cutoff and resonance to fine tune the
sound. You can get the filters to vary with time or other parameters – but that’s for later under Filter Envelope controls.
3
Finally adjust the Osc 1 and 2 Amplifier envelope. This changes how the sounds volume varies
with time and is crucial in simulating an instrument. A trumpet may builds slowly and might
decay immediately. Where as a piano always has a very quick attack (short attack time) and
slow decay (long decay time) see graph below. Press the Amp/EG button to edit the amplifier
envelope and try to make it look a bit like the graph below by following the highest points or
envelope of the graph. Adjust the sliders accordingly – you can simulate the curve but it will not
be identical – in fact every note on a real piano will be different !
A Piano attack and decay curve – The rise of the note is much quicker than the decay. The low
frequency ‘waveyness’ is caused by mis-tuning (beat frequencies) between the strings for the
particular note.
4
The next step is normally to add some effects – Say reverb, Master Effect 52. Goto Effect
tab, select Master Effect 1 and select effect number 52 – Reverb Hall. Make sure the tick box
is ticked so that the effect is switched on !
Now try the sound – Listen carefully and see if you can hear the difference between what you want and
what you have produced on the synth. Practice makes perfect and there is no substitution for good old
trial and error using some informed judgement.
NB. This is a simple example but illustrates the main steps in multi sample sound synthesis. The next
step is to start understanding all of those parameters available to the user. The sections below are
colour coded as the Triton Controller boxes in PCM Edit flow diag. Further information is available in
the parameter Manual which comes with the synth.
P.C.M. PARAMETERS IN DETAIL
PCM EDIT – OSCILLATOR 1 AND 2 PARAMETERS
This section takes a tour around Program Edit Mode - Osc 1 / Osc 2 boxes on the Triton
Controller. I have noted where a particular feature is not found on a particular model.
MultiSample Selection
Multisamples are stored in permanent memory, both internally in the synth and ‘externally’ on
the optional Expansion Boards, as well as samples the user creates using the sampling facility of
the Triton Classic and Triton Studio *.
So first select the source of the sample. 0 are the internal multisamples (Default value) , 1 is
RAM user samples * and 2-9 are the optional Expansion boards – if loaded in the synth.
Then select a multi sample number – The Triton Classic for instance has 425 to choose from.
Tip. An easier way of doing this is to use the Multi Sample/Drum Sample data button in the
middle left of the window. This lists by name the samples and you can search and sort by
name/type.
Press ‘Enter Multisample No.’ button to send instruction to the synth to load the sample.
Reverse & Start Offset
Reverse makes the sample waveform play in reverse – ie. A mirror image from left to right.
Original Sawtooth Waveform.
Reversed Sawtooth Waveform
The Start Offset specifies the point the multi sample begins sounding – This parameter has no
effect on some samples.
Level
This controls the volume or amplitude of the multisample. From 0 to 100%.
Random
A feature not found on the Triton – this randomises various parameters to generate totally new
sounds automatically. Every time you press the button a new sound will be generated. Press a
key each time you press the random button in order to hear it !
Delay
This defines the length of time before a multi sample sounds in milli seconds (1/1000 sec). So
when you press a key on the synth the multisample will not play until the delay time has expired.
Tune
This does what it says on the box – allows fine tuning of the sample in cents. 100 Cents are an
octave.
Tranpose & Octave
Transpose shifts the pitch of a sample up or down by a semitone. Octave shifts the sample up
or down by an octave.
Portamento
This is a classic old synth effect. When you press two different notes, on after another, the
pitch ‘glides’ between them rather than jump. Click the enable button and vary the time to hear
the effect. Finger means that if unchecked portamento is always applied. Checked means that
portamento is only applied if you play legato – that is press the next key before releasing the
previous one.
Velocity Switch
This enables you to go from Osc1 Hi to Osc1 Lo depending on how fast you hit a key. Remember
that real instruments timbre often change with volume. Play with the 3 sliders after selecting 2
totally different multisamples for Osc 1 Hi and Osc 1 Lo. Now hit the synths keys at different
speeds to hear the effect !
PCM EDIT – COMMON PARAMETERS
This section takes a tour around Common parameters. Those controls which affect both Osc 1
/ Osc 2.
Oscillator Mode
This determines whether a sound can use Osc 1 alone or both Osc 1 and 2 sound giving a richer
tone. The Drum option enables the Drum multisamples of which there are another 413 on the
Triton Classic and can be accessed on another T.C. window. Drum Kit edit.
Voice Assign
Determines whether the synth can sound monophonically – 1 note at a time, or polyphonically
(ability to play chords) – upto 64 notes at a time.
The hold feature holds the note even after you release the key.
Legato holds the note on until another note is played.
Priority determines what happens when the polyphonic limit is met – will the highest note get
priority, Lowest note or last note played.
Single Trigger – In polyphonic mode stops repeated notes overlapping. The advantage is that
you do not run out of different notes so quick.
Scale Type
Western Music normally uses an equal temperament scale for where each note is a the 12th
root of 2 in proportion to its neighbour. That is a constant relationship. But musicians from
other areas will want to use scales typical for their traditional music, such as pelog for
Indonesian forms. On the Triton you can even design your own scale should you so wish.
Key defines if C on the keyboard plays C, C#, D etc.
Random scale varies the pitch when a note is sounded. Bigger the value bigger the variance.
Pitch \Envelope Generator
Using this button opens another window full of controls. Here is where you can vary the pitch
of an oscillator with time.
Low Frequency Oscillators LFO Pulse Code Modulation PCM
L.F.O.’s have been around since the early days of synths and are just another oscillator which
runs at a low frequency, often too low to hear. LFO’s can control vibrato, tremolo and many
other cyclic effects.
Osc 1 & 2 Filters
The next major group of controls are the filters. One group for each of the 2 oscillators. Filters
change the timbre of the sound by either removing harmonics or accentuating them. Basically
changing the original waveform. If you strip out all the harmonics in a wave you will eventually end
up with a sine wave. Below is a simple analog Voltage Controlled Filter module filtering a square
wave into something different. This is the type of module in a old Korg MS10 synth, which has
now been replaced by digital circuitry in the Triton. But the effect is the same !
Cut Off Frequency and Resonance
These are two classic filters found on almost all synths. Basically cut off frequency defines the
frequency at which frequencies either higher or lower than it are attenuated. So if you cut off
frequencies higher than the fundamental frequency you will eventually end up with a sine wave as
the harmonics are removed. Stripping out lower frequencies leaves the harmonics, reduces the
fundamental frequency leaving a brighter sound.
Resonance accentuates frequency components around the resonant frequency and if applied at
the cut off frequency can yield a squeel if applied too much. Play with both sliders to see the
effect they have on the multi samples. The horizontal resonance slider determines the amount of
resonance.
Below you can see the effect of centering the resonant frequency around the cutoff frequency.
Amplitude is the vertical axis and frequency is the horizontal axis.
Radio Buttons LPF +Res and LPF + HPF
Low Pass Filter + Resonance – sets the cut off frequency to attenuate frequencies higher than
the cut off frequency.
Low pass filter + high pass filter yields a band pass filter. So only frequencies around the cut off
frequency remain un attenuated.
Controlling Cut off and Resonance with other sources.
You can make the cut off frequency vary with time by using the drop down box and assigning an
envelope to it, or linking it to a Low Frequency Oscillator or joy stick or any of the other sources
in the list.
Random
Another control not found on the Triton or Karma. This randomises parameters for both
oscillators and filters and automatically generates new sounds.
Filter /E.G.
This opens a sub window and allows an envelope to be defined for the filters and many different
types of Alternate Modulation Sources A.M.S.
Osc. 1 & 2 Amp Output
This is the amplifier section which controls the loudness of both oscillators. The level is just
like the volume control on your hi-fi.
Pan is the balance between stereo channel left and right. Slide it up and down to hear the sound
on the synth move from left to right.
Send to Master Effect 1 and 2 is the level of the signal sent to the master effects and then
blended with the original sound.
A.M.S.
Allows the user to choose what source of modulation can control the amplitude of the signal.
Applying a low frequency oscillator to the signal will create a tremolo effect.
A.M.S. pan is the balance between the signal sent to the left and right stereo channel.
Amplifier Envelope Generator
This opens a sub window and allows an envelope to be defined for the amplifiers and many
different types of Alternate Modulation Sources A.M.S.
Effects
Although all the effect parameters are contained on another window of the T.C., you can set the
routing of the signal after the amplifiers, to any of the L/R (normal stereo), Internal Effects,
Master Effects, Outputs 1 to 4 etc. using the drop down box.
Sysex Manual Entry
This is for the advanced user, familiar with midi system exclusive. Notice how the values change
when you press any button in this window – you can see the decimal midi commands which are
being sent to the synth. (In fact the synth actually receives bytes not decimal data). You can
input decimal values to control parameters directly. This is not advised to be used unless you
are familiar with midi definition for the synth. Although it will normally do no harm you may get
unexpected results.
Audition Sound Using PC keyboard
For those who do not have the PC close to the synth, you can play the Triton in a fashion on the
PC keyboard. It is also polyphonic depending on the quality of the PC’s keyboard buffer. This
feature is useful when you are using the T.C. program and editing sounds and don’t want to
continually move from PC to synth.
Press the button and then any PC keyboard key Z-M or Q-U which is an octave higher.
Load PCG File
If you have opened a PCG file in the librarian and selected a program and then pressed ‘Turn to
Hex’ yellow button on the PCG window, you can view all of the parameters making that program.
Just click ‘Load PCG’. You will see all of the sliders, check boxes etc. move to their actual
positions used in the PCM program when you do this.
Tip…If you need further ‘Help’ there is a button at the top left of the window which will take you
straight to the program documentation.
That’s it for PCM edit mode – now the best way of learning is to play around with the settings. You can
do no harm, just keep the volume low on your speakers just in case a new sound turns out to be rather
LOUD !
So What is Moss ?
The Moss board is a user installable synth in its own right and is an optional extra. MOSS stands for
Multi Oscillator Synthesis System. It is a circuit board which can be inserted into the Triton Classic,
Studio, Rack and Karma and uses physical modelling tone generator using Sondius XG technology
developed at the University of Berkley, California. Its different to multisample synthesis as it does
not contain any samples but generates waveforms similar to musical instruments such as trumpets or
electric pianos. It has many different parameters which the user can vary to change elements such as
the lip character and bell character for Brass models. Its really another synthesizer in its own right
and can be combined with the multisamples and have the Triton effects applied to it as well. Moss is
great for lead sounds as it has limited polyphony – ie. Only 6 notes can sound at once. The Moss
generator starts with a voice, eg. Electric piano and the user can then apply envelope generators, Low
frequency oscillators, controls and finally effects. The Korg Z1 synthersizer used Moss exclusively,
although you had 12 voice polyphony expandable up to 18 voices.
MOSS PARAMETERS IN DETAIL
OSCILLATOR 1 AND 2 PARAMETERS
This section takes a tour around Moss - Osc 1 / Osc 2 boxes on the Triton Controller (Moss
Section).
You can use 2 Oscillators on the Moss Board and each oscillator can be set to generate 13
different waveform algorithms. You first pick the oscillator type you need. They are:1.
2.
3.
4.
5.
6.
7.
8.
9.
10.
11.
12.
13.
Standard – Simulates the oscillator of a classic analog synthesizer such as a MOOG or
Korg MS10.
Comb Filter – Produces ‘noisy’ sounds, synth basses and string simulations.
VPM – Variable Phase Modulation – Generates harmonics and has a wave shaping table.
Resonance – Utilises filter approach to generate resonance. Good for creating mallet
and pad sounds
Ring Modulation – Classic feature of early synths produced when the difference
between two oscillators is fed to an output. Produces rich overtone structure in a wave
and great for metallic sounds.
Cross Modulation – Similar to above
Sync Modulation – Similar to above
Organ Model – Simulates a Hammond organ with 3 drawbars but each drawbar can
produce waves other than just sine waves.
Electric Piano Model – Simulates a warm electric piano such as a Fender Rhodes.
Brass – Double Osc so you can only use 1 Osc at once. Simulates instruments like a
Trumpet or Trombone.
Reed – Simulates woodwind instruments such as a flute or sax.
Plucked String – Simulates bass or guitar.
Bowed String – Simulates a violin or cello.
Tip…The EXB-Moss user manual which comes with the board contains a wealth of
information and should be studied in detail in order to get the most out of the Moss board.
What follows is hopefully written in laymans terms.
Each Oscillator has a multitude of individual controls and these can be accessed by clicking on
the ‘More’ button on the T.C.
Octave – You can set the frequency of each oscillator to 4’,8’,16’ and 32’. ie. The Octave.
‘Random’ button produces a random selection of the 2 oscillators, sub oscillator and noise
generator. Not on the Moss board but part of T.C. program - great for quickly creating new
sounds.
Osc. 1 and 2 Parameters
Like PCM Edit mode controls a series of parameters which are common to both oscillators.
The main features most people will need are portamento and Frequency offset. The latter is
useful, as if you detune 1 oscillator from the other you can get a richer sound.
Sub Oscillator
No synth would be complete with a Low frequency or Sub Oscillator. Useful for all types of
modulation and sound generation in its own right if the output frequency is over 40 hertz.
Sub Oscillator Waveform enables a choice between sine, square , triangle and saw.
Sine
Square
Triangle
Saw
Click on the links above to hear the sound.
It is also possible to tune and transpose the frequency by cents and semitones and Octaves as
well. The Alternate Modulation controls enable the LFO to be controlled by other sources such as
the joy stick etc. These are less frequently used controls.
Noise Generator – Again a classic sound module in analog synths. Noise is purely random sound,
like the sound when you purse your lips and blow – a whoosing sound. On older analog synths,
the noise was specified as White, Pink etc. Generally all being noise, but filtered at different
frequencies. The first drop down box gives the user choice on how the noise is filtered,
whether a LPF or HPF is used. The sliders control the frequency, trim and resonance applied
to the filters. Again AMS can be applied to the noise.
Mixer Section – This controls the level of the individual oscillators/noise generators fed to
both right and left stereo channel. Feedback is where the output after the amplifiers are fed
back to the mixer. Too big a signal will result in uncontrolled feedback and squeeling. Each
channel at the mixer can be controlled by AMS / intensity of AMS. If you want to switch off
a generator just slide the slider to 0.
Filter 1 and 2 /AMS
This is a very similar array of controls to the PCM Edit mode. You can additionally specify a
dual band pass filter which enables accentuation at 2 not just 1 frequency.
Amp 1 and 2 is again very similar to the same section in PCM Edit mode.
P.C.G. FILES AND THE P.C.G. READER
P.C.G. files are simply Korgs way of storing all of the settings for a Program, Moss program,
Combination, Drumkit or Arpeggio in a file which can be stored on a PC or the synth. Each parameter
which comprises say a Program has its own unique position in the file and the parameters value is
recorded at that location. It is possible to read the file on a PC and send the individual parameters
value via a MIDI system exclusive message to the synth to change that parameter. Typically a
parameter will have an identifier, 2 hex characters and a value. The parameter will always be in the
same relative position in the PCG file. (See Korgs midi implementation for your particular synth).
The PCG reader in the TC is able to read the binary which the PCG file is written in and extract
individual programs, combinations etc. It can then send the file complete to the synth to change the
program etc. in its buffer or load the program into the TC and preset the controls. The user can the
see the settings an individual program comprises. It also does many things the synth cannot do such as
auto audition or merge PCG files to create brand new sounds. In fact the PCG reader is the most
complex part of the program which I developed but is probably the most fascinating. What has been
tricky has been to allow for the different synths , each of which have a slightly different midi
implementation. What is important is that if the TC is set to say a triton Studio, you can only read
native Triton Studio PCG files with it. The way to create one of these native files is to save the PCG
onto floppy disc in your synth. That ensures that it is the correct format. Most PCG files on the web
can be uses but make sure the format is correct for your model, otherwise you will have to load into
your synth and save to disc before loading into the TC. If the format is wrong you will see a strange
listing in the right hand box.
To Load a PCG file into the T.C.
Firstly select the PCG Reader from the top menu.
1..Then goto Librarian menu - open PCG. Choose a native format PCG as appropriate for your
synth . See the utilities section of my website for an example of a Karma OS 2 PCG... You can
generate you own native PCG files yourself by saving any complete pcg on the synth to floppy
disc and then transferring into the PC. LE users will need a memory card reader.
2..Press enable select buttons then ‘Select programs' to pick out the program data in the PCG.
If the pcg does not contain program data – you will get a ‘search string not found’ message pop
up.
3..Press list programs to see them listed by name in the PROGRAM LIST BOX right hand side.
Here you can sort, search etc.
4..Click on the individual program or enter a number to load a single program. In the full
licensed version this will send the program settings to the synths buffer via midi. You can then
play the synth hearing the program you selected on the PC !
The same procedure works for combinations, moss, drum kits etc...
Tip…If you have any problems please read the detailed instructions and feel free to e-mail me as I
will be happy to help.