1
VK-64_SetGuide_US.book
i ページ
2009年3月4日 水曜日 午後3時19分
Network Video Recorder
VK-64/VK-16/VK-Lite
Setup Guide
C
Y
P
O
Ver. 2.1
VK-64_SetGuide_US.book
ii ページ
2009年3月4日 水曜日 午後3時19分
Introduction
Thank you for purchasing Network Video Recorder VK-64 v2.1/VK-16 v2.1 (hereafter referred to as VK-64/
VK-16), or VK-Lite v2.1 (hereafter referred to as VK-Lite). VK-64/VK-16 and VK-Lite are software for recording
and monitoring video via a network, and includes storage server software and viewer software.
Read this guide thoroughly before using the software to build a network camera recording and monitoring
system. Keep this guide in a safe location for future reference.
To Customers
1. All rights reserved.
2. The contents of this guide are subject to change without any notice.
3. All possible measures have been taken to ensure that the contents of this guide are accurate. If you
find any errors, please contact us.
4. Irrespective of the above items 2. and 3., Canon bears no responsibility for any loss or damage
resulting from operation.
To Customers (Disclaimer)
Y
P
O
Software defect may cause an error in recording and damage or loss of recorded data. Canon bears no
responsibility for any loss or damage resulting from operation.
Support Information
For updated product software (patch installer), user's manuals, operating environment, and other
support information, please see the Canon Web site.
Copyright
C
Please note that the copyright laws prohibit any use or publication of recorded videos and still images
for any purpose other than personal requirements, without permission from the copyright holder.
Trademark Notice
z Canon and the Canon logo are registered trademarks of Canon Inc.
z Microsoft Windows and Microsoft Internet Explorer are trademarks of Microsoft Corporation in the
United States and other countries.
z Windows is legally recognized as Microsoft Windows Operating System.
z All other company names or product names used in this guide are trademarks or registered
trademarks of their respective holders.
ii
Introduction
MPEG-4
NOTICE ABOUT THE MPEG-4 VISUAL STANDARD: THIS PRODUCT IS LICENSED UNDER THE
MPEG-4 VISUAL PATENT PORTFOLIO LICENSE FOR THE PERSONAL AND NON-COMMERCIAL USE
OF A CONSUMER TO (i) ENCODING VIDEO IN COMPLIANCE WITH THE MPEG-4 VISUAL STANDARD
("MPEG-4 VIDEO") AND/OR (ii) DECODING MPEG-4 VIDEO THAT WAS ENCODED BY A CONSUMER
ENGAGED IN A PERSONAL AND NON-COMMERCIAL ACTIVITY. NO LICENSE IS GRANTED OR
SHALL BE IMPLIED FOR ANY OTHER USE. ADDITIONAL INFORMATION INCLUDING THAT RELATING
TO PROMOTIONAL, INTERNAL AND COMMERCIAL USES AND ADDITIONAL LICENSING MAY BE
OBTAINED FROM MPEG LA, LLC. SEE HTTP://WWW.MPEGLA.COM.
This product is licensed under AT&T patents for the MPEG-4 standard and may be used for encoding
MPEG-4 compliant video and/or decoding MPEG-4 compliant video that was encoded only (1) for a
personal and non-commercial purpose or (2) by a video provider licensed under the AT&T patents to
provide MPEG-4 compliant video. No license is granted or implied for any other use for MPEG-4
standard.
Third Party's Software
Y
P
O
This product contains third party's software modules. For the license conditions, please see the
LICENSE folder on the supplied Setup CD-ROM.
Software
License
License Agreement
Apache
Apache Software License, Version 1.1
Apache
FastCGI
Open Market License
FastCGI
Expat
MIT License
Expat
C
iii
VK-64_SetGuide_US.book
iv ページ
2009年3月4日 水曜日 午後3時19分
Contents
Introduction ................................................................................................................................ ii
About This Guide ....................................................................................................................... v
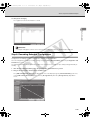
System Operation Overview ..................................................................................................... vi
Overview of VK-64/VK-16 .........................................................................................................................vi
Specification Comparison of VK-64/VK-16 and VK-Lite ...........................................................viii
System Configuration Examples ............................................................................................... ix
Important: Before Starting Operation ........................................................................................ xi
Chapter 1
VK-64/VK-16 Installation
Setup Procedure .....................................................................................................................1-2
Chapter 2
Y
P
O
VK-Lite Installation
VK-Lite System Installation Example ......................................................................................2-2
Step 1: Preparation ............................................................................................................................... 2-3
Step 2: Camera Server Installation and Setup ...................................................................................... 2-3
Step 3: Installation ................................................................................................................................. 2-4
Step 4: Storage Server Configuration ................................................................................................... 2-5
Step 5: Camera Server Registration ...................................................................................................... 2-8
Step 6: Recording Schedule Configuration ........................................................................................ 2-11
Step 7: Viewer Settings ....................................................................................................................... 2-13
Step 8: Management and Maintenance .............................................................................................. 2-15
C
iv
VK-64_SetGuide_US.book
v ページ
2009年3月4日 水曜日 午後3時19分
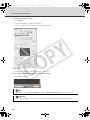
About This Guide
This guide is intended for the following users.
• System administrators who install and manage VK-64/VK-16
• System administrators who install and manage VK-Lite
This guide first explains what you should know before operating a network camera monitoring system, and
differences between VK-64/VK-16 and VK-Lite.
"VK-64/VK-16 Installation" describes the process from preparation for installation to system administration, and
also provides references to each step's detailed explanations in the Administrator’s Manual.
"VK-Lite Installation" describes the basic steps for preparation for installation and operation.
First, read this guide up to "Specification Comparison of VK-64/VK-16 and VK-Lite".
And then, read "VK-64/VK-16 Installation" or "VK-Lite Installation" depending on the software you use.
Icons used in this guide
Y
P
O
The following icons are used in this guide to indicate descriptions that you should read in particular.
Icon
Explanation
Note
Contains notes and operational limitations. Read these notes carefully.
Tip
Contains supplementary explanations and reference information for the operation.
Reference
Shows the relevant page in other manuals that explains more details. Read these as
necessary.
Note
C
It is recommended to read "VK-Lite Installation" even when installing VK-64/VK-16, as an example of simple
configuration with 4 camera servers.
v
VK-64_SetGuide_US.book
vi ページ
2009年3月4日 水曜日 午後3時19分
System Operation Overview
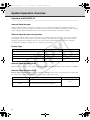
Overview of VK-64/VK-16
Network Video Recorder
Network Video Recorder is software for viewing video, recording video and audio, and playing video from
multiple network cameras (hereafter referred to as camera servers). VK-64/VK-16 and VK-Lite enable viewing
and recording of JPEG and MPEG-4 video, two-way audio communication, and audio recording.
Network Video Recorder Configuration
The Network Video Recorder consists of storage server software and viewer software. You can record videos
from multiple camera servers and can log event information of motion detection and external device input,
using the storage server software. Also you can view live videos from multiple camera servers, and play
recorded videos saved on storage servers, using the viewer software.
Product Type
Product Name
Network Video Recorder VK-64 v2.1
Network Video Recorder VK-16 v2.1
Network Video Recorder VK-64 v2.1 Viewer
Y
P
O
Storage Server
Viewer
1 license
1 license
1 license
1 license
-
1 license
-
5 licenses
Network Video Recorder VK-16 v2.1 5 Viewers
C
Network Video Recorder VK-64
Up to 64 camera servers can be registered to Network Video Recorder VK-64 (hereafter referred to as VK-64).
Network Video Recorder VK-16
Network Video Recorder VK-16 (hereafter referred to as VK-16) has the same core functionalities as VK-64, but
the maximum of number of camera servers, which can be registered to, is 16.
Type
VK-64
VK-16
vi
Storage Server
Viewer
Up to 64 camera servers can be registered.
Up to 16 camera servers can be registered.
All other functions are the same as VK-64.
Same
VK-64_SetGuide_US.book
vii ページ
2009年3月4日 水曜日 午後3時19分
System Operation Overview
VK-64 Viewer (Viewer Only)
You need to purchase the required number of viewer licenses to use additional viewers. Also, VK-64 Viewer is
suitable for a monitoring system, in which you need just monitoring, not recording. You can view live videos
from and control up to 64 camera severs. (Some functions are not available, such as recording and playing
video, displaying event logs of motion detection and external device input, and still frames.)
Upgrade from Older Versions
To upgrade from an older version (v1.1, v1.2, v1.3, v1.4 or v2.0) to v2.1, download the free patch installer from
our website. License keys used for the older versions can also be used for v2.1.
Network Video Recorder VK-Lite
Network Video Recorder VK-Lite supplied with VB-C500D and VB-C60 is a simplified version software of
VK-64/VK-16. VK-Lite allows displaying video, recording video and audio, and playing audio, of up to 4 camera
servers.
Y
P
O
A VK-Lite Viewer license is given per camera server. When using multiple camera servers, you need to buy
additional licenses ("VK-Lite Additional Viewer License") for each camera.
C
vii
VK-64_SetGuide_US.book
viii ページ
2009年3月4日 水曜日 午後3時19分
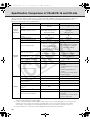
Specification Comparison of VK-64/VK-16 and VK-Lite
VK-Lite is Network Video Recorder which is supplied with VB-C500D and VB-C60. Although VK-Lite basically
provides the same functionalities as VK-64/VK-16, there are some functional limitations as follows, since
VK-Lite is a simplified version of VK-64/VK-16.
Type
Main functional limitations
Max. number of camera
servers
Camera
Available camera servers
server
connection
Automatic camera server
search
Recording format
Max. recording frame rate
Video recording mode
Max. file size setting
Storage
Server
Max. retained history of
recorded video
Audio recording / playback
VK-Lite v2.1
64 / 16
4
VB-C500D, VB-C60,
VB-C300, VB-C50 series,
VB-C10/R, VB150
VB-C500D, VB-C60,
VB-C300,
VB-C50 series
✔
✔
JPEG, MPEG-4
JPEG only
30 fps*1
5 fps *1
Normal Schedule recording
(Continuous recording, Sensor
event recording, Motion
detection recording)
Special Day Schedule
recording Manual recording
Normal Schedule recording
(Continuous recording)
Manual recording
Available
32~1024MB, 1~24 hours
Fixed
1GB/day (1024MB)
999 weeks*1
12 weeks (90 days)
✔
✔
Y
P
O
✔
–
–
Following functions are
unavailable.
z Sending mail when an event
occurs
z Customizing priorities of
events
z Connection via HTTP proxy
z Remote trigger
JPEG, MPEG-4
JPEG, MPEG-4
30 fps*1
30 fps*1
Unlimited*1
8 or less is recommended.
Two-way audio
✔
✔
Registration of multiple storage
servers*2
✔
–
Layout Sequences*3
✔
–
Recording to NAS servers
C
Other functional limitations
Live video format
Max. displaying frame rate
Max. number of video windows
on the viewer
Viewer
VK-64/VK-16 v2.1
Other functional limitations
–
Following function is
unavailable.
z Connection via HTTP proxy
z Viewer control API
*1 Operational limits apply depending on the number of camera servers, the PC performance and hard disk
capacity, and the amount of network traffic.
*2 In case of using VK-64/VK-16 with multiple storage servers, you can unify management of camera servers
registered to each storage server and the recorded data, if you set one master storage server. When
connecting to each storage server using VK-Lite Viewer, you need to switch connection one by one.
*3 Layout Sequences is a function to switch displayed viewer windows at set intervals.
viii
VK-64_SetGuide_US.book
ix ページ
2009年3月4日 水曜日 午後3時19分
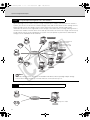
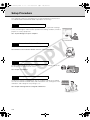
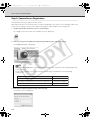
System Configuration Examples
A combination of storage servers and viewers enables various types of system configurations, such as a
simple system with one PC and one camera server, or a system using multiple PCs and camera servers.
Case1
Viewing and Recording on a Single PC
You can configure a system with one PC as both a storage server and a viewer.
Network
Y
P
O
Storage Server
Records video
Viewer
Displays live video and recorded video
Case2
Using One PC as a Storage Server and Another as a Viewer
This configuration is recommended for a system with multiple camera servers.
C
Network
Storage Server
Records video
Viewer
Displays live video and recorded video
ix
VK-64_SetGuide_US.book
x ページ
2009年3月4日 水曜日 午後3時19分
System Configuration Examples
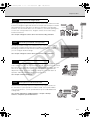
Case3
Using Multiple Storage Servers and Viewers
Up to 10 storage servers can be used on a single network. When multiple camera servers are used in a
system, you can use one of them as a master storage server, and use the others as slave storage servers.
Master storage servers are storage servers, which viewers first connect to, and are used to store
information of camera servers registered to each storage server and to store event logs. Although there is
no limit on the number of viewers to be connected, up to 10 clients can connect to a single server.In all, up
to 192 camera servers can be operated in one system. You can operate a system with a combination of
storage servers and VK-64, VK-16 or VK-Lite.
Slave Storage Server
Stores information of
camera servers
registered to each
storage server and
event logs
Y
P
O
Master Storage Server
Network
Slave Storage Server
Note
C
Viewer
Viewer
The master storage server function is not available with VK-Lite. When operating multiple storage
servers with a VK-Lite Viewer, you need to switch the connection one by one.
Case4
Using Viewer Only
You can also use the viewer only.
Network
Displays live video
Viewer
x
VK-64_SetGuide_US.book
xi ページ
2009年3月4日 水曜日 午後3時19分
Important: Before Starting Operation
Please be sure to perform operational tests in the actual environment before starting operation.
Be aware of the following points prior to operation.
z Video recording and live viewing may not be done as your settings, depending on the network environment
and the PC's performance.
z Under a heavy load on the CPU or disk of the PC, the recording may not be done at the specified frame rate,
recording may be suspended temporarily, or you may receive slow responses to the viewer operation. Also,
when the amount of free disk space become slow, recording may be suspended temporarily, because the
disk load increases due to deleting process of recorded video files.
z Operation and performance of storage servers and viewers may be affected on PCs, where anti-virus
software or firewall software is running.
z When using a proxy server, video recording may not be done at the specified frame rate, or live viewing may
become interrupted. Also, communication between a storage server and viewer may be interrupted. In those
cases, audio cannot be recorded.
Reference
Y
P
O
Details on proxy server in Administrator’s Manual ("How to set the Settings Tab", "Launch Storage
Server by Specifying the IP address")
z Please be sure to read the following reference page for notes on each version of Windows OS.
Reference
"Notes on Operating Environment" in Administrator’s Manual
z When using a NAS server, take note of the following points.
C
• Use recommended NAS servers with Windows Storage Server 2003 or Windows Storage Server 2003
R2.
• To record video to a NAS server, it is recommended that the network for communicating with a
camera server be separated from the network for communication with the NAS server.
z When using audio functions, take note of the following points.
Audio functions are available on VB-C500D, VB-C60, VB-C300, VB-C50i, VB-C50iR, VB-C50FSi.
• Audio can be sent and received using VK Viewer.
• Audio recording is available. However, it is not possible to record audio without video. Video and
audio must be recorded together.
• Video and audio may be asynchronous.
• Audio data may be interrupted depending on the PC's performance and the network environment.
• Audio data may be interrupted on the PC, where antivirus software is running.
• Audio functions cannot be used via a proxy server.
xi
VK-64_SetGuide_US.book
xii ページ
2009年3月4日 水曜日 午後3時19分
Important: Before Starting Operation
C
xii
Y
P
O
VK-64_SetGuide_US.book
1 ページ
2009年3月4日 水曜日 午後3時19分
Y
P
O
VK-64/VK-16 Installation
C
Setup Procedure
VK-64_SetGuide_US.book
2 ページ
2009年3月4日 水曜日 午後3時19分
Setup Procedure
This chapter describes the installation process from preparation to maintenance.
See Administrator’s Manual for detailed explanations of each step.
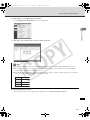
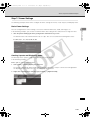
Step1
Preparation
Before installation, check the free space of the hard drive required for a storage
server, considering the video retention period and recording conditions, and then
prepare necessary equipments.
See "System Design Concept" in Chapter1
Step2
Camera Installation and Setup
Set up a camera.
Y
P
O
See Camera's user's manual for details on how to connect the camera.
Step3
Installation
C
Install the VK-64/VK-16 storage server software and viewer software onto the PC
for storage server and the PC for viewer.
See "Chapter 2 Installation"
Step4
Storage Server Configuration
Configure the storage server settings. You can configure settings for recording
such as the maximum retained history and maximum file size, settings for event
notification, and settings for user privileges, etc.
See "Chapter 3 Storage Server Configuration Reference"
1-2
Maximum retained history
Event notification
User privileges
VK-64_SetGuide_US.book
3 ページ
2009年3月4日 水曜日 午後3時19分
Setup Procedure
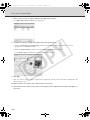
Step5
Camera Server Registration
1
Location
Tokyo branch
Zones
See "Chapter 4 Register Camera Server and Set Recording Schedule"
Sales floor
Step6
Cash desk
Parking lot
Recording Schedule Configuration
Y
P
O
Recording schedule settings are available for each camera server, such as
continuous recording, motion detection recording, sensor event recording.
Recording schedules include normal schedule and special day schedule, so
you can configure detailed settings.
See "Chapter 4 Register Camera Server and Set Recording Schedule"
Step7
Viewer Settings
C
You can customize your monitoring screen by designing and registering layouts
of the viewing area. You can register multiple layouts and switch them at a fixed
time interval, so it is possible to build large-scale monitoring systems. You can
also set an upper limit on the viewing frame rate and configure automatic
adjustment settings, as well as configure settings for event notifications to
operators and audio alert depending on the priority level.
Layout design and registration
Viewing frame rate
Rate upper limit
Automatic adjustment settings
See "Chapter 5 Viewer Reference"
Step8
Management and Maintenance
Network failure caused by unforeseen problems may negatively affect on
the surveillance system operation. In order to avoid, it is recommended to
carry out maintenance, such as periodical back up of recorded data and
settings data.
See "Chapter 6 Operation and Management", "Chapter 7 Backup
Scheme", "Chapter 8 System Maintenance"
Recorded video data
Event data
Settings files
1-3
VK-64/VK-16 Installation
When registering a camera, first set the camera's the location and zone to make
it easier to categorize registered cameras. If we look at an example of a retailer
with multiple branches and stores, the branches and stores correspond to
locations. The sub-classification, such as entrances, cash desks, parking lots,
of each store correspond to zones. Register camera servers after setting
locations and zones.
VK-64_SetGuide_US.book
4 ページ
2009年3月4日 水曜日 午後3時19分
Setup Procedure
C
1-4
Y
P
O
VK-64_SetGuide_US.book
1 ページ
2009年3月4日 水曜日 午後3時19分
Y
P
O
VK-Lite Installation
C
System Installation Example
VK-64_SetGuide_US.book
2 ページ
2009年3月4日 水曜日 午後3時19分
VK-Lite System Installation Example
This chapter explains the process from installation to the operational management with an example of a VK-Lite
surveillance system based on the following recording conditions.
Recording Conditions
Number of camera servers
4
Video size
VGA (640 x 480)
Video quality
Standard (Video data size approx. 50KB*1)
Recording frame rate
1 fps
Video retention period
14 days
*1 May vary depending on the camera.
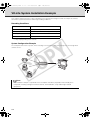
System Configuration Example
Y
P
O
The example below shows a system, where a storage server and a viewer share a single PC connecting with 4
camera servers.
Note
C
Network
This installation example is explained on the assumption that all the preparation have already been
completed, including settings for network cameras, and installation, setup and wiring of related
equipments.
2-2
VK-64_SetGuide_US.book
3 ページ
2009年3月4日 水曜日 午後3時19分
VK-Lite System Installation Example
Step 1: Preparation
Calculate how much free hard disk space will be required for the storage server from the recording conditions
to ensure that the system can operate stably.
The amount of hard disk space required can be calculated using the following formula.
Required free hard disk space
VK-Lite Installation
= No. of cameras x Video data size x Recording frame rate x Video retention period
(sec.)
= 4 x 50 x 1 x (60 x 60 x 24 x 14)
~ 291000000 B
~ 300 GB
Y
P
O
The amount of free hard disk space required is therefore over 300 GB. However, this value does not include the
space required in the system area.
Note
Do not use an external hard drive to store recorded video data. The video may not be recorded properly or
the data may be corrupted.
Reference
"System Design Concept" in Administrator’s Manual
C
Step 2: Camera Server Installation and Setup
Configure initial camera server settings, such as the IP address setting.
See Start Guide for details of initial camera server settings.
Tip
When you use presets and preset tours, it is recommended to complete camera server settings in advance,
so that you can build the system more efficiently.
Reference
Initial camera settings Start Guide
Preset settings "Preset Setting Tool" in Operation Guide
2-3
VK-64_SetGuide_US.book
4 ページ
2009年3月4日 水曜日 午後3時19分
VK-Lite System Installation Example
Step 3: Installation
Install the VK-Lite storage server software on the PC for storage server and the VK-Lite Viewer software on the
PC for viewer, using the CD-ROM supplied with the network camera.
In the following example, VK-Lite storage server and VK-Lite Viewer are installed on a single PC.
Before Installation
The installation drive and the drive for storing recorded video should be formatted in NTFS.
Installation
1. Double-click VKLiteInstall.exe in the VBTools folder on the Setup CD-ROM supplied with VB-C60 or
VB-C500D to start the installation.
2. Click [Next].
Y
P
O
The [Software License Agreement] screen appears. Read the agreement carefully, and then select the
radio button saying [I accept the terms in the license agreement] and click [Next] to continue.
Tip
The License Key entry screen does not appear in VK-Lite installation process.
3. Both of the following applications are displayed.
• Viewer
• Storage Server
C
When you need to install either one of the above, right-click on the application icon, which you will not
install, and choose [This feature will not be available].
4. Click [Next].
A screen for starting the installation is displayed.
Tip
z It is recommended that you do not change the installation directory.
z You can change the installation directory by clicking [Change].
5. Click [Install].
The installation process begins and the progress bar is displayed.
Once the installation has finished, the [InstallShield Wizard Completed] screen is displayed.
2-4
VK-64_SetGuide_US.book
5 ページ
2009年3月4日 水曜日 午後3時19分
VK-Lite System Installation Example
6. Click [Finish].
Now the installation has completed.
Tip
If you are running a system with multiple PCs, you need to install the software on each of the PCs.
VK-Lite Installation
Reference
"Chapter 2 Installation" in Administrator’s Manual
Step 4: Storage Server Configuration
Start up "VK-Lite Storage Server Configuration" for storage server settings.
In the following example we will configure basic settings, such as the maximum retained history, low disk
space warning level, maximum disk space usage, and user management setting. How to set recording
schedule is explained in "Step 6: Recording Schedule Configuration".
Y
P
O
1. Double-click the [VK-Lite Storage Server Configuration v2.1] icon on the Desktop.
The [Login] dialog box is displayed.
C
2. Enter your user name and password, and click [Login].
The [Storage Server Configuration] dialog box is displayed.
Tip
z You need to log on to Windows as a Windows Administrator to configure storage server settings.
z After installation, the following VK-Lite user with administrator privileges is created.
User Name
Password
admin
NVR
z If [User Account Control] is enabled on Windows Vista, the [User Account Control] dialog box will be
displayed. In this case, click [Allow].
2-5
VK-64_SetGuide_US.book
6 ページ
2009年3月4日 水曜日 午後3時19分
VK-Lite System Installation Example
3. Configure the basic storage server settings.
In this example, we use the "Recording Conditions" ( P. 2-2) and the hard disk space calculated in "Step
1: Preparation" ( P. 2-3).
• Set the [Maximum retained history] to 14 days.
• Use the default value of 10% for the [Low disk space warning level] (A value of 10% or more is
recommended).
• Set the [Maximum disk space used] to 300 GB.
C
2-6
Y
P
O
VK-64_SetGuide_US.book
7 ページ
2009年3月4日 水曜日 午後3時19分
VK-Lite System Installation Example
4. If the system is to be used by multiple users, you need to add users using the [User Management] tab.
• Click [Add] and set the user name and password.
• To assign administrative privileges to the user, check the [Administrator] checkbox.
VK-Lite Installation
Note
C
Y
P
O
It is strongly recommended that before operation, you change the user name "admin" and password
created after installation.
Tip
The following operations are available by the administrator only.
• Configuring, registering, and changing camera servers
• Configuring and changing recording schedules
5. Click [Apply].
The changes are saved.
Reference
"Chapter 3 Storage Server Configuration Reference" in Administrator’s Manual
2-7
VK-64_SetGuide_US.book
8 ページ
2009年3月4日 水曜日 午後3時19分
VK-Lite System Installation Example
Step 5: Camera Server Registration
Start up VK-Lite Viewer to register camera servers.
When VK-Lite Viewer is run for the first time, no video is displayed in the viewer screen. To display video in the
viewer screen, register a camera server and then arrange the video window on the viewing area.
1. Double-click the [VK-Lite Viewer v2.1] icon on the Desktop.
The storage server connection menu (startup screen) is displayed.
2. Select [localhost] from the [Master Storage Server] pull-down menu, and click [Connect].
The [Login] dialog box is displayed.
Tip
C
Y
P
O
In this example, [localhost] is selected because a storage server and viewer are installed and operate
on the same PC.
For the master storage server, select one from the following, considering the actual operating
environment.
Operating Environment
The storage server and viewer are running on the same PC
localhost
The storage server and viewer are running on different PCs
Specify the IP address
Not record video but view live video
Storage Server not used
3. Enter the [User Name] and [Password], and click [Login].
The Viewer Screen is displayed.
2-8
Selection
VK-64_SetGuide_US.book
9 ページ
2009年3月4日 水曜日 午後3時19分
VK-Lite System Installation Example
4. Select [View] [Configuration] from the menu.
The [Configuration and Preferences] screen is displayed.
VK-Lite Installation
5. Click the [Locations/Zones] tab to create locations and zones.
Tip
C
Y
P
O
z You can set location names to identify each monitoring site, for example "Office Building", "Store", etc.
z You can set zone names for particular places in each Location, such as "Entrance", "Elevator Lobby",
"Inside Store", "Stock Room", "Parking Lot", etc.
z The following example shows a location name and zone names used for a small retail (Only one Location
is set, on the assumption that there is one branch only).
Location
VB Store
Zone 1
Inside Store
Zone 2
Stock Room
Zonw 3
Parking Lot
6. Click [Find Camera Servers].
Camera servers that can be registered are displayed in the [Search Results] dialog box.
2-9
VK-64_SetGuide_US.book
10 ページ
2009年3月4日 水曜日 午後3時19分
VK-Lite System Installation Example
7. Select a camera server to register, and then click [Add Camera Server].
The [Add Camera Server] dialog box is displayed.
8. Configure the following settings in the [Add Camera Server] dialog box.
Y
P
O
• Enter the [User Name] and [Password], and then click [Connect]. Make sure that the live view is
displayed in the [Preview] window.
• Enter the [Camera Name], and select the [Location] and [Zone] of the camera.
• Click [Start Control], and adjust the viewing angle of the camera.
9. Click [OK].
C
Now, the camera server has been registered. The registered camera server information is displayed in the
right list of the screen.
10. Repeat step 6 to 9 to register other camera servers, if necessary.
11. Check that all of the camera servers that you are using have been registered successfully in the right list of
the screen.
2-10
VK-64_SetGuide_US.book
11 ページ
2009年3月4日 水曜日 午後3時19分
VK-Lite System Installation Example
12. Click [Save Changes].
The registered camera information is saved.
VK-Lite Installation
Reference
Y
P
O
"Chapter 4 Register Camera Server and Set Recording Schedule" in Administrator’s Manual
Step 6: Recording Schedule Configuration
Configure the recording schedule settings after camera server registration.
You can configurate recording schedule settings using the [Recording Schedules] tab in the [Configuration and
Preferences] screen.
The following example shows a normal schedule for continuous recording at 1 fps all day through Monday to
Sunday.
C
1. Click the [Recording Schedules] tab in the [Configuration and Preferences] screen.
2. Drag to select the entire camera server schedule area.
The [Add Schedule Item] dialog box is displayed. If it is not displayed, go to [Camera Summary] tub. Then,
in the [Edit Camera Server] dialog box, choose [Storage Server] from the [Storage Server] drop-down
menu.
2-11
VK-64_SetGuide_US.book
12 ページ
2009年3月4日 水曜日 午後3時19分
VK-Lite System Installation Example
3. Configure the following settings.
• Click [All Day].
• Check the Monday to Sunday checkboxes.
• Select "1 fps" from the drop-down list for recording frame rate.
4. Click [OK].
C
Y
P
O
The configured schedule is displayed in the schedule area.
5. Check that the settings are correct and click [Save Schedule].
The schedule is saved.
Tip
You can only select [Normal Schedule] in VK-Lite. [Special Day Schedule] cannot be selected.
Reference
"Chapter 4 Register Camera Server and Set Recording Schedule" in Administrator’s Manual
2-12
VK-64_SetGuide_US.book
13 ページ
2009年3月4日 水曜日 午後3時19分
VK-Lite System Installation Example
Step 7: Viewer Settings
The following example shows how to configure the basic settings for viewer, create a layout, and display video.
Basic Viewer Settings
1. Click the [Viewer Settings] tab in the [Configuration and Preferences] screen.
The default value of the maximum frame rate is "5 fps". You can select from the following frame rates.
0.1, 0.2, 0.5, 1, 2, 5, 10, 15, 20, 25, 30
Y
P
O
Creating Layouts and Displaying Video
The final step in the system configuration process is to create layouts.
In the following example,
z Use grids to arrange video windows
C
1. Select [View] [Viewing Screen] from the menu.
The Viewer is displayed. Video thumbnails of cameras registered in "Step 5: Camera Server Registration"
are displayed in the camera selection area at the top of the viewer.
2. Right-click on Viewing Area and select [Layout Grids] [Alignment Grid].
2-13
VK-Lite Installation
You can configure basic viewer settings, such as the maximum frame rate, audio, still images, etc.
In the following example, just check the maximum frame rate setting for live video, but not change the value.
VK-64_SetGuide_US.book
14 ページ
2009年3月4日 水曜日 午後3時19分
VK-Lite System Installation Example
3. In the Camera Selection Area, drag a thumbnail onto the grid in the Viewing Area.
4. Drag the video window to the position you want to display. When you release the mouse, the size and
position are automatically adjusted to match the layout frame.
Y
P
O
To change the size of video windows, click and drag any corner of the window. When you release the
mouse, the size and position are automatically adjusted to match the layout frame.
C
5. Click and drag other thumbnails onto the Viewing Area and resize the windows. A layout example is shown to
the right.
2-14
VK-64_SetGuide_US.book
15 ページ
2009年3月4日 水曜日 午後3時19分
VK-Lite System Installation Example
6. Right-click on the Viewing Area and select [Save] from the menu.
VK-Lite Installation
Now, the configuration process has been completed.
Tip
z The aforementioned example shows a layout example using [Default Shared Layout] displayed by
default. You can create and save new layouts under any name.
Y
P
O
z Live video quality may be degraded or be difficult to view depending on the video size for
transmission set on the camera server. In those cases, the quality may be improved by changing the
video size for transmission on the camera server or changing the video receiving size using the rightclick menu of video windows.
Reference
"Chapter 5 Viewer Reference" in Administrator’s Manual
Step 8: Management and Maintenance
C
It is recommended to regularly provide the operational management, including backing up of recording and
setting data, and system maintenance, while you are operating the system.
This section explained the basic operations of some VK-Lite functionalities and configuration examples for a
network camera recording and monitoring system. For more detailed information, see Administrator’s Manual
provided on the supplied CD-ROM.
Reference
"Chapter 6 Operation and Management", "Chapter 7 Backup Scheme", and "Chapter 8 System
Maintenance" in Administrator’s Manual
2-15
VK-64_SetGuide_US.book
16 ページ
2009年3月4日 水曜日 午後3時19分
CANON INC.
30-2, Shimomaruko 3-chome, Ohta-ku, Tokyo 146-8501,
Japan
CANON EUROPA N.V.
Bovenkerkerweg 59-61, P.O. Box 2262, 1185 XB
Amstelveen, The Netherlands
CANON U.S.A.,INC.
One Canon Plaza Lake Success, NY 11042-1198 USA
CANON EUROPE LTD.
6 Roundwood Avenue, Stockley Park, Uxbridge Middlesex,
UB11 1JA, United Kingdom
● If you have any questions, call the CANON
U.S.A. Information Center toll-free at
1-800-828-4040 (U.S.A. only)
CANON CANADA INC. NATIONAL HEADQUARTERS
6390 Dixie Road, Mississauga, Ontario L5T 1P7
CANON CANADA INC. MONTRÉAL
8801 Trans Canada Hwy, St. Laurent Québec H4S 1Z6
CANON ITALIA S.p.A.
Via Milano, 8 San Donato M. se-20097 (MI), Italy
Y
P
O
● If you have any questions, call the CANON
CANADA Customer Information Centre
toll-free at 1-800-OK-CANON (652-2666)
(Canada only)
CANON MEXICANA, S. DE R.L.DE C.V.
Boulevard Manuel Avila Camacho, No. 138 PB, Pisos 15,
16 y 17
Col Lomas de Chapultepec C.P. 11000 México, D.F. México
CANON (Schweiz) A.G.
Industriestrasse 12, 8305 Dietlikon, Switzerland
CANON BELGIUM N.V./S.A
Berkenlaan 3, 1831 Diegem (Mechelen), Belgium
CANON GmbH
Zetschegasse 11, A-1230 Wien, Austria
CANON ESPAÑA,S.A.
Avda. de Europa, 6 Alcobendas, 28108 Madrid, Spain
CANON SVENSKA AB
Gustav III:s, Boulevard 26, 169 88 Solna, Sweden
C
CANON HONGKONG CO., LTD.
19/F., The Metropolis Tower, 10 Metropolis Drive, Hunghom,
Kowloon, Hong Kong
CANON AUSTRALIA PTY.LTD.
1 Thomas Holt Drive, North Ryde, Sydney, N.S.W. 2113,
Australia
PUB.YT1-1407-000
CANON (UK) LTD.
Woodhatch, Reigate, Surrey RH2 8BF, United Kingdom
CANON DEUTSCHLAND GmbH
Europark Fichtenhain A 10, 47807 Krefeld, Germany
CANON CANADA INC. CALGARY
2828, 16th Street, N.E, Calgary, Alberta T2E 7K7
CANON SINGAPORE PTE. LTD.
1 HarbourFront Avenue, #04-01, Keppel Bay Tower
Singapore 098632
CANON COMMUNICATION & IMAGE FRANCE
12 Rue De L’lndustrie, 92414 Corbevoie, Cedex, France
CANON NORGE A/S
Hallagerbakken 110, P.O. Box 33, Holmlia, N-1201 Oslo,
Norway
CANON OY
Huopalahdentie 24, P.O. Box 1, FIN-00351 Helsinki, Finland
CANON DANMARK A/S
Knud Hoejgaards Vej 1, DK-2860, Soeborg, Denmark
© CANON INC. 2009