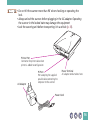
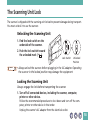
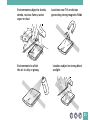
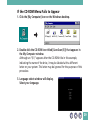
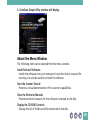
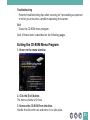
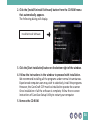
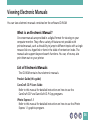
1
CanoScan FB320P/FB620P
Colour Scanner
Product Guide
How to Make Best Use of the Manuals
Printed Manual
Open the
Package
CanoScan FB320P/FB620P
Getting Started
Briefly explains the procedures from setup and software
installation through to scanning. First-time users of this
scanner should definitely read this guide thoroughly.
Want to know how to
achieve better scanning
results, read ...
Electronic Manual
CanoCraft CS-P
Users Guide
Explains how to use the CanoCraft CS-P capture
and editing software and the CanoCraft CS-P
Copy software.
When you have read this guide,
finished setting up the scanner and ...
Want to know more about how
to handle the scanner and the
software CD-ROM, read ...
Electronic Manual
CanoScan FB320P/FB620P
Product Guide
e
uid
G
his
T
Detailed explanation about the scanner and the
software CD-ROM.
Once you’ve read this and mastered the major elements of ScanCraft CS-P, read ...
The manuals that accompany each of the bundled software programs.
Electronic Manuals
Manual for Each
Application Program
iPhoto Express 1.1 and OmniPage Limited Edition
are accompanied by electronic manuals with
detailed instructions on their use.
2
How to Use the Product Guide
This guide provides an in-depth explanation of individual topics related to CanoScan FB320P and FB620P
colour scanners and the accompanying software CD-ROM.
If you haven’t already read the Getting Started guide, we recommend that you follow its suggestions
first before consulting this guide.
Organization of this Guide
This guide tackles the scanner and software topics that could not be accommodated in the
Getting Started guide. Each topic is intended to be read as a discrete unit. You need only
read the topics that apply. The guide is divided into four sections.
Chapter 1
Placement and Connections
How to situate the scanner and connect it to your computer and printer.
Chapter 2
The Software CD-ROM
How to use the software CD-ROM and an introduction to the software and electronic manuals.
Chapter 3
How to Use the Scanner
How to position documents for scanning and how to run the software.
Appendices
Troubleshooting tips and care and maintenance.
*References to Windows in this guide refer to Windows®95, Windows®98 and Windows NT®4.0.
3
Conventions Used in this Guide
This symbol indicates precautions that must be taken when operating the equipment. Ensure that you read all warnings.
This symbol indicates supplementary operating procedures and other
useful information. Read these notes at your own discretion.
Use of shielded cable is necessary to comply with the technical requirements of EMC Directive.
This equipment has been tested and found to comply with the limits for a Class B digital device,
pursuant to Part 15 of the FCC Rules. These limits are designed to provide reasonable protection
against harmful interference in a residential installation. This equipment generates, uses and can
radiate radio frequency energy and, if not installed and used in accordance with the instructions, may
cause harmful interference to radio communications. However, there is no guarantee that interference will not occur in a particular installation. If this equipment dose cause harmful interference to
radio or television reception, which can be determg]ed by turning the equipment off and on, the user
is encouraged to try to correct the interference by one or more of the following measures:
- Reorient or relocate the receiving antenna.
- Increase the separation between the equipment and receiver.
- Connect the equipment into an outlet on a circuit different from that to which the receiver is
connected.
- Consult the dealer or an experienced radio/TV technician for help.
*Use of shielded cable is required to comply with Class B limits in Subpart B of Part 15 of FCC Rules.
Do not make any changes or modifications to the equipment unless otherwise specified in this
manual. If such changes or modifications should be made, you could be required to stop operation of
the equipment.
4
Table of Contents
Features of CanoScan FB320P/FB620P Colour Scanners ........................................ 8
Safety Precautions .................................................................................................. 10
Safe Locations ................................................................................................... 10
About the Power Supply .................................................................................. 12
General Handling Precautions ......................................................................... 13
Components Guide ................................................................................................ 15
Chapter 1 Placement and Connections ....................... 17
The Scanning Unit Lock ......................................................................................... 18
Unlocking the Scanning Unit ........................................................................... 18
Locking the Scanning Unit ............................................................................... 18
Scanner Placement ................................................................................................. 20
Locations to Avoid ............................................................................................ 20
Connecting to a Computer .................................................................................... 22
Connecting the Scanner to a Computer .......................................................... 22
Connecting a Printer to the Scanner ............................................................... 24
Connecting the Power Cord (Turning on the Power) .......................................... 26
Chapter 2 The Software CD-ROM ................................ 27
How to Use the Software CD-ROM ....................................................................... 28
Running the CD-ROM Menu Program ............................................................. 28
If the CD-ROM Menu Fails to Appear .............................................................. 29
About the Menu Window ................................................................................ 30
Exiting the CD-ROM Menu Program ............................................................... 31
5
Installing the Software .......................................................................................... 32
Software Titles................................................................................................... 32
Installing the Software ..................................................................................... 33
Starting the Scanner Tutorial ................................................................................ 35
Viewing Electronic Manuals .................................................................................. 36
What is an Electronic Manual? ........................................................................ 36
List of Electronic Manuals ................................................................................ 36
Software for Viewing Electronic Manuals ...................................................... 37
Viewing Electronic Manuals ............................................................................. 38
How to Operate Electronic Manuals ............................................................... 39
Displaying the CD-ROM Contents ......................................................................... 46
Troubleshooting ..................................................................................................... 48
Chapter 3 How to Use the Scanner ............................. 49
Positioning Documents .......................................................................................... 50
About CanoCraft CS-P ............................................................................................ 52
CanoCraft CS-P as a Stand-Alone Application ................................................ 52
CanoCraft CS-P as a TWAIN Driver ................................................................... 54
Appendices .....................................................................58
Troubleshooting ..................................................................................................... 59
Problems with Software Installation ............................................................... 59
Problems Starting Software Programs ............................................................ 60
Problems with Scanning ................................................................................... 63
Problems with Printing ..................................................................................... 67
Other Questions ................................................................................................ 68
6
Precautions with Printers ....................................................................................... 69
The Scanner and the Pringer Cannot Be Operated at the Same Time ......... 69
Using Windows Printing System (WPS) Printers ............................................. 69
What to Do if a Printer is Not Operating Correctly ........................................ 69
Care and Maintenance .......................................................................................... 72
Major Specifications ............................................................................................... 74
Index ....................................................................................................................... 76
Customer Support Help Desk ................................................................................ 78
Trademarks
• Adobe® and Acrobat® are trademarks of Adobe Systems Incorporated.
• IBM, IBM PC/AT Series are trademarks of International Business Machines Corp., USA.
• Windows is a registered trademark of Microsoft Corporation in the United States and/or other
countries.
• All other brand names and product names used in this manual are trademarks or registered
trademarks of their respective holders.
Caution
1. No part of this document may be reproduced or transmitted in any form or by any means, electronic or mechanical, for any purpose, without the express written permission of Canon Inc.
2. The equipment and software described in this guide are subject to change without notice.
3. Notwithstanding the considerable care taken in preparing this guide, please note that Canon Inc.
does not accept liability for any results arising from the operation of the equipment or software
mentioned herein.
4. Please note that scanning copyrighted materials, including documents and images, without permission from the copyright holder is prohibited by law, except for personal or household use.
5. Portions of this guide are reproduced herein with the permission of Abode Systems Incorporated.
7
Features of CanoScan FB320P/FB620P Colour Scanners
You have purchased one of the world’s finest flatbed colour scanners. The 300-dot-perinch (dpi) optical resolution CanoScan FB320P and 600-dpi optical resolution CanoScan
FB620P incorporate the following special features.
Compact Footprint
Ultra compact body [256.0 x 372.5 x 63 millimeters (10.1 x 14.7 x 2.5 inches)]
for an A4/Letter-size scanner. Weighing only 2.0 kilograms (4.4 pounds),
this scanner is so light that it can easily be placed or moved to suit your
convenience.
Simple Connection to a Parallel Port
Easily connected to your computer’s parallel (printer) port with a single
cable (supplied). Your existing printer connects to the scanner’s second
parallel port, creating a daisy chain configuration. See Precautions with
Printers, p.69 of this guide.
Standby Power and Energy-Saving Features
Convenient standby power feature means that the scanner is always ready
to use. On continuous standby operation, it consumes a mere 2.5 watts per
hour and only 5 watts per hour in full operation.
8
Fine Colour Tones and High Resolution
Scanning method employs proprietary Canon LIDE scanning technology in
an ultrahigh-sensitivity CIS (contact image sensor). Reading 10 bits (1,024
colors) per red, green and blue (RGB) channel, the scanner offers 8-bit
output that reproduces brilliant tones at high resolution.
• It is illegal to reproduce currency, bills, negotiable securities and other
documents prohibited by law. Reproduction of such items may be subject
to criminal action.
• It is illegal to reproduce legal certificates, licenses, travel tickets, and
certain public and private documents prohibited from reproduction by
law. Reproduction of such items may be subject to criminal action.
• Please noted that intellectual property protected by copyright may not be
reproduced without the express permission of the copyright holder except
for personal or household use under limited circumstances.
9
Safety Precautions
The following precautions should be observed in handling the equipment described in
this guide.
Safe Locations
• Place the equipment on a flat, level and stable surface.
• Operate the equipment within the following parameters.
Temperature range: 5-35°C (41-95°F)
Humidity range: 10%-90% relative humidity (without condensation)
• Do not place the equipment in places subject to direct sunlight or high
temperatures, which may raise the interior heat level and lead to equipment damage or degraded performance. Use curtains if locations subject
to direct sunlight are unavoidable.
• The parallel cable provided with the scanner is 1.2 meters (3.9 feet) long.
Place the scanner within reach of the computer using this cable. Use this
cable only. Do not substitute other cables.
• Do not place the equipment in areas subject to rapid changes in temperature or humidity. Refrain from moving the equipment between such
environments to avoid the formation of interior condensation, which
degrades performance. Allow scanner to adjust slowly to the new environment before using it if it is moved between temperature extremes.
10
• Do not place the scanner in close proximity to TVs, speakers or other
devices generating magnetic or electromagnetic fields. Magnetic interference may cause malfunctions.
• Do not place the scanner in environments subject to vibration, smoke,
mist or excessive dust.
• Do not place the scanner in laboratories or other environments in which
chemical reactions are conducted. Avoid locations subject to salty or
greasy air or other corrosive gases and fumes. These locations may damage the equipment.
• Leave space around the equipment as shown below.
10 cm
(4 inches)
20 cm
(8 inches)
10 cm
(4 inches)
• Position the scanner so that its feet are securely in contact with the
supporting surface. If the feet are not fully supported, the unit may fall
over or fall down and cause an injury.
11
About the Power Supply
• Do not use an AC adapter other than the one supplied with the scanner.
Other adapters may damage the equipment.
• Avoid plugging in numerous devices to the same electrical outlet. If
possible, plug the scanner into a dedicated outlet. Devices sharing the
outlet will drop the voltage and create static, reducing the scanner’s
performance. If sharing is unavoidable, use a voltage regulating power
supply or a noise reduction device.
• Check to ensure that the electrical outlet supplying the equipment has
sufficient capacity.
• If the AC adapter is used with an extension, ensure that the total power
cord length is no greater than 5 meters (16 feet). Longer cords will drop
the voltage and may degrade scanner performance.
• Do not handle the AC adapter with wet hands to prevent the risk of
electric shock.
• Do not continue using an AC adapter with a frayed, damaged or modified power cord.
• Avoid frequent unplugging and plugging in of the AC adapter. It may
result in a poor electrical connection.
12
General Handling Precautions
• Prevent foreign substances, such as water and other liquids, metallic
objects and flammable substances, from entering the equipment. Contact
with foreign substances may lead to damage to the equipment, fire,
electric shock and injury.
• Do not drop or jolt the equipment.
• Always disconnect the AC adapter before attaching or disconnecting any
cables.
• Do not place heavy objects or step on the AC adapter body or cord.
• Keep the area around the electrical outlet free of obstacles so that the AC
adapter can be readily removed.
• Do not plug the AC adapter into the electrical outlet before plugging the
power cord plug into the scanner. Plugging it into the electrical outlet
first may damage the equipment.
• Disconnect the AC adapter by gripping the body not the cord.
• Do not attempt to disassemble, alter or repair any part of the equipment
that is not expressly prescribed in this guide.
• Remove the AC adapter before performing any maintenance procedures
on the equipment.
• Do not place heavy objects on the document cover. Placing such objects
may distort the document cover.
• Do not use liquid or aerosol detergents to clean the exterior of the
equipment.
13
• Clean the equipment with a well-wrung, damp soft cloth
• Do not lubricate the equipment.
• Power down the equipment and wait until it has cooled before draping a
dust cover over it.
• Do not play the CD-ROM in an audio CD player. The loud volume of its
contents may lead to ear damage.
• Do not disassemble or modify the equipment.
• Disconnect the AC adapter as a safety precaution if the equipment will
not be used over an extended period, such as long holidays.
• Disconnect the AC adapter immediately and contact your Canon vender if
any of the following should arise:
the AC adapter or cord incur damage
liquids or metallic objects are introduced to the equipment’s interior
the equipment is subjected to rain or water
the main unit is dropped or damaged
the equipment undergoes a obvious change in performance
the equipment generates smoke, strange smells or unusual noises
14
Components Guide
Document Cover
Holds documents in place
Alignment Mark
Align document
edges here
Document Glass
Place documents here
Scanning Unit
Core component of the
scanner, comprising the light
source and sensing units
(Usually found at the front of
the scanner)
Lock Switch
Locks and unlocks the scanning unit
15
• Do not tilt the scanner more than 90˚ when checking or operating the
lock.
• Always unlock the scanner before plugging in the AC adapter. Operating
the scanner in the locked state may damage the equipment
• Lock the scanning unit before transporting it in a vehicle (p. 18).
Printer Port
Connector for printer cable when
printer is added to configuration
AC Adapter
PC Port
Port accepting the supplied
parallel cable connecting the
computer to the scanner
Power Terminal
AC adapter cord attaches here
Power Cord
16
Chapter 1
Placement and Connections
The Scanning Unit Lock ................................................................ 18
Scanner Placement ........................................................................ 20
Connecting to a Computer ........................................................... 22
Connecting the Power Cord (Turning on the Power) ................. 26
17
The Scanning Unit Lock
The scanner is shipped with the scanning unit locked to prevent damage during transport.
You must unlock it to use the scanner.
Unlocking the Scanning Unit
1. Find the lock switch on the
underside of the scanner.
2. Push the lock switch toward
the unlocked mark (
).
Lock Switch
Unlocked
Position
• Always unlock the scanner before plugging in the AC adapter. Operating
the scanner in the locked position may damage the equipment.
Locking the Scanning Unit
Always engage the lock before transporting the scanner.
1. Turn off all connected devices, including the scanner, computer,
printer or other device.
Follow the recommended procedures to shut down and turn off the computer, printer or other device in that order.
Unplug the scanner’s AC adapter from the electrical outlet.
18
2. Confirm that the scanning unit is at the front of the scanner.
First check to make sure that all documents have been
removed from the document glass. Then close the document cover, and after you have plugged the power cord
plug into the scanner, plug the AC Adapter into the
electrical outlet. Check to see that the scanning unit has
correctly returned to the front of the scanner, then unplug
Scanning Unit
the AC adapter from the electrical outlet. Lastly, unplug
Confirm that the
the power cord plug from the scanner.
scanning unit is in
this position
3. Lock the scanning unit by
pushing the lock switch
toward the lock mark ( ).
Lock Switch
Locked Position
• Carrying or transporting the scanner without locking the scanning unit
may damage it. Be particularly careful to lock the scanning unit when
transporting the scanner in a vehicle.
19
Scanner Placement
Locations to Avoid
The scanner can be placed in a variety of configurations to suit your working environment. However, you should avoid the following situations to
prevent damage to the equipment and avoid impairing scanning results.
Uneven or stepped surfaces
High-temperature environments
20
Environments subject to shocks,
smoke, noxious fumes, water
vapor or dust
Environments in which
the air is salty or greasy
Locations near TVs or devices
generating strong magnetic fields
Location subject to strong direct
sunlight
21
Connecting to a Computer
Once you have determined the ideal placement, connect the scanner to the computer
as shown below.
• Ensure that the computer’s power is off before attempting these procedures. In addition, ensure that the scanner’s AC adapter is unplugged.
Connecting the Scanner to a Computer
The connectors at either end of the parallel cable are different. Check to
ensure you insert the correct one.
Parallel Cable (Supplied)
Scanner’s PC Port
22
Scanner’s PC Port
Computer’s Parallel Port
Parallel Cable
Parallel Cable
* The parallel port will have a connector that is approximately 4 cm (1.5
inches) and labeled Parallel or Printer. It is generally found on the back
panel of the computer.
* If a printer is already connected to the computer, detach the printer cable
from the parallel port.
23
Connecting a Printer to the Scanner
To add a printer to the configuration, connect the printer to the printer
port on the scanner.
Use the cable supplied
with the printer.
Printer Port on the
Scanner
Printer Cable
PC Port on the Scanner
A parallel cable should
already be connecting the
computer to this port.
24
• Windows Printing System printers cannot be used in the configuration
above.
• For correct operation, some Epson inkjet models require further adjustments to software settings after the preceding steps. Refer to the notice
titled What to Do if a Printer is Not Operating Correctly (p. 69).
• Since data is sent through the scanner to the printer, ensure that the scanner
power is on before attempting to print even when not using the scanner.
• Devices other than printers cannot be attached to the scanner’s printer port.
25
Connecting the Power Cord (Turning on the Power)
The scanner is powered by the AC adapter supplied in the package.
1. Connect the power cord plug to the power terminal on the scanner.
2. Plug the AC adapter into an electrical outlet.
Power Terminal
AC Adapter
Power Cord
Power Terminal
• Do not use an AC adapter other than the one supplied with the scanner.
Other adapters may damage the equipment.
• There is no power switch on this scanner. The power is activated as soon as
the AC adapter is plugged into a power source. The unit can be left on
standby with the AC adapter plugged in under normal operating conditions.
• To power down the scanner, first turn off the computer and other peripheral devices before unplugging the scanner’s AC adapter from the electrical outlet.
26
Chapter 2
The Software CD-ROM
How to Use the Software CD-ROM .............................................. 28
Installing the Software ................................................................. 32
Starting the Scanner Tutorial ....................................................... 35
Viewing Electronic Manuals ......................................................... 36
Displaying the CD-ROM Contents ................................................ 46
Troubleshooting ............................................................................ 48
27
How to Use the Software CD-ROM
The CD-ROM included in the scanner package contains software and electronic manuals
that will maximize your use of the scanner. This section explains how to use the CD-ROM.
Running the CD-ROM Menu Program
The CD-ROM menu program will automatically display when you place the
disk in the CD-ROM drive.
1. Language select window will display.
Select your language.
2. The menu window is shown below.
28
If the CD-ROM Menu Fails to Appear
1. Click the [My Computer] icon on the Windows desktop.
2. Double-click the CD-ROM icon titled [CanoScan (E:)] that appears in
the My Computer window.
Although an “(E:)” appears after the CD-ROM title in this example,
indicating the name of the drive, it may be labeled with a different
letter on your system. This letter may be ignored for the purposes of this
procedure.
3. Language select window will display.
Select your language.
29
4. CanoScan Setup Utility window will display.
About the Menu Window
The following items can be selected from the menu window.
Install/Uninstall Software
Installs the software onto your computer’s hard drive that is required for
scanning. Can also be used to uninstall the software.
Start the Scanner Tutorial
Presents a virtual demonstration of the scanner’s capabilities.
View the Electronic Manuals
Presents electronic manuals for the software contained on the disk.
Display the CD-ROM Contents
Displays the list of folders and files contained on the disk.
30
Troubleshooting
Presents troubleshooting tips when scanning isn’t proceeding as expected
or when you encounter a problem operating the scanner.
Exit
Closes the CD-ROM menu program.
Each of these items is described on the following pages.
Exiting the CD-ROM Menu Program
1. Return to the menu window.
2. Click the [Exit] button.
The menu window will close.
3. Remove the CD-ROM from the drive.
Handle the disk with care and store it in a safe place.
31
Installing the Software
There are four software programs contained on the CD-ROM. Install them with the
procedures described on the following page.
Software Titles
CanoCraft CS-P (Approximately 9 MB)
A specialized program required for scanning images with CanoScan
FB320P/FB620P scanners. Ensure that you install this program.
CanoCraft CS-P Copy
Installed automatically with CanoCraft CS-P. A program that allows your
computer, scanner and printer easily make a color copy.
iPhoto Express 1.1 (Approximately 35 MB)
A graphics program that works with CanoCraft CS-P to scan and load
images, which can then be edited or retouched. The scanning functions
are only available if CanoCraft CS-P is installed.
OmniPage Limited Edition (Approximately 7 MB)
An optical character recognition (OCR) program that works with
CanoCraft CS-P to scan and load documents, which can then be converted
into text data for editing. The scanning functions are only available if
CanoCraft CS-P is installed.
32
Adobe Acrobat Reader Approximately 7 MB
The reader program for the on-screen software manuals contained on the
CD-ROM.
• Installation of the above programs requires approximately 58 megabytes
on your hard disk.
• Please refer to the Troubleshooting section of this guide if you experience
difficulty in installing the software (p. 59).
* Software descriptions are contained in the Guide to the Software section
of the Getting Started guide, starting on page 18.
.
Installing the Software
• Do not remove the CD-ROM from its drive or power the scanner down
during installation of the software unless prompted by an on-screen
message of CanoScan Setup Utility.
1. Confirm that the scanner is properly connected and powered up.
Place the CD-ROM in the computer drive.
Select your language from the language select window.
33
2. Click the [Install/Uninstall Software] button from the CD-ROM menu
that automatically appears.
The following dialog will display.
Install/Uninstall Software
3. Click the [Start Installation] button on the bottom right of the window.
4. Follow the instructions in the window to proceed with installation.
We recommend installing all the programs under normal circumstances.
Experienced computer users may wish to selectively install the programs.
However, the CanoCraft CS-P must be installed to operate the scanner.
Once installation of all the software is complete, follow the on-screen
instructions of CanoScan Setup Utility to restart your computer.
5. Remove the CD-ROM.
34
Starting the Scanner Tutorial
The tutorial contained on the CD-ROM offers a virtual scanning experience that teaches how
to benefit from the scanner’s many features.
1. Click [Start the Scanner Tutorial] on the CD-ROM menu.
The following window will display.
Start the Scanner Tutorial
2. Follow the procedures on the screen to proceed through the tutorial.
The necessary instructions and explanations will automatically display on the
screen.
3. Click the [Return to the previous Menu] button once you have finished viewing
the tutorial.
The main menu will display.
4. Exit the CD-ROM menu program.
35
Viewing Electronic Manuals
You can view electronic manuals contained on the software CD-ROM.
What is an Electronic Manual?
On-screen manuals are provided in a digital format for viewing on your
computer monitor. They offer a variety of features not possible with
printed manuals, such as the ability to jump to different topics with a single
mouse click on a hyperlink or item in the table of contents or index. The
manuals also support keyword search functions. You can, of course, also
print them out on your printer.
List of Electronic Manuals
The CD-ROM contains four electronic manuals.
Product Guide (this guide)
CanoCraft CS-P Users Guide
Refer to this manual for detailed instructions on how to use the
CanoCraft CS-P and CanoCraft CS-P Copy programs.
iPhoto Express 1.1
Refer to this manual for detailed instructions on how to use the iPhoto
Express 1.1 graphics program.
36
OmniPage Limited Edition
Refer to this manual for detailed instructions on how to use the
OmniPage Limited Edition optical character recognition program.
Software for Viewing Electronic Manuals
Adobe Acrobat Reader program is supplied for viewing the manuals. The
Adove Acrobat Reader should already have been installed on your computer
in order to read the electronic manuals. In case it is not installed, see page
33 for installation instructions.
* Descriptions of CanoCraft CS-P, CanoCraft CS-P Copy, iPhoto Express 1.1
and OmniPage Limited Edition are included in the Getting Started guide,
pages 18-23.
37
Viewing Electronic Manuals
1. Click [View the Electronic Manuals] in the CD-ROM menu.
The following window will display.
View the Electronic Manuals
2. Select the manual you wish to view.
Adobe Acrobat Reader will automatically display the selected manual.
3. Click [Return to the previous Menu] when you have finished viewing.
Click the
of the Adobe Acrobat Reader Window.
The main menu will display.
38
How to Operate Electronic Manuals
This section briefly explains how to use the major functions of Adobe
Acrobat Reader to view the electronic manuals.
Changing Pages
Page ahead or back with the buttons below.
Previous
Next
Manual Contents
39
Bookmark Display
The bookmark display shows an overview area in which each topic and
subtopic is bookmarked. Click on a bookmark to jump directly to that topic.
Select bookmark display
with this button
Click the icon of
the topic you
wish to view
40
Zoom In/Out
Zoom in or out on part of a page.
Click this icon to select the zoom
tool, then click on the area you wish
to magnify
Hold the [Ctrl] and
click the zoom tool on
the page to zoom out
41
Click a Page Reference to Jump to a Topic
Clicking on a page reference (hyperlink) takes you directly to that topic.
Clicking on a page reference takes you directly to that topic.
42
Clicking on an item in the table of contents or index also takes you directly
to that topic.
Clicking on a table of contents
or index item takes you directly
to that topic.
43
Jump to a Topic with a Keyword Search
Entering a keyword into the Find dialog takes you to the associated topic.
Click the [Tools] menu and select
[Find] to initiate a search
Enter a keyword
and click the [Find]
button.
44
Exit Adobe Acrobat Reader
Click the close box to exit
Adobe Acrobat Reader.
* Some manuals may not contain bookmark references, or may not jump to
the selected topic when a page reference or item in the table of contents
and index is clicked.
* For more information on Adobe Acrobat Reader, please refer to the
[Reader Online Guide] in its [Help] menu.
45
Displaying the CD-ROM Contents
You can view a list of the folders and files contained on the CD-ROM.
1. Click [Display the CD-ROM Contents] in the CD-ROM menu.
The following window will display.
Display the CD-ROM Contents
2. Click the icon of a folder to view its contents.
The contents of selected folder will display.
on the upper right.
To close the window, click its close box
3. When you have finished viewing folder contents, click [Return to
Menu].
The main menu will display.
46
The major files on the CD-ROM are shown below for experienced and
expert users. The folders and files are arranged hierarchically from left to
right. “F” denotes a folder.
Readme
Lists the latest information on the
Setup
Starts the CanoScan Setup Utility
Bin (F)
Contains a file required for the
CD-ROM contents
CanoScan Setup Utility
Acroread (F)
English (F)
Ar32e301
Installs Adobe Acrobat Reader
Ople (F)
Disk1 (F)
Setup
Installs OmniPage Limited Edition
Ipex (F)
Setup
Manual (F)
English (F)
Installs iPhoto Express
Product.pdf
Canocrft.pdf
CanoCraft CS-P electronic manual
Rdreng.pdf
OmniPage Limited Edition
electronic manual
Ipeguide.pdf
CanoCrft (F)
English (F)
Disk1 (F)
iPhoto Express electronic manual
Readme
Setup
Installs CanoCraft CS-P
47
Troubleshooting
The troubleshooting facility is intended to assist you when you think there
is a malfunction or you are having problems performing a task.
1. Click [Troubleshooting] in the CD-ROM menu.
The following window will display.
Troubleshooting
2. Follow the instructions on the screen to proceed through the troubleshooting section.
3. Click [Return to the previous Menu] when you have finished viewing.
The main menu will display.
48
Chapter 3
How to Use the Scanner
Positioning Documents ................................................................. 50
About CanoCraft CS-P ................................................................... 52
49
Positioning Documents
Position documents for scanning on the document glass, using the alignment mark as a
guide.
1. Lift the document cover.
2. Place the document face down on the document glass with its top
edge at the front of the scanner (the edge farthest away from the
document cover hinge). Align the edges of the document with the
alignment mark.
Bottom Edge
of Document
Top Edge of
Document
Alignment Mark
3. Close the document cover, being careful not to move the document
from alignment.
50
• The maximum allowable size for scanning is 216 x 297 mm (85 x 116.9
inches), up to A4 size or letter size.
• This scanner is equipped with an ultra-sensitive scanning unit. Opening
the document cover during scanning or improperly closing it may not
produce proper results. When the document cover can not be closed
because you are scanning thick documents, such as books, cover the
document glass with a dark cloth to prevent ambient light from affecting
the scan.
51
About CanoCraft CS-P
CanoCraft CS-P is the software program that works with the scanner to
load images into your computer. CanoCraft CS-P can be started two ways.
• As a stand-alone program
• As a TWAIN driver within a graphics program (see next page for
explanation)
CanoCraft CS-P as a Stand-Alone Application
1. Ensure that the scanner power is on.
See Connecting the Power Cord, page 26, for instructions on how to
power the scanner.
2. Click the [Start] button on the
Windows taskbar and select
[Programs], [Canon CanoCraft
CS-P] and [CanoCraft CS-P] in
succession.
52
CanoCraft CS-P will start and display the following window. Use this window to preview and scan images. For instructions for these procedures,
please see the electronic manual entitled CanoCraft CS-P Users Guide.
53
CanoCraft CS-P as a TWAIN Driver
CanoCraft CS-P can be used as a TWAIN driver within a graphics program.
TWAIN is the acronym for a set of scanning standards. CanoCraft CS-P can
be started from within application programs that are TWAIN_32-compliant
to load images directly into the host program. For example, you can start
iPhoto Express 1.1 and use its buttons to open a TWAIN driver for the
scanner. A window of the CanoCraft CS-P will display.
1. Ensure that the scanner power is on.
See Connecting the Power Cord, page 26, for instructions on how to
power the scanner.
2. Click the [Start] button on the
Windows taskbar and select
[Programs], [Ulead iPhoto
Express 1.1] and [iPhoto Express] in succession.
54
iPhoto Express 1.1 will start and its window will display.
3. Click the [File] menu and select [Acquire] and [Images] in succession.
55
4. Select [New Image] and click the [Acquire] button.
The CanoCraft CS-P window will appear in the iPhoto Express 1.1 window. Use this window to scan a document.
56
* If your system is set up for a digital camera or another scanner in addition
to this scanner, click the [File] menu and select [Acquire], [Select source]
and [CanoScan FB320P/FB620P] before scanning. This step is required to
select which device will be used.
* There is only difference between the CanoCraft CS-P window when it is
used as a stand-alone application and a TWAIN driver: as a TWAIN driver,
the save button becomes the scan button.
* When the scans are finished, the CanoCraft CS-P window can be closed
and the scanned images will be displayed in the iPhoto Express 1.1 window
for editing or retouching. For further instructions on the use of iPhoto
Express 1.1, please consult its electronic manual.
* Methods for starting CanoCraft CS-P from within other application programs may differ from those described above. Refer to the respective
manuals for instructions for other programs.
57
Appendices
Troubleshooting ............................................................................ 59
Precautions with Printers .............................................................. 69
Care and Maintenance ................................................................. 72
Major Specifications ...................................................................... 74
58
Troubleshooting
Please read the suggestions below when scanning isn’t proceeding as expected or
when you encounter a problem operating the scanner. If the remedies suggested
below do not solve your problem or your problem isn’t listed below, consult your
Canon vender or the nearest Canon Customer Support Help Desk (p. 78-79).
* When you contact a Customer Support Help Desk, our technicians will
need to know about the computer connected to the scanner. Please take
time now to print out and fill in the System Information page 26 of the
Getting Started guide. Keep this information in a safe place for future
reference.
* For assistance with problems related to the installation and operation of
the software, please also refer to the Readme and Help files accompanying
each program. These files contain important information that may not be
found in the manuals.
Problems with Software Installation
Installation is unsuccessful
Cause 1:
Insufficient memory to run the installer program
Solution: Close other software programs that are running and reinstall
Cause 2:
Solution:
Insufficient free hard disk space
Delete or transfer unnecessary files from the hard disk and
reinstall. Refer to page 33 for the required free hard disk space.
59
Nothing displays when the CD-ROM is placed in the drive
Cause :
CD-ROM will not automatically run the menu program
Solution:
Start the menu program manually (See p. 28)
Installation just doesn’t seem to be working
Solution:
Manually install the software by clicking the [Start] button, selecting [Run] and typing one of the command lines below into the box.
If your CD-ROM drive is labeled other than [D:], substitute the
appropriate letter, such as [E:] or [F:], in the lines below.
To install CanoCraft CS-P: [D:\CANOCRFT\ENGLISH\DISK1\SETUP.EXE]
To install iPhoto Express 1.1:
[D:\IPEX\SETUP.EXE]
To install OmniPage Limited Edition: [D:\OPLE\DISK1\SETUP.EXE]
To install Adobe Acrobat Reader:
[D:\ACROREAD\ENGLISH\AR32E301.EXE]
To read the electronic manuals on the CD-ROM, navigate to the
[D:\MANUAL] folder and open the PDF files in the respective
subfolders.
Problems Starting Software Programs
[Scanner not found] message displays
Cause 1:
Scanner not detected because the AC adapter is not correctly
plugged into the electrical outlet
Solution:
Plug the AC adapter securely into the electrical outlet (See p. 26)
60
Cause 2:
Solution:
Cause 3:
Solution:
Scanner not detected because the power cord plug is not correctly
connected to the scanner
Reconnect the power cord to the scanner (See p. 26)
Scanner not detected because a parallel cable is not securely
fastened to the scanner or computer
Securely fasten the parallel cables (See p. 23)
CanoCraft CS-P will not start
Cause 1:
Insufficient memory (RAM) available to run CanoCraft CS-P
Solution:
Close other programs and run CanoCraft CS-P
Cause 2:
Solution:
CanoCraft CS-P Copy running
CanoCraft CS-P cannot run at the same time as CanoCraft CS-P
Copy. Close CanoCraft CS-P Copy (See CanoCraft CS-P Users Guide)
Cause 3:
CanoCraft CS-P already running within another application as a
TWAIN driver
Close the version of CanoCraft CS-P running within the other
application and restart (See CanoCraft CS-P Users Guide)
Solution:
Cause 4:
Solution:
Printing in progress
CanoCraft CS-P cannot be started while printing is in progress.
Start CanoCraft CS-P after printing finishes
61
Problems starting CanoCraft CS-P as a TWAIN driver from within another application
Cause 1:
Insufficient memory (RAM) available to start CanoCraft CS-P
Solution: Close other programs and start CanoCraft CS-P
Cause 2:
Solution:
CanoCraft CS-P already running as a stand-alone program
Close the version of CanoCraft CS-P that is already running
Cause 3:
Solution:
CanoCraft CS-P not installed
Install CanoCraft CS-P (See p. 33)
Cause 4:
Solution:
Application program is not TWAIN_32 compatible
Start CanoCraft CS-P from within a TWAIN_32-compatible
program
Cause 5:
Solution:
Printing in progress
CanoCraft CS-P cannot be started as a TWAIN driver while
printing is in progress. Start CanoCraft CS-P after printing
finishes
iPhoto Express 1.1 [Images] option from the Acquire menu (File menu)
is disabled (gray) and a TWAIN driver cannot be selected
Cause:
Scanner not selected
Solution: Select scanner by clicking [File] menu and selecting [Acquire]
and [Select source] in succession (See P.57)
62
[CanoScan FB320P/FB620P] option not displayed in [Select source]
menu of iPhoto Express 1.1
Cause:
CanoCraft CS-P not installed
Solution: Install CanoCraft CS-P (See p. 33)
Problems with Scanning
Scanner will not scan
Cause 1:
Scanner not powered up
Solution: Securely connect the AC adapter to the scanner and electrical
outlet (See p. 26)
Cause 2:
Solution:
Scanning unit locked
Unlock scanning unit by setting lock switch to unlocked position (See p. 18)
Cause 3:
Solution:
Software incorrectly installed
Reinstall software (See p. 33)
Cause 4:
CanoCraft CS-P not installed. Only iPhoto Express 1.1 and/or
OmniPage Limited Edition installed
CanoCraft CS-P is required for scanning. Install it (See p. 33)
Solution:
Cause 5:
Solution:
Printing in progress
Scanner cannot be used while printing. Initiate scan after
printing finishes
63
[Low disk space condition, the file may have been truncated.]
Cause:
Scanned image cannot be saved because of insufficient disk space
Solution:
Rescan after removing or transferring unnecessary files to another
disk or specify another disk as the save location
Scanning unit fails to return to ready position (front of scanner)
Cause:
AC adapter out of contact with electrical outlet or scanner while
scanning unit in motion
Solution:
Clear all documents and objects from the document glass, close the
document cover, unplug the AC adapter from the electrical outlet
and then plug it back in.
Scan quality is poor
Cause 1:
Document cover is open
Solution:
Close the document cover
Cause 2:
Solution:
Original document floating on document glass
Gently press down on the document cover to prevent the document
from floating
Cause 3:
Solution:
Improperly closed or floating document cover
Hold document cover down with hand during scan
Cause 4:
Solution:
Dirty document glass or document cover
Clean document glass and document cover (See p. 72)
64
Cause 5:
Solution:
Incorrect scan settings
Rescan with adjusted settings (See the CanoCraft CS-P Users Guide
electronic manual)
Cause 6:
Solution:
A power cord is too close to the scanner.
Move all power cords away from the top of the scanner and
surrounding area.
Glossy color photo will not scan clearly
Cause:
Optical interference created by the photo adhering to document glass produces striped patterns
Solution 1: Gently press down on the document cover
Solution 2: Move the photo on the document glass to break the adhesion
Solution 3: Clean the document glass (See p. 72)
Stripes appear on scan of publication
Cause:
Moiré effect from scan of publication at high resolution (print
screen lines highlighted by optical interference, producing
striped patterns). The appearance of this effect is dependent
upon particular combinations of screen line densities and
scanning resolutions
Solution: Rescan at different resolutions (See the CanoCraft CS-P Users
Guide electronic manual)
65
Whitened edges on image scanned from thick book
Cause:
Scanner employs an ultra-sensitive scanning unit that picks up
ambient light if document cover cannot stop light from entering around the edges of the book
Solution: Cover the book and document glass with a dark cloth to prevent ambient light from affecting the scan
Slow scanning speed
Cause 1:
Improper parallel port setting
Solution: Adjust parallel port setting (See p. 24)
Cause 2:
Solution:
Computer can only interface with the scanner with the parallel
port setting set to the slowest mode (Nibble mode)
Faster speed not obtainable with current computer
Cause 3:
Solution:
Epson Printer Window in use for Epson printer
Close Epson Printer Window (See p. 71)
66
Problems with Printing
Printing fails or printing errors
Cause 1:
Scanner and printer incorrectly connected or cable loose
Solution: Connect cable correctly (See p. 24)
Cause 2:
Solution:
Scanner not powered up
Since data is sent through the scanner to the printer, the
scanner power must be on to print. Connect the AC adapter to
the scanner and electrical outlet (See p. 26)
Cause 3:
Solution:
WPS (Windows Printing System) printer in use
WPS printers cannot be used when connected through the
scanner. To use both the printer and the scanner, alternately
connect the devices to the computer’s parallel port as required.
Cause 4:
Solution:
Scanning in progress
Printer cannot be used while scanning. Initiate print after
scanning finishes
67
Other Questions
Is this scanner compatible with SCSI controllers?
Answer:
No. This scanner can only interface through a parallel port
connection
Can a Film Adapter Unit be used with this scanner?
Answer:
No
Can an Automatic Document Feeder be used with this scanner?
Answer:
No
Can other peripheral devices employing a parallel port connection be
connected to the scanner?
Answer:
The only peripheral devices that can be connected to this
scanner are printers employing parallel port connections
Can a externel parallel switch be used with the scanner?
Answer:
No
Scanner cannot connect to a computer
Cause:
Scanner connected to incompatible computer
Solution:
Scanner is PC/AT compatible and not compatible with other standards, such as Macintosh. Connect to a PC/AT compatible computer.
68
Precautions with Printers
The following precautions should be observed when using a printer in conjunction with the scanner.
The Scanner and the Pringer Cannot Be Operated at the
Same Time
The scanner and printer both use the same parallel port, making it impossible to scan during printing or print during scanning. Attempting to
initiate a scan while printing will cause the [Printer Port is used by another
device.] message to display. Under certain conditions, initiation of a scan
command may succeed during a print job, but the printing operation may
cease and result in a printer error.
Using Windows Printing System (WPS) Printers
Windows Printing System compatible printers, such as Canon BJC-610W,
BJC-620W, LBP-460 and LBP-660 models, will not operate properly when
connected via the scanner. To use such printers, directly connect the printer
to the computer’s parallel port and alternate with the scanner as required.
What to Do if a Printer is Not Operating Correctly
The scanner uses the standard Windows parallel port driver for scanning
and printing operations. As a result, connecting printers that employ their
69
own parallel port drivers, such as Epson inkjet printers, to the scanner’s
printer port will cause the scanner or printer to malfunction. Such printers
must be handled as follows:
* Contact the manufacturer to find out whether or not your printer uses
the standard Windows parallel port driver.
• Using Epson Printers
It is advisable to adjust the Spool Manager settings as follows to avoid misoperation of the scanner during printing. (This procedure is not necessary
on computers running Windows NT 4.0.)
How to Adjust the Spool Manager Settings
1. Click the [Start] button on the Windows taskbar and select [Programs],
[Epson] and [Spool Manager].
2. Double click the icon of the printer currently in use.
3. Click to place a checkmark beside the [Use Print Manager for this port]
option in the settings dialog.
* Selecting the [Use Print Manager for this port] setting causes the computer to spool all of the print data onto the hard drive before sending it to
the printer, resulting in a printing speed that is moderately slower than if
this setting is not selected.
70
Use of the Epson Printer Window software that accompanies Epson printers
may cause the scanner’s scan speed to drop dramatically, failure of the
scanner to be recognized by the computer and incorrect operation of
CanoCraft CS-P.
If you experience problems, please try to solve them by following the
procedures below to disable the Epson Printer Window.
How to Disable the Epson Printer Window
1. Click the [Start] button on the Windows taskbar and select [Programs]
and [Windows Explorer].
2. Use Windows Explorer to navigate to the [Windows], [Start Menu], [Programs], and [StartUp] folders and delete the [Epson Printer Window] icon.
* Deleting the Epson Printer Window software will disable the capacity to
confirm ink levels and read error messages for the printer.
• How to Solve Problems with Other Printers That Are Operating
Incorrectly
Begin by turning off the printer’s bi-directional functions (in its status
monitor or control panel). Please refer to the instructions that accompanied
your printer for an explanation of this operation. If this does not solve the
problem, connect the printer directly to the computer’s parallel port and
alternate with the scanner as required.
71
Care and Maintenance
Clean off the dirt and dust that adheres to the exterior, document glass and document cover
of the scanner during the course of ordinary operation using the following procedures.
1. Power down the computer and peripheral devices.
2. Unplug the AC adapter from the electrical outlet.
3. Dampen a clean, soft cloth with water and wring the cloth well. Use the
well-wrung cloth to gently remove dirt and dust. Be particularly careful to
remove any traces of dirt or liquid from the document glass by wiping it
with a dry soft cloth.
• Do not dampen the connectors, ports or other metallic components on the
scanner’s back panel. Immediately remove any moisture that contacts these
components by wiping them with a dry cloth.
• Do not use a sodden cloth or apply a liquid directly to any portion of the
scanner. Any moisture that enters the interior, the underside of the document
glass or the sensors may degrade image quality and lead to malfunction s.
• Never use substances containing thinners or benzene on the equipment. Use
of these substances may deform, discolor or dissolve the casing.
4. Thoroughly remove any moisture or water vapor from the scanner with a
dry cloth.
• Moisture left on the document glass or cover may damage photographs and
other documents as well as not produce proper image results.
72
Outer Casing
Document Cover
Document Glass
Thinner Benzene
Never use substances containing
thinners or benzene to clean the
equipment
73
Major Specifications
CanoScan FB320P
Scanner Type
Flatbed (stationary document type)
Scanning Element
CIS (Contact Image Sensor)
Light Source
Three-color RGB LEDs
Optical Resolution
300 x 300 dpi
Selectable Resolution
Scanning Bit
Depth
600 x 600 dpi
25 to 1200 dpi
Colour
Grayscale
10 bits Input/ 8 bits output for each color (RGB)
10 bits Input/ 8 bits output
Dithering
Scanning Speed
CanoScan FB620P
64 tones
Colour
60 sec. (A4/300 dpi)
120 sec. (A4/600 dpi)
Grayscale
20 sec. (A4/300 dpi)
40 sec. (A4/600 dpi)
B&W
20 sec. (A4/300 dpi)
40 sec. (A4/600 dpi)
Prescan Speed
Interface
Maximum Document Size
15 sec.
Parallel interface (IEEE 1284/ECP)
A4/Letter, 216 x 297 mm (8.5 x 11.7 inches)
74
CanoScan FB320P
CanoScan FB620P
Power Requirements
AC Adapter (100/120/230/240 V) *1
Power Consumption
5 watts maximum (using supplied adapter)
Dimensions (W x D x H)
Weight
256 x 372.5 x 63 mm (10.1 x 14.7 x 2.5 inches)
Approximately 2.0 kg (4.4 pounds)
Operating Range Temperature
Humidity
5ºC to 35ºC (41ºF to 95ºF)
10%-90% (without condensation formation)
*1 Type of AC adapter depends on the area where the scanner is used.
Subject to change without notice
75
Index
A
D
AC Adapter 12, 16, 26
Adobe Acrobat Reader 33, 38, 45
Alignment Mark 15, 50
B
Display CD-ROM Contents 46
Document Cover 15, 50, 72, 73
Document Glass 15, 50, 72, 73
Document Size 51, 74
Bookmark Display 40
E
C
Electromagnetic Interference 11
Electronic Manuals 30, 36
Epson Inkjet 25
Exiting the CD-ROM Menu Program 31
CanoCraft CS-P as a Stand-Alone Application
52
CanoCraft CS-P as a TWAIN Driver 54
CanoCraft CS-P Copy 32
Care and Maintenance 72
CD-ROM 28
CD-ROM Menu Program 28
Changing Pages 39
Cleaning 72
Components Guide 15
Connecting a Printer 24
Connecting to a Computer 22
Connections 22, 24, 26
Connector 16, 22, 23
Copyright 7
H
Handling Precautions 13
I
Install/Uninstall Software 30, 32, 33
Install/Uninstall Software Button 34
Installing the Software 32, 33
Insufficient Free Hard Disk Space 59
Insufficient Memory 59
Intellectual property 9
iPhoto Express 1.1 32, 54, 63
L
Legal Restrictions 9
List of Electronic Manuals 36
Locations to Avoid 20
Lock Switch 15, 18
76
M
Magnetic Interference 11
Menu Window 30
O
OmniPage Limited Edition 32
Optical Character Recognition 32
P
Parallel Cable 10, 22, 23
Parallel Port Drivers 70
PC Port 16, 24
Placement 20, 21
Positioning Documents 50
Power Cord 16, 26
Power Supply 12, 26
Power Switch 26
Power Terminal 16, 26
Powering Down the Scanner 26
Precautions with Printers 69
Printer Cable 24
Printer Connections 24
Printer Port 16, 24
S
Safe Locations 10
Safety Precautions 10
Save Button 57
Scan Button 57
Scanner Not Found Message 60
Scanner Placement 20, 21
Scanning Unit 15, 51
Scanning Unit Lock 15, 18
Software Requirements 33
Specifications 74
Standby Operation 8, 26
Start Button 52
T
Text Data 32
Thick Documents 51
Transport 16, 18
Troubleshooting 59
Tutorial 30, 35
TWAIN Driver 52, 54
TWAIN_32-Compliant 54
U
Unlocking the Scanner 18
Unsuccessful Installation 59
V
Viewing Electronic Manuals 30, 36
W
Windows 95 Parallel Port Driver 69
Windows Printing System (WPS) Printers
25, 67
Z
Zooming In/Out in Electronic Manuals 41
77
Customer Support Help Desk
CANON (UK) LTD.
Canon House, Manor Road, Wallington, Surrey
SM6 0AJ, United Kingdom
For technical support, please contact Canon
Helpdesk.
Helpdesk:
P.O. Box 431, Wallington, Surrey SM6 0XU
TEL: (0990) 143 723 (Calls may be recorded.)
FAX: (0990) 143-340
BBS: (0990) 143-350
For sales equiries: (0121) 666-6262
CANON FRANCE S.A.
17, quai du Président Paul-Doumer
92414 Courbevoie Cedex, France
Tél. 01 4199 7777
Fax. 01 4199 7951
Hotline:
Tél. 01 4199 7070
CANON DEUTSCHLAND GmbH
Europark Fichtenhain A10, 47807 Krefeld,
Postfach 528, 47705 Krefeld, Germany
TEL: 02151/345-0 FAX: 02151/345-102
CANON- Hotline-Service
Customer Support: 02151/349-555
Info-Desk: 02151/349-566
Mailbox: 02151/349-577
Telefax: 02151/349-588
CANON ITALIA S.p.A
Palazzo L, Strada 6, 20089
MilanoFiori-Rozzano (MI), Italy
TEL: 02/8248. 1
FAX: 02/8248. 4604
Pronto Canon 02/8249. 2000
http://www.canon.it
CANON OY AB
Kornetintie, 3, 00380 Helsinki, Finland
Tel: 010 544 20
Help Desk: 0600-0-22606
Fax: 010 544 4382
CANON SVENSKA AB
S-127 88, Skärholmen, Sweden
BRUHN A.S.
Vasekær 12, DK-2730 Herlev, Denmark
Hotline: 44 88 26 66
http://www.canon.dk
CANON NORGE AS
Hallagerbakken 110, Boks 33, Holmia 1201 Oslo
12, Norway
Tlf: 2262 9321
FAX. 2262 0615
78
CANON BENELUX NEDERLAND B.V.
Neptunusstraat 1, 2132 JA Hoofddorp
The Netherlands
CANON BENELUX BELGIUM N.V./S.A.
Bessenveldstraat 7, 1831 Diegem, Belgium
CANON GmbH
Zetschegasse 11, 1232 Wien, Austria
CANON NEW ZEALAND LTD.
Fred Thomas Drive, Takapuna, P.O. Box 33-336
Auckland, New Zealand
Info-Line: 0900-522666
CANON HONG KONG CO., LTD.
10/F, Lippo Sun Plaza, 28 Canton Road
Tsimshatsui, Kowloon, Hong Kong
CANON SINGAPORE PTE. LTD.
79 Anson Road #09-01/06, Singapore 079906
CANON (SCHWEIZ) A.G.
Industriestrasse 12, CH-8305 Dietlikon
Switzerland
Tel: 01/83561 61
Fax: 01/835 68 60
Hotline: 157 30 20
CANON LATIN AMERICA, INC.
6505 Blue Lagoon Drive Suite 325, Miami Florida
33126, U.S.A.
CANON ESPAÑA S.A.
C/Joaquin Costa No 41, 28002 Madrid, Spain
Teléfono de attención al cliente: 901-301301
Tel.: 91-5384500
Fax.: 91-4117780
CANON EUROPA N.V.
Bovenkerkerweg 59-61, P.O. Box 2262
1180 EG Amstelveen, The Netherlands
CANON INC.
30-2 Shimomaruko 3-chome, Ohta-ku
Tokyo 146-8501, Japan
CANON AUSTRALIA PTY. LTD.
1 Thomas Holt Drive, North Ryde, Sydney N.S.W.
2113, Australia
Info-Line: (02)9805 2864
I-OE-012AA
© CANON INC. 1998
CREATED IN JAPAN