1
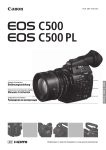
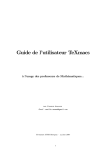
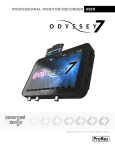
PUB. DIE-0427-000B 1 C Y P O Instruction Manual Version 1.1 Windows Table of Contents 02 3 Introduction 3 About Cinema RAW Development 3 Conventions in the Manual 4 Running Cinema RAW Development 4 Starting Up Cinema RAW Development 4 Exiting Cinema RAW Development 5 Overview of the Main Window 5 Folders Panel 6 6 Clips Panel Selecting clips 7 Playing Back and Developing Clips 7 Displaying the Preview Window 7 8 9 9 10 Playing Back Clips Changing the way video is displayed Adjusting the volume Changing the playback position Repeating playback of a clip 11 11 Developing Clips Adjusting the development settings 13 Setting In and Out Points 14 Connecting to an External Monitor Using SDI Output C 22 22 Menus and Keyboard Shortcuts Menu bar 23 Troubleshooting Error Messages Y P O 15 Exporting Clips 15 Adjusting the Export Settings 16 18 18 18 Developing and Exporting RAW Clips Removing clips from the export queue Changing the destination folder Adding a RAW clip in the export result list to the export queue again Saving the export log 18 22 Reference and General Information 20 Displaying and Editing Metadata 20 20 Displaying Clip Information Entering and editing clip information 21 Displaying Frame Information Introduction Introduction About Cinema RAW Development Cinema RAW Development allows you to develop, play back and export Canon RAW files (referred to as “RAW clips” in this manual) shot with Canon digital cinema cameras. The following are the main features of Cinema RAW Development. 03 Develop and play back Develop RAW clips stored on your computer and simultaneously play the clips back. Develop and export Develop RAW clips stored on your computer and export the clips as DPX files or OpenEXR files. You can also copy RAW clips as is. NOTES When you use this software, make sure to set your computer so that it does not enter sleep or standby mode. Y P O Conventions in the Manual Important precautions related to the software’s operation. Additional information that complements the main procedure. 0 Reference page number in this instruction manual. File > Open This font is used to indicate menu options and commands, as they appear onscreen. C • For the most part, screens shown in this manual were captured on a computer running Windows 7. Actual screens may differ slightly. Disclaimers • This software was developed for exclusive use with RAW clips created using a Canon digital cinema camera and external recorder compatible with Canon RAW data. • While every effort has been made to ensure that the information contained in this manual is accurate and complete, Canon shall not be liable for any damages resulting from corrupted or lost data due to mistaken operation or malfunction of the software. • Your camera may not support all of the features and functions described in this manual. Screens show clips recorded using a Canon EOS C500 digital cinema camera and external recorder. • The software records internal operations, including full path information of the clips used, on a log file kept on the hard disk. The information recorded will be used only for the purpose of providing technical support in case of a problem with the software. Running Cinema RAW Development Running Cinema RAW Development Starting Up Cinema RAW Development Double-click the Cinema RAW Development shortcut icon on the desktop. After a short while, the application’s main window will appear. 04 Double-click NOTES C Y P O • Multiple instances of Cinema RAW Development cannot be opened simultaneously. • If Windows’ display font size is changed from the default 96 dpi, some text and buttons on the main window or dialog boxes may not be displayed correctly. • If your computer is running resident software that periodically accesses the hard disk, such as an antivirus application, computer performance when playing back and exporting clips may decrease. Exiting Cinema RAW Development Using the menu: Click File > Exit. From the main window: Click the (Close) icon on the top right corner of the window. Overview of the Main Window Overview of the Main Window The main window shows the folders panel and clips panel. 05 Folders Panel Folders Panel Clips Panel C Y P O Shows a list of folders on your computer. Select the folder that contains the desired clips. Overview of the Main Window Clips Panel After you select a folder in the folders panel, the clips panel will display a list of the clips saved in that folder. The list shows the clip types (RAW, DPX and OpenEXR) and clip names. From the list, you can select which RAW clips* to play back or export. * RAW clips are folders that are comprised of video, audio and management files. 06 Selecting clips To play back or export a clip, you must first select it. When exporting, you can select multiple RAW clips. In the clips panel, click on the desired clips. • To select multiple, non-successive clips: Click the desired clips while holding the Ctrl key (Ctrl + Click). • To select multiple, successive clips: Click the first clip and then click the last clip while holding the Shift key (Shift + Click). C Y P O NOTES If you select a library such as Videos, clips in that highest level folder will not be displayed. If you select a sub-folder in that library, then any clips contained therein will be displayed. Playing Back and Developing Clips Playing Back and Developing Clips Displaying the Preview Window The preview window shows the preview panel and development settings panel. You can develop and play back the RAW clip currently selected in the clips panel. Click View > Preview. • The preview window will appear. 07 Y P O Preview Panel C Development Settings Panel Playing Back Clips This software features basic playback functionality of your clips. You can play back the RAW clip currently selected in the clips panel and display it in the preview panel. During playback, you can use the playback controls under the video display area. RAW clips will be played back using quick development (0 11). 1. In the clips panel, select the clip you want to play back (0 6). • The video display area will show the first frame from the clip. • After selecting a RAW clip, it is developed according to the settings in the development settings panel (0 11) and then displayed. 2. Click A to start the playback. • The clip will be played back. The playback position slider and time code display will advance as the clip is played back. • During the clip’s playback, the A button will change to B. 3. Click B to stop the playback. • Selecting a different clip in the clips panel will also stop the playback of the current clip. Playing Back and Developing Clips Video display area 08 Total duration of the clip Time code Playback position slider Playback controls IMPORTANT Y P O Your computer’s performance can affect the playback quality. In certain cases, you may notice some of the following anomalies. - Playback is not smooth and frames are dropped. - The displayed time code does not match the actual frame being displayed. - Parts of the screen freeze or take longer to be refreshed. NOTES C • You can play back RAW clips shot with Canon digital cinema cameras. • When the input focus* is on the playback position slider in the preview panel, you can press the space key or K key to start/stop the playback. * “Input focus” refers to the window or item that can receive keyboard input from the user. Changing the way video is displayed You can change how video is displayed in the video display area. Click View > Desired option. Options Fit to Preview Area Displays the entire video so that the entire picture is visible. Display at 100% Displays the video at actual size. As such, only a portion of the video will be displayed. A display area graphic will appear to the right of the playback position slider indicating what portion is being displayed. You can use the mouse to drag the picture in the video display area to change what is being displayed. Playing Back and Developing Clips Display area graphic 09 Fit to Preview Area setting Adjusting the volume Display at 100% setting Y P O Drag the volume slider to adjust the playback volume. You can click the the sound. button to temporarily mute Click to mute the audio C Volume slider Changing the playback position You can change the playback position during playback or in playback pause mode in the following ways. Playback position slider Move to the out point Next frame Previous frame Move to the in point Mouse operation Keyboard shortcut* Action Home Move to the in point. Move to the first frame if the current frame position is before the in point. End Move to the out point. Move to the last frame if the current frame position is after the out point. Ô J Go back one frame. Ó L Advance one frame. * Usable when the input focus is on the playback position slider in the preview panel. Playing Back and Developing Clips Repeating playback of a clip When you place a check in the Repeat box, you can have the clip repeat playback. After playing back to the out point, playback starts again from the in point. 10 Place a check in the box to repeatedly play back the clip NOTES • If you select a DPX or OpenEXR clip in the clips panel that was exported with this software, you can display a desired frame. Use the playback position slider, and the Ô (go back one frame) and Ó (advance one frame) controls to select a frame. • OpenEXR clips are displayed in a different color from RAW clips before export. • This software displays OpenEXR clips by applying the Reference Rendering Transform (RRT), which is stipulated in the ACES specifications, and Output Device Transform (ODT) into Rec. 709. C Y P O Playing Back and Developing Clips Developing Clips Adjusting the development settings RAW clips must be developed before they can be played back or exported. You can adjust various development settings using the development settings panel. 1. Select the desired RAW clip from the clips panel. • The clip will be developed and the video display area will show the first frame from the clip. 11 2. In the development settings panel, adjust the desired settings. • The clip is developed again based on the new settings and then displayed in the video display area. 3. Play back the clip (0 7). Return white balance to default settings White balance adjustment mode Click White Balance Color temperature C Y P O Brightness White balance shift Sharpness View gamma Quick development Development settings Default settings are underlined. Setting Setting options Function White balance adjustment mode Shooting Settings, Click White Balance, Color temperature Selects how the white balance is adjusted. Click White Balance — Adjusts the white point. After clicking the button, click in the video display area to adjust the white balance by using the color of the location clicked as the white point. Color Temperature 2,000 to 15,000 K (5200) Allows you to adjust the color temperature using the slider or by directly entering a value (in increments of 100 K). You can click K to return the setting to its default value. Playing Back and Developing Clips Setting 12 Setting options Function Brightness -3.0 to 3.0 (0.00) Allows you to adjust the brightness using the slider or by directly entering a value (in increments of 0.01). You can click K to return the setting to its default value. White Balance Shift -10.0 to 10.0 (0.0) Allows you to adjust the white balance shift using the slider or by directly entering a value (in increments of 0.1). You can click K to return the setting to its default value. Sharpness 0 to 10 (0) Allows you to adjust the sharpness using the slider or by directly entering a value (in increments of 1). You can click K to return the setting to its default value. View Gamma Canon Log, Rec. 709, Wide DR Selects the gamma setting for development that will be applied during playback of a RAW clip. This setting will be applied to the preview panel and the picture output through the SDI terminal (0 14). Quick Development Off, On When exporting a RAW clip or during playback pause mode, processing is simplified to shorten the development time. Because some processes such as false color reduction will not be implemented, the color and resolution will differ from the result obtained using normal development. During playback, quick development is always enabled, regardless of this setting. NOTES Y P O • Use a computer with a GPU supported by this software to develop clips. Although it is possible to develop clips using a computer that does not have a GPU supported by this software, it is not recommend to do so. For the latest information on this software, including system requirements, visit your local Canon Web site. • Development settings cannot be changed while playing back a RAW clip. • You cannot adjust the sharpness of RAW clips that were recorded in HRAW recording mode (4096x1080, 3840x1080) C Playing Back and Developing Clips Setting In and Out Points You can set the in and out points (starting and ending points) of a range of frames in a clip. By default, the first frame of the clip will be the in point and the last frame will be the out point. However, you can change these points. The in and out points will be represented by the and icons, respectively. Mouse operation 13 Keyboard shortcut* Action I Sets the current frame as the in point. O Sets the current frame as the out point. * Usable when the input focus is on the playback position slider in the preview panel. In point icon Out point icon Button to set the out point Button to set the in point NOTES Y P O You can set in and out points to export only a specific portion of a clip (0 16). C Playing Back and Developing Clips Connecting to an External Monitor Using SDI Output If your computer has an expansion card with SDI output capability, you can use this software to play back clips on an external monitor using your computer’s SDI terminal*. During output, an output area graphic (see the illustration below for an example) will be available to select what portion of the playback picture is displayed but the playback picture itself will not appear in the graphic. Refer also to the instruction manual of the expansion card. * The picture resulting from playing back a clip with this software will be referred to hereafter as the “playback picture”. 14 1. Connect the external monitor to the computer’s SDI terminal. • Follow the procedure in the instruction manual of the expansion card. 2. Click Tools > User Configuration. 3. Select the video output configuration that matches the external monitor’s capability (�). 4. Click OK (�). 5. Click the SDI OUT button (�). • A graphic will appear in the video display area indicating what portion of the picture is being displayed. • Click the SDI OUT button again to disable SDI output. 6. Play back the clip (0 7). Y P O • The playback picture will be output from the SDI terminal. • The size of the output picture will automatically be enlarged or reduced depending on the aspect ratio of the playback picture and the resolution selected in step 3 for External SDI Monitor. If the aspect ratios are different, the output picture will be letterboxed or pillarboxed. To play back without reducing the size Place a check in the 100% box. • During playback pause, you can use the mouse to drag the picture on the output area graphic to change what is being displayed. C 쐃 Output area graphic � � User Configuration dialog box SDI OUT button NOTES • For External SDI Monitor, if you select 4096x2160 RGB, 3840x2160 RGB or 2048x1080 RGB, clips with a frame rate of 59.94P or 29.97P will be output at 23.98P and those with a frame rate of 50.00P will be output at 25.00P. If you select 1920x1080 RGB, clips with a frame rate of 59.94P will be output at 29.97P and those with a frame rate of 50.00P will be output at 25.00P. • If the playback picture size is reduced, moiré patterns or other artifacts may appear. • If the resolution of the clip and SDI monitor differ, dropped frames may occur during playback. Exporting Clips Exporting Clips Adjusting the Export Settings You can select the type of file exported, the file name and the destination folder. You must perform the settings before adding the desired RAW clip to the export queue. � 15 � � � 쐃 Export window Y P O � � 1. Click View > Export. C • The export window will appear. 2. Click the � Export settings dialog box button (�). • The export settings dialog box will appear. 3. Select how the exported file’s name will be generated (�). Use Clip Name of Metadata [metadata clip name]1_[number corresponding with the RAW file].[file extension] Use same file name as RAW file [RAW file name].[file extension] Enter File Name [file name input by user2][_consecutive clip number3]_[number corresponding with the RAW file].[file extension] 1 This is the clip name that was given to the clip recorded on the CF card at the same time the RAW clip was recorded. If no clip was recorded on the CF card when the RAW clip was recorded, then the file name method will be the same as that of “Enter File Name”. 2 If you add a clip to the export queue, the file name settings dialog will appear. 3 This consecutive number is added when multiple clips are added to the export queue at once. • For proxy files, “Proxy_” will be added to the beginning of the file name. 4. Under Export Destination, click Browse and then select the export destination folder (�). 5. Under Export File, select the development process (�). Output Full-quality Files Output Proxy Files Copy RAW Files The RAW clip that is output is developed normally so that the generated file will have image quality as close as possible to the original RAW clip. The RAW clip that is output is partially developed and reduced in size so that the generated file will be easier to edit. The RAW file is copied to the export destination folder. Exporting Clips 6. If you selected Only Full-Quality File in step 5, select the file type (�). • For the file type, you can select DPX RGB 10-bit, DPX RGB 16-bit or OpenEXR (ACES)*. * If you selected OpenEXR, select Auto Select, Daylight or Tungsten for ACES IDT. If you selected DPX for the file type, the Canon Log gamma setting will be applied; if you selected OpenEXR (ACES), the file will be output as scene-linear data without a gamma setting. If you selected Only Proxy File in step 5, select the file type (�) and gamma setting (�). • For the file type, you can select DPX RGB 10-bit 720x480 or DPX RGB 10-bit 1920x1080. • For the gamma setting, you can select Canon Log, Rec. 709 or Wide DR. 16 7. Click OK (�). Processing and file types Development process Output Full-quality Files Output Proxy Files File type DPX Characteristics RGB 10-bit Gamma Canon Log RGB 16-bit OpenEXR RGB 16-bit Linear DPX RGB 10-bit 720x480 Canon Log, Rec. 709, Wide DR RGB 10-bit 1920x1080 NOTES Y P O • Files will be saved in subfolders in the folder you selected in step 4. For full-quality files, the subfolder name will have the same name as the RAW clip. For proxy files, the subfolder name will have the same name as the RAW clip with “Proxy_” added to the beginning. For RAW copied files, the subfolder name will have the same name as the RAW clip with “Copy_” added to the beginning. • When an OpenEXR clip is exported, it will be converted into a color space defined by the Academy Color Encoding System (ACES), which was proposed by the Academy of Motion Picture Arts and Sciences (AMPAS). C Developing and Exporting RAW Clips You can develop a RAW clip and export it as a standard file type. 1. In the clips panel, select the RAW clip to be exported. 2. Adjust the development settings as necessary (0 11). 3. In the main window, click the Add to Export Queue button (�). • If a dialog box appears prompting you to change the file name, enter a file name and click OK. • The selected RAW clip will be added to the bottom of the export queue. • You can also drag a clip from the clips panel and drop it on the export queue to add it. 4. Repeat steps 1 to 3 as necessary to add other RAW clips to the export queue. • You can change the export settings for each clip separately (0 15). 5. Click the Export button (�). • The RAW clips in the export queue will be exported in order starting from the file on the top. • The range of frames from the in point to the out point will be exported. • RAW clips that have been exported will be removed from the export queue and then be added to the export result list. • For clips that are displayed in the export result list, you can select Show All, Show Error Clips or Show Successful Clips. • The Export button will change to Cancel, which you can click to cancel the export process. Exporting Clips • You can click the Delete All button to clear the export result list. • You can develop full-quality files using quick development. Proxy files will always use quick development regardless of the Quick Development setting. Export queue 17 � 쐃 Y P O Export result list Items displayed in the export queue and export result list Item Description Clip name Shows the name of the RAW clips. Frames Shows the number of frames processed on the left and the total number of frames on the right. The number on the left will be updated while RAW clips are being exported. This appears only in the export queue. Destination folder Full-quality file C Shows the folder to which exported files are saved. Determines whether a full-quality file is output, the output format and ACES IDT (for OpenEXR files only). Proxy file Determines whether a proxy file is output, the output format and the gamma setting. Copy Determines whether the file is copied. Export results The (blue) icon indicates that the file was successfully exported while the (red) icon indicates an error. Status Shows details of the export results (explains the reason an error occurred). Messages displayed in the status column Item Description Successful Clip export was completed successfully. Development Error The RAW clip is corrupted. Use backup data. Destination drive does not exist. Cannot access the drive that contains the destination folder. Check the drive. Insufficient Available Size The drive that contains the destination folder does not have enough available space. Select a different drive for the destination folder. Read Error The RAW clip is corrupted. Use backup data. Write Error Could not write to the destination folder. Check that the folder permissions allow for writing. Cannot Create a Folder Exporting Clips Item Unknown Error Description An error not covered by the other error messages in this list, such as a lack of memory error, has occurred. After restarting your computer, perform the operation again. NOTES 18 The following operations cannot be performed during export. - Playing back a clip - Adjusting development settings - Viewing clip information or frame information Removing clips from the export queue Follow the steps below to remove a RAW clip from the export queue. 1. Select the RAW clip to remove from the export queue. • You can select multiple clips at once. 2. Click Y P O in the export panel. • The selected RAW clip will be removed from the export queue. Changing the destination folder C You can change the destination folder for clips added to the export queue. 1. Select a RAW clip in the export queue. • You can select multiple clips at once. 2. In the export window, click Change Folder and select the destination folder. Adding a RAW clip in the export result list to the export queue again You may find it convenient to add a RAW clip in the export result list to the export queue again in cases such as when an error has occurred. 1. Select a RAW clip in the export result list. • You can select multiple clips at once. 2. In the export window, click Re-add to Queue. • The selected RAW clips will be added to the export queue with their previous settings. • If necessary, you can also change the destination folder. Saving the export log 1. In the Tools menu, select User Configuration. 2. Place a check in the Save Export History box. 3. Click Browse under Destination folder and select a destination folder. 4. Click OK. • The export log from this point on will be saved in an export log file (CSV format). • Export log files are generated on a daily basis on days in which files are exported. The file’s name Exporting Clips will appear in the destination folder as [CRD_Export_YYYYMMDD].CSV where YYYYMMDD represents the year, month and day. Data recorded in the export log file Item 19 Description Status Shows the result of the export process. Date Shows the date in which the file was exported. Time Shows the time in which the file was exported. Source Shows the file path of the RAW clip. Destination Shows the file path of the exported file. Type Shows the output format of the exported file. If the file was copied, this appears as RMF. Resolution Shows the resolution of the exported file. Gamma Shows the gamma settings for the exported file. For OpenEXR files, this appears as Linear. IDT Shows the IDT setting applied to OpenEXR files. Start TC Shows the starting time code for the exported file. End TC Shows the ending time code for the exported file. C Y P O Displaying and Editing Metadata Displaying and Editing Metadata Displaying Clip Information When you display the clip information window, you can display the clip information in the metadata associated with the RAW clip that is selected in the clips panel. Click View > Clip Information. • The clip information window will appear. 20 C Y P O Entering and editing clip information 1. In the clip information window, double-click Clip Title, Creator or Description. • The Edit Clip Information dialog box will appear. 2. Enter text or edit the fields as necessary. • You can enter up to 1000 characters into the description field and a maximum of 100 characters for the other fields. 3. Click OK. • The user information will be saved with the RAW clip. Displaying and Editing Metadata Displaying Frame Information When you display the frame information window, you can display the frame information (information on each frame in the RAW clip) recorded in the metadata of the frame that currently appears in the preview window. During playback, the information will be updated to match the frame being played back. Click View > Frame Information. • The frame information window will appear. 21 C Y P O Reference and General Information Reference and General Information Menus and Keyboard Shortcuts Menu bar 22 Menu submenu Keyboard Shortcut Function 0 File Export Configuration Ctrl + D Opens a dialog box where you can adjust export settings. 15 Add to Export Queue Ctrl + F Adds the clip currently selected in the clips panel to the export queue. — Start Export Ctrl + G Starts export. — Stops export. Cancel Export Exit Alt + F4 View Preview — Export — Clip Information — Frame Information — Fit to Preview Area Display at 100% Tools C Exits Cinema RAW Development. Y P O 16 4 Opens or closes the preview window. 7 Opens or closes the export window. 15 Opens or closes the clip information window. 20 Opens or closes the frame information window. 21 Ctrl + N Adjusts the size of the video so that the entire picture is visible. Ctrl + M Displays the picture in the preview panel at 100% size. 8 — Opens a dialog box where you can set your preferences about the software’s operation. — View Instruction Manual F1 Open’s Cinema RAW Development’s instruction manual (this PDF file). — About Cinema RAW Development — Displays details about the software’s version. User Configuration Help — Reference and General Information Troubleshooting Error Messages Following is a partial list of error messages in alphabetical order. Cannot add clips. Export queue has reached the maximum number of clips. • The export queue already contains RAW clips. You can add other RAW clips after export has finished. 23 Cannot start program due to insufficient memory. • Close other applications and then start this software again. Cinema RAW Development has already been started by other user. • Multiple users cannot open the software simultaneously on the same computer. The user who has already started the software must exit it. Trademark Acknowledgements • Microsoft and Windows are trademarks or registered trademarks of Microsoft Corporation in the United States and/or other countries. • Other names and products not mentioned above may be trademarks or registered trademarks of their respective companies. External Library Licenses Y P O This software uses the following external library. OpenEXR www.openexr.com License: Modified BSD License: Copyright (c) 2002-2011, Industrial Light & Magic, a division of Lucasfilm Entertainment Company Ltd. All rights reserved. Redistribution and use in source and binary forms, with or without modification, are permitted provided that the following conditions are met: Redistributions of source code must retain the above copyright notice, this list of conditions and the following disclaimer. Redistributions in binary form must reproduce the above copyright notice, this list of conditions and the following disclaimer in the documentation and/or other materials provided with the distribution. Neither the name of Industrial Light & Magic nor the names of its contributors may be used to endorse or promote products derived from this software without specific prior written permission. THIS SOFTWARE IS PROVIDED BY THE COPYRIGHT HOLDERS AND CONTRIBUTORS "AS IS" AND ANY EXPRESS OR IMPLIED WARRANTIES, INCLUDING, BUT NOT LIMITED TO, THE IMPLIED WARRANTIES OF MERCHANTABILITY AND FITNESS FOR A PARTICULAR PURPOSE ARE DISCLAIMED. IN NO EVENT SHALL THE COPYRIGHT OWNER OR CONTRIBUTORS BE LIABLE FOR ANY DIRECT, INDIRECT, INCIDENTAL, SPECIAL, EXEMPLARY, OR CONSEQUENTIAL DAMAGES (INCLUDING, BUT NOT LIMITED TO, PROCUREMENT OF SUBSTITUTE GOODS OR SERVICES; LOSS OF USE, DATA, OR PROFITS; OR BUSINESS INTERRUPTION) HOWEVER CAUSED AND ON ANY THEORY OF LIABILITY, WHETHER IN CONTRACT, STRICT LIABILITY, OR TORT (INCLUDING NEGLIGENCE OR OTHERWISE) ARISING IN ANY WAY OUT OF THE USE OF THIS SOFTWARE, EVEN IF ADVISED OF THE POSSIBILITY OF SUCH DAMAGE. C Reference and General Information For support concerning this software, please contact a Canon Service Center. For details see the back cover of your camera’s Instruction Manual. 24 C Y P O The information in this manual is verified as of May 2013. Subject to change without previous notice. PUB. DIE-0427-000B © CANON INC. 2013