1
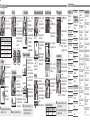
Custom Functions
Shooting Operation
S AF Point
� Press the <W> button, then
turn the <6/5> dial.
� Turn the <6> or <5> dial to
set the exposure, then shoot.
Shooting Mode
d (Program AE)
s (Shutter-priority AE)
f (Aperture-priority AE)
a (Manual exposure)
E: AF Mode
6 Dial
Program shift
Shutter speed setting
Aperture setting
Shutter speed setting
C
Y
P
O
5 Dial
Exposure compensation
Exposure compensation
Exposure compensation
Aperture setting
� Set the lens focus mode switch
to <E>.
Press the <o> button,
then turn the <6> dial.
•
X (One-Shot AF):
For still subjects
Z(AI Servo AF):
For moving subjects
Instead of pressing the shutter button halfway, AF is also possible
by pressing the <p> button.
Y Auto Exposure Bracketing (AEB)
R: Drive Mode
� Press the <S> button and use
the <9> or turn the <6> and
<5> dials.
� By pressing <9> straight down,
you can toggle between the center
AF point z automatic selection.
� If all the peripheral AF points light
up, automatic AF point selection
will take effect.
9
C
Y
P
O
6
5
� Press the <o> button,
then turn the <5> dial.
u: Single shooting
o: High-speed continuous shooting
(Approx. 10 shots per sec.)
p: Low-speed continuous shooting
(Approx. 3 shots per sec.)
k: 10-sec. self-timer
l: 2-sec. self-timer
6: Silent single shooting
Increased exposure
q Metering Mode
� Press the <Q> button, then
turn the <6> dial.
qEvaluative metering:
Standard metering mode
wPartial metering: Approx. 13.5% at center
rSpot metering: Approx. 3.8% at center
eCenter-weighted average metering:
Metering weighted at the center and
averaged for the entire scene
Multiple spot metering is possible with the <I> button.
Y
P
O
AEB increment
O Exposure Compensation
Decreased exposure
–
+
Standard exposure index
Exposure level
� Set the power switch to <J>.
� Focus the subject, then check the
exposure setting.
� Turn the <5> dial to set the
exposure compensation amount.
+ � You can set the amount up to ±3
stops in 1/3-stop increments.
C
–
Shooting Mode
2. Decreased
exposure
1. Standard exposure
3. Increased exposure
� Select [6 Live View/Movie
func. set.].
� Select [LV z/k set.] and set
[Stills].
� Press <0> to display the Live
View image on the LCD monitor.
Y
P
O
� After the three bracketed shots
are taken, AEB will not be
canceled. To cancel AEB, set the
AEB increment to “0.0”.
C
AE lock
� Focus the subject.
� Press the <A> button to lock the
current exposure setting.
� The exposure level indicator will
show the AE lock exposure level
and the current exposure level in
real-time.
� Recompose and take the picture.
k Shooting Movies
C
Y
P
O
� Press the <W> button and
turn the <6/5> dial to select
the shooting mode.
� Press the shutter button halfway.
After focus is achieved, press the
shutter button completely.
� Press <0> to end the Live View
shooting.
Battery Life with Live View Shooting
Temperature
Possible shots
At 23°C / 73°F
Approx. 270 shots
At 0°C / 32°F
Approx. 230 shots
Frame rate
C.Fn I: Exposure
1
Exposure level
increments
2
ISO speed setting
increments
� Select [Movie rec. size] and set
the size.
3
Set ISO speed range
� Press the shutter button halfway
to turn off the menu screen.
� Pressing <0> will display the
movie image on the LCD monitor.
4
Bracketing auto cancel
5
6
7
Spot metering link to AF
point
8
Safety shift
9
Select usable shooting
modes
� Select [LV z/k set.] and set
[Movies].
� Press the shutter button halfway
to turn off the menu screen.
w AE Lock
� To cancel exposure
compensation, set the exposure
level indicator to the standard
exposure index (<a> or <C>).
�You can also set it with the <O> button and <6/5> dial.
� For light-colored subjects, set it to the plus side. For
dark-colored subjects, set it to the minus side.
z Live View Shooting
� Press the <W> button and
<o> button
simultaneously, then turn the
<6/5> dial to set the AEB
amount.
� It can be set up to ±3 stops in
1/3-stop increments.
� The bracketed shots will be taken
in the current drive mode in the 1,
2, 3 sequence.
Autoexposure Shooting
Y
P
O
� Press the <W> button and
turn the <6/5> dial to select a
shooting mode other than <a>.
� Press the shutter button halfway
to focus.
� Press the <I> button to start
shooting a movie. During movie
shooting, the “o” mark will
appear on the upper right.
� To stop shooting the movie, press
the <I> button again.
Recording movie
C
� If you set the shooting mode to <a>, you can set manual
exposure for movie shooting.
� You can take a still photo during movie shooting by pressing
the shutter button completely.
17 FE Microadjustment
5
C.Fn II: Image/Flash
exposure/Display
Lens drive when AF
impossible
6
Lens AF stop button
function
7
AF Microadjustment
8
9
1
Long exposure noise
reduction
2
High ISO speed noise
reduction
Bracketing sequence
3
Highlight tone priority
Number of bracketed
shots
4
Auto Lighting Optimizer
5
E-TTL II flash metering
6
Shutter curtain sync.
7
Flash firing
8
Viewfinder info. during
exposure
9
LCD panel illumination
during Bulb
C
Y
P
O
10 Select usable metering
modes
11 Exposure mode in
manual exposure
12 Set shutter speed range
13 Set aperture value range
14 Apply shooting/metering
mode
15 Flash sync. speed in Av
mode
16 AE Microadjustment
10 INFO. button when
shooting
C.Fn III: Auto focus/Drive
1
USM lens electronic MF
2
AI Servo tracking
sensitivity
3
AI Servo 1st/2nd image
priority
4
AI Servo AF tracking
method
C.Fn IV: Operation/Others
1
Shutter button/AF-ON
button
2
AF-ON/AE lock button
switch
AF expansion with
selected point
3
Quick Control Dial in
metering
Multi-controller while
metering
4
Assign SET button
5
Tv/Av setting for Manual
exposure
10 Selectable AF point
11 Switch to registered AF
point
Dial direction during Tv/Av
Av setting without lens
8
WB + media/image size
setting
9
H button function
Y
P
CO
12 AF point auto selection
13 AF point display during
focus
14 AF point brightness
6
7
15 AF-assist beam firing
10 Button function when 5
<OFF>
16 Orientation linked AF
point
12 Focusing Screen
17 Mirror lockup
18 Continuous shooting
speed
19 Limit continuous shot
count
11 Start movie shooting
13 Timer length for timer
14 Shortened release time
lag
15 Add aspect ratio
information
16 Add image verification
data