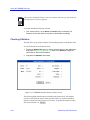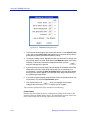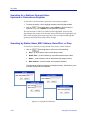
1
®
Portable Management Application
for the
TRMMIM
User’s Guide
The Complete Networking Solution
Notice
Cabletron Systems reserves the right to make changes in specifications and other information
contained in this document without prior notice. The reader should in all cases consult Cabletron
Systems to determine whether any such changes have been made.
The hardware, firmware, or software described in this manual is subject to change without notice.
IN NO EVENT SHALL CABLETRON SYSTEMS BE LIABLE FOR ANY INCIDENTAL, INDIRECT,
SPECIAL, OR CONSEQUENTIAL DAMAGES WHATSOEVER (INCLUDING BUT NOT LIMITED
TO LOST PROFITS) ARISING OUT OF OR RELATED TO THIS MANUAL OR THE INFORMATION
CONTAINED IN IT, EVEN IF CABLETRON SYSTEMS HAS BEEN ADVISED OF, KNOWN, OR
SHOULD HAVE KNOWN, THE POSSIBILITY OF SUCH DAMAGES.
Virus Disclaimer
Cabletron has tested its software with current virus checking technologies. However, because no antivirus system is 100% reliable, we strongly caution you to write protect and then verify that the
Licensed Software, prior to installing it, is virus-free with an anti-virus system in which you have
confidence.
Cabletron Systems makes no representations or warranties to the effect that the Licensed Software is
virus-free.
Copyright © 1996 by Cabletron Systems, Inc. All rights reserved.
Printed in the United States of America.
Order Number: 9031130-E6 October 1996
Cabletron Systems, Inc.
35 Industrial Way, P.O. Box 5005
Rochester, NH 03867-0505
SPECTRUM, MiniMMAC, FNB, Multi Media Access Center, and DNI are registered trademarks,
and Portable Management Application, IRM, IRM2, IRM3, IRBM, ETSMIM, EFDMIM, EMME,
ETWMIM, FDMMIM, FDCMIM, MRXI, MRXI-24, NB20E, NB25E, NB30, NB35E, SEHI, TRBMIM,
TRMM, TRMMIM, TRXI, Media Interface Module, MIM, and Flexible Network Bus are
trademarks of Cabletron Systems, Inc.
UNIX and OPENLOOK is a trademark of Unix System Laboratories, Inc. OSF/Motif and Motif are
trademarks of the Open Software Foundation, Inc. X Window System is a trademark of Massachusetts
Institute of Technology. Ethernet and XNS are trademarks of Xerox Corporation. Apple and
AppleTalk are registered trademarks of Apple Computer, Inc. Banyan is a registered trademark of
Banyan Systems, Inc. DECnet is a registered trademark of Digital Equipment Corporation. Novell is a
registered trademark of Novell, Inc. CompuServe is a registered trademark of CompuServe. Sun
Microsystems is a registered trademark, and Sun, SunNet, and OpenWindows are trademarks of Sun
Microsystems, Inc.
i
Restricted Rights Notice
(Applicable to licenses to the United States Government only.)
1.
Use, duplication, or disclosure by the Government is subject to restrictions as set forth in subparagraph (c) (1)
(ii) of the Rights in Technical Data and Computer Software clause at DFARS 252.227-7013.
Cabletron Systems, Inc., 35 Industrial Way, Rochester, New Hampshire 03867-0505.
2.
ii
(a)
This computer software is submitted with restricted rights. It may not be used, reproduced, or disclosed
by the Government except as provided in paragraph (b) of this Notice or as otherwise expressly stated
in the contract.
(b)
This computer software may be:
(1)
Used or copied for use in or with the computer or computers for which it was acquired, including
use at any Government installation to which such computer or computers may be transferred;
(2)
Used or copied for use in a backup computer if any computer for which it was acquired is
inoperative;
(3)
Reproduced for safekeeping (archives) or backup purposes;
(4)
Modified, adapted, or combined with other computer software, provided that the modified,
combined, or adapted portions of the derivative software incorporating restricted computer
software are made subject to the same restricted rights;
(5)
Disclosed to and reproduced for use by support service contractors in accordance with
subparagraphs (b) (1) through (4) of this clause, provided the Government makes such disclosure
or reproduction subject to these restricted rights; and
(6)
Used or copied for use in or transferred to a replacement computer.
(c)
Notwithstanding the foregoing, if this computer software is published copyrighted computer software,
it is licensed to the Government, without disclosure prohibitions, with the minimum rights set forth in
paragraph (b) of this clause.
(d)
Any other rights or limitations regarding the use, duplication, or disclosure of this computer software
are to be expressly stated in, or incorporated in, the contract.
(e)
This Notice shall be marked on any reproduction of this computer software, in whole or in part.
Contents
Chapter 1
Introduction to SPMA for the TRMMIM
The TRMMIM ................................................................................................................ 1-1
Using the TRMMIM User’s Guide ............................................................................. 1-1
What’s NOT in the TRMMIM Guide... ............................................................... 1-2
Conventions ................................................................................................................... 1-3
Screen Displays ...................................................................................................... 1-3
Using the Mouse .................................................................................................... 1-5
Getting Help .................................................................................................................. 1-6
TRMMIM Firmware ..................................................................................................... 1-7
Chapter 2
Using the TRMMIM Hub View
Using the Hub View ..................................................................................................... 2-1
Navigating Through the Hub View .................................................................... 2-2
Hub View Front Panel ........................................................................................... 2-3
Using the Mouse in a Hub View Module........................................................... 2-6
Hub View Port Color Codes................................................................................. 2-8
Port Display Form.................................................................................................. 2-8
FNB Display.......................................................................................................... 2-10
Monitoring Hub Performance................................................................................... 2-11
Checking Device Status and Updating Front Panel Info ............................... 2-13
Checking Module Status..................................................................................... 2-14
Checking Port Status ........................................................................................... 2-16
Checking Station Status ...................................................................................... 2-17
Configuring Station Name, Location, or Priority..................................... 2-20
Checking Ring Port Status.................................................................................. 2-20
Checking Statistics ............................................................................................... 2-22
Managing the Hub ...................................................................................................... 2-24
Managing the Hub at the Device Level ................................................................... 2-24
Find MAC Address.............................................................................................. 2-24
Setting the Polling Intervals ............................................................................... 2-25
Managing the Hub at the Module Level.................................................................. 2-28
Controlling Token Ring FNB Multiplexer Connections ................................. 2-28
FNB Bypass States ........................................................................................ 2-29
Manipulating the FNB in the Hub View ................................................... 2-29
Using the Module FNB Configuration Window ...................................... 2-29
Clearing the Module FNB Configuration Window Selections............... 2-31
Controlling Token Ring Speed ........................................................................... 2-31
Controlling Token Ring MIM Management Mode ......................................... 2-32
Enabling All Ports on Token Ring Modules..................................................... 2-32
iii
Contents
Managing the Hub at the Port Level ........................................................................ 2-33
Converting a Station Port to a Ring-out Port ................................................... 2-33
Enabling and Disabling Station and Ring Ports .............................................. 2-33
Removing a Station from the Ring .................................................................... 2-34
Chapter 3
Ring Map
Launching the Ring Map.............................................................................................. 3-2
Selecting a Ring to Map................................................................................................ 3-3
Viewing Station-specific Information......................................................................... 3-6
The Quick Info Popup Window........................................................................... 3-6
Setting a Station Name .......................................................................................... 3-8
Setting a Station Drop............................................................................................ 3-9
Viewing Management Station Configuration .................................................... 3-9
Viewing Ring-level Information ............................................................................... 3-13
Setting the Statistics Calculation Mode ............................................................ 3-13
Viewing the Error Table ...................................................................................... 3-14
Changing the Station Labels............................................................................... 3-18
Viewing Device Information .............................................................................. 3-19
Setting the Map Poll Interval.............................................................................. 3-20
Viewing Beacon History...................................................................................... 3-21
Beacon Configuration.......................................................................................... 3-23
Using the Find Options .............................................................................................. 3-25
Searching for a Station’s Nearest Active
Upstream or Downstream Neighbor ......................................................... 3-26
Searching by Station Name, MAC Address, Board/Port, or Drop............... 3-26
Searching for the Active Monitor, Ring Management Station,
or Last Beaconing Station ............................................................................ 3-27
Finding the Active Monitor on the Network ............................................ 3-27
Finding the Management Station on the Network .................................. 3-28
Finding the Last Beaconing Station............................................................ 3-28
Searching by Highest or Lowest Occurrence of a
Performance Parameter................................................................................ 3-28
Accessing Other SPMA Applications ....................................................................... 3-30
Chapter 4
Alarm Configuration
Setting and Viewing Ring Alarms .............................................................................. 4-3
Setting a Ring Level Alarm................................................................................... 4-5
Setting and Viewing Station Alarms .......................................................................... 4-5
Setting a Station Level Alarm............................................................................... 4-9
Chapter 5
Statistics
Using Statistics............................................................................................................... 5-1
Viewing the Ring Station List ...................................................................................... 5-2
Using the Reverse MAC Button........................................................................... 5-4
iv
Contents
Refreshing the Station List.................................................................................... 5-4
Monitoring Ring and Station Statistics ...................................................................... 5-4
Creating a Pie Chart .............................................................................................. 5-5
Creating a Graph or Meter ................................................................................... 5-6
Ring and Station Variables........................................................................................... 5-8
General .................................................................................................................... 5-8
Protocols.................................................................................................................. 5-8
Frame Sizes ............................................................................................................. 5-9
Isolating Errors ....................................................................................................... 5-9
Non-Isolating Errors............................................................................................ 5-10
Chapter 6
Ring Security Configuration
About Ring Security ..................................................................................................... 6-1
Launching the Security Configuration Window ...................................................... 6-2
Configuring Security .................................................................................................... 6-7
Building the Allowed List Automatically .......................................................... 6-7
Adding New Stations to the Allowed or Disallowed Stations List ................ 6-7
Deleting Stations from the Allowed or Disallowed Lists................................. 6-8
Moving a Station Between the Allowed and Disallowed Stations List.......... 6-9
Clearing All Entries in the Allowed or Disallowed List................................... 6-9
Changing the Ring Security Mode .................................................................... 6-10
Appendix A TRMMIM MIB Structure
IETF MIB Support ........................................................................................................ A-1
TRMMIM MIB Structure............................................................................................. A-1
A Brief Word About MIB Components and Community Names .................. A-3
v
Contents
vi
Chapter 1
Introduction to SPMA
for the TRMMIM
The TRMMIM; how to use the TRMMIM User’s Guide; manual conventions; contacting Cabletron
Technical Support; TRMMIM firmware versions supported by SPMA
The TRMMIM
The TRMMIM™ is an intelligent Token Ring management module designed to be
used in a mid-chassis slot of a Cabletron Systems Multi-Media Access Center®
(MMAC™) chassis, with a TRMM® or an Ethernet intelligent repeater that
supports Cabletron’s backplane protocol (currently the EMME™ or the
EMM-E6™) residing in the management slot. The latter case allows you to fully
manage both Token Ring and Ethernet networks coexisting in the same chassis.
Using the TRMMIM User’s Guide
Your SPECTRUM Portable Management Application (SPMA) for the TRMMIM
consists of a number of different applications, each of which provides a portion of
the overall management functionality. Each of these applications can be accessed
from the icon menu (if you are using a management platform), from the Hub
View (which is a graphical display of the TRMMIM-managed hub), and from the
command line (if you are running in stand-alone mode).
The TRMMIM User’s Guide describes how to use many of the applications
included with the module; note that the instructions provided in this guide apply
to the TRMMIM module regardless of the operating system or management
platform you are using. Instructions for launching each individual function from
the command line (stand-alone mode) are also included in each chapter.
Following are descriptions of the applications detailed in this guide; while we
provide as much background information as we can, we do assume that you’re
familiar with Token Ring networks and general network management concepts.
1-1
Introduction to SPMA for the TRMMIM
•
Chapter 1, Introduction, describes the TRMMIM User’s Guide and the
conventions used in this and other SPMA manuals, explains where to find
information about the TRMMIM, and tells you how to contact Cabletron
Systems Technical Support.
•
Chapter 2, Using the TRMMIM Hub View, describes the visual display of the
Hub and explains how to use the mouse within the Hub View. Also described
are some basic functions available only from within the Hub View (changing
the Hub View display, opening menus and windows, enabling and disabling
ports, checking device and module status, and so on).
•
Chapter 3, Ring Map, describes how to graphically display all stations
inserted into your TRMMIM-managed Token Ring network. Using the Ring
Map application, you can display stations and perform station searches
according to various parameters, view and compare errors detected on the
ring, configure the ring management station, set station drops or station
names, view summary information about station configuration and ring
performance, view ring history information, and launch other SPMA Token
Ring applications.
•
Chapter 4, Alarm Configuration, describes how to set thresholds and enable
or disable alarms at the ring and station levels.
•
Chapter 5, Statistics, describes how to use the statistics windows to view ring
and station-specific information, including traffic counts, total error counts,
and error type breakdowns.
•
Chapter 6, Ring Security Configuration, describes how to remotely configure
security for the TRMMIM. The Ring Security application allows you to control
access to your TRMMIM-managed Token Ring network, and specify a security
mode for stations illegally attempting to enter the ring.
•
Appendix A, TRMMIM MIB Structure, lists the individual components that
collectively compose the TRMMIM’s MIB.
What’s NOT in the TRMMIM Guide...
The following standard SPMA tools are available through the TRMMIM module
and are explained in the SPECTRUM Portable Management Application Tools
Guide:
1-2
•
Charts, Graphs, and Meters
•
Community Names
•
Global Find MAC Address Tool
•
MIBTree
•
MIB I, II
•
Telnet
Using the TRMMIM User’s Guide
Introduction to SPMA for the TRMMIM
•
TFTP Download
•
Trap Table
The Charts, Graphs, and Meters application is accessible from the Hub View and
the command line; the Global Find MAC Address Tool is accessible from the
platform console window Tools menu; the MIBTree application is accessible from
the platform console window Tools menu, the Stand-alone Launcher window,
and the command line; the Telnet application is available from the command line;
the rest of the tool applications are available only from the icon menu or the
command line.
NOTE
Graphing capabilities are provided by an application that is included in HP Network
Node Manager and IBM NetView; therefore, graphs are only available when SPMA is
run in conjunction with one of these network management platforms. If you are running
SPMA in a stand-alone mode or in conjunction with SunNet Manager, no graphing
capabilities are available and no graph-related options will be displayed on buttons or
menus. Note that the screens displayed in this guide will include the graph-related
options where they are available; please disregard these references if they do not apply.
Instructions on discovering Cabletron devices, creating icons, and accessing the
icon menus within your management platform are included in your Installing
and Using SPECTRUM for... guide. If you are using SPMA for the TRMMIM in
stand-alone mode (without benefit of a specific network management system),
instructions for starting each application from the command line are included in
each chapter, both in this guide and in the SPMA Tools Guide.
Conventions
The family of SPECTRUM Portable Management Applications can work with a
number of different network management systems running on several different
operating systems and graphical user interfaces. This versatility presents two
documentation problems: first, there is no standard terminology; and second, the
appearance of the windows will differ based on the graphical interface in use. For
the sake of consistency, the following conventions will be followed throughout
this and other SPMA guides.
Screen Displays
SPMA runs under a variety of different operating systems and graphical user
interfaces. To maintain a consistent presentation, screen displays in this and other
SPMA guides show an OSF/Motif environment. If you’re used to a different GUI,
don’t worry; the differences are minor. Buttons, boxes, borders, and menus
displayed on your screen may look a bit different from what you see in the guide,
but they’re organized and labelled the same, located in the same places, and
perform the same functions in all screen environments.
Conventions
1-3
Introduction to SPMA for the TRMMIM
Some windows within SPMA applications can be re-sized; those windows will
display the standard window resizing handles employed by your windowing
system. Re-sizing a window doesn’t re-size the information in the window; it just
changes the amount of information that can be displayed (see Figure 1-1). When
you shrink a window, scroll bars will appear as necessary so that you can scroll to
view all the information that is available.
Use the scroll bars
provided to choose
what to display in a
window that’s been
resized
Click here to
display footer
message history
Figure 1-1. Window Conventions
Some windows will also contain a
button; selecting this button
launches a History window (Figure 1-2) which lists all footer messages that have
been displayed since the window was first invoked. This window can help you
keep track of management actions you have taken since launching a management
application.
1-4
Conventions
Introduction to SPMA for the TRMMIM
Figure 1-2. The History Window
Using the Mouse
The UNIX mouse has three buttons. Procedures within the SPMA document set
refer to these buttons as follows:
Button 1
Button 2
Button 3
Figure 1-3. Mouse Buttons
If you’re using a two-button mouse, don’t worry. SPMA doesn’t make use of
mouse button 2. Just click the left button for button 1 and the right mouse button
when instructed to use mouse button 3.
Conventions
1-5
Introduction to SPMA for the TRMMIM
Whenever possible, we will instruct you on which mouse button to employ;
however, menu buttons within SPMA applications will operate according to the
convention employed by the active windowing system. By convention, menu
buttons under the Motif windowing environment are activated by clicking the left
mouse button (referred to as mouse button 1 in SPMA documentation), and there
is no response to clicking the right button (mouse button 3). Under
OpenWindows, menu buttons can be activated by clicking the right button, and
convention dictates that the left button activates a default menu option; within
SPMA, that default option will also display the entire menu. Because of this
difference, references to activating a menu button will not include instructions
about which mouse button to use. All other panels from which menus can be
accessed, and all buttons which do not provide access to menus, will operate
according to SPMA convention, as documented.
Getting Help
If you need additional support related to SPMA, or if you have any questions,
comments, or suggestions related to this manual, contact Cabletron Systems
Technical Support. Before calling, please have the following information ready:
•
The product name and part number
•
The version number of the program that you need help with. SPMA is
modular, which means each application will have a specific revision number.
Where applicable, an INFO button provides the version number; you can also
view the version number for any application by typing the command to start
the application followed by a -v.
You can contact Cabletron Systems Technical Support by any of the following
methods:
By phone:
Monday through Friday between 8 AM and 8 PM
Eastern Standard Time at (603) 332-9400.
By mail:
Cabletron Systems, Inc.
PO Box 5005
Rochester, NH 03866-5005
By CompuServe®:
GO CTRON from any ! prompt
By Internet mail:
[email protected]
FTP
ctron.com (134.141.197.25)
Login
anonymous
Password
your email address
By BBS:
Modem Setting
1-6
(603) 335-3358
8N1: 8 data bits, 1 stop bit, No parity
Getting Help
Introduction to SPMA for the TRMMIM
For additional information about Cabletron Systems products, visit our World
Wide Web site: http://www.cabletron.com/
TRMMIM Firmware
SPMA for the TRMMIM has been tested against firmware versions 3.00.10 and
3.01.01; if you have an earlier version of firmware and experience problems
running SPMA contact Cabletron Systems Technical Support for upgrade
information.
TRMMIM Firmware
1-7
Introduction to SPMA for the TRMMIM
1-8
TRMMIM Firmware
Chapter 2
Using the TRMMIM Hub View
Navigating through the Hub View, monitoring hub activity; managing the hub at the device, module,
and port levels
The heart of the SPECTRUM Portable Management Application (SPMA) for the
TRMMIM is the Hub View, a graphical interface that gives you access to many of
the functions that provide control over the TRMMIM-managed hub.
NOTE
Note that the Hub View application only allows you to control boards and ports in the
domain of a single management module. If you have another management module
installed in the chassis to the left of the monitored TRMMIM, boards that are under the
domain of that module (i.e., Media Interface Modules – or MIMs – to its left) will still
display in the Hub View of the monitored TRMMIM; however, only boards within the
domain of the monitored TRMMIM can be correctly controlled. Flexible Network Bus
(FNB) connections across the MMAC chassis will be displayed regardless of modules
installed; however, only FNB connections within the domain of the monitored module can
be controlled. For example, if you had a TRMMIM and a TRBMIM installed in the same
chassis with the TRBMIM to the left of the TRMMIM, and you were modeling the
TRMMIM in a Hub View, you would have to create a separate Hub View for the
TRBMIM to control the FNB connections and manage MIMs to the left of the TRBMIM.
However, even while modeling the TRMMIM, you would still be able to view the boards
and FNB connections across the entire MMAC.
Using the Hub View
There are two ways to open the Hub View: if you are working within a network
management system, you can select the Hub View option from the icon menu;
specific directions for creating a TRMMIM icon and accessing the icon menu can
be found in the appropriate Installing and Using SPECTRUM for... guide. If you
are running the TRMMIM module in a stand-alone mode, type the following at
the command line:
spmarun e5hub <IP address> <community name>
2-1
Using the TRMMIM Hub View
The community name you use to start the module must have at least Read access;
for full management functionality, you should use a community name that
provides Read/Write or Superuser access. For more information on community
names, consult the appropriate Installing and Using SPECTRUM for... guide,
and/or the Community Names chapter in the SPMA Tools Guide.
NOTES
The spmarun script invoked first in the above command temporarily sets the environment
variables SPMA needs to operate; be sure to use this command any time you launch an
application from the command line. This script is automatically invoked when you launch
an application from the icon menu or from within the Hub View.
If you wish to configure your Token Ring hub in any way, be sure to use a community
name with at least Read/Write access. If you only wish to view current settings, a
community name with Read access will be sufficient.
If there is a hostname mapped to your TRMMIM’s IP address, you can use <hostname>
in place of <IP address> to launch this application. Please note, however, that the
hostname is not the same as the device name which can be assigned via Local
Management and/or SPMA; you cannot use the device name in place of the IP address.
Navigating Through the Hub View
Within the Hub View (Figure 2-1), you can click mouse buttons in different areas
of the window to access various menus and initiate certain management tasks.
The following describes the information displayed in the Hub View and shows
you how to use the mouse to display the Device, Module, and Port menus.
2-2
Using the Hub View
Using the TRMMIM Hub View
Figure 2-1. TRMMIM Hub View
Hub View Front Panel
In addition to the graphical display of the Media Interface Modules (MIMs), the
Hub View gives you device-level summary information. The following Front
Panel information appears to the right of the module display in the Hub View:
Contact Status is a color code that shows the status of the connection between
SPMA and the device:
Using the Hub View
•
Green indicates a valid connection.
•
Blue means that SPMA is trying to reach the device but doesn’t know yet if the
connection will be successful.
•
Red means that SPMA is unable to contact or has lost contact with the device.
2-3
Using the TRMMIM Hub View
Uptime
The time that the device has been running without interruption. The counter
resets to 0 days 00:00:00 (days HH:MM:SS) when one of the following occurs:
•
Power to the MMAC chassis is cycled.
•
The device is reset manually.
Time and Date
The date and time are taken from the device’s internal clock.
Device Name
A text field that you can use to help identify the device.
Device Location
A text field that you can use to help identify the device.
NOTE
If the TRMMIM you are modeling is installed in an MMAC-3 chassis, its window titles
will be truncated. If you have assigned a device name or location that contains more than
19 characters, only the first 19 will be displayed in the Hub View. Check the Device Status
window for the complete name and/or location, if necessary. See Checking Device
Status and Updating Front Panel Info, on page 2-13, for details.
IP Address
The device’s Internet Protocol (IP) address. You can’t change the TRMMIM’s IP
address from SPMA.
MAC Address
The device’s factory-set hardware address. The MAC address cannot be changed
from SPMA.
Clicking on the Device button displays the Device menu, Figure 2-2.
2-4
Using the Hub View
Using the TRMMIM Hub View
Figure 2-2. The Device Menu
The Device menu lets you perform the following:
Using the Hub View
•
Open the Device Status window.
•
Change the Port Display Form.
•
Change the FNB display for all modules in the chassis.
•
Open the Find MAC Address window.
•
Open the Polling Intervals window.
•
Launch the Ring Map application, which graphically displays all stations
inserted into the TRMMIM-managed ring network. The Ring Map also
provides an Error Table, a Ring History Information window, a Management
Station Configuration window, and powerful sort and find capabilities. Refer
to the Ring Map chapter for complete information on this application.
•
Launch the Alarm Configuration application. This application is described
thoroughly in the Alarm Configuration chapter.
•
Launch the Statistics application, which lets you graphically view statistical
information via pie charts, graphs, and meters. Details on this application are
provided in the Statistics chapter.
2-5
Using the TRMMIM Hub View
NOTE
Graphing capabilities are provided by an application that is included in HP Network
Node Manager and IBM NetView; therefore, graphs are only available when SPMA is
run in conjunction with one of these network management platforms. If you are running
SPMA in a stand-alone mode or in conjunction with SunNet Manager, no graphing
capabilities are available and no graph-related options will be displayed on buttons or
menus. Note that the screens displayed in this guide will include the graph-related
options where they are available; please disregard these references if they do not apply.
•
NOTE
Launch the Security application, so that you can establish safeguards against
unauthorized stations attempting to insert into the ring. This application is
described thoroughly in the Ring Security Configuration chapter.
The IP Address Table option in the Device menu (shown in Figure 2-2, grayed out) is not
supported for the TRMMIM.
If you need to call Cabletron’s Technical Support about a problem with the Hub
View application, you’ll need the information provided in the Info window:
Token Ring Device Hub View
program version
Token Ring Device firmware
revision
Figure 2-3. Hub Information Window
Clicking mouse button 1 on the Hub View Quit button closes all Hub View
application windows; any open applications which can also be accessed from the
command line will remain open.
Using the Mouse in a Hub View Module
Each MIM installed in the TRMMIM-controlled hub will be displayed in the Hub
View; use the mouse as indicated in the illustrations on the following pages to
access Module and Port menus and functions, as well as to configure the
multiplexers which connect the module to the MMAC chassis Flexible Network
Bus (FNB).
2-6
Using the Hub View
Using the TRMMIM Hub View
Module Index
Displays the index of the Module in
the MMAC chassis.
Click mouse button 1 to open the
Module Status window.
Click mouse button 3 to display the
Module menu.
FNB Bypass State
Indicates the bypass state of the Module with
respect to the displayed FNB.
Click mouse button 1 to toggle the MIM to INS
(inserted) or BYP (bypassed).
Click mouse button 3 to display the Module menu.
Module Type
Displays the type code for the
module.
Click mouse button 1 to open the
Module Status window.
Click mouse button 3 to display the
Module menu.
FNB Index
Indicates the index of the currently
displayed FNB.
Change the displayed FNB using
the FNB Display command from
the Device menu.
Port Index
Displays the interface index of the
port on the MIM.
Click mouse button 3 on the port to
display the Station Port menu.
Ring Ports
Ring In
Ring Out
Click mouse button 1 on the status
area to enable or disable the ring
port.
Click mouse button 3 on the index
or status area to display the Ring
Port menu.
Module Management Mode
Displays whether the MIM is set to
operate via hardware defaults or
has been configured via
management. Click mouse button
1 to toggle the mode between AUT
(hardware defaults) or MGT
(management).
Module Ring Speed
Indicates the current operating
speed of the board.
Click mouse button 1 to toggle ring
speed between 4 or 16 Mbps.
FNB Status/Control
Displays the state of the module
with respect to the currently
displayed FNB.
Click mouse button 1 in the box to
display the Module Status window.
Click mouse button 1 on a
connection symbol to change
connection status.
Click mouse button 3 in the box to
display the Module menu.
Port Display Form
Using the Device menu, you can
change the port display form
shown in the Module Status boxes
to display several different port
display types.
Click mouse button 1 to open the
Module Status window.
Click mouse button 3 to display
the Module menu.
Port Status
Displays port Admin/Link status,
or a variety of statistics.
Click mouse button 1 to toggle the
port between ENB (enabled) and
BYP (bypassed).
Click mouse button 3 to display
the Station Port menu.
Figure 2-4. Mousing Around a Module
Using the Hub View
2-7
Using the TRMMIM Hub View
Hub View Port Color Codes
The Port Status boxes on each MIM in the Hub View are color-coded to indicate
the port’s connection status. There are two color-coding schemes: one which is
associated with port Admin/Link status, and another associated with port
Admin status (these modes are described in the Port Display Form section,
following). The default color scheme is the one which indicates port Admin/Link
status; that is, for any Port Display Form except port Admin status, the colors will
indicate the status conditions described below.
•
Green indicates that the port is active; that is, the port has been enabled by
management, has a valid Link signal (if applicable), and is able to
communicate with the station at the other end of the port’s cable segment.
•
Blue indicates that the port has been disabled or bypassed through
management.
•
Yellow indicates that the port is enabled but does not have a valid connection.
This usually indicates that the device at the other end of the segment is turned
off, or that there is no cable attached to that port; stations which remove
themselves from the ring for self-testing will also display as yellow.
When Admin is the selected Port Display Form, there are only two status
conditions and colors:
NOTE
•
Green indicates that the port is enabled. This does not indicate whether or not
there is any cable connected to the port, or whether communication has been
established with the device at the other end of an attached cable.
•
Blue indicates the port has been disabled or bypassed through management.
If an intelligent MIM (e.g., the TRBMIM) is inserted in the MMAC chassis to the left of
the TRMMIM, its module status box will be colored purple and labeled “Special” for clear
identification. To manage another intelligent MIM (and any boards in its domain), a
separate Hub View must be created for it. For example, if you had a TRMMIM and a
TRBMIM installed in the same chassis, with the TRBMIM to the left of the TRMMIM,
and you were modeling the TRMMIM in a Hub View (the TRBMIM would bear the
“Special” module status box mentioned above), you would have to create a separate Hub
View for the TRBMIM in order to control the FNB connections and manage MIM ports
to its left. However, even while modeling the TRMMIM, you would still be able to view
the boards and FNB connections across the entire MMAC.
Port Display Form
You can change the type of information displayed for each port in the hub by
using the Port Display Form option on the Device menu. Changing the port
display form via the Device menu will affect all manageable ports in the hub.
To change the port display form:
1. Click on
2-8
to display the Device menu.
Using the Hub View
Using the TRMMIM Hub View
2. Drag down to Port Display Form, then right to select one of the port display
options. The current selection will be displayed in the Port Display Form text
box(es) on the module display.
Port display form options are:
Frames
Shows the total number of frames transmitted by the port, in a frames/second
format.
Total Bytes
Shows the total number of bytes transmitted by the port, in a bytes/second
format.
Errors
Shows port traffic errors as a rate (errors/second). You can display any one of the
following types of errors:
•
•
•
•
•
•
•
•
•
•
•
•
•
Total errors
Isolating errors
Non-isolating errors
Line errors
Burst errors
AC errors
Abort Sequence errors
Internal errors
Lost Frame errors
Rx Congestion errors
Frame Copied errors
Token errors
Frequency errors
For error type descriptions, see Checking Statistics, page 2-22.
NOTE
When a device is reset, statistics windows and/or statistics displays in the Hub View may
display very large numbers for one polling interval. This is due to the resetting of the
counters.
Port Type
Provides the following administrative information about the port:
•
Using the Hub View
Admin/Link Status indicates the Administrative and Link connection status
of the ports:
-
ENB (Enabled) indicates that the port has been enabled by management,
but there is no station linked to the port.
-
BYP (Bypassed) indicates the port has been disabled by management.
2-9
Using the TRMMIM Hub View
-
INS (Inserted) indicates the port has been enabled by management, and
there is a station linked to the port.
-
ACT indicates a ring port is active and passing data.
-
WRAP indicates data communications have been terminated at the ring
port, and it has wrapped so that the ring’s back-up path is in effect.
-
“---” for ring ports without a connection, or for any port with an unknown
connection status.
•
Admin Status displays either ON or OFF, an indication of whether
management has the port enabled or disabled. A port can be ON but not
operational. Under the Admin display, ports that are enabled but not linked
are shown as ON.
•
Media Type applies only to selectable-media ring ports and indicates the type
of cabling supported by the port:
•
-
On a module with media-selectable ring ports, the ring ports will display
the current selection: FO (Fiber Optic) or STP (Shielded Twisted Pair).
-
On a module without selectable ring ports, the ring ports will display
“UNS”.
-
Ring ports that do not have media selection will display “---”.
-
Station ports will display “---”.
Active Ports displays the following information about statistics for the port:
-
Yes if a linked (green with INS Admin/Link status) port on the
TRMMIM-managed ring has recorded statistics since the statistical
counters were last reset.
-
No if a linked (green with INS Admin/Link status) port on the
TRMMIM-managed ring has not recorded statistics since the statistical
counters were last reset.
-
“---” for non-TRMMIM-managed ports (i.e., ports that are not
on the managed ring), regardless of their status.
FNB Display
NOTE
2-10
The FNB Display option is meant for use with multi-Token Ring management modules
(e.g., the TRMM-2 and TRMM-4) and port switching MIMs (e.g., the TRXMIM and
TDRMIM) in order to view the FNB connection status of the port switching MIMs.
Since the TRMMIM is a single-Token Ring management module, only the FNB 1 display
selection (which is the default display for your Hub View) is applicable.
Using the Hub View
Using the TRMMIM Hub View
Using the FNB Display option from the Device menu, you can change the FNB
index (see Figure 2-4 ) for all boards in the Hub View. By default, all boards in the
Hub View initially display FNB 1. When you change the FNB Display, the Hub
View will change to show each board’s relationship with the selected FNB. Hub
View features that will change include:
•
The FNB index, which will display the index for the selected FNB.
•
The FNB Bypass State, which will change to show the bypass state (INS, BYP,
or ---) for each module with respect to the selected FNB. If FNB 2, 3, or 4 are
selected, non-port switching modules in the chassis will display ---, indicating
that no connection is possible with the selected FNB. To change the FNB
Bypass State, see Controlling Token Ring FNB Multiplexer Connections, on
page 2-28.
•
The FNB Status/Control symbols, which will display each module’s
relationship with its neighbors with respect to the selected FNB. If FNB 2, 3,
or 4 are selected, no FNB Status/Control symbols will be present for
non-port switching modules in the chassis. For information on manipulating
the FNB Status/Control symbols, see Controlling Token Ring FNB
Multiplexer Connections, on page 2-28.
To change the FNB display for all boards in the Hub View:
1. Click on
to display the Device menu.
2. Drag down to FNB Display, then right to select FNB 1, 2, 3, or 4.
Monitoring Hub Performance
The information displayed in the Hub View can give you a quick summary of a
device’s activity, status, and configuration. SPMA can also provide further details
via its four-level menu structure. The Device, Module, Station Port, and Ring Port
menus (Figure 2-5, below) give you control over the hub at these four levels and
give you access to the tools, menus, and windows which let you monitor specific
aspects of hub performance, change hub display options, and set TRMMIM
operating and notification parameters. Some of the same functions are available at
all four levels; keep in mind, however, that functions accessed from the device
menu will provide information about and control all the modules in a hub or in
the first ring detected by the management board, while the functions accessed
from the module or port menus provide information about and control a single
module or port.
Monitoring Hub Performance
2-11
Using the TRMMIM Hub View
Figure 2-5. The Device, Module, Station Port, and Ring Port Menus
NOTE
Note that the Hub View application only allows you to control boards in the domain of a
single management module. If you have another management module installed in the
chassis to the left of the monitored TRMMIM, boards that are under the domain of that
module (i.e., Media Interface Modules – or MIMs – to its left) will still display in the Hub
View of the monitored TRMMIM; however, only boards within the domain of the
monitored TRMMIM can be correctly controlled. Although you can display Module
menus for MIMs outside of the domain of the monitored TRMMIM, you cannot use these
menus to correctly control those MIMs.
Hub performance data available through these menus includes:
•
NOTE
2-12
Device, Module, Port, Station, and Ring Port Status windows.
Note that information displayed in the Status windows is static; that is, it is only gathered
at the instant the Device, Module, Port, Station, or Ring Port Status window is opened.
To receive updated information in one of these windows, you must exit the window and
re-open it.
•
Device and Station statistics, which provide a complete breakdown of ring
activity.
•
Device pie-charts, graphs, and meters, as graphic representations of the types
and levels of traffic passing through the hub. (For more information about pie
charts, graphs, and meters, see the Charts, Graphs, and Meters chapter in the
SPMA Tools Guide.)
Monitoring Hub Performance
Using the TRMMIM Hub View
NOTE
Graphing capabilities are provided by an application that is included in HP Network
Node Manager and IBM NetView; therefore, graphs are only available when SPMA is
run in conjunction with one of these network management platforms. If you are running
SPMA in a stand-alone mode or in conjunction with SunNet Manager, no graphing
capabilities are available and no graph-related options will be displayed on buttons or
menus. Note that the screens displayed in this guide will include the graph-related
options where they are available; please disregard these references if they do not apply.
Checking Device Status and Updating Front Panel Info
The Device Status window is where you change the information displayed on the
Hub View Front Panel and where you can see summary information about the
current state of the hub.
To open the Device Status window:
1. Click on
to display the Device menu.
2. Drag down to Status and release.
Figure 2-6. The Device Status Window
Name and Location
These text fields help identify this TRMMIM. The information you enter in the
Name and Location boxes is set at the TRMMIM and appears on the Hub View
front panel.
Monitoring Hub Performance
2-13
Using the TRMMIM Hub View
Contact
This text field allows you to enter the identity of the network administrator
responsible for the TRMMIM. The information you enter in the Contact text box is
set at the TRMMIM.
Date and Time
Cabletron’s intelligent devices incorporate an internal clock. The Front Panel Date
and Time display is a real-time presentation of the device clock.
To change the name, location, contact, date, or time:
1. Highlight the appropriate field and type the new values.
2. Press Return on the keyboard to save each change before moving on to
another field. Each change will appear on the front panel as soon as Return
is pressed.
Total Rings
Indicates the number of ring networks resident on the TRMMIM-controlled
MMAC chassis.
Total Ports
Indicates the number of ring and station ports currently detected on the
TRMMIM-controlled MMAC chassis.
Checking Module Status
You can open a Module Status window (Figure 2-7) for any module in a hub. To
open the Module Status window:
1. Click mouse button 1 in the Module Type box.
or
1. Click mouse button 3 in the Module Type or Module Index box to display the
Module menu.
2. Drag down to Status and release.
2-14
Monitoring Hub Performance
Using the TRMMIM Hub View
Figure 2-7. Module Status Window
The Module Status window contains the following fields:
Module Name
This text field can help identify this module; the information entered here does
not appear anywhere else in the Hub View.
To edit the Module Name:
1. Highlight the text in the Module Name box and type in a new name.
2. Press Return on the keyboard to save your change.
Module
Indicates the index number of the module in the MMAC chassis. Module
numbers are counted from right to left in the chassis, with 1 being the rightmost
slot.
Speed Fault
Indicates whether a ring speed fault has been detected on the selected module.
Possible returned values are Fault Detected or No Fault Detected.
Note that if your module hardware does not support this feature, this field will be
grayed out.
Speed Fault Location
Indicates the last ring speed fault detection circuit(s) alerted by the fault. Possible
circuit locations are FNB, Ring-in, or Ring-out. Note that this field will only be
active if a fault has been detected.
Monitoring Hub Performance
2-15
Using the TRMMIM Hub View
Checking Port Status
You can open a Port Status window for any station port on any manageable
module installed in the hub. A Port Status window reflects the condition of the
station port interface on the MMAC hub to which a station can attach.
To open the Station Port Status window:
1. Click mouse button 3 in the station Port Status or Port Index box to display
the Station Port menu.
2. Drag down to Port Status and release. The Port Status window, Figure 2-8,
will appear.
Figure 2-8. The Port Status Window
Port Name
This text field can help identify the attached station; the information entered here
is not displayed anywhere else in the Hub View.
Module/Port
Indicates the module (board) and port index of the selected interface.
Admin State
Displays the administrative state of the port: enabled or disabled.
Link State
Indicates whether the attached station is inserted into the ring (Link) or not (No
Link).
2-16
Monitoring Hub Performance
Using the TRMMIM Hub View
Link State Time
The time, in hours, minutes, and seconds, since the last Link State change.
Speed Fault
Indicates whether a ring speed fault has been detected at the selected station port.
Possible returned values are Fault Detected or No Fault Detected.
Note that if your hardware does not support this feature, this field will be grayed
out.
Insertion Trap
This configurable field indicates whether insertion (link) traps are enabled or
disabled for the station port. Insertion traps are generated by the TRMMIM when
a station inserts into the ring (i.e., the port status on the chassis changes from ENB
to INS) or removes itself from the ring (the port status changes from INS to ENB).
Note that your management system will only receive traps if your management
station’s IP address has been entered in the TRMMIM’s trap table. Refer to the
SPMA Tools Guide for more information on the trap table.
NOTE
SPMA does not accept the trap messages; that task is left to your network management
system. (See the appropriate network management system documentation for details
about viewing trap messages.) When this utility is used in stand-alone mode, traps will
either be ignored when they return to the workstation from which you are running SPMA
for the TRMMIM, or they will turn up at another management workstation which has
been configured to accept traps. Note also that, regardless of the configuration performed
using this utility, NO traps will be sent by the TRMMIM unless its trap table has been
properly configured; see the TRMMIM hardware manual and/or the Trap Table chapter
in the SPMA Tools Guide for more information.
By default, these traps are disabled to reduce the amount of management activity
on your network.
To Enable/Disable the Insertion Traps:
1. Click mouse button 1 on the Enable or Disable option, as desired. Insertion
traps will either be activated or deactivated accordingly.
Checking Station Status
You can open a Station Status window for any station inserted into the ring. A
Station Status window provides information about the station inserted into a
station port interface on the MMAC hub. Note that if there is no station attached
to the monitored port, no information will display.
To open the Station Status window:
1. Click mouse button 3 in the station Port Status box to display the Station Port
menu.
Monitoring Hub Performance
2-17
Using the TRMMIM Hub View
2. Drag down to Station Status and release. The Station Status window,
Figure 2-9, will appear.
Figure 2-9. The Station Status Window
Station Name
This text field can help identify the attached station; the information entered here
is not displayed anywhere else in the Hub View.
Module/Port
Indicates the module (board) and port index of the selected interface.
MAC Address
The physical (hardware) address of the station connected to the interface in MAC
(Ethernet) or Canonical (Token Ring) format.
Vendor
This field displays the name of the attached device’s manufacturer (if known), as
determined by the first three bytes of the MAC address.
Upstream Neighbor/Downstream Neighbor
These fields display the MAC addresses of the attached station’s neighbors on the
ring.
2-18
Monitoring Hub Performance
Using the TRMMIM Hub View
Physical Location
This text field can help identify where the station is situated. The information
entered here is not displayed anywhere else in the Hub View.
Priority
The priority assigned to a station controls how often it will receive the token and
how long it can hold it. In this field, you can assign a station priority number
between 0 and 3, with 0 being the lowest and 3 the highest priority. Use caution
when assigning a high priority, as this can significantly slow network traffic.
Port Mapping
Port Mapping enables the TRMMIM to determine if station address information
can be matched to a specific board and port index. This ability is important during
the Automatic Beacon Recovery Process, when the TRMMIM needs to match
address information contained in beacon frames with physical port locations so it
can determine the “fault region” and locate failing ports. (See the Ring Map
chapter for more information about Automatic Beacon Recovery, or ABRP.)
When Port Mapping is enabled, the TRMMIM can determine if a port is
physically linked to the MMAC without being mapped as part of the ring
network — that is, the device does not participate in neighbor notification. If a
port in this condition is detected, the TRMMIM will physically shut down the
port to prevent ring problems. Port Mapping is enabled by default.
However, you may want to attach a device to the MMAC — such as a ring
analyzer — that does not participate in the normal operation of token ring
protocol. In this case, you will want to disable Port Mapping for the port to which
that device will be attached, to ensure that the TRMMIM does not shut the port
down.
!
CAUTION
If you wish to insert an analyzer on a ring, be sure you disable Port Mapping on the port
you use for insertion; if you don’t, the TRMMIM will detect that a station which is not
participating in neighbor notification has been inserted, and will shut down the port.
Also, be sure you do not insert anything other than an analyzer into a port whose
mapping function has been disabled, since the TRMMIM will not recognize the link
status of that port, and will therefore not be able to map ports correctly (since it detects
more stations than linked ports).
Click on Enable to enable port mapping for the selected port, or on Disable to
disable it.
Reverse MACs
Selecting the Reverse MACs button will toggle the station’s MAC address
between Token Ring and Ethernet formats (Token Ring MAC addresses are the
reverse bit order of Ethernet MAC addresses). The Upstream and Downstream
neighbor addresses will also be affected.
Monitoring Hub Performance
2-19
Using the TRMMIM Hub View
Configuring Station Name, Location, or Priority
To assign a new station Name, Location, or Priority:
1. Highlight the text in the Name, Location, or Priority box and type in the new
value(s).
2. Press Return on the keyboard to save your change.
Checking Ring Port Status
You can check the status for any ring port on a manageable module inserted into
the MMAC hub.
To open the Ring Port Status window:
1. Click mouse button 3 in the ring Port Status box to display the Ring Port
menu.
2. Drag down to Status and release. The Ring Port Status window, Figure 2-10,
will appear.
Figure 2-10. The Ring Port Status Window
Port Name
This text field can help identify the ring interface; the information entered here is
not displayed anywhere else in the Hub View.
2-20
Monitoring Hub Performance
Using the TRMMIM Hub View
Module/Port
Indicates the module (board) and port index of the selected ring interface.
Fault State Time
The time (in an hours, minutes, seconds format) since the last change in the port’s
fault state.
Media Fault
When you are monitoring a ring port that supports auto-wrap, this field tells you
whether or not the ring port has a valid connection to the node at the other end of
the cable segment.
The possible link conditions are:
•
Fault Detected – There has been a fault detected on the segment, and the port
has autowrapped.
•
No Fault Detected – No faults have been detected on the segment; therefore,
the connection is valid.
Class
This field indicates the capabilities of the ring port, including whether it supports
the autowrap feature and media type selection.
If the ring port does not support autowrap, the field will read “noAutowrap”; if it
supports autowrap, but not a selectable media type, it will return “autowrap”;
and if it has a selectable media (as well as autowrap), it will return “selectable.”
Media Type
The media type can be one of the following:
•
•
STP (shielded twisted pair)
Fiber (fiber optic)
If the ring port supports this feature, you can use this field to change the media
type by selecting the STP or Fiber option.
Note that if your hardware does not support this feature, this field will be grayed
out.
Phantom Current
This selection only applies when the Media Type is set to STP for a ring port.
Devices that support autowrap feature a phantom current, which acts as carrier
sense between two connected ring ports. If the carrier sense is broken (i.e., the
wire is broken) the phantom current is lost and the ports automatically wrap to
retain the continuity of the ring. If you are attaching an older device (e.g., earlier
TRM-10R, TRM-20R) or a passive concentrator (TRC800) without the autowrap
feature, then you must disable the phantom current for the connection to remain
valid.
Monitoring Hub Performance
2-21
Using the TRMMIM Hub View
NOTE
After you have disabled the Phantom Current, remember that if the ring cable breaks, the
autowrap feature will not be supported.
To Enable/Disable the Phantom Current:
1. Click mouse button 1 on the Active or Inactive option, as desired. The
Phantom Current will either be activated or deactivated accordingly.
Checking Statistics
The Hub View can provide a summary of Token Ring statistics at the Station level.
To view hub statistics at the Station level:
1. Display the Station Port menu by clicking mouse button 3 in the appropriate
area (refer to Figure 2-4, on page 2-7). Refer to the Statistics chapter for
information on Device-level statistics.
2. Drag down to Statistics and release.
Figure 2-11. TRMMIM Statistics Window (Station Level)
The following fields detail statistics available at the Station level. All statistics
counts are read from the station at the time the window is opened, and reflect
statistics collected since the device was last reset. To update the statistics counts,
click mouse button 1 on
.
2-22
Monitoring Hub Performance
Using the TRMMIM Hub View
NOTE
When a device is reset, statistics windows and/or statistics displays in the Hub View may
display very large numbers for one polling interval. This is due to the resetting of the
counters.
Errors
The total number of errors detected by the selected station port since the device
was last reset.
Frames
The total number of frames transmitted by the selected station port.
Bytes
The total number of bytes transmitted by the selected station port.
Line
The count of line errors detected by the selected station. This error indicates a
non-data bit between the starting and ending delimiters of data, or a frame check
sequence error.
Burst
The count of burst errors detected by the selected station port. This error indicates
a bit information-encoding error where there are no transitions between 0 and 1
over five half-bit times.
AC
The number of frames containing errors in the A or C bits detected by the selected
station port.
Abort
The number of times the selected station has transmitted abort sequences during
transmission.
Internal
The number of recoverable internal errors detected by the selected port,
indicating that its attached station is in marginal operating condition.
Lost Frames
The number of frames that the selected station has transmitted that have not
returned because the Timer – Return to Repeat (TRR) timer has expired.
Congest
The number of times the selected station has not been able to copy a frame
addressed to it because of a lack of internal buffering.
Monitoring Hub Performance
2-23
Using the TRMMIM Hub View
Frame Copy
The number of frames addressed to the selected station that have the A bits
already set to 1, which indicates a possible electrical line disturbance, or a
duplicate address on the ring.
Token
The number of times the selected station, while acting as the active monitor, has
detected an error that required the transmission of a token.
Frequency
The number of times the selected station has detected that the incoming signal’s
frequency differed from the expected frequency by more than allowed.
Managing the Hub
In addition to the performance information described in the preceding sections,
the Hub View also provides you with the tools you need to configure your hub
and keep it operating properly. Hub management functions at the device level
include finding a MAC address and setting the polling intervals to contact the
device. At the module level, you can configure the module’s FNB left and right
connections, set board speed and operating mode, and enable all ports on the
module. At the station or ring port levels, you can remove a station from the ring,
convert a station port to a ring-out port; and enable or disable station or ring
ports.
Managing the Hub at the Device Level
From the Device menu, you can select the Find MAC Address and Polling
Intervals menu options.
Find MAC Address
The Find MAC Address menu command will let you search for any station on the
TRMMIM-controlled ring by MAC address. When a station is found, its location
will be described by module and port number.
To start the Find MAC Address command:
1. Click on
to display the Device menu.
2. Drag down to Find MAC Address, and release. The following window will
appear.
2-24
Managing the Hub
Using the TRMMIM Hub View
Figure 2-12. The Find MAC Address Window
3. Enter the desired MAC address in the Find window, and press Return to start
the search. Note that this feature is not case-sensitive.
If the address is found, it will be listed in the window along with its board and
port index.
Setting the Polling Intervals
By setting the polling intervals you can determine how often the following fields
and status indicators are updated in your hub view window: contact status icon,
device uptime, time, date, device name, device location, IP Address, MAC
Address, port status indicators and statistics windows. You can set different
polling intervals for each of the five polling groupings. This enables you to reduce
traffic on your network by setting a high polling interval for the information that
usually remains constant (e.g., Device General Status) and a low interval for one
that is changing more frequently (e.g., Statistics).
To set the polling intervals used by SPMA:
1. Click on
to display the Device menu.
2. Drag down to Polling Intervals, and release.
Managing the Hub at the Device Level
2-25
Using the TRMMIM Hub View
Figure 2-13. TRMMIM Polling Intervals
3. To activate the desired type of poll, click mouse button 1 on the selection box
to the right of each polling type field. Note that you will not be able to edit the
polling interval unless you have activated the polling.
4. To change a polling interval, highlight the value you would like to change, and
enter a new value in seconds. Note that the Use Defaults option must not be
selected, or values will revert back to default levels when you click
,
and your changes will be ignored.
5. If you wish to use your new polling interval settings as the default values that
SPMA will use for each Token Ring Hub Module you are managing, use
mouse button 1 to select the Save as Defaults option. Note that these default
polling intervals will be applied to all intelligent Token Ring modules that you
are monitoring through SPMA.
6. If you wish to replace existing values with the current set of default values, use
mouse button 1 to select the Use Defaults option.
7. Click mouse button 1 on
once your changes are complete.
Changes take effect after the current polling cycle is complete.
You can set the update interval (in seconds) for the following:
Contact Status
Indicates the interval that the device waits between polling for the status of the
connection between SPMA and the device. This information appears in the form
of the contact status icon at the top right corner of the hub view.
2-26
Managing the Hub at the Device Level
Using the TRMMIM Hub View
Device General Status
This polling interval controls how often the Hub View Front Panel Information,
such as Uptime, Device Name, etc., and some network, module, and port status
information is updated.
Device Configuration
Indicates when SPMA polls the device for the type of equipment installed in the
TRMMIM-managed hub; information from this poll would change the Hub View
to reflect the addition and/or removal of a MIM or MIMs.
Port Operational State
Indicates at what interval SPMA polls the device for the status of the individual
ports. This is represented in the color-coded port display format in the Hub View.
Statistics
This polling interval controls how often the Statistics windows are refreshed. The
Statistics windows are available from the Device and Station Port menus.
NOTE
SPMA generates network traffic when it retrieves the information described above; keep
in mind that shorter intervals mean increased network traffic. Range limits for these
polling times are 0-999,999 seconds; however, an entry of 0 will be treated as a 1.
You can save changes made to the polling window as defaults. After you have
saved a polling configuration as a default it will be used as the polling interval
each time you open the window while the Use Defaults option is selected. These
update intervals will replace your current default values. To save your changes as
defaults for all your Token Ring Management Modules:
1. Change the Polling Intervals as necessary (follow the steps in the section
above).
2. Select the Save as Defaults option.
3. Click mouse button 1 on
to save the changes you have made to
the window. The polling intervals you have entered will now be used as the
default values for all Token Ring Management Modules.
If you have made changes to the Polling Interval window, but have not saved
them as defaults, you can revert to the default values by selecting the Use
Defaults option. If you leave this option selected, the window will appear with
the default values each time you open the window. Use the following steps to
activate this option:
1. Select the Use Defaults option from the Polling Intervals window.
2. Click mouse button 1 on
to save the Use Defaults option.
Subsequent openings of the Polling Interval window will use default values.
Managing the Hub at the Device Level
2-27
Using the TRMMIM Hub View
Managing the Hub at the Module Level
At the module level, you can configure the module’s FNB left and right
connections and FNB Bypass state, set board speed and operating mode, and
enable all station ports, all ring ports, or all ports on the module.
Controlling Token Ring FNB Multiplexer Connections
You can control the configuration of your Token Ring network by changing the
FNB multiplexers – that is, the way modules connect to their neighbors through
the MMAC Flexible Network Bus (FNB).
By wrapping a Token Ring module’s FNB left and right connections, you can
physically disconnect a module from the FNB. Enabling a module’s FNB Bypass
state causes its station ports to be isolated from the ring, while the module itself
remains physically connected to the FNB.
The following diagram shows how you view the module display in the Hub View
to check the FNB left and right connections, as well as the FNB Bypass state, of the
hub modules.
INSerted: the
module is inserted
into the ring.
Individual station
ports on the module
can still be
BYPassed.
FNB Left
connection
disabled.
FNB Right
connection
disabled.
Module 7 FNB
Right Connection
enabled
Module 6 FNB
Left Connection
enabled
Figure 2-14. Bypass State and FNB Connection Symbols
There are two methods that you can use to control the FNB left and right
connections for Token Ring MIMs; you can click the mouse on the FNB symbols in
the Hub View FNB Status/Control box, or you can use the Module FNB
Configuration window, available via the Module menu. There are also two ways
to control the module’s FNB Bypass state; you can click the mouse on the
module’s FNB Bypass state box in the Hub View, or use the Module FNB
Configuration window to toggle the module’s FNB Bypass state between INS
(inserted) or BYP (bypassed).
2-28
Managing the Hub at the Module Level
Using the TRMMIM Hub View
FNB Bypass States
Figure 2-14 shows that all three modules are inserted into FNB 1, as opposed to
being bypassed from the FNB by a multiplexer. There are two possible status
conditions for a Token Ring module:
INS
The Bypass multiplexer is disabled, and all station ports and ring ports can be
connected to the FNB (depending on the status of the surrounding boards and
FNB connections).
BYP
The module is Bypassed, and the MIM ports form a self-contained ring. Stations
connected to the ports can communicate with each other, but they can’t pass
frames to the main ring. Ring ports are unaffected by the Bypass state (unless you
are modeling an older TRMIM-10R or TRMIM-20R; with these two modules, all
ports on the board enter bypass state and are isolated from the main ring). They
can communicate with other Token Ring modules if the FNB connection status
allows, but station ports on the MIM are no longer connected to the ring ports.
Ring ports can be separately bypassed using the RP Bypass option in the Module
FNB Configuration window. See Using the Module FNB Configuration Window
for details.
Manipulating the FNB in the Hub View
To change a module’s FNB left and right connections from within the Hub View:
1. Click mouse button 1 on the appropriate FNB connection symbol to toggle
between disabled and enabled.
To change a module’s FNB Bypass state from within the Hub View:
1. Click mouse button 1 on the Bypass State box at the top of the module to
toggle between BYP and INS.
Using the Module FNB Configuration Window
The Module FNB Configuration window allows you to manipulate a module’s
FNB left and right connections and FNB Bypass state. You can also bypass a
module’s ring ports using this window. The window lists each FNB interface
available for a module (for the TRMMIM, only FNB 1 is available), allowing you
to select the FNB and quickly apply the desired settings. To open the Module FNB
Configuration window:
1. Click mouse button 3 on the Module Name, FNB State, or Port Display
Form box to display the Module menu.
2. Drag down to FNB Status, and release. The Module FNB Configuration
window, Figure 2-15, will appear.
Managing the Hub at the Module Level
2-29
Using the TRMMIM Hub View
Figure 2-15. The Module FNB Configuration Window
The Module FNB Configuration window contains the following fields:
Board:
This field displays the board number of the module for which the Module FNB
Configuration window is being displayed.
FNB
This field lists the FNB number for each FNB interface available for the selected
module. For the TRMMIM, only FNB 1 is available.
Left Connect
This field lists the FNB left connection status for each corresponding FNB in the
list. Possible values for this field are Attached or Wrap.
Right Connect
This field lists the FNB right connection status for each corresponding FNB in the
list. Possible values for this field are Attached or Wrap.
Bypass
This field lists the FNB Bypass state for each corresponding FNB in the list.
Possible values for this field are Enabled or Disabled.
RP Bypass
This field lists the Ring Port Bypass state for each corresponding FNB in the list.
Possible values for this field are Enabled, Disabled, or NA (not applicable). The
default setting for this field is Disabled. Modules without ring ports will display
NA.
2-30
Managing the Hub at the Module Level
Using the TRMMIM Hub View
To attach or wrap a module’s FNB left and right connections using the Module
FNB Configuration window:
1. Click mouse button 1 on the FNB Interface in the list. The list entry will be
highlighted to show that it is selected.
2. Click mouse button 1 on the Attach or Wrap option for the connection that
you wish to manipulate (Left or Right).
3. Click on
. The desired FNB connection operation will be performed.
To change a module’s FNB Bypass state using the Module FNB Configuration
window:
1. Click mouse button 1 on the desired FNB Interface in the list. The list entry
will be highlighted to show that they are selected.
2. Click mouse button 1 on the Bypass: Enable or Disable option.
3. Click on
!
CAUTION
. The desired FNB Bypass operation will be performed.
The Network 1 interface of your TRMMIM is dedicated to monitoring FNB 1. If you
enable a module’s FNB Bypass state for FNB 1, that module (and its ports) will no longer
be in contact with the managed ring, and will form their own self-contained (orphan)
ring.
To change a module’s Ring Port Bypass state using the Module FNB
Configuration window:
1. Click mouse button 1 on the FNB Interface in the list. The list entry will be
highlighted to show that it is selected.
2. Click mouse button 1 on the RP Bypass: Enable or Disable option.
3. Click on
performed.
. The desired Ring Port Bypass operation will be
Clearing the Module FNB Configuration Window Selections
Clicking
at the bottom of the Module FNB Configuration window will
return all options to their unselected state.
Note that clicking
set by clicking
will not undo any FNB operations which you have
.
Controlling Token Ring Speed
Token Ring networks can operate at either 4 or 16 Mbps. All modules connected
to the same network must operate at the same speed.
Managing the Hub at the Module Level
2-31
Using the TRMMIM Hub View
To change the ring speed of a module:
1. Click mouse button 1 on the Module Ring Speed box (at the bottom of the
module) to toggle between 4 and 16 Mb/second.
or
1. Click mouse button 3 in the Module Name, FNB State, or Port Display Form
box to display the Module menu.
2. Drag down to Speed, right to 4 Mega Bits or 16 Mega Bits, then release.
Controlling Token Ring MIM Management Mode
Token Ring MIMs can run in one of two modes:
Auto (AUT)
Auto mode means that the MIM is using the hardware configuration settings; it is
not being controlled. If you change an operating parameter (ring speed, bypass
state, and so forth) on a module in Auto mode, the mode changes to Management
to indicate that it is being managed.
Management (MGT)
Management mode means that management takes precedence over the default
hardware settings on the board. If you toggle back to Auto mode, the hardware
default settings will be restored, and any administrative actions you have taken to
alter those settings will be undone.
To change a module’s management mode:
1. Click mouse button 1 on the Module Management Mode box (at the bottom
of the module) to toggle between AUT and MGT.
or
1. Click mouse button 3 in the Module Name, FNB State, or Port Display Form
box to display the Module menu.
2. Drag down to Mode, drag right to Auto or Management, and then release.
Note that there is no Auto mode available for the management board.
Enabling All Ports on Token Ring Modules
You can choose to enable all Station Ports, all Ring Ports, or all ports on a module.
To enable all ports on a Token Ring MIM:
1. Click mouse button 3 in the Module Name, FNB State, or Port Display Form
box to display the Module menu.
2-32
Managing the Hub at the Module Level
Using the TRMMIM Hub View
2. Drag down to Enable Ports, drag right to All Station Ports, All Ring Ports,
or All Ports, and release.
Managing the Hub at the Port Level
At the Station or Ring port level, you can convert a station port into a ring-out
port, remove a station from the ring, or enable or disable a station or ring port.
Converting a Station Port to a Ring-out Port
If you are monitoring a TRXMIM or a 93 Series Token Ring MIM (the TRMIM
22A/24A/ 42A/44A), you have the ability to switch the function of a station port
to that of a ring-out port. In this configuration, you can add a stand-alone passive
concentrator (such as a Cabletron Systems TRC800 or IBM® 8228) to the ring. This
allows for a star-wired network with the MMAC at the center.
To convert a station port on a TRXMIM or a 93 Series TRMIM into a ring-out port:
1. Click mouse button 3 in the Port Index or Port Status box to display the
Station Port menu.
2. Drag down to Enable Ring Out and release to convert the station port into a
ring-out port.
The converted port will assume full functionality of a ring-out port, and will
reflect as such in the Hub View window. The port status will now display as that
of a ring-out port, and the port menu will now assume ring port menu properties.
To convert the ring-out port back into a station port:
1. Click mouse button 3 in the Port Index or Port Status box to display the Ring
Port menu.
2. Drag down to Disable Ring Out and release to revert the functionality of the
port back to a station port.
Enabling and Disabling Station and Ring Ports
You can enable ports from the Module menu, which affects all ports on a single
module. You can enable and disable ports from the Station Port and Ring Port
menus, which affect individual ports.
To enable or disable an individual station or ring port:
1. Click mouse button 1 on the Station or Ring Port Status box to toggle the
port On or Off. Enabled ports are yellow, disabled ports are blue.
Managing the Hub at the Port Level
2-33
Using the TRMMIM Hub View
or
1. Click mouse button 3 in the Port Index or Port Status box to display the
Station Port menu or Ring Port menu.
2. Drag down to Enable or Disable and release. Enabled ports are yellow,
disabled ports are blue.
To enable all Station ports, all Ring ports, or all ports in a module:
1. Click mouse button 3 in the Module Name, FNB State, or Port Display Form
box to display the Module menu.
2. Drag down to Enable Ports, drag right to All Station Ports, All Ring Ports,
or All Ports, and release. Enabled ports are yellow, disabled ports are blue.
Removing a Station from the Ring
The Remove Station option on the Station Port menu allows you to remove a
station from the ring so that it can perform a loopback test. When you select this
option, the TRMMIM sends a Remove MAC Frame to the selected station. Upon
receiving this frame, the station will perform a loopback test to verify that its
MAC adapter is functioning correctly.
If the station fails the loopback test, it will stay off the ring. If it passes the test, its
actions will depend on the manufacturer of the adapter card. Cabletron Token
Ring DNI® cards (and some others) will reinsert into the ring automatically. IBM®
adapter cards (and others) will remove themselves from the ring until the station
is re-booted.
To remove a station:
1. Click mouse button 3 in the Port Index or Port Status box to display the
Station Port menu.
2. Drag down to Remove Station and release.
2-34
Managing the Hub at the Port Level
Chapter 3
Ring Map
Launching the Ring Map application; changing the map poll interval; setting the calculation mode;
assigning station labels; viewing the Map Error table; the Quick Info Pop-up window; management
station configuration; viewing Ring History; using the Find features; accessing other SPMA
applications
The Ring Map application comprises several major windows that provide
information about the ring your TRMMIM is managing:
•
The Ring Map window graphically displays all the stations inserted into a
selected ring network. Labelling options allow you to display the stations
according to several parameters, including vendor, address,
board/port/drop, and station name.
•
An Error Table allows you to compare the number of soft errors detected by
stations on your ring. You can select the errors either as a sum total, or select
an individual soft error type.
•
The Management Station Configuration window provides information on
the ring management device in its role as a station on the ring. The window
allows you to issue commands, allow or disallow active monitor contention,
and establish the time interval at which error reports are sent to the ring
management station.
•
The Beacon History window provides a record of ring events, including
Active Monitor changes, ring purges, and beacon information.
In addition, menus from individual station displays allow you to set a station
drop or station name; you can also invoke a Quick Info Pop-up window that
summarizes an individual station’s configuration and ring performance.
Powerful sort and find capabilities allow you to search for individual stations on
your network according to various parameters; you can also use this application
to invoke other SPMA Token Ring applications.
3-1
Ring Map
Launching the Ring Map
To launch the Ring Map application
from the icon:
1. Click on the appropriate TRMMIM icon to display the icon menu.
2. Drag down to Ring Map and release.
from the Hub View:
1. Click on
to display the Device menu.
2. Drag down to Ring Map and release.
from the command line (stand-alone mode):
1. From the appropriate directory, type the following at the command line:
spmarun e5map <IP Address> <community name>
NOTES
The spmarun script invoked first in the above command temporarily sets the environment
variables SPMA needs to operate; be sure to use this command any time you launch an
application from the command line. This script is automatically invoked when you launch
an application from the icon menu or from within the Hub View.
If you wish to configure a station while in the Ring Map window, be sure to use a
community name with at least Read/Write access. If you only wish to view the ring map,
a community name with Read access will be sufficient.
If there is a hostname mapped to your TRMMIM’s IP address, you can use <hostname>
in place of <IP address> to launch this application. Please note, however, that the
hostname is not the same as the device name which can be assigned via Local Management
and/or SPMA; you cannot use the device name in place of the IP address
The Ring Selection window, Figure 3-1, will appear.
3-2
Launching the Ring Map
Ring Map
Figure 3-1. The Ring Map – Ring Selection Window
Selecting a Ring to Map
The Ring Map Ring Selection window allows you to choose which ring to map
from among the rings, or networks, supported by the monitored TRMMIM.
Networks are identified by the following two fields:
No.
The index number assigned to the ring.
Ring Name
This network name assigned to each ring managed by the TRMMIM. The default
network name is Network X, where X represents the index number.
To view a ring map:
1. Click to select the ring you wish to monitor; the entry will be highlighted to
show it is selected.
2. Click on
Selecting a Ring to Map
. The Ring Map window, Figure 3-2, will appear.
3-3
Ring Map
Figure 3-2. The Ring Map Window
You can also change the ring you’re viewing without quitting the Ring Map
application. To do so:
1. Click on
.
2. Drag down to Select Ring. The Ring Selection window will re-appear.
Note that when you re-open the Ring Selection window, there is a Cancel
button in place of the Quit button in the window. Clicking on Cancel closes
the selecting window without exiting the application.
The Ring Map window displays all stations on the currently selected ring
counter-clockwise in downstream neighbor order, beginning with the monitored
device. You may need to re-size the window or scroll through it to view each
station on the selected network. The current active monitor will display in green
text; the current ring management station will be displayed surrounded by a blue
border. If the ring management station and the current active monitor are the
same station, that station will bear both the green text and the blue border.
3-4
Selecting a Ring to Map
Ring Map
The upper section of the Ring Map window, beneath the
buttons, displays the following ring information:
and
Speed
Displays the operating speed (4 Mbits/sec or 16 Mbits/sec) of the selected ring.
Stations
Displays the number of stations currently inserted into the selected ring.
Name
Displays the name assigned to the selected ring network.
Utilization
Displays the percentage of the total usable bandwidth (4 or 16 Mbits) that is
currently being used on the monitored ring. This field will update after each
polling interval.
State
Displays the current operational status of the monitored ring. Possible status
conditions are:
Unknown
Indicates the state of the ring cannot be detected by the
management station.
Closed
Indicates that the management station is not inserted into
the ring, and therefore cannot determine the ring state.
Normal Token
Protocols
Indicates the ring is running with no problems, and
tokens are being detected by the management station.
Purge
Indicates that the active monitor has issued a ring purge
command. Communications will be restored when a new
token is released.
Contention
Indicates that the ring has entered into the active monitor
contention process to select a new active monitor.
Beaconing
Indicates that the management station has detected a
beacon frame.
Lobe Fail
Indicates that a station failed the lobe self-test when it
attempted to insert into the ring.
Use the
whole.
Selecting a Ring to Map
button to launch applications which apply to the ring as a
3-5
Ring Map
Use the
button to locate a specific station on the ring by any one of a
number of characteristics, including drop, station name, and MAC address; you
can also identify stations of special interest, such as the active monitor or the last
beaconing station.
Use the individual station boxes to view station-specific information.
Viewing Station-specific Information
The Quick Info Popup Window
Using the Quick Info Popup window, you can view a summary of configuration
and performance information for an individual station.
NOTE
Remember, in the Quick Info Popup window, statistics are measured at the specified
polling interval and are displayed according to the selected calculation mode. The
calculation mode is global in nature; that is, when you change mode, it affects all statistics
— including those in the Quick Info window. The calculation mode currently in effect is
indicated at the bottom of the window.
To open a Quick Info Popup window for a station:
1. Double-click mouse button 1 on the selected station’s label.
or
1. Click mouse button 3 on the selected station’s label to access the Station
Menu; drag down to Quick Info, and release.
2. The Quick Info Popup window, Figure 3-3, will appear.
3-6
Viewing Station-specific Information
Ring Map
The current
Calculation Mode
is displayed here
Figure 3-3. Quick Info Popup Window
The Quick Info Popup window contains the following information about the
selected station:
MAC Address
The hardware address of the station’s network adapter, displayed in Canonical
form.
Name
The administratively assigned name of the station, if one has been assigned; if
none has been assigned, this field will remain blank. See Setting a Station Name,
page 3-8.
Board and Port
If the station is resident in the same hub as the TRMMIM, its board and port
location will display here. If the station is physically remote from the monitored
hub, the board and port will display 0.
Drop
The drop location of the station, if one has been administratively assigned. See
Setting a Station Drop, page 3-9.
Viewing Station-specific Information
3-7
Ring Map
Utilization
The percentage of the total usable bandwidth (4 or 16 Mb) that is currently being
used by the station. This field will update after each polling interval.
Performance and Errors
Error and performance statistics for the selected station are displayed according
to the currently selected calculation mode. Statistics displayed are:
•
•
•
•
•
•
•
•
•
•
•
•
Frames
Bytes
Line
Burst
AC
Abort Seq
Internal
Lost Frames
Congestion
Frame Copied
Token
Frequency
See Viewing the Error Table, page 3-14, for detailed definitions of these statistics.
Setting a Station Name
Using the Ring Map window, you can administratively assign a name to any
station on the monitored ring network.
To do so:
1. Click mouse button 3 on any station label in the map.
2. Drag down to Set Name, and release. The Set Station Name window,
Figure 3-4, will appear.
Figure 3-4. Set Station Name Window
3. In the Enter Name text field, enter a name (up to 10 ASCII characters) for the
selected station.
4. Click on
3-8
. The new name will be set at the station.
Viewing Station-specific Information
Ring Map
Setting a Station Drop
Using the Ring Map window, you can administratively assign a physical drop
identifier to any station on the monitored ring network.
To do so:
1. Click mouse button 3 on any station label in the map.
2. Drag down to Set Drop, and release. The Set Station Drop window,
Figure 3-5, will appear.
Figure 3-5. Set Station Drop Window
3. In the text field, type up to four ASCII characters.
4. Click on
selected station.
. The new physical drop identifier will be set at the
Viewing Management Station Configuration
The Management Station Configuration window provides information related to
the ring’s management device in its role as a station on the ring; from this window
you can issue certain commands, allow or disallow active monitor contention,
and establish the interval at which error reports are sent to the management
station.
To open the Management Station Configuration window:
1. In the Ring Map itself, look for the station whose label is outlined in blue. This
is the management station.
or
1. Click on
, drag down to Management Station, and release. The map
window will scroll if necessary to display the management station label.
2. Click mouse button 3 on the station label for the management station; drag
down to Management Station Configuration, and release. The
Management Station Configuration window, Figure 3-6, will appear.
Viewing Station-specific Information
3-9
Ring Map
Figure 3-6. The Management Station Configuration Window
The Management Station Configuration window contains the following
information and configurable options:
Commands
You can choose one of five commands to execute on the management station. To
select a command, click mouse button 1 on the button next to it.
3-10
No-op
No operation (command) will be performed on the
device.
SW Reset
The device will be reset through the software; note that
this does not reset statistical counters.
HW Reset
A hardware reset will occur on the device, which is the
equivalent of physically resetting the device. This
reinitializes the module and all counters are reset.
Open
Forces the management station to “open” on to the ring.
This causes the station to participate in the ring poll
process and receive and transmit data onto the ring.
Close
Forces the management station to “close,” therefore
removing itself from the ring and making the station
incapable of receiving or transmitting any data onto the
ring.
Viewing Station-specific Information
Ring Map
Open Status
This field displays the result of the last “open” command or the last attempt by
the management station to open onto the ring: whether the management station
did in fact open onto the ring, or if an error occurred. This field may display any
one of the following:
No Open
An open command has not been issued.
Bad Param
The open command could not be completed because the
parameters did not allow for the station to be opened
onto the ring.
Lobe Test Failed
The lobe media check has failed for the management
station.
Signal Loss
A signal loss condition has been detected at the
management station’s receiver input during the open
process.
Insertion Timeout
The management station has failed to logically insert on
the ring before the insertion timer expires.
Purge Failed
The management station has timed out when attempting
a ring purge after becoming the active monitor: that is,
the management station was unable to receive its own
ring purge MAC frames.
Beaconing
The management station received a beacon MAC frame
after physically inserting into the ring.
Duplicate MAC
Address
Another station on the ring has the same MAC address
as the management station.
Parameter Requested
The management station has determined that a Ring
Parameter Server (RPS) is present on the ring, but it does
not respond to a request initialization MAC frame.
Remove Received
The management station received a remove adapter
MAC frame during the insertion process.
Open
The open command was completed successfully.
Error Status
This field displays a number associated with the most recent error status that was
reported by the management station. It is possible for more than one error status
to be reported at one time; in this case, the number displayed would be the sum of
the codes of the last errors recorded. The following table lists the possible errors
and their corresponding error codes:
Viewing Station-specific Information
3-11
Ring Map
Code
Error
0
No problem detected
32
Ring Recovery Error
The management station has observed claim token MAC frames on the ring.
64
Single Station
The management station has sensed it is the only station on the ring.
128
Counter Overflow
One of the management station’s error counters has incremented from 254 to 255.
256
Remove Received
The management station has received a remove ring station MAC frame request
and has removed itself from the ring.
1024
Auto-Removal Error
The management station has failed the lobe wrap test resulting from the beacon
auto-removal process and has removed itself from the ring.
2048
Lobe Wire Fault
The management station has detected an open or short circuit in the cable between
itself and the wiring concentrator or hub.
4096
Transmit Beacon
The management station is transmitting beacon frames to the ring.
8192
Soft Error
The management station has transmitted a report error MAC frame.
16384
Hard Error
The management station is presently transmitting beacon frames to or receiving
beacon frames from the ring.
32768
Signal Loss
The management station has detected a loss of signal on the ring.
131072
No Status, Open Not Completed
Table 3-1. Error Status Codes and Definitions
Active Monitor
This field allows you to determine whether or not the management station will
participate in active monitor contention. The contention process occurs as part of
the recovery procedures initiated after certain ring error situations, and is used to
select a new Active Monitor for the ring. If you disallow contention for the
selected management station, that station will not participate in the contention
process, and will therefore never be chosen as Active Monitor.
3-12
Viewing Station-specific Information
Ring Map
NOTE
If you disallow contention for a management station which is currently serving as the
Active Monitor, that station will continue as Active Monitor until the next contention.
Error Report Timer
The Error Report Timer determines the interval at which stations will report the
number of errors they have detected. The default timer value is 2 seconds. To
change this value:
1. Highlight the current setting.
2. Type in a new setting, and press Enter.
NOTE
Current versions of TRMMIM firmware do not support the ability to set the Error Report
Timer Delay; future versions will include this feature.
After making changes in the Management Station Configuration window, click
here to update the information shown in the window’s fields.
Viewing Ring-level Information
Setting the Statistics Calculation Mode
Statistics available from the Ring Map window are calculated according to one of
three formulas:
Rate
Units expressed as a change in value divided by the
length of the polling interval, or ∆ units measured /∆ time
(in seconds). For example, if you measured 3200 frames
over a 10 second interval, the frame rate would be
320/sec.
Cumulative
Total units measured since the cumulative option was
selected. For example, if you measured 390 frames
during the first interval since cumulative was selected,
270 in the second, and 500 in the third, the cumulative
total would be 1160. You can reset the Ring Map’s
cumulative counters at any time.
Delta
The change in the units measured from the previous poll
to the current poll.
Viewing Ring-level Information
3-13
Ring Map
The calculation mode you select will be used to determine the statistics values
displayed in the Quick Info Pop-up window (see page 3-6), the Error Table (see
page 3-14), and in the Find feature which displays the stations with the lowest
and highest occurrences of certain statistical values (see page 3-28).
To set the calculation mode:
1. Click on
at the top of the Ring Map window.
2. Drag down to Set Calculation Mode, and release. The Set Calculation Mode
window, Figure 3-7, will appear.
Figure 3-7. Set Calculation Mode Window
3. Click to select the desired mode of calculation: Rate, Cumulative, or Delta.
4. Click on OK to accept the calculation mode, or Cancel to exit without
changing the calculation mode.
To refresh the cumulative statistics and begin re-calculating them, bring up the Set
Calculation Mode window, click on
, and then on
.
Viewing the Error Table
The Error Table provides a ranking of ring stations according to the total number
of errors or the total of an individual error type detected by each station. Stations
are listed hierarchically, from greatest to least; each station is identified by MAC
address as well as rank.
In addition to the ranking and selected error statistic, the table also provides the
total number of frames and bytes processed by each station.
Error table rankings are determined based on the calculation mode currently in
effect, and statistical values are displayed in that mode; note that changing the
calculation mode may also change the ranking, since the values used for ranking
will be different. Only the top ten stations will appear in the list; stations reporting
identical numbers of errors — including 0 — are listed in an arbitrary order.
3-14
Viewing Ring-level Information
Ring Map
To access the Error Table:
1. Click on
.
2. Drag down to Error Table, and to the right to select Total Errors or a specific
error. The Error Table, Figure 3-8, will appear.
Figure 3-8. The Error Table Window
NOTE
The statistics for each category are measured at the end of the specified polling interval
and are displayed according to the selected calculation mode. The calculation mode is
global in nature; that is, when you change modes, it affects all statistics — including
those in the Error Table. The window title notes the calculation mode currently in effect.
The reported soft errors are errors from which the ring can recover through
normal operation of the Token Ring protocol. Although these errors do not cause
ring failure, in sufficient numbers they may cause degradation of ring
performance, and the ring may have to be purged (the Active Monitor must
perform ring recovery operations), or Active Monitor contention may have to be
initiated. In either of these situations, the data flow will be halted while normal
operations are being restored on the ring.
Viewing Ring-level Information
3-15
Ring Map
Basic performance information is provided regardless of which error type has
been selected for display:
Frames
The number of frames transmitted by the associated
station as measured using the currently selected
calculation mode.
Bytes
The number of bytes transmitted by the associated
station as measured using the currently selected
calculation mode.
The remainder of the window displays the counts for the error type or types you
selected when you launched the window. Remember, these counts reflect which
stations are reporting the error to the Ring Error Monitor, not which stations are
experiencing the error condition.
TIP
If the error is an isolating error, you can narrow the fault to a certain domain – that is
the adapter card of the reporting station or its downstream neighbor – or to the cabling
between the two stations. Non-isolating errors cannot be narrowed to a fault domain
(with the exception of Congestion errors), because they could be caused by any station on
the ring.
Total Errors
The number of soft errors detected by the associated station as measured using
the currently selected calculation mode.
Isolating Errors
Line Errors
Burst Errors
3-16
The count of line errors detected by the associated station
during the last statistics poll interval. A line error
indicates the presence of a coding violation between the
starting and ending delimiters of data, a frame check
sequence error, or a code violation in a token. These can
be caused by power surges on the ring; they are counted,
but initiate no other recovery procedures.
The count of burst errors detected by the associated
station. A burst error occurs when five half-bits of
Manchester-encoded data are received by a station
without a phase change (a signal transition from 0 to 1 or
from 1 to 0). This error is normal when stations enter or
leave the ring without phantom current; however, it can
also indicate a problem with the receiver on the reporting
node, the transmitter on its NAUN, or the cabling or hub
hardware between them. Burst errors will cause the
active monitor to initiate the ring purge process, and may
cause frames to be lost on the ring.
Viewing Ring-level Information
Ring Map
AC Errors
The count of frames containing errors in the ARI
(Address Recognized Indicator) or FCI (Frame Copied
Indicator) bits. Also known as ARI/FCI errors, AC errors
occur during the Ring Poll or Neighbor Notification
process when one station fails to correctly set the ARI
(address recognized) and FCI (frame copied) indicator
bits on the current AMP (active monitor present) or SMP
(standby monitor present) frame intended for it, thus
leaving its downstream neighbor without an accurate
upstream neighbor’s address. AC errors are detected
when a station receives more than one AMP frame with
ARI and FCI bits still set to 0 without seeing an
intervening SMP frame with its bits set to 1, or when the
station detects an SMP frame with its ARI and FCI bits
set to 0 without having seen an AMP frame with its ARI
and FCI bits set to 1. When a station detects an AC error,
it stops the Ring Poll process by not issuing its own SMP
frame; no other ring recovery procedures are initiated.
These errors are typically associated with hardware
(adapter) problems.
Abort Seq
The number of times that the associated station has
issued an abort sequence during transmission. These
occur when a station begins to queue data onto a token,
and subsequently detects that the token is corrupted
(because it does not have an ending delimiter after its
access control field). The station reports the error, but
does not release the corrupt token back onto the network.
This will cause the Active Monitor to purge the ring and
issue a new token. A failing network adapter is likely to
be the cause of this isolating error.
Internal Error
The count of errors caused by the station recognizing a
recoverable internal error in its adapter and removing
itself from the ring. Possible problems with the adapter
hardware include inoperable chip set, timer, or counters.
Non-Isolating Errors
Lost Frame Errors
Congestion Errors
Viewing Ring-level Information
The number of frames that the associated station has
transmitted that have not completely returned before its
Timer Return to Repeat (TRR) timer has expired (after 4.1
milliseconds). These non-isolating errors are generally
harmless, since they are often caused by a brief
disruption of ring clocking as a station enters or exits the
ring. However, they do require the Active Monitor to
purge the ring.
The number of times the associated station was unable to
copy frames addressed to it because of a lack of internal
buffering – that is, the station is receiving frames faster
than its adapter can copy information from the receive
3-17
Ring Map
buffers. Note that this counter reports the number of
times frames were dropped for lack of buffering, not the
number of frames dropped. Although this is considered a
non-isolating error, you can assume that the adapter
reporting the error is at fault. If the error occurs
frequently, you may want to consider replacing the
reporting station’s NIC card.
Frame Copied Errors
The number of frames addressed to the associated station
that had the A (Address Recognized Indicator) bits
already set to 1 when the station received the frame. This
indicates that an electrical line disturbance has corrupted
the token, or that there is a duplicate address on the ring
(either a station with a shared administratively assigned
address, or a transparent bridge that has set the bit).
Token Errors
The number of times the associated station, while acting
as the active monitor, has detected an error that required
the transmission of a token (either because a frame was
lost, or a token or frame has recirculated the ring). Note
that this error can only be reported by a station that is, or
was previously, the active monitor for the ring.
Frequency Errors
The number of times the associated station detected that
the incoming signal’s frequency differed from the
expected frequency by more than allowed by the IEEE
802.5 standard (.6%). Frequency is measured by an
on-board crystal oscillator on each network interface.
This could indicate an error in the reporting station’s
oscillator, the Active Monitor, or any station between the
two; it happens more often on 16 Mbps rings than on 4
Mbps rings, and can also be a symptom of too many
stations on the ring. When a station detects this
condition, it will begin a monitor contention process to
select a new Active Monitor.
Changing the Station Labels
Initially, each station in the ring map is labelled by MAC address
; addresses are displayed in Canonical format (reverse
bit order).
You can change the map’s station labels to reflect one of the following:
Board/Port/Drop – This label displays each station’s board and port index, as well
as its administratively assigned drop number (if one has been assigned).
3-18
Viewing Ring-level Information
Ring Map
If the inserted station is connected to another hub (via the monitored hub’s
Ring-in/Ring-out ports), the board and port are unknown and will display as
zeroes (0,0).
The station’s physical drop is an administratively assigned string that you can use
to identify a station’s physical location. If assigned, the drop will appear as a
subvector in certain Token Ring MAC frames (such as a new active monitor
frame, report error frame, or the report station address frame used in the neighbor
notification process). A physical drop consists of up to four alphanumeric
characters; to set one, see Setting a Station Drop, page 3-9.
Name – This label displays the name administratively assigned to each station, if
one has been assigned. To assign one, see Setting a Station Name, page 3-8.
If a station does not have an administratively assigned name, <none> will display
in the label.
MAC Address – This is the default label; it displays each station’s six byte MAC
address in Canonical format (reverse bit order).
Vendor/MAC Address – This label displays the vendor of the monitored station,
as determined by the first three bytes of its MAC address; the remainder of the
MAC address is also displayed.
To change the label format of a station:
1. Click on
at the top of the Ring Map window.
2. Drag down to Label by, and then right to select a label option: Board, Port,
Drop; Name; MAC Address; or Vendor + MAC Address.
The Ring Map window will refresh, and the station labels will reflect the selected
display option.
Viewing Device Information
The Device Information window displays the name of the monitored
management device and its firmware version. To invoke the Device Information
window:
1. Click on
at the top of the Ring Map window.
2. Drag down to Device Information, and release. The Device Information
window, Figure 3-9, will appear.
Viewing Ring-level Information
3-19
Ring Map
Figure 3-9. The Device Information Window
Setting the Map Poll Interval
You can set the poll interval that controls how often the monitored hub is queried
for changes in the selected ring’s station list. The poll interval is also used to
update the error and performance information that is returned in the Ring Map’s
associated windows.
To set the poll interval:
1. Click on
at the top of the Ring Map window.
2. Drag down to Set Polling Interval, and release. The Set Polling Interval
window, Figure 3-10, will appear.
Figure 3-10. Set Polling Interval Window
3. In the Enter Interval field, type in the number of seconds you desire between
polls from your management station to the monitored hub. The poll interval
you enter must be at least 10 seconds; the default is 20 seconds.
4. Click on
to accept the interval or
changing the interval.
to exit without
Note that the next time the Ring Map application is started, the poll interval will
reset to its default value of 20 seconds.
3-20
Viewing Ring-level Information
Ring Map
Viewing Beacon History
The Beacon History window displays a record of significant ring events,
including active monitor changes, ring purges, and information related to
beaconing states. The information displayed in this window will update after
each polling interval.
To open the Beacon History window:
1. Click on
at the top of the Ring Map window.
2. Drag down to Beacon History, and release. The Beacon History window,
Figure 3-11, will appear.
Figure 3-11. The Beacon History Window
The Beacon History window contains the following information:
Active Monitor Changes
Displays the number of times the ring’s active monitor has changed since the ring
was first initialized or the device was last reset.
Ring Purges
Displays the number of times the active monitor has purged the ring. This
includes the purge at the end of the active monitor selection process.
Note that this count is not reset when the active monitor changes.
Beacon Events
This field detects the number of beaconing occurrences detected by the active
monitor on the ring. A beacon is transmitted when a hardware error — such as a
wire fault, frequency error, or ring signal loss — is detected on the ring, and when
monitor contention times out.
Viewing Ring-level Information
3-21
Ring Map
Last Beacon Type
This field displays the type of beaconing frames last detected on the monitored
ring. When a beaconing condition begins, the content of the beacon frames varies
depending on the condition that caused the beaconing process. Beacon frames are
identified by a sub-vector which pinpoints the reason for the adapter’s
transmission of beacon frames. Possible beacon types are:
Signal Loss Error
This beacon is transmitted by a station when it detects
signal loss from its upstream neighbor (most likely
because of a cable fault), enters monitor contention, and
monitor contention times out.
If a station detects signal loss while transmitting
streamingSignal beacons (the two following entries),
they will be changed to signalLossError beacons.
If a station detects a signal while transmitting
signalLossError beacons, they will be changed to
streamingSignalNotClaimToken (bit streaming) beacons.
Streaming Signal
Not Claim Token
This beacon is transmitted by a station when a
monitor contention time-out occurs in its adapter while it
is in monitor contention transmit mode, and it did not
receive any claim token MAC frames during the monitor
contention period.
Streaming Signal
Claim Token
This beacon is transmitted by a station when monitor
contention times out while its adapter was in monitor
contention mode (transmit or repeat), and one or more
claim token MAC frames were received during the
contention period. This indicates that monitor contention
could not be resolved within one second.
Recovery Mode Set
This beacon is transmitted when the ring has begun the
recovery process.
No Beacon Frames
Detected
There has been no beacon condition detected on the
ring yet.
Longest Beacon
Displays the duration of the longest beaconing occurrence, in an
hours:minutes:seconds format.
Last Beacon
Displays the duration of the last beaconing occurrence, also in an
hours:minutes:seconds format.
3-22
Viewing Ring-level Information
Ring Map
Beacon Configuration
The Beacon Configuration window allows you to enable and configure the
parameters for the Automatic Beacon Recovery Process (ABRP). If the Beacon
Recovery option is enabled, the TRMMIM will automatically attempt to repair its
ring when it detects an unusually high concentration of hard errors that have not
been corrected by normal ring recovery procedures. ABRP is a sequential process
that is designed to isolate the source of the errors as quickly as possible.
If a frequent occurrence of hard errors is detected, the TRMMIM first determines
if the problem is internal or external to the chassis by turning each ring port off to
see if the error condition clears. If the beaconing goes away (because it is external
to the hub), the TRMMIM enables the Ring In/Ring Out ports at the interval
specified in the Ring Port Retry Delay field for the number of times specified in
the Ring Port Enable Retry field to see if the beacon condition on the network has
cleared. If the beaconing continues after the specified number of retries, the faulty
Ring In/Ring Out ports remain disabled.
If the beaconing continues when the Ring In/Ring Out ports are shut off, then the
problem is internal to the hub. The TRMMIM individually bypasses each module
to isolate the one with the fault (as evidenced by ring recovery on bypass). When
the module with the fault is identified, the module is reinserted, and that
module’s ports are turned off one by one until the ring recovers again. The last
port turned off is considered to be the failing port. Once the failing port is
identified, all ports which were previously turned off are turned back on. For
devices running older versions of firmware, the failing port will be retried once at
a pre-determined interval, and if beaconing continues, remain disabled; for newer
firmware versions, the port will be retried at the interval specified in the Station
Port Retry Delay field for the number of times specified in the Station Port
Enable Retry field. Again, if beaconing continues, the port will remain disabled.
Ports disabled by ABRP must be manually re-enabled before they can be used
again; this prevents a user from rebooting a problem station which may bring the
ring down.
Once ABRP is completed, the TRMMIM generates traps to the remote
management workstation which will pinpoint the problem’s cause, including:
•
•
•
•
•
the beaconing adapter’s address
its NAUN address
the type of beacon
the port(s) and/or module(s) bypassed, and
the duration of the beaconing condition
To launch the Beacon Configuration window and configure beacon recovery
parameters:
1. Click on
at the top of the Ring Map window.
2. Drag down to Beacon Configuration, and release. The Beacon
Configuration window, Figure 3-11, will appear.
Viewing Ring-level Information
3-23
Ring Map
Figure 3-12. The Beacon Configuration Window
3. In the Beacon Recovery field, click in the appropriate field to Enable or
Disable the ABRP capability. ABRP is enabled by default.
4. In the Ring Port Enable Retry field, click and drag the scroll bar to select the
number of times disabled ring ports will be retried to see if the beaconing
condition clears. Selecting a setting of Infinite (by dragging the scroll bar all
the way to the right) will cause the TRMMIM to continue retrying faulty ring
ports until the beaconing condition clears; selecting a setting of Disabled (by
dragging all the way to the left) will disable this feature. Other allowable values
are 1 to 100.
5. In the Ring Port Retry Delay field, click and drag the scroll bar to select the
interval, in seconds, between ring port retries. You should select a value which
is a multiple of 7; values which are not divisible by 7 will be rounded down to
the nearest appropriate value.
6. In the Station Port Enable Retry field, click and drag the scroll bar to select
the number of times disabled station ports will be retried to see if the
beaconing condition clears. Selecting a setting of Infinite (by dragging the
scroll bar all the way to the right) will cause the TRMMIM to continue retrying
faulty station ports until the beaconing condition clears; selecting a setting of
Disabled (by dragging all the way to the left) will disable this feature. Other
allowable values are 1 to 100.
3-24
Viewing Ring-level Information
Ring Map
7. In the Station Port Retry Delay field, click and drag the scroll bar to select
the interval, in seconds, between station port retries. You should select a
value which is a multiple of 7; values which are not divisible by 7 will be
rounded down to the nearest appropriate value.
Each value is set as soon as the mouse button is released; footer messages will
indicate set failure.
NOTE
Remember, not all devices nor all versions of device firmware support the ability to
configure station port retry parameters; if the device you are monitoring does not support
this feature, the related fields will be grayed out. Where these parameters are not settable,
station ports will be retried once, at a pre-determined interval, then remain disabled until
further management action is taken.
Using the Find Options
The Ring Map window provides several search options that allow you to discover
individual stations on the selected ring network by any one of the following
characteristics:
•
•
•
•
Drop
Board and Port Index
Station Name
MAC Address
For convenience, you can also identify the following stations of interest:
•
•
•
Active Monitor on the ring
The Ring Management Station
Last Beaconing Station on the ring
And you can identify a selected station’s:
•
•
NAUN (Nearest Active Upstream Neighbor)
NADN (Nearest Active Downstream Neighbor)
Finally, to keep track of station performance, you can identify stations on your
network in ascending (By Lowest –> Highest) or descending (By Highest –>
Lowest) order of frames processed, total errors, or specific errors.
Using the Find Options
3-25
Ring Map
Searching for a Station’s Nearest Active
Upstream or Downstream Neighbor
To search for a selected station’s upstream or downstream neighbor:
1. To select the station, click to highlight its label in the Ring Map window.
2. Click on
, and drag down to select NAUN (to find the station’s
upstream neighbor) or NADN (for its downstream neighbor).
The selected station’s NAUN or NADN will be highlighted. Note also that,
depending on the position of the selected station in the map, the map display may
shift so that the appropriate station appears in the viewing area (although the
upstream and downstream order will not change).
Searching by Station Name, MAC Address, Board/Port, or Drop
To search for a station by its Drop, Board/Port, Name, or MAC Address:
1. Click on
, and drag down to select one of the following:
a. Drop... (to find a station with a certain drop number)
b.
Board, Port.... (to find a station by a specified board and port index)
c.
Name.... (to find a station with an administratively assigned name)
d. MAC Address... (to find a station via its physical address).
The appropriate window will appear (as illustrated below), with fields for you to
enter the desired search parameters.
Figure 3-13. Sample Find Windows
3-26
Using the Find Options
Ring Map
2. In the Enter text field, type in one of the following:
a. The physical drop number (four ASCII characters)
b.
The board and port index
c.
The station name (up to 10 ASCII characters); note that this is case
sensitive, and the name must be typed exactly as it was assigned
d. The MAC Address of interest (six hexadecimal bytes – each byte
separated by a colon).
3. Click on
.
If found, the specified station will be highlighted in the map.
If not found, you will receive an error message stating that the specified station
does not exist in the map. Click on
to exit the Find window.
Searching for the Active Monitor, Ring Management Station,
or Last Beaconing Station
Find Active Monitor, Find Management Station, and Find Last Beacon allow you
to quickly discover the ring network’s active monitor and its ring management
station, as well as the last station reporting a hardware failure.
Finding the Active Monitor on the Network
The Active Monitor is the station responsible for setting timing functions for the
ring, activating hardware to remove an improperly circulating frame or token,
purging the ring to restore it to normal condition, and starting the ring poll
process, among other duties.
In the Ring Map window, its label is displayed in green to differentiate it from
other stations. However, in a ring network with many stations, it may be
inconvenient to scroll through the map to find the Active Monitor. The Find —>
Active Monitor feature allows you to quickly identify the Active Monitor on the
network. To find the Active Monitor for the currently selected ring network:
1. Click on
, and drag down to select Active Monitor.
The current active monitor will appear highlighted in the Ring Map window, and
the display will shift if necessary.
Using the Find Options
3-27
Ring Map
Finding the Management Station on the Network
In the Ring Map window, the management station’s label is surrounded by a blue
border to differentiate it from other stations. However, in a ring network with
many stations, it may be inconvenient to scroll through the map to find the
management station. The Find —> Management Station feature allows you to
quickly identify the management station on the network. To find the management
station for the currently selected ring network:
1. Click on
, and drag down to select Management Station.
The current ring management station will appear in the Ring Map window
surrounded by a blue border, and the display will shift if necessary.
Finding the Last Beaconing Station
A beacon is an alert issued by a station when it detects a hardware failure on the
network (because its incoming signal has been lost). Note that the station
transmitting the beacon may not be the actual station experiencing a hardware
failure (since the fault could lie with the NIC adapter of its upstream neighbor,
with its own adapter, or with the cabling between the two stations).
The Find —> Last Beacon feature lets you determine which station on the
network last issued beacon frames. To find this station:
1. Click on
, and drag down to select Last Beaconing Station. If no
stations have beaconed since the map was invoked, a footer message will
appear. A footer message will also appear if the last beaconing station is no
longer on the ring.
Searching by Highest or Lowest Occurrence of a
Performance Parameter
You can use the Find By Highest and Find By Lowest features to search for a
station by ascending (By Lowest –> Highest) or descending (By Highest –>
Lowest) order of frames processed, total errors, or specific errors.
3-28
Using the Find Options
Ring Map
NOTE
The statistics used to rank stations in highest—>lowest or lowest—>highest occurrence
of a particular parameter are measured at the end of the specified polling interval and are
displayed according to the selected calculation mode. Remember, the calculation mode is
global in nature; that is, when you change modes, it affects all statistics — including
those used to rank stations in highest or lowest order.
When Rate is the selected mode, Find by Highest or Lowest detects the station with the
greatest or smallest rate of frames processed or errors detected within a polling interval.
The following formula is used to find the station with the highest or lowest rate of frames
or errors:
∆ Frames or Errors measured/∆ Time (in seconds)
For example, if one station detects 250 total errors over a 10 second poll interval (250/10
= 25 errors per second), and a second station detects 170 errors over the same 10 second
interval (170/10 = 17 errors per second), the first station is found to have a higher error
rate than the second.
When Cumulative is selected, selecting By Highest or Lowest will display the station
with the greatest or smallest number of frames or errors detected since the cumulative
option was last selected.
When Delta is selected, selecting By Highest or Lowest will display the station with the
greatest or smallest number of frames or errors detected during the last poll interval.
Note, too, that changing the calculation mode may change the rankings; a station that has
had a high rate of traffic in recent polling intervals may or may not have processed the
greatest cumulative number of packets, and so on.
To find the station by Highest or Lowest number of frames processed or errors
detected:
1. Click on
, and drag down to select By Highest or By Lowest.
2. Drag to the right to select the performance or error parameter of interest, and
release.
The station experiencing the highest or lowest number of the selected
parameter (according to the selected calculation mode) will be highlighted in
the map, and a window will appear, displaying the MAC address, node name
(if assigned), board and port index (if the station is connected to the
monitored hub), and the station’s measurement of the selected parameter.
See Figure 3-14, following page, for some sample windows.
Using the Find Options
3-29
Ring Map
Figure 3-14. Sample Find Highest and Lowest Windows
3. To find the station with the next highest or lowest incidence of the selected
parameter, click on
or
,
respectively.
Note that you can also click on
parameter.
for a brief description of the selected
Accessing Other SPMA Applications
The Program menu also provides access other SPMA applications that are specific
to token ring devices. To launch another application:
1. Click on
.
2. Drag down to select one of the following; the selected application will initialize
in a new window:
Alarm Configuration (see Chapter 4)
Statistics (see Chapter 5)
Security (see Chapter 6)
Note that the new application launches in its own, independent window, and the
Ring Map window remains open and available.
3-30
Accessing Other SPMA Applications
Chapter 4
Alarm Configuration
Setting Alarms at the Ring and Station levels; Alarm Types defined
Alarms work in conjunction with your network management system to let you
know when certain defined thresholds have been reached. Using this tool, you
define the condition that will trigger an alarm; the device monitors traffic and,
when defined thresholds are reached, reports to the network management station
in the form of a trap. You can set alarms at the Ring and Station levels; the effect of
an alarm depends on the parameters you have set via your management
platform.
NOTE
SPMA does not accept the trap messages; that task is left to your network management
system. (See the appropriate network management system documentation for details
about viewing trap messages.) When this application is used in stand-alone mode, traps
will either be ignored when they return to the workstation from which you are running
SPMA for the TRMMIM, or they will turn up at another management workstation
which has been configured to accept traps. Note also that, regardless of the configuration
performed using this application, NO traps will be sent by the device unless its trap table
has been properly configured; see the TRMMIM hardware manual and/or the Trap Table
chapter in the SPMA Tools Guide for more information.
At the Ring level, you can set alarm thresholds for the cumulative totals of ring
purges, active monitor participant errors, token errors, claim token errors, lost
frames, and frame counts detected on the ring. At the Station level, you can set
alarm thresholds for each individual station’s count of line, internal, burst, AC,
and congestion errors.
To access the main alarm window
from the icon:
1. Click on the appropriate device icon to display the Icon menu.
2. Drag down to Alarm Configuration and release.
4-1
Alarm Configuration
from the Hub View:
1. Click on the Device button to display the Device menu.
2. Drag down to Alarm Configuration and release.
from the command line (stand-alone mode):
1. From the appropriate directory, type
spmarun e5alarms <IP address> <community name>
NOTES
The spmarun script invoked first in the above command temporarily sets the environment
variables SPMA needs to operate; be sure to use this command any time you launch an
application from the command line. This script is automatically invoked when you launch
an application from the icon menu or from within the Hub View.
If you wish to change any Alarm Configuration settings, be sure to use a community
name with at least Read/Write access. If you only wish to view current settings, a
community name with Read access will be sufficient.
If there is a hostname mapped to your TRMMIM’s IP address, you can use <hostname>
in place of <IP address> to launch this application. Please note, however, that the
hostname is not the same as the device name which can be assigned via Local
Management and/or SPMA; you cannot use the device name in place of the IP address.
The Ring/Stn Alarms window, Figure 4-1, will appear.
Figure 4-1. The Ring/Stn Alarms Window
This window provides a list of the Token Ring interfaces, or networks, available
on the TRMMIM, as well as command buttons that allow you to display the Ring
Alarms and Station Alarms windows.
4-2
Alarm Configuration
Setting and Viewing Ring Alarms
To view or set ring-level alarms, highlight the appropriate interface (network),
then click mouse button 1 on
; the Ring Alarms window, Figure 4-2,
will appear.
Figure 4-2. The Ring Alarms Window
The alarm Timebase entered here applies to all enabled alarms at both the ring
and station levels; this is the interval (in seconds) over which the selected
variable(s) will be counted for comparison to the threshold values. For example, if
the Ring Purges alarm is enabled, the threshold is set at 70, and the timebase is set
to 10 seconds, the TRMMIM will generate an alarm if 70 ring purges are detected
on the ring as a whole within a 10-second time period.
NOTE
Alarm conditions which occur over the span of two timebase intervals will not be detected,
even if the threshold is crossed within a period of time that is less than or equal to the
defined timebase interval. For example, if you set your timebase to 10 seconds and an
alarm threshold to 50, an alarm will be generated if 50 of the specified events are detected
within a specific 10-second interval defined by the device. If, however, those 50 events
occur in any 10-second time frame which straddles two device-defined intervals — say, 25
in the last five seconds of one interval, and 25 in the first five seconds of the following
interval — that condition will not be detected, and no alarm will be generated.
Setting and Viewing Ring Alarms
4-3
Alarm Configuration
The Alarm Type list displays the variables available for alarms, the current status
of each alarm, and the current threshold setting. To change the status or threshold
for an alarm, you must first select it in this list. You can set an alarm threshold for
the following variables:
4-4
Ring Purges
The number of times the active monitor has purged the
ring since the network was created, or since the
TRMMIM was last reset. This includes the purge at the
end of the active monitor selection process; however, the
count is not reset when the active monitor changes.
Active Monitor
Participant
Errors
The number of times a duplicate active monitor has been
detected on the ring. When any station which considers
itself to be the active monitor receives a ring purge or
AMP (active monitor present) frame that it did not
transmit, it will become a standby monitor. If this process
leaves the ring without an active monitor (because both
active monitors have switched to standby mode), the
monitor contention process will begin.
Token Errors
The number of times the active monitor either does not
see a token circulating on the ring before its TVX (Timer,
Valid Transmission) timer expires (e.g., a Lost Frame
error has occurred), or sees a recirculating frame or
token. Each time a token error is noted, the active
monitor purges the ring and issues a new token.
Claim Token
Errors
The number of times a claim token has been released by a
station on the ring. A claim token is released when a
station detects that the active monitor is missing or
malfunctioning, or following a beaconing condition; the
issuing of a claim token initiates the monitor contention
process, through which a new active monitor will be
chosen.
Lost Frames
The number of times a station’s TRR (Timer, Return to
Repeat) timer expires before the frame it is transmitting
returns. This timer, which is set to 4.1 milliseconds,
ensures that each station returns to the data repeat state
after transmitting: retrieves its token, strips it of data,
and issues a new token. Lost frame errors will cause the
active monitor to initiate the ring purge process and issue
a new token; these errors are usually caused by stations
entering or leaving the ring while a frame is circulating
(since stations entering or leaving briefly throw the ring
out of sync).
Frame Count
The number of frames detected on the ring.
Setting and Viewing Ring Alarms
Alarm Configuration
The Threshold field allows you to configure a new threshold for the alarm
highlighted in the Alarm Type list.
NOTE
When setting thresholds for ring-level alarms, keep in mind that the TRMMIM is
counting all occurrences of the selected variable on the whole ring, not just those
occurrences on a single station. Note, too, that ring-level alarms can only be set for nonisolating errors — that is, those that do not pinpoint a specific trouble spot on the ring.
The Status field allows you to enable or disable the alarm highlighted in the
Alarm Type list.
Click on
to save any changes you have made to an alarm before
selecting another alarm; click on
to exit the window.
Setting a Ring Level Alarm
To set an alarm at the ring level:
1. In the Timebase field, enter the amount of time, in seconds, you want the
selected variable counted for comparison to your alarm thresholds.
Remember, this timebase will apply to all enabled alarms at both the ring and
station levels.
2. In the Alarm Type list, click mouse button 1 on the alarm type you wish to
configure.
3. Enter your desired alarm threshold in the Threshold field, keeping in mind
that ring-level alarms will count all occurrences of the selected variable on the
ring as a whole.
4. Enable or Disable the selected alarm type by clicking mouse button 1 in the
appropriate Status option.
5. Click mouse button 1 on
to save your changes. If you wish to
configure more than one alarm type, be sure to click on
before
selecting another alarm type, or the changes you made to the first alarm will
be lost.
Your new alarm status and thresholds will take effect immediately.
Setting and Viewing Station Alarms
To view or set station-level alarms, highlight the appropriate interface in the
Ring/Stn Alarms window, then click mouse button 1 on
; the Station
Alarms window, Figure 4-3, will appear.
Setting and Viewing Station Alarms
4-5
Alarm Configuration
NOTE
You need not close the Ring Alarms window before launching the Station Alarms
window; just move the Ring Alarms window out of the way, if necessary, to reach the
main Ring/Stn Alarms window.
Figure 4-3. The Station Alarms Window
The alarm Timebase displayed here is defined in the Ring Alarms window and
applies to all enabled alarms at both the ring and station levels; this is the interval
(in seconds) over which the selected variable(s) will be counted for comparison to
the threshold values. For example, if the Burst Errors alarm is enabled, the
threshold is set at 10, and the timebase is set to 10 seconds, the TRMMIM will
generate an alarm if 10 burst errors are detected by the selected station(s) within a
10-second time period.
4-6
Setting and Viewing Station Alarms
Alarm Configuration
NOTE
Alarm conditions which occur over the span of two timebase intervals will not be detected,
even if the threshold is crossed within a period of time that is less than or equal to the
defined timebase interval. For example, if you set your timebase to 10 seconds and an
alarm threshold to 50, an alarm will be generated if 50 of the specified events are detected
within a specific 10-second interval defined by the device. If, however, those 50 events
occur in any 10-second time frame which straddles two device-defined intervals — say, 25
in the last five seconds of one interval, and 25 in the first five seconds of the following
interval — that condition will not be detected, and no alarm will be generated. These
conditions are most likely to occur when a large threshold is used with a short timebase
interval.
The Alarm Type options at the top of the window represent the variables for
which you can assign station-level alarm thresholds. To change the status or
threshold for an alarm type, you must first click on its option at the top of the
window; threshold and status changes will be applied to the alarm type selected
at the time the changes are made and to the stations as determined by the current
setting in the Set Alarm For field. You can set an alarm threshold for the following
variables:
Line Errors
A line error indicates the presence of a coding violation
between the starting and ending delimiters of data, a
frame check sequence error, or a code violation in a
token. These can be caused by power surges on the ring;
they are counted, but initiate no other recovery
procedures.
Internal Errors
An internal error is counted when a station recognizes a
recoverable internal error in its own adapter (and may
temporarily remove itself from the ring). A large number
of internal errors indicates a station in marginal
operating condition; possible problems include
inoperable chipset, timers, or counters.
Burst Errors
A burst error occurs when five half-bits of Manchesterencoded data are received by a station without a phase
change (a signal transition from 0 to 1 or from 1 to 0).
This error is normal when stations enter or leave the ring
without phantom current; however, it can also indicate a
problem with the receiver on the reporting node, the
transmitter on its NAUN, or the cabling or hub hardware
between them. Burst errors will cause the active monitor
to initiate the ring purge process.
Setting and Viewing Station Alarms
4-7
Alarm Configuration
AC Errors
Also known as ARI/FCI errors, AC errors occur during
the Ring Poll or Neighbor Notification process when one
station fails to correctly set the ARI (address recognized)
and FCI (frame copied) indicator bits on the current AMP
(active monitor present) or SMP (standby monitor
present) frame intended for it, thus leaving its
downstream neighbor without an accurate upstream
neighbor’s address. AC errors are detected when a
station receives more than one AMP frame with ARI and
FCI bits still set to 0 without seeing an intervening SMP
frame with its bits set to 1, or when the station detects an
SMP frame with its ARI and FCI bits set to 0 without
having seen an AMP frame with its ARI and FCI bits set
to 1. When a station detects an AC error, it stops the Ring
Poll process by not issuing its own SMP frame; no other
ring recovery procedures are initiated.
Congestion
Errors
A congestion condition occurs when a station recognizes
a frame addressed to it, but is unable to copy the frame
because it has no available buffer space. Although this
may indicate a station which is performing poorly, no
ring recovery procedures are initiated. Note that the
count of congestion conditions reflects the number of
times frames have been dropped, not the number of
frames dropped.
The Station List box lists the stations detected on the selected ring, the module
and port through which they are connected, the name of the station (if one has
been assigned), and the status and threshold of the alarm type highlighted in the
alarm list.
NOTE
A station listed at module and port 0 is part of the TRMMIM-managed ring, but not
directly connected to the TRMMIM-controlled hub (or TRMMIM). You can still set
alarms for these stations.
The Threshold field allows you to configure a new threshold for the selected
alarm type; the new threshold will be applied as indicated by the current selection
in the Set Alarm For field.
NOTE
4-8
When setting thresholds for station-level alarms, keep in mind that the TRMMIM is
counting occurrences of the selected variable on individual stations only, not all
occurrences on the ring. Note, too, that station-level alarms can only be set for isolating
errors — that is, those that do pinpoint a specific trouble spot on the ring. Station alarm
notification (traps) will include the address of the offending station.
Setting and Viewing Station Alarms
Alarm Configuration
The Status field allows you to enable or disable the selected alarm; this alarm
status will be applied as indicated by the current selection in the Set Alarm For
field.
The Set Alarm For field features a menu button which allows you to apply new
alarm status and threshold settings to selected stations only, to all stations on a
module, or to all stations on the ring.
Click on
to save any changes you have made to an alarm before
selecting another alarm and/or station; click on
to exit the window.
Setting a Station Level Alarm
To set an alarm at the station level:
1. Select the Alarm Type option (at the top of the window) for the alarm variable
you would like to apply to a new station and/or for which you would like to
configure a new threshold.
2. In the Station List box, click mouse button 1 on the station or stations for
which you would like to edit the threshold, or to which you would like to apply
a new alarm type. If the Set Alarms For button displays Selected Stations
(the default setting), you can select any stations in the list; to de-select any
highlighted station, click on it again. If the selection All Stations On Module is
displayed in the Set Alarms For button, you can select only one station at a
time; alarm parameters will be set for all stations on the same module as the
selected station. If the selection All Stations on Ring is displayed in the Set
Alarms For button, all available stations will be automatically selected; if you
de-select any station, the Set Alarms For button will automatically revert to
the Selected Stations setting. To change the setting in the Set Alarms For
button, click mouse button 1 on the button and drag down to select a new
setting.
3. Enter your desired alarm threshold in the Threshold field, keeping in mind
that station-level alarms count variable occurrences on single stations only.
4. Enable or Disable the selected alarm type by clicking mouse button 1 on the
appropriate Status option.
5. Click mouse button 1 on
to save your changes. If you wish to
configure more than one alarm type, be sure to click on
before
selecting another alarm type, or the changes you made to the first alarm will
be lost.
Your new alarm status and thresholds will take effect immediately.
Setting and Viewing Station Alarms
4-9
Alarm Configuration
4-10
Setting and Viewing Station Alarms
Chapter 5
Statistics
Using Statistics; Viewing the Ring Station List; Monitoring Ring and Station Statistics, Ring Variables;
Station Variables
Using Statistics
The statistics windows provide you with a variety of information about the ring
as a whole and each station inserted into the ring, including traffic counts, total
error counts, and error type breakdowns. These statistics can be displayed via a
selection of pre-formatted pie charts, or you can design your own graphs or
meters to display only the ring and station information you want to view.
NOTE
Graphing capabilities are provided by an application that is included in HP Network
Node Manager and IBM NetView; therefore, graphs are only available when SPMA is
run in conjunction with one of these network management platforms. If you are running
SPMA in a stand-alone mode or in conjunction with SunNet Manager, no graphing
capabilities are available and no graph-related options will be displayed on buttons or
menus. Note that the screens displayed in this guide will include the graph-related
options where they are available; please disregard these references if they do not apply.
To open the Ring/Stn Statistics window
from the icon:
1. Click on the appropriate Token Ring device icon to display the Icon menu.
2. Drag down to Statistics and release.
from the Hub View:
1. In the Hub View, click on the Device button to display the Device menu.
2. Drag down to Statistics and release.
5-1
Statistics
from the command line (stand-alone mode):
1. From the appropriate directory, type:
spmarun e5stats <IP Address> <community name>
NOTES
The spmarun script invoked first in the above command temporarily sets the environment
variables SPMA needs to operate; be sure to use this command any time you launch an
application from the command line. This script is automatically invoked when you launch
an application from the icon menu or from within the Hub View.
A community name with Read access will be sufficient to view the statistics.
If there is a hostname mapped to your TRMMIM’s IP address, you can use <hostname>
in place of <IP address> to launch this application. Please note, however, that the
hostname is not the same as the device name which can be assigned via Local
Management and/or SPMA; you cannot use the device name in place of the IP address.
The Ring/Stn Statistics window, Figure 5-1, will appear.
Figure 5-1. The Ring/Stn Statistics Window
This window lists the interfaces with their corresponding numbers that are
available on your Token Ring device. Use the scroll bar on the side of the display
window if necessary to see the full list of Ring Names. This window allows you to
choose a ring and then display the Ring and Station Statistics window specific to
that ring. You may also quit the Token Ring statistics tool from this window by
clicking mouse button 1 on
.
Viewing the Ring Station List
From the Ring/Stn Statistics window, select the network from which you would
like to gather statistics and click mouse button 1 on
. The Ring and
Station Statistics window, Figure 5-2, will appear.
5-2
Viewing the Ring Station List
Statistics
Figure 5-2. Ring and Station Statistics Window
The Ring and Station Statistics window lists each active station on the ring; the
following information is provided for each station:
MAC Address
Displays the station’s MAC or hardware address. MAC addresses are usually
factory set and cannot be changed. (The MAC address will be displayed in Token
Ring format.)
Module and Port
Provides the station’s location in the MMAC chassis by module and port number.
If module and port equal 0, the station is not physically connected to the
monitored device (e.g., it is connected via a ring in or ring out port).
Vendor
Displays the name of the station’s manufacturer.
Stn Name
Displays the name assigned to the station.
Upstream Addr
Displays the MAC or physical address of the station’s nearest active upstream
neighbor (NAUN).
Downstream Addr
Displays the MAC or physical address of the station’s downstream neighbor.
Viewing the Ring Station List
5-3
Statistics
Using the Reverse MAC Button
The Reverse MAC button, available in the Ring and Station Statistics window,
enables you to toggle between Token Ring and Ethernet MAC address formats.
Token Ring MAC addresses (the default address format in this window) are
displayed in the reverse bit order of Ethernet MAC addresses. The Ethernet MAC
format is the more recognizable format; therefore, the Reverse MAC button can be
used to enable the network manager to recognize the MAC addresses more easily.
To use the Reverse MAC button:
1. Highlight the station whose MAC address format you would like to change.
2. Click mouse button 1 on
be changed.
; the station’s MAC address format will
3. Repeat the process to toggle back to the original Token Ring MAC address
format.
NOTE
When you toggle the MAC address format, the neighbor and ring port addresses are not
affected; they will always be displayed in Token Ring format.
Refreshing the Station List
Once it is displayed, the information in the station list is static, and will not reflect
changes to the ring. You can update the station list by clicking mouse button 1 on
, located at the bottom of the window. Using the Refresh button will
display the current configuration of your ring.
Monitoring Ring and Station Statistics
Ring and Station Statistics can be viewed in pie chart, graph, or meter form. The
ring statistics will reflect the activity of the entire ring, while the station statistics
will reflect only the station that is highlighted when you choose the chart, graph,
or meter you wish to display.
There are five pre-formatted pie charts you can display to view statistics specific
to the ring as a whole: general statistics, protocols, frame sizes, isolating errors,
and non-isolating errors. For viewing statistics specific to an individual station,
three pre-formatted charts are available: general statistics, isolating errors, and
non-isolating errors.
You can customize ring-specific or station-specific meters by using 29 available
ring-related variables, or 13 available station-related variables. With SPMA, you
can run up to 25 meters simultaneously.
5-4
Monitoring Ring and Station Statistics
Statistics
If you are running SPMA in conjunction with HP Network Node Manager or IBM
NetView you can also customize ring-specific or station-specific graphs using the
same variables as are available for the meters. You can graph up to 25 variables in
a single graph.
NOTE
Graphing capabilities are provided by an application that is included in HP Network
Node Manager and IBM NetView; therefore, graphs are only available when SPMA is
run in conjunction with one of these network management platforms. If you are running
SPMA in a stand-alone mode or in conjunction with SunNet Manager, no graphing
capabilities are available and no graph-related options will be displayed on buttons or
menus. Note that the screens displayed in this guide will include the graph-related
options where they are available; please disregard these references if they do not apply.
Creating a Pie Chart
To create a pie chart:
1. Click on either
or
.
2. A Pie Charts menu will appear. When creating a Ring Pie Chart select one of
the following menu selections: General, Protocols, Frame Sizes, Isolating
Errors, or Non-Isolating Errors. When creating a Station Pie Chart select
one of the following menu selections: General, Isolating Errors, or NonIsolating Errors.
3. Release the mouse button while highlighting your selection. A pie chart similar
to the one below will be displayed.
Monitoring Ring and Station Statistics
5-5
Statistics
Figure 5-3. Ring General Pie Chart
To create Figure 5-3 the following steps were taken:
1. Click on
.
2. Select General from the pull down menu.
3. Release the mouse button. Figure 5-3 will appear.
Creating a Graph or Meter
To create a graph or meter:
1. Click mouse button 1 on either
or
. The Ring Graph/Meter Choices or the Station
Graph/Meter Choices window, as appropriate, will appear.
2. Choose your variables by clicking mouse button 1 on the radio button next to
the variable name. Variables are grouped logically. You can pick up to 25
variables at one time. Either a single graph will be created containing all the
variables you chose, or each variable will form its own separate meter. (See
the Ring and Station Variables section of this chapter for descriptions of
each variable.)
3. Click mouse button 1 on
or
, as desired. A graph or meter
window similar to the one displayed below will appear.
5-6
Monitoring Ring and Station Statistics
Statistics
Ring Meters
Ring Graph
Note that the
graph tool will only
be available when
you are running
SPMA with HP
Network Node
Manager or IBM
NetView.
Figure 5-4. Ring Graph and Meters
To create the ring meters in Figure 5-4 the following steps were taken:
1. Click mouse button 1 on
.
2. Select Errors, Frames, and KBytes from the Ring Graph/Meter Choices
window.
3. Click mouse button 1 on
Figure 5-4 will appear.
. Meters similar to those displayed in
To create the ring graph in Figure 5-4 the following steps were taken:
1. Click mouse button 1 on
.
2. Select Frames, Kbytes, SNA, XNS, TCP IP, Banyan, IPX, Netbios, Lan Net
Manager, and Other from the Ring Graph/Meter Choices window.
3. Click mouse button 1 on
will appear.
Monitoring Ring and Station Statistics
. A graph similar to the one in Figure 5-4
5-7
Statistics
For more information on using pie charts, graphs, and meters and understanding
how to read the information displayed, see the Charts, Graphs, and Meters
chapter in the SPMA Tools Guide.
A brief description of each of the variables available for both Ring and Station Pie
Charts, Graphs, and Meters follows in the Ring and Station Variables sections.
Ring and Station Variables
Although many of the variables are the same for Ring and Station Statistics, it is
important to note that these statistics are collected from different sources. The ring
statistics will reflect the activity of the entire ring, while the station statistics will
reflect the activity of only one station.
General
Errors
Indicates the total number of errors counted on the ring or received by the station.
Frames
Indicates the total number of frames received by the device from the ring or
station.
KBytes
Indicates the total number of kilobytes transmitted on the ring or from the station.
Protocols
Protocols are only available for Ring Pie Charts and Meters. Use the following
variables to display the number of packets counted on the ring of the following
protocols:
5-8
SNA
IBM’s System Network Architecture.
XNS
A Xerox protocol used in early Ethernet networks.
TCP/IP
A public domain set of protocols developed by the US
government.
Banyan
A proprietary protocol, VINES IP, used by Banyan’s
VINES network operating system.
IPX
One of the standard protocols for Novell networking
systems.
NetBIOS
Sytek, Inc., and IBM’s Network Basic Input Output
System, used by many application programs for network
communication.
Ring and Station Variables
Statistics
LanNet Manager
IBM’s Token Ring LAN Network Manager.
Other
All other protocols not described above.
Frame Sizes
Frame Sizes are only available for Ring Pie Charts and Meters. Frame Sizes
displays the number of packets counted on the ring of the following sizes:
•
•
•
•
•
•
•
•
Up to 63 bytes
64 to 127
128 to 255
256 to 511
512 to 1023
1024 to 2047
2048 to 4095
4096 and up
Isolating Errors
Isolating errors report the region of a fault, therefore pointing out where on the
ring the problem is occurring. Isolating errors include line, internal, burst, A/C,
and abort errors, described below.
Line Errors
A line error occurs when there is a coding violation in the data part of the frame.
A power surge on the ring may cause the data portion of a frame or token to be
corrupted. It is the equivalent to an Ethernet CRC error in both cause (usually
electronic noise along the ring medium or other cable problems) and effect. These
errors are counted, but initiate no other recovery procedures.
Burst Error
A burst error occurs when five half-bits of Manchester-encoded data are received
by a station without a phase change (a signal transition from 0 to 1 or from 1 to 0);
this typically indicates a clocking error. Usually, burst errors occur when there
was a brief electrical surge or electronic noise on the network. This error is normal
when stations enter or leave the ring without phantom current; however, it can
also indicate a problem with the receiver on the reporting node, the transmitter on
its NAUN, or the cabling or hub hardware between them. Burst errors will cause
the active monitor to initiate the ring purge process, and may cause frames to be
lost on the ring.
AC Error
AC errors indicate that the reporting station’s NAUN is faulty, because it is
unable to report its address.
Ring and Station Variables
5-9
Statistics
If a station receives an AMP or SMP MAC frame with the ARI and FCI bits set to 0
without first receiving an intervening AMP frame it recognizes that its upstream
station failed to set the ARI/FCI bits.
The receiving station will increment an ARI/FCI set error counter, and end the
ring poll process by not transmitting an SMP MAC frame. Since it has not
received a valid SMP frame, it does not have a correct NAUN address. However,
stations between the Active Monitor and the malfunctioning adapter will have
correct NAUN addresses.
This error will not cause ring recovery functions to occur. You will probably not
witness this error often, since it is associated with a station hardware problem
rather than a “normal” disruption of ring activity. However, if you do note that a
station’s adapter did not increment the ARI/FCI bits, you might assume that the
adapter is failing or about to fail. You can isolate this error to the upstream
adapter of the reporting station.
Abort Error
These occur when an adapter has frames to transmit and receives a token, but
does not detect an ending delimiter on the token after its access control field. This
indicates that the token is corrupted.
This error will cause the Active Monitor to detect a lost token (since it was not
released back onto the ring) and to restore the ring through the ring purge
process. This error is also somewhat uncommon, and will often indicate a failing
adapter. A common cause of abort sequences is overheating by the adapter in an
overloaded system. Note that the adapter may also issue an Internal Error
simultaneously, which will cause the adapter to remove itself from the ring.
Internal Error
An internal error is counted when a station recognizes a recoverable internal error
in its own adapter (and may temporarily remove itself from the ring). A large
number of internal errors can indicate that one or more stations on the monitored
ring are in marginal operating condition.
Non-Isolating Errors
Non-isolating errors are conditions that could have been caused by any station on
the ring, thus their fault domain cannot be detected. Non-isolating errors include
lost frames, congestion errors, frame copied errors, token errors and frequency
errors.
Lost Frames
A lost frame error is counted each time a station’s TRR (Timer, Return to Repeat)
timer expires before the frame it is transmitting returns. This timer, which is set to
4.1 milliseconds, ensures that each station issues a new token after having
transmitted data.
5-10
Ring and Station Variables
Statistics
Lost frames are usually caused by a station entering or leaving the ring as the
frame is circulating. Lost frames will cause the active monitor to initiate the ring
purge process and issue a new token.
Congest
A congestion error occurs when a station recognizes a frame addressed to it, but is
unable to copy the frame because it has no available buffer space.
Although this indicates a station which is performing poorly, it will not adversely
affect other stations on the network; therefore, no ring recovery procedures are
initiated.
Frame Copy
An FC error is counted each time a station recognizes a frame addressed to itself
and detects that the Frame Status field’s ARI bits are already set to 1, indicating
that there has possibly been a line surge, or that another station is duplicating its
address.
Note that it is virtually impossible to have a ring with duplicate addresses, since
most of the time the ring uses the hard-coded address on the adapter, and
duplicate addresses are checked for when a station inserts itself into the ring.
However, a system administrator can pass a locally assigned address to the
adapter, so it is possible to unintentionally administer a duplicate address while a
device is on a ring. This error is more commonly caused by transparent bridging
on a Token Ring network.
Token Errors
A token error is counted when the active monitor either does not see a token
circulating on the ring before its TVX (Timer, Valid Transmission) timer expires
(e.g., a lost Frame error has occurred), or sees a recirculating frame or token. Each
time a token error is noted, the active monitor purges the ring and issues a new
token.
As in lost frames, the major cause for token errors is the disruption of the ring as
stations enter or leave the ring. Note that token errors are only reported by an
active monitor. If you see a token error reported by another station, it was serving
as active monitor at some previous time.
Frequency Errors
A frequency error occurs when the ring clock frequency and a station’s internal
crystal clock frequency differ by an excessive amount. This type of error happens
more often on 16 Mbps rings than on 4 Mbps rings; it can also be a symptom of
too many stations on the ring.
Detection of a frequency error initiates the monitor contention process, since this
typically indicates that the active monitor is not present or is malfunctioning.
Ring and Station Variables
5-11
Statistics
5-12
Ring and Station Variables
Chapter 6
Ring Security Configuration
Selecting a ring for which to set security; configuring the Allowed and Disallowed Station Lists;
selecting ring security levels
About Ring Security
The Ring Security application allows you to control access to the Token Ring
networks being managed by the TRMMIM by specifying an “Allowed List” of
stations permitted to enter the ring, a “Disallowed List” of stations removed from
the Allowed List, and a security mode which controls the ring’s response to
stations illegally attempting to enter the ring.
The Allowed List, which by default contains the MAC address of each station
known or permitted on the ring network when security is enabled, is a database
stored at the TRMMIM itself. Each Token Ring hub can store up to 250 station
MAC addresses in the Allowed List, which is maintained in its battery-backed
Non-Volatile Random Access Memory (NVRAM). When you power up or reset
the TRMMIM, all MAC addresses will be retained and ring security resumes its
previous state.
You first build the Allowed List either by enabling ring security with the “Warn”
security mode activated (as described in Configuring Security, page 6-7) —
which will add the MAC addresses of all stations currently detected on the ring to
the Allowed List — or by individually entering the MAC addresses of each station
using the Add button. Once the list has been built and updated, you can switch
the security mode to “Warn and Remove,” which will issue a trap to your
management station and send a Remove MAC frame to any unauthorized station
(that is, one not in the Allowed List) which tries to enter the ring. You can add to
the allowed list at any time.
The Disallowed List acts as a repository for the MAC addresses of stations that
have been removed from the Allowed List, or station addresses that you
administratively enter. These addresses are stored in a “Disallowed” database
that is maintained at your management workstation. The number of entries in the
database is limited only by disk space. You can add to the Disallowed List either
6-1
Ring Security Configuration
manually (by entering the address of a disallowed station), or by moving an entry
from the Allowed List. You can also restore a station from the Disallowed List to
the Allowed List, if desired.
Once Security has been configured and enabled, the TRMMIM acts as the Ring
Security Monitor and provides security for the entire ring.
!
CAUTION
The Token Ring Security application is intended to be used by a knowledgeable network
administrator. In the hands of an inexperienced user, it could severely impact your
network by creating beaconing conditions on the ring. The Security application posts
confirmation messages to forestall any indiscriminate actions; however, you should still
use care when running the application.
We also recommend that you configure and enable security on only one device per ring, to
reduce the possibility of conflicting security information on the network.
Launching the Security Configuration Window
To launch the security application
from the icon:
1. Click on the appropriate TRMMIM icon to display the icon menu.
2. Drag down to Security and release.
from the Hub View:
1. Click on
to display the Device menu.
2. Drag down to Security and release.
from the command line (stand-alone mode):
1. From the appropriate directory, type:
spmarun e5sec <IP Address> <community name>
6-2
Launching the Security Configuration Window
Ring Security Configuration
NOTES
The spmarun script invoked first in the above command temporarily sets the environment
variables SPMA needs to operate; be sure to use this command any time you launch an
application from the command line. This script is automatically invoked when you launch
an application from the icon menu or from within the Hub View.
If you wish to change any Security settings, be sure to use a community name with at
least Read/Write access. If you only wish to view current settings, a community name
with Read access will be sufficient.
If there is a hostname mapped to your TRMMIM’s IP address, you can use <hostname>
in place of <IP address> to launch this application. Please note, however, that the
hostname is not the same as the device name which can be assigned via Local
Management and/or SPMA; you cannot use the device name in place of the IP address.
The Security Configuration Ring Selection window, Figure 6-1, will appear.
Figure 6-1. The Security Configuration Ring Selection Window
The Ring Selection window displays each manageable network supported by the
monitored device, and lets you access a Security Config window to configure
security for the selected ring. Networks are identified by the following two fields:
No.
The index number assigned to each ring network.
Ring Name
This field displays the ring name assigned to each network.
To set up security for the ring network being managed by the TRMMIM, click
mouse button 1 to select the desired ring, then click mouse button 1 on
. The Security Config window (Figure 6-2) will appear.
Launching the Security Configuration Window
6-3
Ring Security Configuration
Figure 6-2. The Security Config Window
The Security Config window is where you actually configure security for the
selected ring; it contains the following information:
Allowed Station List
This list box displays the MAC address of each station in the ring security
Allowed List database — that is, those that have security authorization to enter
the selected ring. This database is maintained in the TRMMIM itself.
Note that the current Active Monitor will be indicated by an asterisk (*) next to its
MAC address. The Active Monitor cannot be removed from the Allowed List.
Allowed Count
This field shows the number of stations currently on the Allowed List. The
allowed range is from 1-250 stations.
Disallowed Station List
This list box displays the station MAC address entries in the Disallowed List
database — all those addresses which have been removed from the Allowed List,
plus any additional addresses which have been added manually. This database is
stored on your network management station.
Disallowed Count
This field shows the number of stations currently on the Disallowed List.
6-4
Launching the Security Configuration Window
Ring Security Configuration
Vendor
This field, visible in both list boxes, displays the vendor associated with each list
entry, as determined by the first three bytes in its MAC address.
Security Mode Options
The Security Mode options at the top of the Security Config window display the
current security configuration, and allow you to reconfigure security. When you
select the Warn mode, that level of security will immediately be set at the device;
when you select the Warn and Remove mode, you will be asked to confirm your
selection.
Disable Security
If this option is selected, no security is set at the device. Any station can attempt to
enter the ring without security action being taken. Security is disabled by default.
Enable Security
If Enable Security is selected, one of two Security Mode options is in effect; these
modes determine what action will be taken when an unknown MAC address (i.e.,
one not in the Allowed List) is detected trying to enter the ring. The two Security
Mode options are:
Warn
In Warn mode, new stations can enter the ring, but a
“Station Added” trap will be sent to the network
management station in response. This trap message is
only sent once, and it includes the new station’s MAC
address. Because new stations can still be added to the
Allowed List in Warn Mode, you can use this mode to
allow new users to enter the ring; while in Warn mode,
the TRMMIM automatically enters the MAC address of
each inserted station on the ring in the Allowed List. This
saves you from entering MAC addresses one at time
using the Add button.
Warn and Remove
This is the highest level of ring security, which will lock
the ring to new stations. While in the Warn and Remove
mode, the TRMMIM sends a “Remove MAC Frame”
command to any unauthorized station attempting to
enter the ring, and a trap to your management station
informing it of the action taken. The TRMMIM will try
three times to remove an unauthorized station from the
ring; if after three attempts the station cannot be
removed, a trap will be sent to the management station
informing it that the station could not be removed.
Launching the Security Configuration Window
6-5
Ring Security Configuration
Allowed/Disallowed List Configuration Buttons
The following buttons are used to manipulate the Allowed and Disallowed Lists
and to set the security mode at the device:
This button moves a selected address(es) from the
Allowed List to the Disallowed List.
Note that if you are in the Warn mode, removing a
station from the Allowed List will have little effect,
because the station will remain on the ring and
automatically be re-added to the Allowed List (although
a trap will be sent to your management workstation
when the station is re-added to the list). Note that the
Allowed and Disallowed Lists will refresh automatically
when a station reinserts into the ring.
If no items in the Allowed List are selected, this button
will be grayed out.
This button moves a selected address(es) from the
Disallowed List to the Allowed List. If there are no items
selected in the Disallowed List, this button will be grayed
out.
Selecting this button will delete selected address(es) from
the Allowed or Disallowed Station Lists.
This button is active in all security modes; however, if
you have Enable Security-Warn mode selected, the
station will automatically be re-added to the Allowed
List. Note that the Allowed List will automatically
refresh when a station is re-added.
Selecting this button will invoke a pop-up window
which allows you to add a station to the Allowed or
Disallowed Station List (as described in the following
section). This button is only active if security is enabled.
When pressed, this button will invoke a pop-up window
that allows you to remove all address(es) from the
Allowed List.
This button is active in all security modes; however, if
you have Enable Security-Warn mode selected, the
cleared stations will simply be re-added to the list. Note
that the Allowed List refreshes automatically when
stations are re-added.
Selecting this button will refresh both the Allowed List
(stored on the TRMMIM itself) and the Disallowed List
(stored on your management workstation). Should any
6-6
Launching the Security Configuration Window
Ring Security Configuration
duplication exist between the lists, the duplicate entries
will be removed from the Disallowed List. There will not
be any alert if this occurs.
Selecting this button closes the Security Config window.
Any sets you have made in the window before closing
will have taken effect.
Configuring Security
Before configuring security, be sure that your network meets the requirements
and conditions specified in your TRMMIM’s hardware Installation and User’s
Guide.
Your TRMMIM must also be properly configured to send traps to the appropriate
network management station; this will ensure that traps generated by ring
security arrive at the appropriate destination. Refer to the SPMA Tools Guide for
information on using the Trap Table tool.
Building the Allowed List Automatically
When security is set to Warn mode, any station which inserts onto the ring is
automatically added to the Allowed List. You can use this feature to build the
Allowed List automatically, as follows:
1. Click to select the Enable Security-Warn option. The TRMMIM will enable
ring security and automatically generate the Allowed List, adding to it each
station which is currently inserted on the ring. If your network management
station address is entered into the TRMMIM’s trap table, you will receive a trap
informing you of each device which is added to the list.
2. The Allowed Station List display will update to show you new entries.
Adding New Stations to the Allowed or Disallowed Stations List
To add an individual station to the Allowed or Disallowed Stations List:
All entries to the Allowed and Disallowed Lists are verified for proper MAC format and
list duplication. Should you add an entry which already exists in the Allowed or
Disallowed List to the other list, the address will be removed from the original list and
added to the new one.
NOTE
1. Click on
Configuring Security
. The Station Addition window (Figure 6-3) will appear.
6-7
Ring Security Configuration
Figure 6-3. The Station Addition Window
2. Enter the MAC address of the station you want to add to the Allowed or
Disallowed Stations List, as follows:
a. In the MAC Address field, type the address in XX-XX-XX-XX-XX-XX
hexadecimal format.
b.
Using the buttons at the bottom of the window, select the Allowed or
Disallowed List option, as appropriate.
c.
Click on
to enter the new stations in the appropriate list, then
to exit the window.
Deleting Stations from the Allowed or Disallowed Lists
NOTE
You must set ring security to the Warn and Remove mode to delete a station from the
Allowed List and keep it off the ring; remember, in Warn mode, any station entering the
ring is automatically added to the Allowed List, and permitted to stay on the ring.
To remove an individual station or a range of stations from the Allowed Stations
List:
1. Make sure that the security mode is set to Warn and Remove to be sure a
station is permanently removed from the Allowed List.
2. Click mouse button 1 on an individual station in the appropriate list, or click
and drag to select a range of stations you want to delete. A station will be
highlighted to show it is selected.
3. Click on
6-8
to remove the stations from the list.
Configuring Security
Ring Security Configuration
Moving a Station Between the Allowed and Disallowed Stations List
You can move an individual station or a range of stations between the Allowed
and Disallowed Stations Lists, as follows:
1. Click mouse button 1 on an individual station in the appropriate list, or click
and drag to select a range of stations you want to switch to the opposite list. A
station will be highlighted to show it is selected.
2. Use the Arrow buttons to switch addresses between the Allowed and
Disallowed List, as follows:
a. Click
to move the currently selected address(es) from the
Disallowed List to the Allowed List. If no items in the Disallowed List are
selected, this button will be grayed out.
b.
Click
to move the currently selected address(es) from the
Allowed List to the Disallowed List. If no items in the Allowed List are
selected, nothing will occur.
Clearing All Entries in the Allowed or Disallowed List
To remove all entries from the Allowed or Disallowed List:
1. Click on
. The following window will be displayed.
Figure 6-4. Clear List Window
2. Click mouse button 1 to select the appropriate option: Allowed or
Disallowed.
3. Click on
to remove all entries from the list, or
the window without making changes.
Configuring Security
to exit
6-9
Ring Security Configuration
Changing the Ring Security Mode
Use the Enable Security and Disable Security options at the top of the Security
Config window turn security on and off; use the Security Mode options to select
the level of security you wish to activate:
Disable Security
Selecting this option disables ring security so that any station can attempt to enter
the ring. The Security Mode selections — those which determine the action that
will be taken when an unauthorized station attempts to enter the ring — are
de-activated (grayed out) when security is disabled. Security is disabled by
default.
Enable Security
Selecting this option enables you to choose one of two Security Mode options
which determine the actions that will be taken when an unauthorized MAC
address (i.e., one not in the “Allowed List”) is detected trying to enter the ring.
The two Security Mode options are:
Warn
This is the default Enable Security mode. In Warn mode, new
stations can enter the ring, but a “Station Added” trap will be
sent to the network management station in response. This trap
message is only sent once, and it includes the new station’s MAC
address. Because new stations can still be added to the Allowed
List in Warn Mode, you can use this mode to allow new users to
enter the ring; while in Warn mode, the TRMMIM automatically
adds every inserted station to the Allowed List. This saves you
from entering MAC addresses one at time using the Add button.
Note that this option will be set as soon as it is selected; there is
no confirmation required.
Warn and
Remove
This is the highest level of ring security, which will lock the ring
to new stations. The Alarm/Remove mode sends a “Remove
MAC Frame” command to a new station attempting to enter the
ring, and a trap to your management station informing it of the
action taken. If, after three attempts the station cannot be
removed from the ring, a trap is sent to the management station
informing it that the station could not be removed.
Note that, because of the potentially serious consequences of
setting this high level of security, you will be asked to confirm
this selection before it is set.
6-10
Configuring Security
Appendix A
TRMMIM MIB Structure
TRMMIM management information base configuration
IETF MIB Support
In addition to its proprietary features, the TRMMIM currently supports the
following IETF MIBs:
•
RFC 1213 MIB for Network Management of TCP/IP-based Internets: MIB-II
•
RFC 1271 Remote Network Monitoring MIB
•
RFC 1757 Token Ring Extensions to RMON
TRMMIM MIB Structure
Cabletron’s newer intelligent devices — like the TRMMIM — organize MIB data
into a series of “components.” A MIB component is a logical grouping of MIB
data, and each group controls a defined set of objects. For example, for each ring
that is formed in the MMAC chassis, there will be an individual network
component that contains all management information specific to that particular
ring.
The TRMMIM MIB consists of six component groups, each of which is described
below. Note, however, that at any given time, the MIB component list displayed
by your TRMMIM may not include some of the components described below,
since the TRMMIM has the ability to alter the components which make up its MIB
in response to changes in the chassis. For example, if you have two rings formed
in the hub, you will see two “Network” components; if at any time you form a
third logical ring, the necessary MIB component will automatically appear in the
chCompTable. To see which MIB components are currently being used in your
TRMMIM, bring up the Community Names application, or use any SNMP Get
operation that will allow you to view the contents of the chCompTable.
A-1
TRMMIM MIB Structure
The TRMMIM MIB consists of the following components:
Chassis MGR
The Chassis MGR MIB component contains most of the basic information about
the TRMMIM, the chassis it is controlling, and the other modules installed in that
chassis, including: chassis type, backplane type, number of slots, which module
types and names are installed in which slots, the TRMMIM’s MIB component
information (in the chCompTable), device and module names, hardware revision
numbers, MAC and IP addresses, the current time and date, and information
related to alarms, ring security, and TFTP download. The following groups from
MIB-II are also included: system, interfaces, at, ip, icmp, udp, and snmp. The
community names assigned to this MIB component provide the gateway that all
SPMA applications use to access all information in the other components, even if
those components have different community names; the Chassis MGR
community names are the same as those assigned via Local Management.
LM
The TRMMIM LM, or Local Management, component contains the objects that
provide out-of-band management via the Console port on the TRMMIM’s front
panel. No objects from this component are used for remote management.
Protocol Stack
The Protocol Stack MIB component is the IP stack for in-band communication
which provides the TRMMIM with its IP functionality.
SNMP Agent
The SNMP agent MIB component contains the objects that provide the TRMMIM
with its IP functionality - essentially, those functions which allow the device to
operate over a network - including functions such as ping, Telnet, and TFTP.
Network One, Network Two
The Network MIB components contain all of the objects related to basic Token
Ring operation, including ring name, port counts, port enable and disable, ring
state, ring speed, active monitor, information about each station inserted on the
ring, error status, and packet, byte, and error counts. Also included are the objects
related to the alarms function. The default community names for the Network
MIB components will always be different from one another and from the default
names assigned to all the other components; if you change community names,
remember that no network component may ever share a community name with
any other network component on the same device.
Note that the only fully implemented Network MIB component will be
Network 1 - the one that applies to the ring of which the management device
is a part. Each additional Network component - indexed 2, 3, 4, etc. - supplies
only minimal, physical management for each independent ring installed in the
same chassis.
A-2
TRMMIM MIB Structure
TRMMIM MIB Structure
RMON
The RMON, or Remote Network Monitoring, MIB component contains the
statistics, history, alarm, event, and Token Ring groups from the RMON MIB
(RFC 1271 and 1757).
Telnet
The Telnet component provides a means by which you can remotely access the
TRMMIM’s Local Management screens, including MIB Navigator — a command
set from which you can configure and manage your TRMMIM by viewing and
modifying the objects in the device’s MIB. Local management and the MIB
Navigator are accessible through SPMA via the Telnet application; see the SPMA
Tools Guide and/or your TRMMIM hardware manual for more information.
A Brief Word About MIB Components and Community Names
In the original version of the component MIB architecture, each MIB component is
protected by its own set of user-configurable Read-Only, Read/Write, and SuperUser community names. These names determine the level of access that will be
granted to the information controlled by each individual component. For these
devices, the central point of access for remote management is provided by the
Chassis MGR MIB component — that is, if you define your device icon or launch
a management application using the read-only, read/write, or super-user
community name assigned to the Chassis MGR MIB component, your SPMA
application is granted the appropriate level of access (read-only, read/write, or
super-user) to all of that device’s MIB information — even if the other MIB
components have different community names (as will occur of necessity with the
TRMMIM’s multiple Network MIB components, each of which must have a
unique set of community names).
NOTE
The set of community names you assign via Local Management are those which apply to
the Chassis MGR MIB component.
Newer versions of devices with this component-based MIB architecture have
been simplified somewhat; these devices support a single, global set of community
names, with small modifications added automatically to accommodate multiple
instances of the same MIB component (as occurs with the TRMMIM’s Network
components). Again, defining your device icon or launching a management
application with one of these global community names gives SPMA access to all
MIB information.
Where community names may become an issue, however, is when you are using
the MIBTree or any similar MIB-based tool (such as those provided by SunNet
Manager or HP Network Node Manager) to access MIB information. For these
kinds of tools, you must supply the precise community name assigned to the
component that contains the information you want. For devices which support
TRMMIM MIB Structure
A-3
TRMMIM MIB Structure
the original component-based MIB architecture, this means you must use the
exact community name you have assigned to a specific component to access that
component’s MIB information. (Again, note that the TRMMIM’s Network
components always have unique community names.) For devices which support
the new global community names, you must make note of the automatic
modifications that are made for network components, and use those specific
community names when trying to access information stored in those components.
The MIB component descriptions provided above will serve as a roadmap for
determining where the information you’re interested in is located; you can use the
SPMA Community Names tool (described in Chapter 3 of the SPMA Tools Guide)
to determine whether your version of firmware supports the original componentbased MIB architecture, or the new global community names. The Community
Names tools also allows you to both view and set the community names which
apply to your device.
A-4
TRMMIM MIB Structure
Index
A
Abort 2-23
abort error 5-10
Abort Sequence 3-17
AC 2-23
AC error 5-9
AC Errors 3-17
AC errors 4-8
accessing Module and Port menus 2-6
ACT 2-10
Active Monitor 3-27
active monitor 3-4, 3-12
active monitor changes 3-21
active monitor participant errors 4-4
Active Ports 2-10
Active Users 2-14
Address Recognized Indicator (ARI) 3-17
Admin 2-8, 2-10
Admin State 2-16
Admin status 2-8
Admin/Link 2-9
Admin/Link status 2-8
alarm limits 4-1
Alarm List Box 4-4
alarm response 4-1
alarm threshold 4-5, 4-8
alarm timebase 4-3, 4-5, 4-6
alarm variables 4-4
alarms
ring level 4-3
station level 4-5
Allowed Count 6-4
Allowed List 6-1
Allowed Station List 6-4
Allowed Stations List
Adding Stations 6-7
Clearing 6-9
Deleting Stations 6-8
Moving a station from 6-9
Auto 2-32
Automatic Beacon Recovery Process 2-19
Automatic Beacon Recovery Process
(ABRP) 3-23
B
Bad Param 3-11
Beacon Configuration 3-23
beacon configuration 3-23
beacon events 3-21
Beacon History 3-1, 3-21
beacon history 3-21
beaconing 3-5, 3-11, 3-22, 3-28
Burst 2-23
burst error 5-9
Burst Errors 3-16
burst errors 4-7
BYP 2-9, 2-29
Bytes 2-23
C
calculation mode 3-6, 3-14, 3-29
Changing the port display form 2-8
changing the ring speed 2-32
Charts, Graphs, and Meters 1-2
Chassis MGR A-2
Chassis Type 2-14
claim token errors 4-4
Class 2-21
community name 3-2
Community Names 1-2
community names A-3
component-based MIB architecture A-3
Congest 2-23
congest 5-11
Congestion Errors 3-17
congestion errors 4-8
connection 2-8
Contact 2-14
Contact Status 2-3, 2-26
contention 3-5
conventions 1-3
Index-1
Index
D
Date 2-14
Device button 2-4
Device Configuration 2-27
device date 2-4
Device General Status 2-27
Device Information 3-19
Device menu 2-5
Device Name 2-4
Device Status Window 2-13
device time 2-4
Device, Module and Port Menus 2-12
Disable Ring Out 2-33
Disable Security 6-10
Disallowed Count 6-4
Disallowed List 6-1
Disallowed Station List 6-4
Disallowed Stations List
Adding Stations 6-7
Clearing 6-9
Deleting Stations 6-8
Moving a station from 6-9
Duplicate MAC Address 3-11
E
e5alarms 4-2
e5hub 2-1
e5map 3-2
e5sec 6-2
e5stats 5-2
Enable Ring Out 2-33
Enable Security 6-5, 6-10
enabling and disabling ports 2-33
Enabling and Disabling the Phantom
Current 2-17, 2-22
enabling token ring ports 2-32
ENB 2-9
Error Report Timer 3-13
Error Status 3-11
Error Table 3-1, 3-14
Errors 2-23
errors 5-8
F
fault region 2-19
Fault Start Time 2-21
Find Highest/Lowest windows 3-30
find MAC address 2-24
Find options 3-25
Index-2
find parameters 3-26
finding nearest neighbor 3-26
firmware version 1-7, 3-19
FNB Bypass State 2-7
FNB connection symbols 2-28
FNB Display 2-10
FNB Multiplexer 2-28
FNB Status 2-7
frame check sequence error 3-16
Frame Copied Errors 3-18
Frame Copied Indicator (FCI) 3-17
Frame Copy 2-24
frame copy 5-11
frame count 4-4
Frame Sizes 5-9
Frames 2-23
frames 5-8
Frequency 2-24
frequency error 5-11
Frequency Errors 3-18
G
General/Error Statistics 2-24
Getting Help 1-6
global community names A-3
Global Find MAC Address Tool 1-2
graph 5-6
H
hard errors 3-23
Help 1-6
History window 1-4
hostname 2-2
Hub Configuration View
Device Name 2-4
IP Address 2-4
Hub View 2-2
HW Reset 3-10
I
IETF MIBs, supported by TRMMIM A-1
Infinite 3-24
Info window 2-6
INS 2-10, 2-29
Insertion Timeout 3-11
Insertion Trap 2-17
Internal 2-23
Internal Error 3-17
Index
internal error 5-10
internal errors 4-7
IP Address 2-4
Isolating Errors 3-16, 5-9
K
Kbytes 5-8
L
Last Beacon Type 3-22
LIM A-2
Line 2-23
Line Errors 3-16
line errors 4-7, 5-9
Link State 2-16
Link State Time 2-17
LM A-2
lobe fail 3-5
Lobe Test Failed 3-11
Local Management A-2
Location 2-13
Lost Frame Errors 3-17
Lost Frames 2-23
lost frames 4-4, 5-10
M
MAC Address 2-4, 2-18
Management 2-32
management station 3-28
Management Station Configuration 3-1
management station configuration 3-9
Media Fault 2-21
Media Type 2-10, 2-21
Meter 5-6
MGT 2-32
MIB component A-1
MIB component descriptions A-4
MIB I, II 1-2
MIBTree 1-2
Module 2-15
Module (board) 2-16, 2-18, 2-21
Module Index 2-7
Module Management Mode 2-7
Module Name 2-15
Module Ring Speed 2-7
Module Status 2-14
Module Type 2-7
Motif 1-3
N
NADN (nearest active downstream
neighbor) 3-26
Name 2-13
NAUN (nearest active upstream neighbor)
3-26
Network 1 2-31
Network One, Two A-2
No Open 3-11
Non-Isolating Errors 3-17, 5-10
non-isolating errors 4-5
Normal Token Protocols 3-5
O
opening the Device Status window 2-13
opening the Hub View 2-1
opening the Module Status window 2-14
opening the ring Port Status window 2-20
opening the station Port Status window 2-16
opening the Station Status window 2-17
OSF/Motif 1-3
P
Parameter Requested 3-11
Phantom Current 2-21
physical drop 3-7, 3-9, 3-19, 3-26
Physical Location 2-19
Pie Chart 5-5
poll interval
ring map 3-20
Port 2-18, 2-21
Port Display Form 2-7
Port Index 2-7
Port Location Configuration 2-20
Port Mapping 2-19
Port Name 2-16
Port Name Configuratin 2-20
Port Operational State 2-27
Port Physical Location 2-19
Port Priority 2-19
Port Priority Configuration 2-20
Port Status 2-7, 2-8
Port Status Window 2-16
Port Type 2-9
Protocols 5-8
purge 3-5
Purge Failed 3-11
Index-3
Index
Q
Quick Info 3-6
Quit button 2-6
R
ranking, by errors 3-14
Recovery Mode Set 3-22
Remove MAC Frame 2-34, 6-5
Remove Received 3-11
Remove Station 2-34
Re-sizing a window 1-4
Reverse MAC button 5-4
Ring and Station Statistics Variables 5-8
Ring and Station Statistics window 5-3
Ring Map 3-1
Ring Name 3-3, 6-3
Ring Port Name 2-20
Ring Port Status Window 2-20
Ring Ports 2-7
ring purges 3-21, 4-4
Ring Security – Warn and Remove Mode 6-1
Ring Security – Warn Mode 6-1
Ring Security Mode – Changing 6-10
Ring Security Monitor 6-2
ring-level alarms 4-3
Ring-out Port 2-33
RMON A-3
Streaming Signal Not Claim Token 3-22
SW Reset 3-10
T
Technical Support 1-6
Telnet 1-2, A-3
TFTP Download 1-3
threshold 4-5, 4-8
Time 2-14
timebase 4-3, 4-5, 4-6
Token 2-24
token
corrupted 3-17
token error 5-11
Token Errors 3-18
token errors 4-4
Token Ring MIM Management Mode 2-32
Token Ring Statistics 5-1
Trap Table 1-3
TRMMIM MIB components A-2
TRXMIM 2-33
U
unique community names A-3
Upstream Neighbor/Downstream
Neighbor 2-18
Uptime 2-4
Utilization 3-5
S
Security Configuration – Ring Selection 6-3
Security Mode Buttons 6-5
Set Alarm For 4-7, 4-8
Setting a Port’s Trunk Type 2-28
Setting the Polling Intervals 2-25
Signal Loss 3-11
Signal Loss Error 3-22
soft errors 3-15
Speed Fault 2-15, 2-17
Speed Fault Location 2-15
spmarun 3-2, 6-2
Station Added 6-5, 6-10
station labels 3-18
Station Name 2-18
Station Priority 2-19
Station Status Window 2-18
station-level alarms 4-5
Statistics 2-22, 2-27
Statistics Calculation Mode 3-13
Streaming Signal Claim Token 3-22
Index-4
V
Vendor 2-18, 6-5
version numbers 1-6
viewing trap messages 2-17, 4-1
stand-alone mode 2-17, 4-1
W
Warn and Remove Mode 6-5
Warn Mode 6-5, 6-10
WRAP 2-10