1
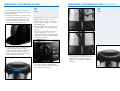
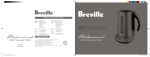
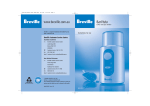
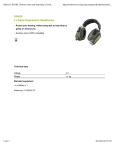
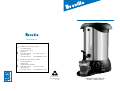
Breville Urn
Breville is a registered trademark of Breville Holdings Pty. Limited
ABN 98 000 092 928
Breville Customer Care Centre
Australian Customers
Breville Customer Care Centre
Locked Bag 2000
Botany NSW 2019
Australia
Customer Service
Ph: 1300 139 798
Fax (02) 9384 9601
Email Customer Service
[email protected]
New Zealand Customers
Breville Customer Service Centre
Private Bag 94411
Greenmount
Auckland, New Zealand
Customer Service
Ph: 09 271 3980
Fax 0800 288 513
Email Customer Service
[email protected]
✉
☎
✉
☎
PRINTED ON
RECYCLED PAPER
© Copyright. Breville Holdings Pty. Limited 2004
Due to continual improvements in design or otherwise, the product you
purchase may differ slightly from the one illustrated in this booklet.
Model URN6/URN10
Issue 2/00
INSTRUCTIONS FOR USE
MODEL URN6/URN10
BREVILLE RECOMMENDS SAFETY FIRST
KNOW YOUR BREVILLE URN
Congratulations on your purchase of a new
Breville Urn. We at Breville are very safety
conscious. We design and manufacture
consumer products with the safety of you,
our valued customer foremost in mind.
1.
Capacity (Urn6 - 6 litres, Urn10 - 10
litres)
2.
Stainless steel body
3.
• Always use the appliance on a dry, level
surface. The Urn is not intended for use
on water craft or other non-stationery
vehicles.
• Do not place this appliance on or near a
hot gas or electric burner, or where it
could touch a heated oven.
In addition, we ask that you exercise a
degree of care when using any electrical
appliance and adhere to the following
precautions.
• Do not let the cord hang over the edge of
a table or counter, touch hot surfaces or
become knotted.
READ THESE INSTRUCTIONS BEFORE
OPERATING AND SAVE FOR FUTURE
REFERENCE.
8.
Automatic boil dry cut out protects
against overheating (safety reset button
is under the base)
1800 watt concealed element
9.
Power ‘on’ and ‘heating’ lights
4.
Non-drip tap with 2 way pouring action
10. Extra long cord with cord storage
5.
External water gauge
11. Bonus drip tray
6.
Variable heat control
12. Steam holes (on top of lid)
7.
Locking lid with ergonomic handles
• Do not immerse cord, plug or base in
water or any other liquid.
This appliance is designed for the boiling of
water only, never use it to heat or boil any
other liquids or food.
7.
• Always switch the appliance to off, switch
the power off at the power outlet and
then remove the plug when the appliance
is not being used and before cleaning.
• This appliance is for household use only.
Do not use this appliance for other than
its intended use. Do not use outdoors.
• Before use fully unwind power cord.
• If supply cord, plug or actual appliance
becomes damaged in any way, return the
entire appliance to the nearest authorised
Breville Service Centre for examination,
replacement or repair.
• The appliance is not intended for use by
young children or infirm persons without
supervision.
• Young children should be supervised to
ensure that they do not play with the
appliance.
5.
1.
• Any maintenance other than cleaning
should be performed at an authorised
Breville Service Centre.
• Do not leave the appliance unattended
when in use.
2.
• Do not touch hot surfaces. Use handles.
4.
3.
6.
9.
8.
11.
10.
2
3
OPERATING YOUR BREVILLE URN
BEFORE FIRST USE
☛
It is recommended that before the first use,
the Urn is filled to the maximum level, boiled
and water discarded.
NOTE!
☛
Do not fill above the
maximum fill line on the
external water gauge as
boiling water may splash out
from the Urn.
NOTE!
The lid should always be
fitted and locked into position
when in use.
4. After filling the Urn, ensure that the lid is
replaced and locked into position.
Use caution when pouring
water from your Urn, as
boiling water will scald. Do
not pour the water too
quickly.
5. Plug the power cord into a 230/240V
power outlet and switch on. The red ‘on’
light will illuminate.
Do not open the lid when in
operation as steam may
escape from the top.
1. Firstly fully unwind power cord from base.
2. Place the Urn on a dry level surface and
position the drip tray at the front of the
Urn (tilt the Urn back and slide the drip
tray under to secure in place fig 1).
OPERATING YOUR BREVILLE URN (CONTINUED)
6. Turn the variable heat control to ‘Hi’ for
fast boiling (fig 3). The heating light will
remain on.
Steam may escape from the
steam holes on top of the
Urn. Exercise caution at all
times.
Fig 4
When the unit has boiled, select the
desired setting from ‘Low’ to 7 to
maintain temperature. The heating light
will illuminate on and off maintaining the
temperature selected.
Always empty the Urn before
moving to a new position.
Never carry the Urn when in
operation.
Always use the handles to
carry the Urn (fig 6).
Fig 1
3. To fill with water, turn the locking lid anticlockwise and remove (fig 2). Use a
smaller container to fill the Urn between
the minimum and maximum marks. Too
little water will result in the Urn switching
off before the water has boiled.
Fig 5
Fig 3
7. To pour hot water, place a cup in the drip
tray and push the non-drip tap down
(fig 4). For continuos pouring, lift the tap
in the vertical position (fig 5).
Lock
8. After use, switch the appliance to off,
switch the power off at the power outlet
and then remove the plug when the
appliance is not being used and before
cleaning.
Fig 6
Unlock
Fig 2
4
5
SAFETY BOIL DRY PROTECTION
CARE AND CLEANING
The Urn is fitted with a safety device which
protects against overheating should the
appliance be operated with insufficient water
or has boiled dry. If this occurs, the Urn will
stop heating. Both the red and orange lights
will turn off.
Always switch the appliance to off, switch
the power off at the power outlet and then
remove the plug before cleaning. Never
immerse the Urn controls or cord in water,
or allow moisture to come in contact with
these parts.
Switch the appliance to off, switch the
power off at the power outlet and allow the
Urn to cool. Press the safety reset button
under the base before refilling (fig 7). The
safety device will then be reset and the Urn
is ready for use.
REMOVAL OF MINERAL DEPOSITS.
Fig 7
Mineral deposits in tap water may cause the
Urn interior to discolour. This may be
removed by using a commercial kettle
descaler which is available from most
leading supermarkets, departments and
hardware stores.
TO CLEAN THE POLISHED
EXTERIOR.
The stainless steel surface may be wiped
over with a damp cloth and polished with a
soft dry cloth.
☛
NOTE!
6
Do not use chemical, steel
wool, or abrasive cleaners to
clean the outside of the Urn.
7