1
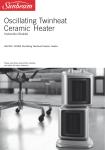
BCH3230U visual version.qxd
7/2/02
7:15 PM
Page 2
digital TwinHeat™
CERAMIC
heater
BCH3230
Read instructions before operating. Retain for future reference.
Instruction Leaflet
☎
INFO-LINE
If after having read this leaflet, you have any
questions or comments on your heater,
call 1-800-788-5350 in North America.
428-0769
BCH3230U visual version.qxd
7/2/02
7:15 PM
Page 4
HEATER SAFETY
PLEASE READ AND SAVE
THESE IMPORTANT
SAFEGUARDS.
IMPORTANT INSTRUCTIONS
When using electrical appliances, basic safety precautions
should always be followed to reduce the risk of fire, electric
shock, and injury to persons, including the following:
1. Read all instructions before using the appliance.
2. To avoid fire or shock hazard, plug the appliance
directly into a 120V AC electrical outlet.
3. The heater is hot when in use. To avoid burns, DO
NOT let bare skin touch hot surfaces. If provided, use
handles when moving this heater. Keep combustible
materials, such as furniture, pillows, bedding, papers,
clothes, and curtains at least 3 ft (0.9 m) from the front
of the heater and keep them away from the sides and
rear.
4. DO NOT run cord under carpeting. DO NOT cover
cord with throw rugs, runners, or the like. Arrange cord
away from traffic area and where it will not be tripped
over.
5. This heater is not intended for use in bathrooms,
laundry areas and similar indoor location. NEVER
locate heater where it may fall into a bathtub or other
water container.
6. Extreme caution is necessary when any heater is
used by, or near, children or disabled persons, and
whenever the heater is left operating and unattended.
7. DO NOT insert or allow foreign objects to enter any
ventilation or exhaust opening as this may cause an
electric shock or fire, or damage the heater.
8. DO NOT operate heater with a damaged cord or plug,
or after the heater malfunctions, has been dropped
or damaged in any manner. Return appliance to
manufacturer for examination, electrical or mechanical
adjustment, or repair.
9. A heater has hot and arcing, or sparking, parts inside.
DO NOT use it in areas where gasoline, paint, or
flammable liquids are used or stored.
1
BCH3230U visual version.qxd
7/2/02
7:15 PM
Page 6
10. Use appliance only for intended household use as
described in this manual. Any other use not
recommended by the manufacturer may cause fire,
electric shock, or injury to persons. The use of
attachments not recommended or sold by Bionaire®
may cause hazards.
11. DO NOT use outdoors.
12. To prevent a possible fire, DO NOT block air intakes
or exhaust in any manner. DO NOT use on soft
surfaces, like a bed, where openings may become
blocked.
13. To disconnect heater, set controls to OFF, then
remove plug from outlet.
14. Avoid the use of an extension cord because the
extension cord may overheat and cause a risk of fire.
However, if you have to use an extension cord, the
cord shall be No. 14 AWG minimum size and rated
not less than 1875 watts.
15. Always unplug the heater when not in use.
16. Discontinue use if plug outlet is hot. The manufacturer recommends outlet be replaced if plug or outlet
is hot to touch.
PLEASE SAVE THESE
INSTRUCTIONS.
CONSUMER SAFETY
INFORMATION
THIS PRODUCT IS
EQUIPPED WITH A POLARIZED AC (Alternating Current)
PLUG (a plug having one
blade wider than the other).
This plug will fit into the power outlet only one way. If the
plug does not fit fully into the outlet, reverse the plug. If it
still does not fit, contact qualified personnel to install the
proper outlet.
DO NOT DEFEAT THE SAFETY PURPOSE OF THIS
POLARIZED PLUG IN ANY WAY.
The length of the cord used on this product was selected
to reduce the hazards of becoming tangled in, or tripping
over a longer cord. If a longer cord is necessary an
2
approved extension cord may be used. The electrical
rating of the extension cord must be equal to or greater
than the rating of the heater. Care must be taken to
arrange the extension cord where it cannot be pulled
on by children or accidentally tripped over.
This device complies with Part15 of the FCC Rules.
Operation is subjected to the following two conditions: (1)
this device may not cause harmful interference, and (2) this
device must accept any interference received, including
interference that may cause undesired operation.
AUTO SHUT-OFF
This heater is equipped with a patented, technologicallyadvanced safety system that requires the user to reset the
heater if there is a potential overheat situation. When a
potential overheat temperature is reached, the system will
automatically shut the heater off. It can only resume
operation when the user resets the unit.
To Reset the Heater:
1. Unplug the heater and wait 10 minutes for the unit to
cool down.
2. After the 10 minutes, plug the unit in again and operate
normally.
PRE-OPERATING INSTRUCTIONS
1. Carefully remove your heater from the box. (please save
the carton for off-season storage).
2. Place heater on firm level surface.
3. Avoid overloading your circuit by not using other high
wattage appliances in the same outlet. At 1500 Watts,
this unit draws 12.5 Amps.
Note: The power light will remain lit during operation.
FIRST USE ONLY:
1. Put batteries into Remote. The "Room" temperature is
displayed at all times. (Use 3 AAA Alkaline batteries
only, do not mix batteries)
2. Plug unit into outlet. The first time the unit is plugged
in, it will beep every two seconds until it is synced
with the remote. To sync unit with remote follow the
below steps:
Unlock remote. (This must be done before each use of
3
BCH3230U visual version.qxd
7/2/02
7:15 PM
Page 8
the remote) To Unlock remote, hold down the mode
button for 2 seconds until the lock symbol disappears
from the screen. Once the remote is unlocked, press
the mode button again and the unit will quickly beep
5 times telling the user the signal was received.
DO NOT SYNC more than 1 unit at once. A
hazardous situation may occur.
Note: If the batteries are running low on power, a low
battery indicator will appear on the remote. Low batteries
will affect transmission distance and the screen contrast.
The manufacturer recommends replacing batteries
immediately.
Figure 1
mode
Note: The maximum transmission distance for this remote
is 30 ft. Do not use remote more than 30 ft from appliance.
Remote must be used in same room as appliance.
Note: Galileo™ can be used in either Fahrenheit or
Celsius. To change the reading on the remote, flip the
remote over and push the button located on the right hand
side under the stand with a ball point pen tip. This switch
will change the reading from F to C and vice versa.
Note: Every minute while in Auto mode, the Galileo™
communicates with the base unit. If the Galileo™ goes
out of range and/or has low batteries, the communication
will stop, and after 8 minutes of non-communication the
unit will shut off.
MANUAL OPERATION WITH REMOTE
1. Press Mode button on the remote. "Low" illuminates
on remote screen indicating mode. The power light
on the unit will turn on. The unit turns on and operates
in "Low" mode. The units "Low" light will illuminate. In
this mode, the unit will continuously run at its low
4
wattage.
2. Press Mode button on remote a second time.
The remote screen will now display "High" (1500
Watts). The unit’s "High" light will illuminate and the
unit will run in this mode. In this mode the unit will
continuously run at 1500 Watts.
Note: While using the remote, the backlight function will
turn on when any button is pushed and will turn off after
10 seconds of non-use.
Note: Do not cover remote while in use, this may affect
the accuracy of the temperature reading.
Note: Do not place remote under lamps as the radiant
heat from the lamp may affect the accuracy of the
thermostat.
Note: Do not place remote on control panel while in use.
This may affect the temperature reading.
Note: Because heat rises, and the Galileo™ remote
senses temperature, Bionaire® recommends that you do
not locate the Galileo™ remote higher than 4ft from the
ground. By locating the Galileo™ more than 4ft from the
ground, you will get a less accurate temperature reading
than under normal circumstances.
THERMOSTAT OPERATION WITH REMOTE
1. Press Mode button on remote until the remote screen
displays "Auto" and "low". The "Set" temperature is
displayed next to the "Room" temp. The unit will cycle
on and off to maintain the "Set" temperature. The
default room temp = 72ºF/22ºC. In this mode the unit
will run to maintain the "Set" temperature.
2. Press Mode button on remote again. The remote
screen displays "Auto" and "high". The "Set"
temperature is displayed next to the "Room" temp.
The "Auto" light on unit stays illuminated. The unit will
cycle on and off to maintain the "Set" temperature at
high wattage (1500 Watts).
3. To turn unit "Off", press the Mode button and the LCD
will go blank (except for the "Room" temperature
display which is always displayed while batteries are in
the remote) and the unit will shut off.
Note: It is normal for the heater to cycle on and off as it
maintains the preset temperature. To prevent the unit from
5
BCH3230U visual version.qxd
7/2/02
7:15 PM
Page 10
cycling, you need to raise the thermostat setting.
ADJUSTING SET TEMP:
1. When in "Auto" mode, press the (+) button on the
remote. The "Set" number will increase with each
press. Hold the button down to scroll. The minimum
temp is 55ºF/13ºC and the maximum is 85ºF/29ºC.
The unit scrolls one digit at a time in a continuous loop.
55º, 56º…, 84º, 85º, 55º, 56º….
2. When in "Auto" mode, press the (-) button on the
remote to decrease the "Set" temperature. The unit
scrolls one digit at a time in a continuous loop.
UNIT OPERATION WITHOUT REMOTE
A. Remote and Unit are OFF:
1. Press the Mode button on the unit the first time. The
"Low" light illuminates and the unit runs in "Low" mode.
Figure 2
HIGH
(1500 Watts)
LOW
(1000 Watts)
MODE
high
auto
low
AUTO
mode
The power light turns on.
2. Press the Mode button a second time to run in "High"
mode (1500 Watts).
3. Press the Mode button a third time and the unit shuts
off.
Note: The "auto" light only illuminates when the unit is set
to "auto" mode by the remote.
B. Remote is ON and Unit is ON:
1. Press the Mode button on the unit. The unit will then
switch "Modes"; either from "Low" to "High" or "High"
to "Off". The unit’s lights will reflect the change. The
Remote will display a different mode – the mode in
which it was left. If a button is pressed on the Remote,
the Remote’s signal will override the "Mode" on the unit
and the two will be back in sync.
6
TIMER FUNCTION:
To turn unit off while remote and unit are on (in low,
high, auto state).
1) Hold mode button for 2 seconds to unlock remote.
2) Push + and - together.
2.1) "timer" turns on. 1 Hr appears on the screen.
3) Push + or - to adjust the number of hours the unit will
run before it automatically shuts itself off.
3.1) you can choose from; 1 to 8 hours
3.2) 1 through 8 will scroll in a continuous loop
4) After you have made your selection, the whole screen
flashes for 5 seconds after last button push of + or then goes back to previous mode
4.1) "timer" remains lit to show the timer function has
been set.
5) At any time if you unlock the remote and push the
mode button to turn the unit off the timer setting
will be erased and "timer" will disappear from the
remote.
6.) To check how much time is remaining, press
and hold the + and – buttons simultaneously.
To turn unit on while remote and unit are off (only
ambient temp is displayed on remote).
This function is meant for a person to preheat a room by
setting the timer. For Example: It’s 8 am, and you want to
come home to a warm room at 8 pm. To accomplish this,
place the unit in the desired room and set the timer to turn
the unit on in 12 hours. Once the timer is activated the unit
will run for a preset time of 2 hours. The digital thermostat
will maintain the room temperature at a default of
72°F/22ºC.
1) Hold mode button for 2 seconds to unlock remote.
2) DO NOT push mode again as this will turn unit on.
3) Push + and - together.
3.1) Unit remains off.
3.2) "timer" and "auto - high" turns on and flashes on
the remote, and 1 Hr appears on the screen
4) Push + or - to adjust the number of hours that will pass
before it turns itself on.
7
BCH3230U visual version.qxd
7/2/02
7:15 PM
Page 12
4.1) you can choose from 1 to 16 hours
4.2) 1 through 16 will scroll in a continuous loop
5) The whole screen flashes for 5 seconds after last
button push of + or - then goes back to previous mode
5.1) "timer" and "auto - high" remain lit to show the
timer function has been set.
5.2) The timer will turn the unit on and run for 2 hrs
then shut off and maintain the room in auto - high
at the default of 72º/22ºC. After these 2 hours,
the unit will shut off.
6) At any time if you unlock the remote and push the
mode button on the remote the timer setting will be
erased and "timer" will disappear from the screen.
7) To check how much time is remaining, press and hold
the + and - buttons simultaneously.
CLEANING/MAINTENANCE
During Season Care:
1. Always unplug the heater before cleaning
2. Clean the unit with a soft cloth moistened with a mild
soap solution.
3. NEVER use abrasive or flammable solvents to clean the
unit.
4. After cleaning, be sure to completely dry the unit with a
cloth or towel.
After Season Care:
1. Store heater in a cool, dry location
2. The manufacturer recommends that you store the unit
in its original carton.
• Check for obstructions. If you find an obstruction turn
the heater OFF, and unplug the unit. Carefully remove
the obstruction and follow the reset instructions.
• The temperature may be set too low. Adjust the
thermostat until the heater restarts.
Please DO NOT attempt to open or repair the heater.
Please see the Warranty for Service Instructions.
HEATER SERVICE INSTRUCTIONS
1. Do NOT attempt to repair or adjust any electrical or
mechanical functions on this unit. Doing so will void the
warranty. The inside of the unit contains no user
serviceable parts. All servicing should be performed by
qualified personnel only.
2. If you need to exchange the unit, please return it in its
original carton, with a sales receipt, to the store where
you purchased it. If you are returning the unit more than
30 days after the date of purchase, please see the
enclosed warranty.
3. For service information please call 1-800-788-5350 or
visit our website at www.bionaire.com.
4. ✉ If you have any other questions or comments,
feel free to write to us:
The Holmes Group, Inc.
Consumer Service Department
32B Spur Drive
El Paso, TX 79906
☛ TIP: Over time, dust may accumulate on the front grills.
This can be removed by wiping the unit with a damp
cloth. Always unplug unit and allow to cool prior to
cleaning.
TROUBLESHOOTING
If your heater fails to operate:
• UNPLUG THE UNIT
• Make sure the electrical outlet or circuit breaker is
working.
8
9
BCH3230U visual version.qxd
7/2/02
7:15 PM
Page 14
WARRANTY
Bionaire® warrants to the first retail purchaser, for TWO (2)
YEARS from the date of original purchase, either to repair
or replace at its option, without charge (parts and labor),
any supplied or manufactured part of this heater which,
upon inspection by an authorized service center, proves to
have failed in normal use due to defects in material or
workmanship, or at its option, to replace the unit.
Operation under conditions other than those
recommended or at voltages other than the voltage
indicated on the unit, or any attempts by unauthorized
personnel to service the unit or modify it, will render the
guarantee void.
Bionaire® shall not be liable for any personal injury, property
damage or any incidental or consequential damages of any
kind (including water damage), resulting from defects,
malfunctions, misuse, improper installation or alteration of
the product.
BIONAIRE® EXPRESSLY DISCLAIMS ALL
RESPONSIBILITY FOR CONSEQUENTIAL
DAMAGES OR INCIDENTAL LOSSES
CAUSED BY USE OF THIS PRODUCT.
The provisions of this Warranty are in addition to, and not a
modification of, or subtraction from the statutory warranties
and other rights and remedies contained in any applicable
legislation and to the extent that any such provision
purports to disclaim, exclude or limit any such statutory
warranties or other rights or remedies, such provisions
shall be deemed to be amended to the extent necessary
to comply therewith.
For Warranty Service, please call 1-800-788-5350
in North America.
A Bionaire® consumer service representative will help
determine which is the best procedure in order for your
heater to be repaired.
KEEP THIS NUMBER FOR FUTURE REFERENCE.
Galileo™ is a trademark of The Holmes Group, Inc.
Bionaire® and Bionaire® logo are registered trademarks of
The Holmes Group, Inc.
10