1
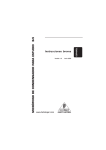
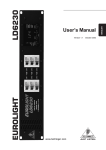
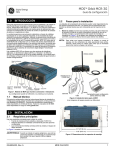
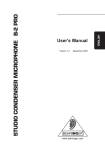
User Manual
SINGLE DIAPHRAGM CONDENSER
MICROPHONE B-5
Gold-Sputtered Large-Diaphragm Studio
Condenser Microphone
behringer.com
2
SINGLE DIAPHRAGM CONDENSER MICROPHONE B-5 User Manual
Important Safety
Instructions
Terminals marked with this symbol
carry electrical current of sufficient
magnitude to constitute risk of
electric shock. Use only high-quality
commercially-available speaker cables with
¼" TS plugs pre-installed. All other installation
or modification should be performed only by
qualified personnel.
This symbol, wherever it appears,
alerts you to the presence of
uninsulated dangerous voltage
inside the enclosure - voltage that may be
sufficient to constitute a risk of shock.
This symbol, wherever it appears,
alerts you to important operating
and maintenance instructions in
the accompanying literature. Please read
the manual.
Caution
Condenser microphones are
extremely moisture-sensitive.
Never use your microphone in close proximity
to water (e.g. bath tubs, wash basins, sinks,
washing machines, pools, etc.). When doing
voice recordings, always use the enclosed
popscreen to safely protect the capsule
from moisture.
Caution
Always use the power
supply specified in the
operating instructions.
Caution
Take care not to drop your
microphone as this can lead to
severe damage. BEHRINGER assumes no liability
for any damage caused by the user.
After each use, remove the
microphone from its mount and
wipe it down with a soft cloth
and place it back into its protective casing
(included with the microphone). Then, lay the
small bag containing the moisture-absorbing
crystals on top of the microphone head.
Limited Warranty
Please register your new BEHRINGER
equipment right after your purchase by
visiting behringer.com and read the terms and
conditions of our warranty carefully.
3
SINGLE DIAPHRAGM CONDENSER MICROPHONE B-5 User Manual
1. Power Supply
Phantom power (+48 V) is required to operate your microphone. We assume
no liability for damage caused to your B-5 through deffective phantom power.
Before activating phantom power, mute your playback system and connect the
B-5 to the microphone input of your mixing console. After activating phantom
power, the B-5 requires several seconds to stabilize itself.
2. Pickup Patterns
Your B-5 was delivered with two capsules allowing different pickup patterns:
cardioid ( ) and omnidirectional ( ).
If you use the cardioid pattern capsule, the pickup pattern is such that the sound
produced by sources located in front of the mic is strongly picked up, while sound
sources to the side are picked up less pronouncedly. Therefore, the cardioid
pattern capsule is ideal for directional pickup of acoustic instruments. It is
often used in recording situations in which several sound sources are present.
Since this capsule selectively tones down the pickup of sounds located to the side
of the microphone, this way you can achieve good separation of sound sources,
thus easily avoiding feedback.
The so-called proximity effect is typical for microphones with the cardioid pickup
pattern. Depending on the distance between the microphone and the sound
source, a slight increase in the lower frequency range occurs. The shorter the
distance, the more pronounced this effect. By cleverly selecting the position and
the angle of your microphone, you can effectively manipulate the proximity effect
and thus affect how your recording sounds. Experiment with various positions in
order to gain more experience.
The proximity effect does not occur with the capsule featuring the omnidirectional
pickup pattern; its strength is its ultra-linear frequency response. With this
pickup pattern, your B-5 picks up a large portion of diffuse ambience sound
and is therefore particularly well suited for atmospherical, natural-sounding
recordings. Similarly, you can also use the omnidirectional pickup pattern capsule
in situations in which several sound sources (e. g. a group of singers) need to be
picked up together.
4
SINGLE DIAPHRAGM CONDENSER MICROPHONE B-5 User Manual
3. Low Cut-Filter and Level
Attenuation (-10 dB)
The B-5 features a switchable low-cut filter that eliminates low-frequency
noise such as floor rumble. Set the switch to its middle position to activate the
low-cut filter.
For situations in which the microphone is exposed to extremely high sound
pressure levels, the B-5 features a switchable level attenuation (“pad”).
When the switch is in its “-10 dB” position, the level attenuation is activated.
When the switch is in its top-most position, the signal is not influenced
in any way.
4. Microphone Installation
To properly attach your microphone to a microphone stand, a clamp is included.
First screw this clamp onto your stand before attaching the microphone itself.
5. Changing Microphone Capsules
When your B-5 leaves the assembly plant, it has the cardioid pickup pattern
capsule screwed onto its shaft. To loosen the capsule, hold the shaft firmly
and unscrew the capsule turning it counter-clockwise.
◊ When installing a capsule, please make sure to handle both the capsule
and the microphone shaft with attention and care to avoid damaging
the screw thread. In no situation should you ever apply excessive force.
6. Audio Connection
To connect the B-5 to your equipment, use a balanced XLR microphone cable with
the following pin assignment: Pin 1 = shielding, pin 2 = +, pin 3 = -. Since all
contact points of the B-5 are gold-plated, your microphone cable too should
feature gold-plated connectors, if possible.
5
SINGLE DIAPHRAGM CONDENSER MICROPHONE B-5 User Manual
7. Level Setting/Adjusting the Basic Sound
Adjust the gain control in the microphone channel of your mixing console so
that the peak LED lights up only occasionally or never at all. The EQ controls
in the microphone channel should be set to mid-travel position to start with;
low-cut filter and level attenuation should be off. Try to achieve the desired sound
by experimenting with the microphone position. Often, it will be useful to set up
acoustic barriers (“baffles”) at various angles towards the signal source. Only when
the desired basic sound has been achieved, should you start using equalizers and
signal processors, if any at all. Remember: less is often more!
0 dB
330˚
0˚
-5 dB
30˚
-10 dB
300˚
60˚
-15 dB
-20 dB
-25 dB
-30 dB
270˚
90˚
240˚
120˚
210˚
150˚
250 Hz
500 Hz
1000 Hz
2000 Hz
180˚
4000 Hz
8000 Hz
16000 Hz
Polar pattern (cardioid)
dB
20.0
10.0
0.0
-10.0
-20.0
Low cut
50.0
100.0
Frequency response (cardioid)
1000.0
10k 15k 20k Hz
6
SINGLE DIAPHRAGM CONDENSER MICROPHONE B-5 User Manual
0 dB
330˚
-5 dB
-10 dB
300˚
-15 dB
270˚
240˚
210˚
250 Hz
500 Hz
1000 Hz
2000 Hz
180˚
4000 Hz
8000 Hz
16000 Hz
Polar pattern (omnidirectional)
dB
20.0
10.0
0.0
-10.0
-20.0
Low cut
50.0
100.0
Frequency response (omnidirectional)
1000.0
10k 15k 20k Hz
7
SINGLE DIAPHRAGM CONDENSER MICROPHONE B-5 User Manual
8. Specifications
Transducer type
true condenser, 18 mm (0.71") single diaphragm
Operating Principle
Cardioid
pressure gradient
Omnidirectional
pressure operated
Polar pattern
1 x cardioid
1 x omnidirectional, exchangeable
Connection
gold-plated, balanced XLR connector
Open Circuit Sensitivity (at 1 kHz)
Cardioid
-38 dBV (0 dBV = 1 V/Pa), 12.6 mV/Pa
Omnidirectional
-40 dBV (0 dBV = 1 V/Pa), 10 mV/Pa
Frequency response
20 Hz - 20 kHz
Level attenuation
-10 dB (switchable)
Low-cut filter
6 dB/oct. at 150 Hz (switchable)
Max. SPL (1% THD @ 1 kHz)
140 dB (0 dB)
150 dB (-10 dB)
Equivalent SPL (IEC 651)
16 dB-A (cardioid)
18 dB-A (omnidir.)
Signal-to-Noise Ratio
Cardioid
78 dB A-weighted
Omnidirectional
76 dB A-weighted
Nominal impedance
70 Ω
Load impedance
>1 kΩ
Supply voltage
+48 V
Supply current
3 mA
Physical/Weight
Dimensions
Ø shaft: 20 mm
Length
120 mm
Weight
approx. 0.21 lbs / 0.09 kg
behringer.com