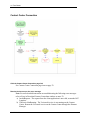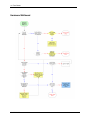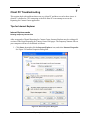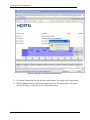
1
Reporting for Contact Center Troubleshooting
and Maintenance Guide
BCM50 3.0
Contact Center
Document Number: NN40020-403
Document Status: Standard
Document Version: 01.01
Date: July 2007
Copyright © 2007 Nortel Networks, All Rights Reserved
The information in this document is subject to change without notice. The statements, configurations, technical data,
and recommendations in this document are believed to be accurate and reliable, but are presented without express or
implied warranty. Users must take full responsibility for their applications of any products specified in this
document. The information in this document is proprietary to Nortel Networks.
Trademarks
Nortel, the Nortel logo, and the Globemark are trademarks of Nortel Networks.
Microsoft, MS, MS-DOS, Windows, and Windows NT are registered trademarks of Microsoft Corporation.
Java is a trademark of Sun Microsystems Incorporated.
All other trademarks and registered trademarks are the property of their respective owners.
Table of Contents
List of Figures .............................................................................................................6
List of Tables...............................................................................................................8
How to Use this Guide................................................................................................9
Introduction ..........................................................................................................................................9
How this Guide is organized ................................................................................................................9
Introduction ...............................................................................................................11
About this Guide ............................................................................................................................... 11
How to get Help................................................................................................................................. 11
Getting Help from the Nortel Web site ......................................................................................... 11
Getting Help over the phone from a Nortel Solutions Center ...................................................... 12
Getting Help through a Nortel distributor or reseller .................................................................... 12
Flow Charts ...............................................................................................................13
Introduction ....................................................................................................................................... 13
Key to the flow charts................................................................................................................... 13
Diamonds............................................................................................................................... 13
Rectangles............................................................................................................................. 14
Ovals...................................................................................................................................... 14
Installing Reporting for Contact Center............................................................................................. 16
Contact Center Connection............................................................................................................... 18
Historical Reports.............................................................................................................................. 20
Real Time Screens ........................................................................................................................... 21
Software Wallboard........................................................................................................................... 24
Hardware Wallboard ......................................................................................................................... 26
Print Schedules ................................................................................................................................. 28
Raising a Case: Information Gathering................................................................... 31
Web Host PC Troubleshooting ................................................................................35
Microsoft SQL Server 2005............................................................................................................... 36
Overview and installation ............................................................................................................. 36
Version compatibility .................................................................................................................... 36
Uninstalling and re-installing ........................................................................................................ 36
Backup and Restore the RCC Database ..................................................................................... 36
Backup................................................................................................................................... 37
Restore .................................................................................................................................. 39
Database Corruption.................................................................................................................... 42
Reporting for Contact Center Troubleshooting and Maintenance Guide
4 Table of Contents
Internet Information Services.............................................................................................................43
IIS overview and installation .........................................................................................................43
IIS version compatibility ................................................................................................................43
Recreating Virtual Directories .......................................................................................................43
Virtual folders not created in Internet Information Services ...................................................43
Restarting the IIS Service .............................................................................................................44
Java Runtime Environment................................................................................................................45
Java overview and installation......................................................................................................45
Java version compatibility.............................................................................................................45
Real Time screens are not displayed correctly ......................................................................45
Java Cache...................................................................................................................................49
Real Time screens are displayed but no data is seen (clearing the Java Cache) .................49
Firewalls.............................................................................................................................................51
Ports and .exe files used by Reporting for Contact Center ..........................................................51
Port Numbers used by Reporting for Contact Center ............................................................51
.exe files used by Reporting for Contact Center ....................................................................51
Common Firewall Configuration ...................................................................................................52
Uninstalling other firewalls......................................................................................................52
Windows Firewall ...................................................................................................................52
Norton Internet Security and Personal Firewall......................................................................52
Zone Alarm and Sophos.........................................................................................................53
Anti Virus............................................................................................................................................54
Anti-Virus Software Slowing Down the File System .....................................................................54
Blank dialog boxes........................................................................................................................54
McAfee 8.0i Anti-Virus software .............................................................................................54
Proxy Server ......................................................................................................................................56
Proxy settings for BCM50 3.0 .......................................................................................................56
Disabling Proxy server..................................................................................................................56
URL not allowed to be proxied error message .............................................................................58
Disabling the proxy server on a Client PC .............................................................................59
Allowing exceptions on the proxy server................................................................................59
Historical Reports ..............................................................................................................................63
Error on page in Report Viewer ....................................................................................................63
Reporting Services Restore Utility................................................................................................63
Real Time screens.............................................................................................................................65
Connection Status not green ........................................................................................................65
Connection Status is red with error message...............................................................................65
Error messages in Real Time screens ...................................................................................65
Slow updates on Real Time screen..............................................................................................73
Web Host PC Requires a Host File entry...............................................................................73
Real Time screens are not displayed ...........................................................................................74
Ad Blocking in Norton Internet Security .................................................................................74
Wallboards .........................................................................................................................................76
ipView SoftBoard and Wallboard Summaries...............................................................................76
IP Address of the Hardware Wallboard ........................................................................................76
Pause in parameter count on the Hardware Wallboard ...............................................................76
Further problems with the ipView SoftBoard or Hardboard...............................................................77
Printing report ....................................................................................................................................78
Reports are not printing ................................................................................................................78
Check the printer ....................................................................................................................78
Check the print schedule........................................................................................................78
Print Caller Service (PCS) ............................................................................................................78
Miscellaneous ....................................................................................................................................79
Contact Center Connection page item .........................................................................................79
Error messages ............................................................................................................................79
Error in Download Contact Center data window ....................................................................79
NN40020-403
Table of Contents 5
Client PC Troubleshooting.......................................................................................88
Tips for Internet Explorer .................................................................................................................. 88
Internet Explorer cache................................................................................................................ 88
Deleting temporary Internet files ........................................................................................... 88
Launching Reporting for Contact Center from a shortcut ............................................................ 89
Internet Explorer security settings ............................................................................................... 90
Allowing pop-ups.......................................................................................................................... 92
Page cannot be displayed message............................................................................................ 95
Error on Closing Group of Internet Explorer Windows ................................................................ 97
Real Time Viewer............................................................................................................................ 100
Real Time screens and Java Runtime Environment on Client PCs .......................................... 100
Manual installation of Java Runtime Environment..................................................................... 101
Alternative method to a manual installation of Java Runtime Environment .............................. 106
Unable to print reports .................................................................................................................... 107
BCM and CCRS Troubleshooting .......................................................................... 110
Pinging the BCM / Contact Center.................................................................................................. 110
Resolving pinging failure on your network ................................................................................. 110
Checking XML from the Contact Center ......................................................................................... 111
CCRS Test Page ............................................................................................................................ 111
Contact Center errors ................................................................................................................ 114
Invalid XML ................................................................................................................................ 115
Incompatible XML ...................................................................................................................... 117
Voicemail patch and RCC ................................................................................................... 118
Upgrade and Patch procedure for the BCM and Reporting for Contact Center ............................. 119
Voicemail Patch procedure ........................................................................................................ 119
Glossary ..................................................................................................................121
References ..............................................................................................................128
Index ........................................................................................................................ 129
Reporting for Contact Center Troubleshooting and Maintenance Guide
6 List of Figures
List of Figures
Figure 1: SQL Server Management Studio login dialog box.......................................................................................37
Figure 2: Navigation tree view of databases................................................................................................................38
Figure 3: Back Up Database control dialog box..........................................................................................................39
Figure 4: Restore Database control dialog box............................................................................................................41
Figure 5: Point in time restore dialog box ...................................................................................................................42
Figure 6: Page cannot be found error message ............................................................................................................46
Figure 7: Internet Properties Dialog Box.....................................................................................................................47
Figure 8: Advanced window for JRE 1.6.0 for <applet> selection..............................................................................48
Figure 9: Clearing the Java Cache (Control Panel) .....................................................................................................49
Figure 10: Clearing the Java Cache (Java Control Panel) ...........................................................................................50
Figure 11: Clearing the Java Cache (Prompt)..............................................................................................................50
Figure 12: Selecting LAN Settings from Connections window...................................................................................57
Figure 13: Disabling proxy server in LAN Settings ....................................................................................................58
Figure 14: Proxy server denying access to RCC .........................................................................................................59
Figure 15: Selecting LAN Settings from Connections window...................................................................................60
Figure 16: Proxy server enabled in the LAN Settings window ...................................................................................61
Figure 17: Allowing an IP Address exception in Proxy Settings.................................................................................61
Figure 18: Reporting Services Restore Utility dialog box...........................................................................................64
Figure 19: Reporting Services restored successfully dialog box .................................................................................64
Figure 20: Example Host File......................................................................................................................................74
Figure 21: Ad Blocking option in Norton Internet Security ........................................................................................74
Figure 22: Ad Blocking Window in Norton Internet Security.....................................................................................75
Figure 23: Indexing Service Properties General window ............................................................................................77
Figure 24: Internet Properties Dialog Box...................................................................................................................88
Figure 25: Delete Files Dialog.....................................................................................................................................89
Figure 26: Internet Properties Advanced window Settings .........................................................................................90
Figure 27: Internet Options Security window..............................................................................................................91
Figure 28: Security Settings window...........................................................................................................................92
Figure 29: Pop-up Blocker Settings dialog box...........................................................................................................93
Figure 30: Pop-up options from information bar.........................................................................................................94
Figure 31: Allow Web site pop-up confirmation box ..................................................................................................95
Figure 32: Internet Properties Dialog Box...................................................................................................................96
Figure 33: Advanced window in Internet Properties ...................................................................................................97
Figure 34: Taskbar Properties Dialog Box ..................................................................................................................98
Figure 35: Selecting Close Group option from Internet Explorer Programs taskbar button........................................98
Figure 36: Internet Explorer Close Group Error..........................................................................................................99
Figure 37: JRE installation message..........................................................................................................................101
Figure 38: Internet Explorer Security Warning window ...........................................................................................102
Figure 39: ActiveX control message in Information Bar...........................................................................................103
Figure 40: JRE License Agreement and setup type window .....................................................................................104
Figure 41: JRE Complete window.............................................................................................................................105
Figure 42: JRE applet logo on Real Time page .........................................................................................................106
Figure 43: Print warning message .............................................................................................................................107
Figure 44: MS SQL Server add-on in Information bar..............................................................................................108
Figure 45: MS SQL Server installation window........................................................................................................109
Figure 46: Successful ping response to Web Host PC...............................................................................................110
Figure 47: CCRS Test page .......................................................................................................................................112
Figure 48: XML data from the BCM.........................................................................................................................113
Figure 49: InvalidPassword XML error in CCRS Test page .....................................................................................114
Figure 50: Invalid XML data error message..............................................................................................................116
Figure 51: ERROR! Invalid Data Detected page.......................................................................................................117
Figure 52: Incompatible schema version between RCC and XML error message ....................................................118
NN40020-403
List of Figures 7
Reporting for Contact Center Troubleshooting and Maintenance Guide
8 List of Tables
List of Tables
Table 1: IIS version compatibility with Microsoft Windows Operating Systems .......................................................43
Table 2: Issues causing the error messages seen in the Real Time screens .................................................................66
Table 3: Issues causing the error messages in the Download Contact Center data window........................................80
Table 4: A sample of acceptable date and times for requesting historical XML data ...............................................113
NN40020-403
9
1
How to Use this Guide
Introduction
This guide is designed to allow a Nortel Customer, a Nortel Partner, a Network Administrator, or
Support Personnel to maintain and troubleshoot Nortel Reporting for Contact Center.
How this Guide is organized
The Reporting for Contact Center Troubleshooting and Maintenance Guide is organized into the
following chapters:
How to Use this Guide
Provides a brief overview identifying the organization of
this guide.
Introduction
Provides an overview of the Reporting for Contact Center
Troubleshooting and Maintenance Guide. Information is
also included on getting help from Nortel.
Flow Charts
Flow charts to aid the user in troubleshooting a problem
encountered in Reporting for Contact Center.
Raising a Case: Information
Gathering
Details the information from Reporting for Contact Center
and the Contact Center to gather for Nortel Technical
Support when troubleshooting a problem.
Web Host PC Troubleshooting Typical problems and solutions for troubleshooting a Web
Host PC, for example, backing up and restoring the
MySQL database, using anti-virus software, and so on.
Client PC Troubleshooting
Typical problems and solutions for troubleshooting a
Client PC.
BCM and CCRS
Troubleshooting
Typical problems and solutions for troubleshooting the
Business Communications Manager (BCM) and Contact
Center Reporting Server (CCRS).
Glossary
Glossary of terms used in this guide.
References
Lists documents referenced in this guide.
Index
Provides a cross-reference of topics in this guide.
Reporting for Contact Center Troubleshooting and Maintenance Guide
10 How to Use this Guide
NN40020-403
11
2
Introduction
The Reporting for Contact Center Troubleshooting and Maintenance Guide is to be used by
Nortel customers and partners to troubleshoot any problems encountered in the Nortel Reporting
for Contact Center client application reporting tool that is a component of the Contact Center.
About this Guide
Where a symptom indicates a problem with Reporting for Contact Center this guide, which is
divided into appropriately named chapters, enables the user to quickly refer to a particular
section. For instance, if the user sees an issue on the Web Host PC, the reader can go directly to
the Web Host PC Troubleshooting chapter, and look up the relevant topic to troubleshoot.
Alternatively, the user can troubleshoot a problem encountered in Reporting for Contact Center
by using flow charts. These are provided in the Flow Charts chapter, beginning on page 13. The
flow charts cover several areas of Reporting for Contact Center from the installation and
connection of Reporting for Contact Center to print schedules for reports.
If a problem can not be resolved in this guide, the user is advised to consult Nortel Technical
Support – this will be referred to as Nortel Support in the rest of this document. The following
section, How to get Help, provides information on how to get help from Nortel for either
Reporting for Contact Center issues, or issues with the Contact Center.
How to get Help
This section explains how to get help for Nortel products and services.
Getting Help from the Nortel Web site
The best source of support for Nortel products is the Nortel Support Web site:
http://www.nortel.com/support
This site enables customers to:
•
Download software and related tools
•
Download technical documents, release notes, and product bulletins
•
Sign up for automatic notification of new software and documentation
•
Search the Support Web site and Nortel Knowledge Base
•
Open and manage technical support cases
Reporting for Contact Center Troubleshooting and Maintenance Guide
12 Introduction
Getting Help over the phone from a Nortel Solutions Center
If you have a Nortel support contract and cannot find the information you require on the Nortel
Support Web site, you can get help over the phone from a Nortel Solutions Center.
In North America, call 1-800-4NORTEL (1-800-466-7835).
Outside North America, go to the following Web site and look up the phone number that applies
to your region:
http://www.nortel.com/callus
When you speak to the phone agent, you can reference an Express Routing Code (ERC) to route
your call more quickly to the appropriate support specialist. To locate the ERC for your product
or service, go to:
http://www.nortel.com/erc
Getting Help through a Nortel distributor or reseller
If you purchased a service contract for your Nortel product from a distributor or authorized
reseller, you can contact the technical support staff for that distributor or reseller.
NN40020-403
13
3
Flow Charts
Introduction
The flow charts enable the user to troubleshoot problems encountered in Reporting for Contact
Center. There are seven flow charts covering areas from installation of Reporting for Contact
Center to print schedules of reports. The user is advised to go to the relevant flow chart in the
area of Reporting for Contact Center where a problem has arisen. The flow charts are as follows:
1. Installing Reporting for Contact Center
2. Contact Center Connection
3. Historical Reports
4. Real Time Screens
5. Software Wallboard
6. Hardware Wallboard
7. Print Schedules
Questions raised and action items to be performed in a flow chart are explained in additional help
provided directly after the flow chart. A key to the flow charts is provided, see the following
section Key to the flow charts, which explains what the different shapes and colors represent, as
well as what some of the content mean.
Key to the flow charts
Diamonds
These shapes are questions; they have either a Yes or No answer. Depending on the answer you
will be redirected to an additional step:
No is represented with a red arrow
Yes is represented with a blue arrow
The yellow background indicates that there is more help available in this document for that
question; this will be displayed directly below the relevant flow chart, as in the following:
Reporting for Contact Center Troubleshooting and Maintenance Guide
14 Flow Charts
Q) Is IIS Installed?
[Answer will be displayed here]
Rectangles
These shapes are action items. You must perform the action detailed in this step. Black arrows
direct you to the next step to take from here.
The yellow background indicates that there is more help available in this document for that
action item; this will be displayed directly below the relevant flow chart, as follows:
From Add Remove Windows Components Install IIS
[Answer will be displayed here]
Rectangular action items with a green background indicate an important step in the flow chart. A
rectangular action item with a blue background indicates that part of the flow chart is continued
on another flow chart as specified in the step.
Ovals
These oval shapes are either the start point of a flow chart which will also be colored green, or a
terminating action in the flow chart. Terminating actions require you to consult further with
Nortel regarding the current problem. For further help refer to the How to get Help section on
page 11.
The terminating actions display either, Consult Nortel (RCC), or Consult Nortel (CC)
indicating whether the Reporting for Contact Center (RCC) component or the Contact Center
(CC) requires the initial focus of consultation with Nortel Support.
If you suspect a problem with RCC, collect the RCC logs. If you suspect a problem with the
BCM, collect the BCM logs. If you are unsure whether the problem originates on the BCM or
the RCC, collect logs from both.
Note: Various diagnostic logs are always running when Nortel Reporting for Contact
Center is operational. The Logging Menu allows you to Archive the current log files
and download any previously archived log files.
NN40020-403
Flow Charts 15
To Archive the current log files click the Archive Logs button. This will create a
single .zip archive file of the current log files. A new entry will appear in the list of
archived files table, following the Log files location on the Logging Menu page.
Recently created log file archives are indicated by a yellow star. To stamp the Real
Time log click the Stamp Real Time Log button. This will stamp the Real Time log
constantly for 15 seconds. As the Real Time log can be quite large this option is useful
for tracking down a problem to a specific time. Clicking the Stamp Real Time Log
button will disable the button for 15 seconds. Stamping cannot be initiated again in
this time until 15 seconds have passed. After this time has elapsed the button will be
enabled. To download a log file archive click the Download Logs button next to the
desired archive and save it to a location on your computer.
Note: The maximum number of archives you can create is 5. When a 6th archive is
created it will automatically delete the oldest archive. The file naming convention
includes (in the same order) the year, month, day, hour, minute and second that the
archive was created, this can be used to determine how old the log file archive is. To
view the contents of the archive you will need to have either WinZip, WinRAR or any
other compatible zip file viewer installed. The default compressed folder viewer that
comes with Windows XP and above will not work with these archives.
For the ipView SoftBoard, logging is activated by echoing to the loop back IP address
of 127.0.0.1. The log file is stored in the installation folder of the SoftBoard.
To retrieve logs of a hardware wallboard, set up an ipView SoftBoard to echo to the
hardware wallboard. Again, echo the SoftBoard to the loop back IP Address
(127.0.0.1) to activate logging of the hardware wallboard. The wallboard log file can
be retrieved from the installation folder of the SoftBoard.
Reporting for Contact Center Troubleshooting and Maintenance Guide
16 Flow Charts
Installing Reporting for Contact Center
NN40020-403
Flow Charts 17
Is IIS Installed?
Refer to the Reporting for Contact Center Setup and Operations Guide (NN40040-303)
to check whether IIS is installed.
From Add/Remove Windows Components install IIS
Refer to the Reporting for Contact Center Setup and Operations Guide (NN40040-303)
for instructions on installing IIS.
Remove RCC, Microsoft SQL Server 2005 and Java Runtime Envrionment 6 from Add/Remove
Programs and try again
If the Reporting for Contact Center installation did not complete 100%, Reporting for
Contact Center should be removed from the Web Host PC, then Microsoft SQL Server
2005 and finally Java Runtime Environment 6, as follows:
a. Click on Start > Control Panel > Add/Remove Programs.
b. Select Reporting for Contact Center and click the Change/Remove button to start
the un-installation of Reporting for Contact Center.
c. Follow the on-screen instructions in InstallShield Wizard to remove the program.
d. Repeat steps b and c for Microsoft SQL Server 2005 and Java SE Runtime
Environment 6.
Install Reporting for Contact Center again.
Q) Do you see “Page cannot be displayed” rather than an error message?
If Yes, go to step Turn off Friendly HTTP Error Messages as follows, or return to the
Installing Reporting for Contact Center flow chart.
Turn off Friendly HTTP Error Messages
To see HTTP 500 error messages, Friendly HTTP Error Messages must be disabled in
Internet Explorer. See Page cannot be displayed message on page 95.
Reporting for Contact Center Troubleshooting and Maintenance Guide
18 Flow Charts
Contact Center Connection
Click the Contact Center Connection page link
See Contact Center Connection page item on page 79.
Resolve the issue as per the error message
Note: For more detailed instructions on troubleshooting the following error messages
refer to Error in Download Contact Center data window on page 79.
a) InvalidRequest - The request from the client application is not valid, restart the RCC
Launcher.
b) VMServiceNotRunning - The Voicemail service is not running on the Contact
Center. Restart the Voicemail service on the Contact Center through the Element
Manager.
NN40020-403
Flow Charts 19
c) InvalidPassword - The password used by the client application is not valid. Enter the
correct password, use the CCRS test page to check if you are not sure.
d) NoKeyCode - The keycode used to turn on the CCRS data stream is not present.
Enter the correct keycode.
e) NoCCData – No data is present in the CCRSAppServer database. Configure at least
one skillset in CallPilot Manager.
f) NoCCKeyCode - The keycode used to enable the Contact Center application is not
present. Enter the correct keycode.
g) CCRSDisabled - The CCRS data stream is disabled. Enable the CCRSAppServer in
the Element Manager.
h) ServerBusy - The server is too busy to handle the request (too many simultaneous
users). Check that other Reporting for Contact Center clients are not communicating
with the same Contact Center, restart the RCC Launcher.
i) CannotConnectToCC - The CCRS cannot contact the Contact Center.
j) CannotConnectToDB – The CCRS could not connect to the Contact Center
database.
k) CCRefusedConnection - Indicates that the Contact Center refused to register the
AppServer.
l) UnknownServerError – If none of the above, contact Nortel Support.
Q) Can you connect to the CC using the CCRStest page?
Refer to CCRS Test Page on page 117 for instructions on connecting to the Contact
Center using the CCRS Test page.
Q) Can you ping the CC?
Note: Ensure that any active firewall is not blocking ping requests.
From the Web Host PC, at the command line type ping xx.xx.xx.xx, where xx.xx.xx.xx is
the IP Address of LAN1 or LAN2 of the BCM.
For further information on pinging to the Contact Center, see Pinging the on page 110.
Resolve the Ping failure within your network
To resolve the Ping failure, see Resolving pinging failure on your network on page 110.
Reporting for Contact Center Troubleshooting and Maintenance Guide
20 Flow Charts
Historical Reports
Q) Do you see “Page cannot be displayed” rather than an error message?
To see HTTP 500 error messages by disabling friendly HTTP error messages in Internet
Explorer see Page cannot be displayed message on page 95.
Turn off Friendly HTTP Error Messages
To see HTTP 500 error messages, Friendly HTTP Error Messages must be disabled in
Internet Explorer. See Page cannot be displayed message on page 95.
Q) Were your questions answered by consulting the Reports Explained guide?
Detailed information on the Reports within Reporting for Contact Center can be found in
the Reporting for Contact Center - Reports Explained (NN40010-626) guide (installed
along with this guide on the Web Host PC). This guide details how to use the report
viewer, the terms used within Reporting for Contact Center reports, what statistics and
formulas are used to calculate each field in the reports (where applicable) and frequently
asked questions.
NN40020-403
Flow Charts 21
Real Time Screens
Reporting for Contact Center Troubleshooting and Maintenance Guide
22 Flow Charts
Q) Do you see “Page cannot be displayed” rather than an error message?
To see HTTP 500 error messages by disabling friendly HTTP error messages in Internet
Explorer see Page cannot be displayed message on page 95.
Turn off Friendly HTTP Error Messages
To see HTTP 500 error messages, Friendly HTTP Error Messages must be disabled in
Internet Explorer. See Page cannot be displayed message on page 95.
Install the Java Runtime manually
To manually install Java Runtime Environment see Real Time screens are not displayed
correctly on page 45.
Q) Is there a correct response from the CC using the CCRStest page?
See CCRS Test Page.
Q) Do you see a red status icon with an error message next to it?
Should an error message be returned from the Contact Center it will be displayed directly
below the Connection Status indicator with a red status icon next to it.
Resolve the issue as per the error message
Note: For more detailed instructions on troubleshooting the following error messages
refer to Error messages in Real Time screens on page 65.
a. Invalid Request - The request from the client application is not valid, restart the
RCC Launcher.
b. Voicemail Service Not Running - The Voicemail service is not running on the
Contact Center. Restart the Voicemail service on the Contact Center through the
Element Manager.
c. Invalid Password - The password used by the client application is not valid. Enter
the correct password, use the CCRS test page to check if you are not sure.
d. No Key Code - The keycode used to turn on the CCRS data stream is not present.
Enter the correct keycode.
e. No CC Data – No data is present in the CCRSAppServer database. Configure at
least one skillset in CallPilot Manager.
f. No Contact Center Key Code - The keycode used to enable the Contact Center
application is not present. Enter the correct keycode.
g. CCRS Disabled - The CCRS data stream is disabled. Enable the CCRSAppServer
in the Element Manager.
NN40020-403
Flow Charts 23
h. Server Busy - The server is too busy to handle the request (too many simultaneous
users). Check that other Reporting for Contact Center clients are not
communicating with the same Contact Center, restart the RCC Launcher.
i. CDN Conflict – There is a Control Directory Number (CDN) conflict in the Skillset
and CDN identified in the error message, this must be resolved in the CallPilot
Manager interface.
j. Unknown Server Error – If none of the above, consult Nortel Support.
Increase your Wallboard and Real Time refresh rate to 3 seconds
a.
b.
c.
d.
Launch and log on to Reporting for Contact Center as an Administrator.
Click on the Contact Center Connection link.
Select 3 Seconds from the Wallboard and Real Time Refresh Interval.
Click Submit.
Reporting for Contact Center Troubleshooting and Maintenance Guide
24 Flow Charts
Software Wallboard
NN40020-403
Flow Charts 25
Uninstall and re-install the ipView SoftBoard
Refer to the ipView Software Wallboard Setup and Operation Guide (NN40010-500).
Reconfigure the Wallboard, with the correct IP Address and port.
Refer to the ipView Software Wallboard Setup and Operation Guide (NN40010-500).
Were your questions answered by consulting the ipView SUOG?
Detailed information on the ipView SoftBoard can be found in the ipView Software
Wallboard Setup and Operation Guide (NN40010-500).
Close the SoftBoard and reconfigure the firewall to allow the same port as configured in RCC.
Refer to Ports and .exe files used by Reporting for Contact Center on page 51 for
Reporting for Contact Center port numbers and executable files.
Reporting for Contact Center Troubleshooting and Maintenance Guide
26 Flow Charts
Hardware Wallboard
NN40020-403
Flow Charts 27
Is MS Indexing Service running?
On the Web Host PC, or the PC that the hardware wallboard is directly connected to,
check by one of the following options:
Option 1
1. Open the Windows Task Manager by pressing Ctrl+Alt+Delete.
2. Click Task Manager.
3. Click the Processes tab.
4. Search for the process cidaemon.exe. If this is running, MS Indexing Service will be
running on the PC.
Option 2
1. From the Start menu, click on Settings > Control Panel > Administrative Tools >
Services.
2. Locate the service Indexing Service.
3. If the Status is set to Started, MS Indexing Service will be running on the PC.
Stop the MS Indexing Service and set to Manual
Refer to Pause in parameter count on the Hardware Wallboard on page 76.
Reconfigure the Wallboard, with the correct IP Address and port
Refer to the ipView Software Wallboard Setup and Operation Guide (NN40010-500).
Were your questions answered by consulting the RCC SUOG?
Detailed information on the configuration and the statistics displayed on the hardware
wallboard can be found in the Reporting for Contact Center Setup and Operations Guide
(installed along with this guide on the Web Host PC).
Obtain the correct IP Address of the Hardware Wallboard
Refer to IP Address of the Hardware Wallboard on page 76 for instructions on obtaining
the IP Address of the hardware wallboard.
Reporting for Contact Center Troubleshooting and Maintenance Guide
28 Flow Charts
Print Schedules
NN40020-403
Flow Charts 29
Check that printCaller.exe is not being blocked by your firewall
Refer to the .exe files used by Reporting for Contact Center section on page 51.
Q) Were your questions answered by consulting the Reports Explained guide?
Detailed information on the Reports within Reporting for Contact Center can be found in
the Reporting for Contact Center – Reports Explained (NN40010-626) guide (installed
along with this guide on the Web Host PC). This guide details how to use the report
viewer, the terms used within Reporting for Contact Center reports, what statistics and
formulas are used to calculate each field in the reports (where applicable) and frequently
asked questions.
Check that the report was configured to print on the correct day
Refer to the Check the print schedule section on page 78.
Can you print a standard document using the same printer?
Refer to the Check the printer section on page 78.
Q) Is Print Caller Service (PCS) running?
Refer to the Print Caller Service (PCS) section on page 78.
Launch Print Caller Service (PCS)
Refer to the sub-section Print Caller Service (PCS) on page 78.
Reporting for Contact Center Troubleshooting and Maintenance Guide
30 Flow Charts
NN40020-403
31
Raising a Case: Information Gathering
5
This section details what to check for and the information to collate when problems arise in
Reporting for Contact Center.
The following would be asked by, and should be provided to Nortel Support personnel when
troubleshooting Reporting for Contact Center (try to complete as many questions as possible):
1. Is this a new installation? Yes / No
If Yes, the following should be determined:
•
What was the previous software running on the equipment?
•
Was the issue present on that software or did the issue start after upgrade?
2. Detail a description of the issue:
•
What was the time and date of the first occurrence of the issue?
•
What is the frequency of the issue?
•
Were there any changes to the configuration or system before the issue occurred?
•
Is the issue reproducible? Yes / No
3. What are the steps or conditions to reproduce the issue?
4. If the issue is not reproducible, what were the exact actions taken before the issue
occurred?
5. The name, version, as well as the Service Pack and any hot fixes, and language of the
Operating System of the PC running Reporting for Contact Center? Also, whether the
Operating System is an Original Equipment Model (OEM), or a Microsoft build?
6. Version of Reporting for Contact Center, and the language(s) of installation and logon
User?
7. Version of VoiceMail (CallPilot)?
8. Version of Core (Telephony Version)?
9. Number of Agents?
10. Number of Skillsets?
11. Number of IP Wallboards?
12. Issues related to the reports, such as inaccuracies:
•
Is the issue related to one report, some reports, or all of the reports?
•
Provide a copy of the report(s) exported to PDF format:
This can be done from the report viewer in Reporting for Contact Center.
Note: The Agent Audit report (the recommended report period being less than 24
hours) is a good test for checking issues with Reporting for Contact Center.
•
Provide a detailed description of what the issue is with the report(s).
Reporting for Contact Center Troubleshooting and Maintenance Guide
32 Raising a Case: Information Gathering
•
Provide the date and time of the issue with the report. For example, the exact date and
time when the report gave inaccurate, or did not give any data.
•
Detail how you expect the report(s) to appear.
13. Issues related to Reporting for Contact Center functionality, that is, it does not work as
expected:
•
Provide a detailed description of what the issue is.
•
Capture screen shots of any errors.
•
Detail how you expect Reporting for Contact Center to work.
14. Issues relating to SoftBoards:
In addition to the Reporting for Contact Center logging, see step 16, include the logging
for the problematic SoftBoard by echoing it to 127.0.0.1 for at least an hour and
collecting the .log file in the install location of the SoftBoard.
15. The Archlog of the Contact Center should be attached to the Customer Service Request
(CSR), with details regarding the time and date of the problem and log stamping.
BCM logs are stamped by pressing Feature 9*9 from a display telephone – this displays
a stamp number which should be provided to Nortel for locating the exact point a
problem occurred in the logs. Refer to the BCM 4.0 Administration Guide (N0060598)
and BCM50 Administration Guide (N0016868 01), for instructions on retrieving log files
from the Contact Center.
Note: Before retrieving logs, ensure that the Web Host PC system time is synchronized
with that of the Contact Center.
16. Copy of Reporting for Contact Center logs:
•
The log file location is specified by the Administrator in Reporting for Contact
Center. Click Admin > Maintenance > Logging. The path is given under Log files
location.
a. Collect the latest logs by clicking the Archive Logs button, then click the
Download Logs button next to the log file archive that you wish to download.
17. Copy of the Reporting for Contact Center database for Microsoft SQL Server:
a. From the Start menu, click on Settings > Control Panel > Administrative Tools >
Services.
b. Click on RCC Launcher. Click the Extended tab and click on Stop to stop the RCC
Launcher Server.
c. Click on SQL Server (SQLExpress) service, and click on Stop from the Extended
window to stop the Microsoft SQL Server 2005 service.
d. Browse to the \Program Files\Microsoft SQL Server\MSSQL.1\MSSQL\Data folder.
e. Copy and Paste the CCRDB.mdf and CCRDB_log.ldf to a different location, i.e. the
desktop.
NN40020-403
Raising a Case: Information Gathering 33
f. Restart the SQL Server (SQLExpress) service.
g. Restart the RCC Launcher service.
18. To provide Nortel Support remote access to the user’s PC to resolve the issue, the user
should test the following site: http://nortelsupport.webex.com. This Web site is used for
real-time Nortel Customer Support sessions, called Remote Support, allowing full control
of the RCC Web Host PC’s desktop.
If the user does not have Internet access, attempt to resolve this, with the customer’s
network team. Providing you can access this link, a Nortel engineer will provide a
session number. You will need to ‘join a session’ and complete the details.
For high security sites, please be aware that joining a support session includes a “two way
handshake”. You can join a session; however, you still need to accept the Nortel
engineer to join. Ideally discuss this with the Nortel engineer, when joining the session.
You will also need to allow FTP, should the Nortel engineer wish to FTP files either from
or to the RCC Web Host PC.
Where access to http://nortelsupport.webex.com is not available, this may delay problem
resolution.
Reporting for Contact Center Troubleshooting and Maintenance Guide
34 Raising a Case: Information Gathering
NN40020-403
35
Web Host PC Troubleshooting
6
This section provides information and details possible problems that occur on the Web Host PC
and how to resolve those issues. The Web Host PC is defined as the PC where Reporting for
Contact Center was installed.
This section is further divided into the following subsections:
•
•
•
•
•
•
•
•
•
•
Microsoft SQL Server 2005
Internet Information Services
Java Runtime Environment
Firewalls
Anti Virus
Proxy Server
Historical Reports
Wallboards
Printing report
Miscellaneous
Reporting for Contact Center Troubleshooting and Maintenance Guide
36 Web Host PC Troubleshooting
Microsoft SQL Server 2005
Overview and installation
The historical report information is stored in a standard SQL Server database on the Web Host
PC. If Users have reporting requirements that are not available through Nortel Reporting for
Contact Center, they can analyze the data using third-party reporting packages.
Reporting for Contact Center installs Microsoft SQL Server 2005 which maintains the SQL
Server database.
Version compatibility
Microsoft SQL Server 2005 is used for administrating and maintaining historical data for
Reporting for Contact Center for BCM50 3.0
The user does not need to uninstall this version of Microsoft SQL Server 2005 after upgrading a
previous version of Reporting for Contact Center. If required, the Reporting for Contact Center
database will be modified during the installation of Reporting for Contact Center. There is no
loss of statistical data, but new data, tables, columns, and indexes will be added to it, where
necessary.
Uninstalling and re-installing
The Microsoft SQL Server will need to be removed and re-installed when required, for instance,
if installation of Reporting for Contact Center did not complete 100%, see the Installing
Reporting for Contact Center flow chart on page 16. To remove Microsoft SQL Server from the
Web Host PC, perform the following:
1. Click on Start > Settings > Control Panel > Add or Remove Programs > Microsoft
SQL Server 2005.
2. Click the Remove install button.
After this has been done run the Install Verification Utility (IVU) from the desktop.
Backup and Restore the RCC Database
1. On the Web Host PC download and install the SQL Server Management Studio from the
following location:
http://msdn.microsoft.com/vstudio/express/sql/default.aspx
NN40020-403
Web Host PC Troubleshooting 37
2. After the installation is complete open SQL Server Management Studio Express by
clicking on Start > All Programs > Microsoft SQL Server 2005 > SQL Server
Management Studio Express.
3. From the Connect to Server dialog box, connect to the local SQL Server with the host
name of the current PC and authentication details, see Figure 1: SQL Server Management
Studio login dialog box, as follows:
a. Server name is [PC name]\SQLEXPRESS.
b. From the Authentication drop down box select SQL Server Authentication.
c. Enter the user authentication details where Login is backupuser and Password is
rccbackup! (including the exclamation mark).
Figure 1: SQL Server Management Studio login dialog box
Note: During the backup and restore operations of the database, do not access the Reporting
for Contact Center Web pages. This also applies to any Client PC connected to the Web Host
PC.
Backup
1. From the left of the Microsoft SQL Server Management Studio Express window, in the
Object Explorer pane, expand [PC name]\SQLEXPRESS > DATABASES. See Figure
2: Navigation tree view of databases.
Reporting for Contact Center Troubleshooting and Maintenance Guide
38 Web Host PC Troubleshooting
Figure 2: Navigation tree view of databases
2. Right click on CCRDB and select Tasks > Backup.
3. The Back Up Database – CCRDB dialog box will open, as shown in Figure 3: Back Up
Database control dialog box.
4. Click OK to back up the CCRDB database.
This will take a few minutes depending on the size of your database.
NN40020-403
Web Host PC Troubleshooting 39
Figure 3: Back Up Database control dialog box
Note: Your CCRDB database backup file will be saved to the default location:
C:\Program Files\Microsoft SQL Server\MSSQL.1\MSSQL\Backup.
Do not move the backup file from the default location. You may copy over the back up
file to a network location where files are automatically backed up to a storage media.
Contact your network administrator for advice on your company prodecures for backing
up and restoring the database.
Restore
Before restoring the CCRDB database, stop RCC processes and the SQL Server service as
follows:
1. Press Ctrl+Alt+Delete and click Task Manager to open the Windows Task Manager
dialog box.
2. Select the Processes tab to view all the processes running on the Web Host PC.
Reporting for Contact Center Troubleshooting and Maintenance Guide
40 Web Host PC Troubleshooting
3. Select the process RCCMonitor.exe and click End Process to end this process.
4. Select the process PrintCaller.exe and click End Process to end this process.
5. Close the Windows Task Manager window.
6. Click on Start > All Programs > Microsoft SQL Server 2005 > Configuration Tools >
SQL Server Configuration Manager.
7. Select SQL Server 2005 Services from the left pane.
8. Select SQL Server (SQLEXPRESS) from the right hand pane.
9. From the toolbar click on Stop Service icon.
10. After the service has stopped, from the toolbar click Start Service to restart the service.
Perform the following steps to restore the CCRDB database:
1. From the left of the Microsoft SQL Server Management Studio Express window, in the
Object Explorer pane, expand [PC name]\SQLEXPRESS > DATABASES. See Figure
2: Navigation tree view of databases.
2. Right click on CCRDB and select Tasks > Restore > Database.
3. The Restore Database – CCRDB dialog box will open, as shown in Figure 4: Restore
Database control dialog box.
NN40020-403
Web Host PC Troubleshooting 41
Figure 4: Restore Database control dialog box
4. The latest backup file saved in the default location will be displayed. Click OK to restore
the CCRDB database with the latest saved database.
To restore the CCRDB database from a backup saved at a certain point in time, under
Destination for restore select the ellipsis button to the right of To a point in time. The
Point in time restore dialog box will open.
5. Select A specific date and time and select the point in time from the Date and Time
boxes of the backup database set to restore from. See Figure 5: Point in time restore
dialog box.
Reporting for Contact Center Troubleshooting and Maintenance Guide
42 Web Host PC Troubleshooting
Figure 5: Point in time restore dialog box
6. Click OK.
7. The specified point in time backup file will be displayed. Click OK to restore the
CCRDB database with this database.
After the CCRDB database backup is restored, start the RCC Launcher service and start RCC
Monitor as follows:
1. Click on Start > Settings > Control Panel > Administrative Tools > Services.
2. From the Extended window pane select RCC Launcher.
3. Right-click on RCC Launcher and select Start to restart the RCC Launcher service.
To start RCC Monitor, perform the following:
1. Click on Start > All Programs > Startup > RCC Monitor.
2. The RCC Monitor splash screen will be displayed.
All users are now allowed to access the RCC Web pages.
Database Corruption
Microsoft SQL Server 2005 maintains itself and automatically repairs any corruptions. However,
if a corruption is detected run the Install Verification Utility (IVU) to automatically check this
for you by clicking Start > All Programs > Nortel > Reporting for Conatact Center > RCC
Install Verification Utility.
NN40020-403
Web Host PC Troubleshooting 43
Internet Information Services
IIS overview and installation
Microsoft Internet Information Services (IIS) is a set of Internet-based services for servers using
Microsoft Windows. IIS provides Web application infrastructure for Reporting for Contact
Center. Ensure that the full suite of Microsoft Internet Information Services is installed and
operational on the Web Host PC, and that the Default Web Site is enabled. To install Microsoft
Internet Information Services and check the default Web site, see Reporting for Contact Center
Setup and Operations Guide (NN40040-303).
IIS version compatibility
The following table, Table 1: IIS version compatibility with Microsoft Windows Operating
Systems, is a list of different versions of IIS and the Microsoft Windows Operating System
compatibility:
Operating System
Windows 2000
Windows XP Professional
Windows Server 2003 and
Windows XP Professional
Windows Vista
IIS Version
IIS 5.0
IIS 5.1
IIS 6.0
IIS 7.0
Table 1: IIS version compatibility with Microsoft Windows Operating Systems
Recreating Virtual Directories
Reporting for Contact Center uses virtual folders which are created during an installation of
Reporting for Contact Center on the Web Host PC. These are:
•
rcc
•
java
•
rccx
•
reportservice$sqlexpress
•
reports$sqlexpress
Virtual folders not created in Internet Information Services
Run the Install Verification Utility (IVU) from the desktop and it will check and, if necessary, recreate any virtual directories that are missing.
Reporting for Contact Center Troubleshooting and Maintenance Guide
44 Web Host PC Troubleshooting
Restarting the IIS Service
Perform the following steps to restart the IIS service:
1. Click on Start > Settings > Control Panel > Administrative Tools > Services.
2. From the Extended window pane select IIS Admin (or IIS Admin Service).
3. Click on Start to the left of the Extended window, or right-click on IIS Admin and
select Start to restart the IIS Service.
4. Ensure that the World Wide Web Publishing service is also running by repeating steps 1
to 3, replacing IIS Admin service with World Wide Web Publishing Service.
5. Close all windows.
NN40020-403
Web Host PC Troubleshooting 45
Java Runtime Environment
Java overview and installation
PCs that have network access to the Web Host PC, known as Client PCs, can access Reporting
for Contact Center through Web pages in Internet Explorer browser sessions. Multiple users can,
therefore, use Nortel Reporting for Contact Center without having any software other than
Internet Explorer installed on their PCs.
Note: The Java Runtime Environment (JRE), if required, and the ActiveX Report Viewer
are automatically downloaded to the Client PC the first time they are required.
Java version compatibility
Only one JRE version can live during a browser’s session. In other words, once a version of the
JRE is loaded in a browser’s process, you cannot switch to run an applet in a different version of
the JRE. You can only switch to a different JRE version at the start of the browser process.
It is essential that you have Java(TM) SE Runtime Environment 6 installed on your PC for
correct operation of Reporting for Contact Center. See the following section Real Time screens
are not displayed correctly on page 45.
Note: At the date of release of this guide Java SE Runtime Environment v. 1.6.0_[release
version] was the latest JRE version available on the market. Any future JRE version higher
than this, for example, JRE 1.7.0_[release version] probably will be backward compatible
with Reporting for Contact Center.
Real Time screens are not displayed correctly
If you have multiple versions of JRE installed on your PC and the Real Time screens are not
being displayed correctly check that Internet Explorer is using JRE version 1.6.0 for applets, or
higher, by the following:
Reporting for Contact Center Troubleshooting and Maintenance Guide
46 Web Host PC Troubleshooting
Figure 6: Page cannot be found error message
1. Click Start, then right-click the Internet Explorer icon, and select Internet Properties.
See Figure 7: Internet Properties Dialog Box.
NN40020-403
Web Host PC Troubleshooting 47
Figure 7: Internet Properties Dialog Box
Note: If you do not see the dialog box shown in Figure 7: Internet Properties Dialog Box,
you have clicked a shortcut to Internet Explorer. You must click the Internet Explorer icon
in the Start menu.
2. Click on the Advanced tab and scroll down to Java (Sun) and select the Use JRE
1.6.0_[version] for <applet> check box. See Figure 8: Advanced window for JRE 1.6.0
for <applet> selection.
Click Apply and click OK to close the Internet Properties dialog box.
If the Use JRE 1.6.0[_version] for <applet> option is not available, JRE version 1.6.0
must be installed. Go to step 6.
Reporting for Contact Center Troubleshooting and Maintenance Guide
48 Web Host PC Troubleshooting
Figure 8: Advanced window for JRE 1.6.0 for <applet> selection
3. If the Real Time screens are still being displayed incorrectly, uninstall JRE version 1.6.0
by selecting from the Window taskbar Start > Settings and then click Control Panel.
The Control Panel window appears.
4. Double-click the Add or Remove Programs icon. The Add or Remove Programs dialog
box appears.
5. Under Java(TM) SE Runtime Environment 6 click Remove. Click Yes to confirm
uninstalling the program.
6. Re-install Java Runtime Environment 6 on the Web Host PC by opening C:\Program
Files\Nortel\Reporting for Contact Center\Java. Double-click on the file jre-6-windowsi586.exe to install the Java Runtime Environment.
When JRE 1.6.0 is installed on the PC you should be able to view Real Time screens correctly.
NN40020-403
Web Host PC Troubleshooting 49
Java Cache
Real Time screens are displayed but no data is seen (clearing the Java Cache)
If you can launch the Real Time screens, but once loaded you see no data and the connection
status is red you may need to clear the Java Cache. This is most prevalent when having
performed an upgrade, if you have not performed an upgrade, that is, it is a fresh install this will
not be applicable.
To clear your Java Cache open up the Control Panel window and double-click on the Java icon.
Figure 9: Clearing the Java Cache (Control Panel)
This will open the Java Control Panel window. From the General tab, under Temporary
Internet Files click Delete Files, as shown in Figure 10: Clearing the Java Cache (Java Control
Panel).
Reporting for Contact Center Troubleshooting and Maintenance Guide
50 Web Host PC Troubleshooting
Figure 10: Clearing the Java Cache (Java Control Panel)
The Delete Temporary Files prompt window will open asking to confirm temporary internet files
deletion, as shown in Figure 11: Clearing the Java Cache (Prompt). Click OK.
Figure 11: Clearing the Java Cache (Prompt)
NN40020-403
Web Host PC Troubleshooting 51
Firewalls
Ports and .exe files used by Reporting for Contact Center
Port Numbers used by Reporting for Contact Center
The following is a list of all the port numbers used by Reporting for Contact Center on the Web
Host PC:
•
Port 80 – this is the standard port used by the Web Server (the Web Host PC) for Internet
Information Services.
•
Port 8088 – used for the Reporting Server in the Business Communications Manager
(BCM).
•
Port 3500 – default value used by ipView SoftBoard to listen for incoming data and to
echo to other wallboards.
Note: this value is configurable when setting up a wallboard and should be noted.
•
Port 6010 – used by the Reporting for Contact Center Real Time (RCCRT) Server.
•
Port 6011 – used by the Reporting for Contact Center Reporting (RCCRPT) Server.
.exe files used by Reporting for Contact Center
The following files are used by Reporting for Contact Center. Ensure that these files are not
being blocked by your Personal Firewall:
•
inetinfo.exe
•
java.exe
•
printCaller.exe
•
RCC Install Verification Utility.exe
•
RCC Monitor.exe
•
rcclauncher.exe
•
RSBackup.exe
•
wallboarddriver.exe
Reporting for Contact Center Troubleshooting and Maintenance Guide
52 Web Host PC Troubleshooting
Common Firewall Configuration
If any Internet security software is installed on your PC and a firewall is enabled, the user may
encounter problems with the Contact Center connection whereby data can not be downloaded
from the Contact Center to the database on the Web Host PC.
There are numerous firewall software packages available on the market. Only a selected few are
mentioned here. It is essential that the user checks that files listed under the section .exe files
used by Reporting for Contact Center (page 51), are not being blocked by your personal firewall.
Alternatively, third-party firewall logging can be enabled if the user is unsure whether or not it is
blocking a port or application.
For further information about third-party software firewall settings, the user can refer to their
firewall documentation, or consult their support personnel who manage the third-party firewall.
Uninstalling other firewalls
If the user encounters one or more of the following problems with their PC, more than one
firewall may be installed on that PC:
•
‘Blue screen’ fatal errors, system freezing or sudden system reboots.
•
Every access request is allowed for every application. Nothing is blocked.
•
All application and system activities are blocked and the user is unable to connect to any
site.
•
The computer is unable to boot up.
These problems do not relate to a specific firewall but are common to all firewall software. It is
important that only one firewall is installed on any one PC.
Windows Firewall
Launch the Install Verification Utility (IVU) from the desktop, any blocked ports in the
Windows Firewall will be unlocked.
Norton Internet Security and Personal Firewall
If Norton Internet Security is installed on your PC and the Personal Firewall is enabled, the .exe
files used by Reporting for Contact Center, see .exe files used by Reporting for Contact Center,
may be blocked. This will prevent data to be downloaded from the Contact Center to the Web
Host PC. Perform the following to allow data download from the Contact Center:
1. Open Norton Internet Security.
2. In the Personal Firewall settings page, Block All (recommended) or Custom will have
been selected. Select Permit All.
The data download from the Contact Center should continue as normal.
NN40020-403
Web Host PC Troubleshooting 53
Zone Alarm and Sophos
Zone Alarm and Sophos are names of companies that produce firewall software packages, as
well as anti-virus software. Refer to Common Firewall Configuration on page 52 for advice on
using these, as well as other third-party firewall software packages available on the market.
Reporting for Contact Center Troubleshooting and Maintenance Guide
54 Web Host PC Troubleshooting
Anti Virus
Anti-Virus Software Slowing Down the File System
Some Anti-Virus software packages can significantly slow down the file system of the Web Host
PC. This causes problems in the Real Time screens processing all of the XML data they receive
from the Contact Center in time to refresh the Real Time data in a timely fashion.
Norton AntiVirus is one anti-virus package known to cause this symptom.
Norton AntiVirus software can enable the File System Realtime Protection on your computer
that constantly monitors your computer activity for viruses. Disabling the File System Realtime
Protection option in Norton AntiVirus will no longer restrict the operation of the Real Time
screens. To do this, perform the following:
1. Right-click on the Norton AntiVirus icon in the system tray.
2. If there is a check mark next to Enable File System Realtime Protection, select the
check mark to clear this option.
Anti-Virus packages vary in their implementations and in the granularity with which you can
adjust their operational parameters. Typically the settings that you can adjust that make the Real
Time screens appear sluggish and slow to update are the realtime file scanning settings.
Note: Realtime in this context means that the Anti-Virus software scans the files on your
computer constantly – it does not refer to the Reporting for Contact Center Real Time
screens. It is just a coincidence that both applications have features that have the words real
time in their title.
•
Some Anti-Virus packages allow you to specify files with certain extensions which are to
be ignored during virus scans. If this is possible with your Anti-Virus software, instruct it
to ignore files with .log extensions.
•
Some Anti-Virus packages allow you to specify locations on your hard disk which are to
be ignored during virus scans. If this is possible with your Anti-Virus software, instruct it
to ignore the location of the Reporting for Contact Center log files. By default this is
\Program Files\Nortel\Reporting for Contact Center\Logs.
•
Some Anti-Virus packages allow you to disable or fine tune the real time scanning action
of files, and to isolate which types of file modification will trigger a re-scan (create a file,
modify a file, write to a file, and so on).
Blank dialog boxes
McAfee 8.0i Anti-Virus software
If McAfee Viruscan Enterprise 8.0i is installed on your PC the user may see blank dialog boxes
in Reporting for Contact Center.
If this happens please install the latest patches available from the McAfee Web site:
NN40020-403
Web Host PC Troubleshooting 55
http://www.mcafee.com/
Reporting for Contact Center Troubleshooting and Maintenance Guide
56 Web Host PC Troubleshooting
Proxy Server
A proxy server is a server that sits between the Reporting for Contact Center Web browser and
the Contact Center. All requests from Reporting for Contact Center to the Contact Center will be
intercepted by the proxy server. If the proxy server can not fulfill the requests, the requests are
not forwarded to the Contact Center and an error message is returned to the web browser.
Proxy settings for BCM50 3.0
If a proxy server is enabled on a Web Host PC, ensure that the proxy server is not used when
downloading call data from the Contact Center, see Disabling Proxy server. On a Client PC, the
proxy server can be disabled or have an exception created for the Web Host PC IP Address to
allow communication with the Web Host PC. See also, URL not allowed to be proxied error
message on page 58.
Disabling Proxy server
Ensure any proxy server is disabled on the Web Host PC before downloading data from the
Contact Center as follows:
1. On the Tools menu in Internet Explorer, click Internet Options, click the Connections
tab, and then click LAN Settings. See Figure 12: Selecting LAN Settings from
Connections window.
The Local Area Network (LAN) Settings window will be displayed.
NN40020-403
Web Host PC Troubleshooting 57
Figure 12: Selecting LAN Settings from Connections window
2. Under Proxy server, ensure the Use a proxy server for your LAN (These settings will
not apply to dial-up or VPN connections) check box is cleared, as shown in Figure 13:
Disabling proxy server in LAN Settings.
Reporting for Contact Center Troubleshooting and Maintenance Guide
58 Web Host PC Troubleshooting
Figure 13: Disabling proxy server in LAN Settings
3. Click OK to close the LAN Settings dialog box.
4. Click OK again to close the Internet Options dialog box.
URL not allowed to be proxied error message
If a Client PC cannot access Reporting for Contact Center from an Internet Explorer browser
window and gets a “This URL is not allowed to be proxied” error message, as in Figure 14:
Proxy server denying access to RCC, the Proxy Server settings have to be modified.
NN40020-403
Web Host PC Troubleshooting 59
Figure 14: Proxy server denying access to RCC
For the Client PC to be able to access the Web Host PC, the User can do one of the following on
the Client PC. Either:
1. Disable the proxy server, see Disabling the proxy server on a Client PC; or
2. If the Proxy server has to be active, allow the IP Address of the Web Host PC as an
exception in the proxy server settings. See Allowing exceptions on the proxy server.
Disabling the proxy server on a Client PC
Follow steps 1 to 4 under Disabling Proxy server on page 56 for the Client PC.
Allowing exceptions on the proxy server
Allow the IP Address of the Web Host PC as an exception in the proxy server settings, as
follows:
a. On the Tools menu in Internet Explorer, click Internet Options, click the
Connections tab, and then click LAN Settings. See Figure 15: Selecting LAN
Settings from Connections window.
The Local Area Network (LAN) Settings window will be displayed.
Reporting for Contact Center Troubleshooting and Maintenance Guide
60 Web Host PC Troubleshooting
Figure 15: Selecting LAN Settings from Connections window
b. Under Proxy server, the Use a proxy server for your LAN (These settings will
not apply to dial-up or VPN connections) check box will be selected, as shown
in Figure 16: Proxy server enabled in the LAN Settings window. Click
Advanced.
The Proxy Settings window will open.
NN40020-403
Web Host PC Troubleshooting 61
Figure 16: Proxy server enabled in the LAN Settings window
c. Under Exceptions, enter the IP Address of the Web Host PC to by-pass the proxy
server. Click OK.
Figure 17: Allowing an IP Address exception in Proxy Settings
Reporting for Contact Center Troubleshooting and Maintenance Guide
62 Web Host PC Troubleshooting
d. Click OK to close the LAN Settings dialog box.
e. Click OK again to close the Internet Options dialog box.
NN40020-403
Web Host PC Troubleshooting 63
Historical Reports
Detailed information on the Reports within Reporting for Contact Center can be found in the
Reporting for Contact Center – Reports Explained (NN40010-626) guide (installed along with
this guide on the Web Host PC). This guide details how to use the report viewer, the terms used
within Reporting for Contact Center reports, what statistics and formulas are used to calculate
each field in the reports (where applicable) and frequently asked questions.
Error on page in Report Viewer
If the Report Viewer window displays the message “Error on Page” in the status bar to the
bottom left of the window, the browser window may be caching an older version of Reporting
for Contact Center. In this case press Ctrl+F5 to refresh the page with the current version of
Reporting for Contact Center.
Reporting Services Restore Utility
The RCC installation forces Reporting Services to create an encryption key. In the unlikely event
that the Reporting Services encrytion key is compromised when attempting to view a report, a
user may see the following message:
Microsoft.ReportingServices.Diagnostics.Utilities.ReportServerDisabledException:
The report server cannot decrypt the symmetric key used to access sensitive or
encrypted data in a report server database. You must either restore a backup key or
delete all encrypted content. Check the documentation for more information.
(rsReportServerDisabled) (rsRPCError) Get Online Help
The RCC Database Installer Utility (DBI) creates a backup of the reporting data encrytion key
after the installation. To restore the Reporting Services encryption key run the Reporting
Services Restore Utility (RSR) as follows:
1. From the Start menu select All Programs > Nortel > Reporting for Contact Center >
Reporting Services Restore Utility.
Note: For a Web Host PC using a Windows Vista operating system with the User Account
Control (UAC) feature turned on, a warning message will be displayed as the RSR utility
requires administrator rights to run. Click Allow to run the application.
The RSR Utility dialog box will be displayed as shown in Figure 18: Reporting Services
Restore Utility dialog box.
Reporting for Contact Center Troubleshooting and Maintenance Guide
64 Web Host PC Troubleshooting
Figure 18: Reporting Services Restore Utility dialog box
2. Click on Restore Reporting Services to restore the encryption key from the last restore
point created by DBI. When this has been restored successfully the status of the
Reporting Services restore operation will be displayed, as shown in Figure 19: Reporting
Services restored successfully dialog box.
Figure 19: Reporting Services restored successfully dialog box
3. Click Close.
The user should now be able to view the reports.
NN40020-403
Web Host PC Troubleshooting 65
Real Time screens
Connection Status not green
If the Real Time screen is displayed but the Connection Status indicator on the bottom left of the
screen is not green then the RCC Launcher or Microsoft SQL Server 2005 may not be running.
To check if either of these services are running, launch the Install Verification Utility (IVU) from
the desktop. If neither of these services are running, they will be launched by the IVU.
Connection Status is red with error message
If there are problems with the Contact Center in the display of the Real Time screens the
connection status indicator will be red in color. An error message will also be displayed directly
below the connection status indicator describing the error returned from the Contact Center.
Error messages in Real Time screens
The following table, see Table 2: Issues causing the error messages seen in the Real Time
screens, lists all the possible error messages that can be displayed in the Real Time screens when
the status indicator is red. This table also describes how the user is to resolve these issues.
Reporting for Contact Center Troubleshooting and Maintenance Guide
66 Web Host PC Troubleshooting
Error message
Description of the issue
Invalid Request
The request from the client application is not valid,
restart the RCC Launcher
Voicemail Service Not
Running
The Voicemail service is not running on the Contact
Center. Restart the Voicemail service on the Contact
Center through the Element Manager
Invalid Password
The password used by the client application is not
valid. Enter the correct password, use the CCRS test
page to check if you are not sure
No Key Code
The keycode used to turn on the CCRS data stream is
not present. Enter the correct keycode
No CC Data
No data is present in the CCRSAppServer database.
Configure at least one skillset in CallPilot Manager
No Contact Center Key Code
The keycode used to enable the Contact Center
application is not present. Enter the correct keycode
CCRS Disabled
The CCRS data stream is disabled. Enable the
CCRSAppServer in the Element Manager
Server Busy
The server is too busy to handle the request (too
many simultaneous users). Check that other
Reporting for Contact Center clients are not
communicating with the same Contact Center, restart
the RCC Launcher
CDN Conflict
There is a CDN conflict in the Skillset and CDN
identified in the error message, this must be resolved
in the CallPilot Manager interface
Unknown Server Error
If none of the above, contact Nortel Support
Table 2: Issues causing the error messages seen in the Real Time screens
To resolve the error messages seen in the Real Time screens, perform the following
troubleshooting steps against the error message displayed:
Invalid Request
1. Log on to the Web Host PC as an Administrator.
2. Click on Start > Settings > Control Panel > Administrative Tools > Services.
3. Select RCC Launcher Service. Right-click and select Stop.
4. Wait 10-15 seconds.
5. Select RCC Launcher Service again, right-click and select Start.
NN40020-403
Web Host PC Troubleshooting 67
Voicemail Service Not Running
1. Open Element Manager by clicking on Start > Programs > Nortel > BCM > BCM
Element Manager.
2. To connect to the BCM system, under Element Navigation Panel expand Network
Elements and select the system to connect to. Enter the User ID and Password and click
Connect.
3. From the Task Navigation Panel select the Administration tab.
4. Expand the General folder and click Service Manager. A list of all the services on the
BCM are displayed.
5. Locate and verify that the following services are flagged with the Startup as Enabled and
Status as Running:
•
voicemail
For BCM 4.0 and BCM50 3.0 systems only, the following service should also be
verified:
•
CCRSAppServer
6. If any of these services are not running, select the service and click Start. Click Yes in
the warning message box to confirm start-up of the service.
7. Wait 30-60 seconds for the service to start.
If the service does not start, contact Nortel Support.
Invalid Password
Verify the CCRS Password and that the XML data stream from the Contact Center is enabled by
the following:
1. Open CallPilot Manager by entering the following location in the browser Address bar:
http://[BCM IP Address]/callpilotmanager
2. Enter the User ID and Password and click Submit.
3. From the navigation menu on the left, click Contact Center.
4. Select General Properties to open the Contact Center Properties page.
5. Delete any password in the CC Reporting Server Password field, and re-enter the
Contact Center Reporting Server Password.
6. Confirm the password in the Confirm Password field.
7. Ensure the Enable CC Reporting Data Stream check box is selected.
8. Click Submit to accept the changes.
Reporting for Contact Center Troubleshooting and Maintenance Guide
68 Web Host PC Troubleshooting
From Reporting for Contact Center, attempt a connection to the Contact Center, by the
following:
1. Open the Contact Center Connection page as described in Contact Center Connection
page item on page 79.
2. Enter the details into the Contact Center Connection page including the newly confirmed
CCRS password and click Submit.
The Download Data window should display call data downloading from the Contact Center.
Another method for confirming the CCRS password and to verify that XML data is being
received from the Contact Center, execute the CCRS Test page, as follows:
1. See CCRS Test Page on page 111 for instructions on how to execute the CCRS Test
page.
2. Ensure the CCRS password is the same as that configured in CallPilot Manager.
Once the CCRS Test page is submitted, XML data should be returned and not display an
InvalidPassword XML error page, as shown in Figure 49: InvalidPassword XML error in CCRS
Test page.
No Key Code
Perform the following steps to check that the keycode for the CCRS data stream is active:
1. Open Element Manager by clicking on Start > Programs > Nortel > BCM > BCM
Element Manager.
2. To connect to the BCM, under Element Navigation Panel expand Network Elements
and select the BCM.
3. Enter the logon User ID and Password for an administrator and click Connect.
4. From the Task Navigation Panel select the Configuration tab.
5. Expand the System folder and click Keycodes. A list of all the keycodes on the BCM are
displayed, as well as those that have not been activated.
6. Verify that the following Keycodes are flagged as ACTIVE:
•
ICC
•
ICC Skillset (at least one)
•
ICC Reporting
If the keycodes listed in step 6 are not active and the user requires them on the BCM system,
contact your distributor who can verify whether or not the system needs the keycodes. This will
be done through the Nortel Keycode Retrieval System (KRS).
No CC Data
NN40020-403
Web Host PC Troubleshooting 69
No data is present in the CCRSAppServer database. Configure at least one skillset in CallPilot
Manager.
Reporting for Contact Center Troubleshooting and Maintenance Guide
70 Web Host PC Troubleshooting
No Contact Center Key Code
Perform the following steps to check that the Contact Center application keycode is enabled:
1. Open Element Manager by clicking on Start > Programs > Nortel > BCM > BCM
Element Manager.
2. To connect to the BCM, under Element Navigation Panel expand Network Elements
and select the BCM.
3. Enter the logon User ID and Password for an administrator and click Connect.
4. From the Task Navigation Panel select the Configuration tab.
5. Expand the System folder and click Keycodes. A list of all the keycodes on the BCM are
displayed, as well as those that have not been activated.
6. Verify that the following Keycodes are flagged as ACTIVE:
•
ICC
•
ICC Skillset (at least one)
•
ICC Reporting
If the keycodes listed in step 6 are not active and the user requires them on the BCM system,
contact your distributor who can verify whether or not the system needs the keycodes. This will
be done through the Nortel Keycode Retrieval System (KRS).
CCRS Disabled
Perform the following task:
1. Open Element Manager by clicking on Start > Programs > Nortel > BCM > BCM
Element Manager.
2. To connect to the BCM, under Element Navigation Panel expand Network Elements
and select the system to connect to. Enter the User ID and Password and click Connect.
3. From the Task Navigation Panel select the Administration tab.
4. Expand the General folder and click Service Manager. A list of all the services on the
BCM is displayed.
5. Locate and verify that the following services are flagged with the Startup as Enabled and
Status as Running:
•
voicemail
For BCM 4.0 and BCM50 3.0 systems only, the following service should also be
verified:
•
NN40020-403
CCRSAppServer
Web Host PC Troubleshooting 71
6. If any of these services are not running, select the service and click Start. Click Yes in
the warning message box to confirm start-up of the service.
7. Wait 30-60 seconds for the service to start.
If the service does not start, contact Nortel Support.
Server Busy
The user should contact their network administrator or support technician to diagnose if multiple
PCs are connecting to the same Contact Center.
Restart RCC Launcher as described in Invalid Password on page 66.
CDN Conflict
The Real Time screen will display an error message generated in Reporting for Contact Center,
detailing the Skillset that has a conflicting CDN. The message displayed will be:
There is a CDN conflict with the ***** skillset using CDN #####
The ***** syntax denotes the Skillset name, and ##### denotes the CDN number.
Contact your network administrator to resolve the conflicting device§ that has caused the CDN
conflict, as per one of the following:
•
A newly added telephone set or device, or other Nortel peripheral attachment, is
physically residing on the port that is logically assigned to the Contact Center; or
•
A Voice-over IP (VoIP) telephone set has been manually, or automatically,
assigned a Contact Center CDN.
On determining which device is conflicting with this CDN, whether it is a physical device or an
IP set de-register, disconnect it from the BCM.
Once the conflict has been resolved the Skillset must be re-enabled, as follows:
1. Open CallPilot Manager by entering the following location in the browser Address bar:
http://[BCM IP Address]/callpilotmanager
2. Enter the User ID and Password and click Submit.
3. From the navigation menu on the left, click Contact Center.
4. Select Skillset List to open the Skillset List page.
5. Click Enable on the disabled Skillset experiencing the CDN conflict.
Note: A banner would display which Skillset/CDN is experiencing conflict from the Call
Pilot Manager interface.
§ This can be an Analog Station Module, MTT logger, or any other Nortel or Norstar device.
Reporting for Contact Center Troubleshooting and Maintenance Guide
72 Web Host PC Troubleshooting
NN40020-403
Web Host PC Troubleshooting 73
Unknown Server Error
Contact your distributor for first level support.
If you are a distributor, contact Nortel Solutions Center, see Getting Help over the phone from a
Nortel Solutions Center on page 12. If you prefer to raise a case directly through the Nortel Web
site, refer to the section Getting Help from the Nortel Web site on page 11.
Slow updates on Real Time screen
The Real Time screens should be updated approximately every 1 or 3 seconds depending on your
Contact Center configuration in the Contact Center Connection page of Reporting for Contact
Center.
To increase the Real Time and Wallboard refresh rate to 3 seconds perform the following:
1. Launch and logon to Reporting for Contact Center as an Administrator.
2. From the navigation menu on the left, click on the Contact Center Connection item.
3. From the Wallboard and Real Time Refresh Interval drop down box select 3 seconds.
4. Click Submit.
If the Real Time screens still seem to be slow or sluggish, the following section, Web Host PC
Requires a Host File entry, should be checked.
Web Host PC Requires a Host File entry
Check with your Network Administrator to add an entry in the Web Host PC Host file. This is a
Windows system file and is usually located in the \Windows\System32\drivers\etc folder on the
Web Host PC (this may be called the \Windows\System32\drivers\etc folder).
You must enter the IP Address and the network name (machine name) of the Business
Communications Manager to this file. Separate the two items by using the Tab key.
An example Host file is shown in Figure 20: Example Host File.
Reporting for Contact Center Troubleshooting and Maintenance Guide
74 Web Host PC Troubleshooting
#
#
#
#
#
#
#
#
#
#
#
#
#
#
#
#
#
Copyright I 1993-1999 Microsoft Corp.
This is a sample HOSTS file used by Microsoft TCP/IP for Windows.
This file contains the mappings of IP addresses to host names. Each
entry should be kept on an individual line. The IP address should
be placed in the first column followed by the corresponding host name.
The IP address and the host name should be separated by at least one
space.
Additionally, comments (such as these) may be inserted on individual
lines or following the machine name denoted by a ‘#’ symbol.
For example:
102.54.94.97
38.25.63.10
127.0.0.1
10.1.1.105
rhino.acme.com
x.acme.com
# source server
# x client host
Localhost
BCMMachineName
Figure 20: Example Host File
Real Time screens are not displayed
If Real Time screens are not displayed after making Skillset and Real Time screen selections
from the Real Time page, pop-up blocking may be enabled on the PC. For a Client PC, see
Allowing pop-ups on page 92 to change the pop-up blocker settings.
If Norton Internet Security is installed on your PC and the Real Time screens are not being
displayed, ad blocking may be enabled. See the following section Ad Blocking in Norton
Internet Security to disable ad blocking.
Ad Blocking in Norton Internet Security
To disable Ad Blocking in Norton Internet Security perform the following:
1. Open the Norton Internet Security application.
2. Open the Status and Settings page from the menu to the left of the page.
3. Click the Ad Blocking option. See Figure 21: Ad Blocking option in Norton Internet
Security.
Figure 21: Ad Blocking option in Norton Internet Security
NN40020-403
Web Host PC Troubleshooting 75
This opens the Ad Blocking window.
4. Clear the Turn on Popup Window Blocking check box, see Figure 22: Ad Blocking
Window in Norton Internet Security.
This will disable any window blocking by Norton Internet Security and prevent Real
Time screens being blocked in Reporting for Contact Center.
Figure 22: Ad Blocking Window in Norton Internet Security
5. Click OK to close the Ad Blocking window.
6. Close Norton Internet Security.
The Real Time screens should now open up on clicking the Submit button on the Real Time
page.
Reporting for Contact Center Troubleshooting and Maintenance Guide
76 Web Host PC Troubleshooting
Wallboards
ipView SoftBoard and Wallboard Summaries
Wallboard Summaries are sent to the wallboards on the hour, according to the time of the Web
Host PC clock. The regular hourly and daily statistics that are sent to the wallboard are governed
by the Contact Center platform clock. The hourly statistics are reset to 0 on the hour, according
to the clock in the Contact Center platform.
If the clock in the Web Host PC is set to a different time than the clock in the Contact Center
platform, the hourly Summaries will not be synchronized with the hourly reset of the regular
statistics. To ensure that the wallboard summaries are in time with the hourly resets of the
regular wallboard statistics, ensure that your PC and Contact Center platform times are the same.
IP Address of the Hardware Wallboard
To obtain the correct IP Address of the Hardware Wallboard perform the following:
1. Disconnect the Wallboard from its power supply.
2. Reconnect the power supply. The IP Address will be displayed shortly.
Pause in parameter count on the Hardware Wallboard
If the wallboard parameters do not refresh every 1 or 3 seconds but display a pause in the count,
for instance in the QT time, the Microsoft Indexing Service may be running on the Web Host
PC, or the Client PC that the hardware wallboard is directly connected to.
The Microsoft Indexing Service helps to create fast searches of files on your PC. But this can
also take up a lot of processor usage on your PC. This will in turn slow down other processes
running on your PC including the wallboarddriver.exe process that updates the parameters to the
wallboard. To prevent this from happening, stop the Indexing Service and set it to start up
manually as follows:
1. From the Start menu, click on Settings > Control Panel > Administrative Tools >
Services.
2. Click on the Extended tab and locate Indexing Service.
3. Right-click on Indexing Service and select Stop.
Once Indexing Service has stopped running on your PC, check that the startup type is set to
Manual. If this is not set to Manual, go to step 4.
1. Right-click on Indexing Service and select Properties to open the Properties window.
NN40020-403
Web Host PC Troubleshooting 77
2. In the General tab, see Figure 23: Indexing Service Properties General window, from
Startup type select Manual.
Figure 23: Indexing Service Properties General window
3. Click OK to close the General window.
Close the Services, Administrative Tools and Control Panel windows.
Further problems with the ipView SoftBoard or Hardboard
Detailed information on the operation of ipView SoftBoard or Hardboards can be found in the
ipView Software Wallboard Setup and Operations Guide (NN40010-500). This is installed along
with Reporting for Contact Center on the Web Host PC.
Reporting for Contact Center Troubleshooting and Maintenance Guide
78 Web Host PC Troubleshooting
Printing report
Reports are not printing
Check the printer
Using the same printer as selected in your print schedule, attempt to print a document, this can be
anything and if you do not have a document available create one in Notepad. If the document
fails to print, consult your network administrator.
Check the print schedule
Check that the report was configured to print on the correct day. Daily Reports print the day after
the day which is being reported. That is, if you select a Daily Report Schedule for Monday, it
prints on Tuesday. This ensures that the report day has completely elapsed when the reports are
generated.
Print Caller Service (PCS)
For print schedules to print, the Print Caller Service (PCS) must be running, if it is not running as
a service a user must be logged on to a PC. Logging a user on the PC will automatically launch
PCS. However to check if it is running perform the following:
1. Open the Windows Task Manager by pressing Ctrl+Alt+Delete.
2. Click Task Manager.
3. Click the Processes tab.
4. Search for the item printCaller.exe.
5. If it does not appear in that list then Print Caller Service (PCS) is not running.
To re-launch PCS either reboot the PC or click Start > All Programs > Startup > RCC
Monitor.
NN40020-403
Web Host PC Troubleshooting 79
Miscellaneous
Contact Center Connection page item
To open the Contact Center Connection page perform the following:
1. Log on to Reporting for Contact Center.
2. From the navigation menu on the left panel click Contact Center Connection.
The Contact Center Connection page will be displayed in the browser window.
Error messages
Error in Download Contact Center data window
The following table, see Table 3: Issues causing the error messages in the Download Contact
Center data window, lists the error messages displayed in the Download Contact Center data
window when the status indicator is red. This table also describes how the user is to resolve the
issue.
Reporting for Contact Center Troubleshooting and Maintenance Guide
80 Web Host PC Troubleshooting
Error message
Description of the issue
InvalidRequest
The request from the client application is not valid,
restart the RCC Launcher
VMServiceNotRunning
The Voicemail service is not running on the Contact
Center. Restart the Voicemail service on the Contact
Center through the Element Manager
InvalidPassword
The password used by the client application is not
valid. Enter the correct password, use the CCRS test
page to check if you are not sure
NoKeyCode
The keycode used to turn on the CCRS data stream is
not present. Enter the correct keycode
NoCCData
No data is present in the CCRSAppServer database.
Configure at least one skillset in CallPilot Manager
NoCCKeyCode
The keycode used to enable the Contact Center
application is not present. Enter the correct keycode
CCRSDisabled
The CCRS data stream is disabled. Enable the
CCRSAppServer in Element Manager
ServerBusy
The server is too busy to handle the request (too
many simultaneous users). Check that other
Reporting for Contact Center clients are not
communicating with the same Contact Center, restart
the RCC Launcher
CannotConnectToCC
The CCRS cannot contact the Contact Center
CannotConnectToDB
Could not connect to the database
CCRefusedConnection
Indicates that the Contact Center refused to register
the AppServer
HistoricalReqOver3Hours
The request from the client application is not valid
(exceeds three hours), restart the RCC Launcher
UnknownServerError
If none of the above, contact Nortel Support
Table 3: Issues causing the error messages in the Download Contact Center data window
To resolve the error messages seen in the Download Contact Center data window, perform the
following troubleshooting steps against the error message displayed:
InvalidRequest
1. Log on to the Web Host PC as an Administrator.
2. Click on Start > Settings > Control Panel > Administrative Tools > Services.
3. Select RCC Launcher Service. Right-click and select Stop.
NN40020-403
Web Host PC Troubleshooting 81
4. Wait 10-15 seconds.
5. Select RCC Launcher Service again, right-click and select Start.
VMServiceNotRunning
1. Open Element Manager by clicking on Start > Programs > Nortel > BCM > BCM
Element Manager.
2. To connect to the BCM system, under Element Navigation Panel expand Network
Elements and select the system to connect to. Enter the User ID and Password and click
Connect.
3. From the Task Navigation Panel select the Administration tab.
4. Expand the General folder and click Service Manager. A list of all the services on the
BCM are displayed.
5. Locate and verify that the following services are flagged with the Startup as Enabled and
Status as Running:
•
voicemail
For BCM 4.0 and BCM50 3.0 systems only, the following service should also be
verified:
•
CCRSAppServer
6. If any of these services are not running, select the service and click Start. Click Yes in
the warning message box to confirm start-up of the service.
7. Wait 30-60 seconds for the service to start.
If the service does not start, contact Nortel Support.
InvalidPassword
Verify the CCRS Password and that the XML data stream from the Contact Center is enabled by
the following:
1. Open CallPilot Manager by entering the following location in the browser Address bar:
http://[BCM IP Address]/callpilotmanager
2. Enter the User ID and Password and click Submit.
3. From the navigation menu on the left, click Contact Center.
4. Select General Properties to open the Contact Center Properties page.
5. Delete any password in the CC Reporting Server Password field, and re-enter the
Contact Center Reporting Server Password.
6. Confirm the password in the Confirm Password field.
Reporting for Contact Center Troubleshooting and Maintenance Guide
82 Web Host PC Troubleshooting
7. Ensure the Enable CC Reporting Data Stream check box is selected.
8. Click Submit to accept the changes.
From Reporting for Contact Center, attempt a connection to the Contact Center, by the
following:
1. Open the Contact Center Connection page as described in Contact Center Connection
page item on page 79.
2. Enter the details into the Contact Center Connection page including the newly confirmed
CCRS password and click Submit.
The Download Data window should display call data downloading from the Contact Center.
Another method for confirming the CCRS password and to verify that XML data is being
received from the Contact Center, execute the CCRS Test page, as follows:
1. See CCRS Test Page on page 111 for instructions on how to execute the CCRS Test
page.
2. Ensure the CCRS password is the same as that configured in CallPilot Manager.
Once the CCRS Test page is submitted, XML data should be returned and not display an
InvalidPassword XML error page, as shown in Figure 49: InvalidPassword XML error in CCRS
Test page.
NoKeyCode
Perform the following steps to check that the keycode for the CCRS data stream is active:
1. Open Element Manager by clicking on Start > Programs > Nortel > BCM > BCM
Element Manager.
2. To connect to the BCM, under Element Navigation Panel expand Network Elements
and select the BCM.
3. Enter the logon User ID and Password for an administrator and click Connect.
4. From the Task Navigation Panel select the Configuration tab.
5. Expand the System folder and click Keycodes. A list of all the keycodes on the BCM are
displayed, as well as those that have not been activated.
6. Verify that the following Keycodes are flagged as ACTIVE:
•
ICC
•
ICC Skillset (at least one)
•
ICC Reporting
If the keycodes listed in step 6 are not active and the user requires them on the BCM system,
contact your distributor who can verify whether or not the system needs the keycodes. This will
be done through the Nortel Keycode Retrieval System (KRS).
NN40020-403
Web Host PC Troubleshooting 83
NoCCData
No data is present in the CCRSAppServer database. Configure at least one skillset in CallPilot
Manager as follows:
1. Open CallPilot Manager by entering the following location in the browser Address bar:
http://[BCM IP Address]/callpilotmanager
2. Enter the User ID and Password and click Submit.
3. From the navigation menu on the left, click Contact Center.
4. Select Skillset List to open the Skillset List page.
5. Click on Configure to open the Skillset Properties page. Enter the properties to create a
new skillset and click Submit.
The XML for the newly created skillset will be updated in the CCRSAppServer. The data will be
available to RCC in the next data query.
NoCCKeyCode
Perform the following steps to check that the Contact Center application keycode is enabled:
1. Open Element Manager by clicking on Start > Programs > Nortel > BCM > BCM
Element Manager.
2. To connect to the BCM, under Element Navigation Panel expand Network Elements
and select the BCM.
3. Enter the logon User ID and Password for an administrator and click Connect.
4. From the Task Navigation Panel select the Configuration tab.
5. Expand the System folder and click Keycodes. A list of all the keycodes on the BCM are
displayed, as well as those that have not been activated.
6. Verify that the following Keycodes are flagged as ACTIVE:
•
ICC
•
ICC Skillset (at least one)
•
ICC Reporting
If the keycodes listed in step 6 are not active and the user requires them on the BCM system,
contact your distributor who can verify whether or not the system needs the keycodes. This will
be done through the Nortel Keycode Retrieval System (KRS).
Reporting for Contact Center Troubleshooting and Maintenance Guide
84 Web Host PC Troubleshooting
CCRSDisabled
Perform the following steps:
1. Open Element Manager by clicking on Start > Programs > Nortel > BCM > BCM
Element Manager.
2. To connect to the BCM system, under Element Navigation Panel expand Network
Elements and select the system to connect to. Enter the User ID and Password and click
Connect.
3. From the Task Navigation Panel select the Administration tab.
4. Expand the General folder and click Service Manager. A list of all the services on the
BCM is displayed.
5. Locate and verify that the following services are flagged with the Startup as Enabled and
Status as Running:
a. voicemail
For BCM 4.0 and BCM50 3.0 systems only, the following service should also be
verified:
b. CCRSAppServer
6. If any of these services are not running, select the service and click Start. Click Yes in
the warning message box to confirm start-up of the service.
7. Wait 30-60 seconds for the service to start.
If the service does not start, contact Nortel Support.
ServerBusy
The user should contact their network administrator or support technician to diagnose if multiple
PCs are connecting to the same Contact Center.
Restart RCC Launcher as described in InvalidRequest on page 80.
CannotConnectToCC
The Contact Center Reporting Server can not connect to the Contact Center. This can be due to
either one of the following reasons:
•
The Contact Center is disabled. The Voicemail and CCRSAppServer (on BCM 4.0 and
BCM50 3.0 only) Services have to be started.
•
There are multiple PCs attempting to access the Contact Center.
NN40020-403
Web Host PC Troubleshooting 85
1. The Contact Center is disabled. Perform the following steps to start the Voicemail and
CCRSAppServer (on BCM 4.0 and BCM50 3.0 only) Services:
a. Open Element Manager by clicking on Start > Programs > Nortel > BCM > BCM
Element Manager.
b. To connect to the BCM system, under Element Navigation Panel expand Network
Elements and select the system to connect to. Enter the User ID and Password and
click Connect.
c. From the Task Navigation Panel select the Administration tab.
d. Expand the General folder and click Service Manager. A list of all the services on
the BCM is displayed.
e. Locate and verify that the following services are flagged with the Startup as Enabled
and Status as Running:
f. voicemail
For BCM 4.0 and BCM50 3.0 systems only, the following service should also be
verified:
g. CCRSAppServer
h. If any of these services are not running, select the service and click Start. Click Yes
in the warning message box to confirm start-up of the service.
i. Wait 30-60 seconds for the service to start.
If the service does not start, contact Nortel Support.
2. There are multiple PCs attempting to access the Contact Center. Refer to the ServerBusy
section on page 84 for resolving multiple PCs accessing the Contact Center.
CannotConnectToDB
This XML error is the result of the Database Service being stopped on the Contact Center server
side. Perform the following procedures for either a BCM 4.0, BCM50 2.0, or a BCM50 3.0
system.
Starting the database service on a BCM 4.0 or a BCM50 3.0 system:
1. Open Element Manager by clicking on Start > Programs > Nortel > BCM > BCM
Element Manager.
2. From Element Navigation Panel expand Network Elements and select your BCM
system to connect to. Enter the User ID and Password and click Connect.
3. From the Task Navigation Panel select the Administration tab.
4. Expand the General folder and click Service Manager. A list of all the services on the
BCM is displayed.
Reporting for Contact Center Troubleshooting and Maintenance Guide
86 Web Host PC Troubleshooting
5. Locate postgres service and ensure it is set to Enabled and Running.
6. If not, select postgres service and click Stop. In the confirmation message box, click Yes
to stop the Postgres service.
7. Wait 30-60 seconds.
8. Select postgres from the list of services and click Start. Click Yes in the warning
message box to confirm restarting the service.
9. Wait 30-60 seconds for Postgres service to restart.
Starting the database service on a BCM50 2.0 system:
1. Log on to the PC hosting the Contact Center Reporting Server (CCRS, also known as the
Application Server, or AppServer) as an Administrator.
2. Click on Start > Settings > Control Panel > Administrative Tools > Services.
3. Locate MSSQL$NN_CCRS Service. Ensure the service is set to Started and Automatic
startup.
4. If the service is not running, select MSSQL$NN_CCRS Service, right-click and select
Start.
5. If the service startup type is not set to Automatic, right-click on the service and select
Properties to open the MSSQL$NN_CCRS Properties window. On the General tab
change Startup type: to Automatic. Click Apply and click OK.
CCRefusedConnection
Contact your network administrator or support technician to diagnose if multiple PCs are
connecting to the same Contact Center, as the Contact Center refused to register CCRS.
HistoricalReqOver3Hours
Either Reporting for Contact Center, or the CCRS Test page has made a request of over 3 hours
of historical data from the Contact Center. The server or services have not failed; this is merely
an invalid query for BCM 4.0 and BCM50 2.0 systems. For the CCRS Test page adjust your
query to be a maximum of 3 hours, see step 6 in CCRS Test Page on page 111.
Restart RCC Launcher on the Web Host PC, as described in InvalidRequest on page 80.
UnknownServerError
Contact your distributor for first level support.
If you are a distributor, contact Nortel Solutions Center, see Getting Help over the phone from a
NN40020-403
Web Host PC Troubleshooting 87
Nortel Solutions Center on page 12. If you prefer to raise a case directly through the Nortel Web
site, refer to the section Getting Help from the Nortel Web site on page 11.
Reporting for Contact Center Troubleshooting and Maintenance Guide
88
Client PC Troubleshooting
7
This section deals with problems that occur on a client PC and how to resolve those issues. A
client PC is defined as a PC connecting to the Web Host PC in an attempt to access the
Reporting for Contact Center application.
Tips for Internet Explorer
Internet Explorer cache
Deleting temporary Internet files
After an upgrade of Nortel Reporting for Contact Center, Internet Explorer may be caching old
versions of the Nortel Reporting for Contact Center Web pages. The temporary Internet files on
your computer will have to be deleted as follows:
1. Click Start, then right-click the Internet Explorer icon, and select Internet Properties.
See Figure 24: Internet Properties Dialog Box.
Figure 24: Internet Properties Dialog Box
Reporting for Contact Center Troubleshooting and Maintenance Guide
Client PC Troubleshooting 89
Note: If you do not see the dialog box shown in Figure 24, you have clicked a shortcut to
Internet Explorer. You must click the Internet Explorer icon in the Start menu.
2. When you see the window shown in Figure 24, click Delete Files. The Delete Files
dialog shown in Figure 25: Delete Files Dialog appears.
Figure 25: Delete Files Dialog
3. Select Delete all offline content, and then click OK.
4. Click OK to close the Internet Properties window.
The user can proceed with the installation of Nortel Reporting for Contact Center, as described in
the Reporting for Contact Center Setup and Operations Guide (NN40040-303).
Launching Reporting for Contact Center from a shortcut
If an Internet Explorer shortcut has been created to launch the Reporting for Contact Center
Login page, you must ensure that Reporting for Contact Center is launched in a new window. If
this is not done so, and only one Internet Explorer window is left open at the time of launching
Reporting for Contact Center from the shortcut, Reporting for Contact Center will open in that
window, even if it is a fixed sized window such as a Reporting for Contact Center Real Time
screen.
Follow these steps to launch a Reporting for Contact Center shortcut in a new window:
1. Click Start, then right-click the Internet Explorer icon, and select Internet Properties.
See Figure 7: Internet Properties Dialog Box.
Note: If you do not see the dialog box shown in Figure 7: Internet Properties Dialog Box,
you have clicked a shortcut to Internet Explorer. You must click the Internet Explorer icon
in the Start menu.
2. Click on the Advanced tab and scroll down to the setting, Reuse windows for launching
shortcuts, see Figure 26: Internet Properties Advanced window Settings. Make sure that
the check box is cleared.
Reporting for Contact Center Troubleshooting and Maintenance Guide
90 Client PC Troubleshooting
Figure 26: Internet Properties Advanced window Settings
3. Click OK to close the Internet Properties dialog box.
Internet Explorer security settings
Ensure that the Internet Explorer security settings on the Client PC allow the ActiveX Report
Viewer and Java Runtime Environment 6 (if not already installed on the Client PC) to be
downloaded from the Web Host PC to view the Reports and Real Time screens, respectively, by
the following:
1. Click Start and right-click the Internet Explorer icon. Select Internet Properties.
2. Click on the Security tab. See Figure 27: Internet Options Security window.
NN40020-403
Client PC Troubleshooting 91
Figure 27: Internet Options Security window
To change the security settings, select the Web content zone used to connect to the Web
Host PC – contact your network administrator for any assistance required, as follows:
•
If the Internet is used to access the Web Host PC, for instance, using an IP
Address, for example, http://10.10.10.102/rcc, select Internet;
•
If your intranet is used to access the Web Host PC, for instance, a network name
is used, for example, http://AndysPC/rcc, select Local intranet; or
•
If the Web Host PC has been added as a trusted site to access RCC (select
Trusted sites and click Sites to view all trusted sites), select Trusted sites;
3. Under Security level for this zone for the Web zone selected in step 2, click the Custom
Level button. The Security Settings window will open.
4. From the Security Settings window scroll down to Download signed ActiveX controls,
as shown in Figure 28: Security Settings window. Select the Enable check box.
Reporting for Contact Center Troubleshooting and Maintenance Guide
92 Client PC Troubleshooting
Figure 28: Security Settings window
Under Download unsigned ActiveX controls, select the Prompt check box.
5. Click OK to allow the download of signed and unsigned ActiveX controls.
6. On the Internet Options window, click OK to close the window.
7. If an RCC Web page is already open, click Ctrl+F5 to enable the Internet Explorer
security settings.
Allowing pop-ups
If you are unable to view the Real Time screens and a Pop-ups were blocked icon is displayed
in the status bar, change your pop-up blocker settings as follows:
1. In Internet Explorer, from the menu select Tools > Pop-up Blocker > Pop-up Blocker
Settings. The Pop-up Blocker Settings window will open, as shown in Figure 29: Pop-up
Blocker Settings dialog box.
NN40020-403
Client PC Troubleshooting 93
Figure 29: Pop-up Blocker Settings dialog box
2. In the Address of website to allow box, type the IP address or website of the Web Host
PC you want to view the Real Time screen pop-ups from.
3. Click Add and Close.
You should now be able to view Real Time screens.
Alternatively, if pop-ups are blocked from the Web Host PC, and an information bar is displayed
in the Real Time page, perform the following:
1. Click on the information bar and select Always Allow Pop-ups from This Site, as
shown in Figure 30: Pop-up options from information bar.
Reporting for Contact Center Troubleshooting and Maintenance Guide
94 Client PC Troubleshooting
Figure 30: Pop-up options from information bar
2. A message box will be displayed to confirm allowing pop-ups from the Web Host PC, as
shown in Figure 31: Allow Web site pop-up confirmation box.
Click Yes to refresh the Real Time page.
NN40020-403
Client PC Troubleshooting 95
Figure 31: Allow Web site pop-up confirmation box
3. Select the Real Time screen check boxes to view again and click Submit. The Real Time
screen should pop-up.
Page cannot be displayed message
If Internet Explorer 6 or above is being used to access Reporting for Contact Center Web pages
and the message “Page cannot be displayed” is displayed in the browser window, friendly HTTP
error messages may be enabled.
Internet Explorer friendly HTTP error messages mask the actual text of an HTTP 500 message
that is sent to the browser. To disable friendly HTTP error messages, perform the following:
1. Click Start, then right-click the Internet Explorer icon, and select Internet Properties.
See Figure 32: Internet Properties Dialog Box.
Reporting for Contact Center Troubleshooting and Maintenance Guide
96 Client PC Troubleshooting
Figure 32: Internet Properties Dialog Box
Note: If you do not see the dialog box shown in Figure 32: Internet Properties Dialog
Box, you have clicked a shortcut to Internet Explorer. You must click the Internet
Explorer icon in the Start menu.
2. Click on the Advanced tab and under the Browsing section clear the Show friendly
HTTP error messages check box. See Figure 33: Advanced window in Internet
Properties.
NN40020-403
Client PC Troubleshooting 97
Figure 33: Advanced window in Internet Properties
3. Click Apply to accept the changes.
4. Click OK in the Internet Properties dialog box to close the dialog box.
Open a browser window to view Reporting for Contact Center.
Error on Closing Group of Internet Explorer Windows
If similar taskbar buttons are grouped together on the Windows taskbar, the User may encounter
problems when closing multiple instances of Internet Explorer programs simultaneously,
including Reporting for Contact Center, using the Close Group option.
Note: To check that the Windows taskbar groups similar windows together, rightclick on the taskbar and select Properties. The Taskbar and Start Menu Properties
dialog box will open, see Figure 34: Taskbar Properties Dialog Box. Under Taskbar
appearance, Group similar taskbar buttons will be checked.
Reporting for Contact Center Troubleshooting and Maintenance Guide
98 Client PC Troubleshooting
Figure 34: Taskbar Properties Dialog Box
If the Reporting for Contact Center window and other Reports are grouped together in an
Internet Explorer taskbar button, right-clicking the Internet Explorer taskbar button and
selecting Close Group, as shown in Figure 35: Selecting Close Group option from Internet
Explorer Programs taskbar button, may cause an Internet Explorer problem.
Figure 35: Selecting Close Group option from Internet Explorer Programs taskbar button
If Internet Explorer encounters problems an error message will be shown, as in Figure 36:
Internet Explorer Close Group Error.
NN40020-403
Client PC Troubleshooting 99
Figure 36: Internet Explorer Close Group Error
Click Send Error Report to close down all remaining open Internet Explorer windows. This
will close Reporting for Contact Center and any Report Viewer windows that were open.
Reporting for Contact Center Troubleshooting and Maintenance Guide
100 Client PC Troubleshooting
Real Time Viewer
Real Time screens and Java Runtime Environment on Client PCs
A Java Runtime Environment (JRE) should be automatically installed onto a Client PC, from the
Web Host PC, the first time that the Real Time screens are viewed on the Client PC.
If the Java Runtime is not launched automatically, you will not be able to view the Real Time
screens. A warning message will be displayed near the top of the Real Time page in red bold font
and the Submit button will appear disabled, as shown in Figure 37: JRE installation message:
NN40020-403
Client PC Troubleshooting 101
Figure 37: JRE installation message
Manual installation of Java Runtime Environment
To install the JRE perform the following steps:
1. Press F5 to refresh the page.
Reporting for Contact Center Troubleshooting and Maintenance Guide
102 Client PC Troubleshooting
2. If the Internet Explorer Security Warning window appears, as shown in Figure 38:
Internet Explorer Security Warning window, click Install. Go to step 11.
Figure 38: Internet Explorer Security Warning window
If the Internet Explorer Security Warning box does not appear, a yellow Information Bar
will appear just above the Nortel logo, as shown in Figure 39: ActiveX control message
in Information Bar.
NN40020-403
Client PC Troubleshooting 103
Figure 39: ActiveX control message in Information Bar
3. There are 2 messages that can be displayed in the Information Bar as follows:
Message 1:
“This site might require the following ActiveX control: ‘ Java(TM) SE Runtime
Environment 6’ from ‘Sun Microsystems Inc.’. Click here to install…”
Reporting for Contact Center Troubleshooting and Maintenance Guide
104 Client PC Troubleshooting
If the Information Bar displays Message 1, or another release version of Java Runtime
Environment 6, perform the following:
i. Click on the Information Bar and click on Install ActiveX Control.
ii. An Internet Explorer - Security Warning window will appear, see Figure 38:
Internet Explorer Security Warning window. Click Install to install the latest
version of Java Runtime Environment 6.
Message 2:
“Your security settings do not allow Web sites to use ActiveX controls installed on your
computer. The page may not display correctly. Click here for options…”
If the Information Bar displays Message 2 or any other similarly worded message, your
security settings will have to be adjusted to allow the Java Runtime Environment to be
downloaded onto the Client PC. Refer to Internet Explorer security settings on page 90.
4. The installation of JRE will commence through an Installation Wizard.
5. From the License Agreement window, select the setup check box Typical setup – All
recommended features will be installed. See Figure 40: JRE License Agreement and
setup type window.
Click Accept.
Figure 40: JRE License Agreement and setup type window
NN40020-403
Client PC Troubleshooting 105
The Installation Wizard will install Java SE Runtime Environment 6 with the latest
release version.
6. When the installation is complete the Installation Completed window will be displayed,
as shown in Figure 41: JRE Complete window.
Click Finish.
Figure 41: JRE Complete window
JRE will now be installed on the Client PC.
The Real Time page will display the Java Runtime Environment applet logo along with the
version of JRE installed, as shown in Figure 42: JRE applet logo on Real Time page. If the JRE
applet logo does not display the installed version of JRE, close and open a new Internet Explorer
browser window and log back on to Reporting for Contact Center. Navigate to the Real Time
page again.
The Submit button will now be enabled to allow the user to open up Real Time screens to view.
Reporting for Contact Center Troubleshooting and Maintenance Guide
106 Client PC Troubleshooting
Figure 42: JRE applet logo on Real Time page
Alternative method to a manual installation of Java Runtime Environment
If the JRE still can not install, start the installation by the following:
1. On the Web Host PC in C:\Program Files\Nortel\Reporting for Contact Center\Java
folder locate the file jre-6-windows-i586.exe.
2. Copy this file to the Client PC and execute there.
This will install the JRE.
If further assistance is required on installing JRE, contact your support personnel.
NN40020-403
Client PC Troubleshooting 107
Unable to print reports
If a Client PC with limited PC user rights attempts to print a report for the first time a warning
messsage may be displayed, as shown in Figure 43: Print warning message.
Figure 43: Print warning message
The warning message displayed is due to an ActiveX control that cannot be installed. Perform
the following steps to install the ActiveX component:
1. Either contact your system administrator to log on to the PC, or log on with adminstrator
rights.
2. Log on to RCC and from the Reports and Schedules page select a report.
3. Click View to open the Report Viewer window.
4. Click the Print icon. The warning message, as shown in Figure 43: Print warning
message, will appear along with an Information bar in the Report Viewer window. See
Figure 44: MS SQL Server add-on in Information bar.
Reporting for Contact Center Troubleshooting and Maintenance Guide
108 Client PC Troubleshooting
Figure 44: MS SQL Server add-on in Information bar
5. Click on the Information bar and select the install option. The report will be regenerated.
6. Click the Print icon again. An Internet Explorer Security Warning window will appear,
as shown in Figure 45: MS SQL Server installation window.
NN40020-403
Client PC Troubleshooting 109
Figure 45: MS SQL Server installation window
7. Click Install to install the ActiveX component.
You should now be able to log on to the PC as normal and access RCC to print reports.
Reporting for Contact Center Troubleshooting and Maintenance Guide
110
BCM and CCRS Troubleshooting
8
This section details how to troubleshoot problems that occur on the Business Communications
Manager (BCM).
Pinging the BCM / Contact Center
To test that the BCM is accessible from the Web Host PC over the network, ping to the BCM by
the following:
1. Open a Command Prompt window by clicking Start > Run, type cmd and press Enter.
2. Type Ping [BCM IP Address or Host Name].
3. Press Enter.
A successful ping will show statistics of request packets sent to the target host and packets
received, as shown in Figure 46: Successful ping response to Web Host PC.
Figure 46: Successful ping response to Web Host PC
If the user does not receive response packets back from the BCM, there is pinging failure, see the
section Resolving pinging failure on your network, page 110.
Resolving pinging failure on your network
If there is pinging failure to the BCM, an error message will be seen in the Command Prompt
window after attempting to ping to the BCM. The user should resolve this with the network
administrator.
The error messages shown on attempting to ping the BCM can be one of the following:
Reporting for Contact Center Troubleshooting and Maintenance Guide
BCM and CCRS Troubleshooting 111
•
Request timed out - The IP address is valid, but there is no reply from it. The most
likely cause is a network firewall or a third party software firewall program on the Web
Host PC is blocking the ping request.
•
Unknown host <name> or Ping request could not find host <name> - The computer
name does not exist on the local area network. Ensure that the NetBIOS over TCP/IP is
enabled.
•
Destination host unreachable – The IP address is not on a local area network, and the
default gateway can not access it. Either there is no default gateway set up, the address is
wrong, or it is not functioning.
Checking XML from the Contact Center
A User may be required to retrieve XML data from the Contact Center for verification purposes,
such as for:
•
Connection to the Contact Center;
•
Acceptance of the CCRS password by the Contact Center;
•
Response from the Contact Center;
•
Immediate view of any Contact Center errors, such as InvalidPassword, see Contact
Center errors on page 114; or
•
Invalid XML. See Invalid XML on page 115 for symptoms of invalid XML data from the
Contact Center.
CCRS Test Page
To retrieve XML data from the Contact Center the User must execute the CCRS Test page, as
follows:
1.
In the browser Address bar enter the location: http://localhost/rcc/ccrstest.htm from the
Web Host PC, or: http://[Web Host IP Address]/rcc/ccrstest.htm from a Client PC.
2.
The CCRS Test page opens up, see Figure 47: CCRS Test page.
Reporting for Contact Center Troubleshooting and Maintenance Guide
112 BCM and CCRS Troubleshooting
Figure 47: CCRS Test page
3.
For BCM 4.0 and BCM50 3.0: ensure that the port number to the Contact Center
Reporting Server in the Contact Center is entered after the IP Address of the BCM in the
CC IP Address field, in the format [IP Address]:8088.
For BCM50 2.0: in the CC IP Address field, ensure that the IP Address of the PC with
the Contact Center Reporting Server installed is entered with port number 8088 following
it. The format should be [IP Address]:8088.
4.
Select Yes in the SSL field for a secure connection to the Contact Center.
5.
To get Historical XML data from the Contact Center, select RPT from the Qtype field.
To get Real Time data, select RT in the Qtype field.
6.
Leave the date and time fields blank if requesting Real Time XML data from the Contact
Center. If requesting Historical XML data, specify dates and times, making sure that the
times entered are equal to or less than 3 hours. This is because the Contact Center returns
XML data requests in no more than 3 hourly packets of data. An example of acceptable
NN40020-403
BCM and CCRS Troubleshooting 113
date and time values is given in Table 4: A sample of acceptable date and times for
requesting historical XML data as follows:
QStartDate
QStartTime
QEndDate
QEndTime
2006-09-14
12:00:00
2006-09-14
15:00:00
Table 4: A sample of acceptable date and times for requesting historical XML data
7.
Enter the CCRS password in the CCRS field.
8.
Click Submit Query to get XML data from the BCM. See Figure 48: XML data from the
BCM.
Figure 48: XML data from the BCM
Reporting for Contact Center Troubleshooting and Maintenance Guide
114 BCM and CCRS Troubleshooting
Contact Center errors
On executing the CCRS Test page (see CCRS Test Page on page 117 for instructions on
executing the CCRS Test page) certain error conditions in the Contact Center may return a
special message through the XML rather than in the Historical or Real Time data. If this occurs,
a screen similar to Figure 49: InvalidPassword XML error in CCRS Test page will be seen as
follows:
Figure 49: InvalidPassword XML error in CCRS Test page
The XML elements that appear in an XML error in the CCRS Test page are as follows:
•
ReqTime is a standard field displaying the time that the request was sent to the Contact
Center;
•
Time is the current time in the Contact Center;
•
ReqString is the information sent to the Contact Center by the CCRS Test page;
NN40020-403
BCM and CCRS Troubleshooting 115
•
Reason is the reason why the XML error occurred.
In the XML error example in Figure 49: InvalidPassword XML error in CCRS Test page,
the reason given is InvalidPassword indicating that the password used in the CCRS Test
page is incorrect. A full list of the XML errors that can be displayed are as follows:
o InvalidRequest – The request from the client application is not valid.
o VMServiceNotRunning – The Voicemail service is not running on the BCM or
Call Pilot.
o InvalidPassword – The password used by the client application is not valid.
o NoKeyCode – The keycode used to turn on the CCRS data stream is not present.
o NoCCData – No data is present in the CCRSAppServer database. Configure at
least one skillset in CallPilot Manager.
o NoCCKeyCode – The keycode used to enable the Contact Center application is
not present.
o CCRSDisabled – The CCRS data stream is disabled.
o ServerBusy – The server is too busy to handle the request (too many
simultaneous users).
o CDNConflict – There is a CDN conflict in the Skillset and CDN identified in the
error message.
o CannotConnectToCC – The CCRS cannot contact the Contact Center.
o CannotConnectToDB – Could not connect to the database in the Contact Center.
o CCRefusedConnection – Indicates that the Contact Center refused to register the
AppServer.
o HistoricalReqOver3Hours – The request from the client application is not valid
(exceeds three hours).
o UnknownServerError – None of the above.
Invalid XML
An error message appears in Reporting for Contact Center if invalid XML data is received by the
Reporting for Contact Center Reporting Service, as shown in Figure 50: Invalid XML data error
message.
Perform the following steps to bypass invalid XML from the Contact Center:
Note: The Reporting Service gets XML from the Contact Center on initial download of
data from the Contact Center and then every 15 minutes.
Reporting for Contact Center Troubleshooting and Maintenance Guide
116 BCM and CCRS Troubleshooting
Figure 50: Invalid XML data error message
1. Click the Click here for details link to view information about the invalid XML data.
Note: Only the Administrator can see the link Click here for details.
2. The ERROR! Invalid Data Detected page appears, see Figure 51: ERROR! Invalid
Data Detected page. Here the Administrator can see when the invalid chunk of XML
data occurred.
NN40020-403
BCM and CCRS Troubleshooting 117
Figure 51: ERROR! Invalid Data Detected page
3. The Administrator can click Skip to process XML data from the Contact Center but
bypassing the erroneous invalid chunk of XML. Clicking Skip All will bypass all
invalid XML data from an initial download from the Contact Center. Retry will retry
the same request again and Cancel will not process any XML and return the
Administrator back to their previous page.
Incompatible XML
The voice mail version on CC is strongly linked to the RCC version. XML incompatibility
occurs when the Reporting for Contact Center client application has a different schema version
to that of the XML schema in the Contact Center (that is, incompatible version between the RCC
receiving XML and the BCM sending XML). If this occurs, an incompatible XML schema
Reporting for Contact Center Troubleshooting and Maintenance Guide
118 BCM and CCRS Troubleshooting
message will be displayed on the Reporting for Contact Center browser interface, as shown in
Figure 52: Incompatible schema version between RCC and XML.
Figure 52: Incompatible schema version between RCC and XML error message
After a BCM upgrade, the Reporting for Contact Center client application version downloadable
from the BCM will be compatible with the XML schema version on the Contact Center.
Once a new patch is available for download, the user must ensure that the version of Reporting
for Contact Center is compatible with the schema version of the Contact Center. See the
following section Voicemail patch and RCC.
Voicemail patch and RCC
When applying a voice mail patch, consider the RCC and voice mail in terms of schema. Refer
to the release notes for both the voice mail patch and the RCC patch. The RCC patch release
NN40020-403
BCM and CCRS Troubleshooting 119
notes will include a voice mail patch dependency, and the voice mail patch release notes will
include an RCC patch dependency.
For example, BCM370.125-RCC includes the following dependency:
•
Voicemail v.37.01.04.22
BCM370.119-VM includes the following dependency:
•
Required patches - BCM_370.125_RCC.61.209
You can safely apply both, and install this version of RCC, without an XML incompatibility
problem.
Refer to Upgrade and Patch procedure for the BCM and Reporting for Contact Center on page
119, prior to making changes.
Upgrade and Patch procedure for the BCM and Reporting for Contact
Center
Note: Do not use Reporting for Contact Center on a Web Host PC to avoid problems during
an upgrade of the BCM, or when applying a voicemail patch or service update.
Refer to the accompanying documentation on the correct procedure to be performed.
Before upgrading the BCM (for example, from BCM 4.0 to BCM50 3.0), just prior to the
upgrade, uninstall RCC, refer to the Reporting for Contact Center Setup and Operations Guide
(NN40040-303), and re-boot the Web Host PC.
Voicemail Patch procedure
Before applying a voicemail patch, check the Release Notes for dependencies if you also need to
install a later version of RCC. Uninstall RCC first, and then apply the voicemail patch.
Alternatively, if RCC does not need to be upgraded, however a voice mail patch does need to be
applied, stop the RCC Launcher service on the RCC Web Host PC. Apply the voice mail patch.
Reporting for Contact Center Troubleshooting and Maintenance Guide
120 BCM and CCRS Troubleshooting
NN40020-403
121
9
Glossary
Ad Blocking ............... Software that eliminates advertising and other annoyances from Web
pages. It detects banner ads by size (typically 60 pixels high) and by the
URLs of major advertising sites where the images come from. Such
utilities may also be able to eliminate cookies, referrers and animated
GIF, which are time consuming to download.
Administrator ............. A Nortel Reporting for Contact Center User who has been awarded
Administration rights. These Users can configure core elements of
Nortel Reporting for Contact Center that regular Users can not. They can
perform such actions as connecting the Web Host PC to the Contact
Center, creating other Users, allocating Skillsets to Users, and
administer the logging functionality of Reporting for Contact Center on
the Web Host PC.
Agent.......................... Agents are people who handle calls in the Contact Center.
Anti Virus................... Antivirus software identifies, thwarts, and eliminates computer viruses
and other malicious software. Some antivirus software can reduce
system performance. It may be necessary to disable virus protection
when installing or updating software like the Reporting for Contact
Center application to prevent improper installation or any installation.
Backup ....................... Additional resources or duplicate copies of data on different storage
media for emergency purposes.
BCM........................... The Business Communications Manager (BCM), a converged voice and
data solution, providing a choice of IP-enabled or pure-IP strategy. The
applications in this system include telephony, unified messaging,
multimedia call center, interactive voice response, IP routing and data
services such as firewall and wireless.
Cache.......................... Pronounced “cash”. A cache is used to speed up data transfer and may
be either temporary or permanent. Memory and disk caches are in every
computer to speed up instruction execution and data retrieval and
updating. These temporary caches serve as staging areas, and their
contents are constantly changing.
Browser caches and Internet caches store copies of Web pages retrieved
by the user for some period of time in order to speed up retrieval the
next time the same page is requested.
CC .............................. Abbreviation for Contact Center.
CCRDB ...................... Reference term for the Nortel Reporting for Contact Center Database.
Reporting for Contact Center Troubleshooting and Maintenance Guide
122 Glossary
CCRS ......................... Contact Center Reporting Server, also known as the Application Server,
or AppServer. This is the mechanism in the Contact Center that provides
Nortel Reporting for Contact Center with the data and statistics that
make up the reporting.
CCRS Test ................. Contact Center Reporting Server Test often referred to as the CCRS Test
page is used to check the XML from the Contact Center.
CDN ........................... Control Directory Number, a virtual directory often associated with a
Skillset to act as a controller for incoming calls.
Client PC.................... A PC that has network access to the Web Host PC and so can access the
Nortel Reporting for Contact Center Web pages through the Web Host
PC. Multiple users can, therefore, use Nortel Reporting for Contact
Center without having any software other than Internet Explorer
installed on their PCs. (The Java Runtime Environment, if required, and
the ActiveX Report Viewer are automatically downloaded to the client
the first time they are required.)
Create.bat ................... A Windows batch file. When executed, the batch file creates the
required virtual directories of Nortel Reporting for Contact Center
within IIS.
Firewall ...................... A piece of hardware and/or software functioning in a networked
environment to prevent forbidden communication in line with a security
policy. Firewalls control traffic between different zones of trust, for
example, between the Internet (with a zone of no trust) and an internal
network (a zone with high trust).
Hard Wallboard.......... A stand-alone Contact Center wallboard that does not require installation
on a PC.
Historical Reports ...... Collective name for the Reporting in Nortel Reporting for Contact
Center based on data that is collected from the Contact Center and stored
in the local CCRDB database.
HTTP.......................... HTTP is a request/response protocol between clients and servers. The
originating client, such as a Web browser, spider, or other end-user tool,
is referred to as the user agent. The destination server, which stores or
creates resources such as HTML files and images, is called the origin
server.
IIS............................... Microsoft Internet Information Services (sometimes, erroneously called
Server or System), is a set of Internet-based services for servers using
Microsoft Windows. The servers currently include FTP, SMTP, NNTP
NN40020-403
Glossary 123
and HTTP/HTTPS although HTTP is the only service used by Nortel
Reporting for Contact Center.
Internet Explorer ........ Commonly called “IE”. This is a Web browser that comes with
Microsoft Windows. All the administrative and user interactions with
Nortel Reporting for Contact Center are conducted through a series of
Web pages that are accessed through Internet Explorer browser sessions.
Install Verification
Utility (IVU) .............. A utility automatically run after Reporting for Contact Center (RCC) has
been installed. This utility checks that all the components of RCC have
been installed and setup corretly. Any configuration or setup issues are
automatically resolved.
IP Address.................. (Internet Protocol address) The address of a device attached to an IP
network (TCP/IP network). Every client, server and network device
must have a unique IP address for each network connection (network
interface). Every IP packet contains a source IP address and a
destination IP address.
Java Runtime
Environment............... The Java Runtime Environment, or JRE, is a software bundle from Sun
Microsystems that allows a computer system to run a java application.
This bundle includes a Java Virtual Machine, and a set of standard class
libraries.
Logs or Logging......... Text files stored on the Web host PC that collect debug information and
XML from the Contact Center.
Microsoft SQL Server
2005 Express.............. SQl Server is a multithreaded, multi-user, SQL Database Management
System (DBMS).
Offline content ........... Offline content are complete Web pages that have been stored on a
computer for browsing when the user is not connected to the Internet.
PC............................... A personal computer (PC) is usually a microcomputer whose price, size,
and capabilities make it suitable for personal usage.
PDF ............................ Portable Document Format file. The file format in Adobe's Acrobat
document exchange technology. Acrobat/PDF has become the de facto
standard for document publishing. On the Web, there are countless
brochures, data sheets, white papers and technical manuals in the PDF
format.
Reporting for Contact Center Troubleshooting and Maintenance Guide
124 Glossary
PING .......................... Packet Internet Groper. An Internet utility used to determine whether a
particular IP address is reachable online by sending out a packet and
waiting for a response. Ping is used to test and debug a network as well
as see if a user or server is online.
Popup Window
Blocking..................... A utility that prevents Web site popups from being displayed. The
challenge with this software is to distinguish a valid popup from an
advertisement. There are an enormous number of Web pages that launch
legitimate browser windows to display additional information, and a
popup is a small browser window.
Port Numbers ............. A Software Port (usually just called a port) is a virtual data connection
that can be used by programs to exchange data directly, instead of going
through a file or other temporary storage location. The most common of
these are TCP and UDP ports which are used to exchange data between
computers on the Internet.
Print Caller Service
(PCS).......................... An application service within Nortel Reporting for Contact Center
whose primary purpose is to control and send to the printer, at the
correct time, any scheduled Historical reports.
Proxy Server............... Also called a proxy. As the word implies, the proxy server “acts on
behalf of” a client and server. This computer system or router breaks the
connection between sender and receiver. Functioning as a relay between
client and server, proxy servers are used to help prevent an attacker from
invading the private network. Proxies are one of several tools used to
build a firewall.
Raise a Case ............... The process of raising a problem or question with Nortel Technical
Support. A case is raised with Nortel in line with the user’s normal
support processes, that is, raising a case using the Internet, or contacting
Nortel Contact Center to raise a case on the user’s behalf.
RCC............................ Abbreviation for Nortel Reporting for Contact Center.
Real Time Screen....... Information is available that displays the current states of Skillset Calls
and Agents. This information is refreshed approximately every 3
seconds. These displays are called the Real Time screens. Information
can also be displayed on hardware and software TCP/IP enabled
wallboards, to provide Real Time information to the Contact Center
Agents.
Remote Support ......... This is a component of Webex Support Center. This provides a rich and
dynamic environment for conducting real-time customer support
NN40020-403
Glossary 125
sessions over the Web. Nortel Support can view, remotely control, and
annotate a customer’s applications or entire desktop to analyze and solve
problems, thereby enhancing the effectiveness of traditional telephonebased customer support. For example, a customer can be shown how to
use an application, or they can troubleshoot it directly on the customer’s
computer. Files can be transferred to and from a customer’s computer to
analyze them or to install updates or patches.
RPT ............................ Abbreviation for Report and typically refers to the Historical Report
XML stream from the Contact Center.
RT .............................. Real Time; this refers to the Real Time XML stream from the Contact
Center.
Services ...................... Administrative tools as part of a management console that run in the
background. These service applications are programs, routines, or
processes that perform specific system functions to support other
programs, particularly at a low (close to the hardware) level. Service
applications provide features such as client/server applications, Web
servers, database servers and other server-based applications to users,
both locally and across the network. Some examples of services are the
MySQL4 service, voicemail service, and World Wide Web Publishing
service.
Skillset........................ Groups of Agents who perform a particular function, for instance, a
contact center department, like human resources. Contact Center
Skillsets answer and distribute calls to Agents as they become available.
Other functionality include, holding calls for different contact center
departments, such as sales and technical support.
Software Wallboard ... The full name is ipView Software Wallboard, also referred to as ipView
SoftBoard. A Windows software application that provides a softwarebased, IP-enabled wallboard on the PC desktop of Contact Center
Agents. Audible alerts and histograms can be displayed to graphically
show changes in Contact Center parameters. The ipView SoftBoard is
completely compatible with the ipView Hardware Wallboard and can be
configured within the Nortel Reporting for Contact Center application.
Sophos........................ A company that produces a range of security software including Sophos
Client Firewall and Sophos Anti-Virus, which are aimed primarily at
corporate environments. It is available for the latest versions of
Microsoft Windows XP/2000. Sophos Client Firewall is a locationaware centrally managed firewall providing added protection from
viruses and worms. The Client Firewall is tightly integrated with Sophos
Anti-Virus. It stops known and unknown threats by closing all inactive
Reporting for Contact Center Troubleshooting and Maintenance Guide
126 Glossary
ports (stopping many internet worms). The Client Firewall isolates
infected computers from the rest of the network.
Statistics ..................... Data that is displayed in the Real Time screens or in the historical
Reports of Reporting for Contact Center.
SUOG......................... Set Up and Operation Guide. This is a generic name for, and also forms
part of the title of any document that provides the setting up, installation
and operation of a Contact Center application or platform, such as the
Contact Center Set Up and Operation Guide.
Task Manager............. A program that is part of the Operating System which provides
information about the processes and programs (tasks) running on a
computer, as well as the general status of the computer. It can also be
used to terminate processes and programs, as well as change the
processes’ priority.
TCP/IP........................ Transmission Control Protocol/Internet Protocol: a protocol developed
by the US Department of Defense for communications between
computers. It has become the de facto standard for data transmission
over networks, including the Internet. TCP and IP are transport and
address protocols; TCP is used to establish a connection for data
transmission, and IP defines the method for sending the data in packets.
URL............................ Uniform Resource Locator, the address that defines the route to a file on
an Internet server (Web server, FTP server, mail server, and so on).
URLs are typed into a Web browser to access Web pages and files, and
URLs are embedded within the pages themselves as hypertext links. The
URL contains the protocol prefix, port number, domain name,
subdirectory names and file name. If a port number is not stated in the
address, port 80 is used as the default for HTTP traffic. An example
URL is http://www.nortel.com/servsup/kb/
User ............................ A User is a person who has been allocated a Username and Password to
allow them to use Nortel Reporting for Contact Center. Users can
configure some elements of their usage of Nortel Reporting for Contact
Center, but they do not have the same scope for configuration as an
Administrator.
Virtual Directory........ A directory defined by name only in Internet Service Manager. All
references to the virtual directory are redirected to the real directory,
including Users accessing Reporting for Contact Center.
Wallboard................... A Nortel Reporting for Contact Center TCP/IP enabled hardware device
that is used to display Real Time Contact Center statistics and messages
to Agents and other contact center staff.
NN40020-403
Glossary 127
Web Host ................... A designated PC on which Nortel Reporting for Contact Center software
is installed. The Web Host PC communicates directly with the Contact
Center to retrieve Real Time updates (for the Real Time screens and
wallboards) and Historical information (for the reports).
XML........................... Extensible Markup Language; defines all data content from the Contact
Center.
Reporting for Contact Center Troubleshooting and Maintenance Guide
128
10
References
1
2
3
4
5
6
Contact Center Set Up and Operation Guide (NN40040-301)
ipView Software Wallboard Setup and Operation Guide (NN40010-500)
Keycode Installation Guide (NN40010-301)
Reporting for Contact Center – Reports Explained (NN40010-626)
Reporting for Contact Center Setup and Operations Guide (NN40040-303)
Upgrade Guide (N0060597)
Reporting for Contact Center Troubleshooting and Maintenance Guide
References 129
11
Index
A
ActiveX Report Viewer, 45, 90, 91, 101, 102, 103, 121
Ad Blocking, 73, 74, 120
Administrator, 9, 23, 32, 66, 72, 79, 85, 115, 116, 120, 125
Adobe, 122
Agent, 31, 120
Anti-Virus Software, 50, 54, 73, 74, 76, 124
IP Address, 15, 19, 25, 27, 56, 59, 61, 67, 70, 72, 75, 80,
82, 90, 109, 110, 111, 122
ipView Softboard, 15, 25, 27, 51, 75, 76, 124, 127
ipView SoftBoard, 15, 25, 27, 51, 75, 76, 124, 127
J
Java Cache, 49, 50
Java Runtime Environment, 17, 22, 35, 45, 47, 48, 89, 99,
100, 103, 104, 105, 121, 122
B
Backup, 120
BCM 4.0, 32, 56, 67, 69, 80, 83, 84, 85, 111, 118
BCM50 2.0, 84, 85, 111
BCM50 3.0, 36
Browser, 120
Business Communications Manager, 9, 51, 52, 67, 68, 69,
70, 72, 76, 80, 81, 82, 83, 84, 109, 112, 117, 120
C
CallPilot, 19, 22, 23, 31, 66, 67, 68, 70, 79, 80, 81, 82, 114
CCRDB, 32, 38, 39, 40, 41, 42, 120, 121
CCRS, 19, 22, 68, 81, 85, 110, 111, 112, 113
CCRS Test Page, 19, 22, 68, 81, 85, 110, 113
Client PC, 9, 45, 56, 58, 59, 75, 87, 99, 103, 104, 105, 110,
121
Contact Center, 9, 11, 14, 18, 19, 22, 23, 32, 52, 54, 56, 65,
66, 67, 68, 69, 70, 72, 75, 78, 79, 80, 81, 82, 83, 84, 85,
106, 109, 110, 111, 113, 114, 116, 117, 120, 121, 122,
123, 124, 125, 126
Contact Center Connection, 13, 18, 23, 68, 72, 78, 81
Contact Center Reporting Server, 9, 19, 22, 66, 67, 68, 69,
79, 80, 81, 85, 109, 110, 111, 112, 113, 114, 121
Control Directory Number, 23, 66, 70, 114, 121
Control key, Ctrl, 27, 39, 63, 77, 91
Control Panel, 17, 27, 32, 36, 42, 44, 48, 49, 50, 66, 75, 76,
79, 85
L
License Agreement, 103
Localhost, 73
Logging Menu, 14, 15
Login, 23, 37, 72, 77, 78, 88
M
Maintenance, 11, 32
Microsoft, 17, 31, 32, 35, 36, 37, 39, 40, 42, 43, 65, 73, 75,
121, 122, 124
Microsoft SQL Server, 17, 32, 35, 36, 37, 39, 40, 42, 65,
85, 122
MySQL database, 9, 32, 33, 36
N
Nortel Contact Center Reporting Server, 9, 67, 80, 83, 85,
109, 111, 121
Nortel Reporting for Contact Center, 9, 11, 13, 14, 16, 17,
19, 20, 23, 25, 27, 29, 31, 32, 35, 36, 37, 43, 45, 48, 51,
52, 54, 56, 58, 63, 66, 67, 70, 72, 74, 76, 78, 79, 81, 85,
87, 88, 94, 96, 97, 98, 104, 105, 114, 116, 117, 118, 120,
121, 122, 123, 124, 125, 126, 127
O
Operating System, 31, 43, 125
E
Element Manager, 18, 19, 22, 66, 67, 68, 69, 79, 80, 81, 82,
83, 84
H
P
Password, 22, 37, 66, 67, 68, 69, 70, 80, 81, 82, 83, 84, 125
Pop-up, 91, 92
Port Number, 51, 123
Print Schedules, 13, 28
Historical Reports, 123
R
I
Installation, 36, 43, 45, 100, 103, 104, 105, 127
InstallShield, 17
Internet Explorer, 17, 20, 22, 45, 46, 47, 56, 58, 59, 87, 88,
89, 91, 94, 95, 96, 97, 98, 101, 103, 104, 121, 122
Internet Explorer Cache, 87
Internet Information Services, 35, 43, 51, 121
Introduction, 9, 11, 13
Real Time screens, 13, 15, 21, 22, 23, 45, 48, 49, 51, 54,
65, 66, 70, 72, 73, 74, 88, 89, 91, 92, 99, 104, 105, 111,
113, 123, 124, 125, 126
Report Viewer, 45, 63, 89, 98, 121
T
TCP/IP, 73, 110, 122, 123, 125
Reporting for Contact Center Troubleshooting and Maintenance Guide
130 Index
Troubleshooting, 9, 11, 35, 87, 109
U
URL, 56, 58, 125
User, 9, 31, 36, 45, 59, 67, 68, 69, 70, 80, 81, 82, 83, 84,
96, 110, 120, 121, 122, 125
W
Wallboard, 13, 23, 24, 25, 26, 27, 72, 75, 76, 121, 124, 125,
127
Web Host, 9, 11, 17, 19, 20, 27, 29, 32, 33, 35, 36, 37, 39,
43, 45, 48, 51, 52, 54, 56, 59, 61, 63, 66, 72, 75, 76, 79,
85, 87, 89, 90, 92, 99, 105, 109, 110, 118, 120, 121, 126
Web Host PC, 9, 11, 17, 19, 20, 27, 29, 32, 33, 35, 36, 37,
39, 43, 45, 48, 51, 52, 54, 56, 59, 61, 63, 66, 72, 75, 76,
NN40020-403
79, 85, 87, 88, 89, 90, 92, 96, 99, 105, 106, 109, 110,
113, 118, 120, 121, 126
Web page, 45, 121, 122
Windows, 14, 15, 17, 27, 39, 40, 43, 52, 72, 73, 77, 96,
106, 109, 110, 121, 122, 124
Windows 2000, 43, 124
Windows 2003, 43
Windows 95, 84
Windows Vista, 43
Windows XP, 15, 43, 124
X
XML, 54, 67, 68, 80, 81, 84, 110, 111, 112, 113, 114, 115,
116, 117, 118, 121, 122, 124, 126