1
BCM Rls 6.0
Desktop Assistant Pro
Desktop Assistant Pro Admin Edition
Task Based Guide
Desktop Assistant Pro/Pro AE
Copyright © 2010 Avaya Inc.
All Rights Reserved.
Notices
While reasonable efforts have been made to ensure that the information in this document is complete and accurate
at the time of printing, Avaya assumes no liability for any errors. Avaya reserves the right to make changes and
corrections to the information in this document without the obligation to notify any person or organization of such
changes.
Documentation disclaimer
Avaya shall not be responsible for any modifications, additions, or deletions to the original published version of
this documentation unless such modifications, additions, or deletions were performed by Avaya. End User agree to
indemnify and hold harmless Avaya, Avaya’s agents, servants and employees against all claims, lawsuits, demands
and judgments arising out of, or in connection with, subsequent modifications, additions or deletions to this
documentation, to the extent made by End User.
Link disclaimer
Avaya is not responsible for the contents or reliability of any linked Web sites referenced within this site or
documentation(s) provided by Avaya. Avaya is not responsible for the accuracy of any information, statement or
content provided on these sites and does not necessarily endorse the products, services, or information described or
offered within them. Avaya does not guarantee that these links will work all the time and has no control over the
availability of the linked pages.
Warranty
Avaya provides a limited warranty on this product. Refer to your sales agreement to establish the terms of the
limited warranty. In addition, Avaya’s standard warranty language, as well as information regarding support for
this product, while under warranty, is available to Avaya customers and other parties through the Avaya Support
Web site: http://www.avaya.com/support
Please note that if you acquired the product from an authorized reseller, the warranty is provided to you by said
reseller and not by Avaya.
Licenses
THE SOFTWARE LICENSE TERMS AVAILABLE ON THE AVAYA WEBSITE,
HTTP://SUPPORT.AVAYA.COM/LICENSEINFO/ ARE APPLICABLE TO ANYONE WHO DOWNLOADS,
USES AND/OR INSTALLS AVAYA SOFTWARE, PURCHASED FROM AVAYA INC., ANY AVAYA
AFFILIATE, OR AN AUTHORIZED AVAYA RESELLER (AS APPLICABLE) UNDER A COMMERCIAL
AGREEMENT WITH AVAYA OR AN AUTHORIZED AVAYA RESELLER. UNLESS OTHERWISE
AGREED TO BY AVAYA IN WRITING, AVAYA DOES NOT EXTEND THIS LICENSE IF THE
SOFTWARE WAS OBTAINED FROM ANYONE OTHER THAN AVAYA, AN AVAYA AFFILIATE OR AN
AVAYA AUTHORIZED RESELLER, AND AVAYA RESERVES THE RIGHT TO TAKE LEGAL ACTION
AGAINST YOU AND ANYONE ELSE USING OR SELLING THE SOFTWARE WITHOUT A LICENSE. BY
INSTALLING, DOWNLOADING OR USING THE SOFTWARE, OR AUTHORIZING OTHERS TO DO SO,
YOU, ON BEHALF OF YOURSELF AND THE ENTITY FOR WHOM YOU ARE INSTALLING,
DOWNLOADING OR USING THE SOFTWARE (HEREINAFTER REFERRED TO INTERCHANGEABLY
AS "YOU" AND "END USER"), AGREE TO THESE TERMS AND CONDITIONS AND CREATE A
BINDING CONTRACT BETWEEN YOU AND AVAYA INC. OR THE APPLICABLE AVAYA AFFILIATE
("AVAYA").
Copyright
Except where expressly stated otherwise, no use should be made of the Documentation(s) and Product(s) provided
by Avaya. All content in this documentation(s) and the product(s) provided by Avaya including the selection,
arrangement and design of the content is owned either by Avaya or its licensors and is protected by copyright and
other intellectual property laws including the sui generis rights relating to the protection of databases. You may not
modify, copy, reproduce, republish, upload, post, transmit or distribute in any way any content, in whole or in part,
including any code and software. Unauthorized reproduction, transmission, dissemination, storage, and or use
without the express written consent of Avaya can be a criminal, as well as a civil offense under the applicable law.
Third Party Components
Certain software programs or portions thereof included in the Product may contain software distributed under third
party agreements ("Third Party Components"), which may contain terms that expand or limit rights to use certain
portions of the Product ("Third Party Terms"). Information regarding distributed Linux OS source code (for those
Products that have distributed the Linux OS source code), and identifying the copyright holders of the Third Party
Components and the Third Party Terms that apply to them is available on the Avaya Support Web site:
http://support.avaya.com/Copyright.
Trademarks
The trademarks, logos and service marks ("Marks") displayed in this site, the documentation(s) and product(s)
provided by Avaya are the registered or unregistered Marks of Avaya, its affiliates, or other third parties. Users
are not permitted to use such Marks without prior written consent from Avaya or such third party which may own
the Mark. Nothing contained in this site, the documentation(s) and product(s) should be construed as granting, by
implication, estoppel, or otherwise, any license or right in and to the Marks without the express written permission
of Avaya or the applicable third party. Avaya is a registered trademark of Avaya Inc. All non-Avaya trademarks
are the property of their respective owners.
2
NN40011-015 Issue 1.2 BCM Rls 6.0
Desktop Assistant Pro/Pro AE
Downloading documents
For the most current versions of documentation, see the Avaya Support. Web site: http://www.avaya.com/support
Contact Avaya Support
Avaya provides a telephone number for you to use to report problems or to ask questions about your product. The
support telephone number is 1-800-242-2121 in the United States. For additional support telephone numbers, see
the Avaya Web site: http://www.avaya.com/support
Copyright © 2010 ITEL, All Rights Reserved
The copyright in the material belongs to ITEL and no part of the material may
be reproduced in any form without the prior written permission of a duly
authorised representative of ITEL.
NN40011-015 Issue 1.2 BCM Rls 6.0
3
Desktop Assistant Pro/Pro AE
Table of Contents
Desktop Assistant Pro ...................................................... 5
Overview .......................................................................................... 5
Required Information ....................................................................... 5
Supported Operating Systems ...........................................................................5
Flowchart ......................................................................................... 6
Loading and Configuring LAN CTE .................................................. 7
Installing Desktop Assistant Pro ...................................................... 7
Opening Desktop Assistant Pro ..................................................... 14
Button Programming ........................................................................................16
Button Labelling ...............................................................................................17
The Phone Menu .............................................................................................19
Print Preview/Print ...........................................................................................21
Saving Phone Settings ....................................................................................23
Loading Phone Settings ...................................................................................24
Desktop Assistant Pro AE .............................................. 26
Overview ........................................................................................ 26
Required Information ..................................................................... 26
Supported Operating Systems .........................................................................26
Flowchart ....................................................................................... 27
Installing Desktop Assistant Pro Admin Edition ............................. 28
Opening Desktop Assistant Pro Admin Edition .............................. 35
Selecting Another Business Communications Manager System ....................38
Avaya Documentation Links .......................................... 39
4
NN40011-015 Issue 1.2 BCM Rls 6.0
Desktop Assistant Pro/Pro AE
Desktop Assistant Pro
Overview
Desktop Assistant Pro is a LAN CTE based application that provides the enduser with the capabilities to manage the configuration of desktop telephones.
The functionality available includes:
Button labelling including font, font size and background colour control.
Label printing.
Button programming of end-user accessible features (requires CTE
access to devices).
Saving/Restoring a telephone configuration.
Telephone feature help.
Required Information
Before commencing configuration of Desktop Assistant Pro, it would be useful
to obtain the following information/facilities:
The extension number of the phone to be configured by Desktop
Assistant Pro.
LAN CTE associated to the PC and DN in Element Manager.
LAN CTE loaded and configured on the PC that will be running
Desktop Assistant Pro.
Supported Operating Systems
Desktop Assistant Pro is supported on the following operating systems:
Windows XP Professional SP3
Windows Vista Business, Ultimate, Enterprise SP2 32/64 bit
Windows 7 Professional, Ultimate, Enterprise 32/64 bit
NN40011-015 Issue 1.2 BCM Rls 6.0
5
Desktop Assistant Pro/Pro AE
Flowchart
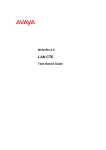
This flowchart depicts the relevant steps required to install and configure the
Desktop Assistant Pro application on a desk top PC.
Ensure LAN CTE is configured on the BCM
to associate the required computers and
telephones: Refer to the LAN CTE Guide.
Load LAN CTE onto the computer that will
be using Desktop Assistant Pro: Refer to
the LAN CTE Guide.
Load Desktop Assistant Pro onto the PC:
Refer to the Installing Desktop Assistant
Pro section of this guide.
6
NN40011-015 Issue 1.2 BCM Rls 6.0
Desktop Assistant Pro/Pro AE
Loading and Configuring LAN CTE
LAN CTE will have to be configured on the BCM via Element Manager to
associate the phone device that you wish to use with Desktop Assistant Pro
and your computer (refer to the LAN CTE Guide).
LAN CTE will have to be loaded onto the computer that will be using Desktop
Assistant Pro (refer to the LAN CTE Guide).
Installing Desktop Assistant Pro
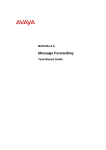
1. Open Internet Explorer.In the address field type (replacing the relevant
part with your BCM IP address): http://<bcm ip address>/
2. Click on Go, or press Return on your keyboard.
Note: You can also use the Web Page button in Element Manager to launch a
web broswer session. The BCM you wish to access must be selected in the
Element Navigation Panel to do this.
3. If you are presented with the Certificate Error window, click on
Continue to this website (not recommended).
NN40011-015 Issue 1.2 BCM Rls 6.0
7
Desktop Assistant Pro/Pro AE
4. Accept any further security messages that you may get presented with.
5. You will now see the login screen, enter your BCM User name and
Password. By default these are set to User ID: nnadmin Password:
PlsChgMe! Click on OK.
6. In the Welcome to BCM window, ensure the Main tab has been
selected, and the BCM button clicked.
8
NN40011-015 Issue 1.2 BCM Rls 6.0
Desktop Assistant Pro/Pro AE
7. In the Applications area, select User Applications,and click on Run.
8. Again, accept any security messages that appear, and if prompted
enter any login details.
9. From the User Applications screen, click on Desktop Assistant Pro.
NN40011-015 Issue 1.2 BCM Rls 6.0
9
Desktop Assistant Pro/Pro AE
10. Click on Download Desktop Assistant Pro Link.
11. Click the Run (or Open) button.
10
NN40011-015 Issue 1.2 BCM Rls 6.0
Desktop Assistant Pro/Pro AE
12. The files will be downloaded to your computer. If you see a Security
Warning screen, click Run.
13. The Welcome screen will appear. Click the Next button.
NN40011-015 Issue 1.2 BCM Rls 6.0
11
Desktop Assistant Pro/Pro AE
14. The Licence screen will appear. Click Yes to accept the agreement.
15. The Choose Destination Location screen will appear. Select Next to
accept the default destination.
12
NN40011-015 Issue 1.2 BCM Rls 6.0
Desktop Assistant Pro/Pro AE
16. The Select Program Folder screen will appear. Select Next.
17. The Install Wizard screen will appear. Select Finish.
NN40011-015 Issue 1.2 BCM Rls 6.0
13
Desktop Assistant Pro/Pro AE
Opening Desktop Assistant Pro
To open Desktop Assistant Pro:
1. Select Start, Programs, Avaya, Desktop Assistant Pro, Desktop
Assistant Pro.
2. The application will then open and the Select Phone device screen will
appear. Select the model of the phone that you wish to program.
Note: If this screen does not appear, ensure the correct association between
PC and extensions has been made within LAN CTE in Element Manager.
Refer to the LAN CTE Guide for more information.
a. Digital Phones examples.
14
NN40011-015 Issue 1.2 BCM Rls 6.0
Desktop Assistant Pro/Pro AE
b. IP Phones examples.
3. Click the OK button when you have selected the correct model of
phone.
4. The phone type and the programming that has been associated with
the computer within the LAN CTE configuration will be displayed.
NN40011-015 Issue 1.2 BCM Rls 6.0
15
Desktop Assistant Pro/Pro AE
Button Programming
Desktop Assistant Pro provides the capability to easily program buttons on a
set without the need to remember the appropriate feature code.
If you have been granted access to a device on the Business
Communications Manager System, you can program buttons on the device
selected.
1. Right click on the appropriate button. At this point you will be shown a
drop down menu listing all the features that you can program.
2. Look down the list or sub-lists and select the feature to then be
programmed on that button.
3. The button will be programmed.
16
NN40011-015 Issue 1.2 BCM Rls 6.0
Desktop Assistant Pro/Pro AE
Button Labelling
In addition to button programming, Desktop Assistant Pro provides the
capability to easily label buttons on a set. This capability can be done in
either offline mode or during button programming.
To label a button:
1. Using the mouse, simply left click on the appropriate label and highlight
the text to be changed. Type in a more appropriate description if
desired.
NN40011-015 Issue 1.2 BCM Rls 6.0
17
Desktop Assistant Pro/Pro AE
2. At this point you can:
a. Change the font type and size.
b. Change the font colour and background colour.
18
NN40011-015 Issue 1.2 BCM Rls 6.0
Desktop Assistant Pro/Pro AE
3. When the buttons have labelled correctly, you can print the labels to
apply. Refer to the Print Preview/Print section of this guide.
The Phone Menu
Clicking on the command Phone opens the Phone Device menu. From this
menu you can select one of the accessible Business Communications
Manager Phone devices available to the current user.
The Phone Device command is only available for online phone device
programming and only if the current user has been granted access to more
than one phone device.
The Phone menu offers the capability to switch to a different phone type. In
offline mode the entire list of supported phones is available to select from. In
programming mode, only those phones in the same class as the current one
can be selected.
In addition, this menu offers a set refresh command. Selecting this option
resets all labels to blank in offline mode. In programming mode, all buttons
are queried from the set and all labels set to the programmed values.
1. Select Phone from the menu bar.
2. Then select the appropriate phone device.
NN40011-015 Issue 1.2 BCM Rls 6.0
19
Desktop Assistant Pro/Pro AE
3. The new model phone device will then be displayed.
20
NN40011-015 Issue 1.2 BCM Rls 6.0
Desktop Assistant Pro/Pro AE
Print Preview/Print
From this dialogue box you can preview the labels for the current device and
print them from here.
1. Select Labels and Print Preview.
2. The labels illustrating the button programming will be displayed.
NN40011-015 Issue 1.2 BCM Rls 6.0
21
Desktop Assistant Pro/Pro AE
3. To Print the labels select File and Print.
4. The Printer dialogue box will be displayed and the screen will display
the name and model of phone associated with this extension.
5. Select the appropriate printer and the click the Print button.
22
NN40011-015 Issue 1.2 BCM Rls 6.0
Desktop Assistant Pro/Pro AE
Saving Phone Settings
From this dialogue box you can select the filename under which the current
device settings will be saved. The default file extension for this file is "pcf"
(Phone Configuration File).
Saved configuration files can only be loaded to the same phone device type.
The Save Settings command is available for both offline button labelling and
online phone device programming.
1. Select File, Save Current Settings.
2. The Save As window will appear. You can then save the phone device
to an appropriate location.
NN40011-015 Issue 1.2 BCM Rls 6.0
23
Desktop Assistant Pro/Pro AE
Loading Phone Settings
From the file open dialogue box you can select the phone configuration file
(i.e. pcf) to load into the current selected phone device. Loading (i.e.
programming) of the device will only be accepted if the saved device type is
the same as the current device. Also note that Line appearances, Answer
Keys, Hunt Group keys, Handsfree keys and Intercom keys are not end user
programmable features and as such will be skipped over.
The Load Settings command is available for both offline button labelling and
online phone device programming.
To schedule a message:
1. Select File and Load settings.
2. The Open window will appear.
3. Select the file to upload and click the Open button.
24
NN40011-015 Issue 1.2 BCM Rls 6.0
Desktop Assistant Pro/Pro AE
4. The programming for the extension you have selected will then be
uploaded and displayed.
NN40011-015 Issue 1.2 BCM Rls 6.0
25
Desktop Assistant Pro/Pro AE
Desktop Assistant Pro AE
Overview
Desktop Assistant Pro Administrator Edition (AE) is a LAN CTE based
application that provides the system administrator with the capabilities to
manage the configuration of desktop telephones.
The functionality available includes:
Button labelling including font, font size and background colour control.
Label printing.
Button programming of end-user accessible features (requires CTE
access to devices).
Saving/Restoring a telephone configuration.
Telephone feature help.
Ability to switch between systems without exiting the program.
Required Information
Before commencing configuration of Desktop Assistant Pro AE, it would be
useful to obtain the following information/facilities:
The Start extension number on the Business Communications
Manager.
The IP Address, user name and password of the Business
Communications Manager.
The IP Address, user name and password of any other Business
Communications Manager you wish to access.
LAN CTE loaded on the PC that will be running Desktop Assistant Pro.
Note: For Desktop Assistant Pro AE, LAN CTE requires no association within
Element Manager to function. LAN CTE only requires loading on the same PC
as Desktop Assistant Pro AE.
Supported Operating Systems
Desktop Assistant Pro Admin Edition is supported on the following operating
systems:
Windows XP Professional SP3
Windows Vista Business, Ultimate, Enterprise SP2 32/64 bit
Windows 7 Professional, Ultimate, Enterprise 32/64 bit
Windows Server 2003 Standard and Enterprise SP2
Windows 2008 Standard and Enterprise SP2
Windows Server 2008 R2 Enterprise 64 bit
Windows Small Business Server R2
26
NN40011-015 Issue 1.2 BCM Rls 6.0
Desktop Assistant Pro/Pro AE
Flowchart
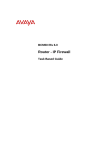
This flowchart depicts the relevant steps required to install and configure the
Desktop Assistant Pro Admin Edition application on a desk top PC.
Load LAN CTE onto the computer that will
be using Desktop Assistant Pro Admin
Edition: Refer to the LAN CTE Guide.
Load Desktop Assistant Pro Admin Edition
onto the PC: Refer to the Installing
Desktop Assistant Pro Admin Edition
section of this guide.
Login to the required BCM with the
appropriate IP address, user name &
password: Refer to the Opening Desktop
Assistant Pro Admin Edition section of
this guide.
NN40011-015 Issue 1.2 BCM Rls 6.0
27
Desktop Assistant Pro/Pro AE
Installing Desktop Assistant Pro Admin Edition
1. Open Internet Explorer.In the address field type (replacing the relevant
part with your BCM IP address): http://<bcm ip address>/
2. Click on Go, or press Return on your keyboard.
Note: You can also use the Web Page button in Element Manager to launch a
web broswer session. The BCM you wish to access must be selected in the
Element Navigation Panel to do this.
3. If you are presented with the Certificate Error window, click on
Continue to this website (not recommended).
4. Accept any further security messages that you may get presented with.
28
NN40011-015 Issue 1.2 BCM Rls 6.0
Desktop Assistant Pro/Pro AE
5. You will now see the login screen, enter your BCM User name and
Password. By default these are set to User ID: nnadmin Password:
PlsChgMe! Click on OK.
6. In the Welcome to BCM window, ensure the Main tab has been
selected, and the BCM button clicked.
7. From the Applications list, select Other Administrator Applications
and click Run.
NN40011-015 Issue 1.2 BCM Rls 6.0
29
Desktop Assistant Pro/Pro AE
8. Again, accept any security messages that appear, and if prompted
enter any login details.
9. The Administrator Applications screen will be displayed. From the
Administrator Applications screen, click on Desktop Assistant Pro AE.
10. Click on the Desktop Assistant Pro Admin Edition download button.
30
NN40011-015 Issue 1.2 BCM Rls 6.0
Desktop Assistant Pro/Pro AE
11. The File Download screen will appear. Click the Run button.
12. The files will be downloaded to your computer. Click Run if you see
another Security Warning.
NN40011-015 Issue 1.2 BCM Rls 6.0
31
Desktop Assistant Pro/Pro AE
13. The Welcome screen will appear. Click the Next button.
14. The Licence screen will appear. Click Yes to accept the agreement.
32
NN40011-015 Issue 1.2 BCM Rls 6.0
Desktop Assistant Pro/Pro AE
15. The Choose Destination Folder screen will appear. Select Next to
accept the default destination.
16. The Select Program Folder screen will appear. Select Next.
NN40011-015 Issue 1.2 BCM Rls 6.0
33
Desktop Assistant Pro/Pro AE
17. The Install Wizard screen will appear select Finish.
34
NN40011-015 Issue 1.2 BCM Rls 6.0
Desktop Assistant Pro/Pro AE
Opening Desktop Assistant Pro Admin Edition
To open Desktop Assistant Pro AE:
1. Select Start, Programs, Avaya, Desktop Assistant Pro AE, Desktop
Assistant Pro AE.
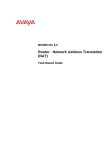
2. The application will then open, and the BCM Login window will appear.
Enter the IP address or Machine name of the BCM you wish to
access in the IP/Machine name field. Then enter the User Name and
Password for the BCM, followed by the first extension on the system.
Click OK.
NN40011-015 Issue 1.2 BCM Rls 6.0
35
Desktop Assistant Pro/Pro AE
3. Click on the File menu and select Phone Device. The Phone Device
Selection screen will appear.
4. The Phone Device Selection screen will appear. By clicking on the
dropdown menu you can select an appropriate extension to configure.
Click OK.
5. The Select Set device screen will appear. Select the model of the
phone that you wish to program. Click the OK button.
36
NN40011-015 Issue 1.2 BCM Rls 6.0
Desktop Assistant Pro/Pro AE
6. The phone type and current programming will be displayed.
7. The phone can now be labelled and programmed in the same manner
as with Desktop Assistant Pro.
NN40011-015 Issue 1.2 BCM Rls 6.0
37
Desktop Assistant Pro/Pro AE
Selecting Another Business Communications Manager
System
From this dialogue box you can select a different Business Communications
Manager system to connect to.
1. From the File Menu select System.
2. You can then enter the IP Address and the start extension of the other
Business Communication Manager you wish to access.
3. Click OK.
38
NN40011-015 Issue 1.2 BCM Rls 6.0
Desktop Assistant Pro/Pro AE
Avaya Documentation Links
LAN CTE Configuration guide
NN40011-015 Issue 1.2 BCM Rls 6.0
39
Desktop Assistant Pro/Pro AE
40
NN40011-015 Issue 1.2 BCM Rls 6.0